
What to bake next? That was the question on my mind the past week or so. I was anxious to bake something as my bread supplies started to dwindle and it’s a travesty when we are cooking something great at home and don’t have a slice of sourdough to accompany. The weather here is really starting to grow cold and I was in the mood for something a bit on the rich side, something with a real deep flavor. I took out my trusty Tartine Bread book and flipped through until Chad’s Tartine Country Sesame Sourdough loaf caught my eager eye.
My exposure to sesame seeds has been limited to probably the same foods as most people: hamburger buns, crackers, sprinkled on top a loaf of bread here and there, Asian and Indian food… While I do love the rich taste they bring to buns and other bread, I was a bit skeptical of how they would taste baked throughout a loaf of sourdough. Would it be too intense of a flavor? I decided to bake Tartine’s Country Sesame and find out.
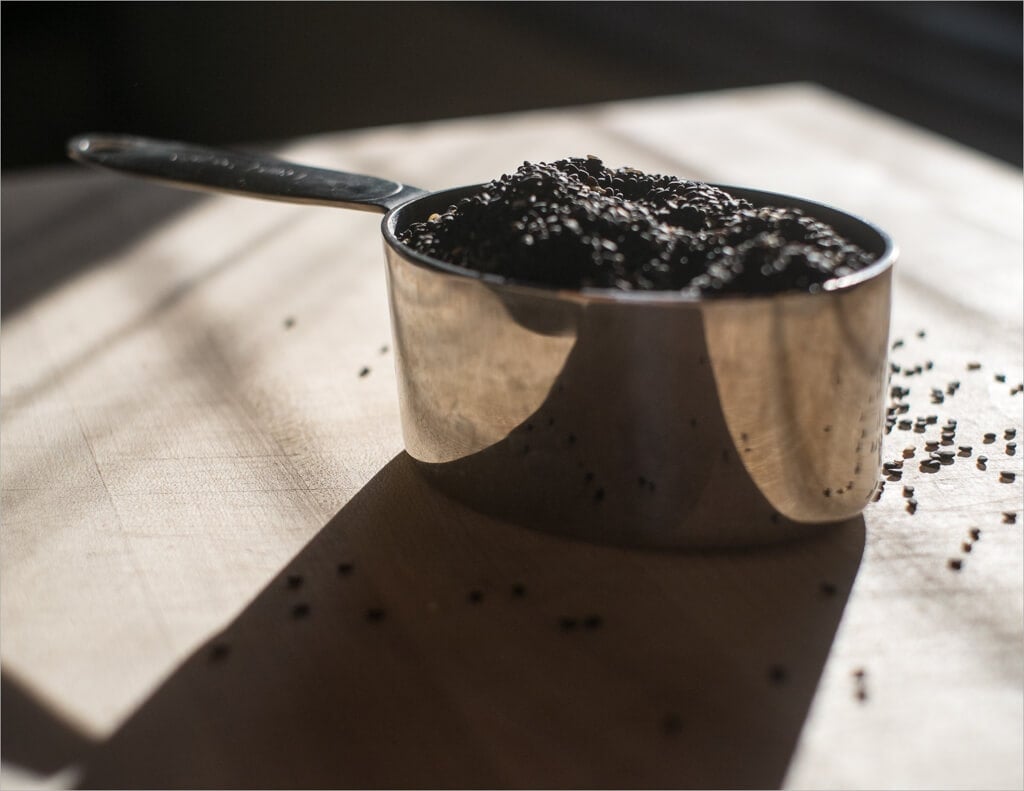
The recipe calls for 1 cup of unhulled sesame seeds, and looking through my kitchen pantry all I could muster was regular old hulled & toasted seeds. I looked at a few markets around town and wasn’t able to find anything close so I turned to Amazon and picked up a bag of these organic unhulled sesame seeds. Shipping was prompt per usual and I was ready to bake over the weekend.
Prepare the leaven – 10:00pm
Friday night I prepared a 100% whole wheat leaven with the following ingredients:
- 30g ripe sourdough starter
- 110g whole wheat flour
- 110g water
After mixing the above in a glass container, I covered and set out on the counter to rest and do its thing overnight.
Mix the flour and water, autolyse – 7:00am
Up early on a Saturday due to work obligations at home, I checked my leaven’s progress. Visibly tiny air pockets throughout and a slight smell of ripe fruit indicated we were ready to go.
Gather up your ingredients and let’s get baking.
Ingredients:
- 250g (25%) of your new leaven
- 800g (80%) white bread flour
- 200g (20%) whole wheat bread flour
- 20g (2%) salt
- 710g Water and 50g (76%) in reserve for the next step
- 1 cup unhulled sesame seeds
Method:
Sesame Prep:
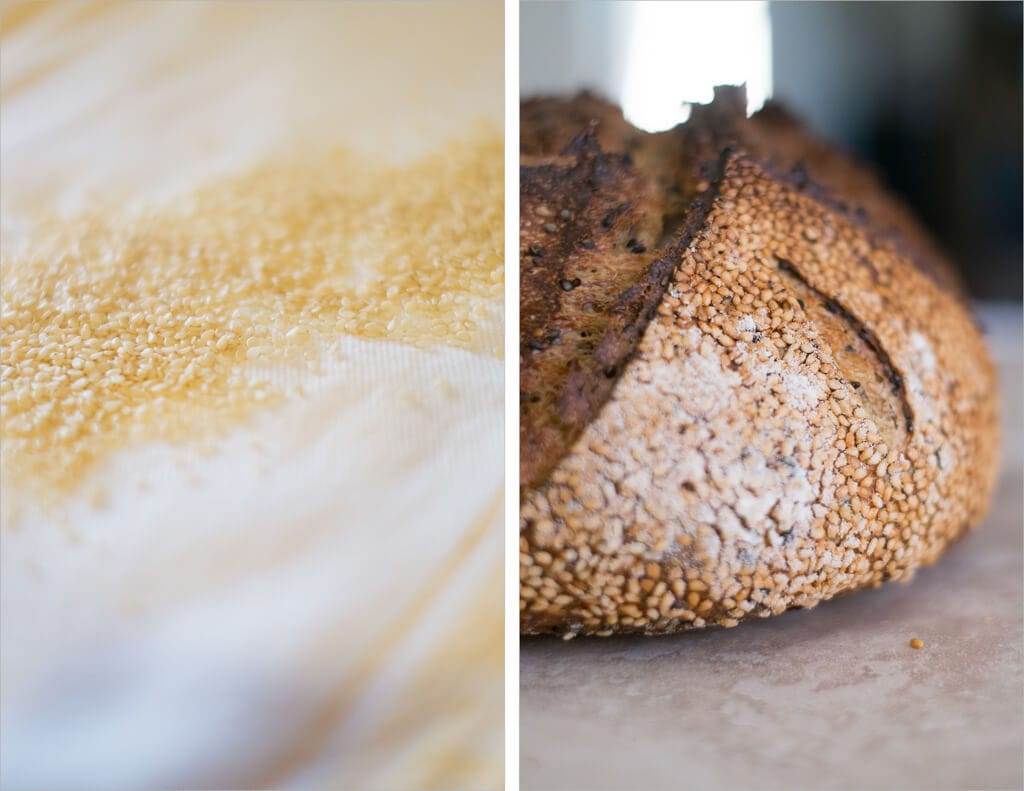
We want to first toast and cool the unhulled sesame seeds. This coaxes even more flavor out and takes the raw edge off.
- Preheat your oven to 400°F (200°C)
- Spread your sesame seeds into a thin layer on a baking sheet
- Bake for 10 minutes, take the baking sheet out and give them a mix
- Bake for an additional 10 minutes
- Set out to cool
The smell from baking these seeds was incredibly intoxicating. It smelled almost like honey to me, and when filling the house, instantly made me want to make some greek yogurt with honey and fresh fruit. And while I waited this is exactly what I did. Who said baking has to be all work anyways?
Dough:
- Add 250g of your leaven to a large mixing bowl
- Pour in 710g warm water and mix with your hands until completely dissolved
- Add 800g white flour and 200g whole wheat flour and mix with your hand until all the dry flour is incorporated throughout
- Cover your bowl with a towel and let it autolyse for 40 minutes
- After 40 minutes add 20g salt to the dough and slowly pour your water on top. Squeeze the dough with your hand to incorporate the salt
- Now reach your hand under the dough and pull one side up and over onto itself. Do this several times until you notice the consistency of the dough to turn very sticky and less wet
- Transfer your dough to a large bowl. Remember you’ll be adding in a cup of sesame seeds so you’ll need a bit more room than usual. Set your timer for 30 minutes
A final dough temperature of 78°F (25°C) is the ideal final dough temperature for the time tables listed in this recipe.
After transferring use your thermometer to take the dough’s temperature (yes, stick it into the dough!). My final dough temp was 78°F (25°C). You really want your final dough temp or DDT (desired dough temp) to be close to this. I’ve noticed this is the “sweet spot” for my baking. Take note of this temperature in your notebook for future reference and adjustment (you have been taking notes of each of these bakes, right?).

Bulk Fermentation – 8:10am
It’s really started to get cold out here and bulk fermentation times needed to be adjusted to accommodate. Keep an eye on how your dough is developing and adjust your bulk times as necessary. Again, if your DDT was less than 78°F (25°C), you might need a longer bulk fermentation step.
During bulk fermentation you want to do 7 turns spaced out 30 minutes apart. The turns should be vigorous; you really want to grab the dough from the bottom of the container, pull it up high, and then tuck it in on the other side. This high lift, and somewhat forceful turn, builds gluten strength in your dough which helps it rise later in baking.
- 8:40am – Turn 1
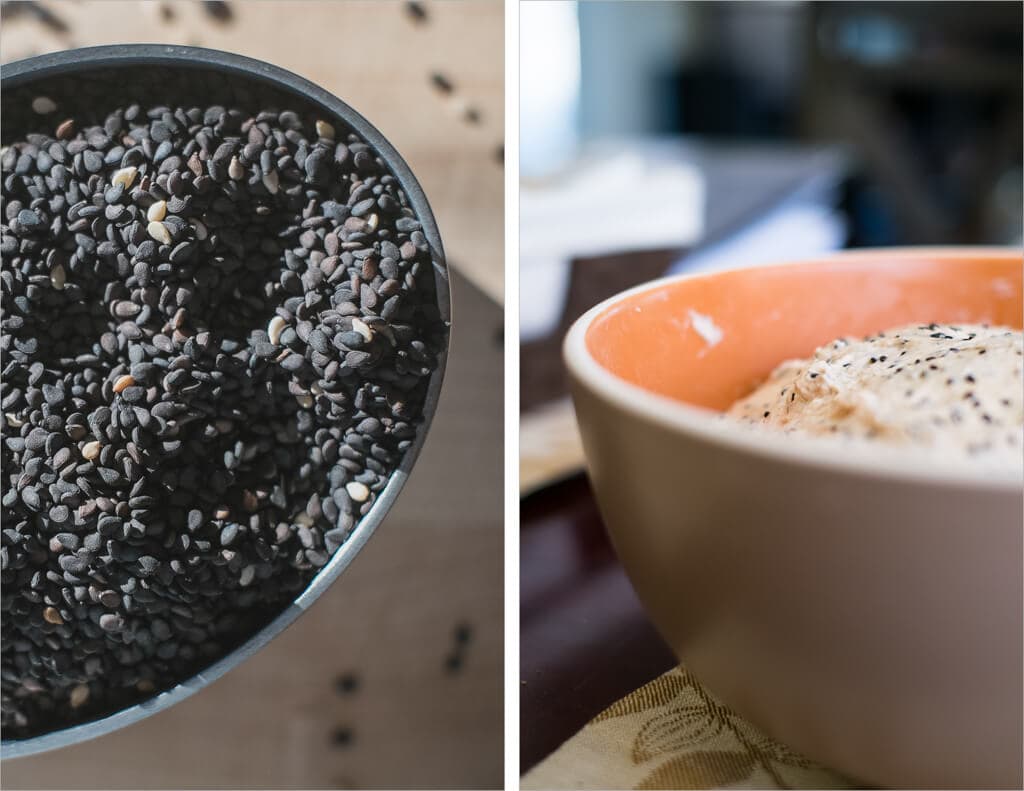
After the first turn is complete, add all your sesame seeds and mix them into the dough by cutting them in the dough with your fingers. If things feel a bit dry, add just a tad of water. I had to add about a tablespoon or so.

- 9:10am – Turn 2
- 9:40am – Turn 3
- 10:10am – Turn 4
- 10:40am – Turn 5
- 11:10am – Turn 6
- 11:40am – 3:00pm – Rest on counter untouched
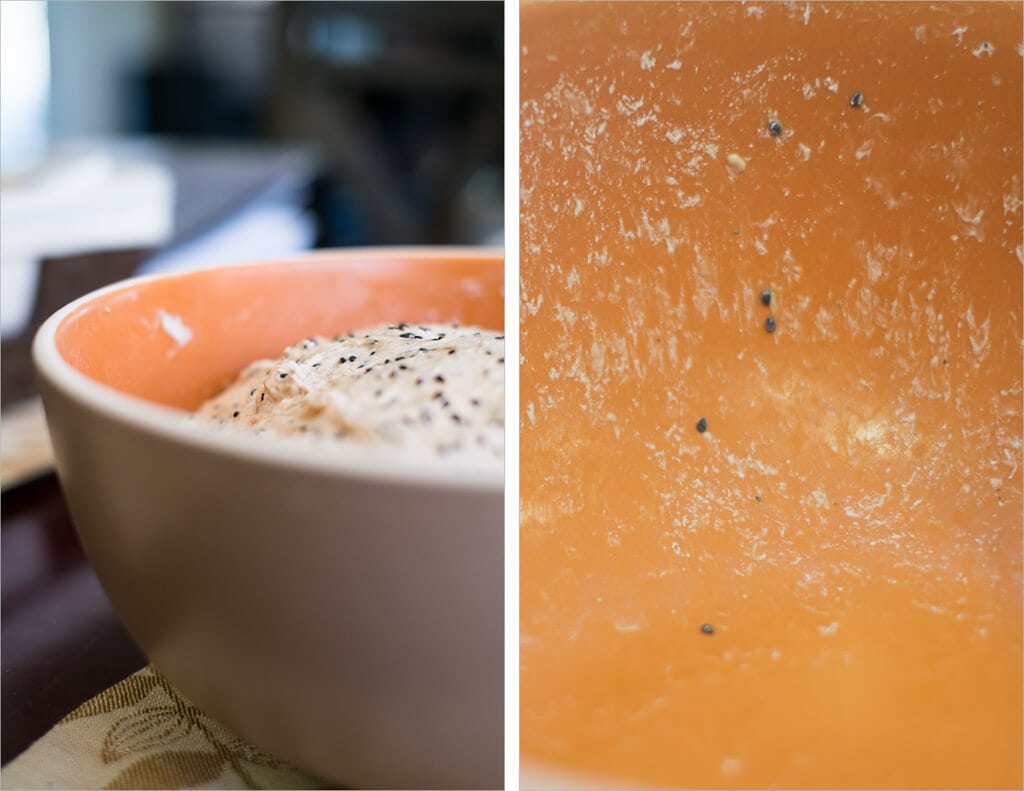
At 3:00pm the dough in my bowl had risen at least 30% and there was some serious fermentation going on. Shaking the bowl a bit had the dough jiggling around, nice and full of air pockets.
Pre-shape – 3:15pm
Take the dough out of the container onto your unfloured work surface and sprinkle some flour on top before dividing. Divide the mass into two halves and flour at the top of each half. I always make one half slightly larger than the other to shape into a longer loaf (batard). Flip one half over with your dough knife and your hand, then gently bend the 4 sides of the dough from under to the top. Using the knife flip the mass so the new seam is on the counter and spin it a few times to create a bit of tension. Set a timer for 35 minutes and let it bench rest.
Lightly dust two linen-lined bowls or proofing baskets with white rice flour. These bowls will hold our fermenting dough overnight to proof.
Shape – 4:00pm
With the larger half of dough, I shaped into a batard and placed into my oblong proofing basket per usual.
With the smaller half of dough I usually do a little experimenting. This experiment might be a new shaping technique, an increased/decreased amount of surface tension, or something else I dream up. This time I wanted to try and coat the outside of the boule with additional hulled sesame seeds. To do this I first shaped into a typical boule, which resulted in the seam side on the counter. I then took out my handy water mister, misted the top of the boule and grabbed the dough up with my hand and dough knife. I then rolled the top (the part of the dough that will eventually be the top after baking) of the boule on top of a kitchen towel I laid out with a thin coat of sesame seeds. The wet boule picked up all the seeds and they stuck to the top before I placed it top-down into my proofing basket.
Proof – 4:15pm
Into the fridge goes both the baskets for a nice rest overnight until the morning…
Score + Bake – 7:20am
Gather your tools (for a complete list of the tools I find the best and most used, check out my tools page!):
In the morning preheat your oven to 450°F (230°C). For more information on baking, see my post to baking with a Dutch oven (or combo cooker).
After one hour, take one of your loaves out of the fridge and cut a piece of parchment paper to place on top of the basket containing the dough. Take your peel and then put it on top of those two and quickly invert it so the dough is now resting on the parchment paper and the peel.
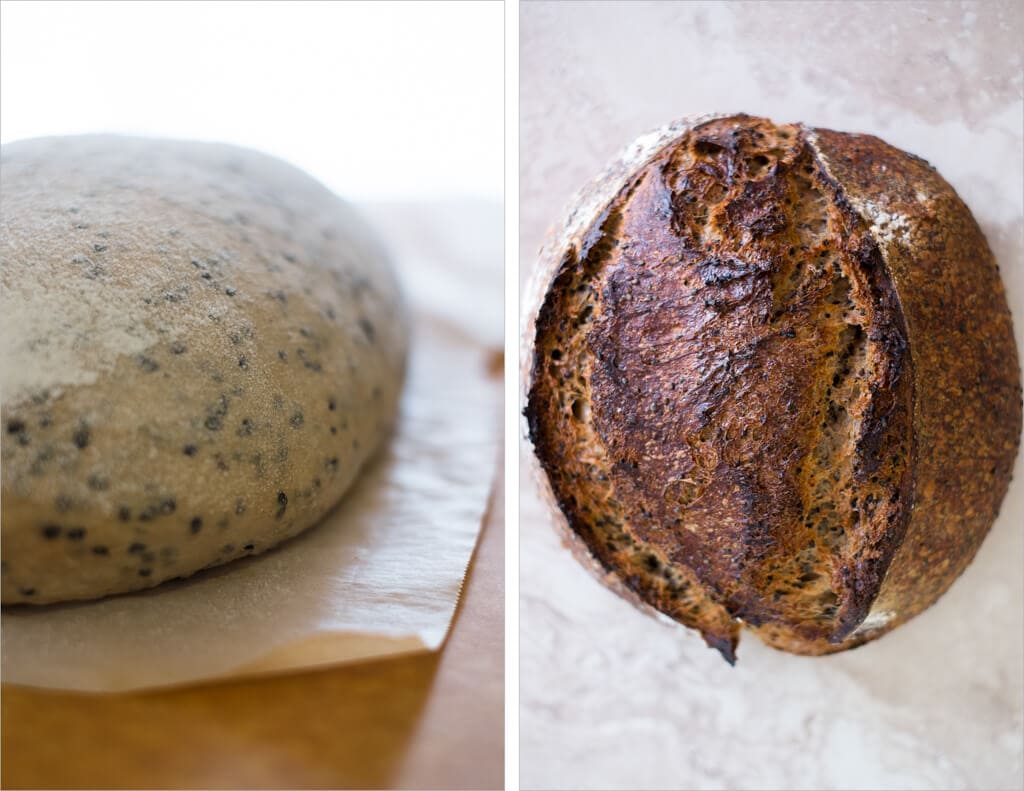
Get your razor blade out and score the top of the loaf to allow the bread to expand while rising in the oven. For the larger batard I did a single slash down the middle starting from the very top to the very bottom. The “experiment” boule (with the sesame seeds on top) I did an “X” with smaller, lighter slashes in-between each section formed by the “X”.
Place the dough into the combo cooker, cover with the lid, and bake for 20 minutes with the lid on. After this time, open the oven, remove the lid of the pot (you can place it on the rack next to the bottom side or remove it to cool), close the oven door and bake for an additional 35 minutes. Repeat for the second loaf.
For more tips on baking, see my post on baking in a Dutch oven.
Conclusion
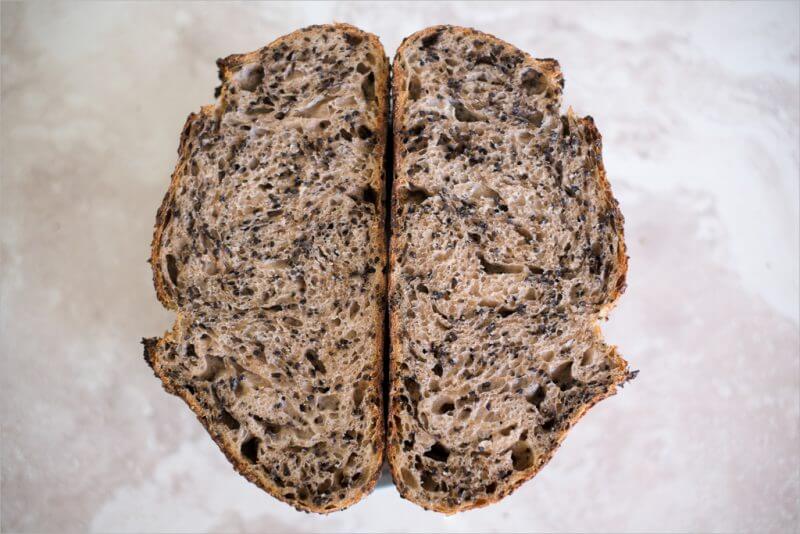
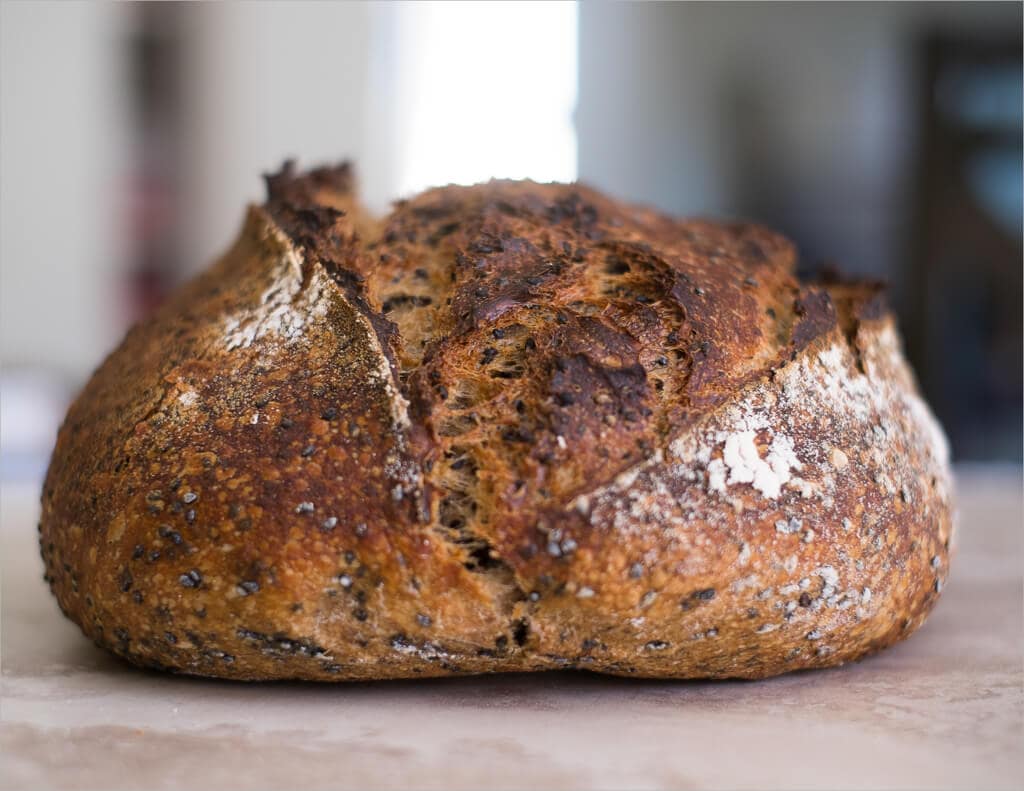
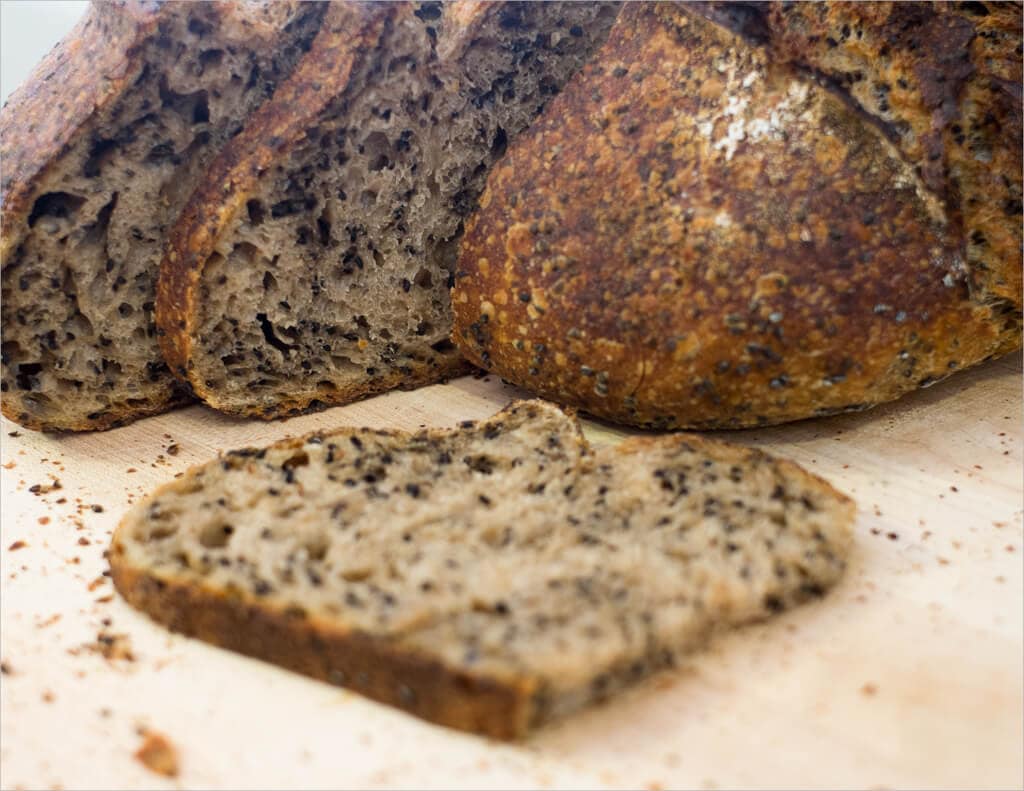
The sesame seeds really gave it that deep flavor I was looking for during these colder fall days. It’s a flavor that is a bit polarizing, you either really enjoy this type of bread or you just don’t like it. My wife wasn’t too happy with it, and I think the main reason was that the flavor of the sesame seeds was a little overpowering. Perhaps reducing the amount of toasted seeds will help reduce this problem.
Crust
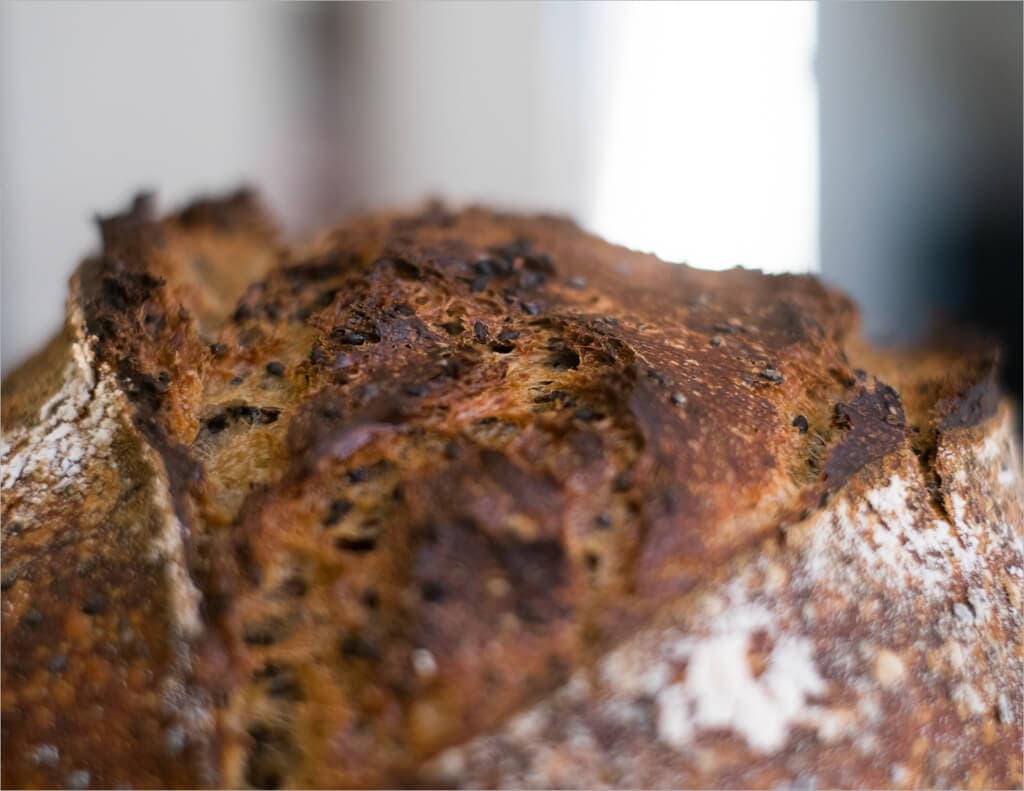
Nice and brittle. I’m not sure if the sesame contributed somehow here, or perhaps I baked it a tad darker than usual, but I really enjoy the crunchy thin crust here. After a day or two when toasted, the crust really takes on almost a cracker-like feel to it. Because it was so thin this really was superb.
Crumb
A bit on the dense side, but totally acceptable. I’ve read in the literature that adding ingredients such as seeds can actually cut through the developed gluten strands in your dough, preventing a high and open rise. I think the rise is perfectly nice here, but again, the crumb is just a tad on the dense side.
Taste
So. Rich. A very deep and intoxicating taste. Again, next time I’ll try reducing the number of sesame seeds. About 1/2 cup sounds just about right to see if it mellows out some of the intense sesame flavors. While I like the rich taste, I’d like the sesame to play more of a background role and let the wheat shine through just a little bit more.
In terms of sourness, the bread didn’t have all that much. I like it this way, and if your curious about maintaining your starter to keep it “young” and less sour, check out my previous post on managing your sourdough starter’s fermentation.
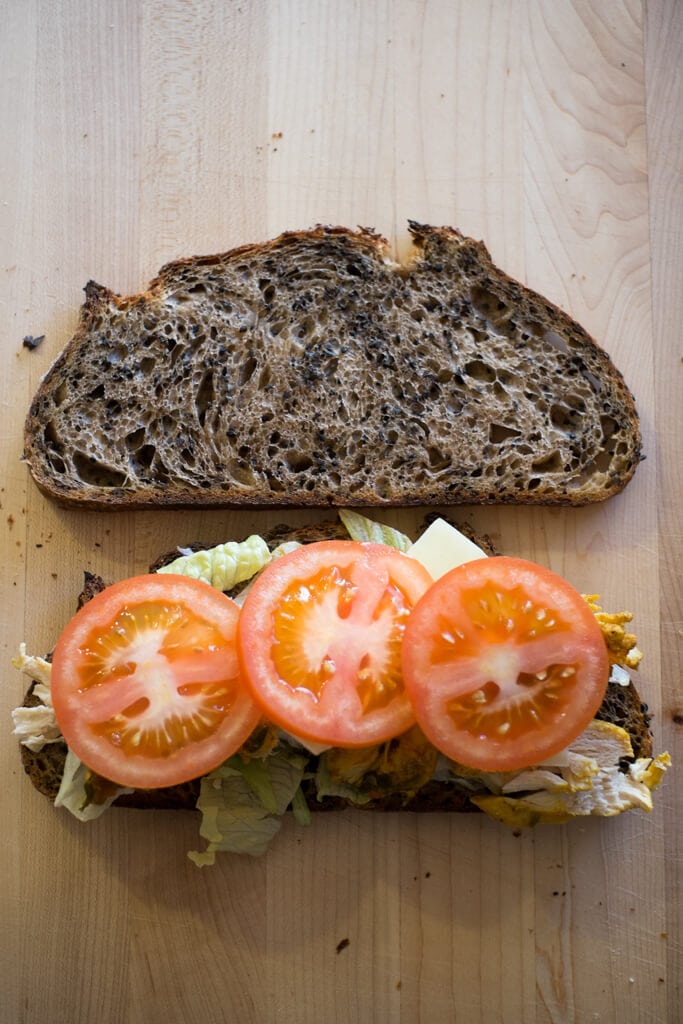
We recently cooked a Moroccan inspired chicken tagine with some really great flavors and I thought it would complement this bread quite nicely. I prepared a sandwich with two slices of this Tartine Country Sesame, Moroccan chicken pulled and cut apart, aged Irish Cheddar, tomato & lettuce, and a small spread of grain mustard. Whew, that’s good…
Buon appetito!
If you use this recipe, tag @maurizio on Instagram so I can take a look!


47 Comments
I don’t think the title of your article matches the content lol. Just kidding, mainly because I had some doubts after reading the article.
Thanks for sharing. I read many of your blog posts, cool, your blog is very good.
Thanks for sharing. I read many of your blog posts, cool, your blog is very good.
I don’t think the title of your article matches the content lol. Just kidding, mainly because I had some doubts after reading the article.
This made my day brighter! Keep up the fantastic work 😊
Your article helped me a lot, is there any more related content? Thanks!
Thanks for sharing. I read many of your blog posts, cool, your blog is very good.
I don’t think the title of your article matches the content lol. Just kidding, mainly because I had some doubts after reading the article.
Your article helped me a lot, is there any more related content? Thanks!
I don’t think the title of your article matches the content lol. Just kidding, mainly because I had some doubts after reading the article. https://www.binance.com/fr-AF/register?ref=JHQQKNKN
I don’t think the title of your article matches the content lol. Just kidding, mainly because I had some doubts after reading the article.
Can you be more specific about the content of your article? After reading it, I still have some doubts. Hope you can help me.
I don’t think the title of your article matches the content lol. Just kidding, mainly because I had some doubts after reading the article.
I don’t think the title of your article matches the content lol. Just kidding, mainly because I had some doubts after reading the article.
Thank you for your sharing. I am worried that I lack creative ideas. It is your article that makes me full of hope. Thank you. But, I have a question, can you help me?
Hey Maurizio, i just threw together my own idea of what a sesame sourdough recipe might be, and looked at your recipe after. We did many of the same things, just a few small differences- I used 175g rye poolish, 1000g bread flour, 780 grams of water, and added 80 grams of untoasted sesame seeds in with the flour during the autolyse. Anyway, thought I would share my recipe on insta and tag you. This is my biggest rise yet. Wondering if it has something to do with the sesame seeds, helping with ferment. The dough rose way more than usual during the cold retard (only 12 hours). Interesting. Thanks for your tips, always nice to confer with your website. Cheers!
BTW I use a rye flour starter and poolish, so I guess our recipes are quite a bit different, but also similar:) thanks again.
Great minds think alike 😉 Sounds great! Yes, I notice seeds help with the texture and consistency of a dough as well, sometimes mine rise a bit higher. Will take a look—thanks for the comments and enjoy your loaf, Amber!
Hi Maurizio,
Can I use toasted black sesame seeds instead?
Thanks!
Yes, absolutely, Cynthia!
awesome! im gonna try it soon! thanks again!
I made this with 700g of AP flour (King Arthur), 150g of whole wheat (King Arthur), and 150g of rye (Arrowmill), and the results were astonishingly wonderful. I’ve made many excellent sourdough loaves before, thinking they could not be any better, but this one was a giant leap forward. The best bread I’ve ever tasted, and my wife agrees (she would not hesitate to say otherwise). It’s truly amazing. And the crumb is open and even. I heartily recommend you try these proportions. (Also, I believe I used 200g of levain, not 250g, though I don’t know if that matters. I was basing it off the Tartine basic country loaf instructions). The dough was also surprisingly easy to shape and score.
I’ll give this a shot, Robert! I’m a huge fan of using a percentage of rye in doughs, it really brings a lot of flavor (and crust color) to a loaf!
Hello! Thank you for all your hard work and wonderful recipes!
Question: I’ve been making 1 loaf every time I make sourdough bread, meaning that I half the recipe and then proceed using the regular timing and number of folds. My loaves turn out fine, but since this particular recipe calls for more turns and resting time than I’m normally used to, is there any case in which the amount of dough factors into the length of bulk fermentation (and I should reduce the amount of folds and rest time)? Or does the bulk fermentation process work purely because of the starter to flour ratio, independent of how much total dough I have?
Thank you for the fabulous recipe! This is my second time baking with it and I have a tiny question –
Why turn out the dough on an unfloured surface to shape? My dough was so bouncy and happy when it came out of the bowl and I was sad to have to unstick it from the counter while shaping. Still turned out beautifully but I’m curious about this step.
Hey there! You can definitely flour the surface if you’d like, but I don’t usually do this unless it’s a special bake (like cinnamon rolls, etc.). I find it’s not necessary and the less raw flour we work into the dough at that point the better — if too much finds its way into the dough it’ll show up in the end as raw spots inside the loaf. That said, feel free to use some if you need to! Just try to keep raw flour out of the inside of the loaf if you can. Nothing to stress about, just something to be aware of.
Happy baking!
Hey Maurizo – I love your site and your detail. Question about this recipe. Why does it call for making 500 g leaven when you say to only use 250 of it for the dough? Do I just throw out the 250 g extra leaven?
Sorry Maurizio- with an extra i! I ended up using the extra as the morning feeding for my starter
No worries, Benjamin! This is an old post when I used to make an extra large levain per Tartine’s recommendations. I’ll update the post to reduce the levain to only what’s needed. Good call using it elsewhere, though!
Thanks! Honestly just wanted to make sure I was reading it correctly and adding the correct amount to have a successful loaf. Thanks for your quick response!
Hi Mauricio… I am a baker wannabe, so very very new with this baking activity. So happy I found your website. I am thru with the starter, done my first sourdough bread, Succeeded on first attempt. Yay!!! So now am trying to make this one. Followed everything, all is good until I get to pre shape part. Don’t know what went wrong 🙁 my dough just gone flat and sticky. Please advice. Thanks a lot 🙏🏽
Is it possible you didn’t have enough fermentation activity in the dough before you went to divide the dough? Make sure your starter is strong (rising and falling predictably) and you use it when it’s nice and mature to build your levain. Then, use your levain when it’s also mature (check out my guide to starter maintenance for information on how to determine when these are “mature”). From there, make sure you give your dough enough time in bulk fermentation — it should be well risen by the end, smooth, and if you tug on the dough it’ll feel stronger and elastic. These steps are all very important!
Thank you for the detialed recipe.
You’re very welcome — happy baking!
I love this blog. Thank you for offering something so rare: (for me, anyway): concise, beautifully photographed instruction on bread-making. I’m not mystified anymore. And I’m cranking out great bread for family and friends. You’re very talented and it’s so cool that you’re sharing this gift with us. Proofing sesame sourdough now for early am bake. Thank you!
Wow thank you so much Beth, I really appreciate those comments! It really makes me happy to hear you’re baking some awesome, healthy bread at home for friends and family — that’s precisely why I started this website 🙂
Happy baking!
I tried something similar a day ago but I made a soaker 50g sesame / 50poppy.
Question. Do you think you should strain and try the seeds before adding it to the dough. Or say you add 100g water to the 100g soaker, you should add the whole 200 grams soaker to the dough, cutting back 100 grams of water from the country recipe ? I just don’t know how much each type of seed absorb water. I am worried that since some of the seeds absorb water the dough is going to turn out to be under hydrated after all.
Any suggestions ?
It’s very easy to over-hydrate with seed soakers so your apprehension is well placed. Lately I’ve been draining the seed soaker before adding the seeds into my dough. This helps remove some of the excess moisture but there will still be some present in the seeds, as you mentioned.
When doing seeded loaves, like this recent seeded sourdough I try to be cautious with the hydration of the dough knowing that the seeds will bring more when added.
So yes, drain the soaker!
Happy baking 🙂
Excellent, excellent thing you have going here, this blog. Keep up the good work. I’m keeping it up right along with ya. Great to know there are bread heads out there as zealous as myself : )
Christian: thanks! Baking seems to take hold of you and never let go…
Happy baking!
such beautiful looking bread. I’ll have to try your recipe. thanks
Thank you very much! If you give it a shot, I’d love to hear how it turns out.
I’m surprised that the sesame seeds needed to be toasted before hand. My experience with sesame seeds makes me think that they would burn during the hour of baking. It didn’t taste burnt?
Honestly I thought the same thing when I started. But no, they didn’t taste burnt at all. Maybe because they were the unhulled version?
Maurizio, I also just discovered your site through the Wild Yeast blog. This does look like an intense flavored bread but delicious I bet. I have seen some of your pics on instagram so it was nice to see you have a blog as well. Bread looks great. Nice work.
You know, as the bread gets older the flavor has really started to mellow out some, it’s definitely not as intense as it first was. Still though, I’m going to reduce to 1/2c next time and see if I prefer it that way.
Thanks for the feedback, glad you’re enjoying the site!
How am I just discovering your wonderful site?! This loaf looks incredible, I’ve used black sesame seeds in some sandwich loaves before but hadn’t thought to add it to my tartine loaves. Thanks for the inspiration!
Glad you stumbled on my journal, welcome! As I wrote above, I’d suggest going with less than 1c of unhulled seeds at first, it’s a pretty intense flavor, and then build up to your taste.
Happy baking!