
These days it seems I seldom bake bread comprised of only a single flour. Usually, my mind busily weaves together a formula of different flours after I decide on an end goal. The end goal is my compass, dictating the direction as I work backward to make it happen: the flavor from this flour, this one is extra nutritious, add some extensibility with this one, perhaps a bit of color with this other, and maybe some added strength, if necessary. Lately, though, I’ve been focusing down on a formula comprised in total of ancient einkorn wheat flour. I’ve baked with einkorn many times in the past at less than one hundred percent of the total formula (and my einkorn miche is always my go-to for large dinners) but pushing the percentage of einkorn results in unique sourdough bread.
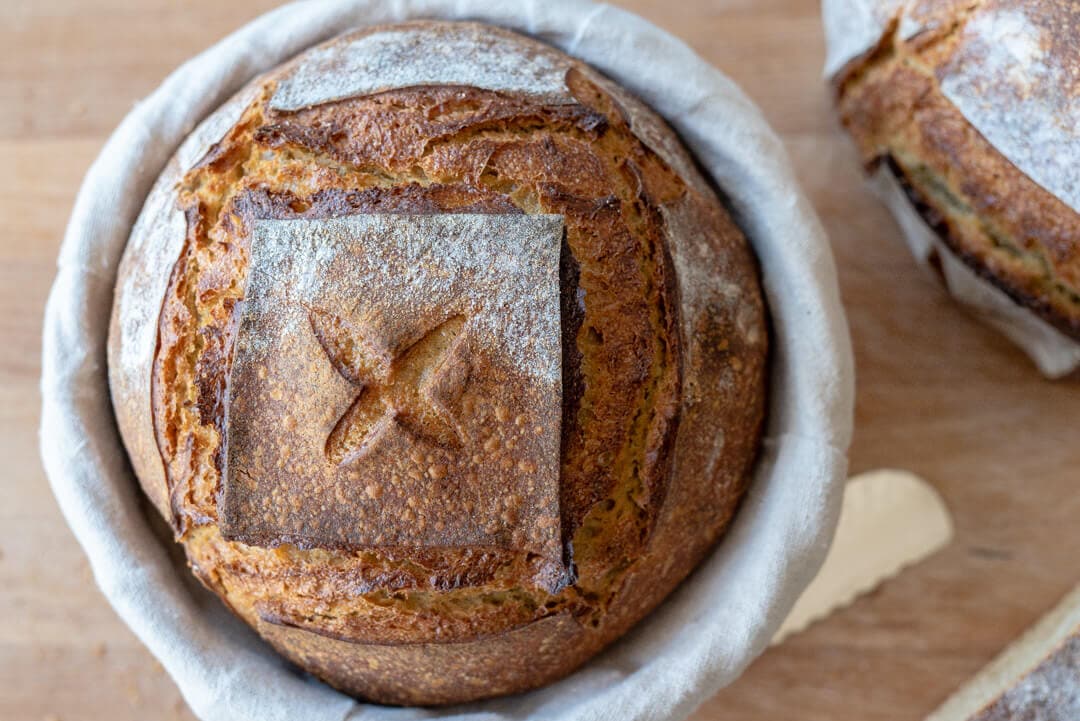
Out of the oven, this bread has a captivating crust: rustic fissures with golden undertones and hints of burgundy. The golden boules, as I like to call them, that have that perfect balance between tender interior and substantial, toothy exterior. The rich and tangy flavor pairs so well with a variety of foods. My favorite use, and right now in perfect seasonal timing, is to use it as a base for fresh chopped tomatoes, basil, extra virgin olive oil, and a dash of balsamic.
The warm—perhaps the best way to describe it—the flavor of the crumb stands up to and balances out, the acidity in the tomatoes and vinegar. It also makes some of the best toast with cultured butter and fresh preserves. The interior crumb of this bread stays moist for days after baking. The rich, warm flavor seems to even amplify as the bread ages a few days after baking. It’s one of those bread, like 100% fresh milled whole grain, where I like to let sit at least half a day (or even until the next day) before slicing. Although, I won’t blame you if you cut into it shortly after taking it out of the oven, a treat we all have to try at least once.
Let’s first discuss einkorn flour selection and then get into a few challenges I’ve discovered with this grain and my proposed solutions.
Einkorn Flour Selection
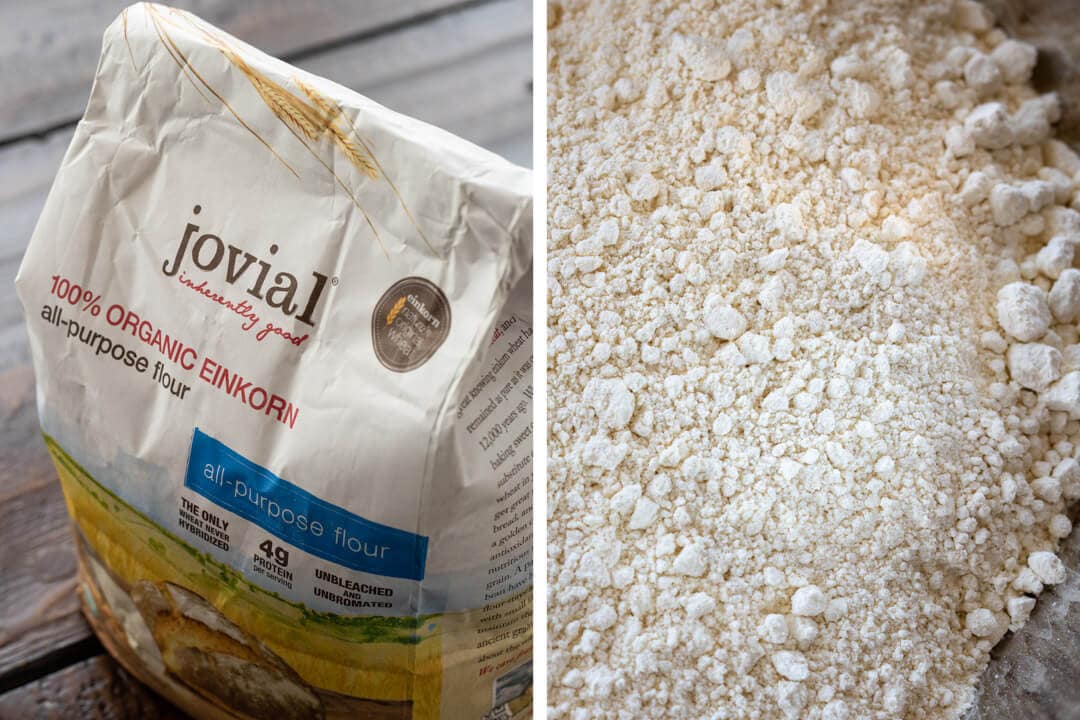
For this formula, I used Jovial’s organic all-purpose einkorn flour. Their flour has a beautiful creamy complexion, and it clumps readily in hand (indicating plenty of natural oils present). In working with their einkorn for my previous miche, I milled their whole berries just before mixing and included the resulting flour at 100% extraction (whole grain). For this bake, I wanted to push the percentage of einkorn flour and use all-purpose in an attempt at an all-einkorn hearth bread.
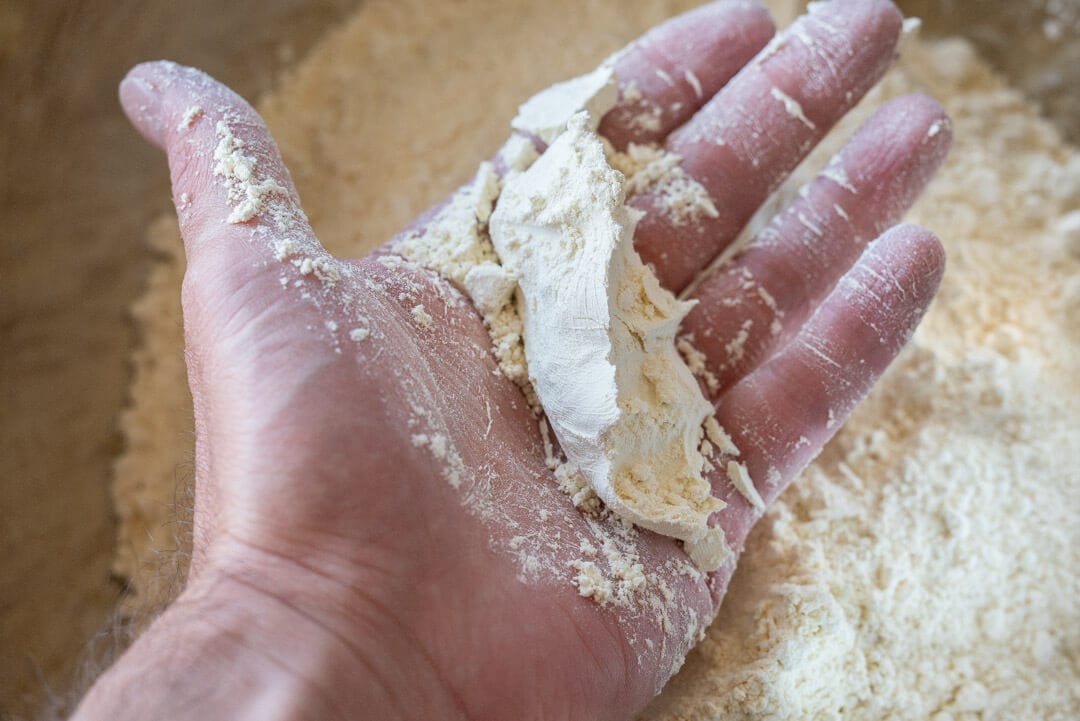
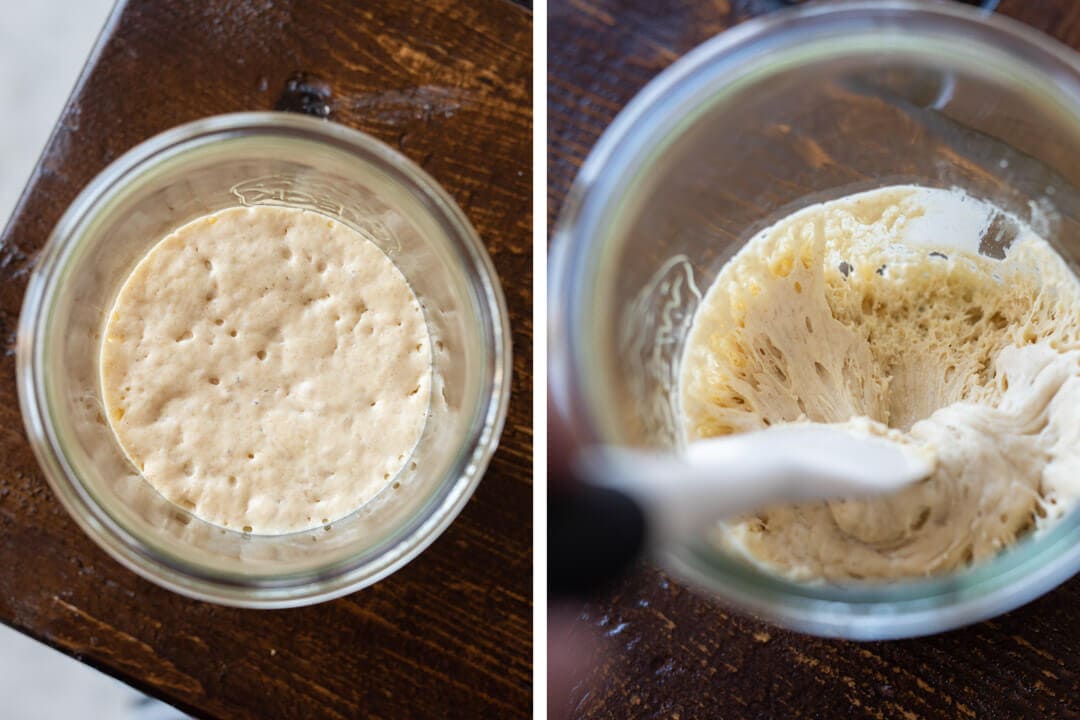
Upon mixing einkorn with water, you’ll notice it has a silky, smooth texture. It tends to break apart easily, feels sticky, and makes mixing by hand a little challenging. If you have a danish dough whisk and are accustom to using it, this might be a good time to take it out. Additionally, I’ve found it to be rather picky with hydration: if you push it too high, the dough will quickly become unusable. As I said above, be conservative with the water through mixing and only add it if the dough feels and looks like it’s able to take more. More on mixing and hydration in the next section.
Nutrition
Studies have shown there are health benefits to eating ancient einkorn wheat. In addition to being a good source of dietary protein and some vitamins (especially B vitamins and thiamine), einkorn has been shown to have higher carotenoid (antioxidant) levels, particularly lutein, also known as “the eye vitamin.” And while einkorn is high in protein, it’s gluten levels are relatively low. Thus some who are sensitive to modern wheat seem to do fine with einkorn sourdough bread (of course, each person is different. Einkorn does contain gluten, so it’s not suitable for those with Celiac disease).
For more einkorn nutrition information, including comparisons between einkorn and modern wheat, head over to Jovial’s website.
Einkorn Sourdough Bread Recipe
This dough formula would also make an excellent pan bread.
This recipe yields a relatively challenging dough to work with. However, the following section will discuss some of the observations I’ve made and techniques used when working with this grain. Additionally, and as always, feel free to adjust the timing and formula to align with your particular flour and comfort level.
My goal was to produce a hearth style loaf, but if you find the dough very slack and hard to handle, you can always use a bread pan to make sandwich bread. The structure of the pan will help keep the dough from spreading and make shaping much easier.
Observations and My Approach
Hydration
In my testing, I found the best results, regarding final taste and texture, with the dough at 75% hydration. While 75% hydration may not seem drastically high, always remember this number is directly related to the grain you’re using. In other words, the percentage doesn’t mean much taken out of context; it only becomes meaningful when compared to the flour you’re using (and perhaps even that particular batch of flour). Further, there is no point to increasing hydration if you don’t see a benefit from it — we don’t push the number to push the number. At 75% hydration, the dough is slack and sticky and requires a deft hand when preshaping and shaping.
If this is the first time you are working with einkorn at 100%, I’d suggest you start with 65-70% hydration and work it up through a few successful bakes, if desired.
Mixing
Mixing this dough by hand is challenging because of the sticky nature and low gluten properties of the grain. I found the best approach was to keep my very hands wet (using the mixing water, not adding more) through the mixing process. If you have a Danish dough whisk it might help aid mixing. I also avoid slap and fold kneading or any dough work on the counter — it’s done all in the bowl, relying on several additional sets of stretch and folds during the bulk to finish strengthening.
Pre-shaping and Shaping
Be sure to pre-shape and shape the dough tight using well-floured (or use water) hands. A tight pre-shape will help impart critical structure to the dough after dividing, setting the stage for a uniform and tight final shape. The dough should show its strength with defined edges when it’s placed in the proofing basket. I have more details, with a picture of the result, in the Shaping section below.
Fermentation Activity
I find this flour leads to an incredibly active dough. In testing, I ended up over proofing an early trial of this dough. To remedy this, I dialed back my levain percentage and employed a stiff levain to help. I would also avoid pushing the cold proof any further than 12-14 hours. Even though in a home fridge the dough is kept very cold at 38-39°F (3-4°C), the dough can quickly overproof.
Einkorn Sourdough Starter
To ensure this bread is truly 100% einkorn, you’ll have to convert your starter over to an all-einkorn sourdough starter if you don’t already maintain one. An alternative to this would be to create a second starter from your current one and feed it einkorn flour for a few days to convert it over. I’ve made this recipe with both a modern wheat starter (my typical sourdough starter) and also an all-einkorn 100% hydration variant—both work equally well.
Ok, on with the formula!
Vitals
| Total Dough Weight | 2000 grams |
| Pre-fermented Flour | 3.50% |
| Hydration | 75% |
| Yield | 2 x 1000g boules |
Einkorn Sourdough Levain
In testing this formula, I found the best performance, taste, and timetable when using a stiff einkorn levain. Even though the flour I’m using is sifted (all-purpose) and not whole grain, this dough can quickly overproof at warmer temperatures. To offset this I found myself gravitating to a stiff levain at a very low pre-fermented flour percentage. Mostly, I treated this all-purpose flour as I would whole grain.
At 100% inoculation (the percentage of ripe starter used to build the levain) my levain was ready to be mixed into the dough after 3 hours at 77-80°F (25-27°C).
When assessing readiness, look for a leveling off of the “dome” that is created as this levain is ripening. Additionally, you’ll see significant aeration at the sides, and if you gently poke at the top, it’ll give readily under pressure. This levain is a fast build: it ripens from the first feeding to maturity in only 3 hours. The high inoculation percentage and warm temp expedite the timetable. If you’d like to lengthen this build to better fit your schedule, drop the inoculation down to 50% ripe starter and it’ll be ready around 5-6 hours.
| Weight | Ingredient | Baker’s Percentage |
|---|---|---|
| 39g | Ripe sourdough starter (100% hydration) | 100% |
| 39g | All-purpose einkorn flour (Jovial organic all-purpose einkorn) | 100% |
| 17g | Water | 45% |
Dough Formula
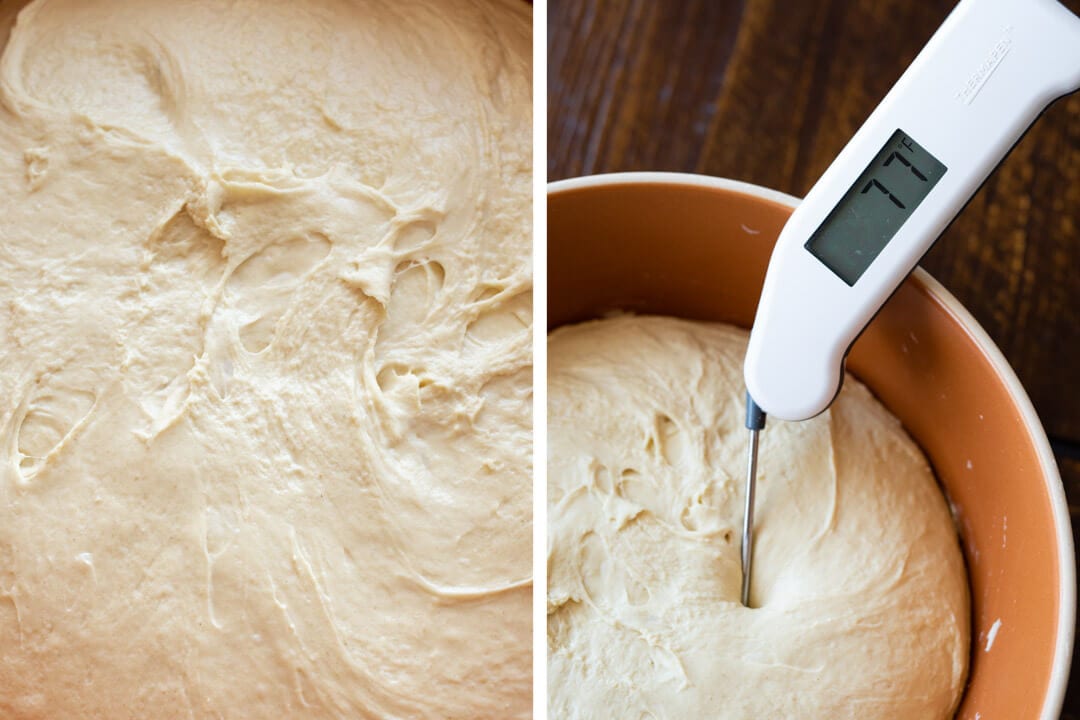
Target final dough temperature (FDT) is 76-77°F (24-25°C). For more information on final and desired dough temperatures, have a look at my guide to the importance of temperature in baking.
Note that the baker’s percentages listed below are with respect to the final dough ingredients and do not take into account the levain.
| Weight | Ingredient | Baker’s Percentage |
|---|---|---|
| 1066g | All-purpose einkorn flour (Jovial organic all-purpose einkorn) | 100.00% |
| 6g | Diastatic malt powder (optional) | 00.52% |
| 811g | Water | 76.09% |
| 22g | Salt | 2.07% |
| 95g | Ripe, stiff levain (see above) | 8.89% |
Method
1. Stiff Levain – 10:00 a.m.
Build the levain (everything listed in the Levain section, above) and store somewhere around 77°F (25°C) ambient until ripe, about 3 hours.
2. Autolyse – 12:45 p.m.
Einkorn has little in the way of extensibility: it tends to tear and fall apart when stretched. I experimented with varying autolyse times between 15 minutes and 1 hour and didn’t notice any significant improvement to extensibility or improved mixing. Here, I opted for a short 15 minute autolyse to give the flour time to hydrate fully. If this isn’t convenient, skipping the autolyse period would also work.
If you choose to autolyse, add the called for flour, malt powder, and all but 150g of the mixing water to a bowl and mix together by hand. Cover the bowl and let rest for 15 minutes.
3. Mix – 1:00 p.m.
To the bowl containing the flour and water from the autolyse step above, break up the ripe, stiff levain on top and add a splash of the reserved water. Mix by hand, or with a dough whisk, until well combined. The mix will be very wet and almost look like it won’t hold together. Perform folds in the bowl to add strength for 5 minutes. Mixing in the bowl keeps things relatively clean and contained.
Let the dough rest for 10 minutes, covered.
Add the salt to the top of the mixed dough with a splash of the reserved water. Mix thoroughly. At this time assess the dough: does it look like it can handle the remaining 150g of water? If so, add the water, if not, omit the remaining water.
It’s essential to hit the 76-77°F (24-25°C) desired dough temperature for this dough, use an instant-read thermometer (like my trusty Thermapen), and make sure the temp of your dough is in this range.
Transfer the dough to a tub or thick-walled bowl for bulk fermentation.
4. Bulk Fermentation – 1:20 p.m. to 4:50 p.m.
Perform a total of 5 sets of stretch and folds during the bulk. The first set is 15 minutes after the start of bulk, and the second set is 15 minutes after that. From there on, the remaining sets are 30 minutes apart. After the last set, let the dough rest for the remaining bulk fermentation time.
If you nailed the final dough temperature, and it’s kept fairly warm, the dough should be ready to divide after 3 hours and 30 minutes.
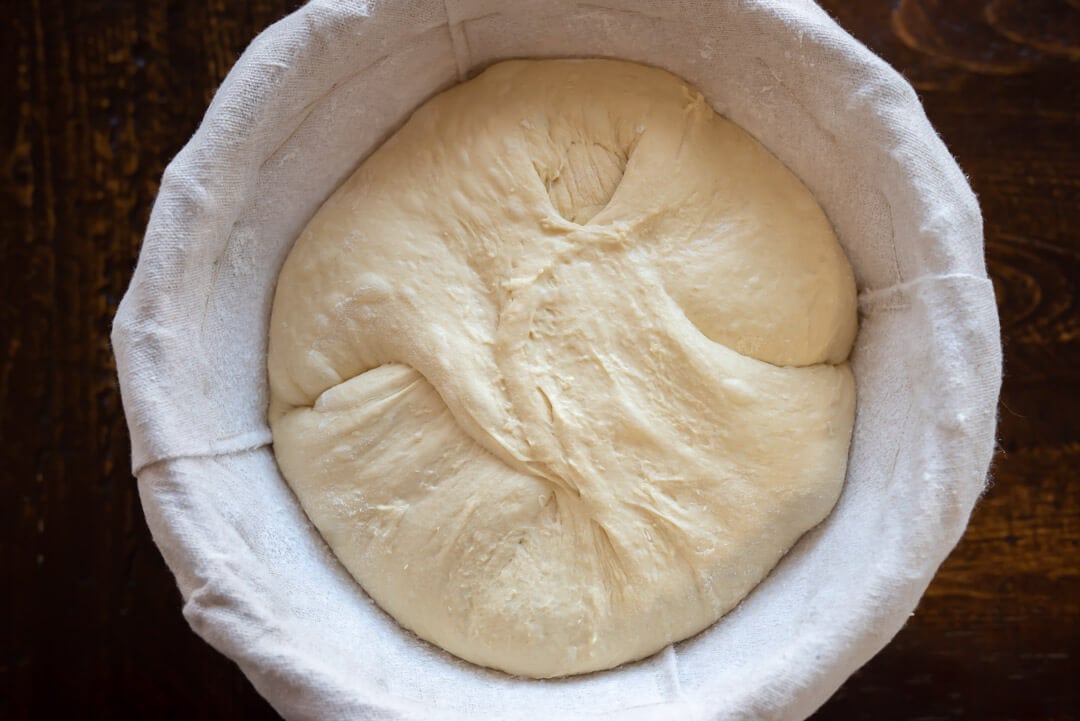
5. Divide & Preshape – 4:50 p.m.
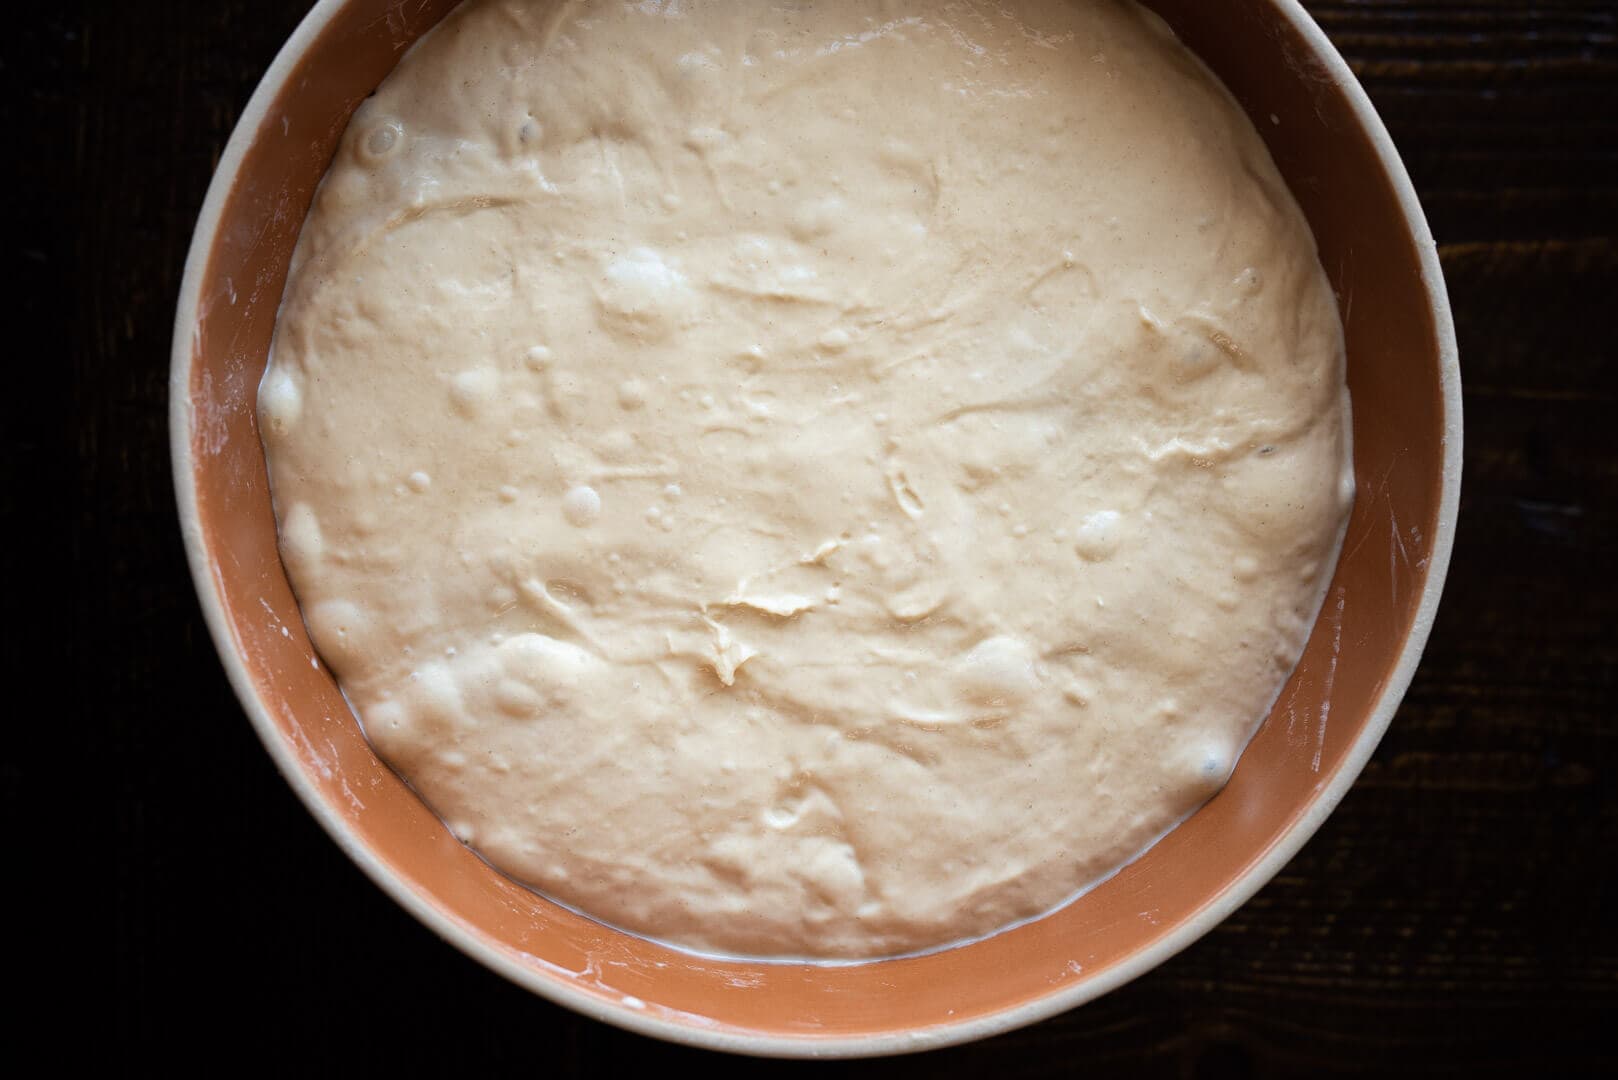
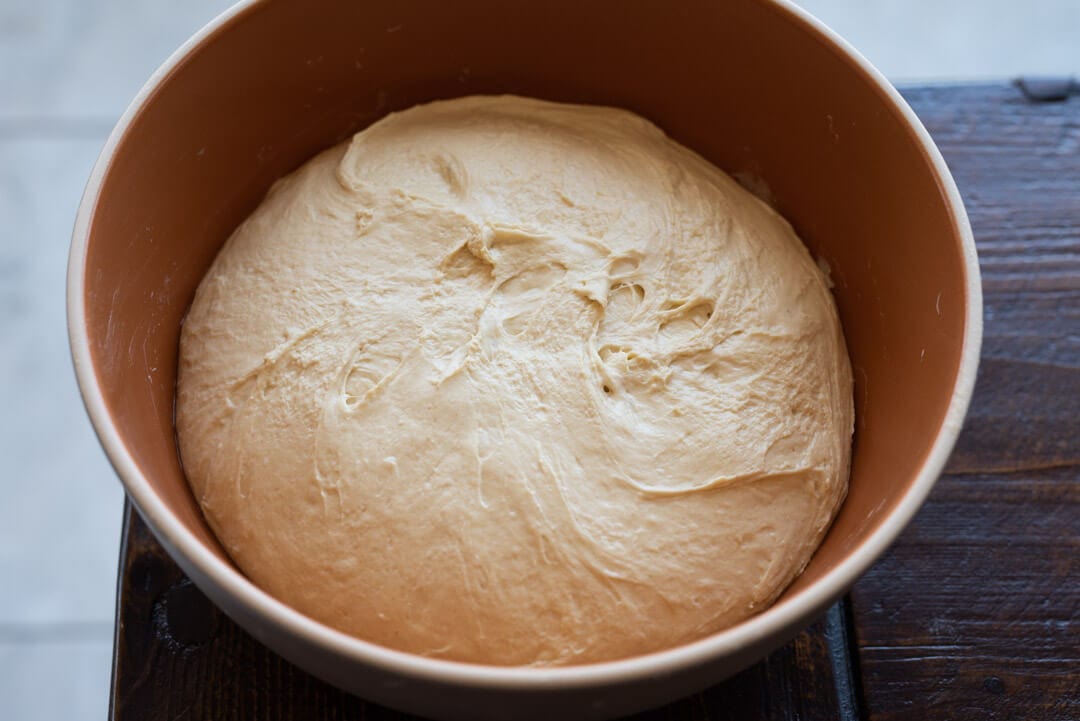
At the end of bulk, as seen below, the dough will have risen some (perhaps not as much as you might be accustom to), be smooth on top, and show signs of healthy fermentation. If you gently shake the bowl, the dough mass will jiggle. Dump the dough from the bulk container to a lightly floured work surface. The dough will be wet, sticky to the touch, and will likely want to spread some. Using well flour hands and a bench knife, divide the mass in half and shape each half into tight rounds. This can be challenging; use as much flour as needed and shape as tight as possible.
Let the dough rest for 15 minutes, uncovered. Keep an eye on the dough, if it starts to spread quickly, skip the remaining rest time and proceed directly to shaping.
6. Shape – 5:05 p.m.
Liberally flour your shaping area and the top of your rested, and relaxed, rounds. Using a bench knife and your hand flip one round over. Fold the bottom up to the middle. Then fold each side, left and right, over to the other to form what looks like an open envelope in front of you. Then, grab the top and fold it up and down to about the middle. You can then flip this whole package over and use both hands to drag the dough down towards you as your pinky fingers create tension. If the dough needs more tension, slightly rotate the mass and continue to drag down with both hands. Repeat as necessary. Using your bench knife invert the round into a proofing basket liberally dusted with white rice flour. To encourage maximum rise the next day, be sure to shape each round tightly. After you place the shaped round in the basket, I found performing two “tucks” of the dough to help it keep shape (see above). Using wet or floured hands, grab the very side of the dough with two hands opposite each other and gently pull up and over to the center to seal. Rotate the boule and repeat the tucks at the opposite ends (you’ll end up with four flaps overlapping in the center).
7. Proof – 5:15 p.m. to 7:30 a.m. (the next day)
Cover each basket with plastic to prevent it from drying out as it proofs overnight. In my home fridge at 38°F (3°C), I proofed this dough for 14 hours.
8. Bake – Preheat oven at 6:30 a.m., Bake at 7:30 a.m.
I baked these boules on my Baking Steel in my oven (see my post on how to steam your home oven for baking), but you could also use a Dutch oven or combo cooker. I baked one round at a time, but you might be able to fit both on your baking surface.
Preheat your oven with baking stone/steel for one hour at 450°F (230°C).
Prepare a pizza peel and two pieces of parchment paper. Remove the dough from the fridge, uncover the baskets, and turn out the dough from the proofing basket onto the parchment that is resting on the pizza peel. Score the dough with a bread lame as desired, and load into your preheated oven by dragging in each piece of parchment holding the dough.
Bake for 20 minutes with steam. Then, remove the steaming pans from inside the oven (or remove the lid to your combo cooker) and bake for an additional 30-35 minutes, or until done, without steam in the oven.
Once fully baked, let the loaves cool on wire racks for at least one, preferably two, hours.
Conclusion
While there might be a few challenges in working with this dough, with practice it yields an outstanding einkorn sourdough bread. The result is a solid, flavor-laden loaf that is sure to delight. Due to the gluten properties of einkorn, you won’t achieve a tall rise out of this bread, but that’s beside the point — it’s all about flavor, texture, and nutrition here. The subtle, tang from natural fermentation paired with the warm, round taste of einkorn results in a truly memorable bread.
Crust
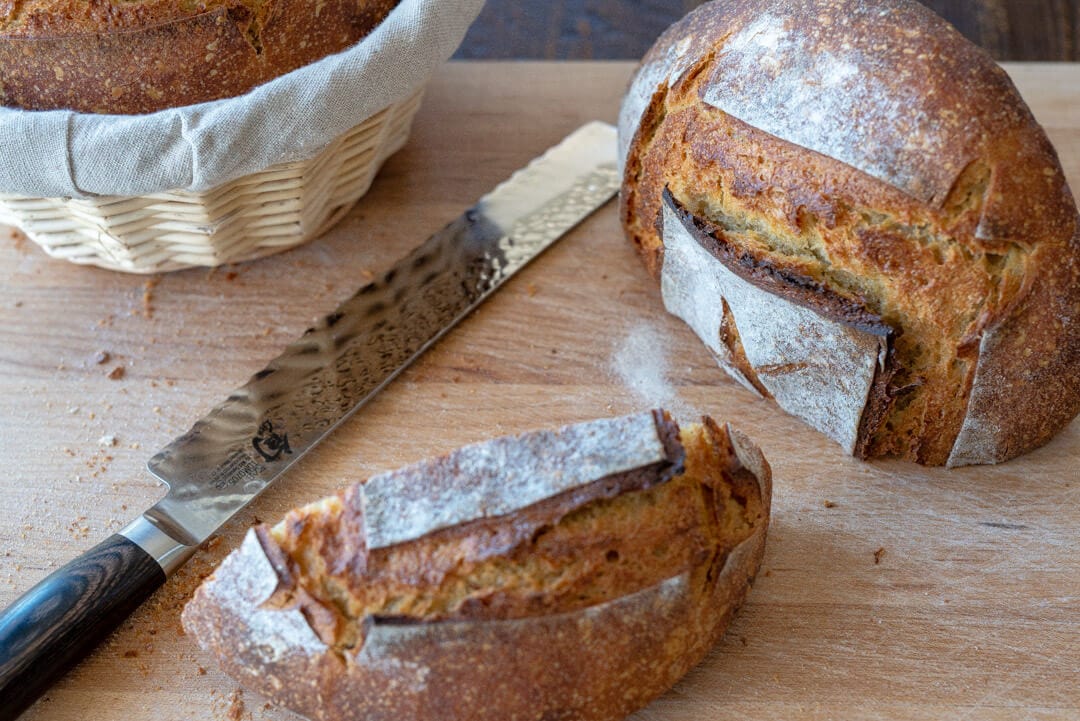
The crust is rugged and deeply colored, igneous even. It’s this kind of crust that has me reaching for the bottle of extra virgin olive oil each time I happen to walk by the cutting board. And to be honest, that happens a little too often on the day this bread is baked.
I like a heavy dusting of white rice flour in the proofing baskets to provide a little aesthetic contrast, a slight reprieve, to the well-colored exterior. The crust is always the first thing you see when you pick up a loaf of bread, and when you see one like this, it’s hard to resist the urge to cut—or even tear—forthwith.
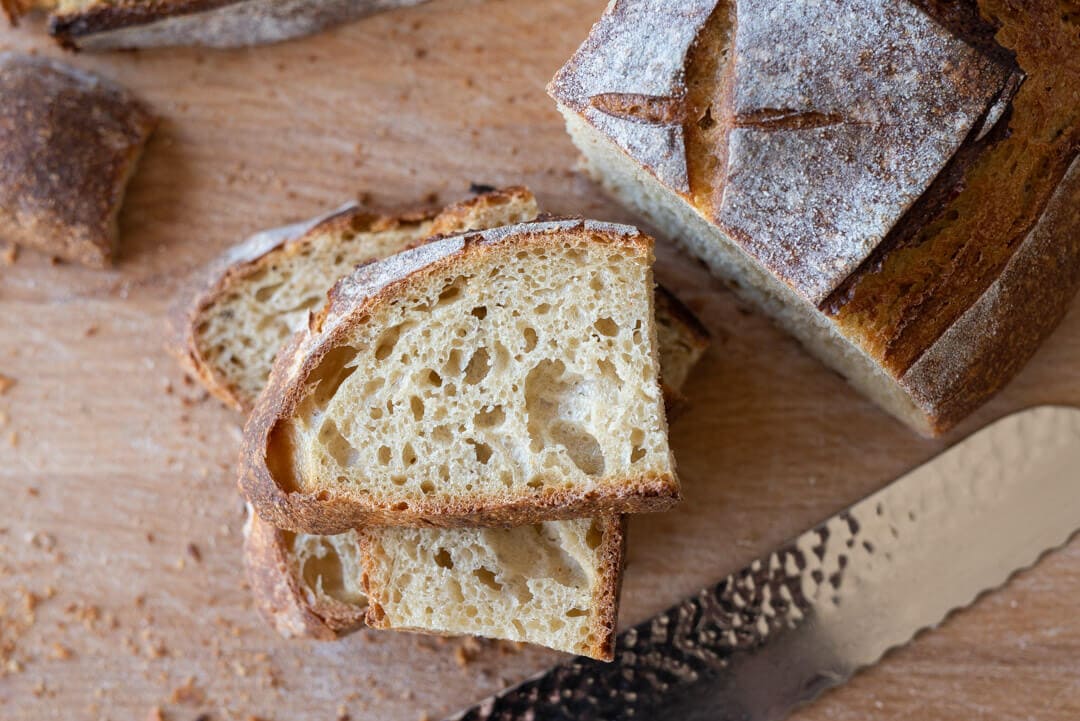
Crumb & Taste
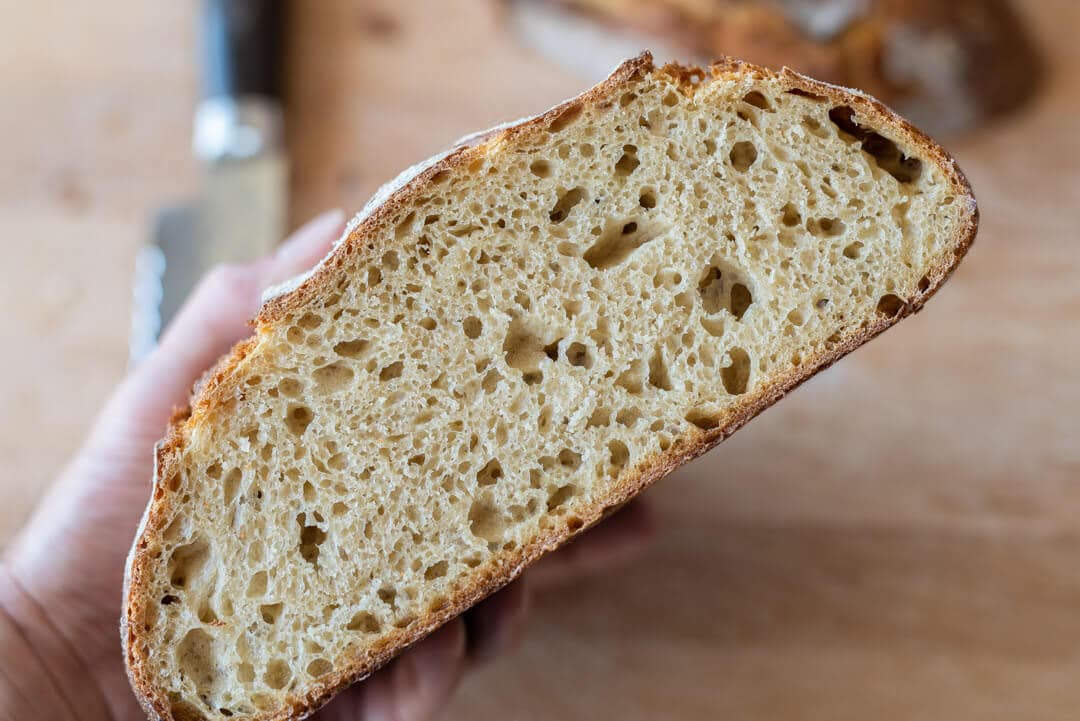
When well fermented, the interior is light and uniformly open. This is a substantial loaf of bread, but through proper fermentation each slice has levity to it, providing just the right amount of chew. The tender interior texture is rather surprising: even days after baking this bread seems to hold on to its moisture, retaining that tenderness and soft chew much longer than expected. Still, be sure to store your bread properly for maximum shelf life.
Thanks to the stiff levain and lengthy fermentation timeline this einkorn sourdough bread has just the slightest of tang at the end of each bite. This subtle sourness heightens your sense of taste, allowing the rich, yet sweet, the flavor of the grain to fully express itself. I would venture to say this bread ranks up there with some of the most flavorful I’ve made.
Thanks so much to Jovial for sponsoring the development of this einkorn recipe and for this post! As always, the opinions and content here are my own.
If you use this recipe, tag @maurizio on Instagram so I can take a look!
Einkorn Sourdough Bread FAQs
The dough is very sticking when mixing, how can I make this easier?
I find hand-mixing this dough in the bowl to be easiest. A dough whisk might help keep your hands clean during the initial stages of mixing. From there, keep your hand moist when doing folds in the bowl to prevent the dough from sticking. My recipe relies more on stretch and folds during bulk fermentation than strengthening the dough up front so don’t worry if the dough isn’t super smooth at mix-time.
The dough is hard to shape, what can I do?
While einkorn is high in protein, its gluten properties aren’t the same as modern wheat. This results in a dough that can be overly sticky and wet by the end of bulk fermentation. If you’re having trouble shaping, try reducing the hydration of the dough next time (see the section below for the formula at 70% hydration). This will help bring a lot of strength to the dough, making it more manageable during shaping.
Why doesn’t the dough rise when I bake it?
While there could be many causes for this, my initial guess is usually over-proofed dough. Try reducing the proof time in the fridge by 2-4 hours and see if this helps eke out more rise.
I’m not getting a nice ear when I score and bake, what gives?
This dough will not yield a super high ear (the area that lifts up on a loaf where it’s slashed). Other causes could be a dough that’s over proofed, not shaped tight enough, or simply not scored deep enough.
What’s Next?
If you’re looking for another large loaf, my Hop Miche, made with a dark, malty stout, has all the lovely qualities of a large loaf (keeping quality! Incredible crust! Delicate crumb!) but with a rich and earthy flavor.
Happy baking!


171 Comments
Hi Maurizio, all you’ve posted and share has been so inspiring! Inspiring enough that I want to try the 100% Einkorn sourdough recipe. I have my regular starter and have taken 50 grams of it mixing it w 50 grams H20 and 50 grams Einkorn flour. The starter is not growing, any suggestions? Thank you!
Thanks, Lisa! Glad to hear that. Hopefully by now your starter is growing and working well. You should see some rise and activity even at 100% einkorn. You won’t see the same rise and bubbles as with a more modern wheat based starter, but you will still see activity. If not, try to keep it relatively warm and feed it consistently and timely. These things should bring more strength to it!
Thanks for posting this! It looks like you’ve had awesome results! Well done!
Can you please share how come in all of the photos you have of the dough there isn’t any flour visible? How do you work with the dough? Do you use water exclusively? I’ve heard that the einkorn though is very difficult to handle. I’ve just ordered some berries and looking forward to grinding them and giving it a shot myself.
It would be so cool if you were to make videos!
You’re very welcome, Gabriel! If you look hard enough I’m sure you’ll find some flour here and there 🙂 But really, I try to use as little as possible during preshaping and shaping. Preshaping with water is definitely an option, but I typically use just a light dusting of flour there.
Einkorn can be challenging to handle, especially at 100%. It takes a little practice in dealing with the wet, sticky dough but the results are definitely worth it: the flavor and nutrition is hard to beat!
Hope that helps and happy baking!
You don’t mention anything about how to get to the goal temperature. I kneaded until I reached it but you don’t mention kneading at that point in the recipe so, what do you suggest?
As a baker, the easiest thing we can control to adjust the final dough temperature is the water: we can heat it or cool it as necessary to help offset ambient temperature, temperature increases due to mixing, and flour temperature.
For more info on this, check out my post on the importance of dough temperature in baking.
Help
I am making this recipe and my bread is never fully cooked. Gummy inside after the full cooking time. I have a healthy Eikorn starter…..
Frustrated
Karen:
If the hydration is too high for your dough it can lead to an overly wet or gummy interior. If the dough feels “soupy” or very “slack” then try pulling back the water percentage by 5% and see if that helps.
Also, make sure to bake your loaves completely. The interior should register around 208°F or higher.
Finally, if your loaf is under proofed then this will typically lead to a gummy or “wet” textured interior. Make sure your starter and levain are very vigorous and strong when you use them. This is very important! From there, make sure to bulk ferment your dough fully (use the images you see in my posts to guide you on what the dough should look/feel like). You want the dough to be alive and aerated before you divide and shape. From there, a full and complete proof is also very important.
I hope this helps!
Wow this recipe is a game changer. Funny how the little adjustments like a longer bulk fermentation and max retardation and specific fold and stretches make a difference when using einkorn. I followed your recipe to the “T” and it was spectacular! I’ve been using einkorn flour for many months but using recipes designed for conventional wheat flour and just never made it past okay bread. For the first time I’m experiencing the creamy sweetness flavors einkorn promises. Now I’m taking it to another level, thank you Maurizio!
That’s awesome to hear, Ursula! Einkorn is such a wonderful grain to work with — it can be tricky, but if you stick with it the flavor and texture (and nutrition!) is really something else entirely. Happy baking and thanks so much for the update!
Just got my hand on some Einkorn and can’t wait to try out this recipe! 🙂 I was thinking of trying a mix of varying coarseness, like maybe 85% finely milled, 10% medium, and 5% rough. Have you tried this?
I will definitely be careful with the water content during the mix, after reading all of these helpful tips.
Do you perform the poke teste before placing it in the fridge? Just wondering what level of “readiness” I should aim for before letting it cold-proof overnight.
Excellent, you’re going to love Einkorn. I have never considered varying the granularity in a single dough mix — what’s your reasoning behind this process? Usually I dial in the mill to output close to as fine as my mill will go, set it there and mill away.
Yes, be cautious with the water. Given the fact that you’re using 100% whole grain einkorn you might be able to push the water a bit higher, but still, be conservative the first try.
I’m almost always poking the dough in some capacity, but not the traditional “poke test” at that point — that’s most useful for ambient proofed doughs near the end of their proof. The dough should be gassy and puffy by the time you put it in the fridge, but not excessively so. Because it still has to undergo the long fermentation time overnight you want some “life” to still be left in the dough, otherwise when you go to bake it the next morning it will not rise optimally.
Hope that helps and have fun!
I typically cold proof my final shaped loaves and have started experimenting with giving them a decent amount of floor time before putting them in the fridge. With my fridge temp set at 37-38, I was frustrated with the lack of open crumb I was getting even with a higher hydration, good bulk fermentation and gentle shaping. Even with a cold proof of 18 hours very little activity was happening over that long, cold proof. I’m hoping that by taking it just shy of ready-to-bake that will help with the final fermentation.
Right on. Yes, some floor time before the bake can def. help if your dough needs it!
Still struggling with the lack of open crumb and I can’t seem to crack it. I just made a 78% hydration dough (that’s total formula with half KA AP and half Camas Country Rouge de Bordeaux). I used 15% pre-fermented flour, got some good strength and fermentation built after about 4 hours at 80*, was gentle with shaping but probably could have made it a bit tighter. I let it have some floor time for about two hours at 70* before putting it in the fridge overnight. Baked it this morning and I just can’t get much openness. I love baking bread (why I went to SFBI in the first place), but these higher hydration doughs have been beating me down. Any ideas on what direction to head in? I do the initial mixing in my 7qt kitchen aid in order to save my wrists, but do a bunch of folds during the bulk.
I’m wondering if your dough might be over proofing — perhaps we’re going in the other direction. I might suggest that dropping the hydration a bit might help bring lots of strength, then work the hydration back up slowly once you get a stronger, more open interior. There are many places where things can be going in the wrong direction here. If you bake this again and take some photos (of the interior and exterior), send them over to me (just remind me of this conversation!) and maybe I can provide a bit more help.
I have a feeling it’s either over proofed dough, too high of a hydration, or something in the handling (preshape/shape) process…
I made this recipe using 30% fresh milled einkorn berries and following your method of using fresh milled flour, the result was fantastic! I kept one loaf for myself and the other I made as an office share. I sliced it and had some Irish butter out…I really like that it comes in soft spread tubs now. I alerted everyone to help themselves, and they certainly did, with ooh’s and ahh’s. I’ll be making this one again. Thanks again Maurizio for your great guides and tips.
Excellent, Larry. Einkorn has such amazing depth of flavor, it’s stunning, really. It’s a little challenging to work with given it’s gluten properties, but it’s worth the challenge! I’ve made this bread many times for family and friends, there’s never been a time where any bread has been left on the table…
Thanks for that update, Larry!
That’s great to hear! Gentle handling during bulk is important, but this dough is challenging to really keep hand interaction to a minimum. Have you tried letting bulk go a bit farther? My temps and times have worked really well!
Hi! Thanks all your precise and detailed work on these recipes! Have enjoyed reading and baking from your Inspiration.
For this einkorn loaf have you done a shorter final proof out of the fridge? Or how long would you think the rise would be on counter at this point? 1 or 1 1/2 hours?
Glad to hear that, Noelle! It’s really hard to say, but yes for this dough I’d say 1-2 hours and it should be ready (at around 75-80°F or so). The poke test will help you here!
Thanks so much for your thorough response to my very long comment and set of issues! I’m trying it out again this weekend, following your advice. I also finally got a lame recently so I think I went a little lame happy—I know that that’s a skill unto itself. And since you mentioned it, the dough was indeed very puffy after the proof, so will decrease time. Thanks again!!
Hi Maurizio, your site has been immensely helpful for a newbie sourdough baker like me…I was perhaps too ambitious taking on such a difficult loaf this early on, but I really wanted to try it. The dough fought me throughout the entire process (or I fought it), and I’m sure I made mistakes along the way. I just tasted it after cooling about an hour, and it’s well baked and delicious, and the crumb surprisingly doesn’t look too different from your last picture, but it hardly rose, if at all, in the oven, even around the scores (baked in cast iron combo). Could you help me figure out where I went wrong?
The levain build went well, and seemed strong.
In the step for adding the salt and reserved water, when you say to add more water if your dough can handle it, can you explain a little more what you mean by that—what kinds of signs or textures to look for? I ended up adding all the reserved water in about 4 stages. The dough got progressively slacker and stickier, but kept to one mass more or less, so it seemed okay to add it all. Maybe I added too much water. That’s one possible issue, and why this dough ended up being more difficult than it needed to be.
During the bulk, I could feel that the dough was getting stronger with each s&f, but it clung to the sides of the containers and did not come off cleanly and as I was used to. I had to scrape the sides a bit to reincorporate. Is that expected here, or a sign that my dough was over hydrated, or still underdeveloped? I debated doing more s&fs but decided to stick to your instructions and kept it to five. The dough did stick less and less to my fingers throughout the folds.
The shaping was a total disaster, no other way to put it. This may have been where I really went wrong. I ended up tearing the dough a little where it stuck to the counter during the shaping process. I could also see that clumps of flour used for dusting were getting incorporated but i just had to go with it at that point to get some kind of shape and tension. Once formed and in the basket I did the extra tucks. The top (or bottom of loaf) was messy and lumpy. I doubted that it would rise at all in the fridge, I thought I’d totally mucked it up by that point.
Surprisingly, it rose quite a bit overnight. The top was still lumpy but had smoothed out a bit, and the dough was on the verge of overflowing the basket. When I inverted onto parchment and scored though, i noticed some deflation. Do you think I scored too deeply or roughly? I finally got a lame and tried it on this loaf, so I’m sure there was some user error…
The bake went well other than the lack of rise, even where I scored the loaf. There are some weird folds in the dough from where I mucked up the shaping and too much dusting flour got folded in, which is something I’m working on in general.
Apologies for the very long post, but hoping you could help me diagnose where I went wrong, because I really want to get this right over time. The bread tastes great and I love the nutritional aspects of einkorn.
Thanks again for your detailed recipes and thanks in advance for any help you can provide!!
Jean — happy to hear my website has helped! This is a challenging dough, but it’s definitely workable, even for beginners. Answers below:
it’s hard to say how much water to add during mixing, it’s really a feeling when I tug on the dough and observe the dough as it’s strengthening during mixing. Typically I look for the dough to be smooth, cohesive, and when I tug on it a feeling of strength. My feeling is try omitting that reserved water next time and see if you get more spring in the oven. A stronger dough might help eek out more rise on your next attempt.
This dough will definitely cling to the sides of the bulk container — it doesn’t remove cleanly even in my ceramic bowl. It’s a good sign that your dough progressively got stronger (even if marginally) and smoother. These are the signs you want to see through bulk fermentation.
Definitely try to keep large clumps of raw flour out of the dough at shape time. I know this dough is hard to handle when dividing and shaping, but excessive flour at that point will end up in the final baked loaf. Use enough flour so the dough is manageable, but try to keep it as a dusting rather than clumps. If you grab some in your hand and kind of throw it at an angle it’ll dust instead of fall. I hope that makes sense. And yes, it does sound like you might not have imparted enough strength during shaping, this would cause the dough to spread more than spring up when baking. It’s ok though, through practice you’ll learn to handle this dough!
If the dough deflated when you scored try scoring more shallow next time. One thing to keep in mind here is the more “weak” and gassy the dough feels (gently poke and tap it when you turn it out from the proofing basket) the more shallow you need to score. I recommend that every time you bake a bread, even if it’s not einkorn, try to observe the dough right before you score it. You’ll build up a feeling for the dough over time, this will help you determine how deeply you can score without deflating the dough.
I’d also recommend you cut the proof time back and hour or two. You don’t want this dough to be excessively gassy when you go to bake, with a reduced proof time you might also see more upward rise in the baked loaf.
I hope these tips help! Einkorn is a fantastic grain, both in terms of flavor and nutrition, and it’s totally worth sticking with it!
Happy baking 🙂
I’m confused by steps 2 and 3. Are you assuming in step 3 that people are skipping the autolyse?
Also, are the stretch and folds in step 4 done in the bowl, or on the counter? If on the counter, should it be floured?
My first attempt at this was a complete disaster, and I got no rise at all. I think I’m still trying to figure out the difference in dough/batter type between einkorn and gluten-free flours and my first attempt was too wet. I have an anti-TPO test that proves my body doesn’t react to einkorn, so I’m determined to get this right!
Hey, Bex! Answers below:
As I mentioned in Step 2, a short autolyse of just 15 minutes was performed on my bakes. However, skipping this would be fine as well (and skipping might be a good idea if you find your dough is overly slack/extensible).
Yes, stretch and folds are done in the bowl with wet hands.
It sounds like you should give this another go with a reduction in water, perhaps 10% would be a good starting point. The dough can quickly over hydrate, causing a sticky mess, so holding back water might be the ticket to success for you. Einkorn flour can be challenging to work with but over time you’ll develop a good feel for the dough and the process.
Let me know how it goes!
I’ve made two beautiful loaves so far, with lower hydration than the first two. Coming from the other side of bread baking (no gluten at all), I’m finding instructions a bit confusing and I think I’m over-compensating. Anyway, I have that settled. And I have crust!
The crumb, while tender, is not very open. I’ve been doing the stretch-and-folds on the counter (I have a dough that will hold together, dammit, and I’m having fun with it!). Could that be the issue? I’ve also been finishing the bulk ferment as soon as I notice some rise (which, for me, is probably a decent amount of rise), rather than trying to figure out what “not quite twice the size” looks like.
Can you explain what the % of hydration means. New to this..
Patrick — the hydration percentage in baking is expressed as a ration between water and the total flour used in a recipe. For example, if your recipe has 1000g of flour and 800g of water, the hydration percentage is 80% (800/1000 = 80%).
For further information on this check out my Beginner’s Sourdough post where I talk more about dough hydration.
Happy baking!
I just started using this unique flour about two months ago. So far, the einkorn breads have been delicious, yet far too dense. (still working on getting my results just right. 🙁 ) I do have a pretty mature sourdough going right now, so I am eager to try your recipe and see if I get better results. So glad I found this blog, and this recipe!!
Glad to have you here, Sandra! Einkorn can be challenging to work with as the protein / gluten properties are different than more modern wheat. Essentially they won’t have the same gas-trapping effect as modern wheat. But! What they lack in that area they have in flavor and nutrition. Stick to it and pay close attention to the dough, you’ll notice things improve each time you bake with einkorn.
Happy baking!
Just put this batch into the oven. I had one of my friends with gluten issues request rye bread, so I substituted about 40% of the einkorn flour with whole rye and added caraway seeds. I usually follow Carla’s method of just folding the dough 3 times, but did stretch and folds this time. I ended up with a lot of dough on my hands and scraper…the lovely stickiness of einkorn! We’ll see how it turns out…will let you know!
Very cool, Gina. Yes, the dough can be quite sticky — wet hands and a good bowl are definitely key! Let me know how it goes and how your friend likes it. Have fun!
So you bake directly out of the refrigerator?
Kira — yes, directly from the fridge!
Thanks! I put in 10% spent grain flour. The flavor is terrific, but the crumb is rather dense. It’s cooked through as it was 211 degrees. The dough wasn’t hard to work with because of the spent grain flour. Next time I’ll leave it out.
Thanks for you great site!
can I use honey as well as diastatic malt powder?
Anina — honey will not serve the same purpose as diastatic malt powder (which helps increase enzymatic activity in the dough, adds to crust coloring, etc.). You could certainly omit the malt powder if you’d like, it’s optional, and add honey for a sweeter end result. Hope that helps!
Do you think a Mockmill 100 on fine then sifted with a fine sift can give the same quality as Jovial all purpose flour?
It’s hard to say but likely not the same exact result. I’m not sure how Jovial mills this but it’s likely their using roller mills with a sifter at the end. Home mills can get close, but I haven’t found I’m able to get quite the same result. However, milling and sifting on your own will still produce amazing flour that’s incredibly fresh and flavorful. As you probably know based on my posts here, I do this quite often (although I usually use it at 100% extraction, no sifting)!
Really loving this and will be trying it out this weekend. Such great timing for me. So many people falling in love with my 🍞 @ podluck but always a few with wheat issuus but they can eat Einkorn.
Thanks, Eugene. Glad to hear your baking is going well and yes, I’m sure this will do well at your potlucks — everyone I’ve given it to has thoroughly enjoyed it (not to mention my rampant consumption of these loaves…). Happy baking!
Awesome post as always with all those details and tips. I have just picked up my Einkorn berries and looking forward to try this formula on Friday. Thank you!
Thanks so much and right on, you’re going to love this bread!
PERFECT timing, Maurizio. I just took my starter out of the fridge for the miche, but I will try this one instead. It looks amazing!
Excellent! Both are great. Let me know how it goes!
It went fairly well. I did do the autolyse and then mixed in the starter and diastatic malt 15 minutes later. That dough was a pain to get off my hands!!! Sticky!!!! I ended adding all the extra water and the dough was beautiful. Shaping was challenging as expected, but I didn’t have any exessive spreading. Tagged you on instagram if you want to sneak a peak at the result. Btw, it tastes amazing! Thank you for your wonderful instructions.
Glad to hear it worked out well for ya! Yes, the dough is definitely sticky and can be worrisome… You just have to keep at it! Thanks for tagging and for the updates 🙂
I discovered K2 Milling about an hour south of where I live. He mills only organic grains from my province, Ontario, Canada. I am thrilled with the results so far. He said he is presently growing einkorn himself. So it will be available some time this year. Thanks for doing all the hard work of going before us and sharing all your wonderful recipes. I look forward to using this one.
On a side note, my breads are always lovely and I follow everything to the T. But i never have those beautiful bubbles I see on your breads and my crust doesn’t quite have the same rise as yours or Chad Roberton’s. Yes I’m comparing your recipes to his. Is it because I’m doing everything by hand and you use a machine? What can I change?
I’ve heard of K2 — sounds like a really great resource near you! You’ll love this einkorn bread, so flavorful (and healthy). I actually did this entire recipe by hand, as are all the ones posted here at my website (unless I otherwise mention using a mixer). There are a lot of factors that go into achieving an even, open interior: proper fermentation, dough that’s sufficiently strong (via kneading and/or stretch and folds during bulk), a full bulk fermentation step, a gentle shape, and finally sufficient proof time. The flour also plays a huge role, of course!
If you have photos of the interior you’d like me to help you with, send them over via the Contact link up top so I can take a look and see if I can help diagnose!
It is as I feared, then. 🙂
Thanks, David! You’re very lucky, indeed. I know of Dave Miller (but haven’t tried his breads, yet) and he’s a huge inspiration for me, especially when it comes to fresh milling. I’ve heard of adding ascorbic acid (vitamin C) to a dough to condition it for better baking properties but I haven’t personally experimented with that. I usually try to stick to flour, water, salt, and usually a little diastatic malt (sprouted barley that’s then milled) because that’s what I’m experienced with. I haven’t had too many issues with grain that’s not suitable for baking, but I’m sure Dave has in his vast experience — in cases where the grain isn’t displaying suitable baking properties working with vitamin C might be very necessary!
This is a challenging dough to work with and takes some practice but I feel the results are very worth it. The flavor and texture is very unique and just tastes great. Let me know if you try this out and thanks for the comments! If I had regular access to Dave’s breads I’m pretty sure I’d either bake less or be inspired to bake even more — not sure which, yet 🙂
On the topic of Miller Bread being either a spur to bake more, or a reason to bake less, alas I have found that it is a reason to bake less. I mentioned to him on Saturday (he only sells at the local farmers’ market) that each purchase I make from him represents a failure on my part to bake. I got a shy smile and a Gallic shrug, along with my bread.
Thanks for the post! Great work as always.
I’m lucky to have a really great baker in the neighborhood, from whom I can get whole berries. I bought 20lbs of einkorn from him a few months ago, and when I picked it up he mentioned that einkorn ‘needs a little boost’ of vitamin c. He’s a careful and completely organic baker so he uses a berry (don’t remember which), but he said I could use ascorbic acid at the rate of 100mg per kilo flour. I didn’t note any mention of this in your write up, though I did race through it and may have missed it. Have you ever heard of this being necessary? He’s Dave Miller (Miller Bakehouse) — very well known among bakers in the U.S., though he keeps a very low profile. Anyway, just curious. Love your work; if I could even once produce a loaf with crumb like your pictures I’d be a happy man.