
Steam burns hurt. Like, really hurt. The small mark on my left forearm begs the question daily: Maurizio, was it worth it? But before we talk about my new baking badge of honor, let’s concentrate on overcoming the challenges of baking good bread at home. While many of these challenges present themselves early in the two-day process (fermentation, flour selection, mixing, shaping, and so on), there is that crucial component at the end of this ordered procession: baking bread with steam in your home oven.
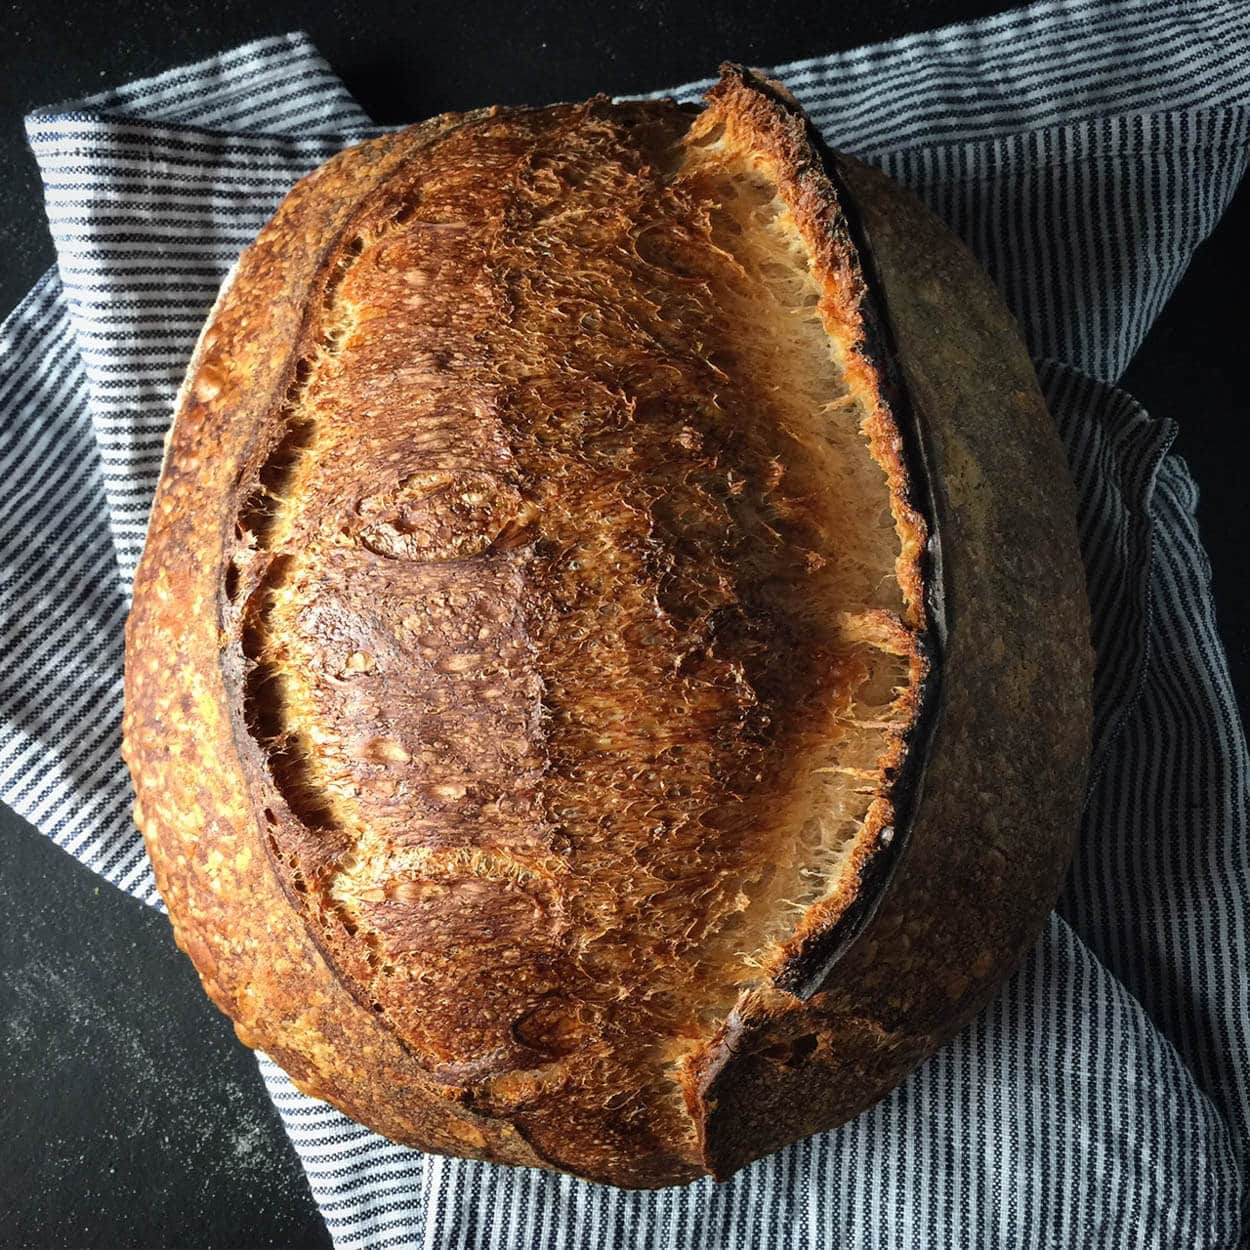
For your bread to rise to its potential, that outer, taut skin on your loaf needs to be able to expand and stretch before hardening off. Steam in the oven and subsequently on the surface of your loaves helps keep that skin pliable and stretchy during baking. If your dough dries and bakes too quickly on the exterior, it can harden off before it rises to its full potential (and you may not see a satisfying gringe, either).
So how can we get enough steam in the oven to keep those loaves rising? There are indeed methods abound, and each person has a different approach, but arguably the most popular choice at the moment, and the one I started with, is baking bread in a Dutch oven (see my guide on how to bake bread in a Dutch oven if you’re not familiar). However, there comes a time when you might want to bake two (or more) loaves at a time, or perhaps your loaves are scaled more substantial than your Dutch oven can comfortably hold. An alternative is to bake directly on stones and generate sufficient steam in your home oven by some other clever means.
Professional baking ovens have steam on tap. Press a button, and a wave of steam sprays over the decks of newly loaded dough (however, there are always challenges, no matter what oven you use). Now there are home ovens that are “steam ovens,” but the ones I’ve looked at are incredibly small. You might be able to fit two loaves, but I could also fit two Dutch ovens in my current home oven; no advantage there. Some other alternatives can’t inject steam at a button press, but they are sealed to trap steam and have a method for generating steam. These look very promising but are on the expensive side.
Since most of us bakers out there do not have one of these fancy ovens, we have to make do—read on to learn how baking bread with steam in your home oven can be a straightforward process.
Video on baking bread with steam
In the video below, you’ll see my baking bread with steam from start to finish.
Baking Steam Method
The following does take a bit of practice. First, ensure you get all your tools ready and within reach; this is a rather hectic process, and you want to do it almost without thought — muscle memory. The longer your oven door is open, the more heat will escape. Your thick baking stones or a baking steel (which is also awesome for sourdough pizza!) will help offset some of the loss, but you still want to act quickly.
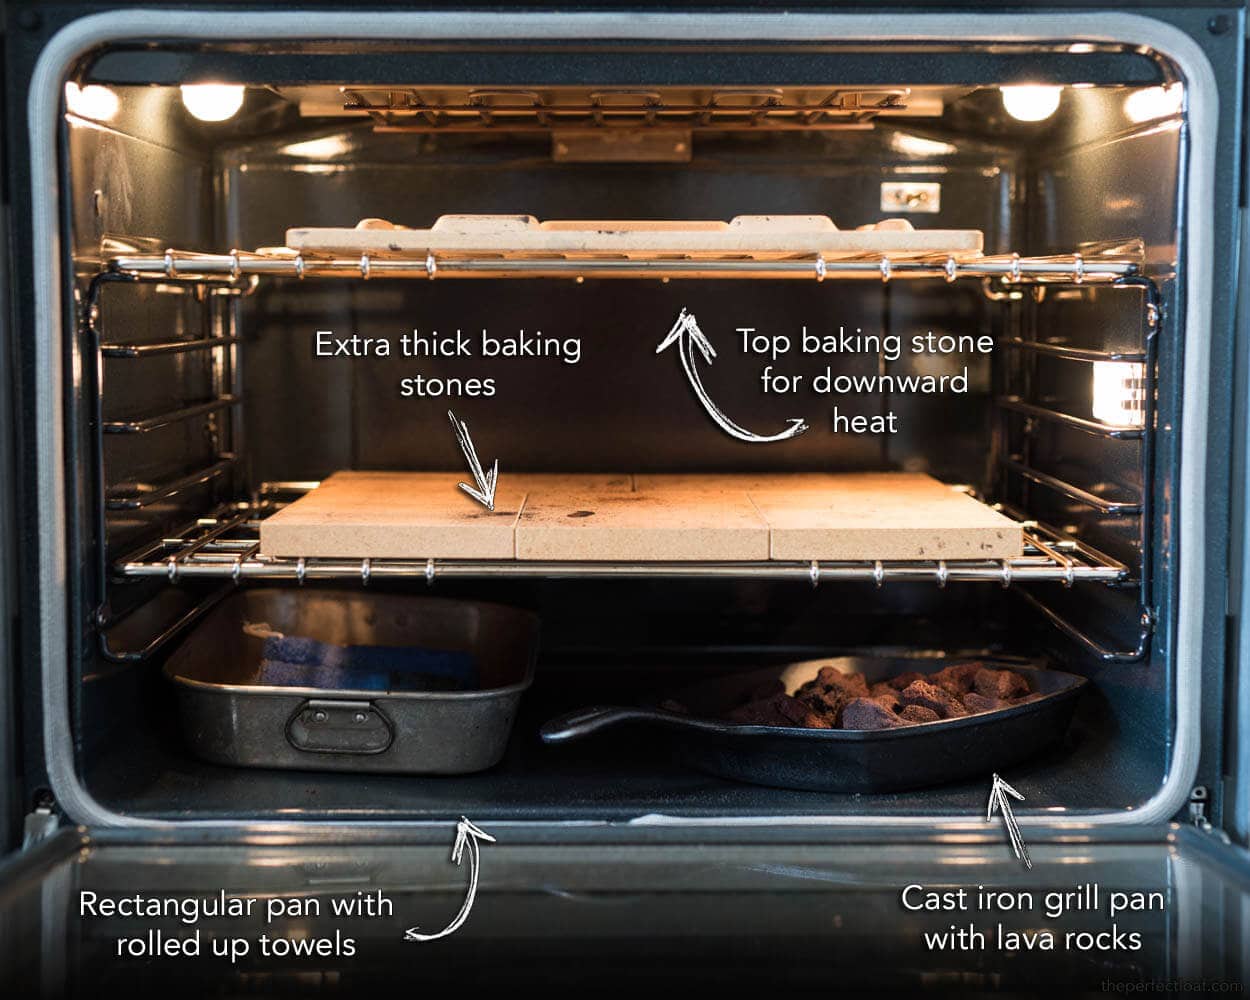
Below is a quick visual showing where I have my pans, where the loaded dough goes, and where my baking stones are.
Now that we have a list of what things we need, where items will be placed, and why, let’s get to the actual method (with the animated version below!).
Home oven steaming method
- An hour before baking, turn on your oven (preheat)
- 10-20 minutes before loading your bread, boil water, pour over the towels in your rectangular baking pan, fully saturate them, and place them in the back corner of your oven
- 10-20 minutes after loading the pan, put each mass of dough on a separate piece of parchment paper
- Place the dough and parchment underneath on a pizza peel
- Score dough
- Open the oven and slide the dough (with parchment) onto baking stones
- Quickly lay a towel on the oven door glass (optional; you can see me doing this below). I’ve read that cold water dropped onto a hot oven glass door will shatter the glass, thus the towel. I have dropped some water on the oven door without any ill effect, but I do this to be safe.
- Carefully toss 1 cup of ice into your cast iron pan with lava rocks
- Quickly spray loaves a bit with a hand spritzer (optional)
- Close the oven door and watch your dough rise
- 20 minutes later, remove both steaming pans (careful these are extremely hot) to stop steaming
- Bake as usual until done
Whew, that’s it! Here is the whole process (minus the preheating and drenching of towels) in one trendy baking-with-steam GIF:
Why do we use two sheets of parchment paper for our dough? When you use two sheets, you can adjust the space between the loaves as they bake, if necessary. One of the worst things to happen is when the dough expands and joins with another loaf; this reduces the overall rise of both loaves. If you notice the loaves start to get a bit close as they rise, quickly slide them apart.
After 20 minutes of baking, we remove the cast iron and rectangular baking pan, so no more steam is generated, allowing your loaves to crisp up and harden off.
Caution: Please be careful with this method: if you drop too much cold water on your oven door, you might crack the glass. I have never had this happen to me, but I know of at least one baker who had this issue. Be sure to keep the water off the glass.
Another approach to baking bread with steam
Baking bread in a sealed post is possibly the easiest method of baking bread with steam at home. You place your dough in a preheated pot, close the lid, and put that in your oven.
That method works incredibly well, but the drawback is you can only bake round loaves this way. You’re limited to the realm of round pots.
If you’d like to keep using a Dutch oven, see my post on how to avoid burning your loaves →
Tools for Steaming Home Oven
We first need to have the right set of tools for the job. Let’s go over a few more additions to our home-baking arsenal:
Lava rocks
The first is a cast-iron pan filled with lava rocks. Other materials will work just as well here: (clean) nuts and bolts, a metal chain, or any other heat-retentive material that will increase surface area. Keep in mind whatever the material needs to be able to withstand around 525ºF and water splashed onto it.
Lava rocks are a primo choice because they get extremely hot, don’t break down easily, and have tons of jagged sides and crevices for an incredible increase in surface area. What’s the big deal about surface area? As cooler water comes into contact with a blisteringly hot surface, it instantly turns to steam. The more hot surface area you have, the more steam you generate. I found these lava rocks, specifically made for home BBQ grills, and they have turned out to be a perfect choice. They come in a fairly large bag, and I am still on my first handful — I probably have lava rocks for life.
Roasting pan
The second component is the heavy-duty stainless steel pan I use to hold the lava rocks. This stainless steel pan is great for a few reasons: it’s super thick-walled, retains heat well, and holds up to abuse.
Rectangular baking pan
The last component is an old rectangular baking pan with small dish towels rolled tightly. I use an old pan around the kitchen and roll up three small towels in the center. The more towels you add, the more steam you’ll generate. I use cheap, clean towels as these will eventually get scorched and need replacing.

Ten to twenty minutes before you start baking, you will boil some water and pour it over the towels in the rectangular pan, so they are fully drenched and steaming. You will then place this pan with towels back inside your oven. This pan will saturate the interior with steam before you even splash water on the lava rocks and will continue to do so well into the bake.
Optional Hand Spritzer
The final item is optional. A stainless steel hand spray bottle I use to spray in a bit more steam just before closing the oven door. I like to have the option to spray in a bit more steam if I feel it is warranted. Additionally, you could use this after 5-10 minutes into baking to quickly saturate the oven inside one more time. Some bakers, like Jeffrey Hamelman in Bread, recommend this second round of steaming in a home oven.
Not many new tools are needed, and if you think about it over the long run, you will probably save money as now we can bake 2-4 loaves at a time — no more wasting all that space in the hot oven. How do we do this now that we have the tool requirements squared away?
Conclusion
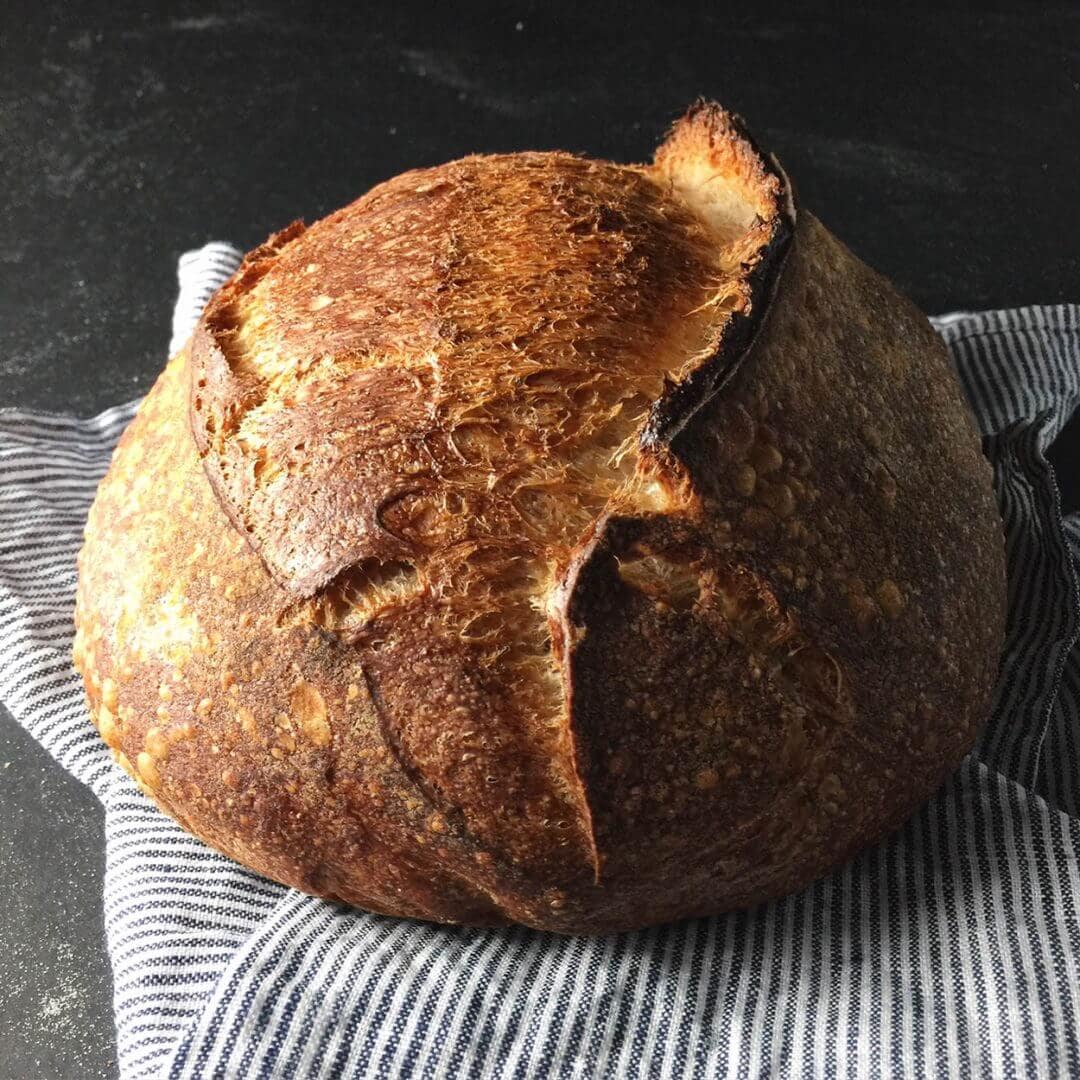
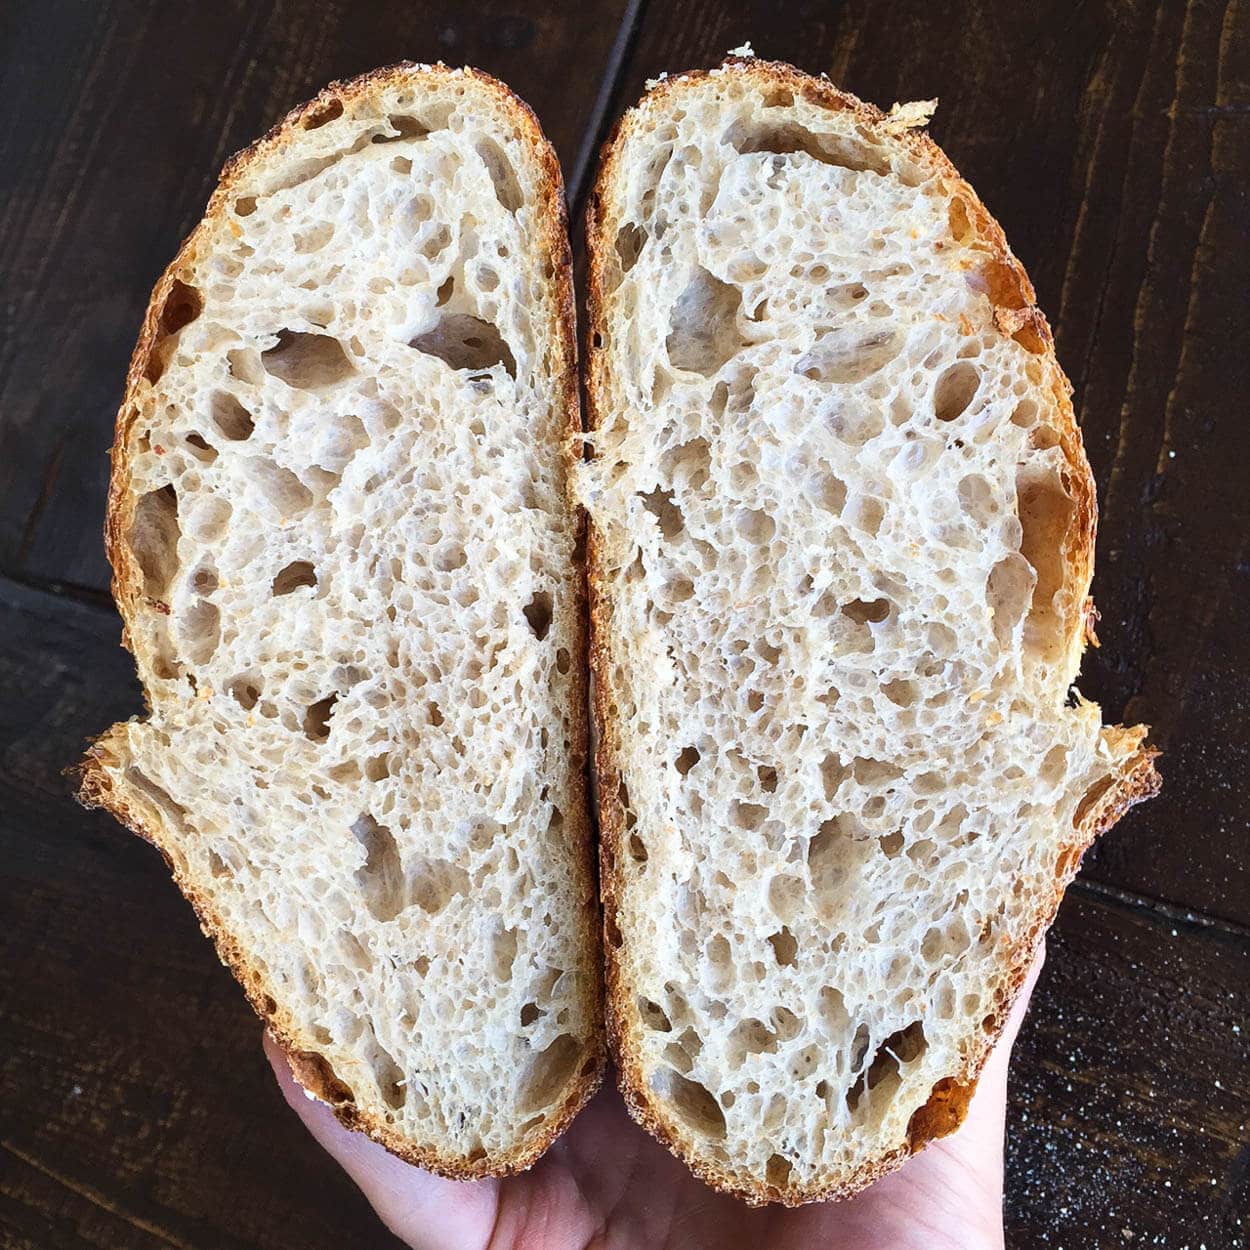
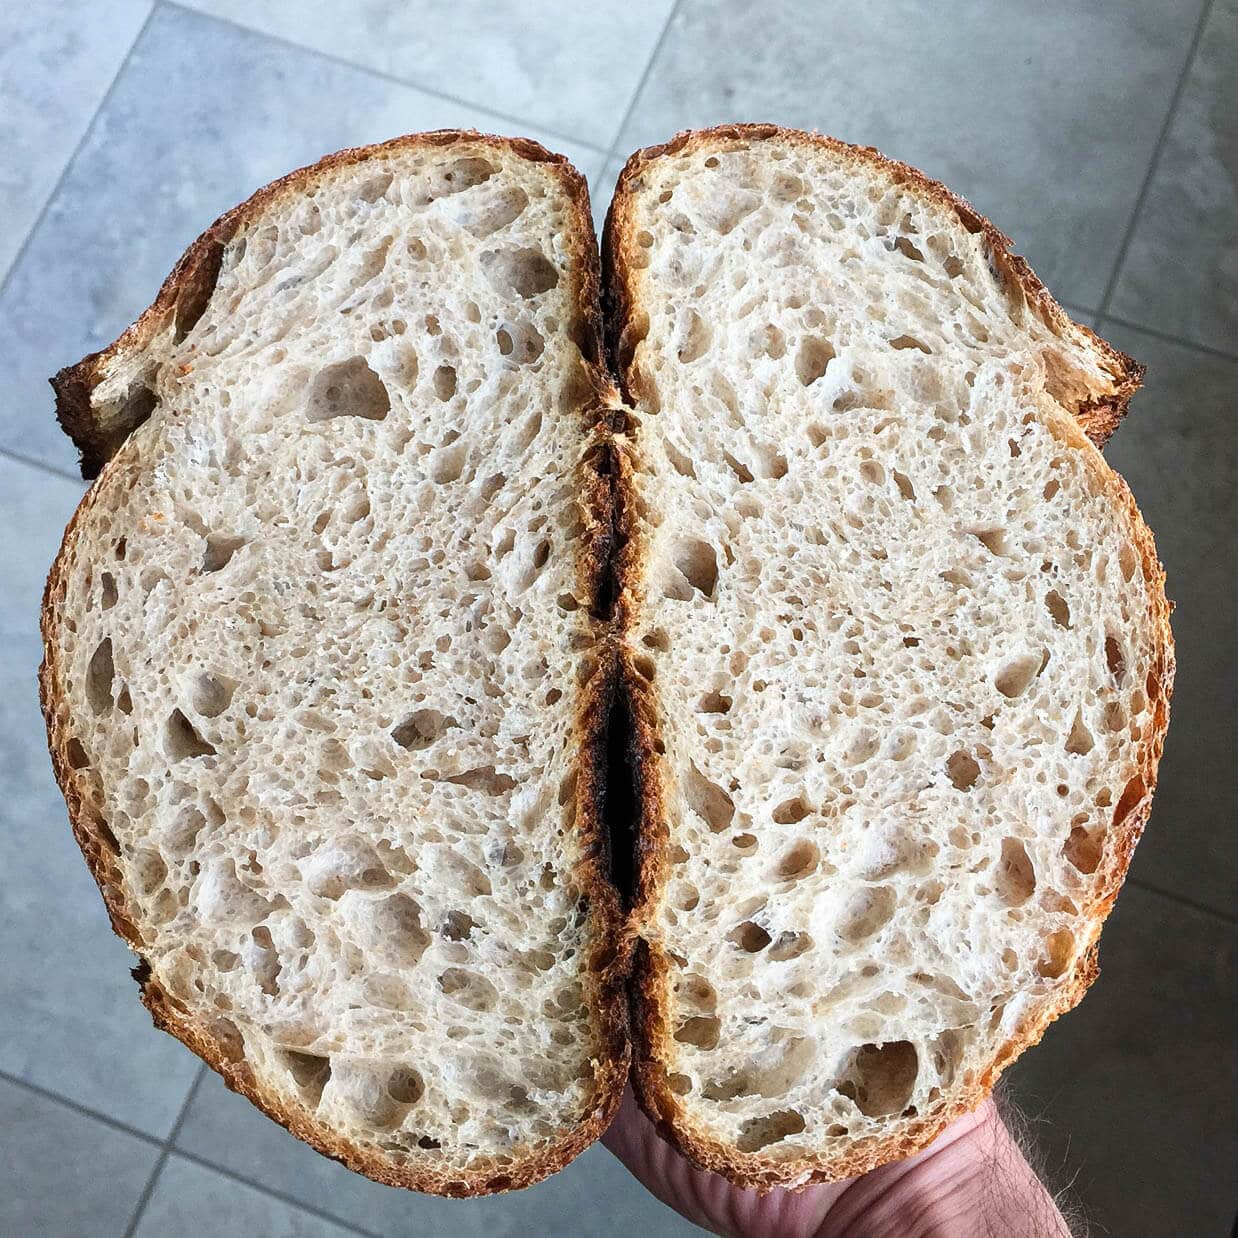
I like this method for baking bread with steam in my home oven because it allows me to cook two large loaves of bread at a time. I plan to bake four loaves at a time, and this will let me do that with no problem. Baking with a Dutch oven (or combo cooker) works exceptionally well, and I might still use that method if doing only a single loaf or a highly hydrated one (the pan will help keep the dough together). Still, I find myself using this new method more and more. The results have come out smashingly.
Small steam burns: worth it (as you can see below).
What’s Next?
Be sure to check out my full guide to baking bread at home for more details on this important step!


423 Comments
I would try using the oven if it works well! Yes, I’d go 20m with steam in there, too.
Jealous of that proof option!
Hello Maurizio! I usualy bake in a dutch ove , but decided to try this method today! I preheated the oven to 240, and baked 20′ with steam and a little hand spritzer, and then 20′ without! The crust turned out to be very thick and a bit hard! Any suggestions? Should there be more steam or the temperature was high?! Thanks
Hey, Michael! You likely need a bit more steam in the oven than you were doing, which will help keep it thinner!
How do you care for the cast iron pan that holds the lava rocks? Mine is rusting something fierce and from what I can find, that’s just the result of boiling the water; it strips the finish every time.
Sadly, yes, this is an issue with cast iron. Lately, I’ve actually switched to a stainless steel pan instead of the cast iron. It, too, get’s a little ruined over the long haul, but much less so than the cast iron!
Good grief, you can buy a bamboo steam cooker for $40
Not sure this would bake a great loaf of bread, though 🙂
Hi Mauricio! Love your website, great resources and instructions! I baked my first ever loaf of sourdough using your easy recipe for sourdough in the start here section of your website. It came out pretty good looking, however it was dense and had a slight sour aroma. How can I improve my technique? Thanks and congrats!
So glad to hear that, Sandra! Happy to have helped. It’s hard to say, it might have been that your loaf was over proofed if it was very sour and didn’t have much rise. Try to follow the pictures and guidance regarding temperatures in the post—especially temperature!
I’m a bit concerned with the lava rocks. My bag says the rocks give off carbon monoxide which is a gas that can kill you. What are your thoughts please.
The ones I use (listed above) state that they’re safe for use in a grill or other culinary applications. The bag I have didn’t have this warning!
You’re welcome, Mark! And yea, the top stone can help, but it really depends on your oven!
Hi Maurizio,
Thanks for all the information on your great blog! As it comes to steam I use the Desh Stoom in my home oven. It’s invented by a Dutch baker and is easy to use and works very well.
Greetings from Holland, Wendy
https://stoom.store/nl/
You’re very welcome, Wendy! That looks very interesting, I’ll have to pick one up. Happy baking!
Desh Stoom doesn’t seem to ship to USA locations. If you were successful would love to know how/where you purchased. And your impressions of the product? Thank you!
The Desh Stoom is so cool! Wish we could get them shipped to the US.
Dear Maurizio,
First of all THANK YOU VERY MUCH for your great blog. I love everything here and your recipes enriched my life in so many ways. I read through this part only yesterday because I rather spontaneously decided to bake two loafs at once. So you can imagine I don‘t have all the equipment handy you described up there. Therefore – and I don’t want to undermine your for sure very good technique – I just simply used my tarte-pan filled with water underneath the backing tray. No baking stones, no lava stones, no Hand-Spritzer. I removed the pan filled with water after 20 minutes (like you recommended). Everything worked just perfectly. To clarify I made your potato bread (which might just have the perfect hydration grade) and also I live in the middle of Europe and the climate is for sure very different here. Maybe all that helped to get a good result with very simple equipment.
Again thank you and please continue your wonderful webpage.
You’re welcome, Stefanie! Glad to hear my site has helped. And you’re absolutely right, steaming the oven can be done with a much more streamlined approach without the need for many pans or other items. I find my approach gives the dough a little more shine and crispness, but it’s not 100% necessary. A pan with some water or ice cubes is all that’s needed. Thanks for the comments and happy baking!
Hi Maurizio! I love your site and the generous amount of information you share. i’m transitioning to steam bakes on a steel. Yesterday was my first bake using your method except I used the lowest rung for the base of a combo cooker filled with lava rocks, worked perfectly. I would like to put the cast iron on the oven floor and steel above it on the sliding rack. Will placing the steam vessel directly on the floor damage it? It would be easier to pour the water onto them with a lower chance of splashing on the glass door. Thank you
Super glad to hear that, Susan! In my oven, I put the pan directly on the floor, but my oven does not have exposed heating elements on the bottom as some ovens do. So I can say if you don’t have coils on the bottom, it’ll work just as well!
I have wall, double ovens with the elements on the top. Super excited to experiment again because the last loaf was a perfect loaf, from the exterior and the crumb. I will tag you on IG. Thank you for your quick response and all that you do!!
Ok, great! Happy to help, Susan 🙂
I am wondering if you have any suggestions for adding steam to a convection oven (commercial) in which the fan cannot be turned off? I’m baking for a small restaurant and this is our only oven.
Ahh, that’s a tough one. If it were me, I might consider baking in pots (Dutch oven, etc.) if the fan and venting couldn’t be subverted…
Thank you so much for this great article! 🙏 I’m a home baker and been doing it for a while using DO, but now more people are asking/ordering my bread, so it’s seems like I’m moving towards a bigger operation here rather than just few loaves for family, so I’m really hoping your method will do wonders and I’ll be able to bake more than 2 loaves at a time 🤗
However, I have a question before I purchase all the components required. I have a GE gas oven which is with vents at the bottom of the oven and expels large amount of air (I learned that hard way – some butter from the cake dripped to the bottom and the amount of smoke coming through the vents was unbelievable! 😱).
So do you think this method be sufficient this type of oven or would I need to cover these vents somehow?
Hey there! You’re very welcome. Hmmm. If your oven has those vents than yes, it’s likely too much steam will leave the chamber. It’s possible my method might still be enough to get some good rise, but a sealed oven is definitely best, although I know that’s typically not the case for home ovens (mine is not).
You might be better off baking in a DO or something similar!
Laima-I have 3 ovens (a gas and a double electric) that have the vents. I add enough water using just the cast iron skillet and boiling water immediately after putting the loaves in and the oven still holds a lot of the steam despite what I see escape it. When I open it 12-15 min later I’m hit in the face with that wet heat so be careful. Good luck!
Hallo Maurizio,
I have a question regarding the lava stones- is there any kind of danger using them in the stone? i read somewhere that the oven glass can get cracked.
my second question- is this method is better than just putting a tray with boiled water on the bottom? whenever i shape a Batard it comes out stiff and nice from the fridge, but than in the steam baking method (only tray with water) in turns flat like pita.
Cracking in the oven is usually if too much cold/cool water gets on the hot glass of the oven door. Be sure to avoid that!
I’ve found a single tray with ice cubes to work really well also, but adding in the towels does seem to take it one step farther. I wouldn’t say it’s mandatory, but it does add more sustained steam through the bake.
Hi Maurizio,
What stone do you use on top? Or it could be any baking stone?Thanks,
Arthur
These days, I actually bake without that top stone. I’ve found my oven does a good enough job with top heat as it is. If you want to use one, any baking stone (or baking steel) will work fine there.
Hello! First of all, thank you soooooo much for making our baking lives so much easier! I recently started a home-based bakery and I’ve been selling my loaves to a very loyal group of customers and I am somehow happy with what I have achieved. However, these past few weeks I noticed inconsistency in the end result, some of my loaves were not rising enough, the scoring was not coming out as aesthetic as before, etc. So I decided to do some research and I came across your blog. Let – me – tell – you, oh boy have you changed my baking perspective! I have just tried the steaming home-oven technique and this is by far the best technique I’ve ever tried. Thank you sooooo much!!!
You’re very welcome, Roman! Congrats on the new baking venture, something I’d love to do myself in the future as well 🙂 Hope my site helps you on your journey and happy baking!
Wow. Everytime I visit your site I learn something new and feel like I’m refining my skills! I would like to move on to batard shapes but without buying much more equipment. I have several cook top cast iron griddles. Can I bake my batard on those (under parchment paper) or do I use those as a heat retention tool?
Those should work!
Hello! Thanks for all the info here! More than helpfu!…Just a question: What should the oven temperature be for baking with steam? Before and after removing the steam sources (stones and towels)?
You’re very welcome! I typically stick to 450°F at all times for most bread.
Thanks for this information! I have a question about your steam oven setup vs a dutch oven. Is the only benefit to the steam oven setup the capability to bake more than on loaf at a time? Or should this setup produce a better oven spring? I’m getting a decent crumb on my sourdough loaves using a dutch oven, but not quite as open as I’d like. Would this method be likely to improve the open crumb?
Mostly it’s to bake more than one loaf t a time, but also to bake different shapes (e.g., batard, baguette, ciabatta, etc.). It does result in really nice spring, but you can get that with a DO also!
Ciao Maurizio, I am very eager to use steam in my oven and branch out from my sweet antique Dutch oven, but my oven has elements in the bottom. I bought the lava rocks and a wonderful baking steel and am excited about using my batard banneton and trying a number of other recipes, but am stuck trying to figure out where to put the lava rocks and towels… Any suggestions? Thanks! Can’t wait to try your Bomboloni once I have a little more time. 🙂
Hey, Kiki! If you have a heating element exposed on the bottom, place an oven rack at the lowest rung just above that. Then, place another a rung or two up from that so you can slide in the pan 🙂
Hi Maurizio!
I’m a little late in the discussion here but I have a question. I, like many others, am waiting for my Rofco B40 to arrive. I have in my possession, however, the 3 steam pods that go with it. I was thinking of trying to incorporate them into this method of adding steam to my home oven. Have you or anyone else tried this? If so, would they replace both pans or just one? Which one? How much water should I pour into them?
Also, I am stuck with a gas oven, which I usually love, but it has an extra-large chimney opening in the top, like 5″X5″. It seems like the steam just goes right up and out of it. Any thoughts on restricting it in some way, like with foil perhaps?
Thanks in advance, and thank you for all you do. You are my main man!
I have not used them in my home oven but have wanted to, it should work really well. I’d probably start with one on the side, but a second could be great, too. It’s hard to say how much water to pour in. Ideally, you want to pour in just enough so it stops steaming after about 20m, but even if it kept going it’s ok, just open the oven door to vent and it should all dissipate.
I’m not sure on blocking that pipe. I’d be a little skeptical to do so… I don’t know!
Given the fact that your Rofco is coming, I might just try with one or two steam pods and see how it goes. If it were me, I’d probably stick to using a Dutch oven or large roaster instead of modding my oven, since the Rofco will be here at some point!
Hope that helps 🙂
Thanks Maurizio!
Hi!
I’ve been making your sourdough bread with a young levain the past year. Since I wanted to make a larger batard rather than a round, I had to use something other than my round dutch oven. In the far corner of my kitchen cabinet was a rarely used, large graniteware roaster with a deep, handle-free lid. This is what I almost exclusively use now, carefully placing my scored batard inside using parchment paper, putting the lid on and placing the whole thing in a 500F oven. The enameled tin is thin, so it doesn’t need preheating like my dutch oven. After 25 mins I turn heat down to 450F and remove the lid, and since both pan and lid are very deep I never had issues with the lid lifting, but have had beautiful rise and ears and perfect crispy crust (but not too thick as I sometimes think is the case in the cast iron Dutch oven). I also make sure to use corn meal on the bottom of the batard so the bottom doesn’t burn from the 500F heat. Since I don’t have an oval banneton and the lid has ridges and no top handle, I often put the shaped dough in the lid (with towels supporting the sides) for the overnight fridge proof, using the pan as a cover.
Best of all, I didn’t have to spend money, but if you don’t have a roaster like this it could cost you as little as $20.
That’s something I wish I had when I first started baking. In fact, I tried many roasters over the years and they all weren’t large enough. That’s a great option if you have one big enough!
Hello (again), Maurizio! I decided to treat myself to a baking steel, so am now trying to figure out the best way to set up my steam. I’ve got a cast iron pan, and typically in the past have just put water directly in there. I was wondering if you have ever heard of using leca (expanded clay balls for hydroponics) instead of the lava rocks? I think it should work, and have a ton of those…
I haven’t heard of using those! As long as their oven-safe and won’t impact the bread baking in any way (smoke, etc.), should be fine!
Hi Pam,
DId you manage getting enough steam from LECA (clay balls)? I have a bunch of them in a cast iron pan in the oven right now pre-heating with some water and I find they’re not generating much steam. Now I’m having second thoughts loading my loaf 🙁
I haven’t done it the right way, so I don’t have anything to compare them to… but I threw water on them after loading the loaf and it seemed to work?
Hey Maurizio, excellent information. I have a steam cleaner that I use for my tile floors. It has different attachments and I could use one of them to inject steam into the oven. I would of course have to open the oven door to accomplish this. I’m just wondering if one injection of steam from this device would be enough steam for the entire bake since. The steam does shoot out at about 60 psig when the steamer is fully charged so I could get a fair bit of steam in there. I see recommended about 1 cup of water added to a pan with lava rocks, so one good inject from the steam cleaner would no amount to 1 cup of water, but it would be a lot of steam. This is the steam cleaner that I have https://www.myvaporclean.com/products/vapor-clean-ii-298-single-boiler-65-psi-4-5-bar-made-in-italy/?gclid=Cj0KCQiA_qD_BRDiARIsANjZ2LCAQNTSY7P5or1ZnbpE_4zAQfHDqWkiinsGxlqycZ8DqvrC-A2RAjQaAjVOEALw_wcB
Thanks! That looks like a great way to steam the oven. I’ve thought about picking one of these up to test, a few others have reported using similar steamers to bake with great success. I’d imagine if you’re getting good rise and a nicely colored crust, that’s doing the job just fine!
Hey Maurizio, thanks for all your info. I was wondering how you steam in your Rofco. I have the smaller version of the B40 and the steaming pans use a lot of space. Thanks.
Hey there! You’re very welcome. Check out my guide to using a Rofco oven for all the details on how I use it!
Thank you so much. Really helpfull
I have not used it but have heard of that function. If I could, I’d probably get it! The key would be to be able to steam however much you’d like—if you could steam at the press of a button that would be great.