
Steam burns hurt. Like, really hurt. The small mark on my left forearm begs the question daily: Maurizio, was it worth it? But before we talk about my new baking badge of honor, let’s concentrate on overcoming the challenges of baking good bread at home. While many of these challenges present themselves early in the two-day process (fermentation, flour selection, mixing, shaping, and so on), there is that crucial component at the end of this ordered procession: baking bread with steam in your home oven.
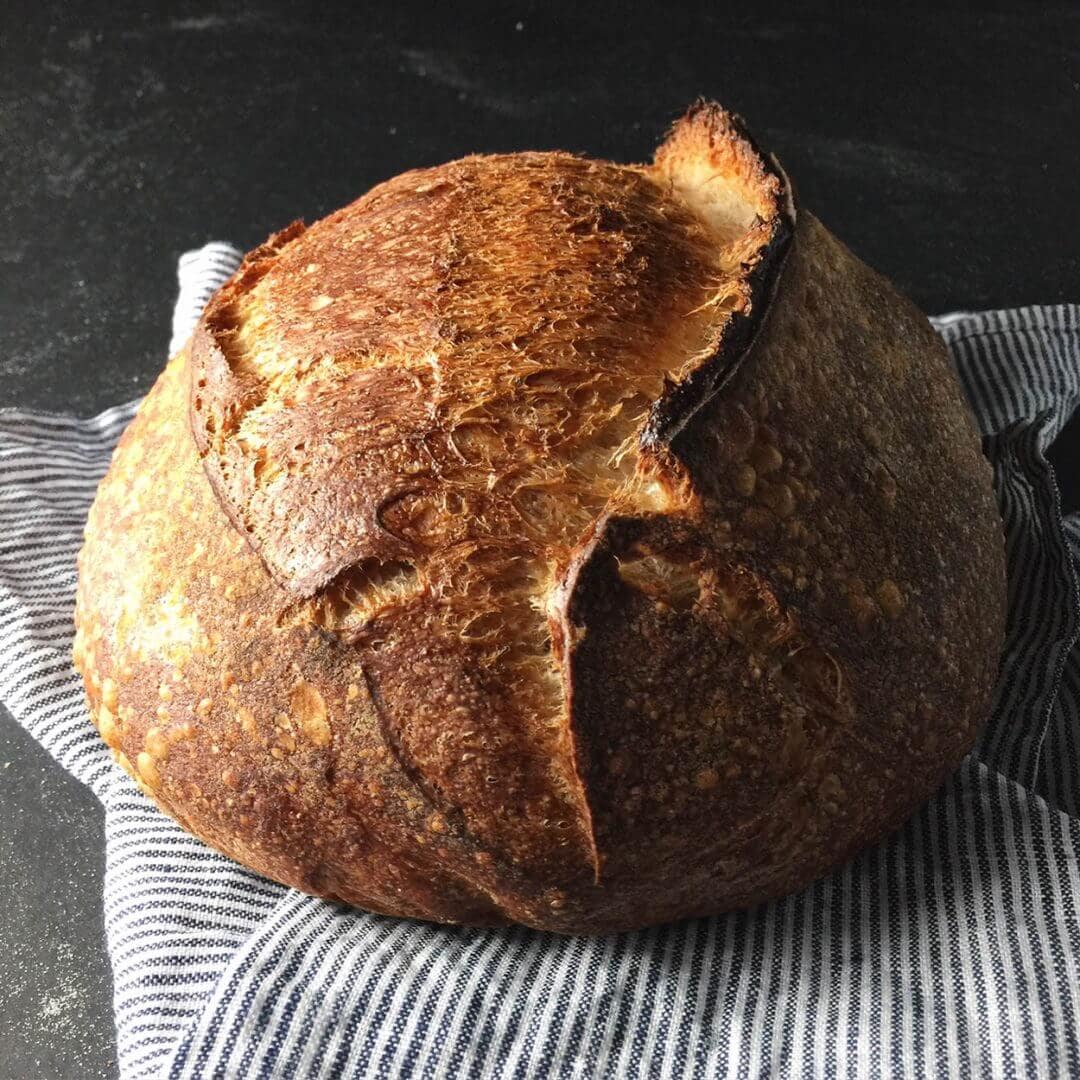
For your bread to rise to its potential, that outer, taut skin on your loaf needs to be able to expand and stretch before hardening off. Steam in the oven and subsequently on the surface of your loaves helps keep that skin pliable and stretchy during baking. If your dough dries and bakes too quickly on the exterior, it can harden off before it rises to its full potential (and you may not see a satisfying gringe, either).
So how can we get enough steam in the oven to keep those loaves rising? There are indeed methods abound, and each person has a different approach, but arguably the most popular choice at the moment, and the one I started with, is baking bread in a Dutch oven (see my guide on how to bake bread in a Dutch oven if you’re not familiar). However, there comes a time when you might want to bake two (or more) loaves at a time, or perhaps your loaves are scaled more substantial than your Dutch oven can comfortably hold. An alternative is to bake directly on stones and generate sufficient steam in your home oven by some other clever means.
Professional baking ovens have steam on tap. Press a button, and a wave of steam sprays over the decks of newly loaded dough (however, there are always challenges, no matter what oven you use). Now there are home ovens that are “steam ovens,” but the ones I’ve looked at are incredibly small. You might be able to fit two loaves, but I could also fit two Dutch ovens in my current home oven; no advantage there. Some other alternatives can’t inject steam at a button press, but they are sealed to trap steam and have a method for generating steam. These look very promising but are on the expensive side.
Since most of us bakers out there do not have one of these fancy ovens, we have to make do—read on to learn how baking bread with steam in your home oven can be a straightforward process.
Video on baking bread with steam
In the video below, you’ll see my baking bread with steam from start to finish.
Baking Steam Method
The following does take a bit of practice. First, ensure you get all your tools ready and within reach; this is a rather hectic process, and you want to do it almost without thought — muscle memory. The longer your oven door is open, the more heat will escape. Your thick baking stones or a baking steel (which is also awesome for sourdough pizza!) will help offset some of the loss, but you still want to act quickly.
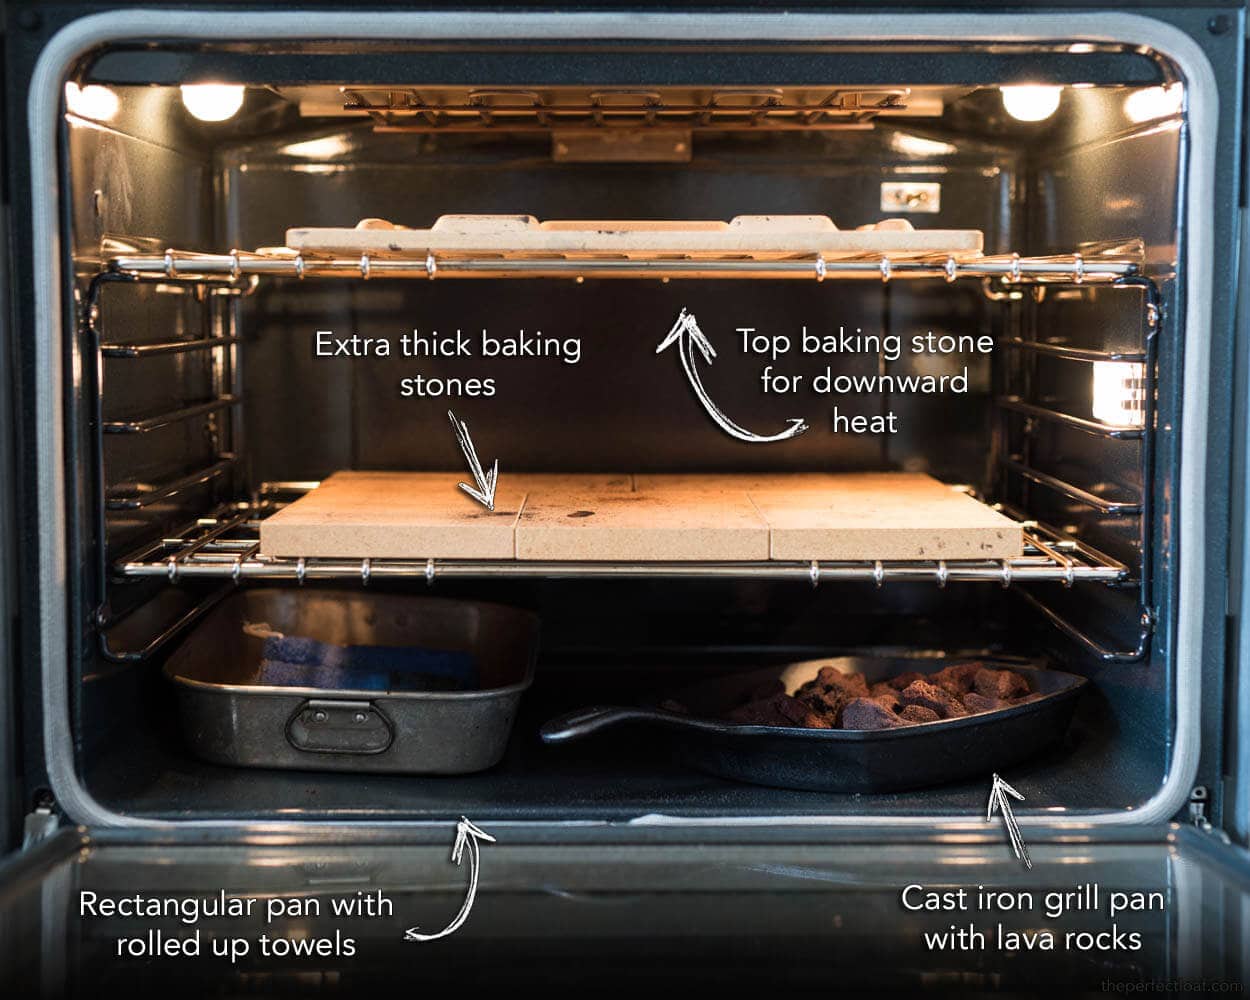
Below is a quick visual showing where I have my pans, where the loaded dough goes, and where my baking stones are.
Now that we have a list of what things we need, where items will be placed, and why, let’s get to the actual method (with the animated version below!).
Home oven steaming method
- An hour before baking, turn on your oven (preheat)
- 10-20 minutes before loading your bread, boil water, pour over the towels in your rectangular baking pan, fully saturate them, and place them in the back corner of your oven
- 10-20 minutes after loading the pan, put each mass of dough on a separate piece of parchment paper
- Place the dough and parchment underneath on a pizza peel
- Score dough
- Open the oven and slide the dough (with parchment) onto baking stones
- Quickly lay a towel on the oven door glass (optional; you can see me doing this below). I’ve read that cold water dropped onto a hot oven glass door will shatter the glass, thus the towel. I have dropped some water on the oven door without any ill effect, but I do this to be safe.
- Carefully toss 1 cup of ice into your cast iron pan with lava rocks
- Quickly spray loaves a bit with a hand spritzer (optional)
- Close the oven door and watch your dough rise
- 20 minutes later, remove both steaming pans (careful these are extremely hot) to stop steaming
- Bake as usual until done
Whew, that’s it! Here is the whole process (minus the preheating and drenching of towels) in one trendy baking-with-steam GIF:
Why do we use two sheets of parchment paper for our dough? When you use two sheets, you can adjust the space between the loaves as they bake, if necessary. One of the worst things to happen is when the dough expands and joins with another loaf; this reduces the overall rise of both loaves. If you notice the loaves start to get a bit close as they rise, quickly slide them apart.
After 20 minutes of baking, we remove the cast iron and rectangular baking pan, so no more steam is generated, allowing your loaves to crisp up and harden off.
Caution: Please be careful with this method: if you drop too much cold water on your oven door, you might crack the glass. I have never had this happen to me, but I know of at least one baker who had this issue. Be sure to keep the water off the glass.
Another approach to baking bread with steam
Baking bread in a sealed post is possibly the easiest method of baking bread with steam at home. You place your dough in a preheated pot, close the lid, and put that in your oven.
That method works incredibly well, but the drawback is you can only bake round loaves this way. You’re limited to the realm of round pots.
If you’d like to keep using a Dutch oven, see my post on how to avoid burning your loaves →
Tools for Steaming Home Oven
We first need to have the right set of tools for the job. Let’s go over a few more additions to our home-baking arsenal:
Lava rocks
The first is a cast-iron pan filled with lava rocks. Other materials will work just as well here: (clean) nuts and bolts, a metal chain, or any other heat-retentive material that will increase surface area. Keep in mind whatever the material needs to be able to withstand around 525ºF and water splashed onto it.
Lava rocks are a primo choice because they get extremely hot, don’t break down easily, and have tons of jagged sides and crevices for an incredible increase in surface area. What’s the big deal about surface area? As cooler water comes into contact with a blisteringly hot surface, it instantly turns to steam. The more hot surface area you have, the more steam you generate. I found these lava rocks, specifically made for home BBQ grills, and they have turned out to be a perfect choice. They come in a fairly large bag, and I am still on my first handful — I probably have lava rocks for life.
Roasting pan
The second component is the heavy-duty stainless steel pan I use to hold the lava rocks. This stainless steel pan is great for a few reasons: it’s super thick-walled, retains heat well, and holds up to abuse.
Rectangular baking pan
The last component is an old rectangular baking pan with small dish towels rolled tightly. I use an old pan around the kitchen and roll up three small towels in the center. The more towels you add, the more steam you’ll generate. I use cheap, clean towels as these will eventually get scorched and need replacing.

Ten to twenty minutes before you start baking, you will boil some water and pour it over the towels in the rectangular pan, so they are fully drenched and steaming. You will then place this pan with towels back inside your oven. This pan will saturate the interior with steam before you even splash water on the lava rocks and will continue to do so well into the bake.
Optional Hand Spritzer
The final item is optional. A stainless steel hand spray bottle I use to spray in a bit more steam just before closing the oven door. I like to have the option to spray in a bit more steam if I feel it is warranted. Additionally, you could use this after 5-10 minutes into baking to quickly saturate the oven inside one more time. Some bakers, like Jeffrey Hamelman in Bread, recommend this second round of steaming in a home oven.
Not many new tools are needed, and if you think about it over the long run, you will probably save money as now we can bake 2-4 loaves at a time — no more wasting all that space in the hot oven. How do we do this now that we have the tool requirements squared away?
Conclusion
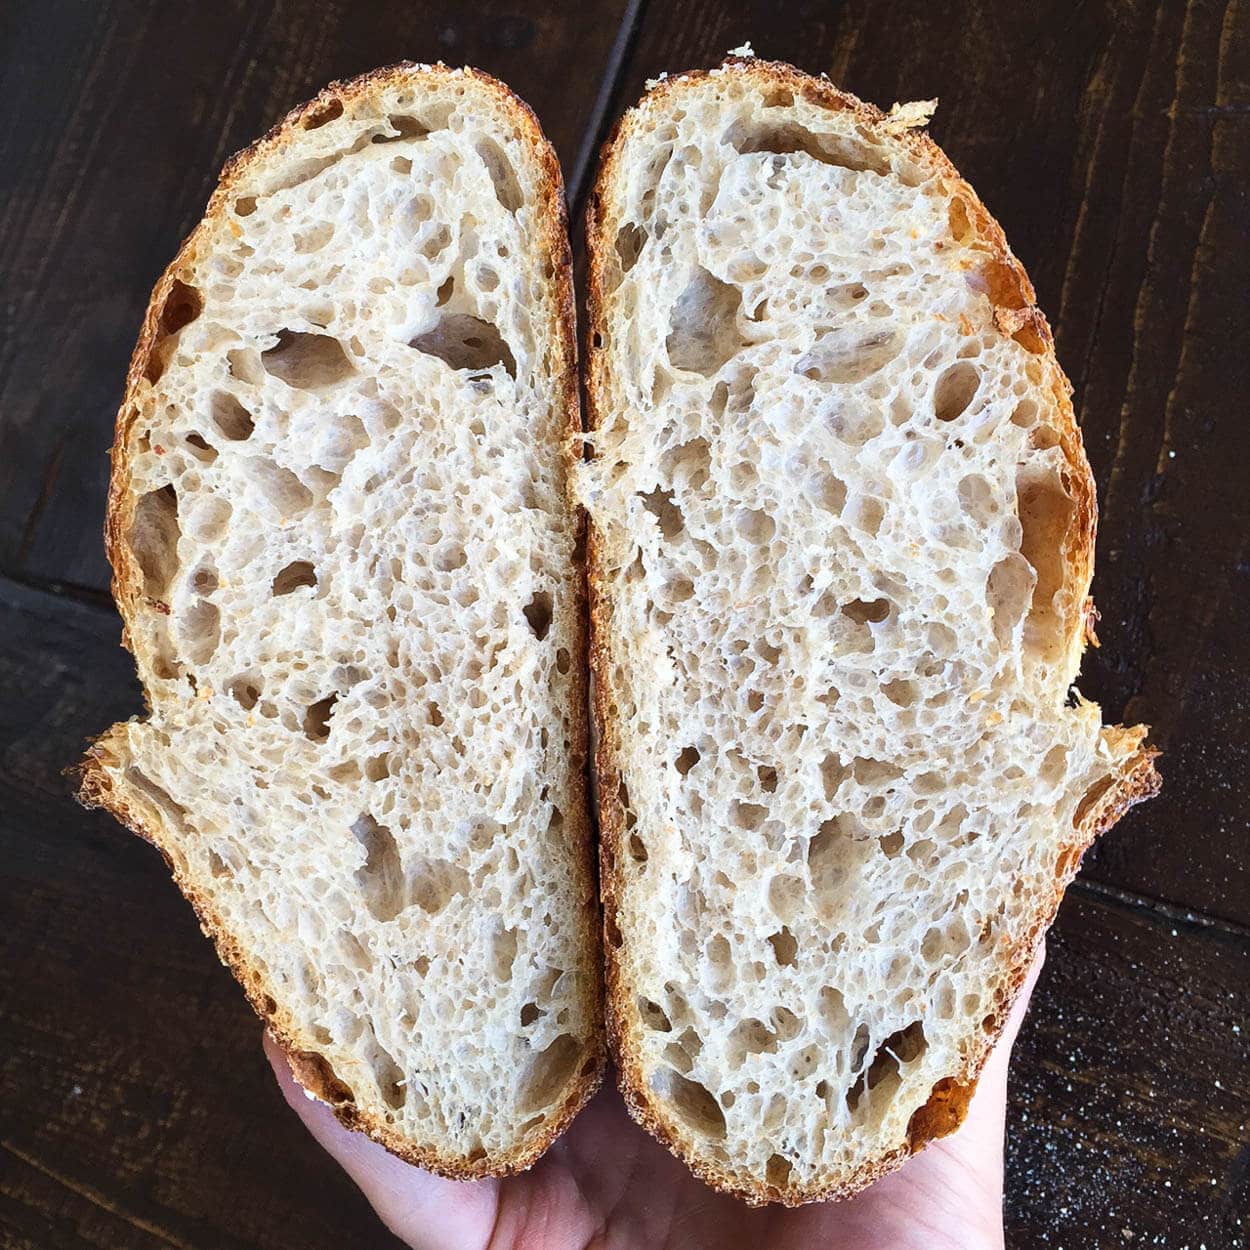
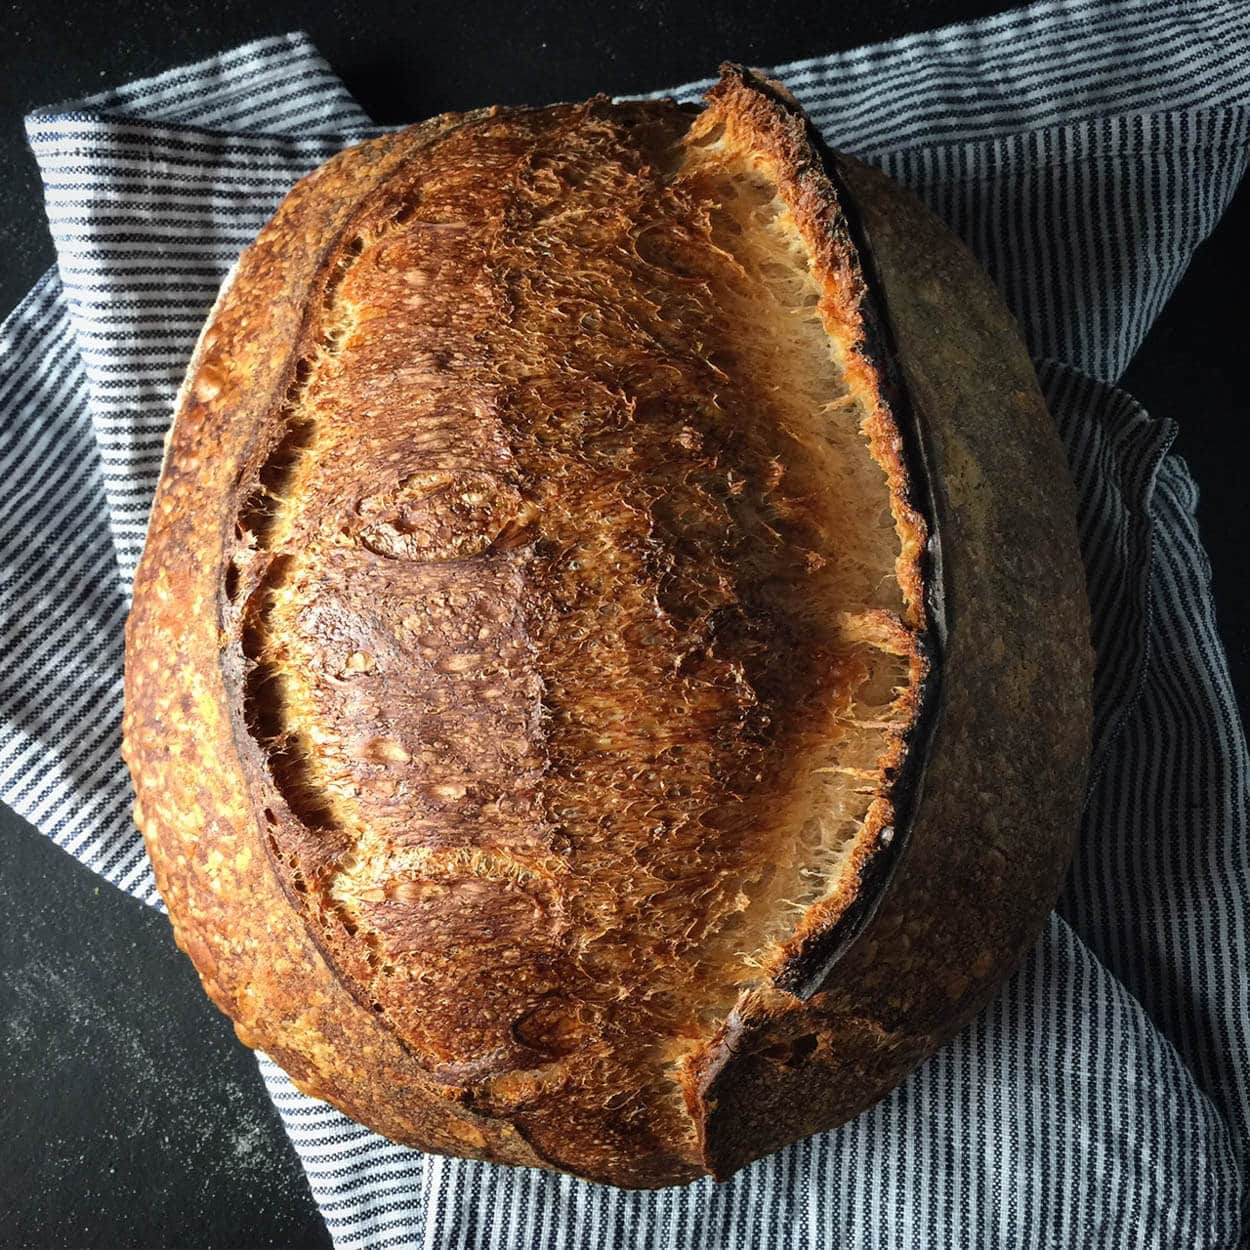
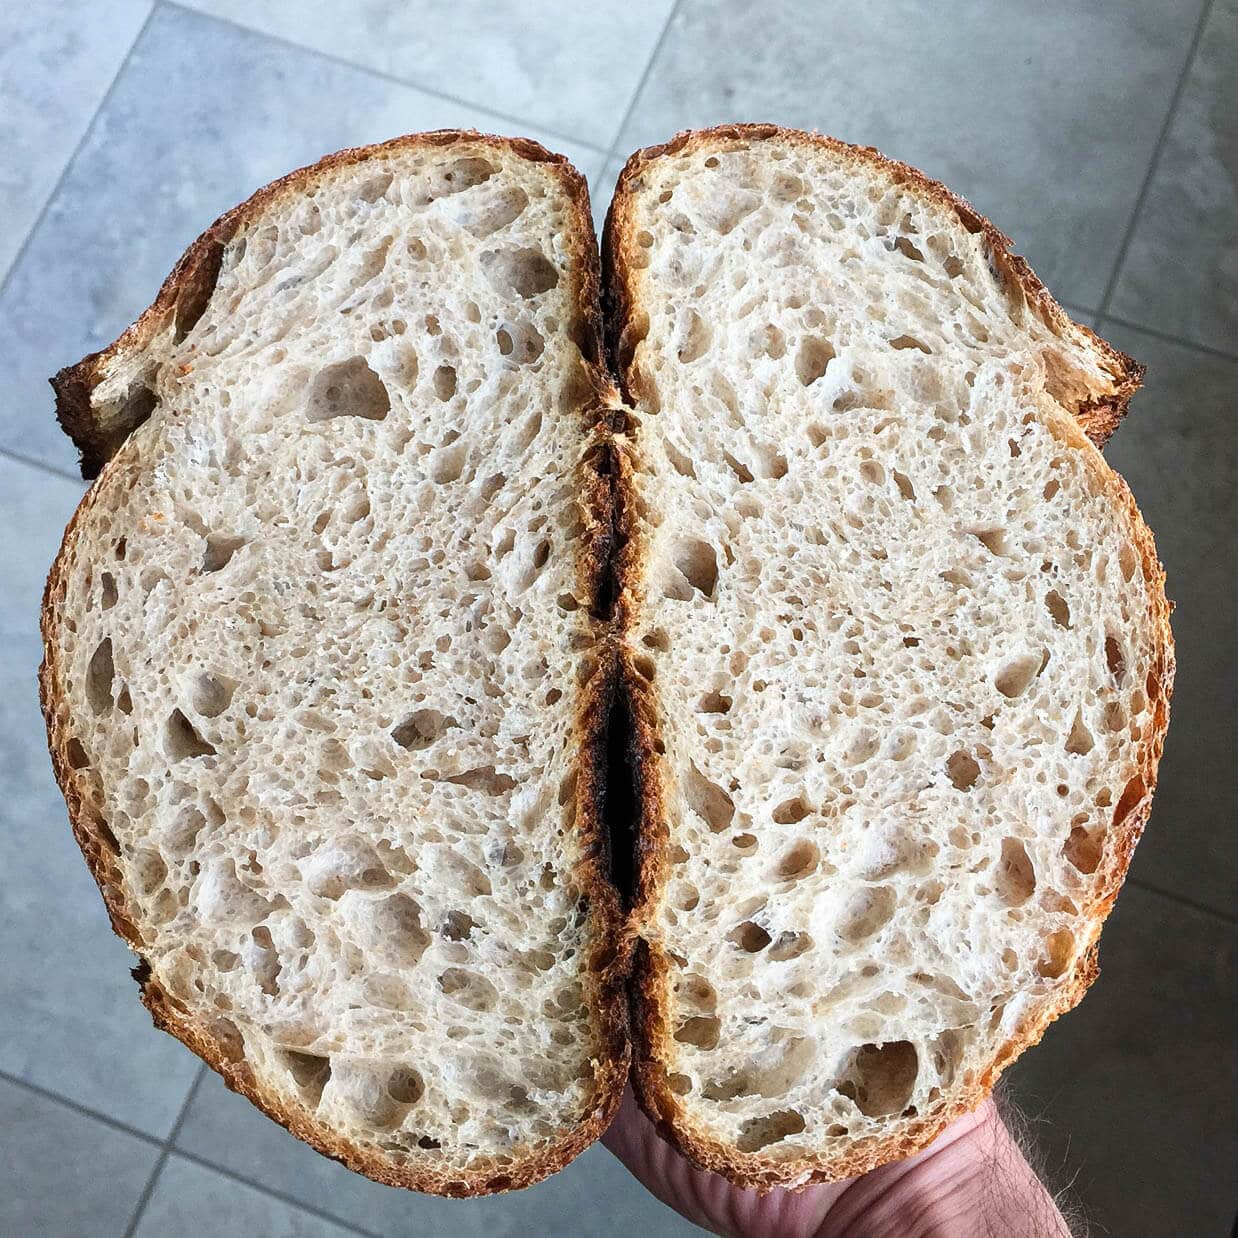
I like this method for baking bread with steam in my home oven because it allows me to cook two large loaves of bread at a time. I plan to bake four loaves at a time, and this will let me do that with no problem. Baking with a Dutch oven (or combo cooker) works exceptionally well, and I might still use that method if doing only a single loaf or a highly hydrated one (the pan will help keep the dough together). Still, I find myself using this new method more and more. The results have come out smashingly.
Small steam burns: worth it (as you can see below).
What’s Next?
Be sure to check out my full guide to baking bread at home for more details on this important step!


423 Comments
Help, I cannot anywhere find direction about which oven settings are being used. Are you using top and bottom heat? Or purely fan bake? My oven has lots of option, from fan bake only, to grill (US=broil), bottom heat only or either of those options with fan assist. I need to adjust the temperature down by 20C if converting from conventional bake (top and bottom heat) to fan bake, so knowing which setting is being recommended/used is really important. I never see this detail on US baking sites, confused as to why. This variety of settings is standard on ovens where I live.
Hi, what’s the purpose of using cast iron skillet for lava rocks? Can I just use two metal pans?
De ce nu putem pune in cuptor o simpla tava cu apa clocotita? Nu genereaza suficient abur?
Do you have a gas or electric oven? Can you use this method with a gas oven?
I did an open bake but the bread is gummy. It's got a beautiful crumb but it's just gummy.
i set my gas oven to 500° and heated everything up for an hour, followed all the steps. I took the lava rocks out after 20 minutes and the internal temperature was 210° after another 15 minutes of baking.
Buuuut it's gummy. It's got a great flavor but gummy, lol.
I may need to invest in a real baking steel. I used an upside cookie sheet, could that have made the crumb gummy?
If the hydration is too high for your dough it can lead to an overly wet or gummy interior. If the dough feels "soupy" or very "slack" then try pulling back the water percentage by 5% and see if that helps.
Make sure to bake your loaves completely. The interior should register around 204-206°F (95-96°C) or higher.
If your loaf is under proofed then this will typically lead to a gummy or "wet" textured interior. Make sure your starter and levain are very vigorous and strong when you use them. This is very important! From there, make sure to bulk ferment your dough fully (use the images you see in my posts to guide you on what the dough should look/feel like). You want the dough to be alive and aerated before you divide and shape.
From there, a full and complete proof is also very important.
A few ideas there for you, let me know how the next attempt goes!
Since I have 2 ovens (bottom is now my dedicated steam oven), I don’t need to remove the steam baths – I can simply transfer my loaves to my top, preheated oven to finish their bake. Then I can add more loaves back to my bottom steam oven.
I’m a lazy baker and prefer to make multiple loaves at a time. I freeze, and give away (trade) my extra loves!
Hey that's not a bad idea, Kathy!
Hiya! I take the simple way out of this dilemma. I place my cast iron pot on the baking stone and preheat heat it and the lid. When at temperature i place the bread on a couple sheets of parchment paper and put it into the heated baking pan. I immediately place 3-4 ice cubes between the sheets of paper around the edges and the pan itself and put the on the lid and bake as usual. I have had success with this and now it is standard procedure! Try it and let me know!! Cheers!!! Mary
Yup, that's a fantastic way as well, Mary! I talk about this in my new guide to the baking step: https://www.theperfectloaf.com/guides/the-ultimate-guide-to-baking-bread-dough/
Hi there – have been experiencing issues with getting any type of oven spring with my electric oven that ONLY has a top element (european modern oven). There is no heat being generated from the bottom and all loafs are coming out well browned on the top, and quite doughy below. I’ve been preheating the oven on convection setting and turning off the fan once I load my loaves. Any suggestions?
I recommend using a baking steel on the bottom of your oven, by preheating it you will get more heat coming form the bottom than you have without it.
Like Kenneth said below, a baking surface will help store some of that heat for the bottom of the loaf!
I’m trying to source the extra thick baking stones under the bread- the link is to the top baking sheet, but how thick are the bottom stones , and I would like to buy 2 or so smaller ones so i can lift them easily as I am a little old lady. 🙂
Thick refractory brick or stones will also work very well!
I’m thrilled that I found such an informative article. I was watching a Julia Child episode earlier today where she used quarry tiles to increase the temperature of her oven. I’ve also read how her husband, Paul, used to place asbestos bricks in a pan of water to create steam. I’d prefer to avoid both asbestos and any potentially improperly made tiles, and wondered if Fire Bricks might work? They appear to be able to be “fitted” together. I just do not know if they are the right sort of tile/bricks for bread making, and if they are able to withstand steam?
Ha ha, definitely avoid the asbestos. Fire or refractory bricks will also work very well!
I’ve been banking great loaves for 5 years and all one has to do is to put a roasting pan under your stone (no towels or lava rocks needed) Drop your dough ball onto the stone and pour a cup of water into the pan. Close the oven door as far as you can and you’re done.
I, too, use a roasting pan. Only difference: I boil the water (2 cups) ahead of time, and pour it into the room temp pan in the preheated oven. Starts to boil again within seconds.
That works well, for sure!
Hi Maurizio! I have attempted the open bake method once and am now experimenting with a few things to achieve a nice loaf. I use a baking steel and create steam underneath. What does the baking stone on the top rack do? Does it prevent the crust from forming too soon?
That one isn't needed, these days, I don't use it!
Hi Maurizio! I love your book and so grateful for all the content you give out. I noticed you have 3 extra thick baking stones in the oven that you place the loaves on to bake. Could you give the link to those stones or the thickness and size of them as you did for the one you use on the top? I tried looking up extra thick baking stones but nothing comes up that looks like yours. Thanks in advance!
Siera
I put a garage sale cast iron pint size kettle in the oven when heating up. When I put the dough in, I put a cup of ice cubes in the cast iron and it steams about 20 min. This way I finish up dry. So far it’s working. I have a Miele electric oven. If anyone ever needs a new oven, I highly recommend a Miele. I never realized how awful my Whirlpool, GE and Kitchenaid 9vens were until I bought this Miele. The roll out racks were an added bonus.
I’m new to sourdough baking. I use a Dutch oven and spritz the loaf just before baking. I start at 500 and reduce the heat to 450. I found just opening the door will lower the temp quite a lot. I put baking pans on the lowest rack to prevent burning the loaf’s bottom. Spraying the loaf with water seems to work well, but I may be missing something?
My towels are cotton / polyester… but polyester melts around 500F or so… should I be using towels with no plastic? Ie 100% cotton etc? About to try this method (though I LOVE the results with the Challenger Bread Pan) in preparation for an attempt at baguettes. Great book by the way.
I only have a Propane oven which by necessity is continually ventilated to the room. Viola, no steam!
Any suggestions about how I can bake other than in a closed pot would be much appreciated.
Thanks.
Barrett
In that case, you’d really have to kind of over steam the oven to ensure it’s steamy enough in there. That’s a challenge!
Damn so I’ve been trying this setup for the past few bakes and I just can’t get enough steam to stay in the oven compared to when I’m using my Dutch oven. Last week I baked two loaves on the same day, from the same dough – one in my DO and one on a baking steel with the towels and rocks. After 15mins the Dutch oven loaf was still super pliable on the outside which after fishing baking it with the lid off gave it the super thin bubbly crispy crust I’m used to, while the ”naked” loaf visibly started to harden up after only like 8 minutes making that crust much more thick…
I’m wondering if my oven (it’s a small 2/3 size oven btw) is just not holding onto the steam as well as it should… the whole time the oven is on / preheating, the cooling fan CRANKS so I wonder if it’s just blowing out all that steam the moment I add the loaves. I’m going to try again tomorrow with two more loaves – might try to cover the vent a bit with a towel to hopefully trap that steam in there for the first half of the bake. Hopefully I don’t blow the house up lol
Yes, sounds like it’s venting too much! I have a few more solutions coming here soon, stay tuned Nicholas!
Yeah so I basically gave up on the lava rocks for the time being – however I did fashion something crazy instead! I bought a handheld steamer (for like cleaning couches and stuff) from amazon, as well as a 500F heatproof silicon tube to go over the nozzle! After launching the loaf I just hold down the lever on that puppy and let it go till it runs out (usually lasts like 10 minutes). It’s not ideal but it certainly works the best compared to anything else I’ve tried, as the steam is being replenished at the same rate as the vent. I’m gonna try it with the lava rocks in there as well for just a little extra initial steam, but I can send pics of the setup if you’d like!
I’ve wanted to do this for so long as well! I’ve heard other bakers use this tool and I looked for one a while ago, but couldn’t find the right one.
Also, here’s my YouTube video on steaming the home oven, as promised!
Yes, would love to see photos of the setup. Are you a TPL Member? If so, please drop the photo in the Discord chat!
I have been using this very method successfully now for over a year. I don’t remove the cast iron with lava rocks though, it’s just so heavy! However would my crust be a bit more crustier 🤣if I did? Stay tuned. Thank you, you rockstar you M!
Totally works to leave it in there! But yes, it’s best to finish baking your bread in a dry oven to fully harden off the crust. My guess is, though, that all the water you’ve put in that pan is gone by midway through anyway, so no harm done!
My oven is gas how do I place Rectangular pan and cast-iron pan with lava rocks on bottom without ruining my oven bottom
You can place an oven rack at the lowest level in your oven (the last rung). Then, place the pans on that. One rung up, place another oven rack with your baking surface.
I have been using the open baking methodjust like yours, for years with much success. I pour boiling water into either an old cake pan in one oven, or a beat up cast iron skillet in my other. After 20 min. all the water has steamed off so I don’t have to remove the pans and risk a burn. Recently I have been experimenting with turning the oven OFF after first steaming, to further reduce hardening off of the crust and increasing oven spring. I think it improves oven spring.. Oven back on after 10 min. Have you tried this? Your opinion welcomed.
That’s a great idea and something to try, Sandy. In my larger bread oven I kind of do the same thing, I turn the heating elements essentially off to prevent the outer crust from forming prematurely… would make sense to try this in the home oven as well!
I use a large metal mixing bowl over my dough to capture steam, and a roasting pan filled w boiling water underneath to generate the steam. After about 30 minutes I remove both and finish the bake. Seems to work great–I get a great crust.
Yes, this is a great approach!
Are you using an electric oven or a gas oven?
I have trouble keeping steam in my gas oven using steam pans under my baking stones. Using dish towels and lava rocks sounds like it could extend the steam generation for my vented gas oven.
I have an electric oven. My method here would definitely help generate more steam!