

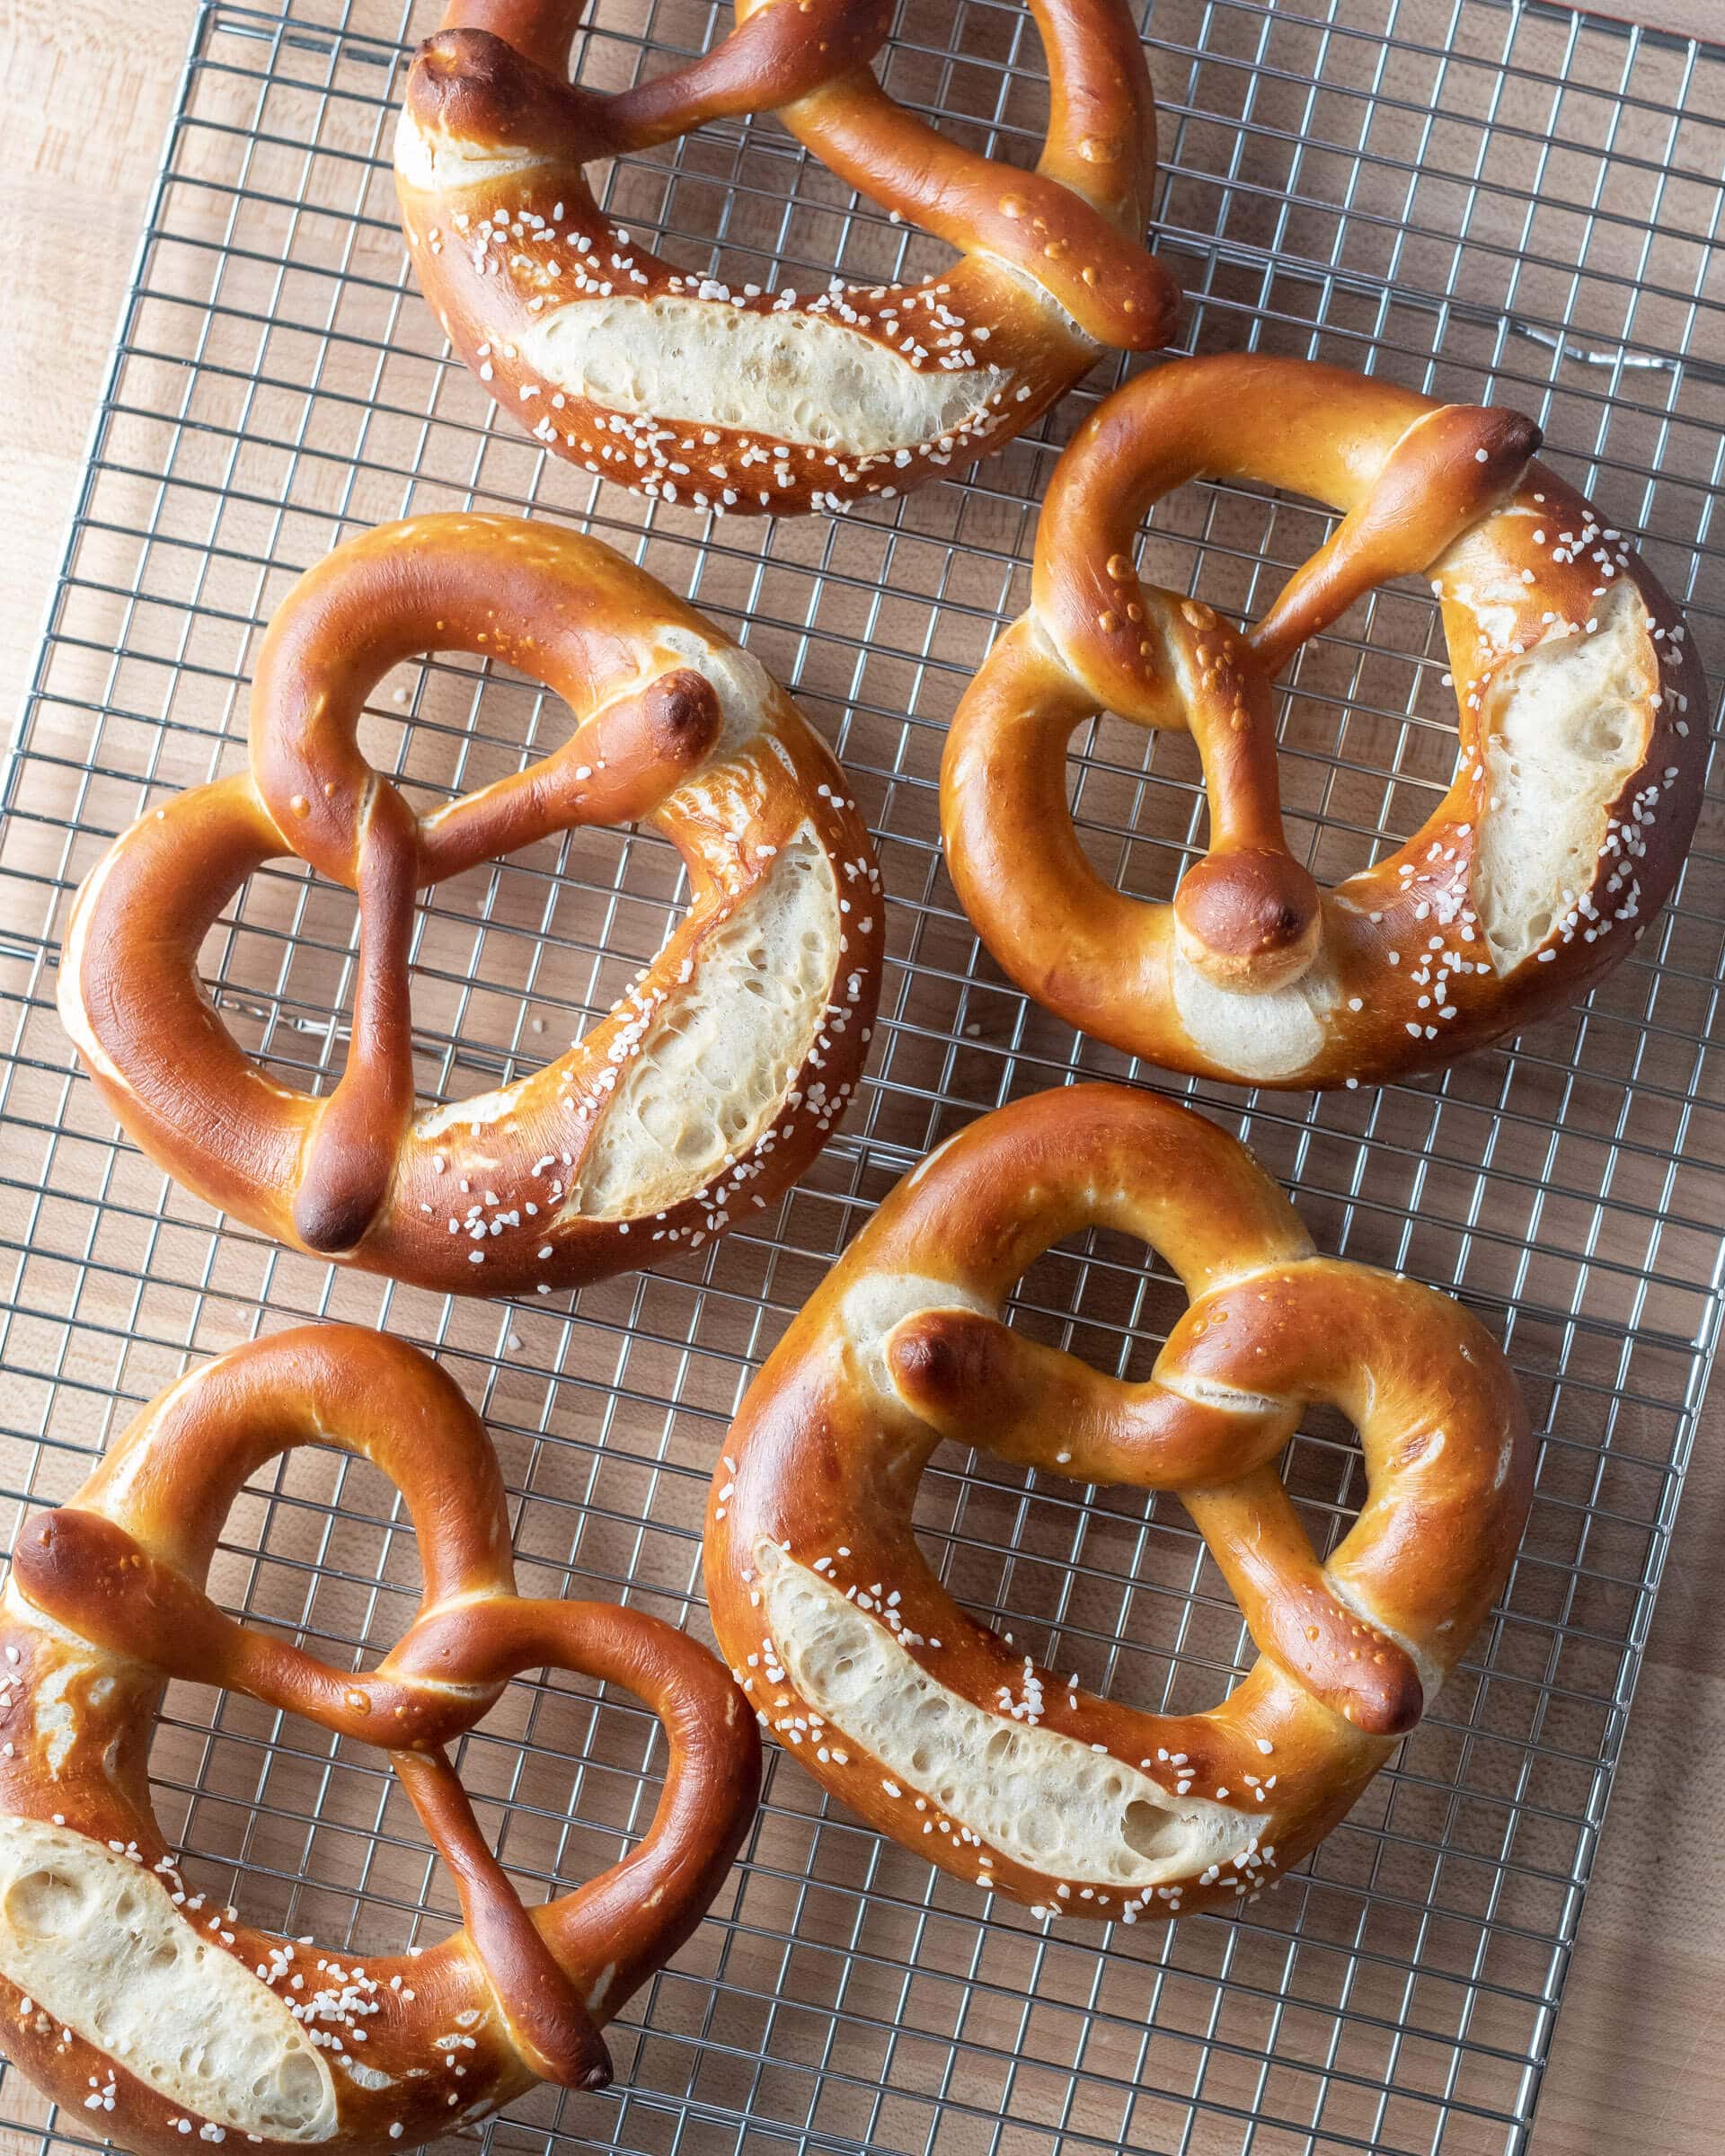
As I walked through the two enormous wooden doors of the German beer hall, each host to a gold-emblazoned crown, my senses were first assaulted by the aromas of beer, mustard, and sauerkraut. It was the beginning of an awakening. An unknown, or perhaps forgotten, craving began to bubble to the surface as I scanned for an empty bench. People were packed tight with broad grins, large mugs of beer, and that happy demeanor that only comes when the world outside is forgotten. My natural desire to raise my voice and tell a few stories was only matched by the desire for a seriously soft (sourdough) pretzel.
In recalling my travels through Germany a few years back, my memories of these beer halls are still fresh. We’d duck the incessant rain by dropping in on a beer hall where we’d have sausage with sauerkraut, a laugenbrezel (pretzel), and a maß (1 liter) of beer. It seemed our entire time in Germany consisted of a series of strung-together visits to these fine establishments. I can confidently say I ate more pretzels during that week-long trip than in all the previous years of my life combined.

And there are so many ways to enjoy pretzels. There are countless variations not only in the final shape, but also in the toppings and accompanying condiments. I’ve also come to find out that there are pretty heated discussions on these topics among pretzel aficionados! It’s safe to say one could spend a fair amount of time traveling around and still fail to encounter all the variants. Laugenbrezel, brezel, brezen, butterbrezel… So many names, varieties, and options–so little time.
Admittedly, my attempts at a soft sourdough pretzel should have started long ago. To make up for my lack of appropriate focus on this wonderful food, I’ve been working on this recipe relentlessly over the past few months. I’ve made them almost every day (as you might have seen on my Instagram feed), and I’ve really come to expect a fresh pretzel for lunch. Now, days without a fresh pretzel have become a day of deprivation.
The beauty of this pretzel recipe is that it can be made in a single day using your already-ripe starter or an overnight levain. However, the work for this flexible dough can also be split over the course of two days, forcing you to make the difficult choice of fresh, warm pretzels in the morning or the later afternoon. Further, the dough is rather easy to get together, mix, and bulk—the only slightly involved part of the process is the lye bath.
Watch a Video of Me Making These Sourdough Pretzels
The Lye (Sodium Hydroxide) Bath
What Does Lye Do to Pretzel Dough?
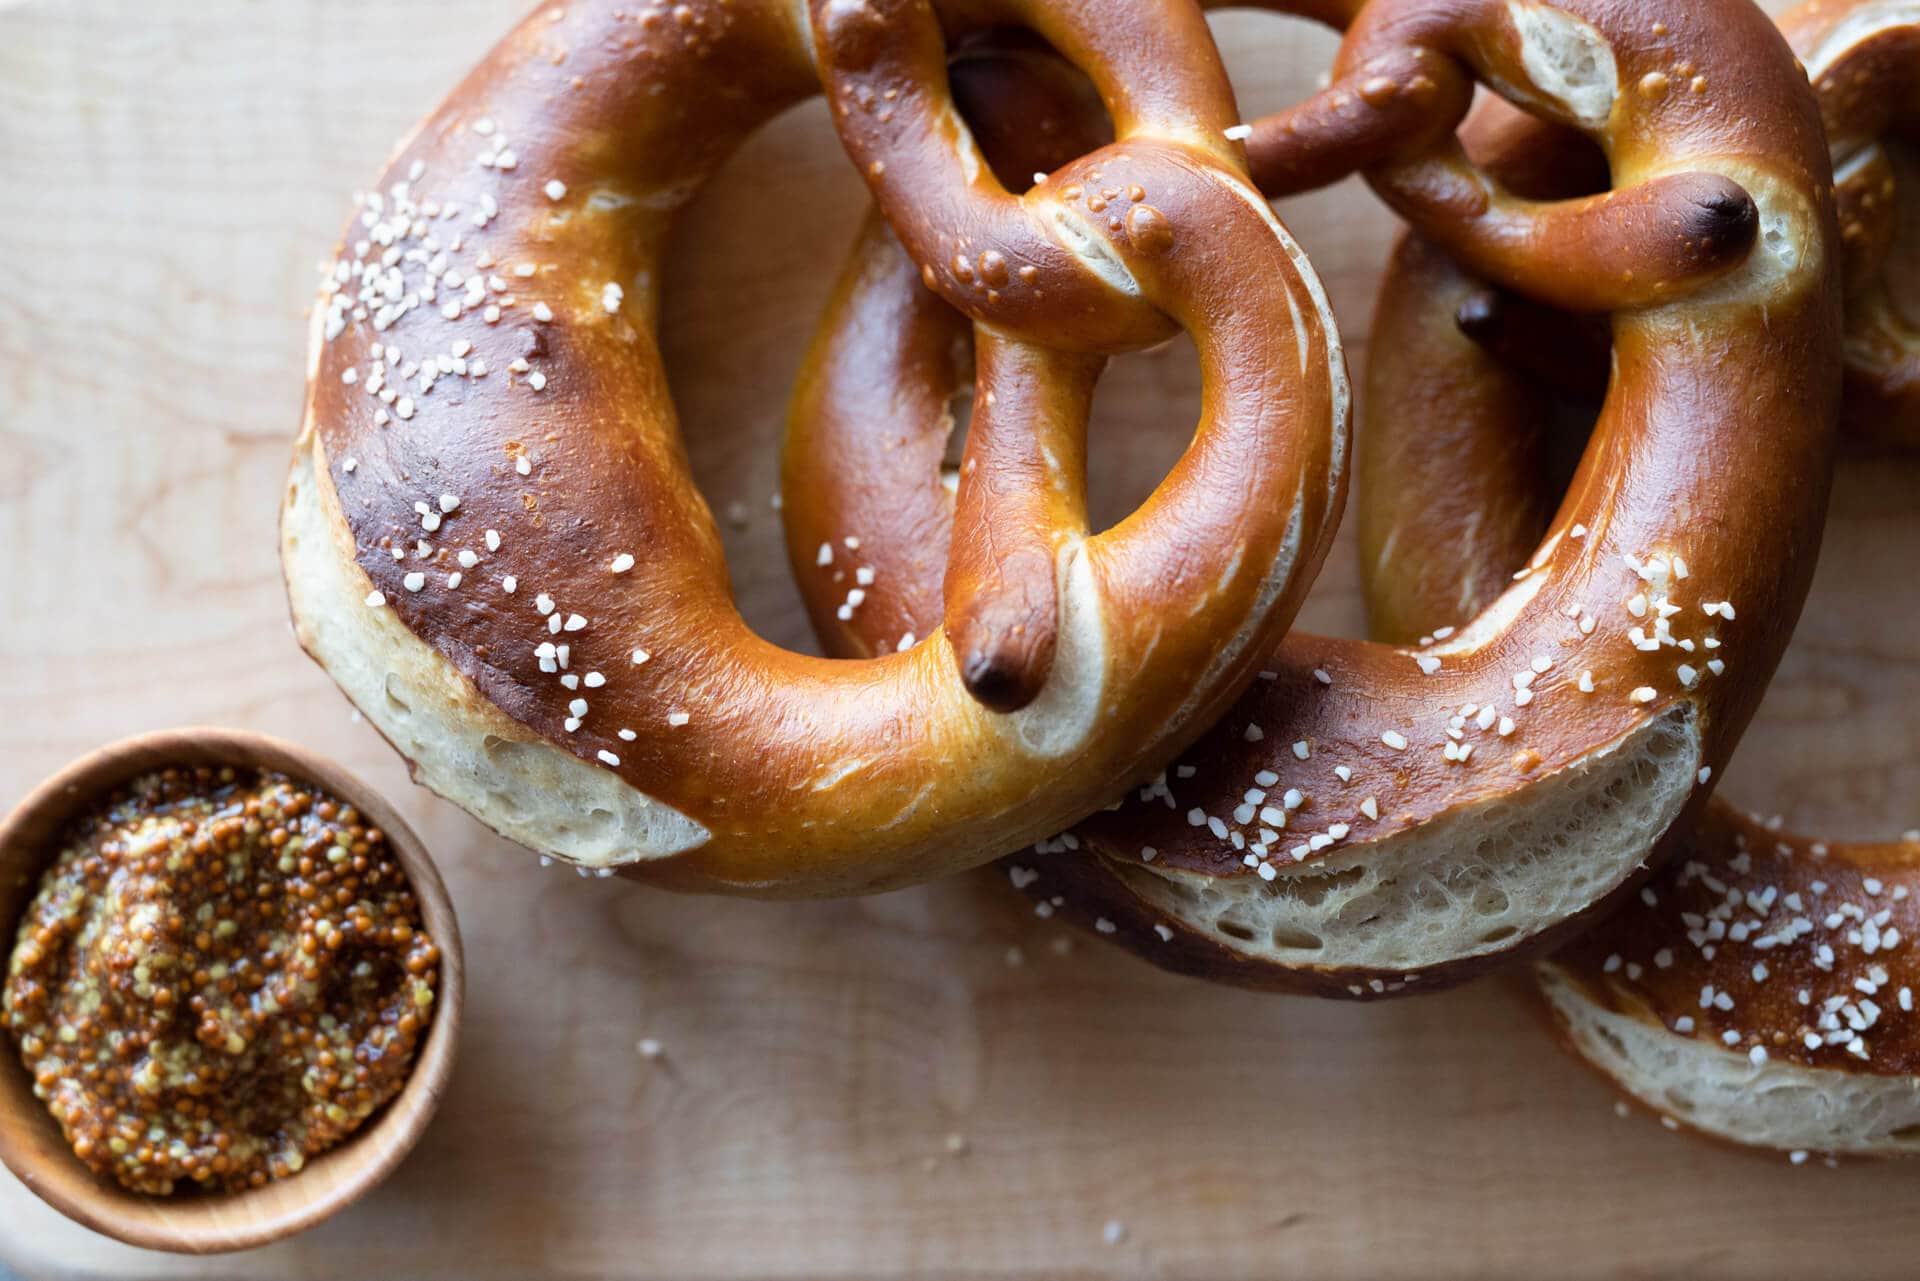
Traditional pretzels are made by dipping (not boiling) the proofed and chilled pretzel dough in a 3 to 4% lye solution before baking. Lye is a corrosive alkali that amplifies the Maillard reacation on the outside of pretzel dough when briefly dipped in a lye bath. This lye bath will give the German style pretzel a deep brown color, shine, a chewy crust that, and a typical “pretzel” flavor.
When baked in the oven, the lye dissipates and becomes harmless while imparting that signature pretzel flavor and a beautiful brown crust (thanks again to the Maillard reaction).
What Lye Should I Use to Make Pretzels?
I use 100% food-grade lye and have used the same brand for all of my tests. It comes in a coarse powder form and you mix the powder in a stainless steel bowl that is already filled with water, stirring until completely dissolved.
I use a 4% lye solution for these sourdough pretzels:
| Cool water (the cold water helps keep the chilled pretzel dough firm) | 940g (1 quart) |
| 100% food-grade lye (sodium hydroxide) | 38g |
Lye is caustic (corrosive) and can be dangerous if used incorrectly. Always wear long rubber gloves (and eye protection, if desired) and be mindful when handling it. It’s best if children and pets aren’t present in the kitchen as well. If by chance some of the lye solution does get on your skin, don’t panic; just wash it off in the sink as quickly as possible. As with all household chemicals, be sure to keep them up and out of curious reach.
After testing this recipe countless times, I’ve found that lye isn’t quite the big deal many make it out to be. If you are careful and use proper precautions when handling the solution, the whole process is safe and over in a matter of minutes.
What Can I Substitute For Lye?
If you don’t want to use lye, another option is a baking soda solution. Baking soda isn’t as caustic as lye but it should have a similar, less potent, effect. I haven’t yet tested the substitution myself, but I’ve read it won’t garner you quite the same result. However, it might be preferential to those who choose not to bring lye into their kitchen.
Finally, another substitute for lye was made famous by Harold McGee, and it was to use baked baking soda. Baked soda (also called jian in Chinese kitchens) becomes a more powerful alkali than traditional baking soda which will help add more flavor and color to a baked pretzel.
Can I Freeze and Store Pretzels?
After baking, these pretzels will keep well for a few days stored in a bread box on the counter. Alternatively, once they are completely cool, you can place them in a freezer bag and keep them frozen for months. To thaw, place them in the refrigerator overnight, and then warm them thoroughly in a low 350°F (175°C) oven.
How Do I Reheat Sourdough Pretzels?
If kept at room temperature, these sourdough pretzels will reheat nicely in a 350°C (175°C) oven for a few minutes until soft.
Seriously Soft Sourdough Pretzel Recipe
Through testing, reading, researching, and discussing with other bakers, I’ve found there are a few key points to making these pretzels.
While some of these are seemingly insignificant, they are small steps that add up to achieving that spectacular result:
- Degas heavily when dividing
- Don’t cover your baking trays when chilling the shaped pretzel in the fridge (this helps to develop a skin on the pretzel)
- Bake in a very hot oven, 450°F (230°C)
- Using lye for the pre-bake bath imparts that classic pretzel color, flavor, and texture
Vitals
| Total Dough Weight | 1,420 grams |
| Pre-fermented Flour | 12.0% |
| Hydration | 55.0% |
| Levain in the final dough | 28.6% |
| Yield | Twelve pretzels |
Total Formula
Desired dough temperature: 76°F (24°C) (see my post on the importance of dough temperature). I typically make these in the cooler months of the year, and if you find yourself doing the same, be sure to review my guide to baking in the winter.
This table shows the entire quantity and baker’s percentages for each ingredient. If you’d like to make fewer or more pretzels, scale up the quantities using baker’s math.
| Weight | Ingredient | Baker’s Percentage |
|---|---|---|
| 635g | High protein bread flour (12-13% protein; King Arthur Bread Flour) | 74.0% |
| 171g | All-purpose flour (11.5% protein; King Arthur All-purpose Flour) | 20.0% |
| 51g | Whole wheat flour (King Arthur Whole Wheat Flour) | 6.0% |
| 60g | Unsalted butter at room temperature | 7.0% |
| 471g | Water | 55.0% |
| 3g | Diastatic malt powder | 0.4% |
| 17g | Fine sea salt | 2.0% |
| 10g | Ripe sourdough starter, 100% hydration | 1.2% |
Sourdough Pretzel Method
1. Prepare the levain – 9:00 p.m., the night before mixing
To make the levain, mix the following ingredients in a jar and leave them covered at a warm temperature, 74-76°F (23-24°C), to ripen overnight.
| Weight | Ingredient | Baker’s Percentage |
|---|---|---|
| 10g | Ripe sourdough starter, 100% hydration | 10.0% |
| 51g | All-purpose flour | 50.0% |
| 51g | Whole wheat flour | 50.0% |
| 102g | Water | 100.0% |
2. Mix – 9:00 a.m.
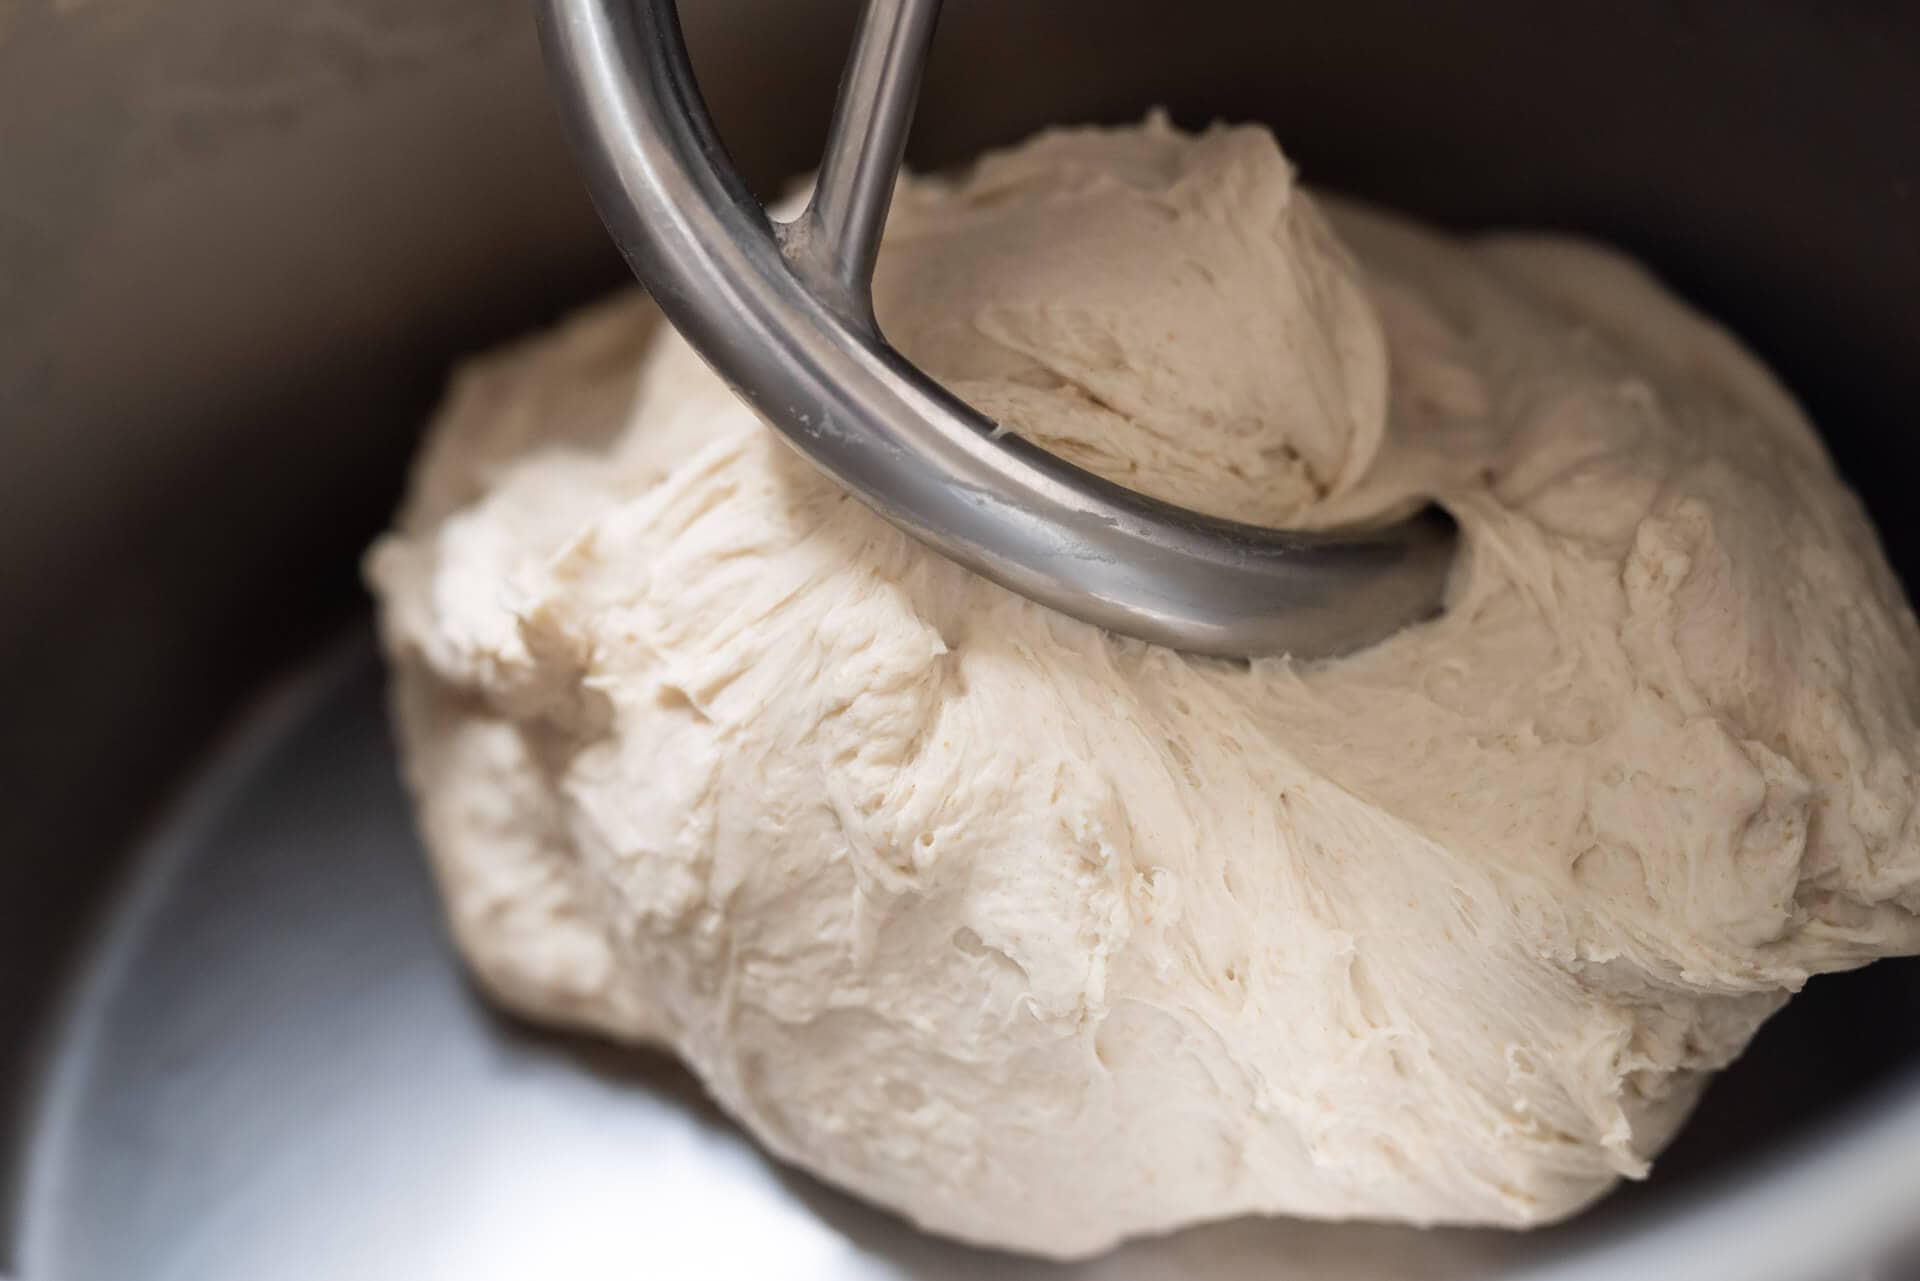
Note: this sourdough pretzel dough is extremely stiff. If you’re using a KitchenAid mixer, it could cause your machine harm in the long run. You could mix for a few minutes in the mixer to incorporate, then turn the dough to the counter and finish kneading by hand (similar to a firm pasta dough). I used my Haussler Alpha dough mixer with a dough hook for this recipe because it excels at working with stiff doughs.
| Weight | Ingredient |
|---|---|
| 635g | High-protein bread flour |
| 120g | All-purpose flour |
| 60g | Unsalted butter at room temperature |
| 369g | Water |
| 3g | Diastatic malt powder |
| 17g | Fine sea salt |
| 214g | Ripe levain (from step 1) |
Cut the butter into 1/2-inch pats. Set them on a plate to warm to room temperature.
To the bowl of a stand mixer fitted with the dough hook attachment, add the flour, water, salt, butter, diastatic malt powder, and levain. Mix on speed 1 for 2 to 3 minutes until all of the ingredients are incorporated. Let the dough rest for 5 minutes.
Continue to mix on speed 2 for 4 to 6 minutes until the dough becomes smooth and cohesive. I’ve found the stronger the mix, the better the result.
Transfer the dough to a container for bulk fermentation and cover it with reusable plastic.
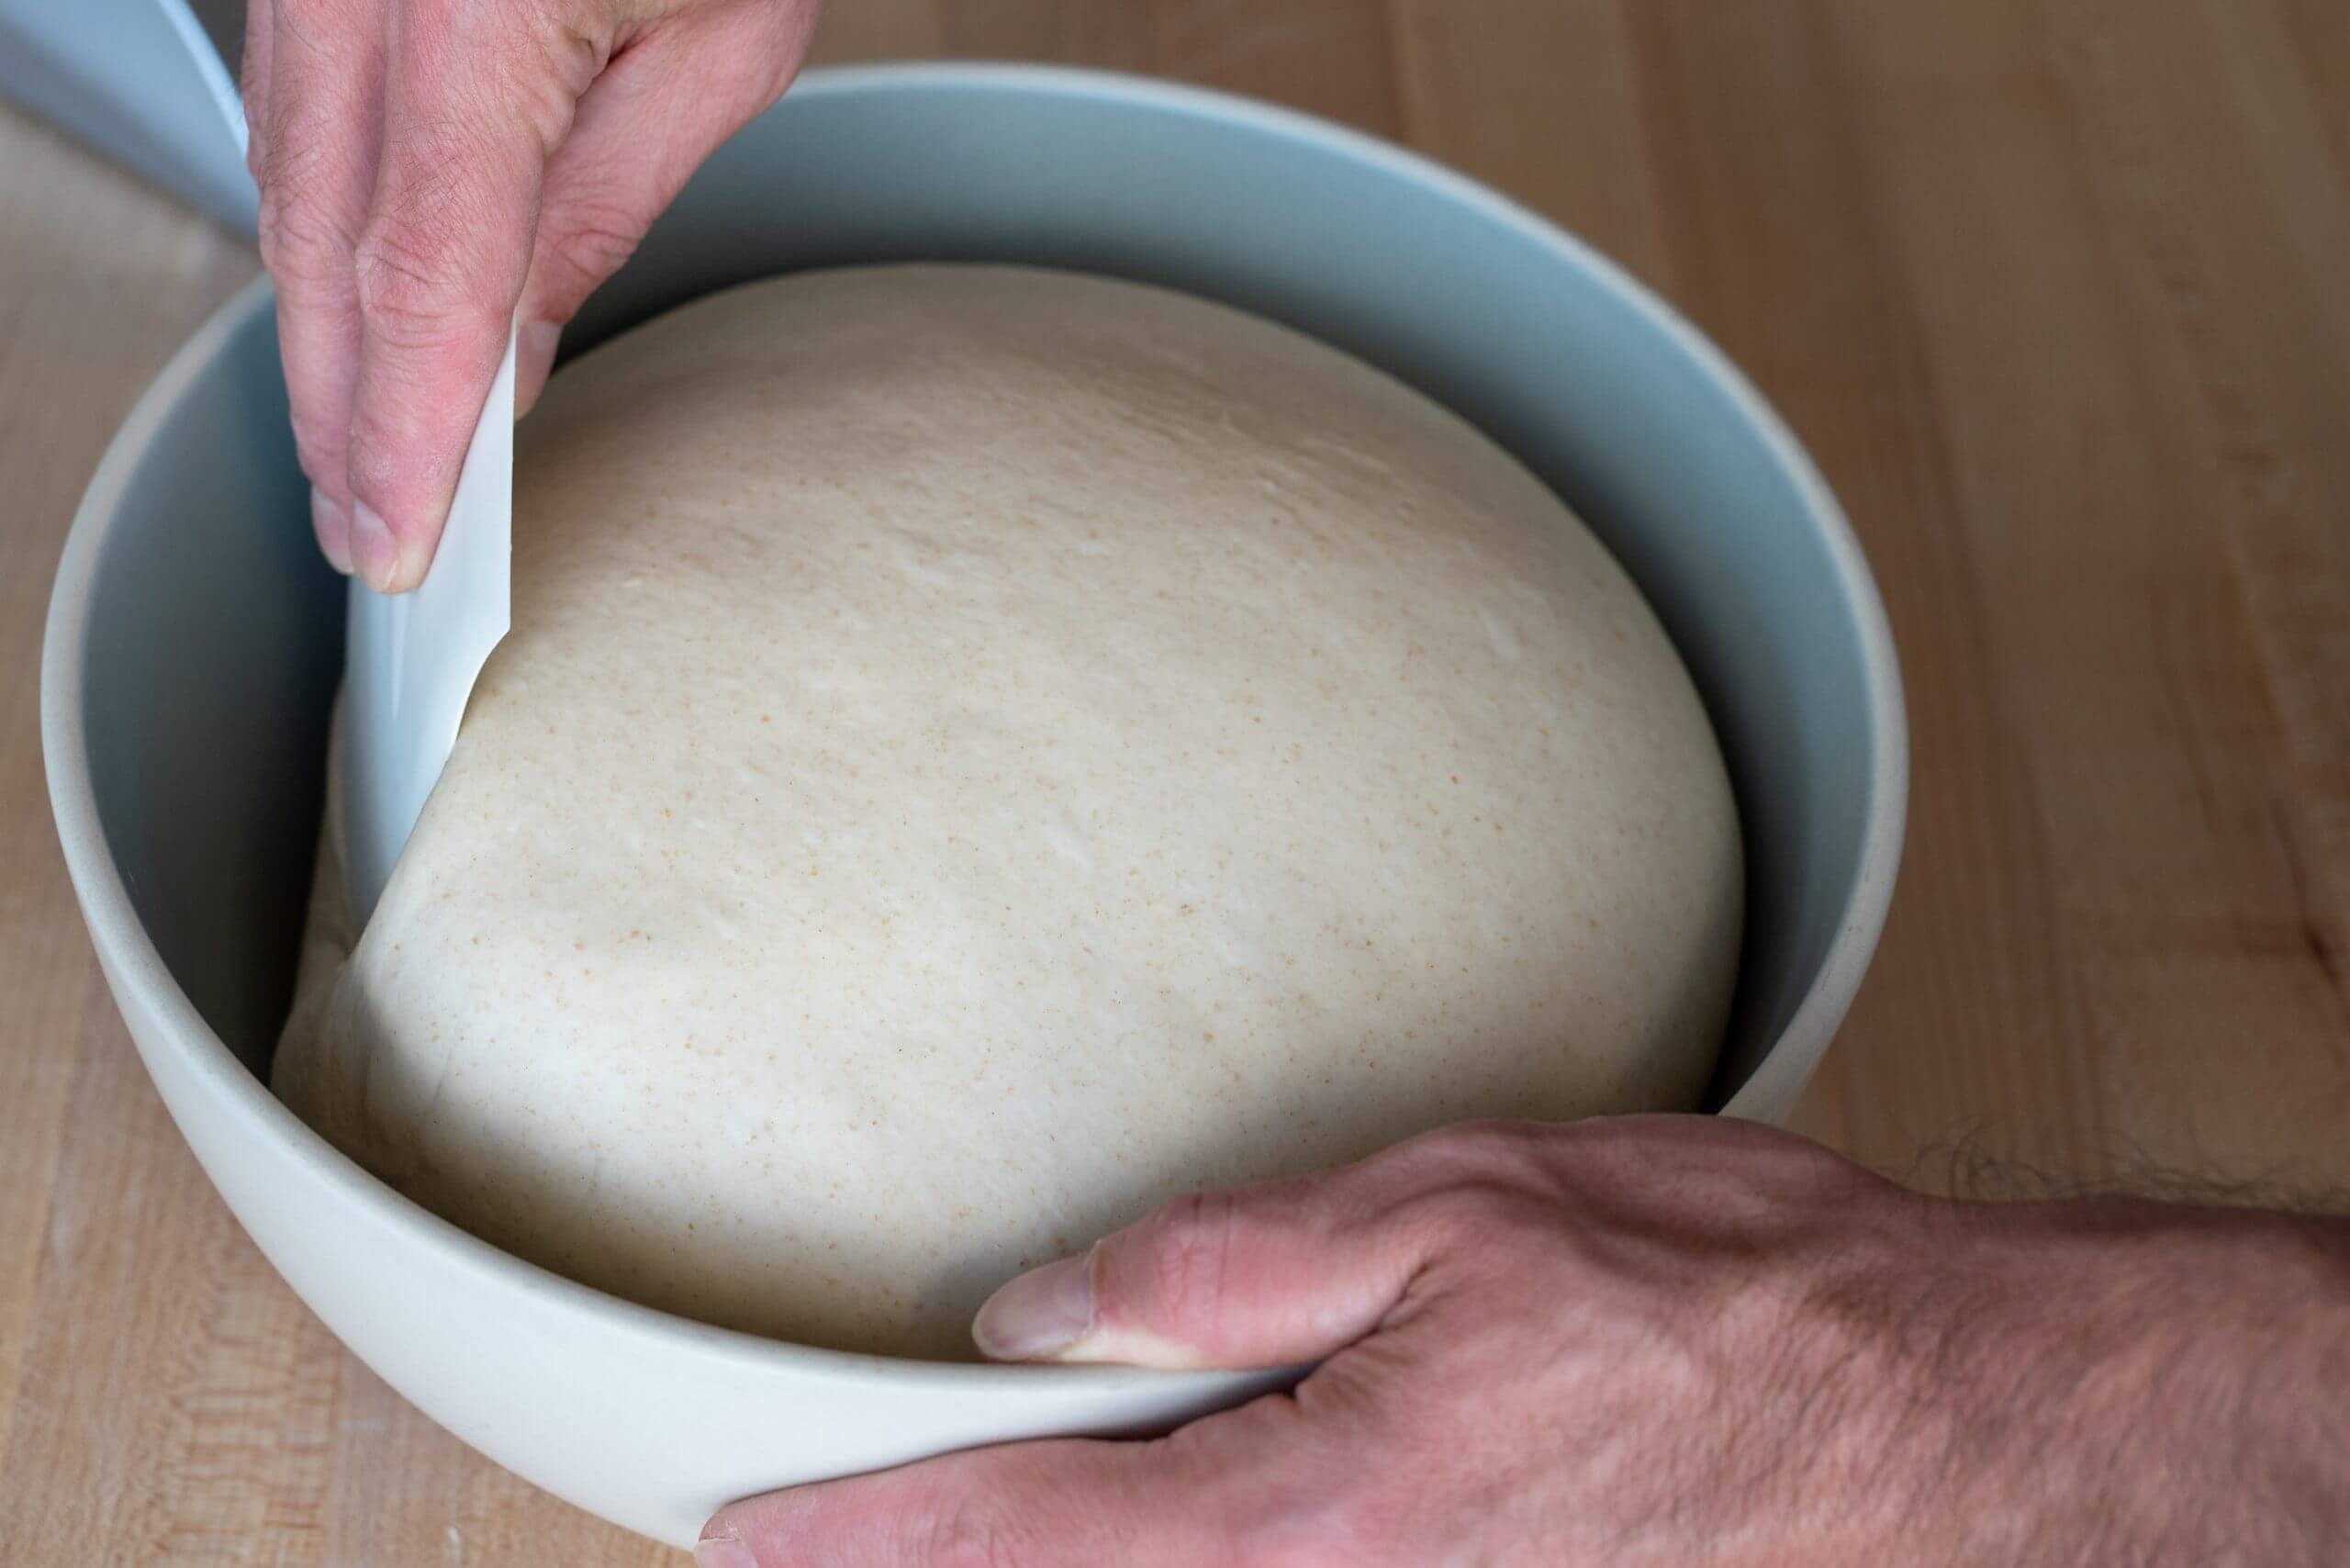
3. Bulk fermentation – 9:15 a.m. to 12:45 p.m.
At a warm room temperature, 74-76°F (23-24°C), bulk fermentation should take about 3 1/2 hours. The dough is ready when it is risen and is slightly puffy.
This dough requires one set of stretch and folds during bulk fermentation. After the first hour of bulk fermentation, turn the dough out onto a clean counter surface, and using two hands, stretch each side of the dough out and over to the middle.
Return the dough to the bulk container and let rest for the remainder of bulk fermentation.
4. Divide and preshape – 12:45 p.m.
When I’m not handling this dough, I like to keep it covered with plastic at all times. Because the dough is low hydration, it can quickly dry out and form a skin on the outside. To cover, I’ll drape one large proofing bag over the mass of dough yet to be divided and one bag over the “cigars” as I finish preshaping each one.
Scrape the dough onto a clean counter surface. Divide the dough into twelve 115g rectangular pieces. For each piece, degas heavily with a flat hand (really be assertive with the dough) and gently stretch it into a small rectangle. The fewer the seams, pits, and uneven sides, the cleaner and more uniform the resulting pretzel will be.
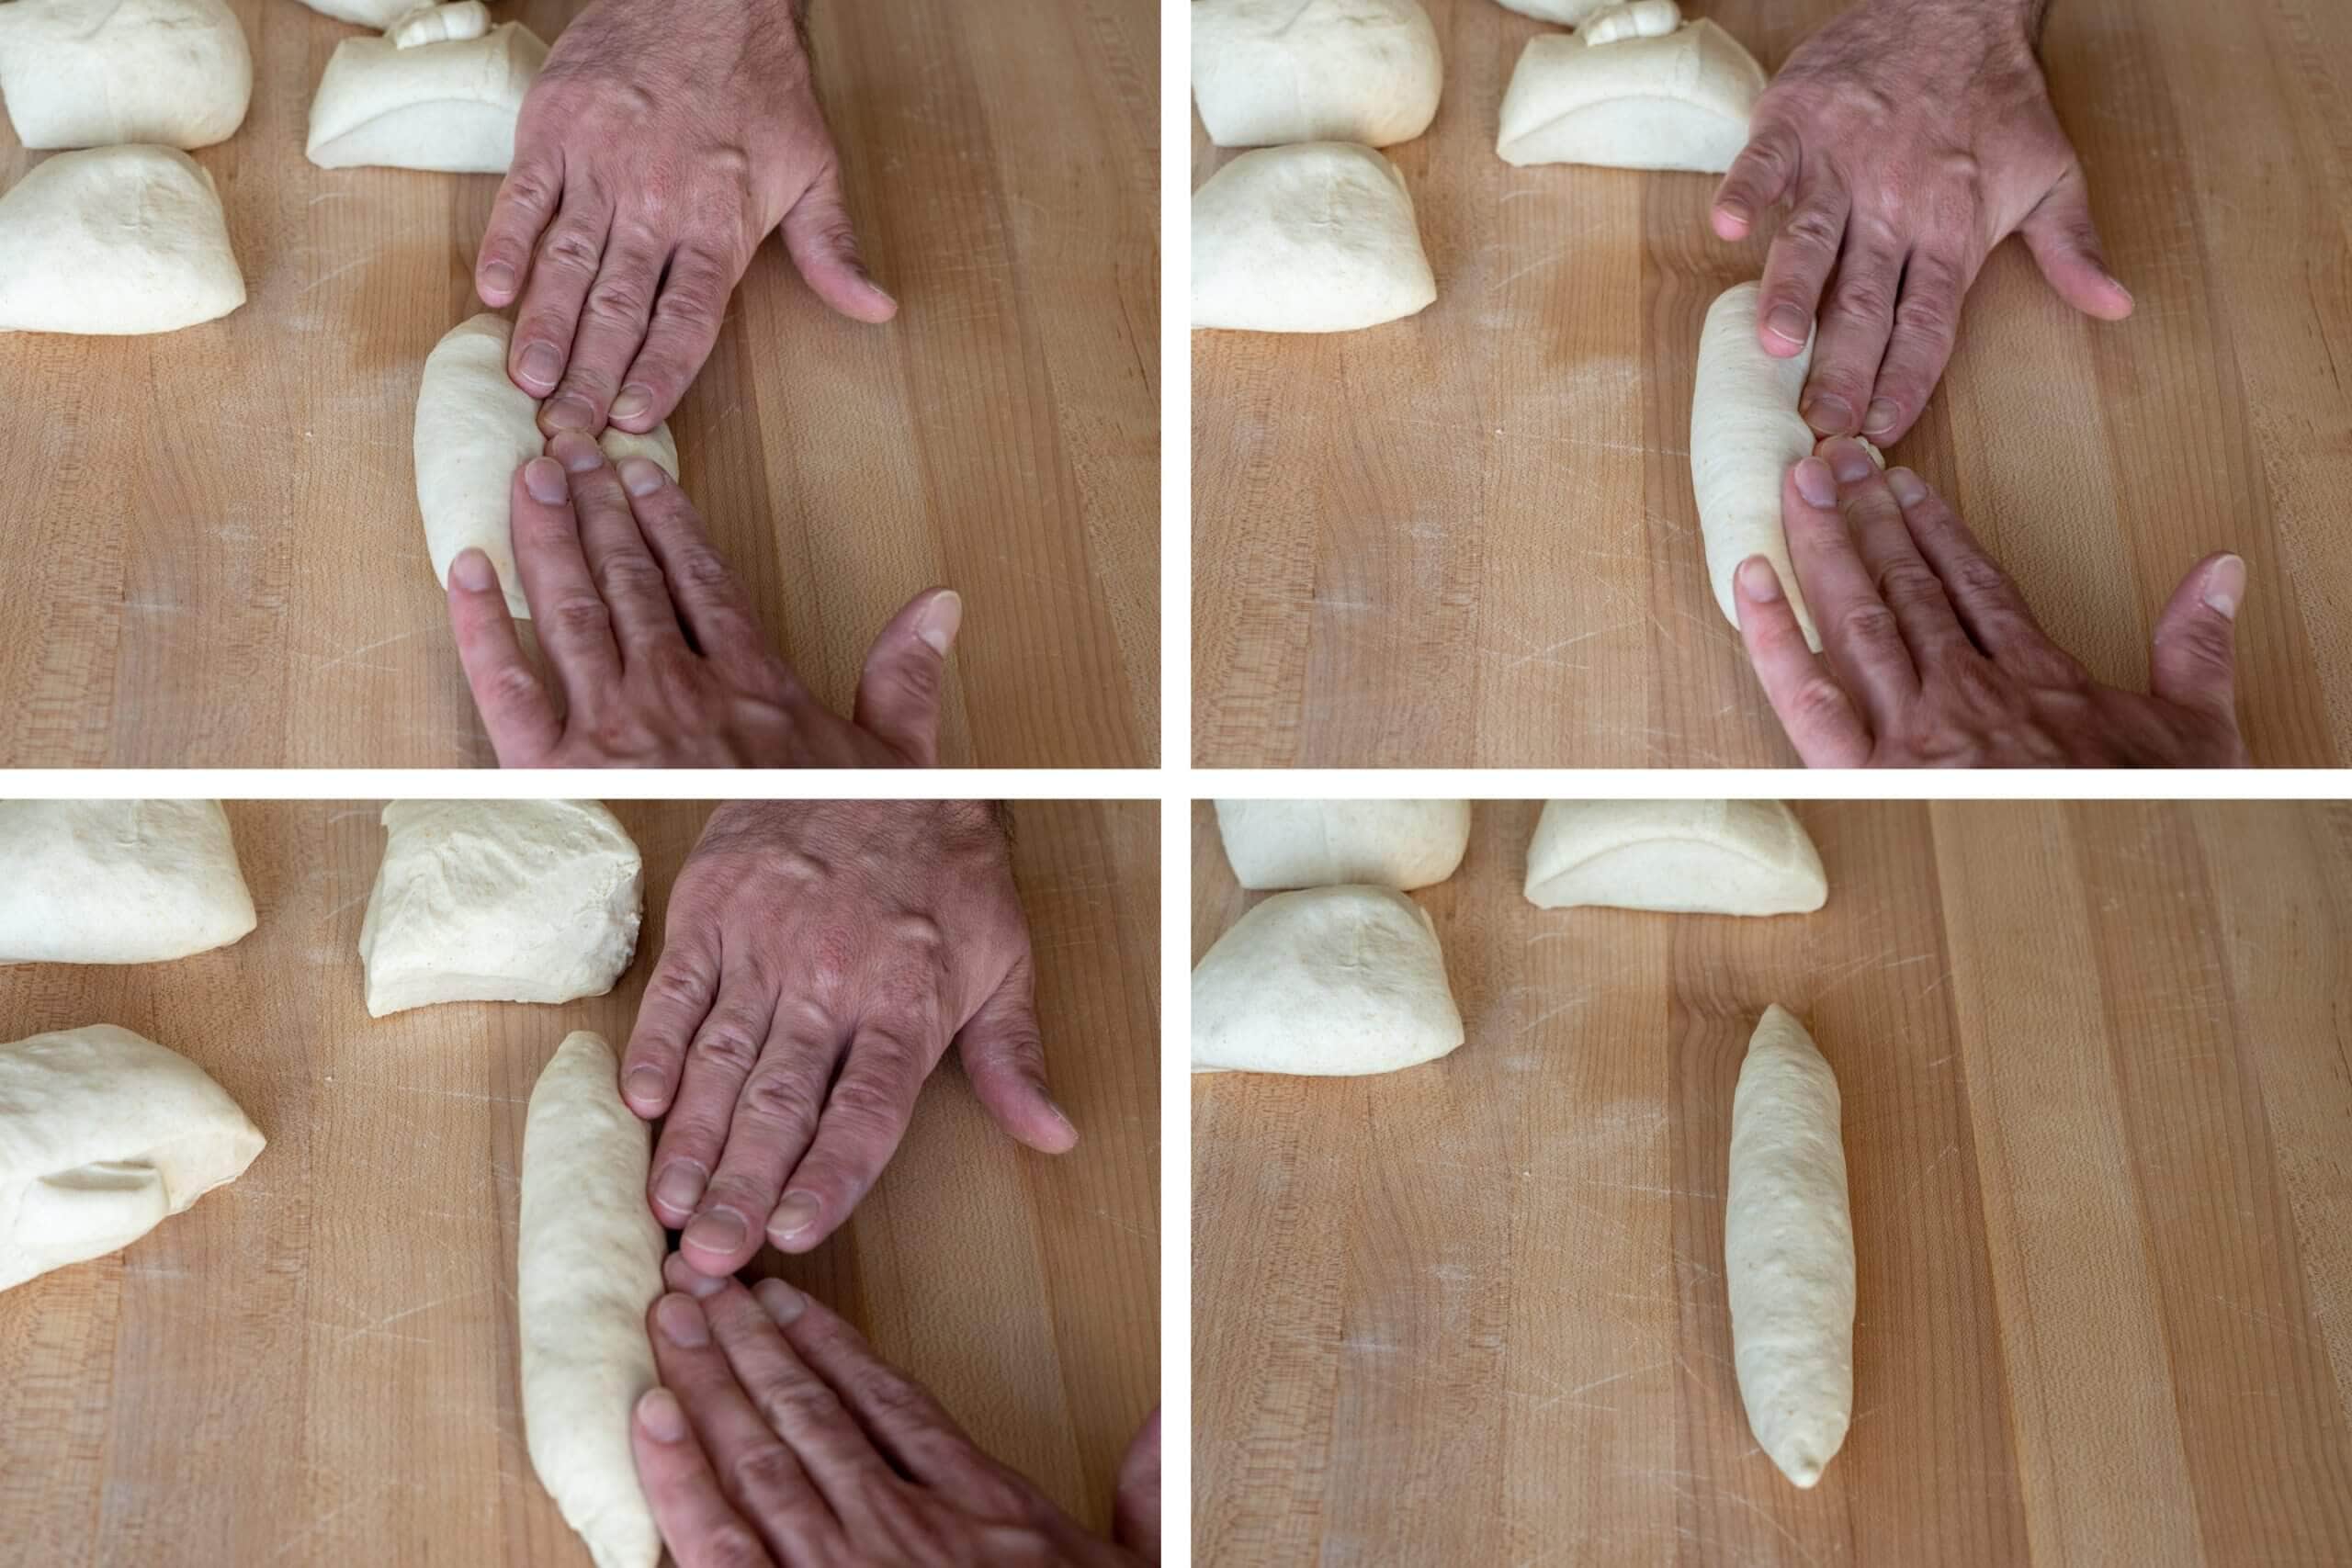
Working with one rectangular piece at a time, using your fingertips, fold down the long, top side of the rectangle and gently press down into the dough with your fingers to begin rolling a cylinder (upper-left image, above). Continue to roll the dough down, gently sealing each revolution, until the dough is rolled up. Seal the seam with your fingers or the palm of your hand.
Transfer the cylinder to the side of your work surface and cover with plastic.
Let the cylinders rest for 15 minutes.
5. Shape – 1:00 p.m.
Prepare two large sheet pans by lining them with parchment paper or a silicone baking mat. Depending on how large you roll out and shape your pretzels, you should be able to fit six per 13 x 18-inch sheet pan.
First, a few tips when shaping:
- If at any point the dough starts to become extraordinarily elastic and resist rolling outward, let it rest for a few minutes before continuing.
- The dough should be moist enough to stick to the work surface when rolling. If the dough dries out excessively, use a handheld spray bottle to lightly mist the dough, your hands, and the work surface to encourage a little friction.
Starting with the piece that you preshaped first, place the cylinder in front of you such that the tips are at your sides. Begin with your hands slightly overlapping in the middle, press down and roll the dough back and forth, away and then toward your body. As you are rolling, begin moving your hands outward to encourage the cylinder to elongate and taper as you move from the center out to the ends. You want to keep an exaggerated bulge in the very center of this rope–this will be the large part of the pretzel you score to encourage rise in the oven.
Finally, classic technique suggests leaving small little bulbs at the extremes of the rope, but that is up to your preference.

Grab the ends of the dough and arrange the dough so it loops away from you (upper-left image, above). Take one end and fold it over the other side (upper-right image above). Switch your hands so your right hand is holding the new right end and your left is holding the new left end. Fold the same side over the other as previously done (you’ll now have performed two twists). Grab the two ends, fold them up over the knot in the middle, and place each end on its corresponding side inside the loop. It looks nice to have a little overlap with each tip. Then, gently press it down into the side to seal (lower-right image, above).
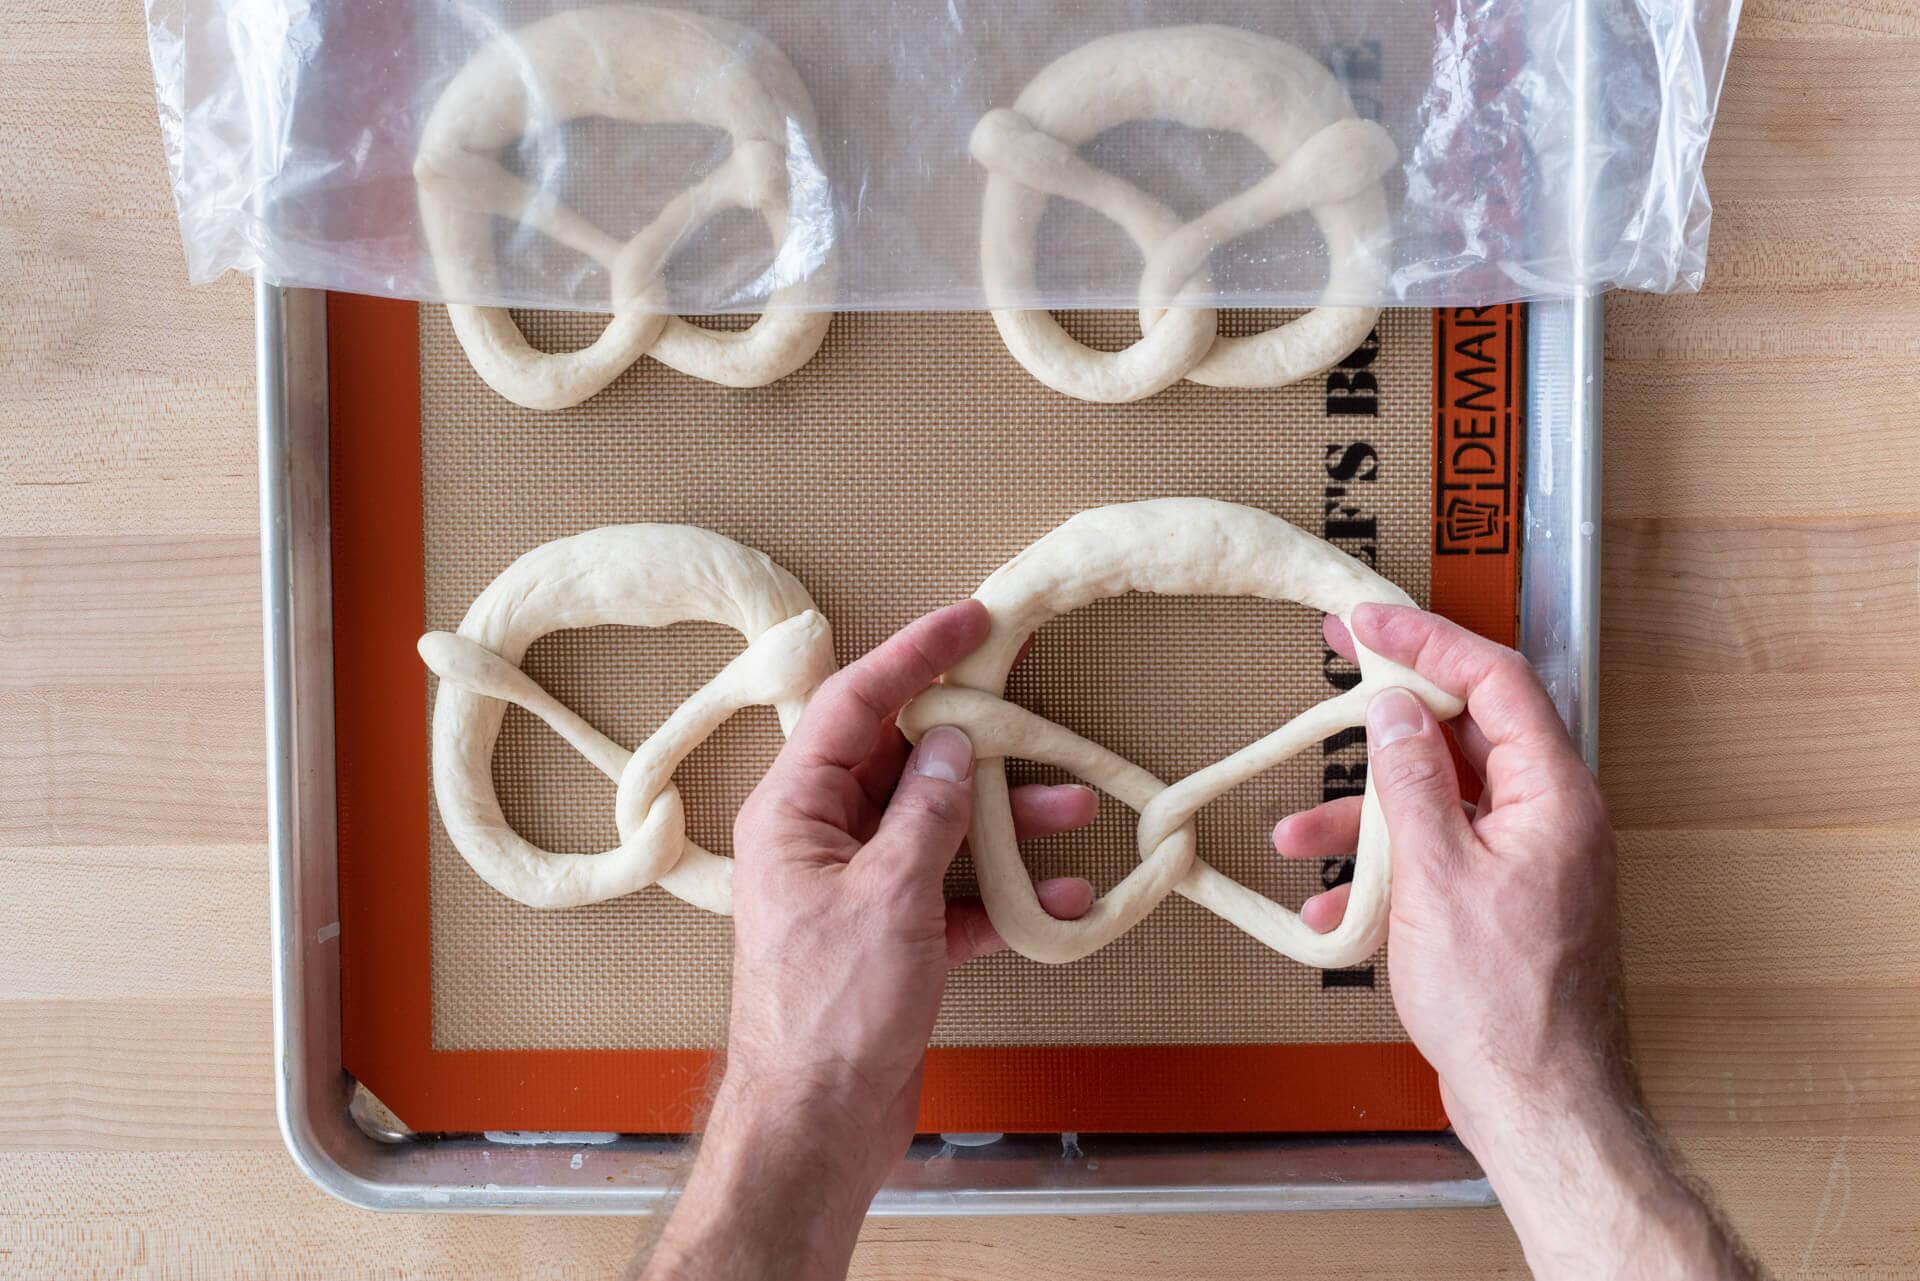
Transfer the shaped dough to the prepared baking sheet. I like to keep the sheet loosely covered while I’m shaping the remaining pretzels.
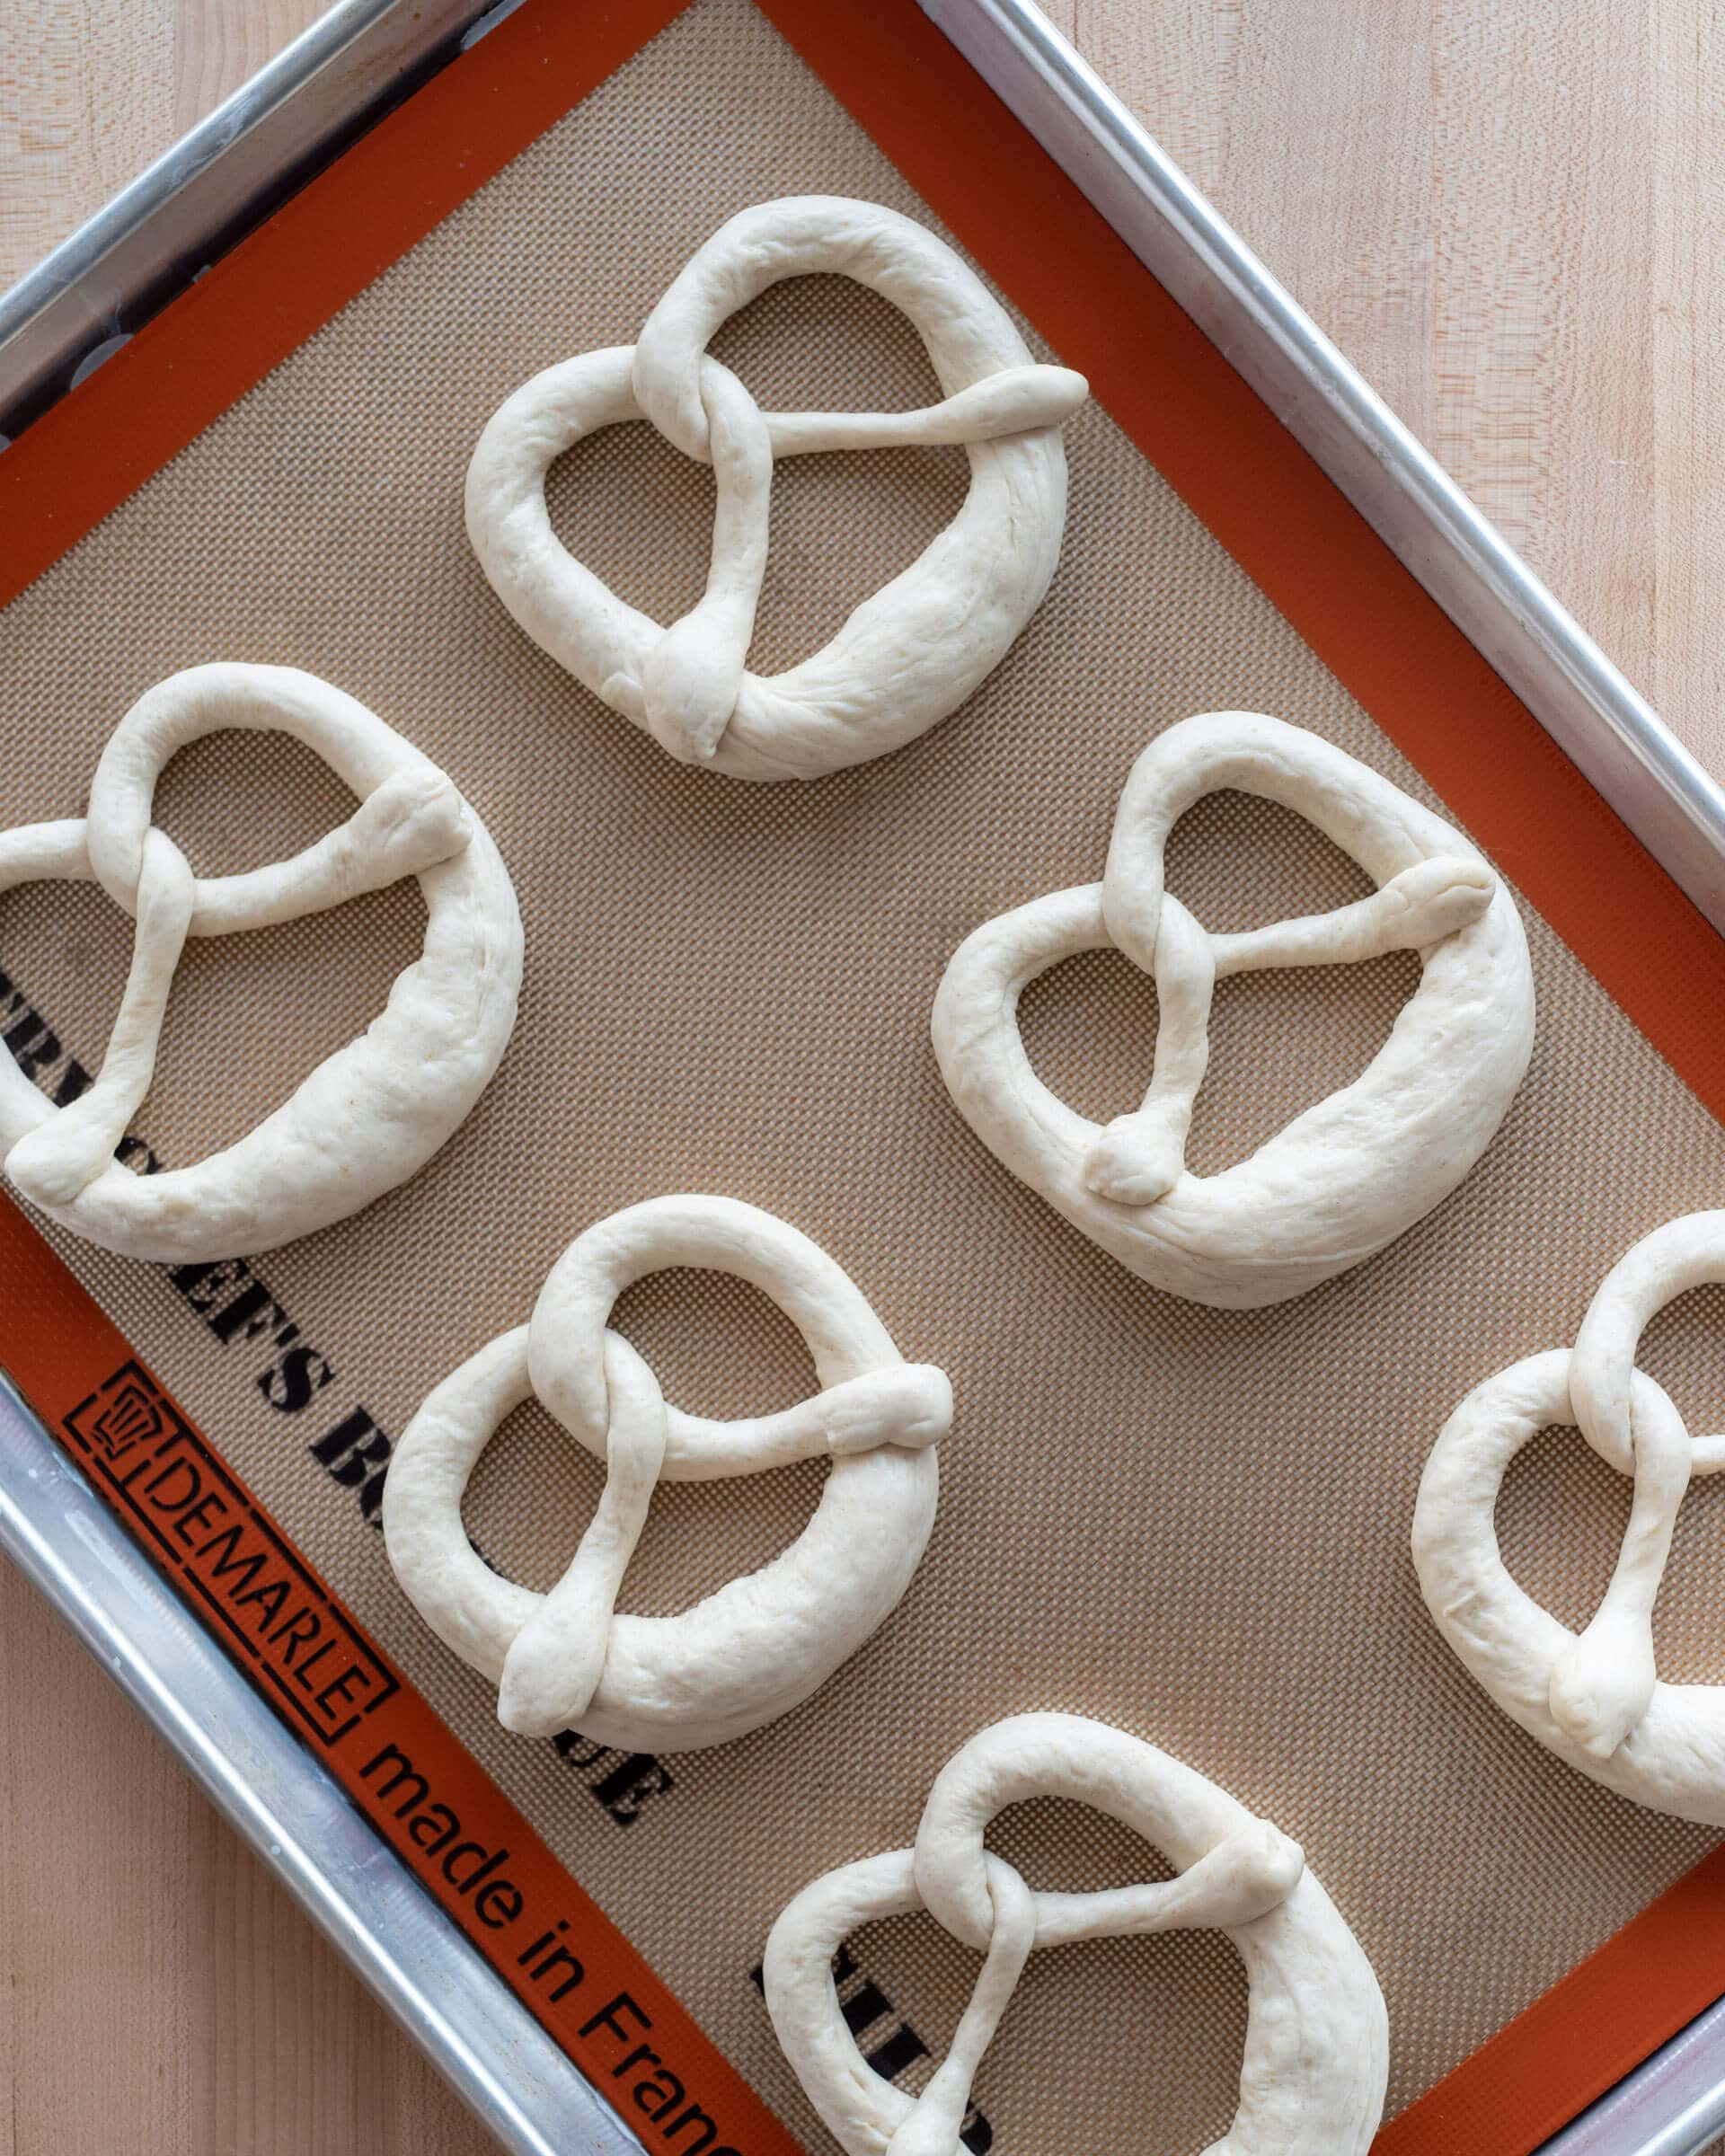
6. Proof – 1:15 p.m. to 1:45 p.m.
Let the sourdough pretzel dough proof on the counter at room temperature for 30 minutes, covered.
OVERNIGHT OPTION: At this point, you could also retard the shaped pretzels in the fridge overnight to make them the next day. Instead of leaving them out for 30 minutes to proof, leave them for only 15 minutes, cover the sheet pans with plastic, and place them in the fridge. The next day, uncover the sheet pans, return them to the fridge, and chill for 20 minutes (to develop a skin, as mentioned previously). Then continue with the rest of the process.
Transfer the uncovered sheet pans holding your pretzels to the fridge for 45 minutes to 1 hour. Be sure to let the dough chill thoroughly and develop a dry skin on the outside. Not only will this make handling the dough easier, it helps the pretzels keep their shape when dipping them in the lye bath.
7. Lye bath – 2:45 p.m.
After the one-hour rest in the fridge, place an oven rack in the bottom third of the oven and another in the top third. Preheat the oven to 450°F (230°C).
Set up your station. Take out the sheet pans with fully proofed pretzel dough and gather the following:
- pretzel salt
- razor blade
- half sheet pan lined with parchment paper or a silicone sheet and a stainless steel wire rack inside,
- stainless steel bowl and rubber gloves for the lye bath. Be sure the bowl is not aluminum, which will react with the lye.
The goal is to set up an assembly line where you can work quickly.While wearing long latex or rubber gloves, add 940g cool water to the stainless steel bowl. Add 38g food-grade lye while gently stirring with a stainless steel whisk or large spoon. The mixture will initially be cloudy; keep stirring until all the powder or pellets are dissolved.
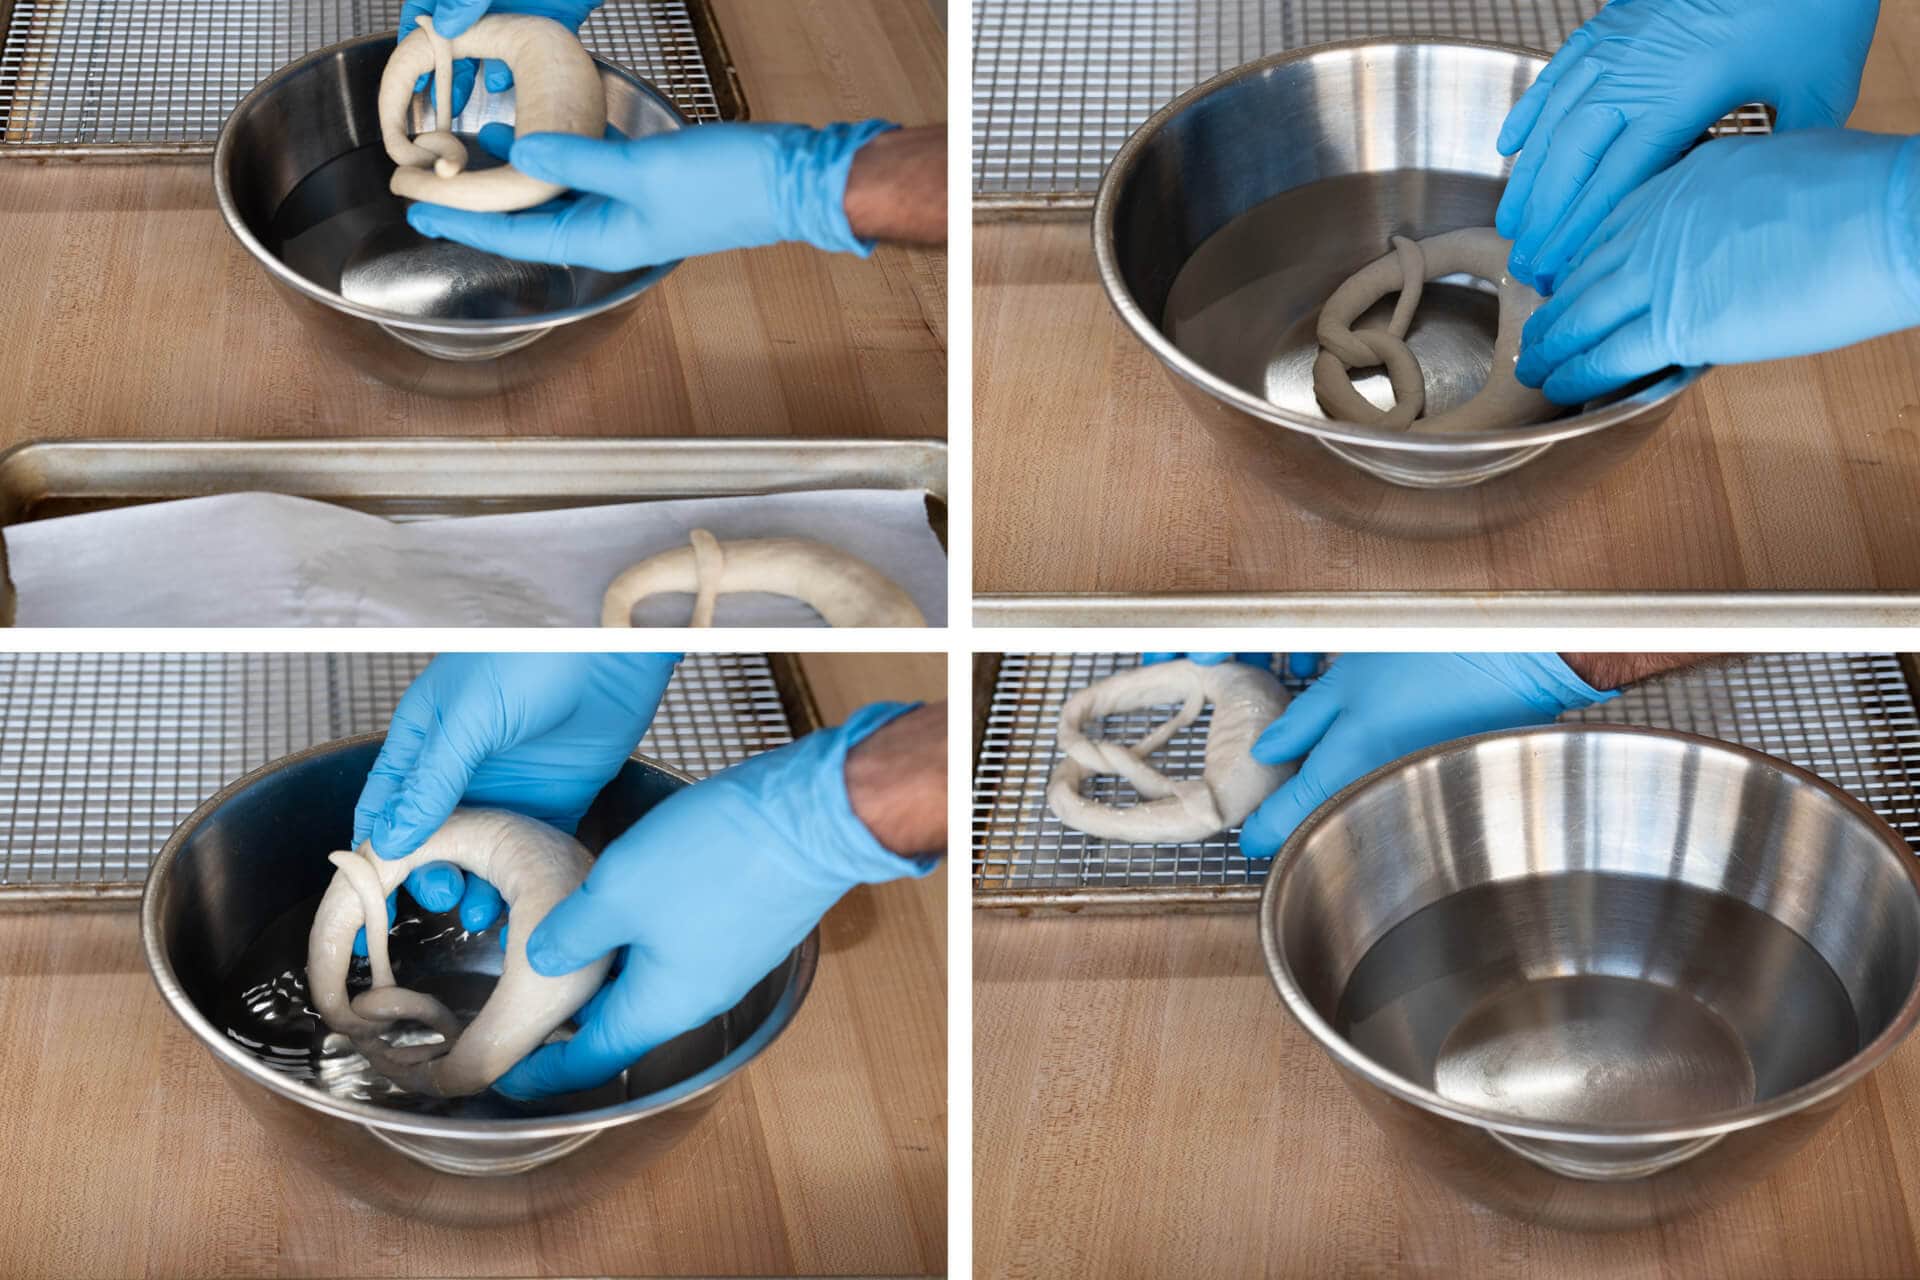
While still wearing gloves, pick up one shaped pretzel and transfer it to the lye bath (upper-left image, above). Let it sit in the bath for 15 to 20 seconds (upper-right image, above) and then transfer it to the wire rack (bottom-left and right image, above). Repeat with 5 more pretzels. Then, transfer the pretzels back to the original sheet pan (it should still have parchment paper or a silicone sheet on top) and setaside. Repeat with the remaining dough.
Carefully flush the remaining lye solution down the toilet or the sink and flush with water.
8. Bake – 3:00 p.m.
Carefully score each pretzel using a razor blade to make a single straight cut across the top of the bulge. Sprinkle the bottom area with pretzel salt. Transfer the sheet pans to the oven.
Bake at 450°F convection for 10 minutes. Rotate the sheet pans (bottom to top, back to front) and reduce the oven temperature to 425°F (220°C) convection. Bake for 8 to 12 minutes more until done to your liking.
Keep an eye on the pretzels in the oven; they will color quickly. If the temperature is too high, open the oven door to let it cool slightly and turn it down by 25°. Each oven is different, and my altitude of 5,280 feet might mean I require a hotter oven and longer duration—adjust as necessary.
Remove the sheet pans from the oven and let cool. The pretzels are best the day they are baked—and sublime still warm from the oven—but will keep quite well for up to 2 days. Enjoy warm with butter, mustard, and beer, of course.

Conclusion
These pretzels check all the right boxes: a beautiful dark color, the thinnest of crusts, that traditional pretzel flavor, and a chewy, soft interior that’s dense but well-fermented.
If you want, you can exaggerate the textural contrast between the “arms” up top and the bulge at the bottom by rolling the arms very thin. This way, they’ll bake completely through and become crunchy, which is a nice counter to the soft bottom.
Print
Seriously Soft Sourdough Pretzel
- Prep Time: 18 hours
- Cook Time: 25 minutes
- Total Time: 18 hours 25 minutes
- Yield: 12 pretzels
- Category: Sourdough, Pretzel
- Cuisine: German
Description
Chewy and soft, these sourdough pretzels are the real deal. Equally delicious with mustard, cheese, and beer, they have that unmistakable pretzel flavor and deep color.
Ingredients
Levain
- 10g ripe sourdough starter, 100% hydration
- 51g all-purpose flour
- 51g whole wheat flour
- 102g water
Main dough
- 635g high-protein flour (“bread” flour)
- 120g all-purpose flour
- 369g water
- 17g fine sea salt
- 60g unsalted butter, softened to room temperature
- 3g diastatic malt powder
Lye bath
- 940g cool water
- 38g food-grade lye
Topping
- coarse pretzel salt
Instructions
- Levain (9:00 p.m.)
In a small bowl or jar, mix the Levain ingredients. Cover the jar and keep it at a warm temperature for 12 hours. - Mix (9:00 a.m., next day)
Add the flour, water, salt, softened butter, diastatic malt powder, and levain to the bowl of a mixer fitted with a dough hook. Mix on speed 1 for 2 to 3 minutes until all of the ingredients are incorporated. Let the dough rest for 5 minutes. Continue to mix on speed 2 for 4-6 additional minutes until the dough becomes smooth and cohesive—an improved mix. - Bulk fermentation (9:15 a.m. to 12:45 p.m.)
Give the dough one set of stretch and folds after the first hour of bulk fermentation. Return the dough to the bulk container and let rest until time to divide. - Divide and preshape (12:45 p.m.)
Because the dough is low hydration, keep it covered at all times. Divide the dough into twelve 115 gram rectangular pieces. Preshape each rectangle into a tapered cigar shape. Let the pieces rest 15 minutes covered with plastic. - Shape (1:00 p.m.)
Line two half-sheet pans with parchment paper. Starting with the piece preshaped first, place the cigar in front of you so the tips are at your sides. Begin with your hands slightly overlapping in the middle, press down and roll the dough back and forth away from and then toward your body. As you are rolling, start to move your hands outward to encourage the tube to spread out and become increasingly thin as you move from the center out to the tips. You want to keep an exaggerated bulge in the very center of this rope, this will be the part you later score to open in the oven. Grab the two tips and arrange the dough so it loops away from you. Take one tip and fold it over the other side . Switch your hands so your right hand is holding the new right tip and your left is holding the new left tip. Fold the same side over the other as previously. Grab the two tips and fold them up over the knot in the middle and place each tip on its corresponding side inside the loop. It looks nice to have a little overlap with each tip — gently press it down into the side to seal. - Proof (1:15 p.m. to 1:45 p.m.)
Let the dough proof on the counter at room temperature for 30 minutes, covered. Then, uncover the pans and transfer to the fridge for 45 minutes to 1 hour. - Lye bath (2:45 p.m.)
Place two racks in your oven, one at the bottom and one in the top third. Preheat your oven to 450°F (230°C) convection (475°F (245°C) without convection). While wearing long latex or rubber gloves, add 940g cool water to a stainless steel bowl. To the water, add 38g food-grade lye while mixing with a stainless steel whisk or large spoon. The mixture will initially be cloudy, keep stirring until all the powder/pellets are dissolved. With gloves, pick up one shaped pretzel and transfer it to the lye bath and let sit for 15-20 seconds. Transfer to the cooling rack on top of the parchment paper inside a baking sheet. Repeat with remaining dough pieces. Once all the pretzel have been dipped, carefully flush the remaining lye solution down the toilet. - Bake (3:00 p.m.)
Score each pretzel with the razor blade and sprinkle on pretzel salt. Bake at 450°F (230°C) for 10 minutes. Rotate the pans back to front and top to bottom, turn the oven down to 425°F (220°C) and bake for 8-12 minutes longer until a deep brown color. Remove from the oven and let cool. Enjoy warm from the oven.
Notes
- For the lye bath, you will need a stainless steel bowl, stainless steel cooling rack, and pair of rubber gloves.
Sourdough Pretzel FAQs
Is pretzel dough the same as bagel dough?
No, they are quite different. Bagel dough typically has barley malt syrup added (and sometimes sugar, too, as I do in my sourdough bagels) to the dough, whereas pretzel dough does not. Additionally, pretzel dough typically has lard or butter added to the dough whereas bagels do not.
What is different about pretzel dough?
Pretzel dough typically has butter added for enrichment, whereas most typical bread recipes do not. Additionally, pretzels are dipped in either lye or a baking soda solution before baking for increased browning and that signature flavor (especially true with lye).
Does pretzel dough need diastatic malt?
I like to add diastatic malt powder to increase the coloring in the pretzels, add a little more chew, and ultimately, more flavor. However, you can omit the malt powder if you don’t have any on hand.
What’s Next?
There’s no question I’ll be making these soft sourdough pretzels often. When I’m in the mood for something sweet, my sourdough bomboloni will do, but these are their savory opposite. They’re slightly salty and the perfect snack for any sporting event, when friends come over for a beer or two, or even just for a tasty weekend treat.
Given the multitude of Oktoberfest festivities in my area, I’m certain I’ll have these on repeat for the next few weeks. The only real question is whether I’ll accompany them with mustard, cheese, or butter… Don’t judge.
If you’re in the mood for another recipe that’s in the same vein as these sourdough pretzels, check out my sourdough bagels: a similarly stiff dough but a completely different end product.
Guten appetite!
If you use this recipe, tag @maurizio on Instagram so I can take a look!


200 Comments
Hey @maurizioleo:disqus. I have Diastatic Malt Flour (I imagine it’s 100% Barley but not sure) and Bread Flour. Now that I look at my bags of Central Milling Organic APF (sold at Costco, great stuff) and King Arthur Bread Flour both contain Malted Barley Flour. Probably not in the quantities I want though considering I don’t have Diastatic Malt Powder on hand (unless Diastatic Malt Flour is the same thing). What to do?
I did find this handy reading guide. https://opentextbc.ca/ingredients/chapter/malt/
If you’re using those flours you’re likely ok not adding any diastatic malt since it’s already blended in. With pretzel I like adding a bit more to give it more of a chew, but not 100% necessary.
Thanks they turned out great. I’m not as patient with rolling them out as you did so they tend to get FAT AF, but that’s fine by me. They taste great and the texture is perfect. Thanks for this recipe. It beats the “Bavarian-Style Soft Pretzels” By Julia Moskin at The New York Times.
https://tehforce.net/images/IMG_6127.jpeg
https://tehforce.net/images/IMG_6129.jpeg
High praise, thank you! Those did come out wonderful. If they’re fatter they’re absolutely fantastic cut in half and stuffed with sandwich materials. Thanks for reporting back and enjoy!
I only had all purpose flour on hand, the dough was a bit sticky so I had to use a bit of flour to shape them. Boiled them for 30s with baking soda because I didn’t have lye (or protective gloves).
They were truly amazing when still warm : crispy on the outside and soft on the inside. Thanks for the recipe !
I’ve done with baking soda also and they did turn out great! Glad to hear you like them — enjoy 🙂
Hey Maurizio, have you yet tried baking your baking soda first for a better lye replacement (a la Harold McGee)? i just recalled this article, and think I’m going to try it. We’ve been craving pretzels.
I’m not a fan of having lye, I know it’s no big deal for most, but disposal is an issue in our house.
https://www.nytimes.com/2010/09/15/dining/15curious.html
I’ve made these with a baking soda bath instead of a lye bath and they turned out great. They weren’t quite to the same level of flavor/color as with lye, bust still really great.
I haven’t tried baking the baking soda per McGee’s article, but it’s something I sure would like to try!
I was thinking about using this recipe to make pretzel buns, which we love using for burgers. How would you recommend adapting the baking time for a roll/ bun shape instead of the pretzel? Also, how important is it to have malted flour? Thank you!
Those are in my agenda as well (with a recipe post here I’m sure!). I think this recipe would work really well for that, but I’d likely reduce the heat and bake them for longer, this way they won’t color so fast on the outside but still ensure a fully baked interior. I’d have to test to find the right times and temps, though, but that will be my approach. It’s ok if you don’t have malted flour, but I do find it adds a little extra color/chew/flavor — not a huge deal. Let me know how they turn out if you give that a try! Have fun 🙂
Ok thank you! Will let you know how it goes, but realized I don’t actually have malt powder in stock either so this will be next weekend’s project!
I have now made these as buns a few times, mixing in some spelt flour and baking 25 minutes or so at 450F. They are delicious, thank you!
Have you ever brushed with butter out of the oven? Not sure if I’d want to do that or not. Guess I’ll try on a couple.
I don’t think you could go wrong with that! Or a melted butter dip to go alongside…
How does the levain differ from simply using 244 grams of sourdough starter, which would allow a complete bake in a single day? The only difference that I can discern is that the levain has some whole wheat flour.
You could certainly just use part of your starter, that’ll work just fine. As you know, they’re really the same thing, making a levain has benefits (scheduling, no mistakingly using all your starter, etc.), but for these using your starter is just fine. Enjoy!
Maurizio, what do you think about boiling them in barley malt syrup as an alternative to lye or baking soda? …Kind of like the Cooks Illustrated bagel recipe. I have some of that on hand.
That would be worth a test for sure. I don’t think you’ll end up with the same exact taste/texture as with lye, but they’ll still be quite good to be sure. I’ll have to try this (I’ve been playing with bagels, recently 🙂). If you give it a go, please report back!
I actually was reading this recipe because I *really* want a good sourdough bagel recipe, and I know there are similarities with bagel and pretzel dough/methods, etc. I would be thrilled if you posted a sourdough bagel recipe! It would be great to have a high whole wheat option. I was so happy to find this website! I have plans to make your Spelt pan loaf, so excited! I am currently at the end of the bulk ferment for your “more whole wheat” pizza crust recipe. Thanks for such great recipes, instructions, and general information on baking with sourdough!
There’s no question that you have to enjoy them with Obazda, of course. 😉
I’ve never tried that but I want to!
Hello! Thank you very much for your amazing website!
For storing the Lye, what kind of container do you use ? Does lye react to plastic?
Lye can react to some plastic, it depends on what kind. If you search online for this information, you’ll find a breakdown of what plastic does not react to lye.
I store the solid granules in the package it came with. When I mix up a lye bath, I end up dumping any remaining liquid down the toilet (carefully).
Be aware that lye can also breakdown glass over time and may react to some metal, stainless is best.
Whatever container you find to store lye in, be sure to label it very clearly and keep it out of reach!
Thank you very much for your thorough reply. Much appreciated!!
Right on, awesome to hear that, Dee! I’ve had various reports about how well these do keep in the freezer with a quick blast from the broiler to bring it back to life. I’m definitely giving that a try next time.
You can form these as small pretzel but I’m not sure they’ll turn out like the bag of pretzel you are imagining from the store. You might be able to make them harder and crunchier if you baked them longer — it might get you close!
Wow…wow…and thank you. My family loves soft pretzels and I can’t believe how wonderful these are, not to mention how easy. I completely messed up – I was double-tasking with a polenta-rosemary loaf, which is on my rotation – and completely forgot to add the levain (I had three going!) until AFTER mixing! I let it rest, incorporated it on low for 2 mins, did a little gentle hand kneading and figured that this would never turn out. Well, it did, and if this is my “mistake” version, I can’t wait until the second try. They were beautiful. and delicious. Dinner is officially ruined by tummies full of pretzels 🙂 Will try to post on Instagram.
Thanks for that feedback, Tracey! Sounds like the mistake wasn’t too bad in the end, but I would have been panicked at that point 🙂 It’s so funny how often my little ones run into the kitchen when they think I’ve made these… I just hear “prezzel? prezzel?” — I love it!
Thanks again and enjoy!
Hi Maurizio, thank you for another delicious recipe, but I am a bit scared about using lye, have you try with baking soda instead? Do you think it works? What about using the same recipe to make bagels?
Don’t fear the lye bath. I just did it and it really isn’t that bad. The instructions here are great, and I really didn’t have any mess. I kept the bowl right next to the racks and had no drips on the counter. I used regular latex gloves that I had in our medicine cabinet. My only problem is getting rid of the solution, as we have a septic system. Can’t just flush it, but other sites have recommended saving it in a glass container for another use.
Don’t store dissolved lye in glass — the glass will slowly dissolve. If you’ve done this, you might notice how the glass container is etched. It might be pretty, but it also means your next batch of pretzels will contain sodium silicate (not toxic, but still quite alkaline and, uh, yuk).
Only use HDPE containers. Search for “safely store lye solution”.
If you want to flush the lye solution, and not harm your septic (I’m in the same situation), you can neutralize it with vinegar first. You’ll need a lot, so buy a gallon. It’s hard to tell how much, since vinegar concentrations vary. I already had some pH test indicator solution (from Amazon, made by General Hydroponics). Add a few drops to the lye solution, and it’ll be blue. Slowly add vinegar until it turns yellow (stopping at lime green is ideal, but it goes by quickly, and the darker green might still be too alkaline for your septic – I don’t know). Look at the test indicator chart for the expected color changes. Also, the solution will get a bit warmer, but not enough to matter.
As @disqus_I9bfMPPwn9:disqus said, the lye bath is not as scary as everyone makes it out to be! But yes, I have tried these with baking soda, you can see my results over at the King Arthur Flour Blog — they’re different but still great in their own way!
Thanks a lot for this recipe! Since I left home (I grew up in Bavaria) I missed good Pretzels. Now they are on my table all the time. As 12 pretzels is a bit too much for 2 persons, I freeze them after dipping them in the lye. When I am in the mood for a pretzel, I just put them on the counter for 10-20 minutes till I can cut them and then bake them for 2-3 minutes longer. works perfectly for me and I can have freshly backed pretzels whenever I like.
When I was in primary school, we visited a bakery and they taught us to shape pretzels by holding the two ends and throwing the middle in the air, so that it turns. Than you put it back on the counter, put the ends were they belong and the pretzel is finished. That’s how I shape my pretzels. It needs a bit of practice but I found that the throwing helps with getting thin arms and a bulky middle part (and it is a fun and fast way to shape pretzels).
Wow, yet another great result from freezing. Love that idea, especially after dipping them in lye, this way you don’t have to worry about doing that step later.
Yes, after I practiced this recipe a bazillion times in the end I started flipping and twisting the pretzel in the air just like you described. It makes for a much faster shape step and you really get into the groove of it.
Thanks for that feedback and happy baking!
Thanks again for all your hard work in testing and posting this recipe!! I baked a large batch the other week and this was very popular among my friends (as well as instagram 🙂 ).
To make a hard pretzel from this recipe, would you simply bake longer at a lower temp until crisp all the way through? I accidentally left two of these in the refrigerator (did the overnight bulk) for an additional 2.5 days but ended up baking them and found a similar hard pretzel consistency since the dough had dried out in the refrigerator! And they were quite a bit more sour due to the extra ferment time. Any thoughts on the viability of either approach? Thanks!
You’re very welcome, Adriano! Glad to hear your pretzel turned out so well. Yes, I’d say try baking them longer to fully dehydrated them. They’ll definitely crisp up quite a bit.
Hey Maurizio,
your “pretzel” looks really nice. As you mentioned, there are a lot of local Brezel-versions in Germany. The most significant differences are content of fat, dough hydration, arm thickness scoring. The traditional bavarian “Brezn” has big “arms” and cracks open by itself due to lower fat content (<3%) and hydration. The swabian Brezel has tiny arm, has to be scored before baking and contains more fat (<10%). So your version looks like a true combination of these two styles 🙂
Check out the two pics on the German wikipedia site: https://de.wikipedia.org/wiki/Brezel or the following text which sums it up pretty well… https://www.blackforestbreads.com/pretzels.html
Cheers and greets from Germany
Sascha
Thanks Sascha for all that info! I played with different fat percentages as well as shapes and the result here is what spoke to me in the end — you’re right, a combination of the two 🙂
In the future I want to play with making a version that has lower fat content with thicker arms and a longer hoop at the bottom. I did this a few times but I need more rounds of experimentation. I also like the idea of adding seeds and other toppings to these.
Thanks again and happy baking!
I grew up eating Laugenbrezel in Bavaria and we always ate them with just butter. You take a bite and then butter the exposed end, take a bite, butter, repeat. . . . One of my favorite things of all time. Thank you so much for this recipe.
Love that idea, and I do remember having butter options in Germany as well. I’ll enjoy them this way this weekend!
Here’s a good article on using baking soda as a substitute for cooking lye.
https://www.nytimes.com/2010/09/15/dining/15curious.html?_r=0
Thanks for sharing that link, Brian! I read through that article and will be giving that a try next week. I’m curious to see the end result and I’m sure it’ll be delicious as well — just different!
I began my love affair with pretzels at a very young age. Growing up in NJ we had Charles Chips’ hard pretzels delivered to our house monthly. In grade school, every morning in home room we could pay 10 cents to have a Philadelphia soft pretzel (the ones they sold on the street corners of the city) delivered to us for our afternoon snack. The smell of them being heated up after lunch was intoxicating! In Pittsburgh there is a company that sells hard, whole wheat pretzels topped with rosemary and garlic and other delicious things. In a pinch, Snyder’s tide me over, but I’ve been wanting to make my own for a while.
Before we went on vacation recently, I tried a batch for a travel snack. They were the cutest little things I’ve ever seen (next to the ginger bread teddy bears I make at Christmas) but tasted…well, of nothing…bland and un-pretzel-like. I’m excited to try this recipe, but still long for the crunch with a slight sour flavor of a hard pretzel. Do you think this recipe can be adapted to that? Maybe less hydration? My other batch had soft spots and burnt spots and an occasional crunch, but definitely not consistent! And I used baking soda.
Thanks M!
It’s funny because growing up here, and in an Italian household, we never had pretzel. I don’t think I had a pretzel (the large soft kind) until much, much later in life. I’ll tell you, though, now I can’t get enough!
I think it’d be hard to go lower on the hydration — the dough is already quite stiff and hard to knead/mix. You might be able to drop a few percentage points but it gets increasingly difficult to mix as you approach < 50% hydration, in my experience. I think the approach would be to make them smaller and thinner. Also, turn the oven temp down and bake them for longer, they will eventually crisp up. I did this by accident on my first ever batch here at home: I baked them far too long at 400°F and the thin areas of the pretzel turned into crunchy crackers, similar to what you'd find in a bag of pretzels at the store. I'd say try that with half a batch and see how it goes! I just tried using baking soda instead of lye, it works well. You won't get exactly the same sheen, color, and crust, but it’s pretty darn close!
Let me know how it goes, Gina. Enjoy!
Hi, living in the UK, I cannot get food grade lye (sodium hydroxide), only industrial sodium hydroxide drain cleaner. Does anyone know if this is okay to use, or just keep for drain cleaning. I am a little anxious at using the industrial stuff as I do not want to kill anyone, or myself for that matter, imaging the headlines, poisoned himself and murdered partner with a pretzel. All suggestions would be great, and if you have used industrial, let me know how it went, and if you can still eat in the usual way LOL
Hey, Baron! Unfortunately I don’t know as here in the US food-grade lye is available online. Hopefully someone else can chime in. Another thought: do you know anyone at a bakery who makes pretzel out in your area? You could try asking them where they source their lye, it might be somewhere in town!
Let me know what you find out regarding this, I’m sure there will be others in the same situation. Happy baking!
These look fantastic! I’m wondering if there is a stage at which I could do a cold ferment and pick back up the next day? And second question is a butter sub- coconut oil? Shortening? Thank you!
Thanks, Amy! After they are shaped, cover the trays and toss them into the fridge until the next day. Then uncover them, put them back into the fridge for 20 minutes or so (to develop that skin I mention in the post), then proceed with the bath. Works really well!
Hard to say on the coconut oil/shortening but I do know more traditional recipes use lard in place of butter. Conceivably any fat should work…
Happy baking!
Fantastic! Love the recipe and the instructions and they came out perfect and even more perfect since I’m going to a German pot luck night tonight! I was initially intimidated by the lye bath, but all went good. So excited to share them (and eat them!)
Glad to hear that, Federica! Perfect timing. I agree, the lye bath seems scary at first, but it’s really not a big deal as long as we’re careful and mindful.
Enjoy!
Hi Maurizio,
again, a great recipe!
How would you go about stretching the recipe over two days?
Bulk fermentation in the fridge? Would be interested in your experiences, here.
Thanks for this! my husband is a big fan of pretzels.
I just tried this recipe over the weekend using baking soda solution.
Two issues i encountered:
The dough was sticky. Eg the ‘knot’ from the 2 twists tend to ‘disappear’ and became a lump, without any defined line of a knot. Does it mean my dough is too wet? PS i live in a tropical climate 85F and 80 % humidity.
The taste was ok when it’s warm. But the next day, it tasted more like a crumbly bread, i.e. no more chewry texture. Could it be that i didnt mix it long enough in the mixer and not enough gluten was formed?
Coz i used a baking soda solution (and not adept at it), the skin was not thin like a normal pretzel and it tasted crunchy when it was warm. I need to try doing it again!
It sounds like the dough might have been over hydrated. I’d try this recipe with a reduction in water (especially since you’re in a very humid environment), I’d probably go down 5% and see if that helps. The dough should feel very stiff and strong when you’re done mixing. It’s hard to over mix this dough, keep going until it almost has a full “windowpane.”
For the baking soda bath, I’d boil them in the water for 1 minute only. If the dough is sufficiently chilled, it won’t come apart in the bath.
Hope that helps!
I’ve found that boiling them in the lye solution rather than using room temperature water impacted a stronger “pretzel” flavor. I go with a 3% lye solution.
Wow, that’s very interesting, for some reason I have not thought of boiling them (although that’s how it’s done with baking soda). I’ll give this a try next go, thanks for the suggestion!
totally! keep me updated with what your think
How long do you boil them? This is fascinating!
When I did trials with a baking soda bath (and boil) I boiled them for 1 minute. Definitely fascinating 🙂
How critical to the end product is the diastatic malt powder? Any ideas about what would change if it were left out? I have some barley malt syrup, but it’s not diastatic.
Most pretzel recipes will utilize non-diastatic malt powder — mostly for flavor. I used diastatic malt because I tend to use a little in most of my sourdough baking to help with the longer fermentation times but it may not be 100% necessary in this instance (since there’s no overnight proof). However, I would recommend you use the barley malt syrup if you’re not using diastatic malt, this way there will be a boost in flavor along the lines of a traditional pretzel. Hope that helps!
I made these yesterday and used the baking soda option (boiled for 30 seconds). They were absolutely delicious and my friends gave rave reviews. My pretzel shaping skills need a little work but they had a lovely burnished crust and great flavor. I didn’t have any malt powder so added about 3 grams of maple sugar instead.
Made these today- came out amazing! My family thanks you (my waistline does not, but that’s another story).
Re: 450°F (232°C) true convection
Maurizio, I do have one question about “true convection”. I entered 450F using the convection option (I normally never use convection), but my oven displayed 425F instead. Does this make sense to you? Is this what was intended by your instructions? Or should I have entered 475F convection so it displays 450F? Or is my oven malfunctioning? I’m so confused…
Some ovens do that, they reduce the temp by 25°F because convection usually bakes faster and a little bit hotter — it’s to “help” people who might not know that. I did mine at 450°F true convection (true convection means the oven heats the air as it’s being circulated around, it’s ok if your oven doesn’t have this setting and it’s only convection option) — meaning I actually input 450°F and used that temp.
However, my baking might be different for you based on your elevation and even your particular oven. I’d say start at 450°F and keep an eye on them. I find this dough is really forgiving if you have the temp a little too high, but if it’s too low and you bake for too long, they’ll dry out and become pretty hard. If you notice they color a bit too fast, just turn it down to 425°F for the remainder of the bake.
These turned out great! I used lye that I use for soap making. I pushed everything back four hours so they would be ready by lunch. I even made a mistake and added too much flour and they were still wonderful. I really like your recipes. My husband and I have seven children so using and baking with my starter daily is very practical now.
That’s great to hear, Michelle; happy they turned out well for you — the dough is pretty flexible! Refreshing and baking with my starter is just a daily routine for me here as well, it really doesn’t take much time each day and you just get into the swing of things. It’s also nice to be able to make such a wide variety of leavened goods straight from home. Happy baking!
Hey maurizio, if i want to use baking soda insted soda caustic, what should i do ?
thanks !
Check out my post over at the King Arthur Blog, I discuss using baking soda.
How could you substitute the butter? I’ve made these a few times and love them, but now I want to share them with my vegan friend and dairy butter def needs to be omitted.
You could try typical butter substitute (perhaps coconut oil?) — but I’m honestly not sure how the end result would bake up. It would require an experiment!
As always, love your recipe and the clear, detailed steps. Just a clarification on the time schedule here. At 1:15 you say to proof for 30 minutes at room temperature. Then you have the lye bath listed for 1:45, but in the prior step you said to then chill the shaped pretzels in the fridge for 45 minutes to an hour. Wouldn’t that mean the lye bath wouldn’t occur until closer to 2:45? Or am I misunderstanding something?
You’re totally correct — that was a typo! I fixed the post to the correct times (2:45 p.m. should be the lye bath). Thanks for catching that!
Hi Maurizio! I’m hoping to try this recipe this weekend, but was considering trying to sneak some whole wheat flour in there. Would that be an ill-advised modification? If so, any ideas on how much I could get away with and how much to increase the hydration to pull it off? Thank you for this recipe!
That’s not a problem at all. I made these recently with 5% rye flour and the result was amazing — a little more acidity, complex flavor, earthiness… They were great. I’d say start with 10% whole wheat if that’s what you’re going for, then work up/down as you like. Have fun, these are so good!
Thanks for your quick response! If I use 10% whole wheat, will I need to add more water, or should I be okay keeping the water content the same?
You might need to increase the hydration slightly, but don’t add too much, this is a rather dry dough for a reason 🙂 Just assess it during mix by feel, splash in a bit more if the dough is impossibly dry.
As an update I made these this weekend with the APF replaced with Brian Severson Farms whole wheat and the water upped to 430 g, and they turned out really great! Thank you so much for the recipe.
Right on, really glad to hear that! Enjoy 🙂
I don’t know if you have seen these, they make it so you can stack 1/2 sheet pans in the fridge, take up less space.
https://www.amazon.com/Nordic-Ware-Universal-Cover-Fits/dp/B001717TM8?ref_=w_bl_hsx_s_ki_web_2597461011
Wow now isn’t that handy. I’m definitely getting a few of those!
Hello, if we do not have a Kitchen Aid, can you please advise as to how adjust this recipe. I made my Levain at 7am this moring, so I’ll be ready to start the pretzels at 7pm tonight, thanks in advance for your time & advice.