
When attempting a new recipe I will usually keep working at it many times over until things are to my liking. I will go through pages and pages of notes with various tweaks to temperatures, folding intensities, flour combinations, and numerous other things. When I finally make a breakthrough I refer to my notes and pictures and will write up a new post in the hopes my discoveries will help any readers out there looking to bake these loaves in their kitchens. And this entry is no different. I believe I’ve finally found a great combination of inputs to produce a superb whole grain sourdough loaf. In my last whole wheat entry, the result was around 75% whole wheat. This entry describes how to get a nice and light, moist crumb with a higher percentage.
If you’re looking for a completely whole grain loaf, take a look at my other recipe for a 100% whole wheat sourdough where I sift out the bran and reincorporate it later!
I haven’t made a “white” sourdough loaf in a few weeks (the last one was my Walnut Cranberry Sourdough loaf), and I’ve become accustomed to the deep & rich taste these whole grains present when baked. They hold up to just about any food, and only sometimes overpower other ingredients.
One thing I’ve been experimenting with is a younger levain, per Chad’s description in his Tartine Bread books. In his latest book, Tartine Nº 3, he describes a levain prepared in about 4 to 6 hours at a warmer temperature between 80°F (26°C) and 85°F (29°C). My levain, however, is typically created overnight (about 12 hours) at a relatively low temperature between 66°F (18°C) and 70°F (21°C), depending on how brutal the winter days have been. I wanted to reduce my levain build time to match Chad’s more closely and see if using it at an earlier stage would help with fermentation activity during my bulk fermentation stage. I’ve only baked a few loaves this way, and all have been whole grain, but I’m eager to try this younger levain method in future bakes with my typical country loaf.
If you’re interested in maintaining a warmer temperature for your starter and/or levain, a small home dough proofer might be a good option. I’ve been using one lately quite heavily in my kitchen and it’s proven to be indispensable.
Here you can see the progression over a 6-hour levain build. Earliest is top left, oldest and ready for the mix is lower right (read like a book).
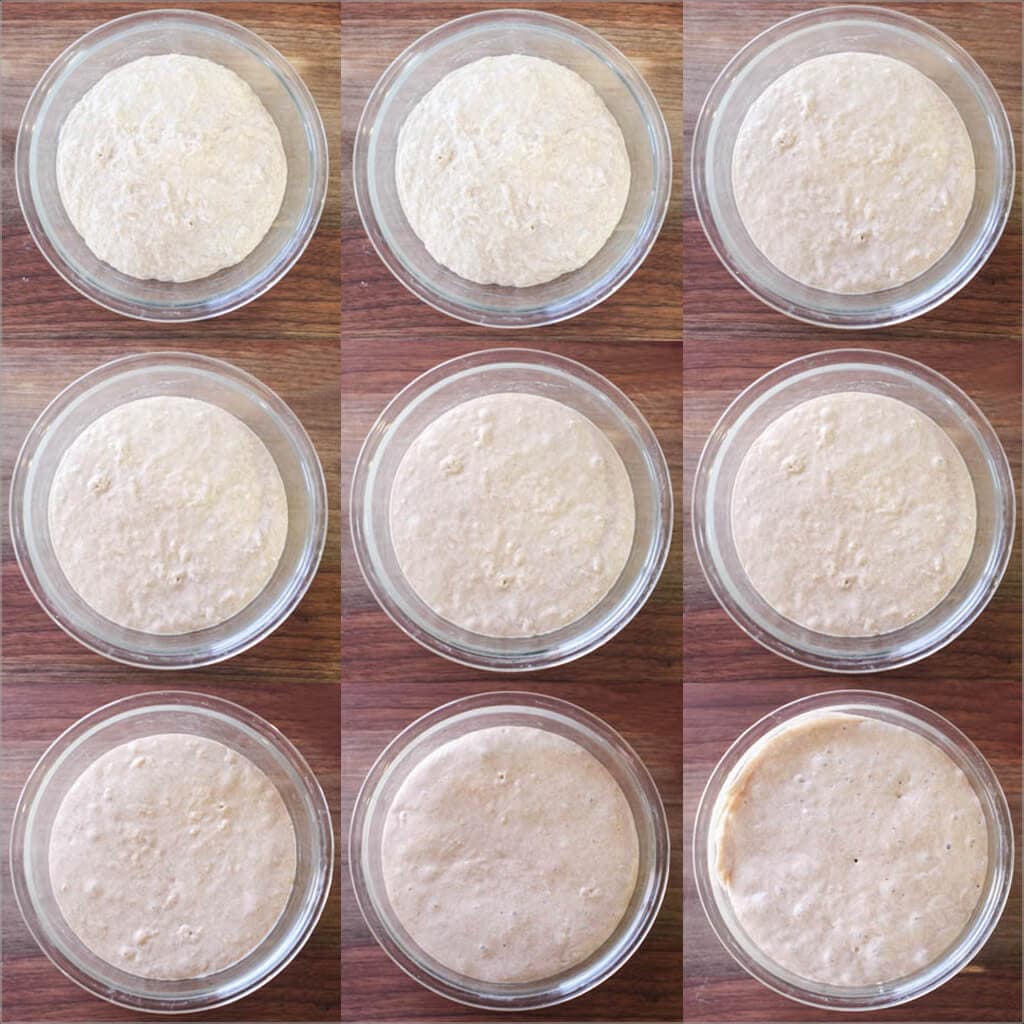
If you’ve only ever used a mature levain for your bread, you might get a little uneasy watching your young levain develop, never quite sure if it’s ready. Remember you can always do a quick “float test” before using the levain to ensure it’s ready.
Whole Grain Sourdough Formula and Method
Prepare the levain – 10:00 a.m.
The following levain build was kept at around 77°F (25°C) ambient temperature and started in the morning on the day I mixed the dough, rather than the night before.
| Weight | Ingredient | Baker’s Percentage |
|---|---|---|
| 19g | Mature sourdough starter (100% hydration) | 25% |
| 39g | Whole wheat flour (Bob’s Red Mill Stoneground Whole Wheat) | 50% |
| 39g | All-purpose or bread flour (Sangre de Cristo) | 50% |
| 78g | Water | 100% |
After mixing the above in a thick-walled glass container, cover and set in a slightly warm area, around 77°F (25°C), for about 6 hours.
Mix the flour and water & autolyse – 10:00 a.m.
Autolyse times for bread with this high of whole grain can typically range from 2 hours to overnight. I’ve done both and almost everywhere in-between. I elaborated on the differences between short and long autolyse times in my last whole wheat entry, but I’ll quickly say here a longer autolyse helps whole grains fully hydrate and starts the gluten development process to reduce total mixing time.
Additionally, during an autolyse, where the flour and water are mixed (remember, no levain or salt added during this step), enzymatic activity begins and sugars are “unlocked” for fermentation. Chad, in Tartine Nº 3 explains best:
As the autolyse is increased, amylase, which is activated by the water, starts to release sugars in the flour, making them more available for the wild yeasts and bacteria when the natural leaven is introduced to the dough. Some slightly bitter grains such as red wheat take on a noticeably sweeter tone…
Chad Robertson
But first, how does a long autolyse increase the rise height of your bread? Hamelman elaborates in his essential book, Bread:
When making breads containing lots of whole-wheat flour, during the autolyse the bran has an opportunity to absorb more dough water. This also has a favorable impact on loaf volume, because during the final mixing of the dough there is less of a cutting action of the bran on gluten strands.
Jeffrey Hamelman
I know, I know, I hear you saying “now I have to not only create a levain and watch it, but I also have to do a longer autolyse and manage that increased time as well?” Well, I found I can make this easy on myself, and you too. Just do your autolyse for the same amount of time as your levain, between 4 and 6 hours. Start them at the same time, and then they are done at the same time. Easy, right? From there you can experiment further with varying autolyse times and note their impact on reduced mixing time and dough strength and adjust accordingly.
Let’s get mixing.
Ingredients for Autolyse:
| Weight | Ingredient | Baker’s Percentage |
|---|---|---|
| 100g | Sangre de Cristo white flour (a locally milled flour, this is high protein, close to bread flour) | 10% |
| 150g | Bob’s Red Mill whole wheat flour | 15% |
| 500g | High Extraction (explained below) Bob’s Red Mill whole wheat flour | 50% |
| 250g | King Arthur Organic White Whole Wheat | 25% |
| 50g | Wheat Germ (optional) | 5% |
| 825g | Water | 82.5% |
Note that the total hydration for these loaves will be 95%, we will add more water later when we dissolve the levain after autolyse.
Method:
Six-Hour Autolyse:
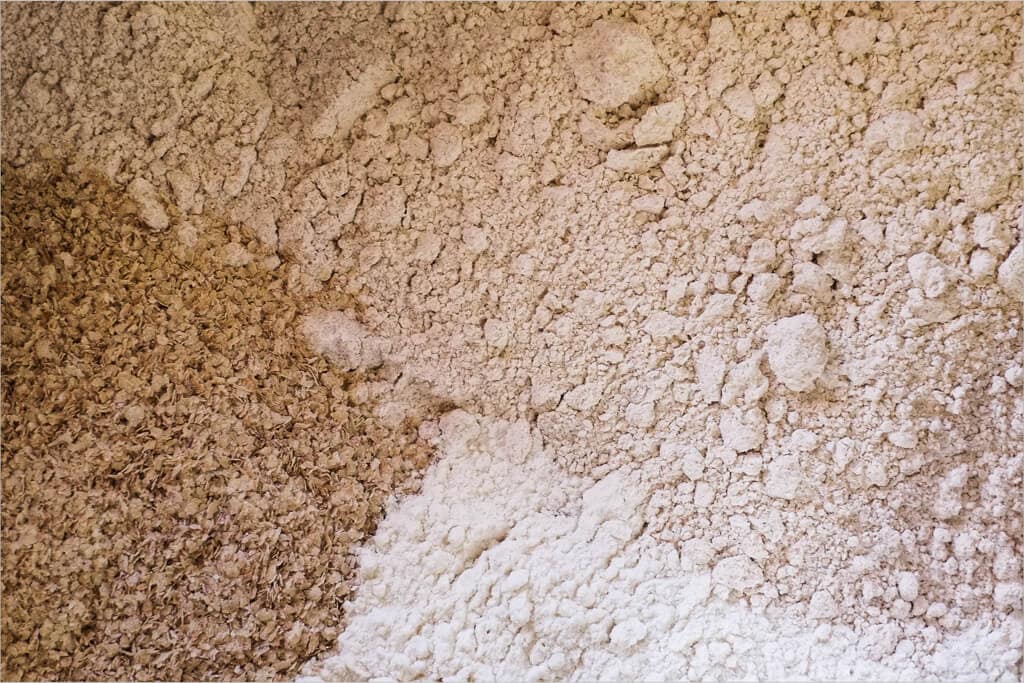
- Create your 500g high extraction flour by sifting your whole wheat flour. The flour that falls through the sifter is what you’ll use now, the bran that remains on the top can be reserved and used to coat your bannetons to prevent sticking but also increasing the whole grain percentage in this bread
- Add 825g water to your mixing bowl
- Add in 500g high extraction flour, 250g white whole wheat flour, 150g whole wheat flour, 100g white bread flour, and 50g wheat germ
- Mix until all the dry flour is incorporated
- Cover with plastic wrap and keep covered in a warmish place in your kitchen at around 77°F (25°C)
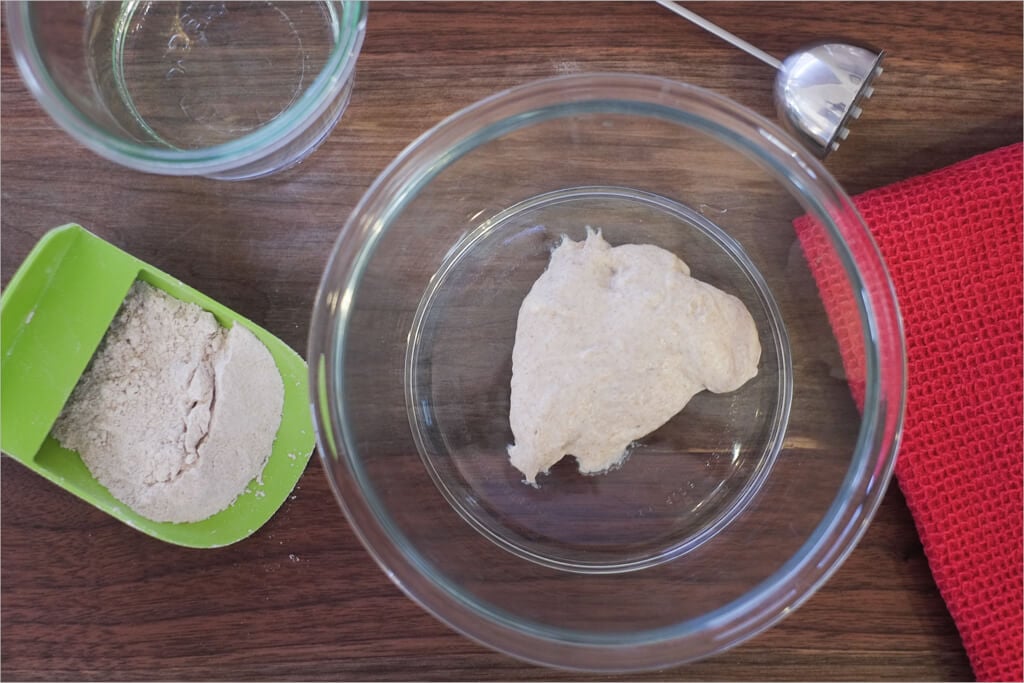
After six hours mix an additional 125g water and 175g levain in a separate bowl. Mix these until you’ve fully dissolved the levain in the water.

Add to your autolysed dough:
- 25g sea salt
- Your dissolved levain (your levain plus the withheld 125g water)
Mix with your hand until the mass becomes a bit “sticky,” and the liquid levain is fully incorporated. Transfer to your bulk fermentation container.
| Final dough temperature: | 78°F (25.5°C) |
Bulk Fermentation – 4:20pm
You’ll notice after the autolyse and mix the dough has some pretty good strength to it, yet it is extensible enough to stretch out without snapping back. Do the following turns gently during the bulk phase to avoid tearing the dough, with the last two sets of turns being very gentle.
- 4:50 p.m. – Turn Set 1
- 5:20 p.m. – Turn Set 2
- 5:50 p.m. – Turn Set 3
- 6:20 p.m. – Turn Set 4
- 6:50 p.m. – Turn Set 5 (very light set of 3 turns)
- 7:20 p.m. – Turn Set 6 (again, very light)
- 7:20 p.m. – 9:00pm – Rest on counter untouched
Note that a “set” here is four stretch and folds. I reach under my dough, pull up, and fold over the other side I do that four times. For this loaf in steps 5 and 6, I only did three very light turns, the dough was strong enough, and I did not want to risk tearing it.

With whole grain like this, you won’t see that crazy explosive rise you will with predominantly white bread, but the bulked dough should look jiggly in the bowl when you slightly shake it. The edges of the dough should have some shape to them in the bowl.
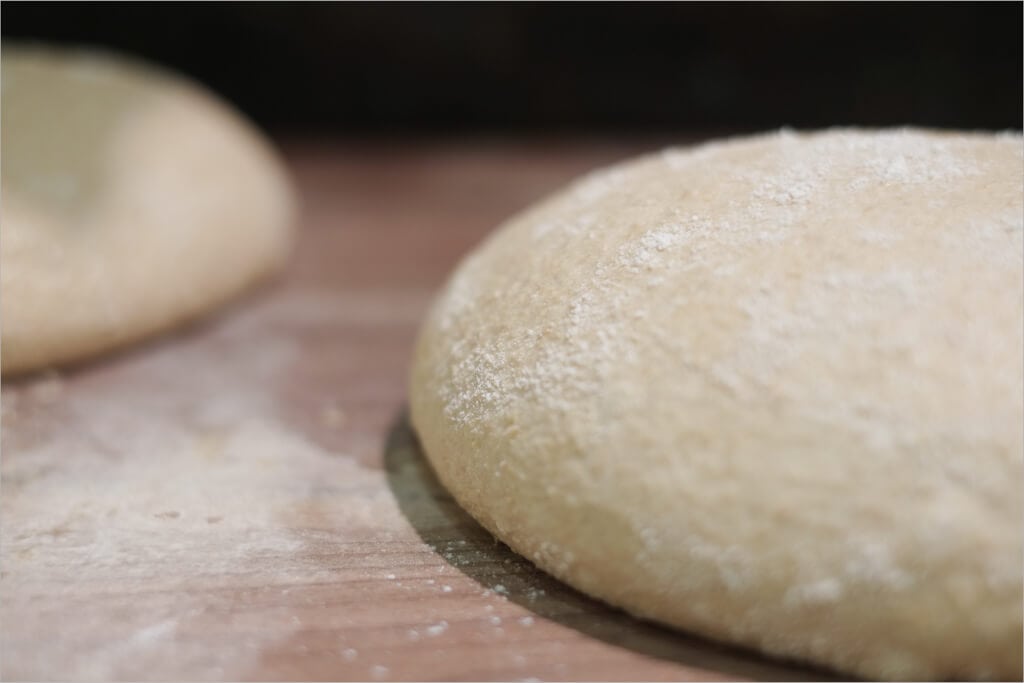
Pre-shape – 9:00 p.m.
Take the dough out of the container onto your work surface and sprinkle some flour on top before dividing. Divide the mass into two halves and lightly spin each half with your dough knife in one hand and your other hand. Let this pre-shape rest for 20 minutes.
Lightly dust your two linen-lined bowls with the bran you’ve reserved when creating your high extraction flour. Alternatively, you can use white or brown rice flour.
Shape + Proof – 9:20pm
After the pre-shape, my dough looked like it was holding its shape quite nicely, but it also still felt very extensible. I decided to do one loaf as a batard as I knew I’d be able to do the more complex shaping required. Plus, I love the batard shape. At 95% hydration shaping can be quite a challenge. Make sure you use enough flour to keep your dough from sticking to your work surface, but try to keep it to as much of a minimum as possible. I know, it’s not an easy balance to find.
See my post on shaping a batard for more tips and a video.
Create a nice taut surface on your loaves to ensure they have maximal oven spring. You don’t want to work them over and press out all the gasses, but you should have nice tight skin on the outside. This tight skin helps the dough rise when first put into the oven. After you’ve shaped them, gently place them into their bannetons and place in the fridge for an overnight proof.
Ahh that was a long day, but it was satisfying, wasn’t it? There’s nothing like taking the time to create these lumps of dough only to see them spring to life as large loaves in the morning not to mention the whole eating them part.
Score + Bake – 7:00am
In the morning, place your baking stone in your oven at the bottom 1/3 position and turn it on to 450°F (230°C) and preheat.
When preheated, take one of your loaves out of the fridge and grab a piece of parchment paper to place on top of the basket containing the dough. Take your peel and then put it on top of those two and quickly invert it, so the dough is now resting on the parchment paper and the peel.
When you score these whole-grain loaves, try not to dig in too deep at a 90° angle. If you go too deep, your loaf may not rise to its full potential. For the boule, I do a very light 90° “X” shape, and the batard is my usual 40° crescent from one side to the other.
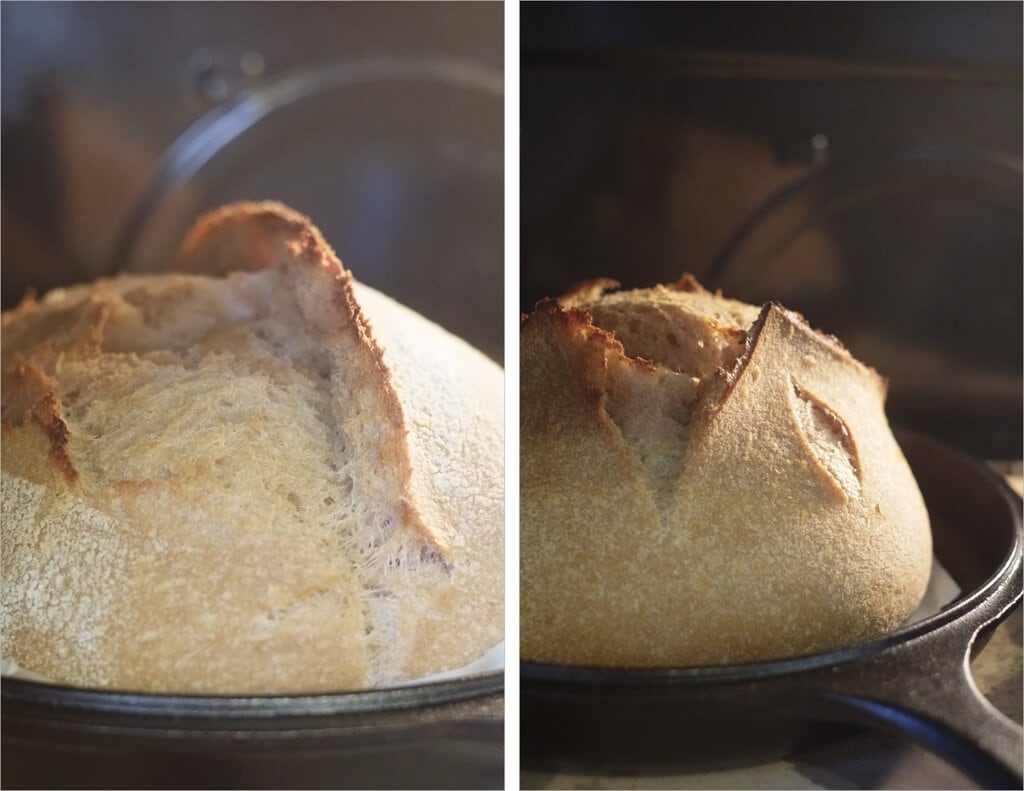
Place the dough into the combo cooker and bake, covered, for 20 minutes. After 20 minutes, take the lid off the combo cooker and bake at 450°F (230°C) for an additional 30 minutes, until done. For each of these, I had to go a bit longer than 30 minutes until the interior temp reached between 205-210°F (96-99°C).
Conclusion
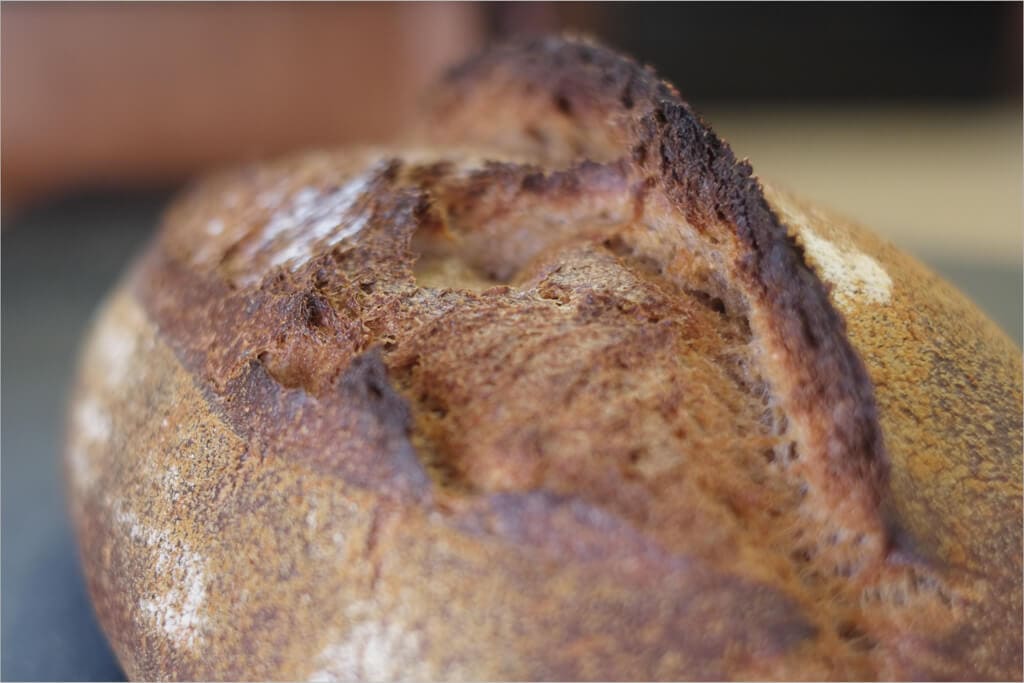
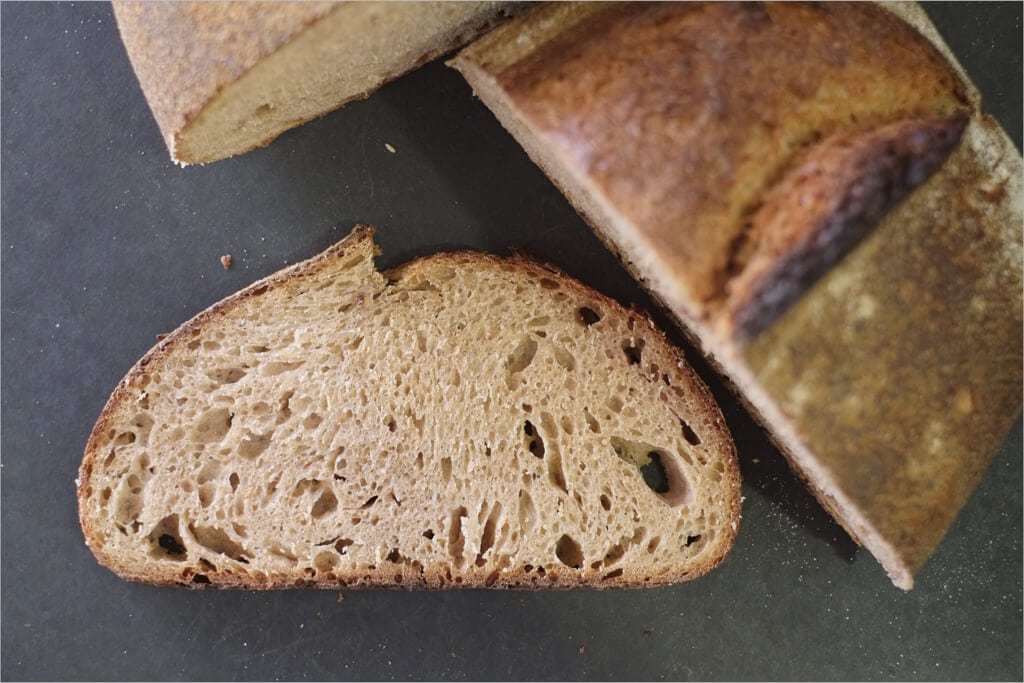
These two guys are, without a doubt, the best whole grain loaves I’ve made. The rise was far superior to any before them, and I just knew they were going to come out great when I loaded the oven. When I turned them out of their bannetons onto the peel, they held their shape: nice and bubbly with some height to them. I firmly believe I still have some room for improvement here and can get them even higher and an even more open crumb. These loaves have upped my bar and are a high starting point from which I’ll keep experimenting.
And as I mentioned up above, my future whole grain experiments have only improved and baking with so much whole grain brings so much flavor.
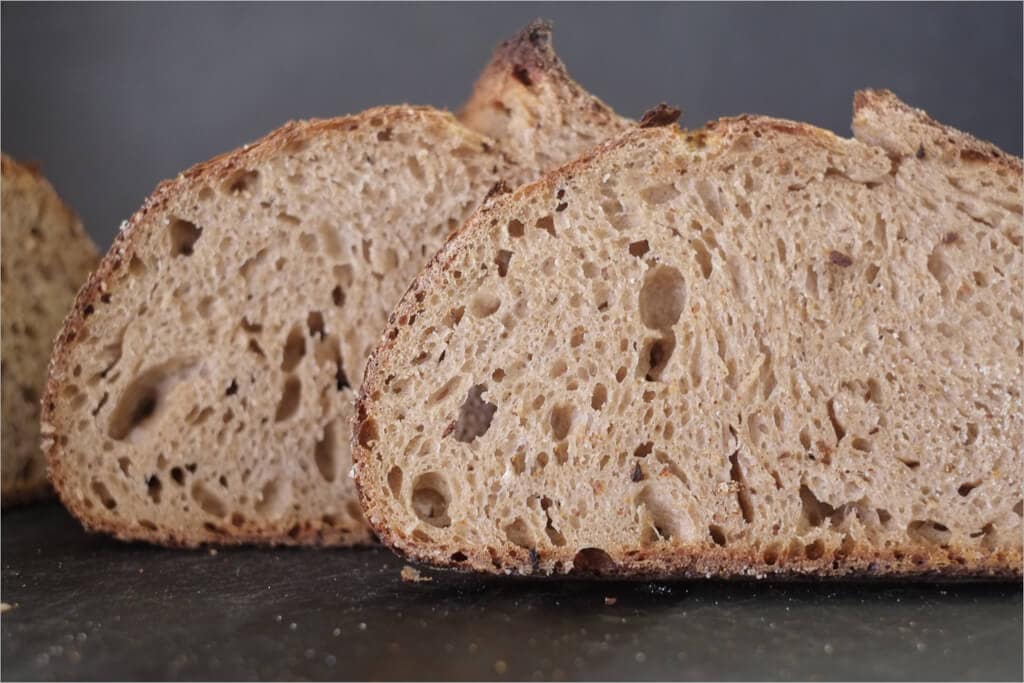
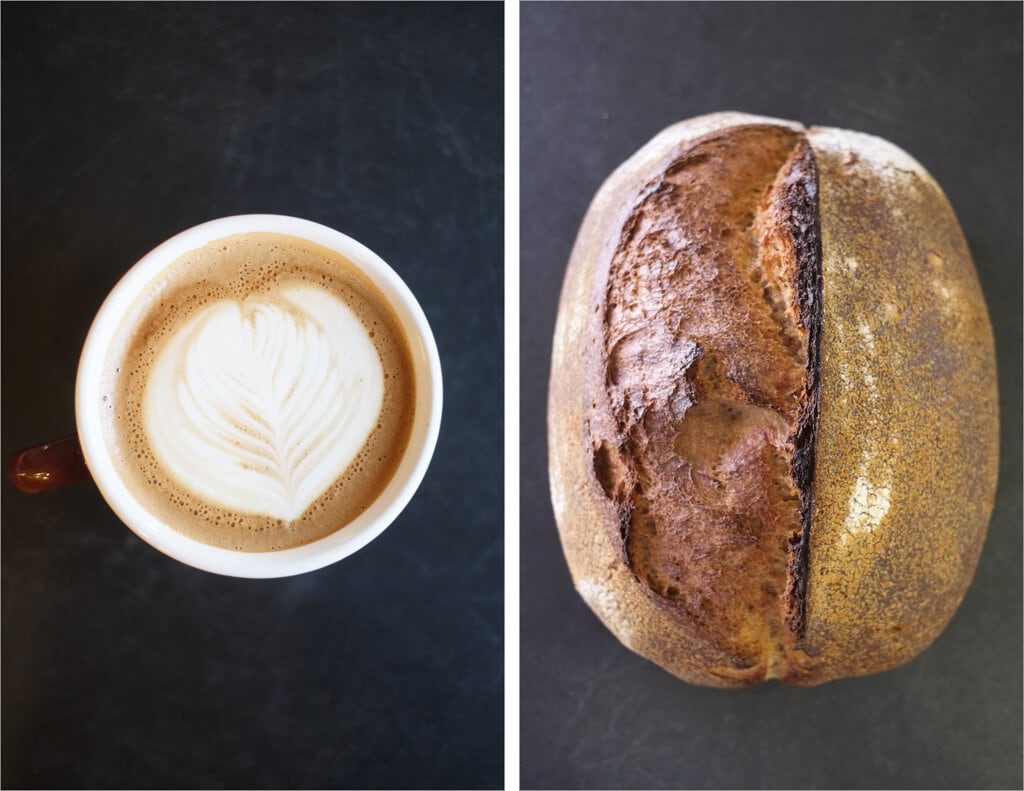
Crust
The crust was a tad on the thick side but not so much that it was hard to eat. I do not mind a thicker crust on my bread, but thin and brittle is what I strive for. Regardless, it was quite fragile, and there were some nice blisters and cracks throughout with some great movement, and look at le gringe! Now those are some ears if I’ve ever seen any.
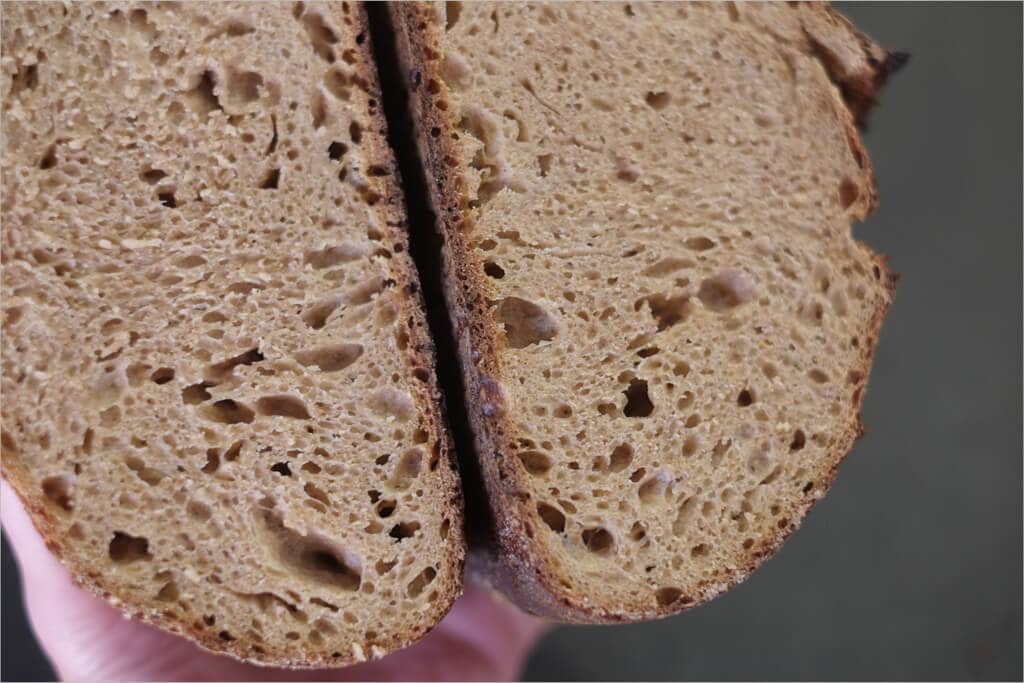
Crumb
High rise on these two! Each slice is open and airy with an excellent level of tenderness. At 95% hydration, a moist crumb is to be expected but I think this might be pushing the hydration levels, more water would not help this achieve anything further. Plus, pushing hydration more than 95% exits my shaping comfort zone as its very hard to handle (I’ve done a 115% hydration loaf, and I thought I was going to end up pitching the entire batch it was so difficult).
Taste
I like the taste of these whole grain loaves. The extended autolyse tones down the sometimes bitter taste found with this much hard red wheat, and the remarkable rise and airy interior help to lighten the loaf. I know I said this last time, but this is now my go-to recipe for whole grain bread!
Buon appetito!
If you use this recipe, tag @maurizio on Instagram so I can take a look!


130 Comments
I did a test levain om room temp (70 degree ).
After six ours a have volume increase of 35%.
Can I assume the levain is ready for use or does it need to be double in size?
It does float.
I do have a proofer so I can use that and build the levain at say 77 degree. If you think that is better.
It does not have to double, but you do want to see consistent rise and fall each day. If you’re seeing the same rise and fall consistency each day you’re good to go!
My starter was doing that I was talking about a levain. Feeded 1-4-4.
I was changing my starter from 50% wheat flower and 50% whole grain rye flour to only wheat flour.
It was less active after feeding it only what flour so no I am back to 50% wheat and 50% rye.
The levain a made with that was double in size at the same time my starter dit.
So that is alright now.
When you say place your baking stone in the oven – does that just sit in there while the dough is baking inside the cast iron dutch oven? Or do I need to place the entire dutch oven in the oven to preheat for an hour @ 500? If the stone is different than the cast iron dutch oven, does the stone get removed when the dutch oven goes in the oven?
Thank you!
Since writing this post I’ve updated my method, see my post on baking bread in a Dutch oven for more tips and process photos. These days I don’t place the Dutch oven on top the baking steel or baking stone, in fact, I don’t put either in the oven at all (the Dutch oven gets hot enough). I do preheat the oven with the Dutch oven inside, though. I place the shallow lid on a rack to one side, and the deep pot on the other.
Happy baking!
I love this recipe so much because the long autolyse and fermentation really help develop the flavor and keeps it from tasting too “healthy” with the large whole wheat content. Thank you for the dedication and time you spend creating these recipes.
I have a question about shaping. When it comes time to pre-shape my dough really wants to spread out over the 20 minute wait period, and then the final shaping I struggle getting tension in the dough to create good structure for baking. Do you think reducing the hydration or kneading more initially would help give the dough enough strength to hold it’s shape better?
Thanks for the kind words and feedback, Aaron! Yes, decreasing hydration and/or a little more strength through kneading or bulk fermentation folds will certainly help with this. I’d say try reducing the hydration 2-5% and see if that helps. If, during bulk, the dough looks very weak give it another fold 20-30 minutes later. It’s incredible how much strength is imparted on the dough with a set of stretch and folds!
Hope that helps and happy baking!
Maurizio — I tried this this week after a few months of doing the 50/50. Got excellent rise & a beautiful loaf — this will definitely be my new go-to! Question: I use Central Milling Organic Whole Wheat Hi-Pro Medium for my high-extraction flour. I have a Vitamix blender with the Dry Grains Container which should allow me to get a finer grind. If I fine grind the removed bran in the Vitamix, could I mix it back in without the bran having a cutting effect on the gluten network? How fine does it need to be? Also, the levain made about 2x the 175g ultimately needed — could I just half it from the get-go?
Great to hear that, Kelly! Yes, you can definitely cut the levain down to meet the recipe. I will update this post to reflect that as well — it should be created that way.
You can certainly mill the flour again in your Vitamix. It’s hard to say how fine is “fine enough,” but generally when I’m milling at home I like to mill as finely as possible, I find a get a better result this way. My thought is you’ll still have a puncturing/cutting effect on the gluten network no matter how fine you go, but you could give it a try. I have heard from some bakers who said if you mill too fine you might cause issues, but I’ve not experience this myself.
Me again. 2 questions: first, why no slap and fold/kneading before bulk ferment begins?; second, would a bit of Diastatic malt be good here? I’m using Central Milling medium hi pro and KAF bread flour.
You can certainly do slap/fold with this recipe if you’d like. Just a few minutes until the dough comes together. I’ve found diastatic malt to not really be necessary with doughs containing high percentages of whole grain flour (there is already plenty of enzymatic activity!).
I’ve revisited this recipe after making your 50/50 almost exclusively and my technique has really improved the outcome of my dough! The flavor is amazing for an almost whole wheat bread, not too “healthy” tasting.
Right on, really glad to hear you liked this recipe, Aaron!
Hello Maurizio!
I love the detail in your instructions and I believe I’ve learned the most from your site than most others!
One question I have for you:
After the long autolyse when it becomes time to mix the levain… how aggressive is this mixing process? I worry because I feel I’m destroying what the long autoyse did. What I did was mix the levain with my hands until it was fully in the dough but I had to crush up the mass to get everything mixed together… it felt wrong to destroy the nice gluten network built from the autolyse… Are we suppose to mix the levain without breaking apart the autolysed doughs structure or is it ok to mash and break everything together?
Thanks, Robert! Sorry for the delayed reply. It’s totally fine to mix vigorously after the autolyse, you won’t destroy anything that’s developed during this time. In fact, think about bakers who use a professional style mixer: they have that mixer running pretty fast to further strengthen the dough. So yea, don’t worry about this at all, you do still need to strengthen it! Hope that helps and happy baking!
Hi Maurizio,
I’m a new bread baker, and I just pulled this loaf from the oven. Two things immediately apparent: the loaf hardly rose at all, and the crust seems very thick and tough. The dough was very wet and spread a lot and was hard (impossible!) to form into a boule. Last week I made your 50-50 loaf, which had similar issues, although the taste and everything else about that loaf was amazing. It just didn’t rise very much. Do you have any tips for what I might be doing wrong, or what I could try differently? I followed another recipe online, another riff on the Tartine loaf that was 100% whole wheat, and it called for adding a little vital wheat gluten. With that loaf I got exceptional rise, though the texture was a little dense. Thanks so much for any tips.
An addendum: I just tasted the loaf and it’s delicious. Wow. So flavor-wise, this is the loaf for me. I just need to work on rise and crust.
These very high percentage whole grain loaves can be difficult to achieve a lofty rise. I’ve never used vital wheat gluten but in my experience flour with too high of a protein percentage can lead to a “gummy” end result — this is why I typically use as little high protein (13%+) flour as possible.
It’s hard to assess just how much rise your loaves had based on your description but know that you will need to set your expectations a little differently for a whole grain loaf of bread: you simply will not get the same loft and rise as you would with a mostly-white flour loaf. Whole grain flours contain much more, if not all, the bran/germ present in a grain and thus will hinder rise in the oven (these sharp particles will have a cutting effect on the gluten network formed, reducing loaf height). However, what they lack in height they more than make up for in flavor and nutrition.
My biggest advice here is to try and stick to the same whole grain recipe for a while, slowly learning the nuances of the flour you’re using and the process. Whole grain loaves do take extra practice! I hope this helps, let me know if you have any more questions and I’ll do my best to help. Happy baking, Carol!
Thanks for this great resource! First, a typo.
“After 20 minutes, reduce the heat to 450ºF, leave the dough covered, and cook for an additional 10 minutes. After this time, take the lid off the combo cooker and reduce the heat to 450º and cook for an extra 30 minutes, until done”
How do you reduce from 450 to 450?
Next a question, I haven’t been gettingg much rise out of my bread. Nothing like the airy crumb in your photo. I’ve decide to do 200g of levain and 100g of water in the final mix. Madness?
Thanks for pointing that typo out. Yes, that seems like quite a lot of levain, especially for this whole grain recipe. You could try it, just be sure to watch the dough, it’ll be quite active!
I have always wondered about the wheat germ left after extracting the flour. Why extract the germ and then add some back in? Would you ever use the germ left after sifting as the germ? It has always seemed a bit redundant, but I am going to try it anyway. Thanks for this recipe!
Typically if you’re sifting out the larger bran/germ you wouldn’t add it back in unless you wanted to soak it in boiling water to help incorporated it back in later (this can help lighten the loaf as the added bran/germ will be softened and incorporated kind of like a porridge or other cracked grain).
Another option is to sift out some percentage of the bran and then use that to coat the loaf after you shape it. This adds back in that sifted-out nutrition and also provides for an interesting aesthetic and texture.
Happy baking!
Do you use toasted wheat germ?
It’s funny you should mention that because I just bought a bag of wheat germ for some future testing. I’ve never toasted it separately and then mixed it into a dough… but that’s something I’m going to be playing with soon!
Help! I don’t understand the 175g levain and 125g water mix: do you only use part of the levain you make at first ie 175g? or is 175g somehow the weight of the levain recipe? if so what do you do with the rest of the levain?
Hey, Victoria! Yes, only use the amount of levain called for in the mix (there will be some extra left over). I keep meaning to come back to this recipe and adjust the levain build so it really only builds what’s necessary for the mix (I used to make a little more than necessary to give myself a little buffer just in case the levain was left too long, this way it had a little extra “food”). Sorry for the confusion!
Thanks so much. Did you specify what hydration starter you use in this levain? I also am going to try this bread using only our local hard white whole grain flour. (Ever heard of Bluebird Grains?)
The hydration of the levain in this recipe is 100% (200g flour to 200g water). I would highly recommend you try using your local grains — I have heard of Bluebird and keep meaning to try some of their offerings! It’s not local to me, I’m jealous as their stuff has a really great reputation.
Happy baking!
Hi, I’ve been making bread based on Chad Robertsons methods for years and like many, I love the bread but have wanted to decrease or eliminate the use of white flour. Reading through your method was inspiring. I’m also a mom of 3 and needed to measure and sift less. So I used your exact amount of water and levain and salt and then added only pure Bob’s Red Milk organic whole wheat flour. I followed your timeline and set the dough in fridge in a bread loaf pan. Baked the next morning in a Sassafras clay baker. What a wonderful loaf. Thank you so much. Tasty and not too dense. I’d add pics but not sure how..
Thanks so much! That sounds like a perfectly fine approach, sifting does take quite a lot of time! Typically I don’t sift and re-incorporate either, it just takes quite a while. Occasionally I will but usually I do just as you’ve done.
If you’re interested, I also have a whole wheat sourdough sandwich recipe that specifically targets a loaf pan as you’ve done — it’s great too.
Thanks for the feedback, really appreciate that!
Hey Maurizio, I follow this recipe almost to the letter, and I always get great tasting bread with open crumb. I always feel like it could be better, though, because the batard spreads out a lot. It just feels so slack. When I do the pre-shape it spreads a lot and then doing the final shape is difficult too. I proof it in the fridge for 14 hours, score it exactly like you do, and as soon as it hits the pre-heated stone it starts to spread out. It springs as much as it can in the oven, but is spreading too much. I figured that meant it needed more “strength”, so I’ve started bulk fermenting a little longer and doing 2-3 additional sets of stretch-and-folds. Is that the right solution or do I need less time fermenting? Any suggestions?
It could be that the dough is over hydrated, there’s not enough strength in the dough (sounds like you’re doing a lot of folds though so I doubt this is the issue) or the dough is over proofing. I’d first start with reducing the hydration 5-10% and see if that helps bring some strength to the dough and reduces spreading.
If that doesn’t help I’d try reducing your proof time by 2-4 hours in the fridge — if you get more rise and strength out of the dough then it was likely going a little over. This is a hard thing to judge sometimes with so much whole grain, things move fast!
I have a question on the amount of levain in the recipe. I use a 100% whole wheat cool levain. My base recipe is not a high hydration bread and I’ve been tweaking it to get it there. My base recipe calls for 450 g of ripe starter. Your only calls for 175g.
Is this because of the lengthy autolyse? I made this but chickened out and used much more starter. It was very wet, quick to rise and actually over proofed. It spread out in the pan, had no oven spring (not surprising since it was over proofed and very wet) and was thus a flatter loaf. It tastes amazing and has a more open crumb and almost creamy texture than anything I’ve made thus far.
I grind my own hard red spring wheat and get awesome rise on all my whole wheat loaves. Should I brave it and cut my starter (by most 2/3!!)? Is the excess starter what is causing the rapid rise to over proof?
On the plus side: I’m getting the knack of working with an extremely wet dough!!
Any feedback would be greatly appreciated!
Hello! For this much whole wheat I like to use a low percentage of levain in my recipe, otherwise I find the dough will rapidly overproof. If you used 450g in my recipe above you’ll find the dough quickly going over. I am almost always in the range of 11% to 20% levain in my final mix, no less and no more.
With fresh milled flour I’ve noticed things ferment much quicker as well and usually get close to 12% levain (you can see some of my fresh milled recipes on my Recipes page) otherwise I’ll quickly get into an overproof situation!
It’s a factor of the percentage though, if your 450g is only 10% or 15% of your recipe (related to total flour) then that is fine!
Glad to hear you’re getting the hang of the wet dough, it takes some practice but soon anything less is too dry 🙂
Hope that helps!
Thank you!!! Over proofing has been a huge issue! This is very helpful. I am making another batch and will use your total flour weight in my freshly ground red spring wheat, water as you state and I will take a leap of faith and decrease my levain to 175 g. I am eager to see my results!
Thank you again!
You’re very welcome, glad it’s working out for you! Good luck with the changes — happy baking 🙂
I am so grateful for your help!! I am able to make wonderful loaves using the 175g of Levain.
I make my autolyse the night before and leave it covered on the counter. I feed my starter and refrigerate. In the morning I take it out to speed it’s doubling. I refrigerate the shaped dough, let it come to room temp for about 2-3 hours, score and bake. I’m getting lovely oven spring and they taste amazing.
My loaves are 100% fresh ground hard spring wheat. I do add vital gluten and diastolic malt. Hubby likes some enrichment so I add a bit of avocado oil and honey.
Wish I could share a picture!
Sounds like you have a fantastic method going for you and some incredible bread! Really glad to hear about that fresh ground wheat, I just love that. Thanks so much for the update, always happy to hear people are making such great bread in their home oven 🙂
Happy baking!
Yes, the winds were bad and now it’s snowing up here! As to your bread, I had to alter the ingredients in this recipe, although I basically kept to the percentages and the technique. I added an extra 100g organic white flour, substituted spelt flour for the wheat germ, used KA white whole wheat instead of sifted bran-out stone ground whole wheat flour. But the important thing is the technique and paying attention to the dough. I did my best and it turned out pretty good. I’d say my loaf was more like 90% whole wheat. Too bad we can’t post photos in the replies, they looked phenomenal. Slight cracking as the bread cooled, although the crust wasn’t as thin as “your best sourdough recipe.” I didn’t find it too thick. The crumb seemed looser than the way yours looked in your photos. Big and small holes, nice distribution. My starter was slightly too strong when I started the levain so the bread was more sour than I wanted, but that’ll be corrected in the next go round. This will be my go to whole wheat loaf. Thank you, Maurizio, for your generous blog.
Your adjustments sound spot-on and your results sound fantastic! I love spelt flour actually, I’ve been working with it quite a bit recently and should have my formula up next week in case your interested. That even distribution of big & small holes is always what I’m after, that makes the best bread for me.
You’re welcome, it sounds like you’ve really made this bread into your own and it sounds fantastic!
Love your blog-the best one I’ve found about naturally fermented bread. Imagine my amazement to find you live only about 60 miles south of me! Two questions: in this recipe should the autolyse only have 700g water, since you add another 125g later? Also, I’m baking at 7000 feet. I also have a very strong and very old starter. In the initial stages my doughs seem to move a bit faster than yours. Does the 2000 ft difference in our respective altitudes affect the way I should handle my dough?
Hey, Christopher! I’m assuming you’re somewhere in the Santa Fe area — very cool!
1) Add the 825g water for your autolyse and then later, when adding salt, dissolve your levain in an additional 175g water at 85ºF, then add this all in to the mix. The overall hydration for this dough is 95%.
2) Literature says as your altitude increases the need for leavening agents decreases, I haven’t really had this issue, but if your dough is moving faster then yes you can certainly reduce your levain percentage added to the dough (2000 ft is quite a bit). As altitude increases air density decreases, so theoretically things should rise easier/faster.
I hope that helps, I’d love to hear how things turn out! Happy baking out there, and enjoy this weather we’re having before the winds come (or are they already here??)!
Thanks for clarifying, I had this question when reading too. Perhaps you should remove the words “the remaining” from “after six hours mix together the remaining 125g H2O”, as this is what lead to my confusion
Good catch, ok I’ve updated it to reflect we are adding an additional 175g when dissolving the levain. Thanks!
Hi Maurizio
Your breads look amazing. I am new to baking sourdough and till on now have got only one good bread done. Now trying this recipe and have cutback all proportions by 5th (tired of wasting flours). Bread is no where close to what I expected and this time trying all tests to debug what’s going on. First problem – neither my starter nor my levain passes the float test. It looks fluffy, holey and strong though. Any suggestions.
It sounds like perhaps your stater is not fermenting at a strong enough pace. Without any more details I can only guess, but one of my recent posts shows a day in the life of my starter, and how I maintain it. You might get some tips there on how often to feed, what it should look like at various times and more. Have you taken a look at my Sourdough Starter Maintenance Routine post?
I noticed that you did not add the leavin to the dough for the autolyze phase. In Tartine #3, the instructions are to include the levain. I tried it this way for the 20% rye whole wheat bread and had for a 3.5 hr autolyze. I got a remarkably sour (like yogurt) bread. Unfortunately I got almost no oven spring and a very fine structure crumb. Not sure whether I over proofed or emssed up the Shaping.
A traditional “autolyse” does not include the levain, it is only flour and water. In some Tartine recipes he’ll add the levain in if the autolyse is rather short (1 hour or less), and sometimes I’ll do the same, but typically it is not included.
Your dough was most likely over proofed by the time you baked it, especially with that much rye and whole wheat. Think about what was happening when you included your levain in that autolyse: your entire dough mass was fermenting for 3.5 hours for the autolyse, plus the bulk time (~ 4 hours), plus the proof time. That’s a long time!
Next time you try this out, don’t include the levain in the autolyse, but mix it in just before adding salt and that remaining water. I bet it will come out smashing.
Let me know how it works out, and let me know if you have any more questions. Happy baking, Martin!
That is all extremely helpful! So much so, that I have just signed up to follow you on instagram. I have been baking the Tartine loaf for the last 6 months now, with a lot of success. But whole wheat bread is a totally different animal. I’m excited to figure things out.
I started making one yesterday, the Ode to Bourdon loaf, and after the Bulk Fermentation, the dough was SO slack! I threw half of it away, I was so discourage. But for the sake of experiment, I decided to keep half and baked two loaves. And they taste great, a little on the flat side, but still little bubbles everywhere. I still have a lot to learn intuitively about the bread making process, so i’m enjoying reading your notes.
I saw on Instagram also that you just had a baby! Congratulations! I have 3 girls, growing like weeds, but it’s so rewarding to be able to bake fresh bread for them. There is a part of me that wonders if they really understand how special it is to have fresh baked bread weekly? 😛 Fyi, my instagram is whistlingduneslily.
Glad to have you along on Instagram as well! I post pretty frequently there and it’s a great community of bakers.
How long did you autolyse for with the Ode to Bourdon loaf? The longer you autolyse, the more extensible your dough can get (up to a point), plus the high hydration of that loaf could lead you to a slack dough.
Whole wheat bread is certainly a whole new ballgame! It’s a bit more challenging in my opinion. I’ve been working on a new recipe and entry for this site, I hope to have it out in the next week or two. I have a few more tips when working with whole wheat.
Thanks, yes my wife and I just had a new little one! Our first so it’s been a wild ride so far. I’m looking forward to baking for him and to pass on what I’ve learned thus far. I don’t think when they are young they will appreciate the work and time that goes into baking (and/or cooking), but later I hope they will. When I was young my grandma used to make us fresh handmade pasta every week — boy did we take that for granted!
I’ll see you in future comments and on Instagram! Ciao 🙂
Hello, I discovered your blog recently and it’s amazing! Full of insightful information. Thank you for documenting and sharing. it must take a good amount of your time!
I read what you had to say to one of your readers about the autolyse being only flour and water. In Tartine and Tartine 3, they use the levain in the autolyse. But in Forkish, I think I remember reading they do not use the levin in the autolyse. I have not tried autolyse sans levain. And with the original Tartine loaf from Tartine, it comes out great. Will it make a bit difference in the whole wheat loaf? Will it also make a big difference in the original Tartine loaf from the Tartine book?
Thank you again! I want to try this blog post out!
Lily thanks so much, glad you’re finding it helpful!
Traditionally autolyse is performed without levain added, it’s only flour + water. However, if you’re doing short autolyse (for me this is 1 hour or less) I’ll usually include the levain in. With any type of bread, depending on other conditions (ambient temperature, water temperature, etc.), adding in the levain can have a big impact. Think of it this way: adding it in and doing a long autolyse, say 2 hours, means your dough is fermenting for a full 2 hour longer than if you didn’t add the levain. Your starter will go to work on consuming starches in your flour and start fermenting. This can help sometimes, especially if conditions are cold in your kitchen, it can give your starter a little extra time to get started.
With whole wheat things are amplified even further. Fermentation is increased with whole wheat flour due to the extra nutrients present for your starter to consume. If you were to autolyse with levain for a long time (say 5 hours) your bread would likely turn out very flat the next day as all the food for your starter would be consumed during autolyse and bulk fermentation.
I hope that helps, let me know if it’s at all unclear! Good luck and I’d love to hear how this bake turns out for you!
fantastic post !
Thanks, Liz!
Hi Maruizio,
I actually came across this blog via your instagram and was initially drawn in by the aesthetic. So much more than that after looking through the blog.
I have a question. I’ve recently been trying to bake the “ode to bourdon” loaf in the tartine and failed on an epic level (2x). As it is somewhat similar to this, my question is this: the autolyse you describe above is with just the flours + water, and then adding the levain + 125g H20 when it has passed the float test. Every autolyse I have done before this was flour(s) + water+ levain, and then the salt and extra H20 were added later. What is the benefit of the autolyse you describe above? If you did an autolyse with the levain, are you at a much higher risk over doing it?
My guess as to where I’m going wrong is an insufficiently long bulk rise. This is somewhat confusing for me because I was under the impression that WW will ferment a bit faster. I’ve tipped between thinking I’ve let the bulk rise go too long, and not being sure if I let it rise long enough.
This is somewhat frustrating as I had gotten at least decent results with every other tartine recipe I’ve tried. I’ll look through your posts with high WW breads and try to figure it out.
Thanks for the amazing blog
damian
Damian,
Thanks for the kind words about my site!
Traditionally you do not want to include any levain in your autolyse: it’s only flour + water. Think about it this way, you are allowing your levain to ferment for an incredibly long time if you include it in a long autolyse (as I do here, and in the Ode to Bouron), it will quite easily go overboard and consume all available food. By the time you get to bulk fermentation there is likely nothing left for your levain to consume, and then by the time you bake your loaves they will most likely collapse with no oven spring. Try this bread with the long autolyse but only include flour + water.
A proper, and complete, bulk fermentation can be tricky to assess. Assuming you perform the autolyse as explained above, once you mix in your levain to your autolysed dough fermentation starts, if your kitchen is in the mid 70’s shoot for around 4 hours to complete your bulk. The dough should increase around 30% and be airy, light, jiggly when you shake the container a bit. If you grab at the dough with wet hands it should resist pulling and look a little smooth. Stay attentive and look for these signs, they will help you determine when things are done!
As you mentioned it is very easy to go overboard with whole wheat, fermentation is much faster as there are so many more nutrients for your yeast/bacteria to consume. Also keep in mind that if your kitchen temperatures are higher (high-70’s) things will progress even faster.
I hope this helps, let me know how it goes the next time you try it out. Feel free to comment back here or on Instagram!
Hey Maurizio,
thanks for the reply. I tried the autolyse and it definitely improved things. I got a decent oven spring, but my crumb is still rather dense. There are definitely some big air pockets, but I think I will have to fine tune it a bit to get a nice open crumb. Thanks again for the comments. I didnt look very thoroughly, but do you have a post where you talk about the final shaping of a batard? If not, do you recommend a link? I only do boules and would like to try my hand at a batard.
Thanks again,
Damian
You’re very welcome. Opening up the crumb on a high percentage whole wheat is not an easy task! I still continue to pursue this and hope to have another post sometime soon with some more findings on how to do so.
I have not gotten around to making videos of my shaping, that’s to come. In the meantime I like this video of master baker Hamelman at King Arthur Bakery: http://www.kingarthurflour.com/videos/techniques-for-the-professional-baker-4-shaping.
I hope that helps, let me know how it goes from time-to-time!
Making this tomorrow. Please explain again about adding in the bran? I was going to ask what you do with all of it.
Also going to try crackers with the extra sourdough, from Bread.
For this recipe I didn’t end up using the bran. However, you can try reincorporating it back in at a later stage kind of like what you would do with seeds or nuts. You can either soak the sifted bran in boiling water right after you sift (and let sit covered) or you can just add back in with a little water. Add the bran in after your second set of stretch and folds during bulk. Keep in mind if you soak it will retain quite a bit of water and effect your overall hydration so take that into account!
An interesting and useful blog.
But calling this recipe 95% whole grain is a stretch. So much bran is removed for the high extraction flour (the result more closely resembles white flour than whole grain), 50% whole grain bread might be nearer the truth.
Thanks! Yes, you’re right I’m probably a bit too heavy-handed with the title. I’ve been experimenting lately with adding back in that removed bran later in the bulk step after soaking in boiling water. I’ve had great results with crumb and flavor with this approach! I’ll have to update this post 🙂
Funnily enough, I sifted out and then added back the bran after kneading on my last batch. I didn’t soak it, though. Will try that next time.
By the way, I’ ve followed the above recipe and have a boule baking right now – as with one of the previous replies, the hydration level was too much for my flour or ambient humidity or whatever, and too wet to shape or slash. Close to a ciabatta dough. It almost poured out of the bowl and stuck to my well floured linen. Has sprung nicely, though, so all is not lost.
Cheers!
You probably would have been in serious trouble if you would have soaked, it adds even more hydration in. The taste is pretty amazing though, very hearty.
My flour was able to hold up to this hydration, not to mention the fact that I’m in a desert that is very dry. That’s great you still got some rise out of it!
How was the taste?
Ciao!
The taste is okay, I guess. But the structure and crumb was a bit of a disaster – large shiny holes (like ciabatta) merging into one large hole under the very chewy crust and an otherwise dense crumb. Too much water and too much steam and too long a fermentation and proving. I’ve still got a boule that I retarded in the fridge overnight – not sure what to do with it. It’ll be well glued to the linen. Probably beyond rescuing. Oh well, put it down to experience…
This same thing has happened to me many times and is always disappointing. You are right though, it’s always a learning experience!
Oh shoot! Finally got brave enough to try the 95% WW recipe and just mixed my levean. However in your ingredient list you have 150g of whole wheat flour but in the directions you have 250g. I was reading amounts from the directions and now have 100g too much WW flour. Is there any hope for this bread turning out now or do i need to start over and waste everything? 🙁
Wow I’m so sorry I have that typo! I just fixed it for future read-throughs, I’m really not sure how I missed that. No worries, continue on you will be just fine. You’re essentially just giving your starter more food to work with, things should be ok at the end 🙂
Thank you! I’ve been a loyal reader to your blog for a long, long time — it’s excellent. I thought I’d share my experiences baking just like you have; there isn’t a lot of good information out there on this wonderful (and challenging) craft!
If you ever want to swap recipes, experiments, etc. please send me over an email, I’d love to collaborate!
[email protected]
Ciao!
Hi Maurizio,
I was reading the master plan in T3, & re-reading the above bread, & noticed that you didn’t mention doing the bulk ferment @ 80-85 degrees, as CR does. Was this bread fermented @ room temp?
ML,
I try to list the “ambient” temperature in my writeup. Above I listed 77ºF, which is a few degrees lower than Chad’s in T3. Your bulk time will of course be longer when the temperature is lower than his, you’ll just have to adjust for your environment.
I think determining when the bulk step is over is one of the challenging things about baking this bread (and sourdough in general). I try to look for the cues: bubbles along the sides, about 20-30% rise and a little jiggly in the bowl when you shake it.
I’ve been experimenting with different temperatures during the bulk fermentation step and have noticed a more open bread with higher temperatures OR longer bulk. You can only push it so far, though, before your dough starts to break down. It’s all a balance!
Hi Maurizio,
I am going to go back to the 90% WW next bake. I have a few start-up questions:
1. When I last made this my levain floated @ 3 hrs but I stuck with the 6hr timeline. Should I shorten this time, or do you think the 6hrs is most important for autolyse? I could start the levain later.
2. You recommended changing hydration by 5%, I think I will.
3. You also recommended more white flour. Do you think using 25% white whole wheat would be close?
I don’t want to change too many things at once.
Recommendations please!
ML,
1. I don’t think any specific time is hard and fast. If your levain was able to float after 3 hours then it should be good to go. Three hours is pretty short in my experience, but again, it all depends on the vigor if your starter and your environment.
2. Sounds good, give that a shot!
3. White whole wheat does have less larger bran particles which should make things easier for you. If it were me I would try that out as it definitely should help. 25% sounds like a good start.
Agreed, you don’t want to change too many things otherwise you won’t know what helped/hurt. Those sound like small tweaks that should get you going in the right direction.
Good luck and let me know how things turn out!
Thanks for the encouragement, Maurizio. I will try your recommendations, take good notes & let you know when I get it right!
In the meantime, I think I will try your sourdough young levain for something completely different. My husband did like the flavor of the wheat bread, even though it was a dud.
Any tips on shaping these really high hydration loaves? I have watched the CR videos, but they make it look so easy.
Good idea, sometimes a completely different attempt will help shed light and encourage insight on other ventures. I do the very same thing. The whole wheat bread really has a great taste, I actually like the deep complex flavor a little more than the standard white loaf.
The high hydration loaves are quite difficult. I find that my comfortable range for white bread is 85% hydration. Anything above this requires practice. I’d say you really need to keep contact with unfloured dough to a minimum. You don’t want to go crazy with spreading flour around but I find it is sometimes better than having the dough stick and completely fall apart. As you get comfortable with it you can reduce the flouring. If you find the dough is sticking terribly to the bench, use your bench knife to quickly lift off the edges, flour your hands, and then proceed. Sometimes I used the bench knife itself to perform the final folds at the beginning.
They do make it look too easy! They make tons of bread each and every day — they have plenty of practice 🙂
Hi Maurizio,
Well, I finally had the chance to make this loaf. Unfortunately, it flopped for me.
My levain seemed strong, floating after 4 hrs. I followed exactly. The dough was so sticky that I had to peel it from the sides of my container for each S&F, which couldn’t have been good for it. This is the same container I usually use, without much trouble. Shaping was really tough, but I did think I had a shape when I was done. Into the fridge it went. This am, when I transferred to DO, I was optimistic. It seemed to hold shape ok. But, it just spread into a low-rider in the oven, not much spring, if any.
So, most times I am a pretty good baker, friends are generally very enthusiastic.
I hate this kind of bake! Makes me not want to waste time & supplies trying again. But, I know I want this bread 🙂 I want a great WW to bake that looks & tastes like yours.
I know you say you go through many trials, sometimes.
Where would you start, with this bake of mine, other than only trying 1 loaf next time 🙂 I think I will reduce the hydration by about 5% for the next try.
ML,
Don’t get discouraged! Trust me, I know just how you feel when a loaf flops: discouraged, your mind searches for what went wrong, and straight up angry! Especially so with this loaf as there are a lot of steps and many places where things can go awry.
From your description is sounds like your dough didn’t have enough strength to it by the end of the bulk step. With this whole wheat dough it’s hard to get a good indicator for when you’ve strengthened it up sufficiently (through turns) and whether it’s risen enough (it won’t puff up as much as a white dough will).
Yes, reduce the water amount by 5-10% while keeping all other things the same. This will tighten up your dough some and should make shaping easier as well. Alternatively, you could try a few more stretch and folds towards the middle/end of your bulk phase to give it a tad more strength.
One other thing I could suggest is to reduce the amount of WW flour by a bit, replacing with white flour. As you get the hang of things slowly start increasing the WW percentage until you get to 90-100%. I know that’s not the advice you’ll want to hear, I know I wouldn’t, but that might help if the next attempt does not improve.
This is a challenging loaf, no doubt about it. I attempted it many times with less than stellar results, in fact, I recently made this loaf almost exactly the same this past weekend and didn’t get quite this nice of a rise. “Baker’s intuition” is something that comes with practice for sure, and when you throw in a whole wheat loaf it really makes things challenging!
Good luck on the next attempt, post back with your results or any other questions and I’ll try to help out. I’ll be doing another whole wheat loaf here in the future and hopefully I’ll have some more insights to help!
Hi!
I have been wondering whether there has been an error in the water quantity to be used in the recipe
In the list with autolyse ingredients, you say 825gr water; however at the step of dissolving the levain you say to mix the remaining 125gr of water with the levain. So, the total qty of water is 950gr? Do I get this correctly?
Thanks!
Yes you are correct: the total water amount after autolyse and mixing is 950g (95% hydration). It may seem like a whole lot of water but during the autolyse, and with so much whole grain, it will just soak it up with no problem!
You speak of taking volumes of notes. Would you mind sharing a little more about that? I can see that you have a basic format that you follow, but maybe you would share some of the experiments from the above loaf. Clearly, you are mastering the process!
You know, I never really thought about it but you’re right, I should share more of my attempts rather than just the one I think “worked”. I’ll start to do this in the future, post up more about what went wrong instead of just what went right. I think it will be instructive for me to share all the things I thought would work but didn’t end up panning out.
For this loaf most of my previous attempts were mainly varying autolyse times and hydration amounts. With such a high amount of whole wheat I had to keep increasing the water level until the dough felt like it should. This happened over the course of a few bakes and I finally settled on the above formula when I got the result I was looking for.
Like I said, next time I do an extensive testing session I’ll document each step and post them as a sort of progression bake. Thanks for the feedback!
Thank you for the amazing posts on whole grain breads! I tried your whole wheat sourdough recipe this weekend and I dare say it was a success! Cannot wait to try the above recipe as well.
I love your detailed step by step analysis and the close up photos. Looking forward to more and more posts 🙂
You are welcome and this is great news! It really makes me happy to hear my posts are helping, and these whole grain loaves can be quite difficult.
More posts are coming, keep an eye out! Happy baking 🙂
Yes, I would say the whole grain recipes in Tartine Book Nº 3 are a bit more, well, advanced. I’ve been struggling with them just the same so I love posting here when I make a “breakthrough” in hopes I can help anyone else having the same issues.
Your approach is a good one: go back and make some standard sourdough loaves, hone your process, pay attention to the subtle signs of what works and doesn’t work, and then use what you learn there to tackle the whole grain breads again.
With the whole grain breads I’ve made so far I’d have to say the extra work here is definitely worth it. The loaves have such a different taste from a more white loaf and the added health benefits are equally as important. I don’t think they will replace my beloved country white sourdough, but they are a great addition to my weekly baking.
Thanks so much for the kind words and I’d love to hear how they turn out when you revisit! Happy baking 🙂
You’re welcome! Yes with this much hydration and the dough being so slack, it was very challenging to shape. I wasn’t sure I would even have enough strength when baking to get good rise, but I sure did. The more I work with these higher hydration doughs the easier it becomes, but I still get surprised from time to time.
And yes, the taste of this loaf is much sweeter than you’d expect, I think the extended autolyse is doing its job! Thanks again for the comments.
Hi, I,m traveling but will try this ASAP when home. You are a magnificent instructor!
Thank you — can’t wait to hear how it turns out!