
Learning how to bake bread in a Dutch oven is the first task many undertake when embarking on their bread-baking journey at home—myself included. Introducing steam in the home oven—a beneficial component in bread baking—can be a challenge, and a sealed pot makes this process simple and unassuming. During the initial stages of baking, steam is released from the dough into the sealed pot, where it is trapped and keeps the dough moist. This humid environment allows the bread to rise high and promotes a crispy and shiny crust.
In this comprehensive guide to baking bread in a Dutch oven, we’ll look at:
- Why using a Dutch oven (like this one, which is my favorite) to bake bread is a good idea (and what it does for your bread dough)
- The baking time and temperature necessary for baking in a Dutch oven
- How to avoid burning the bottom of your bread dough
- Links to my favorite (and high-quality) Dutch ovens
Real Quick: Why Bake Bread in a Dutch Oven?
A Dutch oven helps mimic the environment many professional bakers have in a bakery: a moisture-sealed chamber with intense, (mostly) even radiant heat. The Dutch oven’s thick cast-iron walls provide ample thermal mass, ensuring a temperature-stable baking environment. Additionally, the sealed interior traps steam, a beneficial component of baking bread. Moisture in the oven during the early part of baking allows your bread to rise fully, deepens the crust color, and finally adds a level of shine to the exterior.
Video: Watch Me Bake Bread in a Dutch Oven
Here’s a quick video showing how I use a Dutch oven in my kitchen to bake sourdough bread:
How To Bake Bread in a Dutch Oven, Step by Step
My method for baking bread dough in a Dutch oven:
- Preheat your home oven to 450°F (230°C) with a Dutch oven inside for 30 to 45 minutes
- Line a pizza peel, inverted baking sheet, or cutting board with parchment paper
- Turn out your proofed bread dough onto the parchment paper (trim the paper to fit, if necessary)
- Score your dough
- Slide the parchment paper with the dough into your preheated Dutch oven and return it to the oven
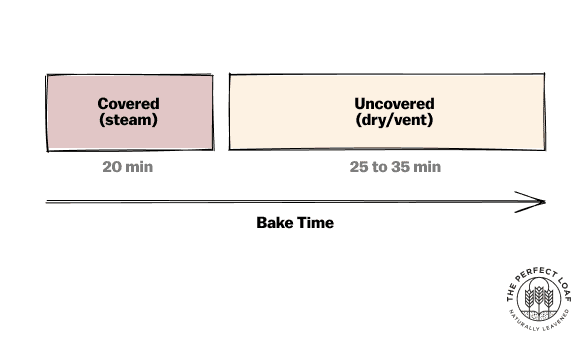
- Cover with the lid and bake for 20 minutes, covered
- After 20 minutes, remove the lid from the oven and continue baking per the recipe (typically 25 to 35 minutes)
When finished, a free-form loaf should have an internal temperature of around 206° to 208°F (96° to 97°C) when fully baked.
As with most things in baking, you might have to adjust the baking duration and oven temperature to suit your environment. See my guide to baking bread at high altitude if you’re a high altitude baker.
Should I Preheat a Dutch Oven When Baking Bread?
Yes, I always preheat my Dutch oven before baking bread dough inside. I’ve tested using a cold Dutch oven, and I don’t get the same oven spring or final loaf volume as when I bake bread dough in a preheated Dutch oven.
How To Remove Your Baked Loaf From a Dutch Oven
When your loaf is finished baking, use a pair of oven-safe gloves to carefully reach down into the pot to remove the bread. The crust will be fully hardened off by this time, so there’s no worry of collapse.
Additionally, if you baked your bread dough in the Dutch oven on a piece of parchment paper as I recommend here, you can lift the corners of the parchment to remove the baked loaf.
Why Bake Bread in a Dutch Oven (Or Any Sealed Pot)
A Dutch oven helps increase loaf volume
Without steam in the oven during the first part of baking (when oven spring occurs), the rapidly expanding dough quickly forms a hard crust on the exterior. This early crust formation limits optimal oven spring and reduces overall loaf volume, resulting in a squat, dense loaf.
Conversely, when you provide adequate steam, the exterior of the dough remains moist and supple, allowing it to expand and stretch further before starches gel and the crust hardens and sets.
It doesn’t require much steam to provide benefit. When the pot is sealed during the first 20 minutes of baking, the moisture escaping from the dough provides the right environment to encourage optimal loaf volume.
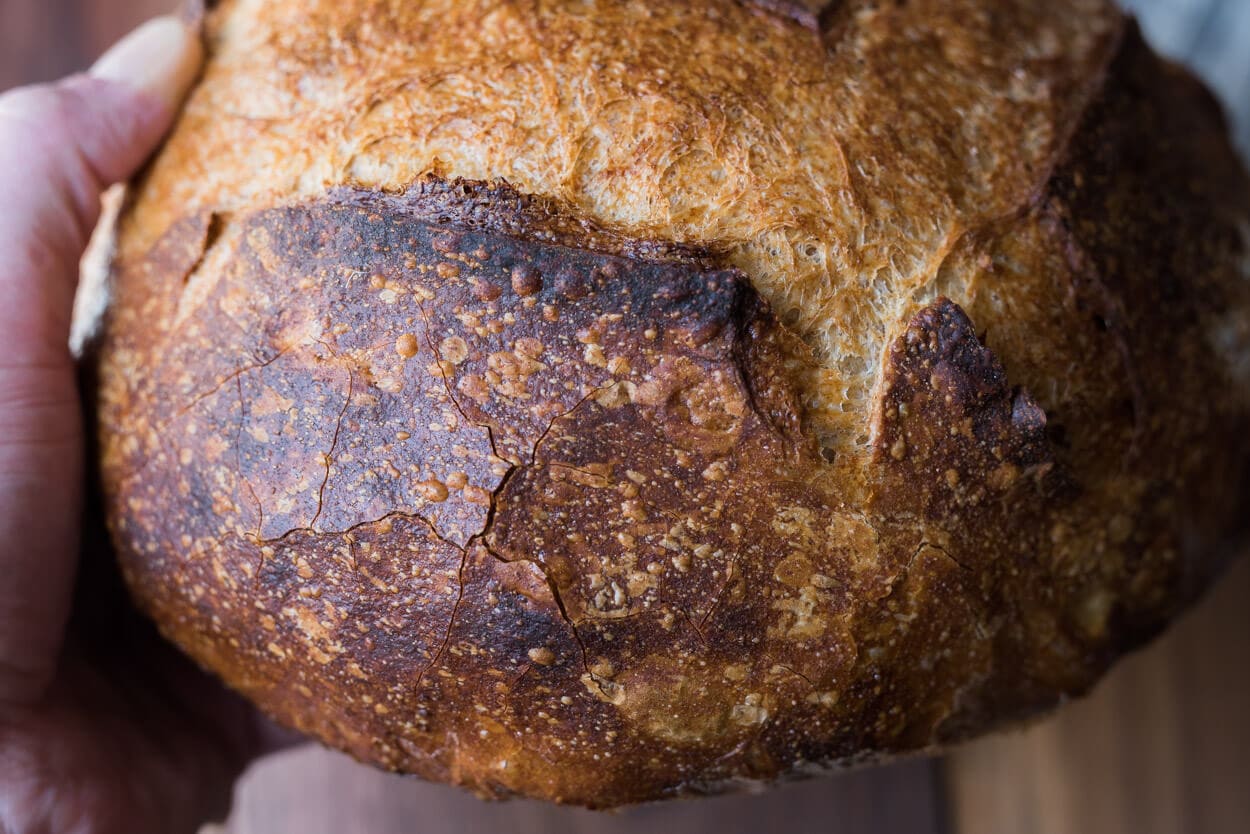
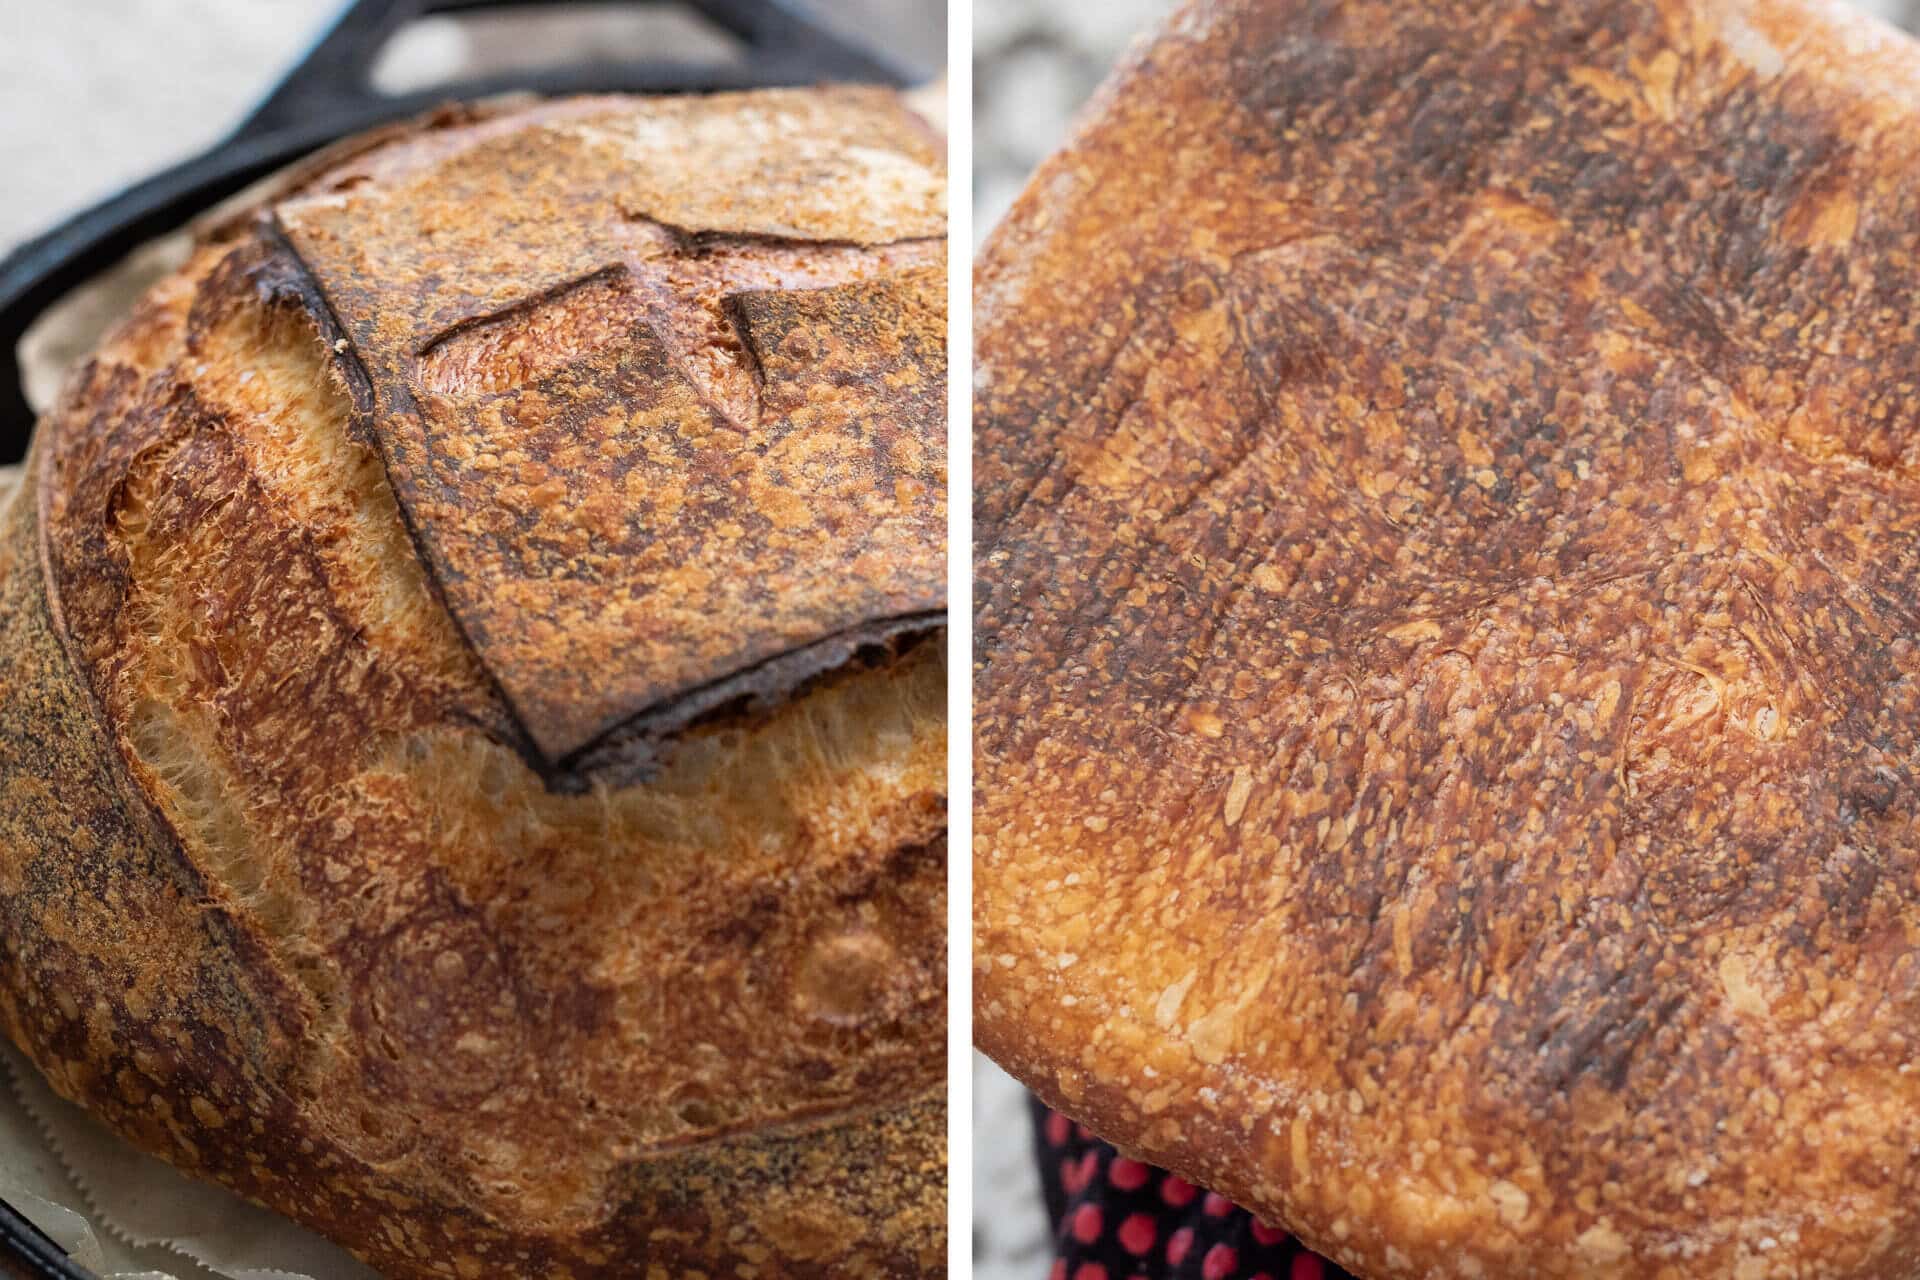
Use a Dutch oven for a deeply colored and shiny bread crust
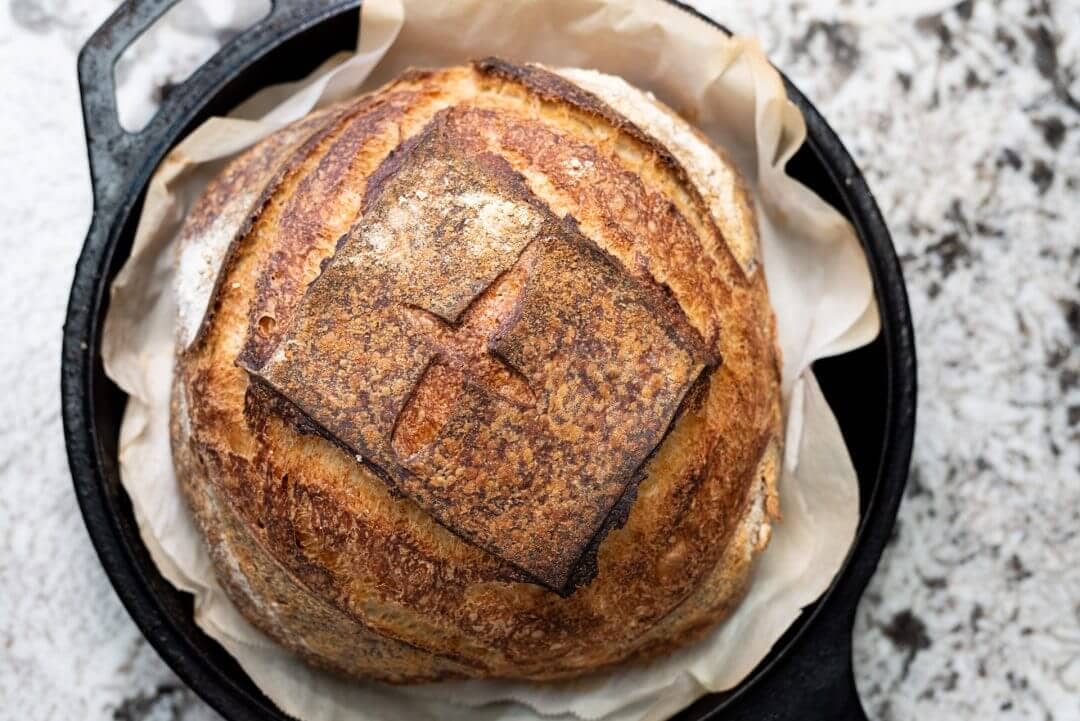
There’s little as elegant as a crust that’s well-colored with a gradient from almost-white to a deep mahogany—the contrast is striking. Add to this a subtle catch of light and shininess: your mouth starts watering even before the intoxicating aroma surrounds you.
As Jeffrey Hamelman states in his book BREAD, the reduced temperature on the exterior of the loaf allows the enzymatic activity to continue for longer. This activity, which has been happening throughout the entire fermentation process, continues to “unlock” sugars that contribute to crust color during baking.
A well-steamed oven also promotes starch gelatinization: in the presence of heat, starch molecules on the exterior of the dough begin to absorb available moisture (hello, steam), start to swell, and eventually pop to form a thin liquid layer (starch gel). This layer finally bakes hard, forming a thin, crispy exterior with a subtle shine.
As we discussed earlier, steam in the Dutch oven’s closed environment settles on the outside of the dough, forming a thin layer that prevents the temperature from rising too quickly. This helps ensure the exterior of your loaf doesn’t darken before you finish baking the interior.
With all these benefits, baking in a sealed pot is a good idea. However, there are some issues with the method, the biggest being a thicker and possibly burned bottom crust. Let’s take a look at a few ways to help mitigate this issue.
How To Keep The Bottom of Your Bread From Burning
In my experience, baking in a Dutch oven typically produces a slightly darker bottom, even with the suggestions below. However, using one or more of these will significantly reduce this darkening.
My methods for ensuring the bottom of my loaf doesn’t burn when baking in a Dutch oven:
- Do not bake bread dough inside a Dutch oven on top of a baking stone
- Reduce the oven temperature during preheating
- Insulate the bottom of the Dutch oven with a baking sheet, baking stone, or even a single sheet of aluminum foil
- Add coarse cornmeal or wheat bran to the Dutch oven before adding your dough
- Use two pieces of parchment paper below the dough
- Remove the dough from the Dutch oven when it’s almost finished baking
Let’s look at each method to help prevent bread dough from burning.
1. Do not bake bread dough inside a Dutch oven on top of a baking stone
The first important thing is to ensure you are not baking with your Dutch oven on a baking stone, or even better, a Baking Steel. When the oven has finished preheating, the stone and the cast-iron pot will be far too hot, resulting in scorched or burned bread.
2. Reduce the oven temperature during preheating
The first approach is to modify your baking temperatures. If you find the bottom crust is burning or becoming too thick, reduce the preheat temperature. For example, some of my recipes here call for a 45-minute preheat at 450°F (230°C); you could reduce it to 425°F (218°C).
3. Insulate the Dutch oven with a baking sheet or stone
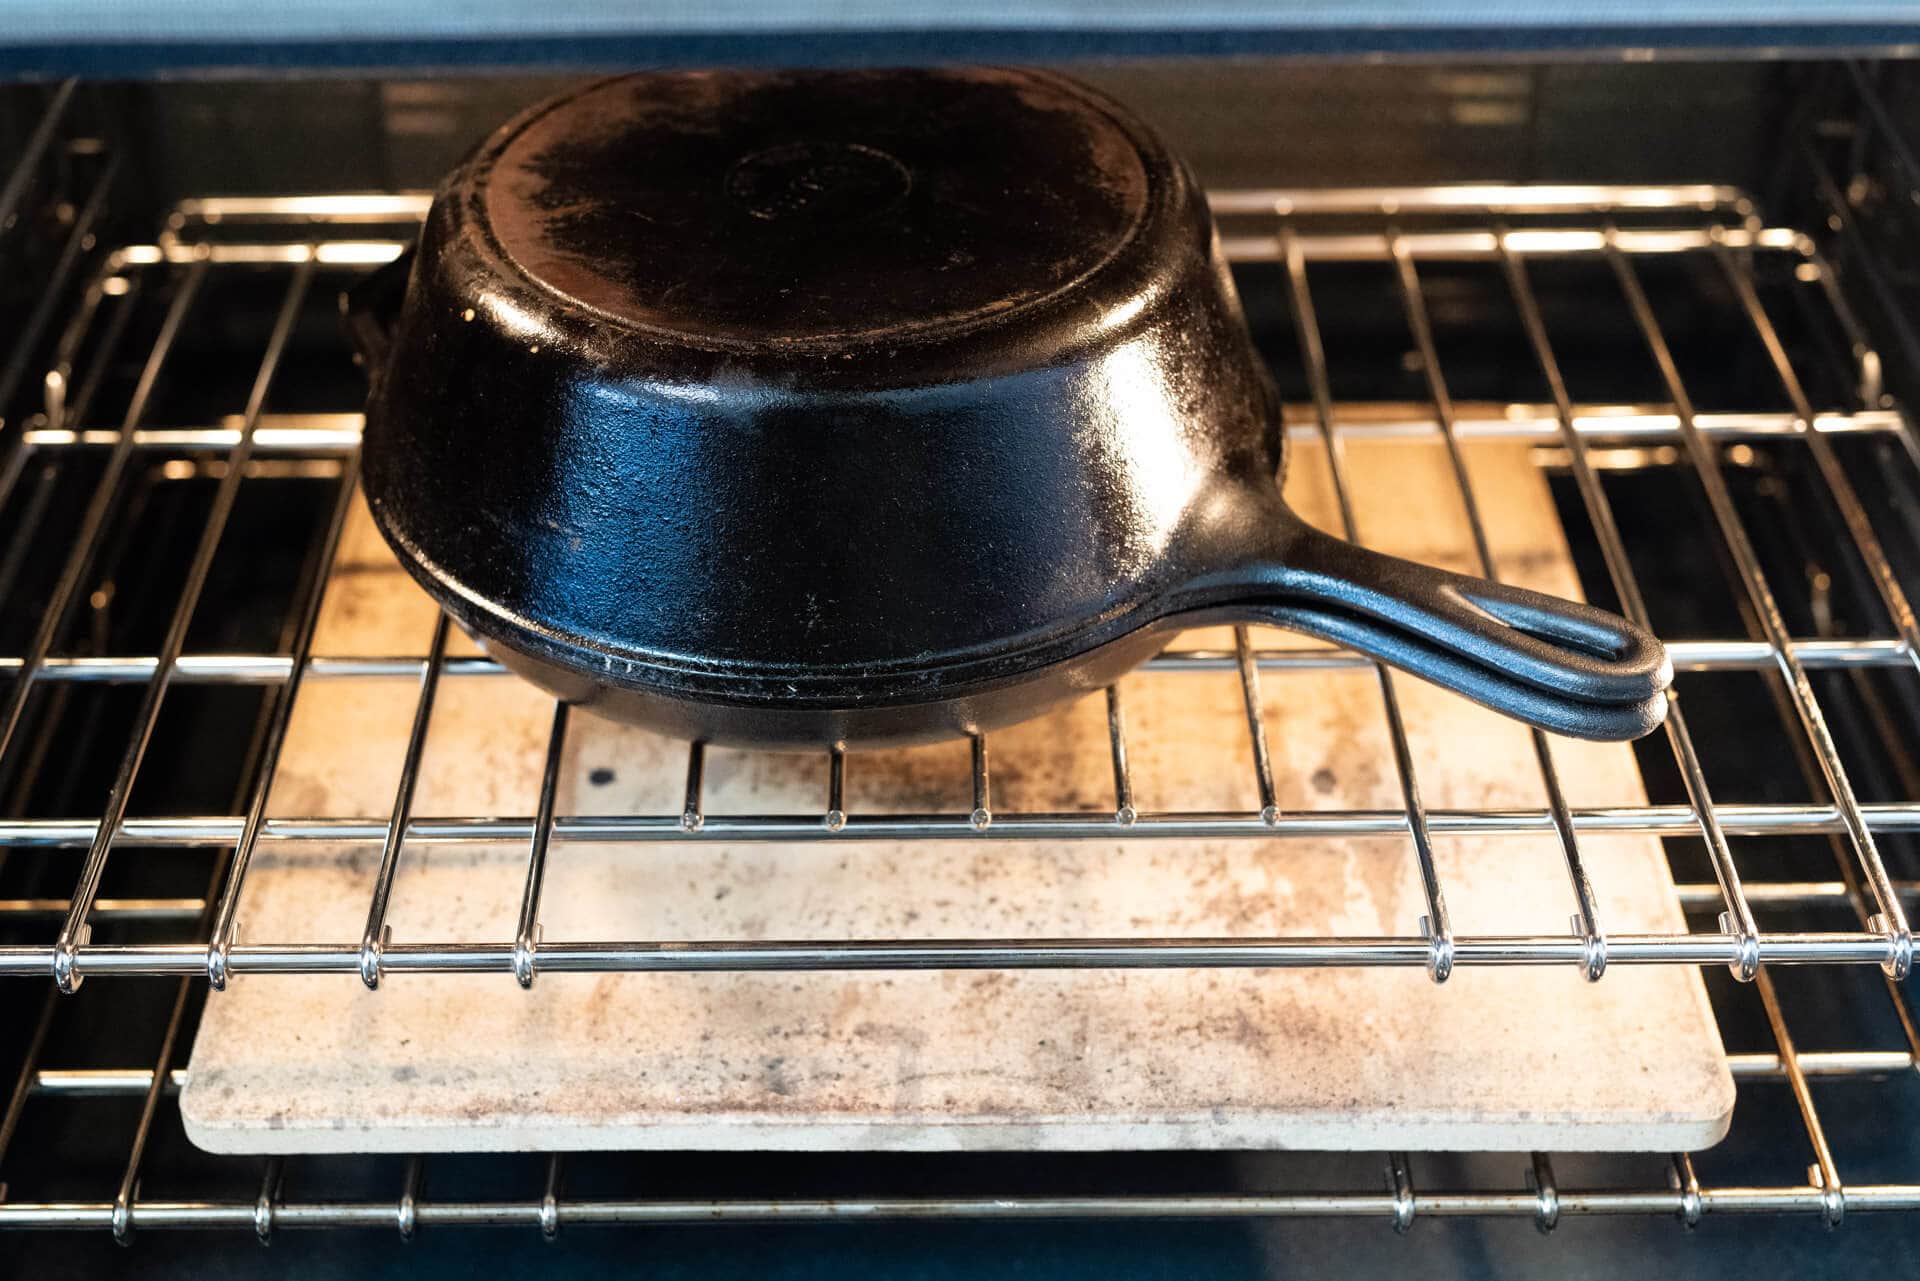
Most ovens have a bottom heating element that can provide far too much heat on the bottom of your dough, especially if you place the rack too close. An insulator, such as a baking sheet or stone, can provide enough thermal mass between the heating element and your dough. This will help insulate your dough when the heating element kicks on, which happens often.
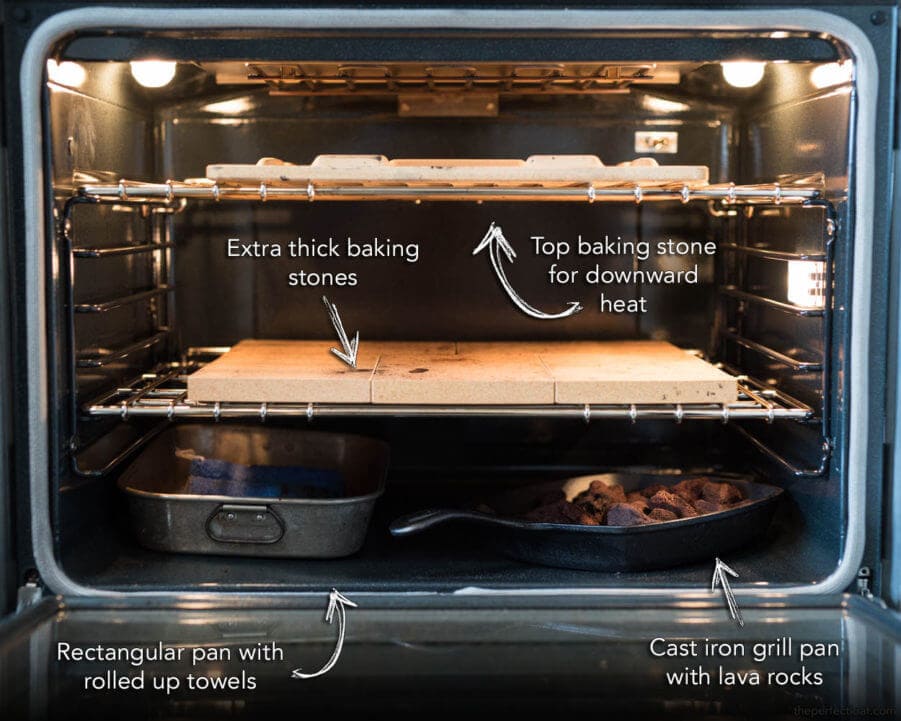
Place a rack on the bottom of your oven, and then place another one or two rungs above that. Place your baking surface on the bottom rack. Then, use the rack above to hold your Dutch oven when baking.
Additionally, a thin aluminum baking sheet, or even a single layer of aluminum foil, placed underneath the Dutch oven will help reflect most of the infrared heat from the bottom of your home oven.
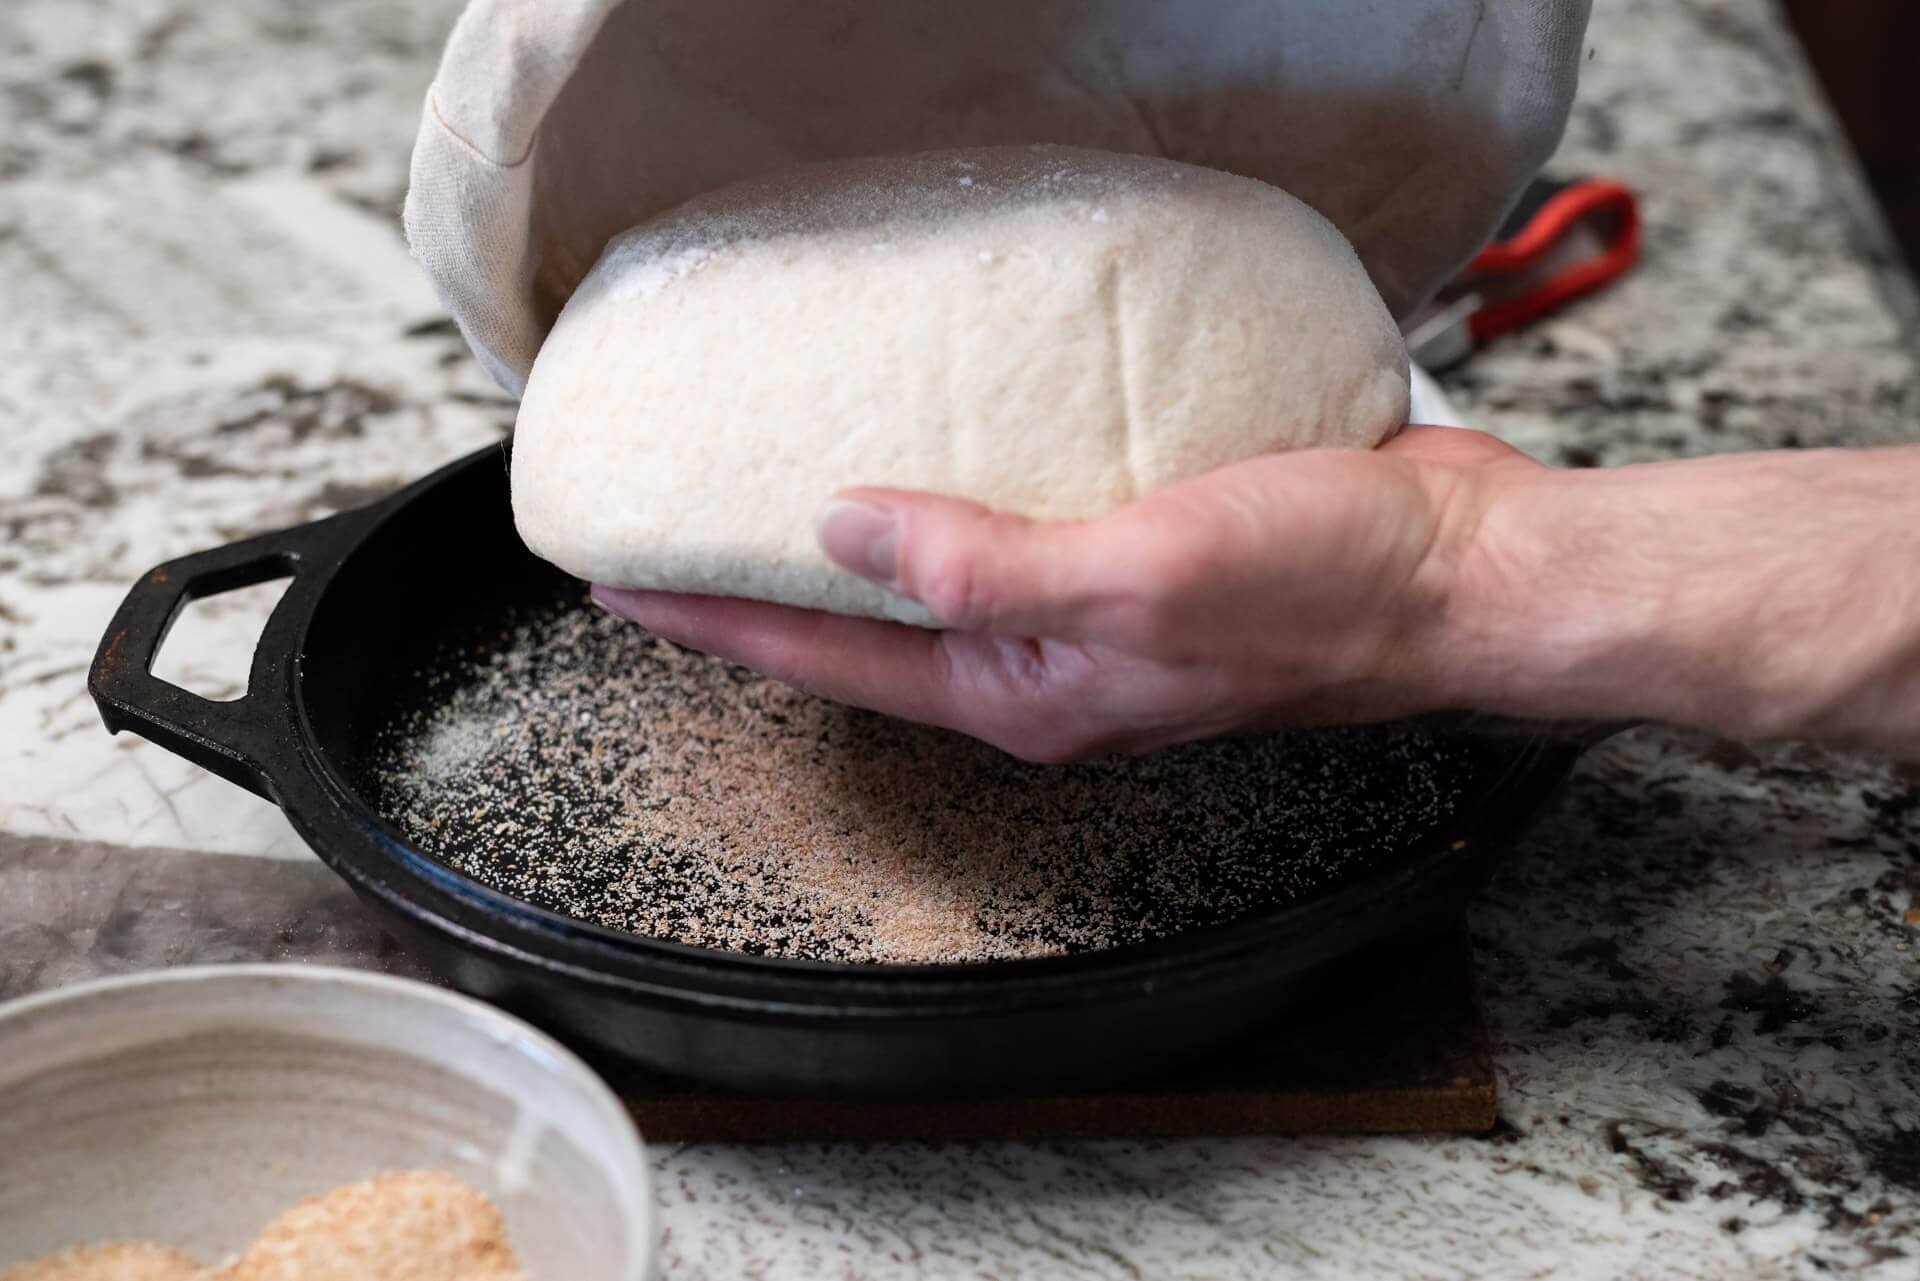
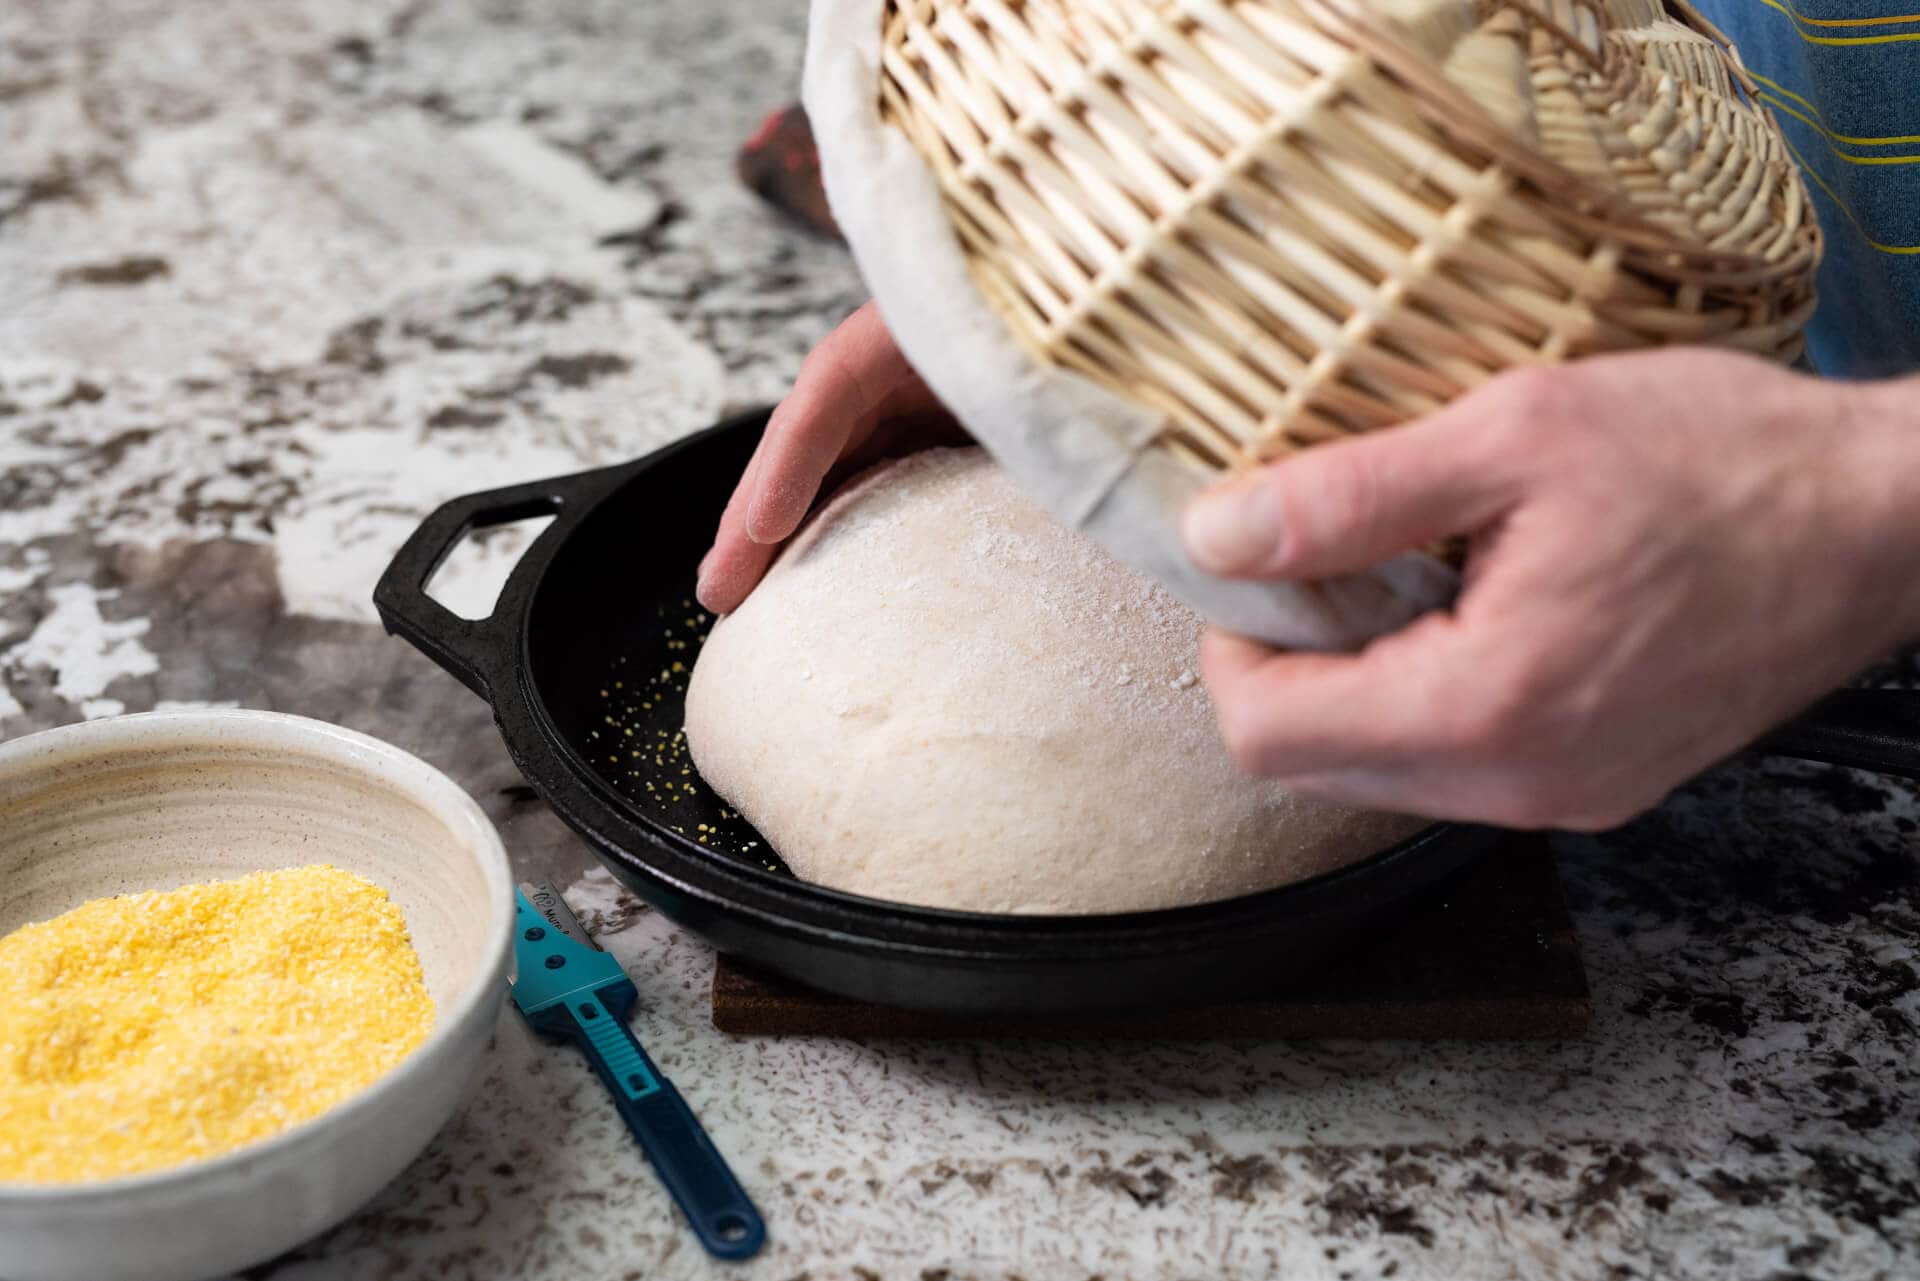
4. Use coarse cornmeal or wheat bran
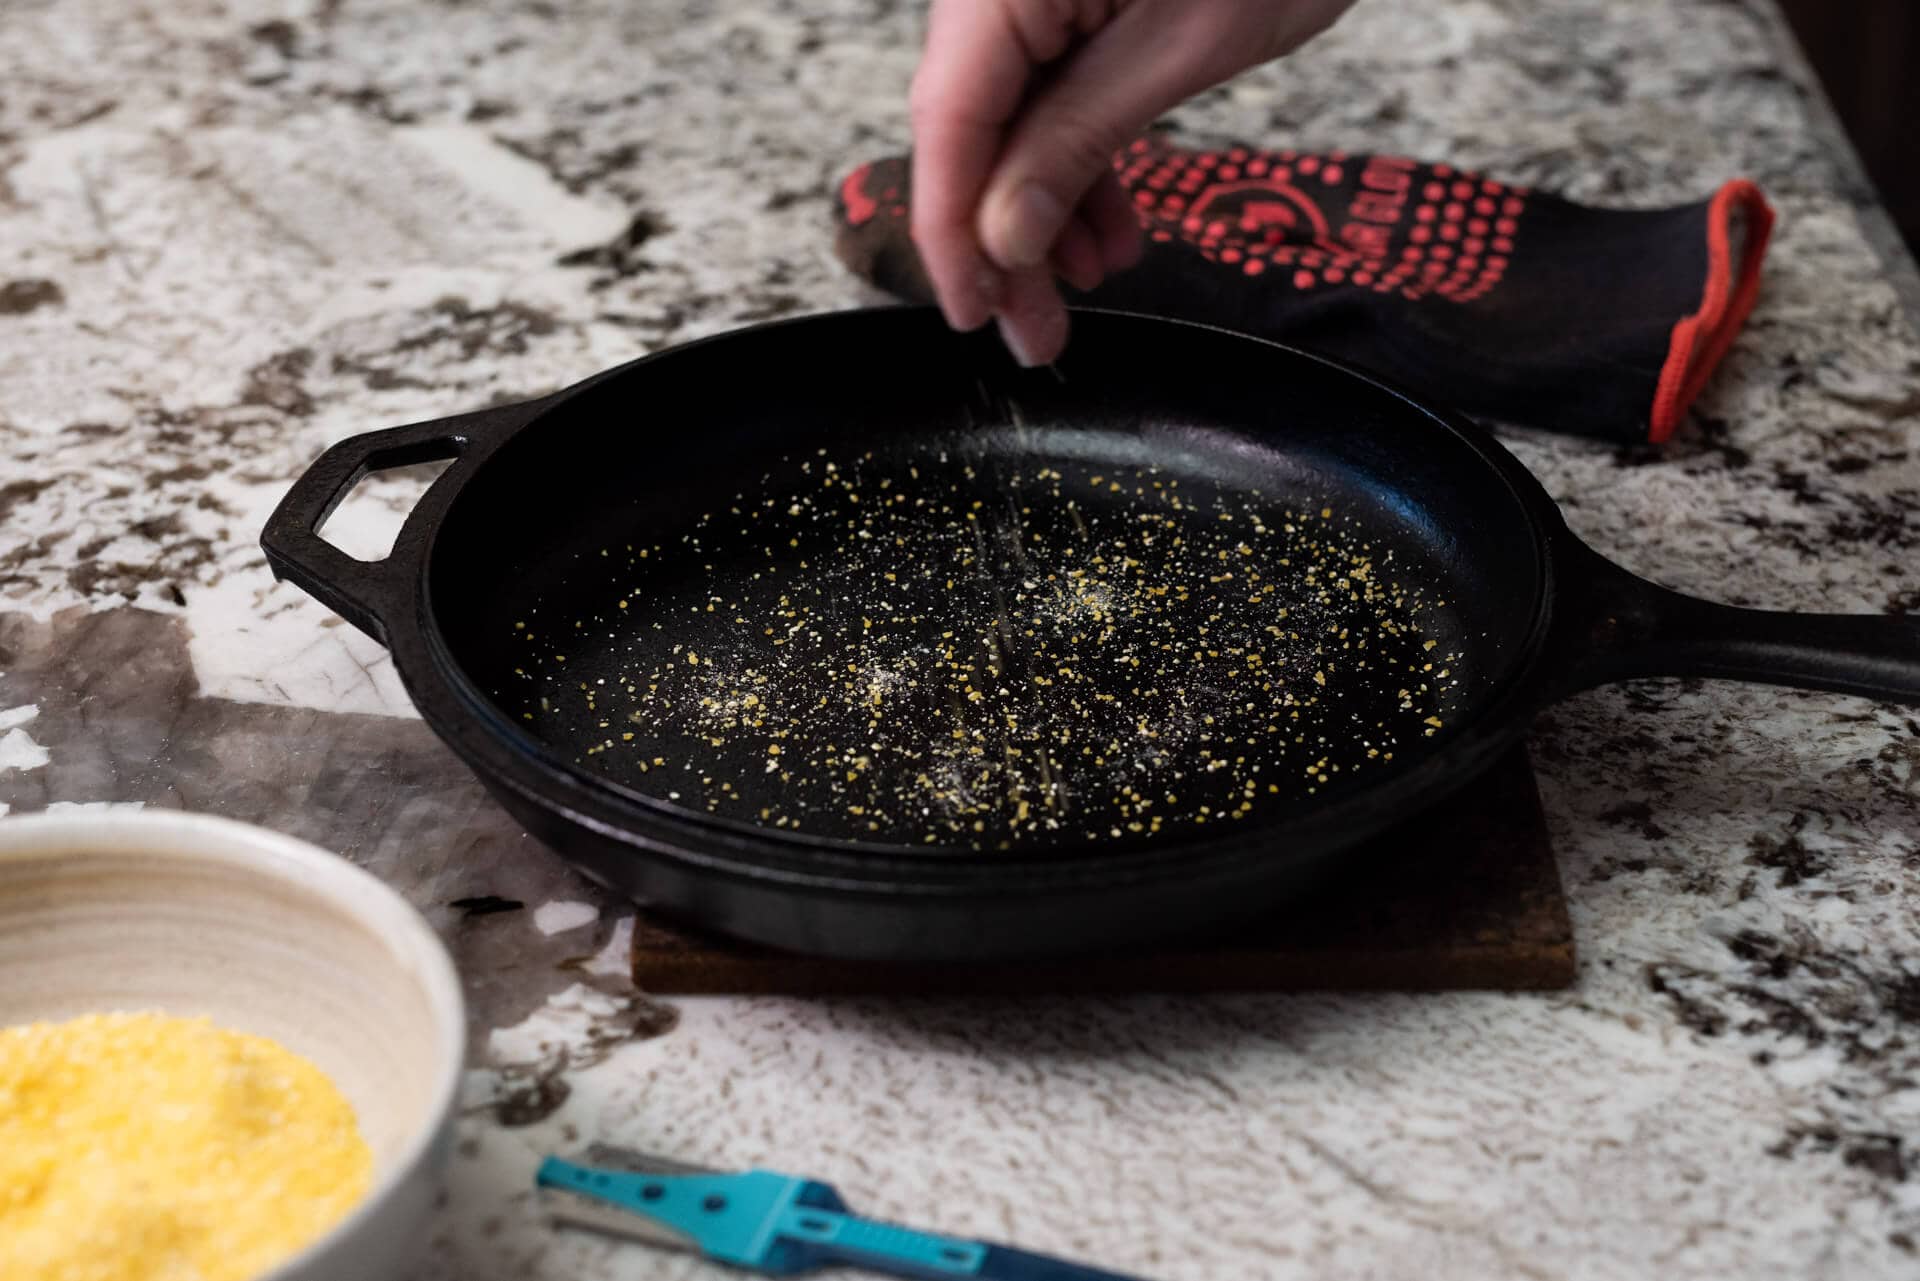
Coarsely ground corn (polenta or corn grits) works exceptionally well to provide a thin layer of insulation between your dough and the Dutch oven. This layer helps keep the dough from sticking to the cast iron while also lifting it to prevent burning.
Sprinkle a generous amount of coarse corn onto the preheated pan just before turning your dough onto it to score. Cover the pot with the deep end and center it over your baking stone insulator, as shown above.
If you frequently mill your own flour and have a sifting screen, save the wheat germ or bran you sift out. These coarse particles (which you can always add to the dough later) perform a similar function to the corn.
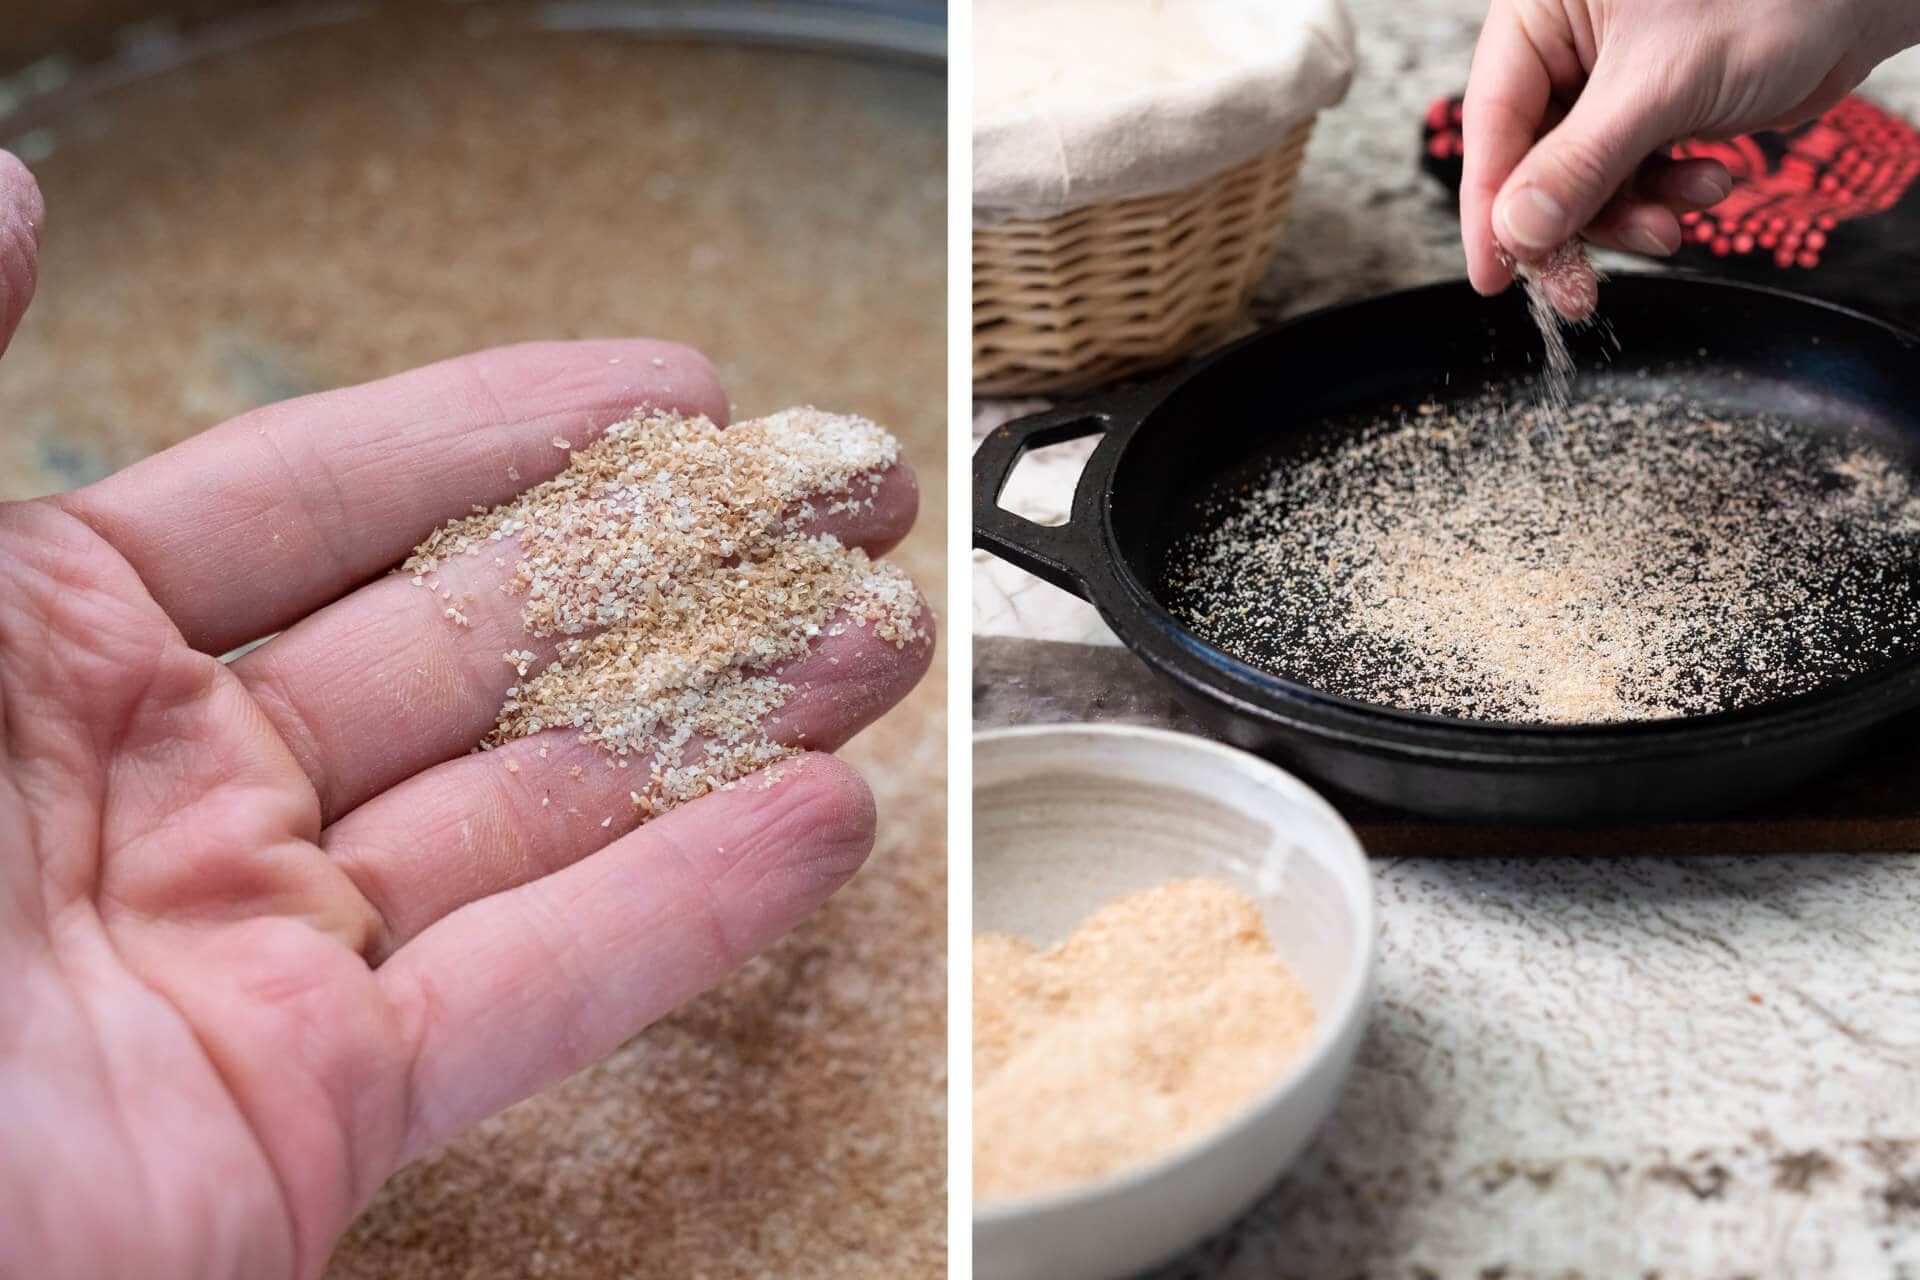
The image above shows the large germ/bran particles I’ve sifted out with my sifting screen. The fine, high-extraction flour falls through my screen into a bowl that I can add when mixing my bread dough. Then, I collect these larger bits to either add to the dough as porridge or use to coat the bottom as insulation.

Bake on two pieces of parchment paper to help prevent burning
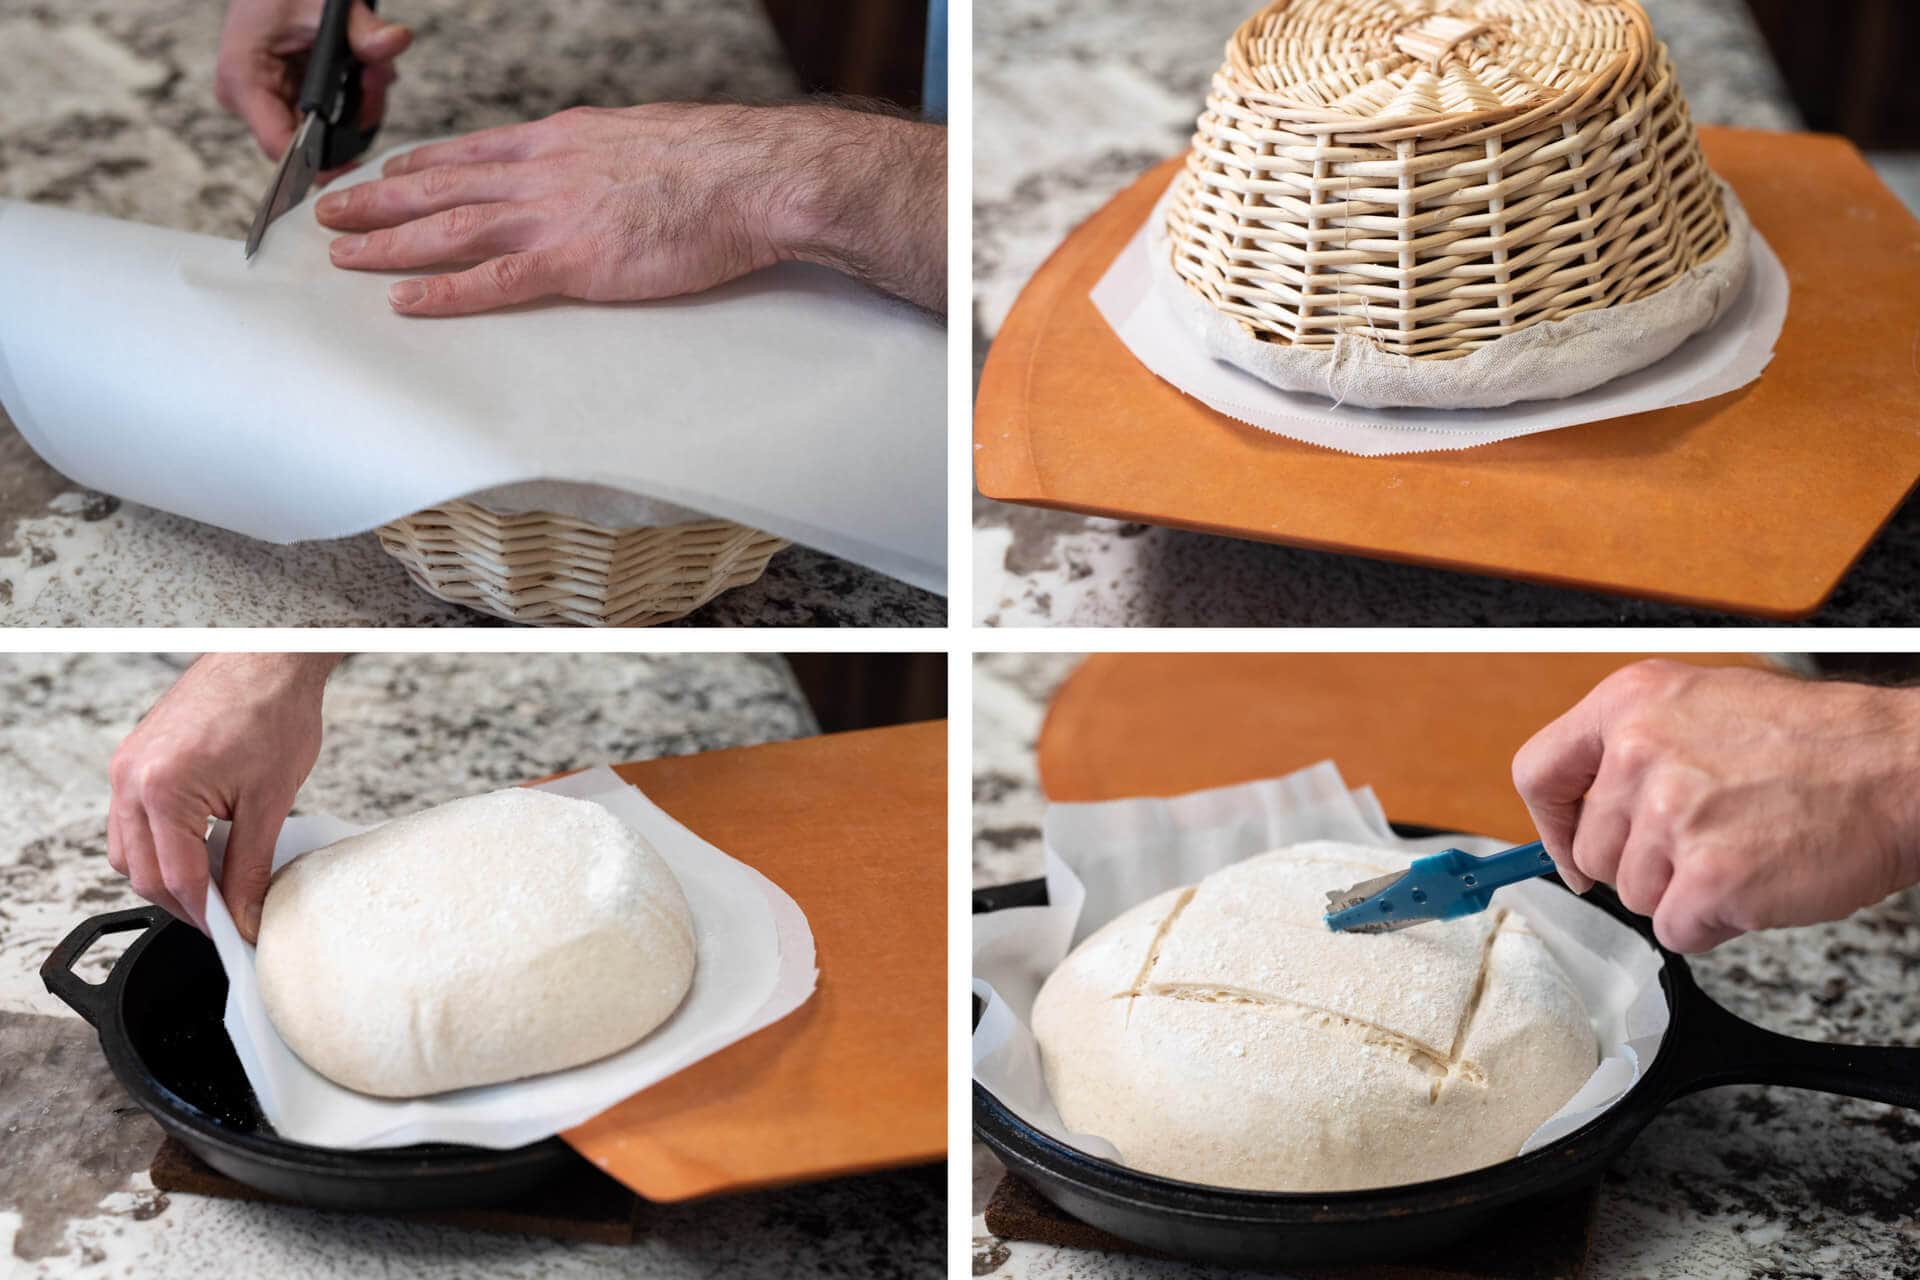
As you might have noticed in my Beginner’s Sourdough recipe, I typically use parchment paper (I love this natural, non-stick option) to help drag dough into the blisteringly hot Dutch oven. As I describe in that recipe post, lay a sheet of parchment paper over your proofing basket containing the dough, and cut it to fit. Invert the basket on a pizza peel, slide the parchment into the preheated Dutch oven, score the dough, and bake.
In this approach, you will follow the same process as before, except you’ll layer two pieces of parchment on top of each other to help further insulate the dough.
Additionally, you can sprinkle coarse corn (as discussed above) into the pan before you drag it into the parchment holding your dough. The corn will not stick to the dough, but it will help further insulate it and prevent burning.
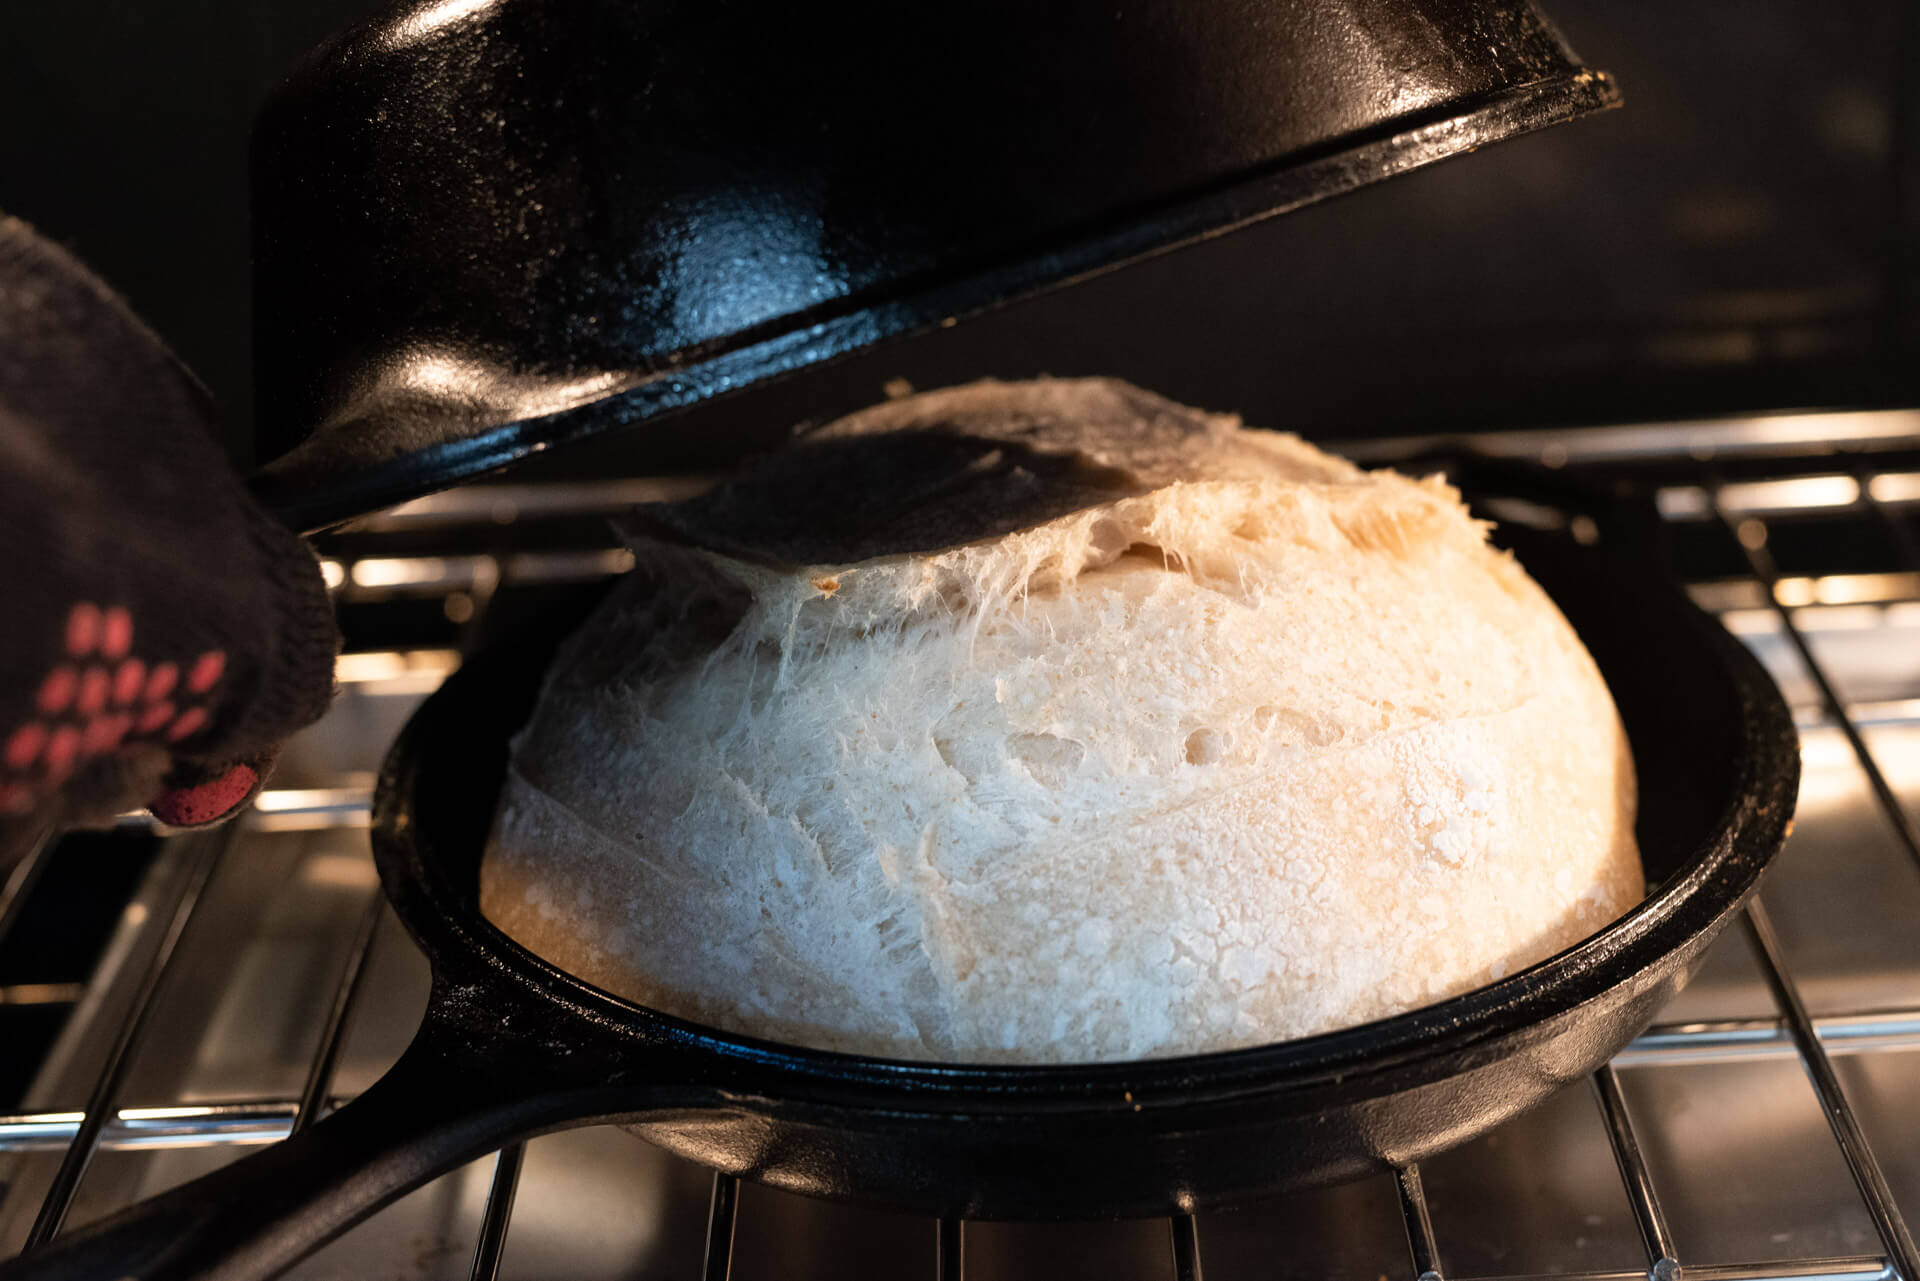
To prevent burning, remove the dough from the Dutch oven when it’s almost done
Another method to help prevent burning your bread dough in a Dutch oven is to remove it once the crust has set, about 30 minutes into baking. This means the dough has baked for 20 minutes with the lid on (and with steam), then uncovered and baked for another 10 minutes.
By this time, the crust should be a pale golden brown and sturdy enough to gently lift the dough from the Dutch oven to finish baking on the oven rack.
Additionally, remove both sides of the Dutch oven and the parchment paper at this time and continue baking until done.
Recommended Dutch Ovens and Combo Cookers
There are many types of Dutch ovens (lidded pots) and combo cookers out there, made from a range of materials, shapes, and sizes, and at varying quality levels. Any Dutch oven or combo cooker will work for baking bread if it’s oven-safe up to 450°F (230°C) and has a tight-fitting lid.
The following is a list of my favorite Dutch ovens for baking bread. I’ve used the following pots for years, and they’ve helped me make countless loaves of sourdough bread.
Note that some pots cannot be preheated empty, so check with the manufacturer if you are unsure.
3.2 Quart Lodge Combo Cooker
| Maximum dough weight | 900g |
| Material | Cast iron |
My favorite Dutch oven (or combo cooker, as Lodge calls it) is the Lodge 3.2-quart cast-iron combo cooker. I’ve been using the same combo cooker since I started baking bread many years ago, and it still looks new. It’ll likely last a lifetime.
This pot is extremely versatile, and I use it for a myriad of other kitchen tasks besides baking bread. I frequently use it to make the wonderful Tartine French toast and crispy-bottomed sourdough cinnamon rolls, and the deep end makes a mean roast chicken.
I’ve comfortably fit bread dough sizes from 500g to 900g in the pot. As with all cast iron, keep it seasoned.
The Dutch Oven Is Heavy. Is There A Lightweight Option?
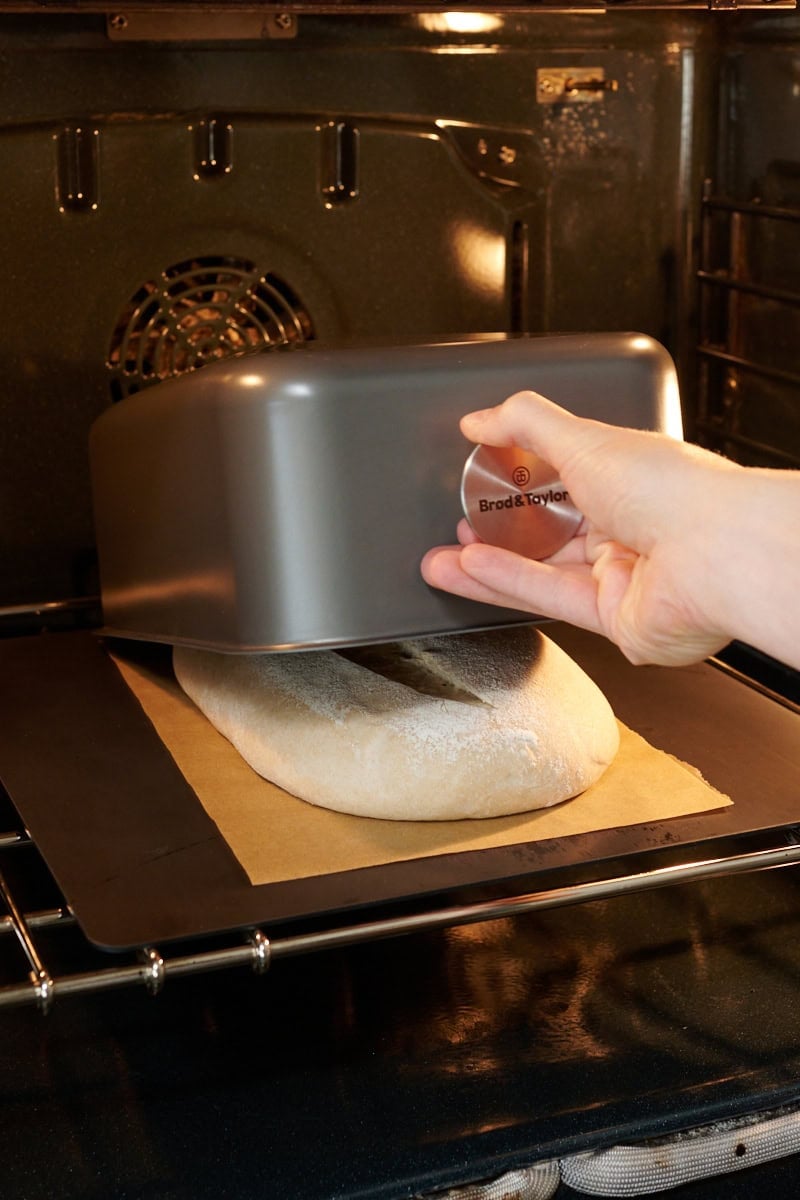
Instead of using a heavy pot to bake your sourdough bread, the new Baking Shell is a metal cover that traps steam and weighs just over 1 pound! If you struggle to move your Dutch oven in and out of the oven, the Baking Shell is perfect for you.
How Do You Bake Bread Without a Dutch Oven?
While using a Dutch oven to bake bread is straightforward, I still enjoy steaming my home oven and baking my sourdough bread directly on a baking surface. With this alternate method, it’s easy to bake two long bâtards (even up to 1.2 kg if your surface is large enough).
Ultimately, use whatever method is most comfortable for you and that you use often for the bread you bake. And if you’re like me, you might often switch between methods.
Baking Bread in a Dutch Oven FAQs
Do you oil a Dutch oven when baking bread?
No, no oil is necessary to bake bread in a Dutch oven.
What is the best size Dutch oven for bread?
I like to use a 4 or 5-quart Dutch oven or a 3.2-quart combo cooker for baking bread. These sizes are large enough to accommodate most bread recipes. If you have a larger Dutch oven, that will work just fine, too.
Should I preheat a Dutch oven when baking bread?
Yes, I always like to preheat the Dutch oven inside my home oven before baking bread. I find a preheated Dutch oven helps encourage maximum oven spring (the amount the dough rises in the oven) at the start of baking.
Can I reuse the parchment paper used to bake bread?
Yes, absolutely! I typically use the same square of parchment paper two to three times before needing a new one.
Why did my sourdough bread burn on the bottom?
It likely was baked for too long at too high a temperature. Reduce the bake time and temperature until it no longer burns. Use the suggestions in this guide post to help reduce burning on the bottom of your bread dough.
Do I have to season my Dutch oven?
Yes, I periodically season the Dutch oven I use to bake my bread—it is cast iron after all. I simply apply a thin layer of vegetable oil to the entire pot.
What’s Next?
And now that you’ve baked a loaf (or two), be sure to read my guide on how to store baked bread to ensure it stays fresh for as long as possible!
If you still have questions about the baking process or are looking for tips on scoring your dough before baking, see my full guide to baking sourdough bread.


351 Comments
I’m about to bake my first loaf of sourdough. I have a 7qt Cuisinart dutch oven. Is that too big?
It’s a little big but it’ll still work!
This was a great article, thank you so much. I always bake in my DO, but have been experiencing darker bottoms than I’d like, so I’ll try reducing the temp a little bit. Question about open baking with steam. I had heard somewhere that this does not work well with gas ovens, as they vent the steam. Do you find this to be true? I would like to bake a batard on my baking stone.
Thank you! 🙂
If you’re baking in a Dutch oven/pot this won’t be an issue, but yes, I have found with convection and gas ovens it’s harder to fully steam the oven because of the fans and vents.
Hey Maurizio, I like to bake batards but the Challenger costs a fortune with the shipping to UK (£415!), can you bake a batard in the Quart Lodge Combo Cooker? Or please can you recommend an oval Dutch oven less than £200?
You can, but the dough weight has to be really small to fit an oval in there. Have you tried steaming your oven instead?
https://www.theperfectloaf.com/baking-with-steam-in-your-home-oven/
Can I preheat a La Cruset Dutch oven
Most of them, yes. Just be sure it doesn’t have a plastic handle. If in doubt, email them or look on their site for your particular one!
Le Creuset sell metal handles for their lids separately, it’s easy to unscrew a plastic handle and replace with a metal one.
Hi, I’ve been using a Lodge Enamel cast iron (5 or 6 quart), and preheating it. I didn’t know preheating was bad for it, but it seems like I haven’t done any damage to it so far. Having said that I think its time to get a cast iron, I’d also like to try baking bread on a fire next time I find myself camping. I’m looking at the 3.2q combo cooker, great price and I like that I can use it for other things.
One question I have though: is 3.2 quarts tall enough for most loaves without encumbering the oven spring? I have noticed the ear almost touching the top of the enamel dutch oven which seems to be 1-2″ deeper (from what I can tell in the photos).
Hey Maurizio! Is it possible to cook a sourdough loaf in a dutch oven ON THE STOVETOP!?
That’s an interesting idea. However, I do not think it would work because you need to bake the dough for a significant amount of time *uncovered* to fully harden off the crust!
Maurizio
What are your thoughts on adding a few ice cubes to the Dutch oven before closing the lid, my bread seams to come out fine.
Just not sure if it helps or not….I have never tried it with out adding them.
Yes, that’ll help add more steam! I just put one cube, if I want a really shiny crust.
My enameled dutch oven mfgr says to NOT preheat their dutch ovens when empty. Any thoughts on that issue? I spoke with another sourdough bread maker who had problems with “inexpensive” enameled dutch ovens flaking the enamel with preheating at high temperatures.
Definitely do not preheat then. If that’s what they recommend, perhaps the vessel is okay with baking from cold? I have never used a pot like this, I’d need to do some testing here… Ahh, another rationalization to buy more baking hardware 🙂
If you give it a try from cold, please let me know how it turns out for you!
I shall let you know. I have done several bread recipes as bake from a cold dutch oven in a cold oven.
I just baked a loaf. The oven was preheated to 350 to warm another item. As soon as it was free, I put the bread in a cold enameled dutch oven in the oven and set it for 450. Baked it for 25 minutes, took off the lid and did another 25 minutes to brown it up. It was at 210 inside, so a cold dutch oven with a small loaf (300 gm or so), works.
I’m definitely going to try this. Thanks for reporting back!!
I’ve been baking bread in enameled dutch ovens, putting bread in the cold pot and putting it in the preheated oven. So far only one loaf ‘bombed’. I had screwed up the recipe but baked it anyway to see what happened. What happened was I threw it out.
For the last part of baking, after removing the lid, I assume the oven must not be with the fan on. Is it correct? 🙂
It actually doesn’t matter! If the fan is on at that point, it will bake faster. At that point, all the steaming has been done so it’s okay if the fan is on (though, I usually have it off).
I don’t have a Dutch oven- could I substitute a baking stone with a large pot inverted over it?
Yes!
I am considering the Kitchenaid ceramic bowl which allows you to mix proof and bake all in one bowl. But it wouldn’t let me preheat the bowl. Do you think it would work. I bake a gluten free dutch oven bread.
I have not had success baking with a cold pot.
I bake at 475 in a preheated Dutch oven. After 30 minutes I take out the loaf and finish it next to the pot on the rack. I put a ring of foil under it. The foil ring is made up of scrunched up foil so the loaf is about a 1/2 inch off the rack. It takes about 10 minutes to brown perfectly. When that one is done the pot is reheated enough to bake the second loaf.
That’s a fantastic method, Jenni! I too will take my almost finished loaf out (as I describe up in the post) and finish baking on the rack. Never thought of the foil ring, great idea!
love this tip!!!
I’ve found another trick that works every time for me to avoid a burnt bottom in a Dutch Oven cooker. I bought some little clay balls used for weighing down pie crusts in pre baking and put these in a single layer in the bottom of the Dutch oven. I still use a single layer of parchment paper. It doesn’t seem to matter if I preheat the Dutch Oven either.
Gosh, this is such a great idea, Garnett. Now I’m going to order some and give that a shot!
I’m fortunate to have a convection/bake setting on my oven and since switching to that I no longer have burnt bottom bread. Also I no longer pre-heat the Dutch oven, I spritz the dough with water, use a scissors instead of a blade, and add some coarse salt to the top.
Ah, I wonder if that convection setting blows the heat around just enough to avoid the bottom getting to hot… I need to try this. Thank you, Gus!
Hi Gus, Just experimenting with my new range on convection. Do you lower your temp or time? Thanks!
I have an old set of Corning ware ceramic baking dishes from the 80’s –the plain white kind without the blue flowers. I use two of the large pans-one deep and one a little more shallow but with the same footprint for my bread baking. The ceramic has a super-smooth surface and the bread never sticks. I started using them when my old Tramontia enameled dutch oven started giving me problems with sticking. I only use them in the oven or the microwave. They conduct heat terribly on the stovetop and frequently burn food, but they are great in the oven. They are also lighter than the cast iron, which is a problem for me as I have arthritis in my thumbs. I tried the Cabot cast iron pan but the single pot handle was too unwieldy for me as I had to grab it with both hands to lift it. Someone got a “find” at the local ARC thrift store.
I remember those baking dishes!! Love these ideas, Ann.
Set the cooker on a single layer of aluminum foil and that does it.
Yup, that’ll reflect much of the IR heat from the oven. Need to add this to my list, thanks J.F.!
Baking half a loaf in the Staub. How much time do I bake a smaller loaf, say half the size of the original boule. There is going to be an adjustment, I’m just not sure how much less time is required.
I still do the initial 20m with steam, then reduce the second half of the bake time (without the lid) as necessary. I’d guess maybe 1/2 that second half!
I see you mentioned the 5.75 qt Staub oval Dutch oven. I was gifted an oval Staub #31. Is this the same size?
I think the #31 is a 7qt, but you can still use that!
Next bake, I’m going to try using my Baking Steel with my pre-heated dutch oven as a lid, inverted over the loaf after it’s loaded on the steel. I think this should work as well as the Lodge or Challenger. A lot easier and safer than dropping the loaf into a hot Dutch oven sitting right-side up. Anyone else tried this?
That’s a great idea. I’ve baked with inverted pots like this and it works well!
Happens! Thanks for sharing, Helen 🙂
I don’t have a Dutch oven. Is there anything I can use as a as a substitute?
You could use any large pot, really. Or, a very deep baking pan, inverted over your dough.
Hi Maurizio, quick question! Is there a reason you choose the 3.2 quart lodge combo cooker over the 5 quart? https://www.amazon.com/gp/product/B000LEXR0K/ref=oh_aui_search_asin_title?ie=UTF8&th=1
I’ve seen some posts online about people baking batards in the 5 quart but wanted to get your thoughts. Thanks!
The 3.2Q has been plenty large for me for almost every recipe (except like a miche). It’s lighter and easier to handle. That said, a 5Q will work as well!
I actually prefer using rice flour for both coating the banneton and on the bottom of the baking pan. I use it to coat my pizza peel to prevent the dough from sticking and necessitate making a big calzone out of a 14-inch pizza.
Have you tried semolina for the pizza peel? The individual grains are like thousands of tiny ball bearings so even the stickiest of pizzas just slide off the peel.
Rice flour works, too!
A timely post as i’m doing a dutch oven loaf this morning, Except, i do not have an oven so having to do mine on top of the woodstove. Any tips would be appreciated! Thanks so much.
That should work as long as the pot forms a good seal!
Hi Maurizio!
Can you please tell me why you open your dutch oven to pre-heat? I have been having issues with a gummy line in the very centre of my loaves, towards the bottom (about 1/2cm from the bottom crust). I often bake multiple loaves at a time and some may have the dense line, where others are perfect. The crumb is otherwise beautiful, like in your photos, so I don’t believe it’s an underproofing or overproofing issue. I’ve played with hydration levels and flour types….to no avail. So now I am focussing more on oven temp. Currently I heat the dutch oven to 230 but with lid on…. I’m curious as to why you take it off…see if it might help me!!
Thank you 😉
It’s not mandatory, you can keep it closed when preheating!