
I’ve been thinking about this recipe for some time, and I’ve been tinkering with it for just about as long. I wanted to create a whole wheat sourdough bread that wasn’t all the way 100% whole grain, but still enough to bring out that assertive wheat flavor, gentle yet complex sourness, and also one that packs a nutritious punch. I wanted it to be light in hand, soft of texture, and be the right starting place for those who might not have had much experience with bread boasting a majority of whole grains.
This recipe is a beginner’s sourdough recipe but with more whole grains than not. A fifty-fifty whole wheat sourdough bread to get you and your family on the whole-grain train without them missing the characteristics of white flour. Typically, bread with a significant amount of white flour is lighter, more open, and loftier.
As you might know, I always like to experiment. To tinker. To change. Even when things are already working well I seem to dig in and just have to adjust. My previous work with whole wheat almost always utilized a stiff levain (around 65% hydration) but here I opted for 100% hydration liquid levain. I made this change mostly to see if the result would be all that different, but also because I wanted to add flexibility to this bread—knowing that I, or you out there, could make it with a stiff or liquid levain just the same. I find there are advantages and disadvantages to both but when it comes down to it as long as you adjust the total water in your recipe you’ll get a great result no matter which type of starter you maintain or levain you use.
Instead of a long levain build period, this formula calls for a shorter time from levain mix to using it in the dough. This is a handy thing to be comfortable with, it means you can get a strong, reliable levain ready to go in a shorter time period (about 3-4 hours instead of 6-7). Nothing groundbreaking here, but I like to highlight it upfront as something to add to your baking toolbox. The ability to adjust your levain to suit your schedule is handy and it means baking can revolve around our busy schedules and hectic weekends.
And finally, I played with baking this bread at a much higher temperature for a shorter period overall—I baked these fast and hot (and you can see that in the image above, a little more color all around and especially on top). Instead of baking on thick baking stones, I opted for a Baking Steel as my “deck,” which gets incredibly hot. More on this later, and before we delve into these things any further, let’s talk about flour.
Flour Selection
My whole wheat selection here is pretty straightforward, just a good quality stoneground whole wheat (and it’s actually the whole wheat flour I use most often here in my kitchen). In experimenting between stoneground and roller milled whole wheat flour I’ve found the flavor of stoneground whole wheat to be more assertive, deep and much tastier overall. Due to the method of milling, stoneground whole wheat preserves more of the bran and germ and these particles are clearly evident when passing the raw flour through your fingers. If you don’t have stoneground whole wheat a roller milled whole wheat (this is typically what you’ll find at the market) will work just as well, perhaps with a slightly different flavor profile and less assertive whole wheat taste overall.
Generally, I prefer the texture of lower protein white flour like Giusto’s or Central Milling Artisan Baker’s Craft (both which are around 11-12% protein). To me, these generally have less of a gummy texture and perform very well for extended fermentation times. If you don’t have access to this flour any “all-purpose” flour would work well here, including King Arthur all-purpose.
Fifty-Fifty Whole Wheat Sourdough Bread Formula
Vitals
| Total Dough Weight | 1,800 grams |
| Pre-fermented Flour | 5.00% |
| Hydration | 82.00% |
| Yield | 2 x 900g loaves |
Total Formula
Target final dough temperature (FDT) is 78°F (26°C).
This recipe is highly hydrated because there’s a high percentage of whole grains, which require more water in the mix (the bran and germ present in the flour can take on quite a bit more). If this is your first time trying this loaf, reserve 100g of the mixing water and only add it in if the dough feels like it can handle the addition.
| Weight | Ingredient | Baker’s Percentage |
|---|---|---|
| 476g | Whole wheat flour (Giusto’s whole wheat) | 50.00% |
| 238g | Medium-protein bread flour or All-purpose flour (~11% protein, Giusto’s Artisan Bread Flour) | 25.00% |
| 238g | High protein flour (~12% protein, King Arthur Bread Flour) | 25.00% |
| 781g | Water | 82.00% |
| 18g | Salt | 1.90% |
| 48g | Sourdough starter (100% hydration) | 5.00% |
Method
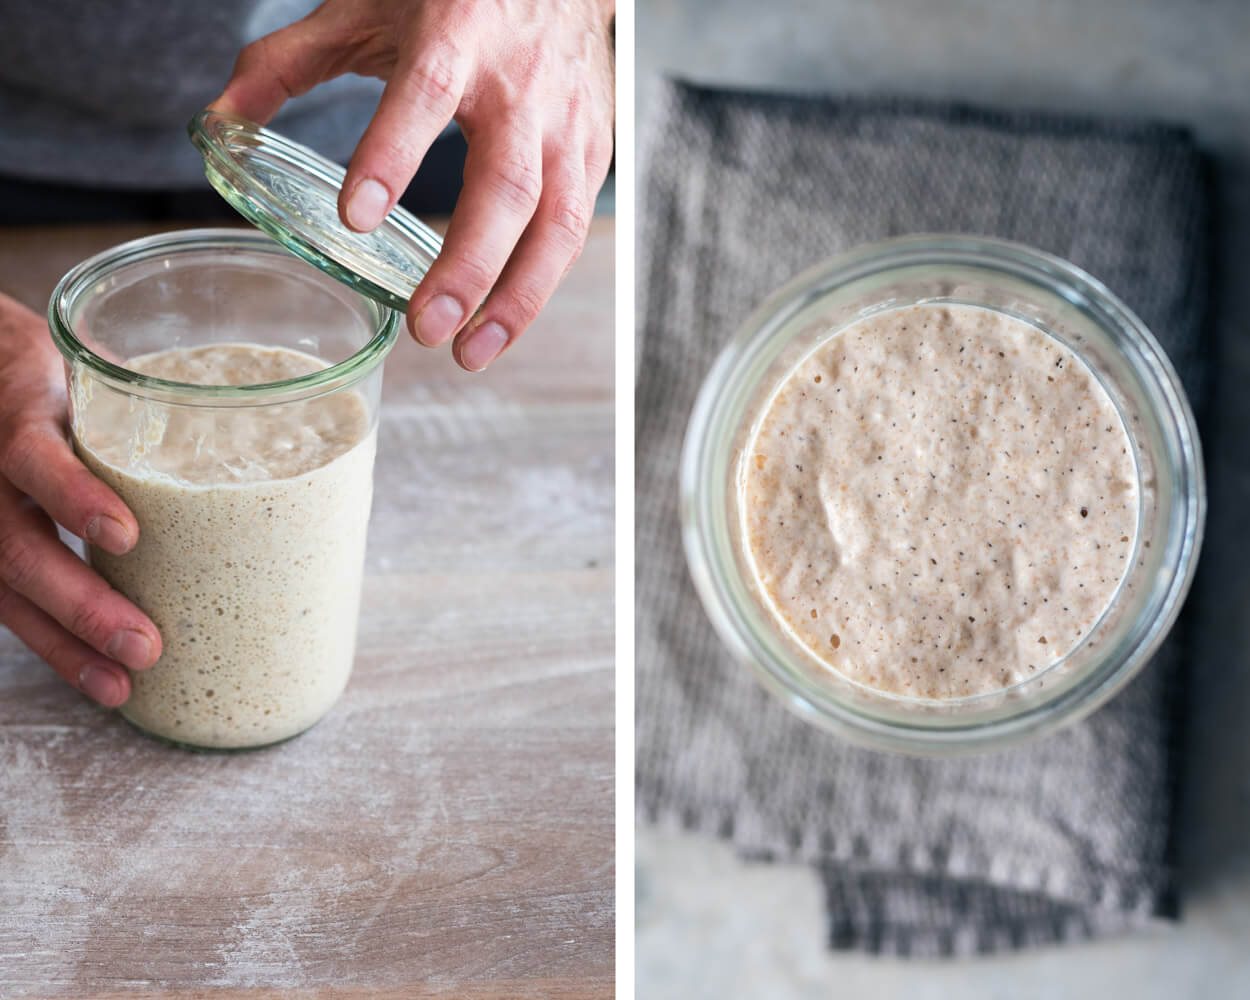
1. Levain – 12:30 p.m.
| Weight | Ingredient | Baker’s Percentage |
|---|---|---|
| 48g | Ripe starter | 100% |
| 24g | Giusto’s Stoneground Whole Wheat | 50% |
| 24g | Giusto’s Artisan Bread Flour | 50% |
| 48g | Water | 100% |
As mentioned earlier, I worked with a shorter levain build for this bread. To adjust for the reduced build time, we’ll increase our inoculation of ripe starter and the water temperature. This gets the whole process moving faster, and by the time you’re ready to use this levain, you’ll notice some significant activity. See my post on the importance of dough temperature for more information.
Build the liquid levain (everything listed in the Levain Build section above) in the morning or afternoon and store somewhere around 78°F (26°C) ambient for 3 hours.
2. Autolyse – 1:30 p.m.
Usually, with high percentages of whole wheat and/or bread flour, I lengthen the autolyse time, sometimes up to 5-6 hours. The two-hour autolyse in this recipe, while not as long as 5-6 hours, helps the high percentage of whole grains fully hydrate and starts the gluten development process without mixing. This will help reduce the total mix time required later in the process.
See my guide to the autolyse technique for more information on its benefits and why I used this technique in this recipe.
| Weight | Ingredient |
|---|---|
| 453g | Whole wheat flour |
| 214g | Medium-protein bread flour or all-purpose flour |
| 238g | High protein flour (“bread” flour) |
| 634g | Water (100g was held back until Mix) |
Mix the above ingredients in a bowl until all dry bits are hydrated. Cover the bowl and store somewhere warm for 2 hours.
3. Mix – 3:30 p.m.
| Weight | Ingredient |
|---|---|
| 143g | Ripe levain |
| 18g | Salt |
| 100g | Water (reserved from Autolyse step) |
Add the called for ripe levain to your autolysed dough and using about half of the reserved 100g of water mix thoroughly with your hands. You want the levain to be pretty well mixed through the dough and the added water absorbed.
Let’s mix/knead. I chose to do slap and fold for about 4 minutes, just until the dough started to show signs of a smooth surface and it was catching some air. If you aren’t comfortable with slap/fold method or don’t like it, you can do stretch and folds in the bowl until your dough tightens up and becomes slightly hard to stretch out and fold over. Medium development.
When finished mixing spread the salt on top of the dough and the remaining water to help dissolve. Pinch through the dough thoroughly and fold the dough over itself to help incorporate and absorb the remaining water. When finished transfer the dough to a tub or thick-walled bowl for our first rise, or bulk fermentation.
4. Bulk Fermentation – 3:40 p.m. to 7:10 p.m.
At 78-80°F (25-26°C) ambient temperature, bulk fermentation should go for about 3 hours and 30 minutes. Give the dough 5 sets of stretch and folds during this time, spaced out by 30 minutes. Keep an eye on the dough as it approaches the three-hour mark. It will rise a bit and be quite active! See my sequence of images below to get a feel for how the dough should look and feel during the 3.5-hour rise.

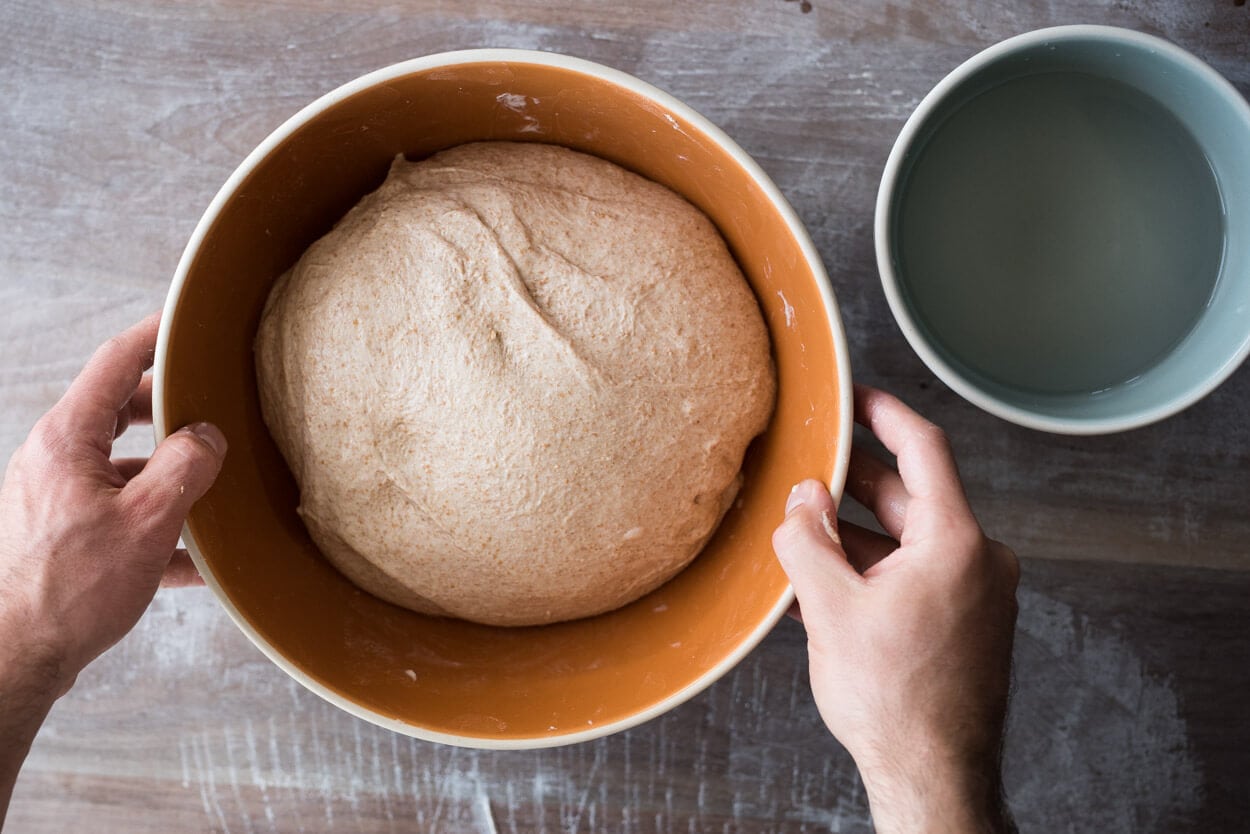
Above is a picture of my dough after mixing and right at the beginning of bulk. You can see how shaggy the dough is, how wet and lifeless—it’s just sitting there in a single flat layer. There’s no rounding between the edges of the dough and the bowl, no bubbles anywhere, and if you jiggled the bowl you wouldn’t see much movement.
Above is my dough after the fifth, and last, set of stretch and folds. Look how strong the dough has become compared to the picture above. It’s holding its shape in the bowl extremely well—this is a sign for me that the dough is now strong enough and no further strengthening is needed. I will now let the dough rest, relax and rise the remainder of the time specified for bulk fermentation.
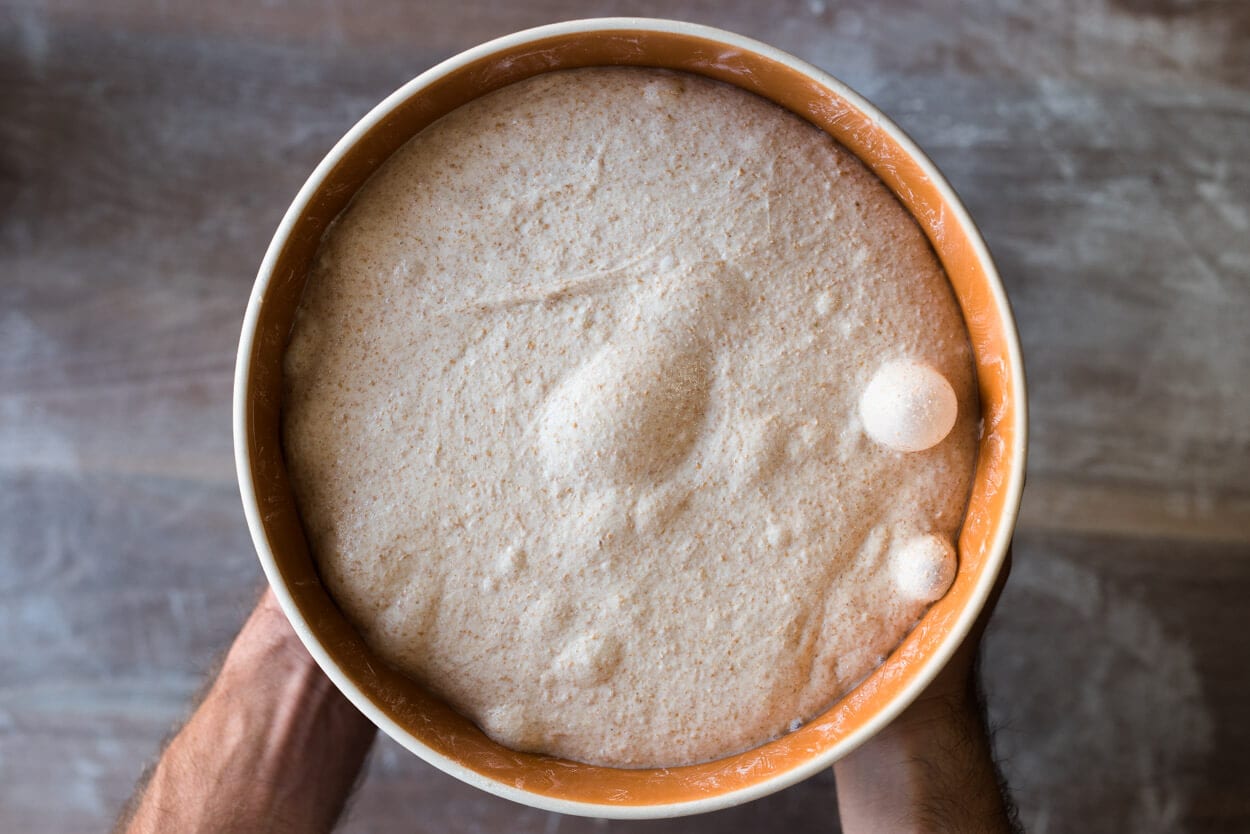
I called bulk fermentation quits when I saw the dough reach the point seen in the picture above. You can see it’s risen significantly, there are plenty of bubbles on top and just below the surface, and most importantly, the edge where the dough meets the bowl is domed & convex.
If I were to wet my hand and tug on the dough a little I’d feel much more resistance and elasticity—the ability of an object or material to resume its normal shape after being stretched or compressed. It’s gained strength and can hold its shape much more than at the beginning of bulk. These are all good signs your dough is strong enough and ready to be divided.
5. Divide & Pre-shape – 7:10 p.m.
Gently dump out the dough from your bulk container onto an un-floured work surface. Divide in half and pre-shape the dough into two round boules. Let the rounds rest 20 minutes uncovered.
6. Shape – 7:30 p.m.
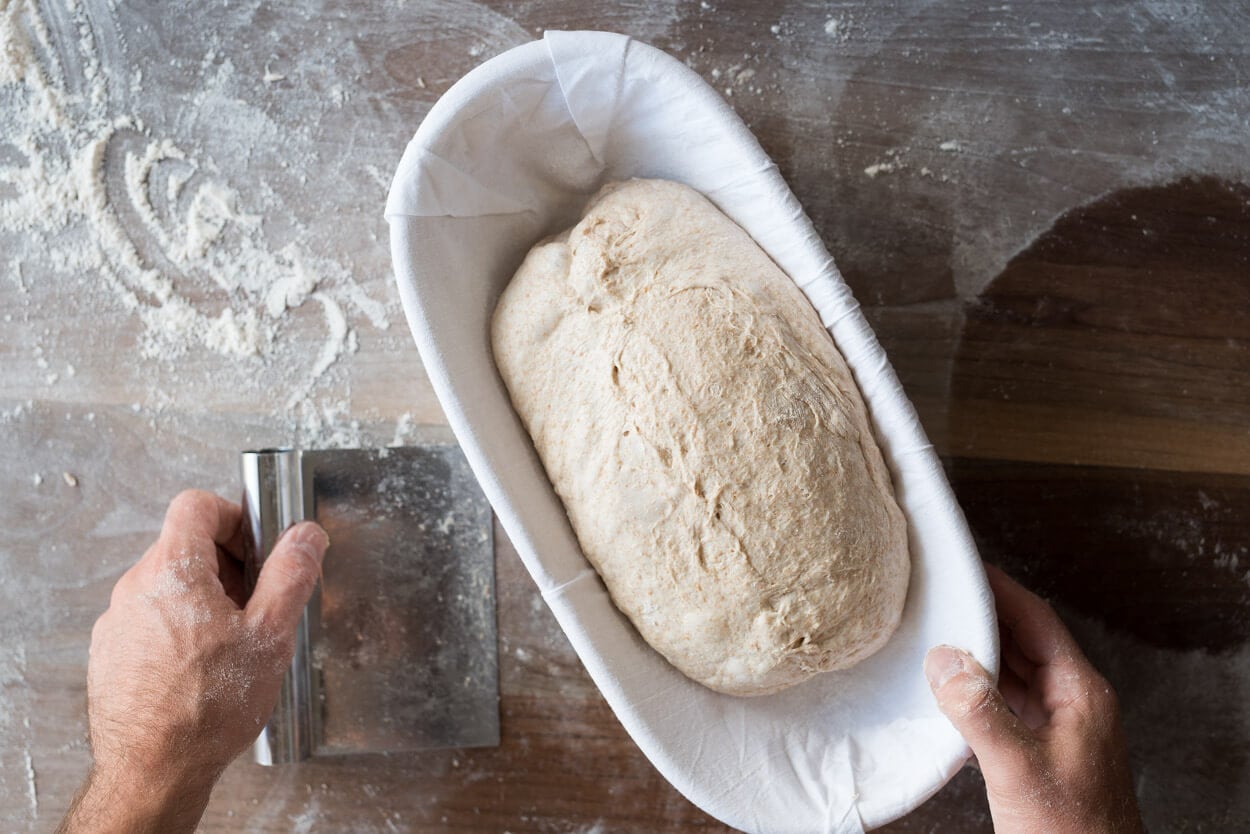
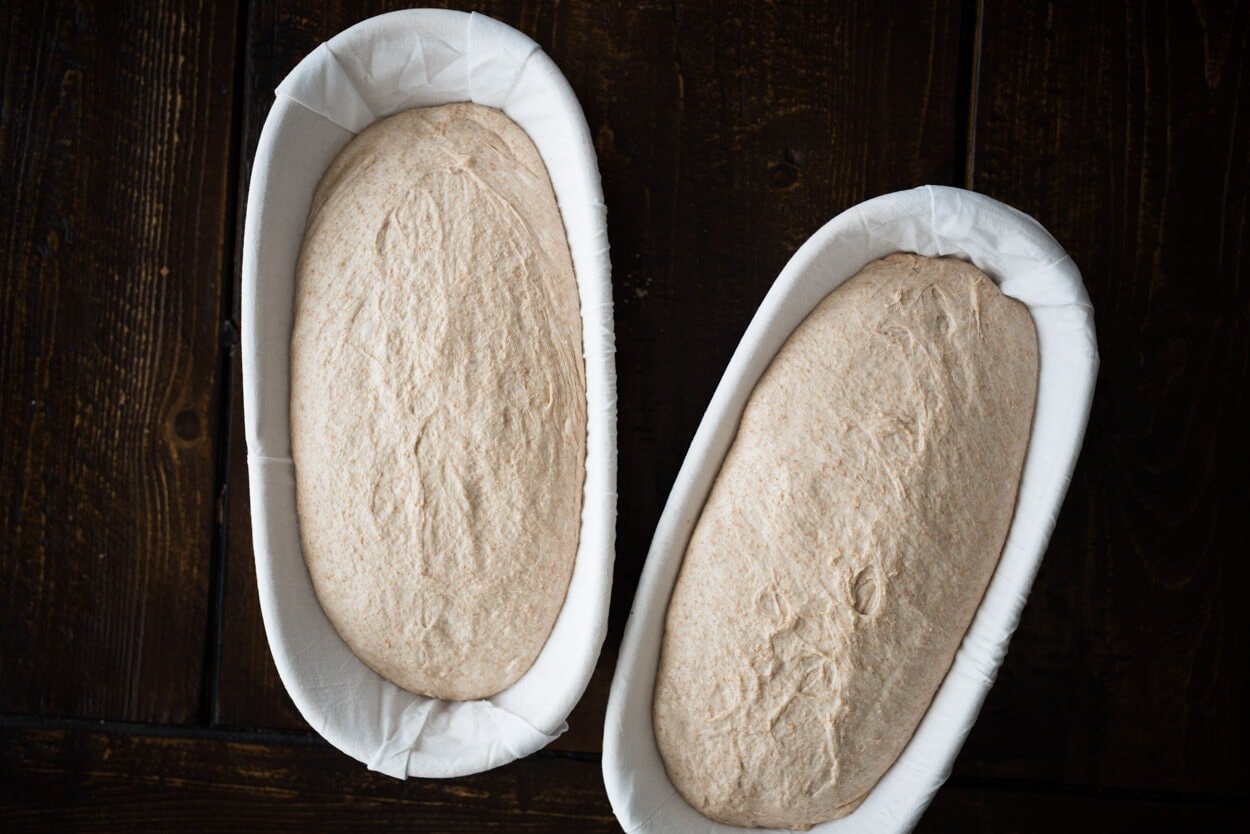
Prepare two baskets that will hold your dough during its long cold proof overnight. If you decide to shape the dough as two boules (rounds), find two round kitchen bowls, and if you decide to shape it as a batard (ovals), use two bread baskets. Line the baskets with cotton or canvas liners if you have them, clean kitchen towels if not, and dust them lightly with white rice flour to prevent the dough from sticking during the proof.
Moderately flour the top of the dough and flour the work surface. Flip one resting round over, so the floured side is down on the work surface. Fold the dough’s top up and over to the middle and repeat for the bottom (you’ll now have a long slender rectangle in front of you). Pickup the rectangle and rotate it 90º, so it’s now lengthwise facing you. Grab the dough at the very top and fold over a little way, press to seal with the dough’s central mass. Now grab this rolled over the top and gently continue to roll it down towards the bottom, tucking in the dough as you go (imagine rolling down a beach towel). At the end of this, you’ll have a tube that has essentially been rolled downward. Once shaped, transfer each to their floured shaping basket with the seam side facing up.
For an in-depth guide to shaping like this, see my batard shaping guide.
Repeat with the other round.
7. Rest & Proof – 7:35 p.m.
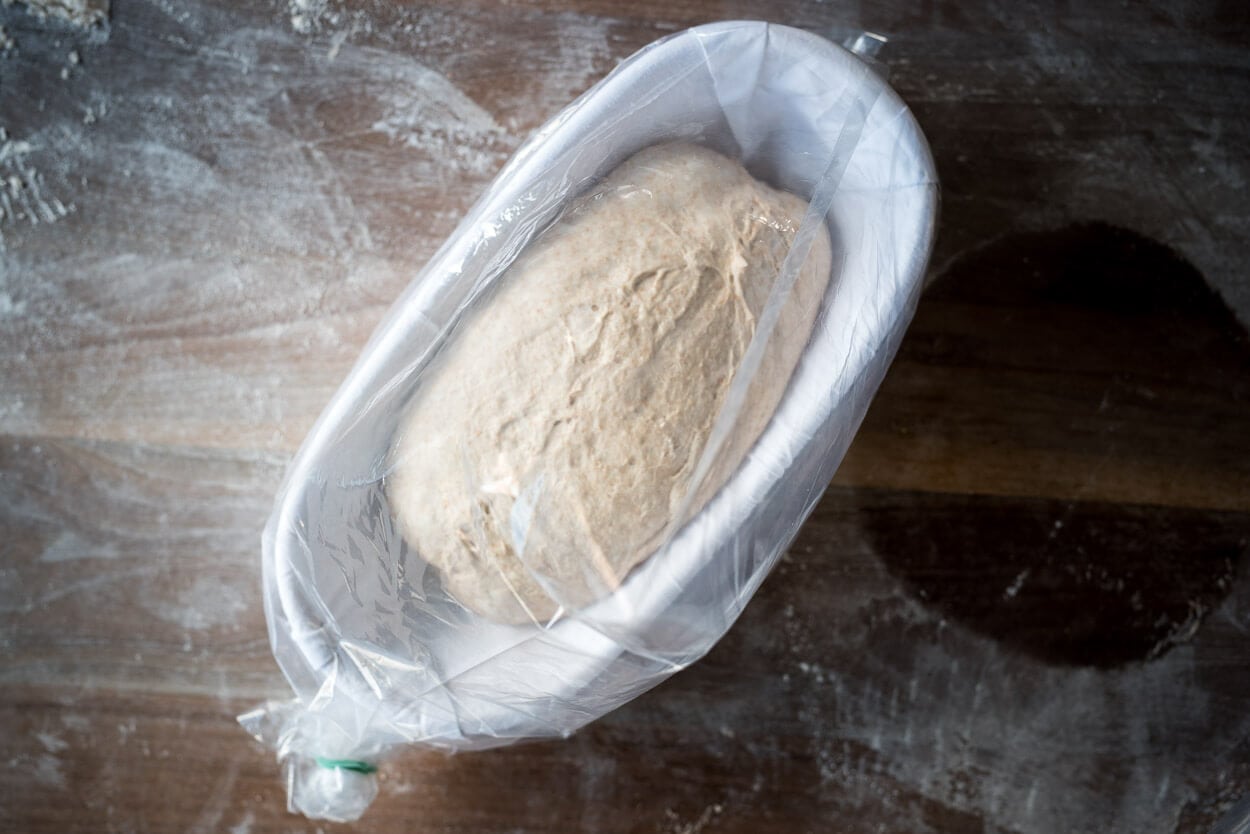
Cover your baskets with plastic and then place them in the refrigerator to proof at 39°F (4°C).
8. Bake – Next Morning: Preheat oven at 8:30 a.m., Bake at 9:00 a.m.
Place your Baking Steel in your oven and preheat for one hour at 450°F (230°C). Once preheated, take out both of the baskets from the fridge and remove the plastic wrap.
You’ll notice my dough has risen somewhat but not a significant amount. Instead, the dough has relaxed to fill my proofing baskets and is perhaps a little puffier (the loaf on the right was a slightly higher final dough weight and will result in a larger loaf).
Cut a piece of parchment paper to fit over the top, place it over the basket, and then place a pizza peel or small cutting board over the top. Quickly invert each basket onto the parchment and peel/board. Using a sharp razor blade fastened to a stick, scissors, or a very sharp knife, carefully score the top of each loaf at a shallow angle to the dough, just deep enough to cut below the top skin created at shape time. I like to score whole wheat loaves with my bread lame at a very shallow angle; this helps the loaf attain maximal rise when in the oven. If you score at a straight 90° angle with the dough, then as the dough rises, it sort of splits open instead of peeling back.
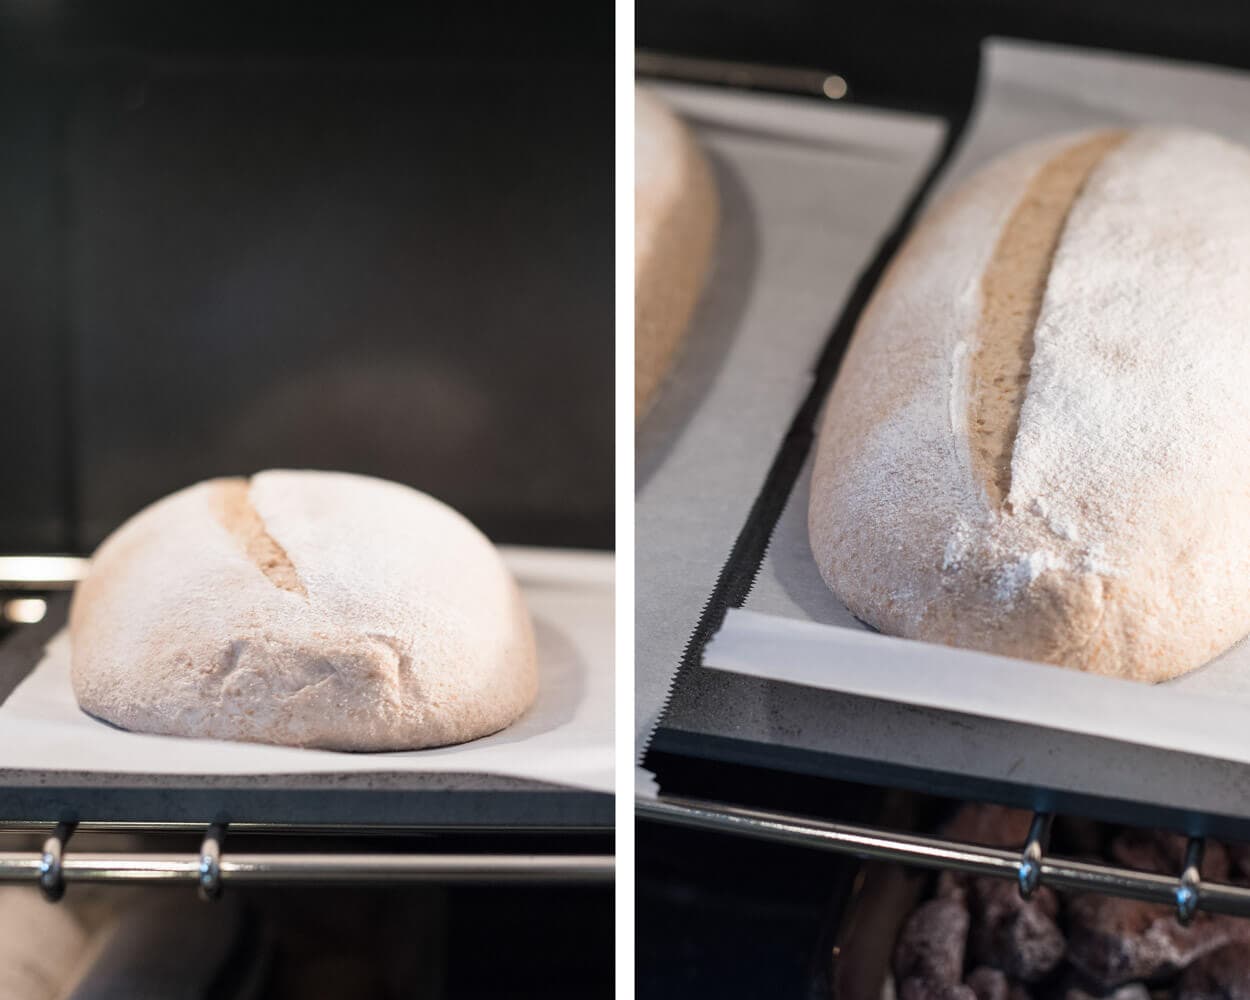
I steamed my oven in my usual way, described here in my post how to steam your home oven for baking. I baked these loaves hot and fast. The goal was to bake the exterior to a nice dark color, and also bake the interior, but take the loaves out before they completely dried out inside. I like my loaves with whole wheat to be much more tender and moist, and I found this baking schedule achieves that.
Bake for 20 minutes, then remove the steaming pans from inside the oven. Then, bake for an additional 30 minutes until the internal temperature registers around 206-210°F (96-98°C). Keep an eye on these from the middle of the bake all the way to the end as the prolonged high temperature can quickly scorch the outside of the loaves.
Note: these times and temperatures work well when baking here at a high altitude (about 5280 ft. above sea level) and in my environment. The first time you try this recipe, keep a close watch over the dough in the oven to adjust as necessary.
For an alternative to baking on a hot surface, check out the Challenger Bread Pan, which is a large cast-iron pan able to bake these batards with no problem.
Remove from the oven and cool on a wire rack for at least 2 hours. Be sure to store the bread properly to keep it fresh for a week or longer.
Conclusion
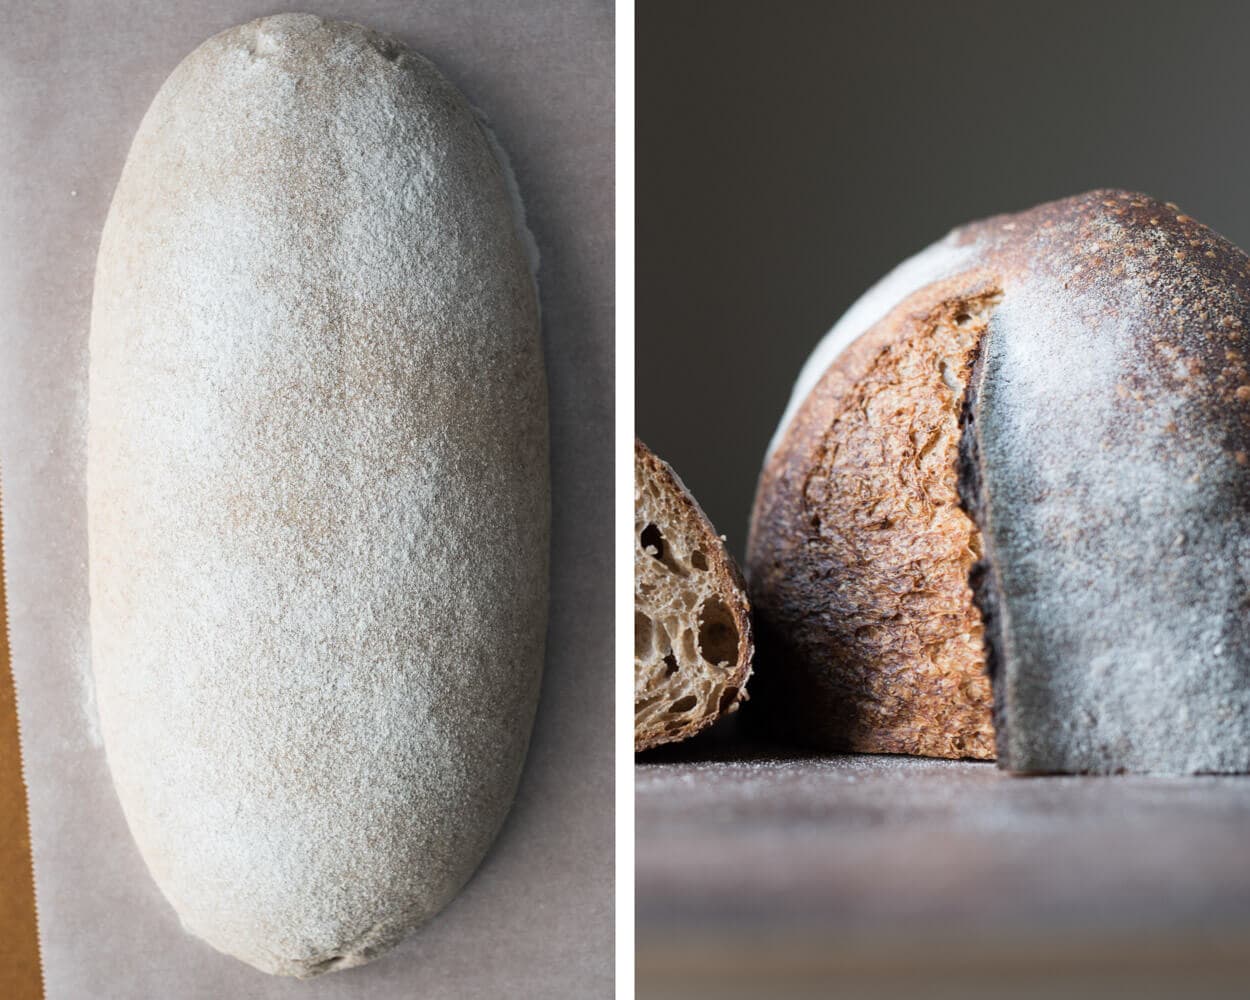
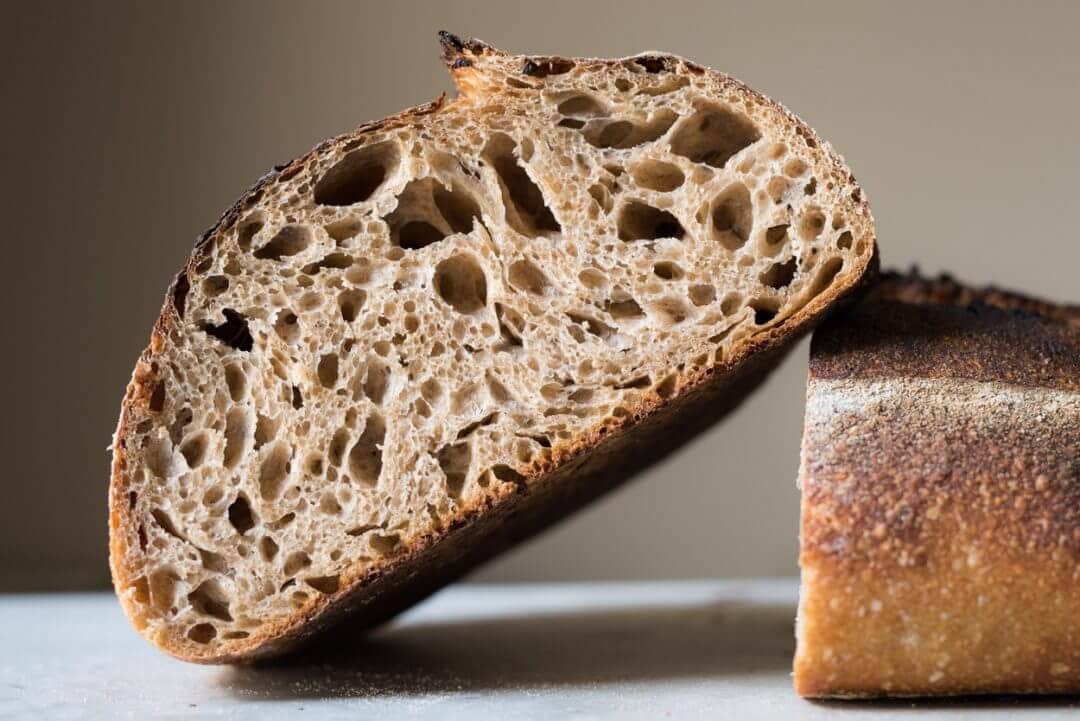
With this much whole wheat, it’s always a challenge to get a tall and airy loaf, but the addition of the bread flour, high hydration, and relatively tight shaping have helped achieve that. Along with the nice rise, the soft and tender interior and dark, crunchy crust play off each other to create a balanced bread that is flavorful and light in hand.
One modification I’d love to try is to use white wheat instead of red wheat for the 50% whole wheat portion. White wheat is one of my favorites to use, mainly because of its mild, laid-back flavor, but also I conveniently have a new 25-pound bag of raw white wheat berries sitting in my pantry ready to go (and nowadays it’s almost always used in my weekly sourdough sandwich bread). This change might reduce this bread’s overall assertiveness, but it would be exciting to see the flavor profile difference.
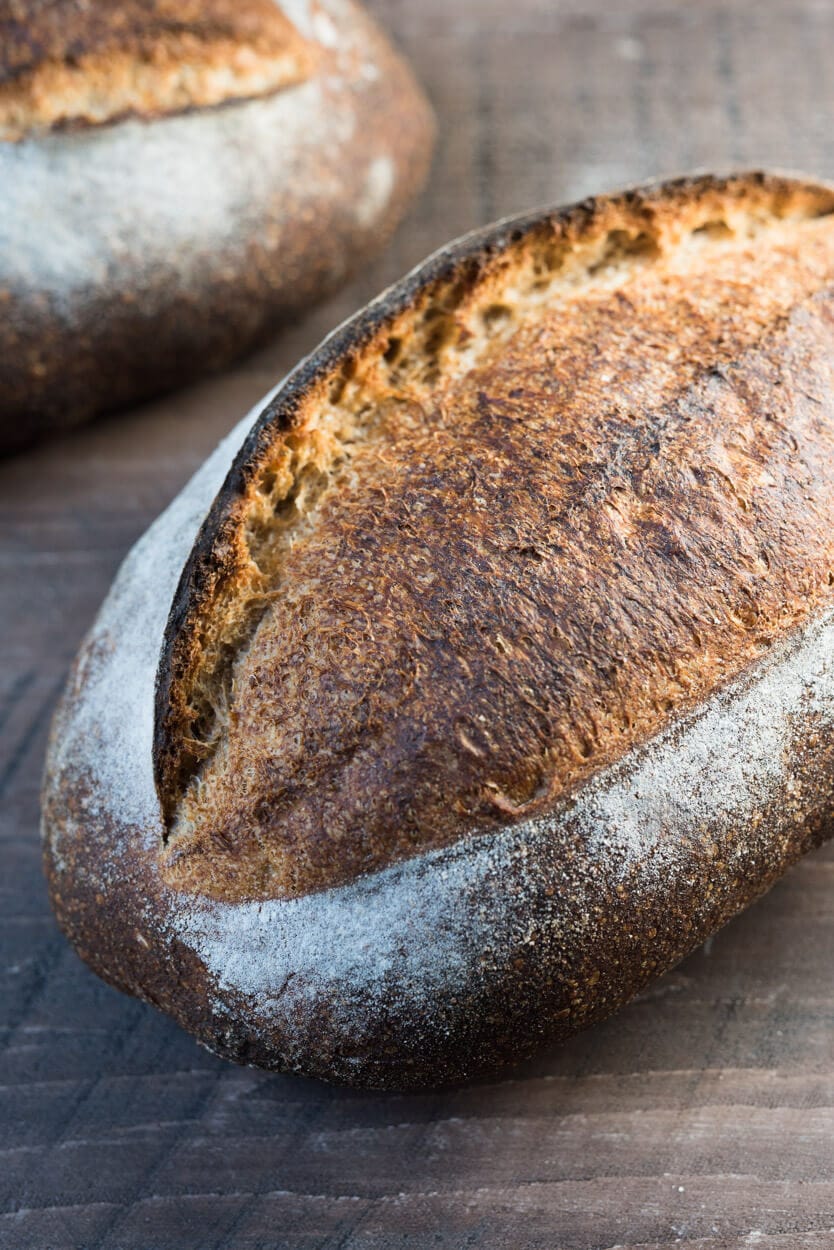
Crust
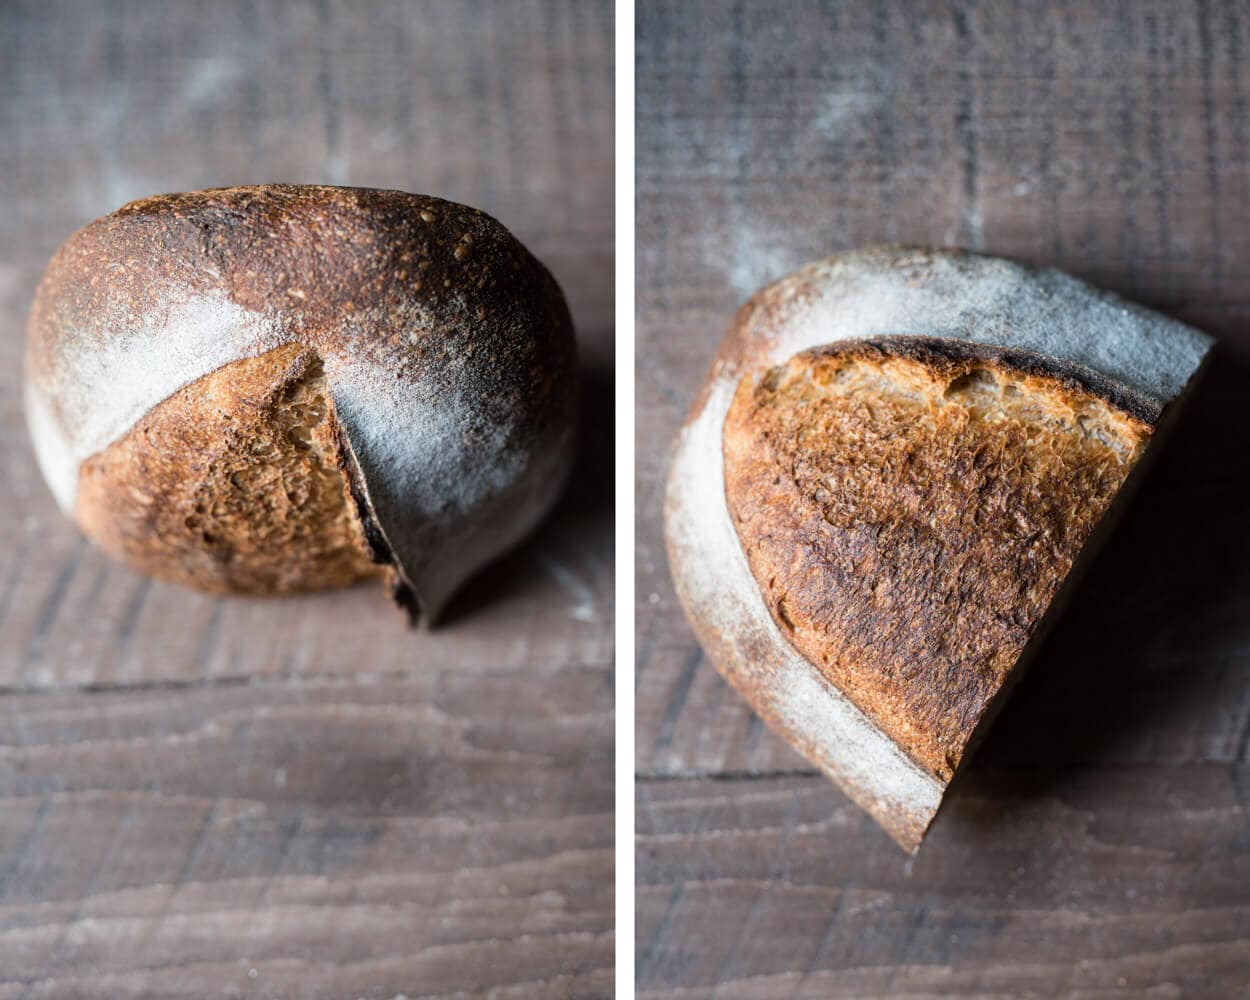
I love this dark crust, and because of the hot bake, the interior did not dry out in the slightest. Sometimes it can be hard to achieve this, but a minor tweak to the baking schedule really did the trick. I plan to try this in the future with my other recipes. The crust results speak for themselves!
I almost always prefer the batard shape over a boule, mainly because of how the bread slices up (not too wide and a little taller), and this bread is no exception. I enjoy how the crust peels back as the bread opens in the oven. It contributes to that tall loaf with a really pleasing aesthetic.
Crumb
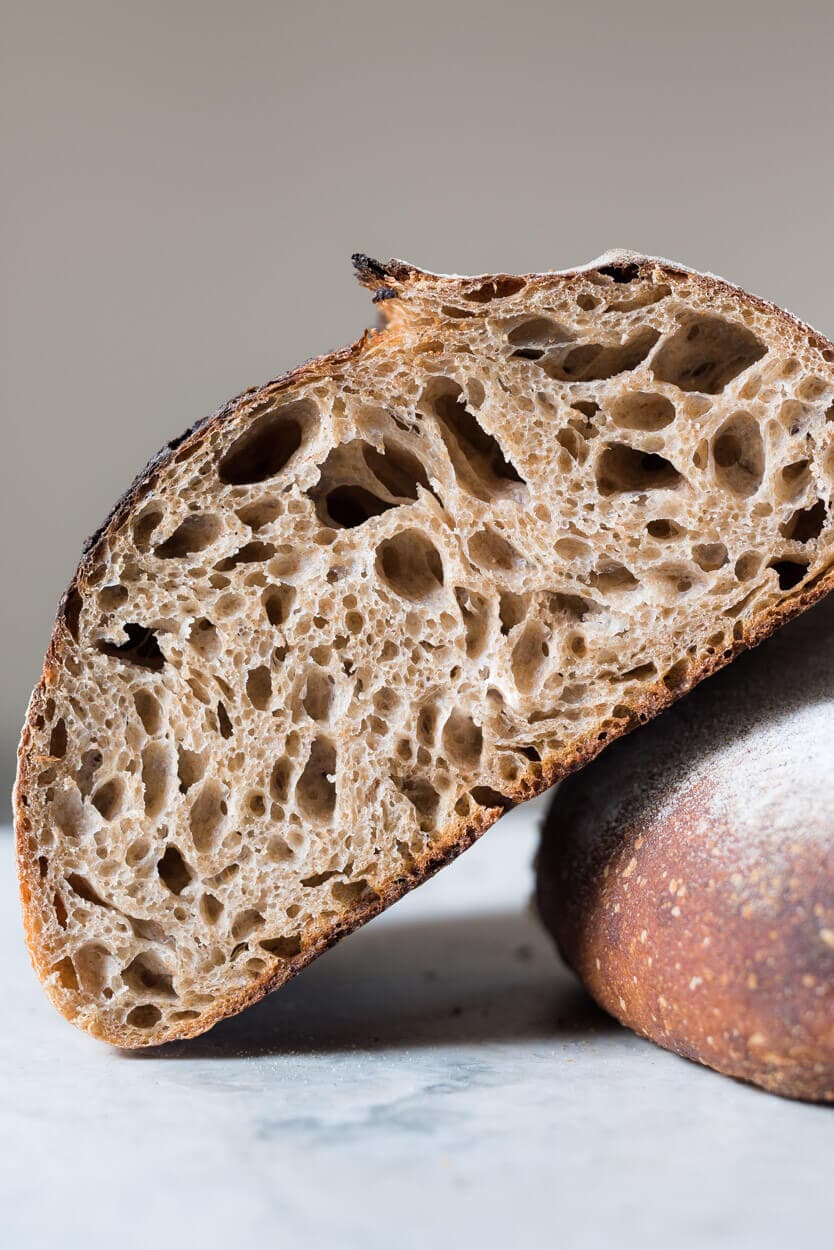
For 50% whole wheat, I couldn’t be happier with the crumb. As you know, the higher you go in whole grains, usually, the denser your bread will be, but I think the relatively high hydration and a mix of flours have helped achieve a really light loaf that has uniform openness throughout.
Taste
This bread has an assertive wheat flavor but not so much that it’s overpowering; it really showcases the stoneground wheat and doesn’t let it play the second role here. There’s a tad more sourness peeking through, but it’s actually a very complimentary flavor to the wheat, adding a touch more complexity and depth. I’m not big on overly sour bread, and for me, this was just right.
If you’d like more sourness, try to proof a bit longer or add even more whole grains, and if you’d like less, do the opposite. Just be wary of the timetable I’ve laid out here when modifying the whole grain percentage. As you know, more whole grains means increased fermentation activity.
I like the idea that this recipe is a starting point for those who might not have a lot of experience working with whole grains (or even if you do!). With this gateway bread, you can adjust the whole wheat percentage up or down to suit you and your family’s tastes. It’s a good jumping-off point with a majority of whole grains and a base formula for our endless tweaking and testing in search of that perfect loaf.
Buon appetito!
Print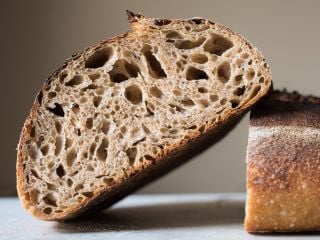
Fifty-Fifty Whole Wheat Sourdough Bread
- Prep Time: 24 hours
- Total Time: 24 hours
- Yield: Two 900g loaves
Description
A delicious loaf of sourdough bread with 50% whole grains. This bread is airy, light in hand, and it has a deep, complex flavor profile from the assertive wheat and fermentation flavor.
Ingredients
Levain
- 24g medium protein bread flour (or all-purpose flour)
- 24g whole wheat flour
- 48g water
- 48g ripe sourdough starter
Autolyse
- 453g whole wheat flour
- 214g medium-protein flour (or all-purpose flour)
- 238g high-protein bread flour
- 634g water
Main Dough
- 18g salt
- 143g ripe levain
- 100g water
Instructions
- Levain (12:30 p.m.)
In a small container, mix the Levain ingredients and keep it at a warm temperature for 3 hours. - Autolyse (1:30 p.m)
In a medium mixing bowl, add the autolyse ingredients and mix until no dry bits remain. Cover the bowl and let rest for 2 hours. - Mix (3:30 p.m.)
To the mixing bowl holding your dough, add the levain and a splash of water. Mix thoroughly and strengthen the dough for about 4-5 minutes. Add the salt, another splash of water, and mix until incorporated. Strengthen the dough further if necessary until it’s elastic and smooth. Transfer the dough to a bulk fermentation container and cover. - Bulk Fermentation (3:40 p.m. to 7:10 p.m.)
This dough will need 5 sets of stretch and folds during bulk fermentation, at 30-minute intervals. After the last set, let the dough rest for the remaining time in bulk fermentation. - Divide and Preshape (7:10 p.m.)
Lightly flour your work surface and scrape out your dough. Using your bench knife, divide the dough in half. Lightly shape each half into a round shape. Let the dough rest for 20 minutes, uncovered. - Shape (7:30 p.m.)
Shape each piece of dough into a round (boule) or oval (batard) and place the dough in proofing baskets. - Proof (7:35 p.m. to 9:00 a.m. the next day)
Cover proofing baskets with reusable plastic and seal shut. Then, place both baskets into the refrigerator and proof overnight. - Bake (The next day, bake at 9:00 a.m.)
Preheat your oven with a baking surface or combo cooker/Dutch oven inside to 450°F (230°C).When the oven is preheated, remove your dough from the fridge, score it, and transfer it to the preheated baking surface or combo cooker. Bake for 20 minutes with steam. After this time, vent the steam in the oven or remove the lid (you can keep it in the oven or remove it) and continue to bake for 30 minutes longer. When done, the internal temperature should be around 206°F (96°C).
Let the loaves cool for 2 hours on a wire rack before slicing.
If you use this recipe, tag @maurizio on Instagram so I can take a look!


646 Comments
The recipe references a warm water temperature, but I do not see one listed anywhere? Based on the hyperlink and the ambient temperature being 78 degrees, is the water temperature 78?
The water should be whatever temp needed so the dough reaches around 76-78F at the end of mixing. But yes, to make it easy, I warm to 78F!
What would be the cooking instructions for 1 big loaf of 1800g in a crockpot ceramic container that i will put in the oven?
And a second question, if i want to start the autolyse around 9 or 10pm and leave it overnight and add salt, water and levain 6 am in the morning… is that an option? Stretch and fold before noon and let proof until around 8pm and cook. Is that a good scenario?
For baking a single 1800g loaf in a ceramic crockpot container, you'll need to adjust both time and temperature. Preheat your oven to 450°F (230°C), then reduce to 425°F (220°C) when you put the dough in. For a loaf that size, bake covered for about 45-50 minutes, then uncovered for another 20-30 minutes to get a good crust. Always check the internal temperature – you're looking for around 205-210°F (96-99°C).
As for your overnight autolyse plan, that's definitely workable.
Let me know how it turns out!
My initial attempt yielded a loaf with a rather odd, rubbery texture. Perhaps it was simply an issue with the baking… I had linked it to a longer-than-ideal autolyse.
My second go, using an autolyse of about 4 and a half hours, gave me a nearly perfect loaf!
For my third try, I adapted the recipe to create a toasted pecan bread by swapping out 200g of white flour for ground toasted pecans. I was hesitant to alter the proportions, as ground pecans obviously won't behave like flour in terms of water absorption, so I expected it to affect the water/flour ratio.
However, the final texture and flavor were spot on. With a 2-hour autolyse and a 6-hour proof at room temperature, I managed to make this bread in a single day.
Tomorrow morning, I'll be making my fourth batch using your best sourdough white bread recipe. Gotta please those picky eaters! They're not fans of the nut bread. My husband, on the other hand, is thrilled…
stay tuned 🙂 Thanks for your feedback and your tips 🙂
Is there a video for this. I would like to see the consistency of the autolyze step
Not yet (coming soon 🙂).
For this recipe I milled whole wheat berries into WW flour. When the time came to add water to the mix I figured a little more water is better due to WW flour absorbtion. The end result was to wet. I tried my won remedy for the proof by giving 2 hrs of proofing on the countertop then 12 hrs in the fridge overnight. It came out pretty nicely considering my starter was a bit weak.
Happens to us all, Robert. Sounds like it still turned out okay though. Next time I'd hold back that extra water!
Hello. I halved this recipe exactly but when I went to mix the Levain with the autolysed dough, the dough was extremely tough. Can this recipe not be halved? Why would the dough be tough? I could hardly stretch it.
It can be halved, no problem. There must have been an issue with measuring there, the dough should be the same if everything was halved!
Hi Maurizio, I've been baking since I was 9 ,love your community and have your cookbook. My best success on your site has been with the seeded sourdoughs and others with add-ins. They all have been excellent
Why do I have such trouble withe the MBS & Beginners Sourdough ? all fresbie contenders. The doughs develop elasticity but pool during shaping.
I baked this bread, the 50-50 WW, last night and it was an utter fail for me-no rise at all.Cannot figure what I am doing wrong but I don't blame the recipes
Amazing, Diane! Really great to have you here and thanks so much for getting my cookbook, means a lot to hear that.
That's very strange. Is it possible your dough is over hydrated? I would try reducing the hydration by 5% and give it another go—the reduced water should bring strength to the dough and you’ll feel it immediately. Once you find a suitable hydration, you can try to push it back up (if desired), but as you do, take note of how the consistency of the dough changes: the dough will start to slacken out as you add more and more water, this means you’ll likely have to mix more upfront or add another set or two of stretch and folds during bulk fermentation.
Generally, with an increased hydration, you need to mix longer to develop the gluten in the dough to sufficiently support the water added, but this only goes so far. At some point, the flour you’re using just isn’t able to take on any more water and you’ll essentially have a weak and slack dough. It’s always best to start conservatively and work your way up with hydration as you feel out your flour. This is typically why I recommend holding back water during mixing, adding it in as the dough handles it.
Try to keep everything else as consistent as possible and let me know how the next attempt goes!
If you're still struggling, please email me (on the About page ) with some photos and I can help!
Maurizio, thank you so much for your reply. Hydration is an issue for me -Florida-so with your concise instruction, I have been scaling it back. Sometimes, I've added none to the mix at all or just a splash. On the 50-50 WW, I only added about 40 grams of the second water. Even that felt like it might be too much but with the WW, I felt comfortable with that amount.
So disappointed because you know at the shaping stage it is a bust.
Prior to that the Sesame-Sunflower, Seeded Sourdough, Jalapeno Cheddar & Chocolate Cherry were great! ok Ciabatta & Baguette but too hard a crust on both. Focaccia & Detroit Pizza-spectacular
None of the basic breads were even salvageable I'll keep trying but it certainly takes the wind out of your sails. lol
Smart approach adjusting hydration for that Florida environment! Yes, it can be frustrating when you know at shaping that things aren't right. Keep adjusting the water down until you find that sweet spot that works for your environment. Focus on those wins with the enriched doughs and specialty breads – you're building great skills. Those basic loaves will come together!
I plan to experiment but I'm wondering if you can point me in the right direction. I made this and ended up with an underproofed dough. The final bake turned out dense on the bottom with big holes on top. More of a sad little puff than a spring.
My best guess is that I underproofed my dough because it's pretty cold in my house — around the high sixties. I also have granite countertops, which I imagine cooled my loaves considerably during shaping. So I'll try to do a warmer bulk fermentation (unless you suggest something else).
Short of insulating my home better what could I do differently? I don't know of any particularly warm places in the house. I do have an oven with a bread-proofing setting, but it runs at 95, which seemed way too warm compared to your recommended temperatures.
Thank you! Your recipes got me to some beautiful loaves a few years ago. I'm excited to get back in the swing!
Jim – I live in NH and our house is generally cooler than “room temperature” during the winter.
I’ve had good luck with warming the oven, turning it off and leaving the oven light on for the duration of proofing. I also warm the ceramic bowl I use to mix and proof my dough. I’ve been baking for years, but those were big “aha” moments for me.
Ooh both ideas make a lot of sense. More tools in the toolbox! Will try those out. Thank you!
Hey Jim! Sorry for the delay. I would recommend warming the mixing water in addition to what @disqus_BiQslPfmyq:disqus said below. Warm it so your final dough temp actually comes in above 78F, try for 82F. Here's some helpful info on temperature .
Also, check out my baking in winter guide , more great tips there. Let me know how it goes!
Thank you Maurizio for this excellent recipe. Your instructions are perfect. After making my first sourdough bread using Maurizio's recipe for beginners, I made this bread. Very delicious with perfect rise. Being in Canada I used 50% each of Robin Hood All wheat Bread Flour & Homestyle white flour with overnight proofing in fridge.
Amazing to hear all this, thank you! I havent used RH flour but I've heard great things about it.
Apparently, Giusto's whole wheat flour can't be purchased in a 5 lb package. What were you thinking? Who did you think your customers are?
They used to be available. Feel free to switch to any whole wheat you normally buy!
Why so rude Frederick?
I also got a very sad bread that never rose much, with no oven spring. I see I'm not the only one who has had issues. I'm not new to baking or sourdough and actually this is the first loaf I've ever made that didn't turn out. I wish I would have read these reviews before committing my time & ingredients to this recipe!
Hey Jennifer! Sorry to hear about this. Did your levain rise and was it very ripe (bubbly, sour smelling, loose) when you went to mix it? If you didn't get any rise at all, it's possible you had the opposite problem where the dough overproofed on you (which is easy to do for anyone!).
I'd love to hear more. Post here or as always, email me (email is on the About page) so I can help you troubleshoot. I've had this recipe up for almost 8 years with many successes (and I make it almost weekly here, in fact I made it just last week !).
I add 1 tsp instant yeast and it works great
I've made this with great success. Don't blame the recipe!
Hi,
Making this recipe, but confused ~ must be a typo, but is it 734 g water or 634. The ingredient listing says 734, but in the body of the instructions it says 634. I ended up using more than 634 (in addition to the 2 splashes during dough assembly).
Anyway, I'm sure it'll turn out fine, just would like a clarification (or maybe I missed something :).
Thanks,
Evie
Evie—it's not a typo. Just go by the water weight in each step. The recipe starts out with 734g water (after making the levain, which takes a little), but then in the Autolyse step you'll use 634g. Finally, in the mix step, the reserved 100g is added if the dough can handle it.
After trying custom milled flours a few years ago, I decided to get really good at recipes that I could make with ones I could find at the grocery stores. This recipe has always delivered! There was nothing wrong with custom flours – far from it! But with the vagaries of life and what you can afford at a given moment, I'd rather have something great from ordinary things!
Our stores sell King Arthur and a few other brands. So, I settled on using their AP, bread flour and whole wheat. They're all consistently good, easy to find (and sometimes on sale!), and are great for this purpose.
You can bake this recipe to the numbers (old airplane term for when you're landing in bad weather and can't see – just trust the instruments and you're golden!). It makes a delicious, loaf that compromises between a pure, whole-wheat experiences and the typical white flour versions.
Thanks for this comment. These artisan flours are marvelous, but unaffordable for me. Working on getting the best results I can with what I can afford.
I love this recipe, and in particular using freshly milled local flour gives it a beautiful nutty malty flavour! I’m having a hard time getting any oven spring when I use fresh milled flour though. When I made it the first time with 50% organic W/W, 10% home milled multigrain flour and 40% supermarket bread flour (Robinhood, 13.3% protein), I had a very good oven spring and the bread was very light for its volume. When I sub the bread flour with fresh flour from a local mill (1847 milling here in Ontario) I no longer get a good (in fact any) oven spring, even though the crumb looks ok and the ferment and proof times are the same. The fresh flour is still brown in Color and has a few bits of the bran/shell, even though it’s much finer than W/W. I tried replacing some of the fresh flour with store bought and the rise has improved but I’d like to use fresh if possible.
Do you have any suggestions how I could achieve better spring? I note the fresh flour contains no added enzymes (but it’s > 13% protein) so I was thinking of adding diastatic malt next time (I already tried adding some vital wheat gluten and it improves the rise a little, but I’m concerned about gumminess and too much chew if I add even more). Do you have any tips I could experiment with that worked from your experience with using 100% fresh flours? Thanks!
I wouldn't add any diastatic malt, I don't think that's you're issue with the freshly milled flour (and it may make things worse). I would try mixing your dough for longer. The added strength (and oxidization) may help eke out more structure in your final loaf!
Thanks Maurizio, I will give that a try!
I increased the mixing time (rubaud) to around 25-30 minutes, and it turned out beautifully! I still ended up using a small percentage of the supermarket flour, but I was able to add in home-milled multigrain flour, sesame, sunflower seeds and more of the fresh milled flour while keeping the crumb light and open. I'll be curious how little of the supermarket flour I can use without compromising the texture going forward.
Hi Maurizio. Recently got your book and am loving the intro to sourdough. However I’m a bit confused as I’m really new to this. Here in the Uk I have access to strong wholemeal bread flour (13g of protein) and plain wholemeal (12g) which I normally use to bake cakes etc with. Which flour should I be using here? Thank you
I would use your 13g protein flour anywhere I call for "high protein" flour, and the other one for "medium protein" flour.
"This was my first time trying this recipe, as I had lots of wheat and less bread flour and needed to start the levain around 12:30. I was a bit nervous about overproofing since my kitchen was pretty warm, so I skipped the rise after shaping and refrigerated it right away. Added just a bit of caraway seeds for flavor .Despite my adjustments, the bread turned out amazing! The crust was strong and flavorful, and my husband even said it was the best bread I've made yet. I've been baking for a year and a half, and this recipe i will definitely make again. Wondering if I could add some rye next.
Right on, Irina! Great work and mods. I'd start by swapping 5% of the whole wheat for whole rye, then work that up in testing until you're happy with the flavor and texture. Have fun!
Maurizio, who actually writes your recipes? Man you are all over the place with different amounts, that my head spins. Not impressed with your crappy inaccurate recipes.
I actually write them. Every single one 🙂 I'm all over the place because the recipes are all very different! Sorry they're confusing, but if every recipe was the same, then they'd just be one recipe!
Every time I’ve made this recipe I make a flat, boring brown loaf. It is nothing like the sexy bread in the pictures. My 50/50 wholewheat loaves would make a good discus, or a wheel for a bread based bus. I’ve tried dropping the amount of water. I’ve proofed the recipe for long periods. In fact, I’ve done every hint and suggestion from the comment section, and again and again I’ve made boring, unsexy, cartwheel bread. Tomorrow I will test how this bread works as a frisbee, because there’s no way I want to eat another flat, featureless bread.
Hey Pete! Super sorry to hear that. What flour are you using and have you tried other types/brands/mills? Also, if you're getting no rise in the oven, it's likely you're overproofing (which is easier to do with this much whole wheat in your loaves!).
Shoot me over an email (address is on the About page) with some photos and I can help diagnose!
I also got flat breads. Putting it in a smallish Dutch oven helps, but the bread wants to lay flat.
I noticed that my dough was initially very resilient and had good body but as bulk fermentation went on,
and I did the each next round of folds, the dough got looser and looser to where it just sagged.
My regular sourdough loaves tend towards the saggy instead of the puffy, but not nearly as bad as this.
Over saturation? Over proof? Over and out.
Can this be baked in a dutch oven instead of using the steam method?
Yes, absolutely, Madeline!
Can this be baked in a dutch oven?
for those of us who don’t have the fridge space to do an overnight proof it would be really useful to have an ambient proving time!
Ambient proof time would be 2-4 hours depending on temp in your kitchen. This is the perfect dough to use the poke test to determine when it’s ready to bake!
Hi there, I am new to sourdough and am glad to have found your site. This was the first recipe of yours I tried, and overall it went well. My kitchen runs a bit cold — 67-68 degrees — this time of year, so I was using my oven with light on for levain building and bulking, but realized that even that was a bit cold about halfway through bulking. I warmed it up, and it all seemed well, though the dough didn’t rise quite as much as I expected it should. My trouble mostly occurred during shaping when I was confused about whether I should flour the surface —- I didn’t. You can imagine the trouble I had shaping. I shaped one loaf as a batard and one as a boule. The batard shaped well. It consequently rose fairly well and baked well — though the full 50 minutes in my oven lead to a very dark loaf at 211 degrees. For the boule, I did the folding it in as shown, but then, without flipping it and doing the final rounding, put it into the proofing basket. I also then baked it a couple of hours after the batard (so maybe 18 hours in the fridge). I decreased the time to 45 minutes, but it also was about 212 when I pulled it out. On each, the crust is very, um, “chewy.” The crumb of the batard is very nice, but the boule is flat and gummy. My question is mostly about the effect of shaping on the crumb. Also, I will add — it wasn’t just the shape of the loaf, but the fact that the half of the dough I shaped as the batard was simply easier to work with, while the half I used for the boule was more slack. Thoughts on that? Thanks much in advance!
Hey Amanda, sorry for the delay. It sounds like maybe your starter wasnt ripe enough or the cold temps really slowed fermentation in your dough. You can compensate for that by warming the mixing water or letting the dough bulk ferment longer.
I don't usually flour my surface when preshaping, I use a bowl with water instead (see my guide to preshaping, here ).
Generally, I find dough shaped into a batard to be more open and light, whereas a boule (round) is usually tighter on the inside. I think it comes down simply to the handling of the dough and how a boule usually takes a little more work/input to make it to a successful final shape.
I'm not sure why the dough was different between the two shaping unless it wasn't mixed evenly!
I just started learning and baking sourdough and a friend sent the link to your website. Until now, my attempts have ended up producing dense bread. Once I changed to your recommended feeding approach and followed your instructions, happy to report much better results. I made one painful mistake recently perhaps due to my lack of understanding material science 🙂 In steaming process I used my “pyrex” baking trays.. in the second ice hit the preheated tray, it exploded in the oven. I had always thought pyrex was resistant to extreme temperature change. Well I found out there are two types of pyrex . The upper case “PYREX” which is resistant to temp change, and the lower case “pyrex” which is not. Both trade names have been licensed out by Corning. Anyway, lesson learned – use steel. And thank you for the fantastic recipes and video instruction !
Super glad to hear I've been able to help, Ray! I didn't know this about Pyrex, now I do!
What percent rise should I look for at the temperatures you suggest? My dough hardly rose during the timeframe you set out in the recipe, and didn’t have nearly the bubble action shown in your picture. I went ahead and shaped, since I feared overproofing, and it felt good during shaping and gave me no problems. The loaf turned out pretty well in the crumb and taste, but didn’t get nearly the rise yours did. I think my starter is strong (it works beautifully for standard Tartine loaves, and I controlled the temperature pretty precisely, so I don’t know what went wrong.
I'd say about a 30% rise or so, but it's so dependent on the flour you are using. If the dough feels very wet and slack, it won't rise up as high during bulk fermentation (thought it still may be properly fermented and ready for dividing). This is why I don't usually give a rise height.
Hello from Lithuania!
Since I have a book of yours, this recipe is my favorite. But… I still struggle to make dough smooth. I tried to extend autolyse, then lower hydration, then mix more to develope gluten (tried even with Kitchen Aid), but dough is too mushy and sticky. Have no idea what to improve or do. The flavor profile on the other hand is my favorit 🙂
It sounds like your dough is most likely over hydrated—your flour likely isn’t able to take on quite a much water, and that’s ok! Try reducing the hydration by 5% and give it another go—the reduced water should bring strength to the dough and you’ll feel it immediately. Once you find a suitable hydration, you can try to push it back up (if desired), but as you do, take note of how the consistency of the dough changes: the dough will start to slacken out as you add more and more water, this means you’ll likely have to mix more upfront or add another set or two of stretch and folds during bulk fermentation.
Generally, with an increased hydration, you need to mix longer to develop the gluten in the dough to sufficiently support the water added, but this only goes so far. At some point, the flour you’re using just isn’t able to take on any more water and you’ll essentially have a weak and slack dough. It’s always best to start conservatively and work your way up with hydration as you feel out your flour. This is typically why I recommend holding back water during mixing, adding it in as the dough handles it.
Try to keep everything else as consistent as possible and let me know how the next attempt goes!
Thank you for SO MUCH this recipe! I have baked four loaves with it now, successfully from the start and my family and I are absolutely loving the addition of whole wheat flavor. When we bought bread at the supermarket, my partner would buy the wholiest grainiest bread he could – what I liked to call “hardtack” – the kind that would grind up your mouth like it was the flour mill, not the flour. He loves the bread I make now according to this recipe, but I am feeling bold and wanting to up the whole wheat proportion to say 75%. Will this end in disaster? Can I essentially follow the same recipe. I often find that the amount of water listed here is a bit too much for my conditions so I end up reducing to more like 600-650g total water. Do you think it will work out if I just up my water a little? Anything else I could take care of to help it succeed?