
The beer scene here in New Mexico has taken off with some of the country’s top-ranking breweries, and several of their recent entries in the Great American Beer Festival have earned gold, silver, and bronze medals. Notably, Marble Brewery was named Small Brewing Company of the Year—a fantastic thing for a city like Albuquerque. With so much beer talk and so many beer purchasing options for every night of the week, it’s also motivated many would-be-brewers to try their hand right in their own homes. Shops around town sell a multitude of grain varieties worldwide and all the tools and necessities one would need to get started. Several of my good friends have picked up this beautifully serious hobby and have made some stunningly good beer, so good I could have sworn they picked up a microbrew 6-pack and did a behind-the-scenes-swap before I could spot them. And since my friends are brewing more than ever, it means an easy way to make this sourdough with spent beer grains.
It’s interesting to hear my friends talk about beer because, you know what, it sounds exactly like the sort of processes we bakers go through to make a great loaf of bread. Yeast, bacteria, fermentation, sugar and starches, and temperature control are all the things we wrestle and wrangle with to cajole those tall, dark loaves out of the oven. As one of my friends quipped, “Fermentation, man, it’s a wonderful thing.” Indeed.
You might have heard somewhere, at some point, that beer is merely “liquid bread.” Well, there is a little bit of truth to that statement. German monks adhering to their religious duties at certain times of the year (strict rules for some monks denote that they are not allowed to eat solid food during certain periods of the religious calendar, most notably Lent) would abstain from eating almost all solid foods. One way to “cope” with this restriction was to cook and ferment their bread grains, thereby converting their bread into “liquid bread” to be consumed in copious quantities. It sounds more like a 46-day party than religious atonement.

I digress. As my friends and I chatted on, and I discovered more and more about their process, I found there is a fair amount of waste when a batch of beer is made. Grains that are soaked to release starches as food for brewer’s yeast are mostly thrown out after they produce what’s needed, wasting what could be used as a nutritious component to many dishes. More on the process below, but I asked a few of them to save their spent grains for me so I can perform a set of test bakes and determine what taste profile these grains would have on the resultant bread. In a few words: a very hearty bread. I’ll get back to the taste and flavor later on, but that sums it up in a nutshell.
What exactly are “spent grains”?
One of the first steps in brewing beer is to make food for brewer’s yeast to consume and produce alcohol. This step is dubbed “mashing”: you mix hot water with grains, usually malted barley, which converts the starches in the malted grain to a sugary liquid that will later be used in conjunction with the brewer’s yeast to start fermentation. As fermentation progresses, the yeast metabolizes the sugars in the liquid producing alcohol and carbon dioxide, essentially turning this liquid (“wort”) into beer. This process is very similar to how our sourdough starters ferment, feeding off the sugars converted from the starches in the flour, producing alcohols, acids, and carbon dioxide.
After you extract the sweet, starchy liquid from mashing the leftover grains, these spent grains are no longer needed. Some breweries will either donate or sell the spent grains to farms for feeding livestock or a variety of other uses. For the home brewer, however, it is usually thrown away or composted.
Instead of just pitching these grains, why not put them to good use, like, in bread.
Preserving Spent Beer Grains
Like other cooked grains I’d imagine these would last probably a week or so in the fridge. My friend’s small batch of beer produced quite a big bag for me to use and I ended up freezing three-quarters of the bag for a later date. I just wrapped the grains up in several layers of saran wrap and placed them into two nested freezer bags.
Next time I receive a large bag like this I plan to split them up into small containers with a small amount in each, say 250 grams as I used in the recipe below, and then defrost a bag at a time per my baking requirements.
Prepare the stiff levain – 9:30 a.m.
For a description of my stiff starter and levain, see my earlier post on its benefits and how it compares to my typical liquid one. For this bread, I decided to use my stiff starter to help confer strength to the highly hydrated final dough.
| Weight | Ingredient |
|---|---|
| 50g | Ripe stiff starter |
| 50g | Giusto’s whole wheat flour |
| 50g | Central Milling Organic Artisan Bakers Craft (malted, unbleached white flour) |
| 65g | Water |
Keep your stiff levain in a warm area and wait about 5 or so hours until it’s matured enough to leaven your dough. Time to take a walk with the dog, do some chores, or if you’re like me, read some more about sourdough and plan for the next bake.
You can see above just how stiff my levain is — you tear it out of the bowl to lay on top in preparation for mixing. It makes for a bit more work when incorporating the levain, but it does help strengthen up the dough.
Autolyse & Mix – 1:40 p.m.
We will do a one hour autolyse with this dough.
Ingredients:
You will want to keep in mind with this recipe that spent grains will still have quite a bit of water contained within, unless whoever gave them to you dried them out. When I received my bags, the grains were still very wet, almost like a porridge. Adjust the hydration of your dough to suit: start with lower hydration, maybe around 700g, and increase in small increments. I ended up here at 800g total water, and I could have done with about 20g less in the end, but the crust & crumb didn’t suffer — I got lucky.
Gather the following:
| Weight | Ingredient | Baker’s Percentage |
|---|---|---|
| 100g | Giusto’s whole wheat flour | 10% |
| 50g | Bob’s Red Mill Dark Rye Flour (optional) | 5% |
| 850g | Central Milling Organic Artisan Bakers Craft (malted) | 85% |
| 800g | Water | 80% |
| 20g | Fine sea salt | 2% |
| 200g | Ripe, stiff levain (amount increased from last time due to cold weather) | 20% |
| 250g | Spent beer grains | 25% |
Perform the following for your autolyse:
- In a thick bowl add all the flour
- Add 750g of your water (the rest is reserved until later when we add in the levain & salt after the autolyse)
- Mix these ingredients by hand until all the dry bits are incorporated
- Cover with wrap and keep near your levain for 1 hour (in my case in the oven to keep warm)
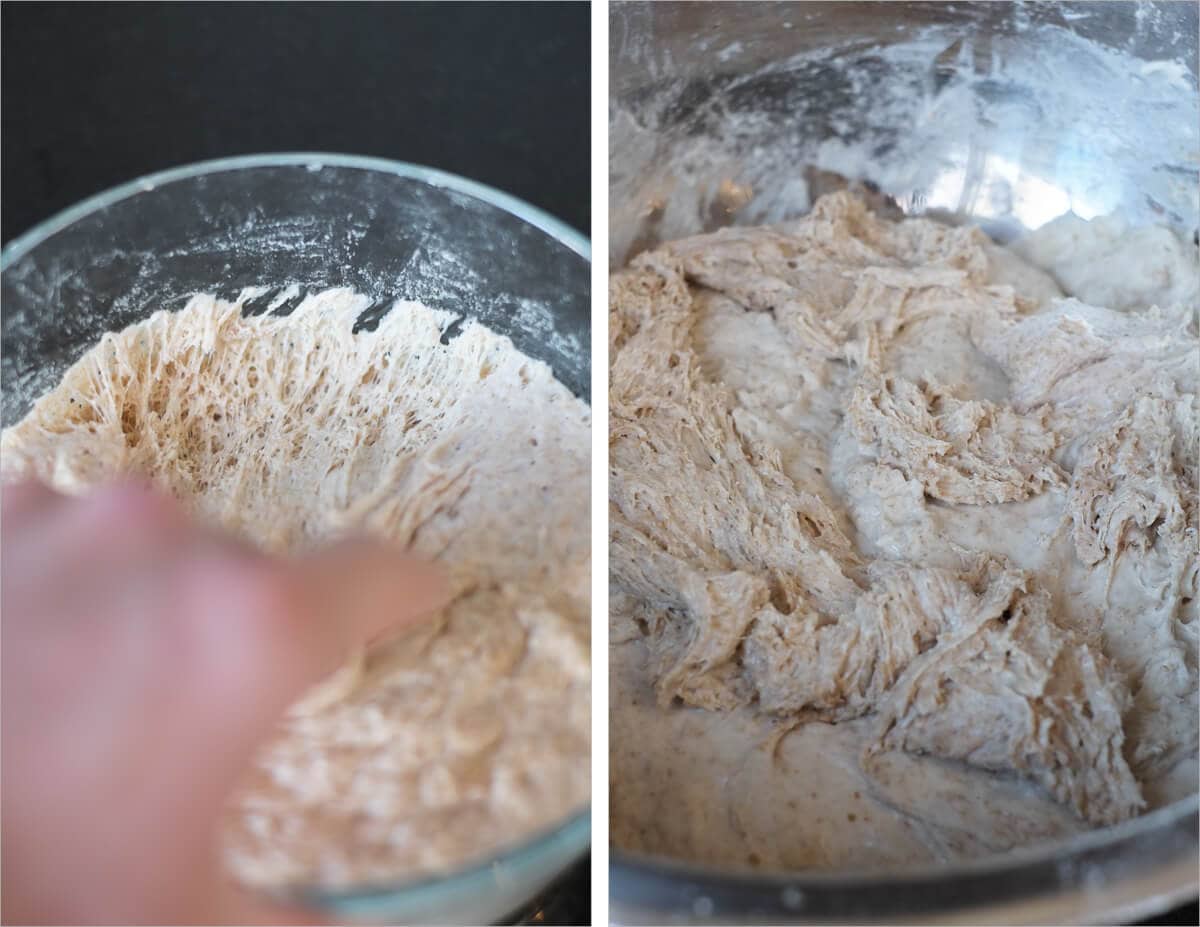
Slap & Fold Mix after your autolyse – 2:40 p.m.
After our one hour autolyse has elapsed, and you’ve done all the research for your next bake, break up the stiff levain on top of the dough and pour on the 20g salt. Pour the remaining warm water on top to help dissolve things and to prepare for mixing.
Lately, I’ve eliminated the two,-step process of adding levain, mixing, adding salt, and mixing. Now, this doesn’t mean I only do one set of slap and folds, but I haven’t noticed any significant difference if mixing is done first without salt and then with salt. I could conjecture here, though, that adding salt might do some damage to the gluten network while strengthening after so many slap and folds, but I haven’t seen any proof of this.
Add the salt and levain at the same time and then proceed with mixing.
Slap and fold for about 5-8 minutes until the dough looks smooth and doesn’t stick to the counter. Return dough to the bowl and let rest for just a minute, then proceed to do another slap and fold session for about 5 minutes until the dough again looks smooth and has some strength to it.
We do an improved mix with this formula at the outset to build up strength in the dough before we add the spent grains (which will bring their own water to the dough).
| Final dough temperature: | 74°F (23°C) |
Bulk Fermentation – 3:00 p.m.
Transfer your dough to a clear container to be used during bulk fermentation and let rest for the first 30 minutes. After the first 30 minutes has transpired, perform your first set of stretch and folds.
- 4:30 p.m. – Turn Set 1
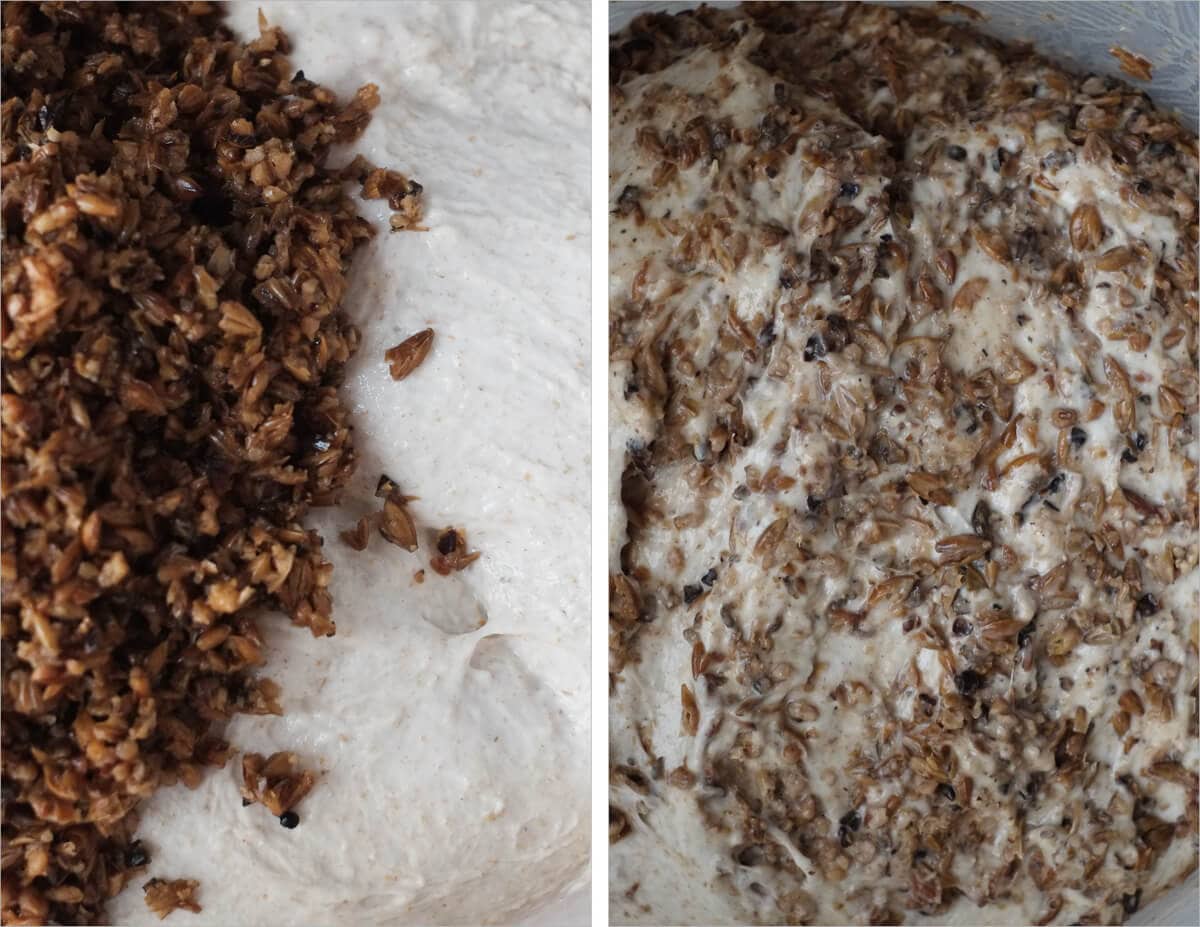
- 5:00 p.m. – Turn Set 2 – Gently fold in your spent grains after turn set 2
- 6:00 p.m. – Turn Set 3
After your second set of stretch and folds add in your spent grains until well incorporated. No need to brutally mix in the grains, pour them on top and fold them in gently. Subsequent folds will further incorporate the grains. You might need a small splash of water here to help the grains mix in thoroughly.
I found that my dough only needed three sets of stretch and folds thanks to my initial medium development achieved during the two slap and fold sessions. If you find your dough is super slack and not holding shape in your container, continue to do stretch and folds until it feels right to you. I know that’s a vague statement, but it’s hard to give any more description to this — deciding when to divide and shape your dough is one of the hardest things in baking.
Pre-shape – 7:45 p.m.
Gently pour out the dough from your bulk container and divide the dough roughly into two halves. I sometimes misjudge here and have one loaf larger than the other, but c’est la vie. If you’re more of a perfectionist, cut down the middle and lift one side onto your scale and compare it to the other half. Do it quick!
Using almost no flour, spin the dough around with your bench knife in one hand and floured second hand. You want a somewhat tight boule resting on the counter, but no need to over tighten here. We’ll let these two rounds rest for 20 minutes until they spread out a bit and relax, this way we can do our final shaping with much more pliable dough.
Shape + Proof – 8:05 p.m., Then in Fridge at 10:40 p.m.
It was starting to get into the darker parts of the night at this point for me, but it wasn’t quite time to rest — we’ve got the dough to shape. Shape each resting dough to your liking and place them into flour-dusted bannetons or kitchen bowls lined with a tea towel. Place these each into a plastic bag and rest on the counter for 1 hour at room temperature (70°F/21°C). If it’s warm where you are, leave the dough out just for 30 minutes before placing it into the fridge. We want to get that final proof off to a good start before popping it into the fridge, as the typical home fridge runs somewhere around 38°F (3°C).
I always proof my dough in plastic bags in the fridge (or I proof them in my home-built dough retarder) to prevent a thick “skin” from forming on the outside, inhibiting optimal oven spring.
After this rest on the counter, you should have noticed your dough rise just a bit with some air bubbles on top and possibly at the sides. Place your bannetons with wrap into the fridge to proof overnight; we will bake these in the morning.
Score + Bake – around 8:30 a.m.
See my guide to baking in a Dutch oven or combo cooker for more information on the baking process below.
In the morning, preheat your oven with an empty Dutch oven inside to 450°F (232°C). When preheated, take one of your bannetons out of the fridge and cut a piece of parchment paper to place on top. Take your peel and then put it on top of those two and quickly invert it, so the dough is now resting on the parchment paper which is resting on the peel. If your dough has risen above your basket’s edge, don’t place the peel on top, smashing your dough. You want to be gentle here. You can quickly invert your basket with one hand on the basket and the other on the top of the dough to help it land softly on your parchment paper.
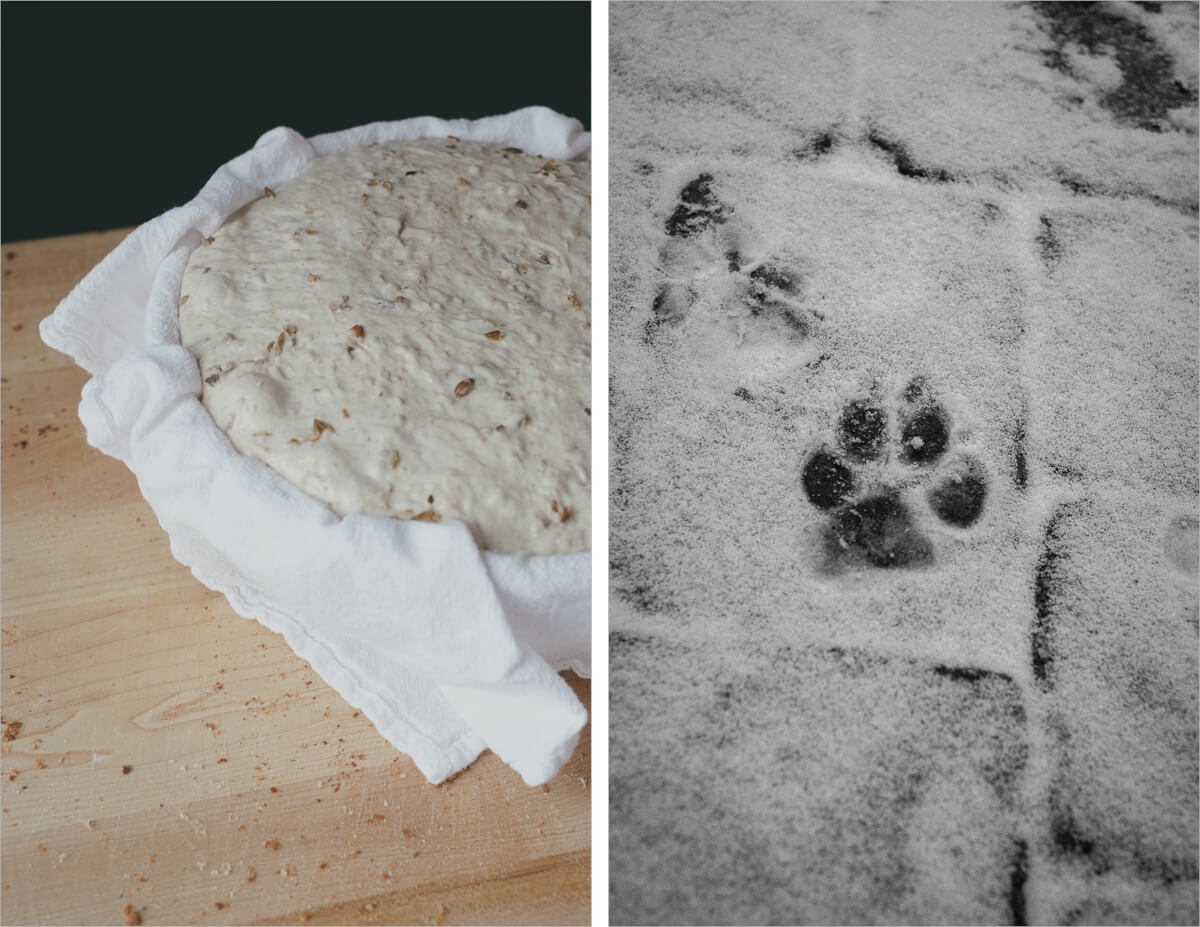
(Evidence of cold temps right above in that photo! My German Shepherd sure doesn’t mind, though)
Score the top of the dough quickly and assertively with whatever your imagination imparts in the morning. Here is where you might say my vision is lacking given I always do a crescent slash, well yeah maybe it is, but there is just something about the look of that adequately shaped batard with the ear reaching up to the sky — I can’t get past that.
Take out the shallow side of your Dutch oven and drag in your dough. Quickly place the pan back in the oven, cover with the deep side, and bake for 20 minutes. After 20 minutes, open the oven and take off the deep lid of the Dutch oven (set it next to the other half inside the oven), then cook for an additional 35 minutes or so, until the bread is to your desired doneness.
Conclusion
It’s a beautiful thing to be able to take what some consider excess and transform it into a delicious bread with a very nutritious slant. Since making this natural sourdough with spent beer grains, and sharing with my beer-making-friend, we’ve come to an understanding. A gentleman’s agreement whereby he provides me with his superb beer and spent grains, and I bake him bread with said grains in return. A win-win and perhaps, just perhaps, the beginnings of my sustainable baking business/co-op…
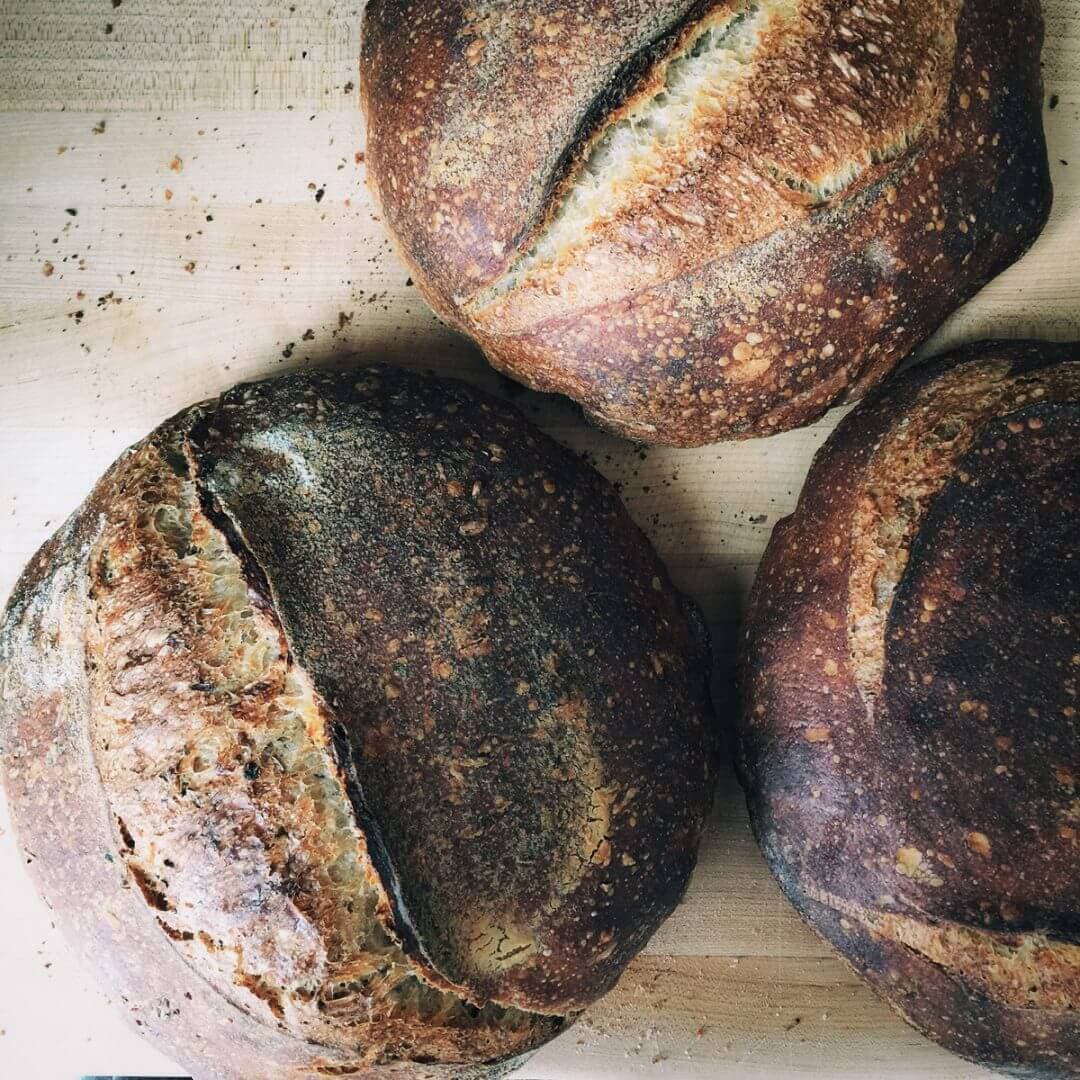
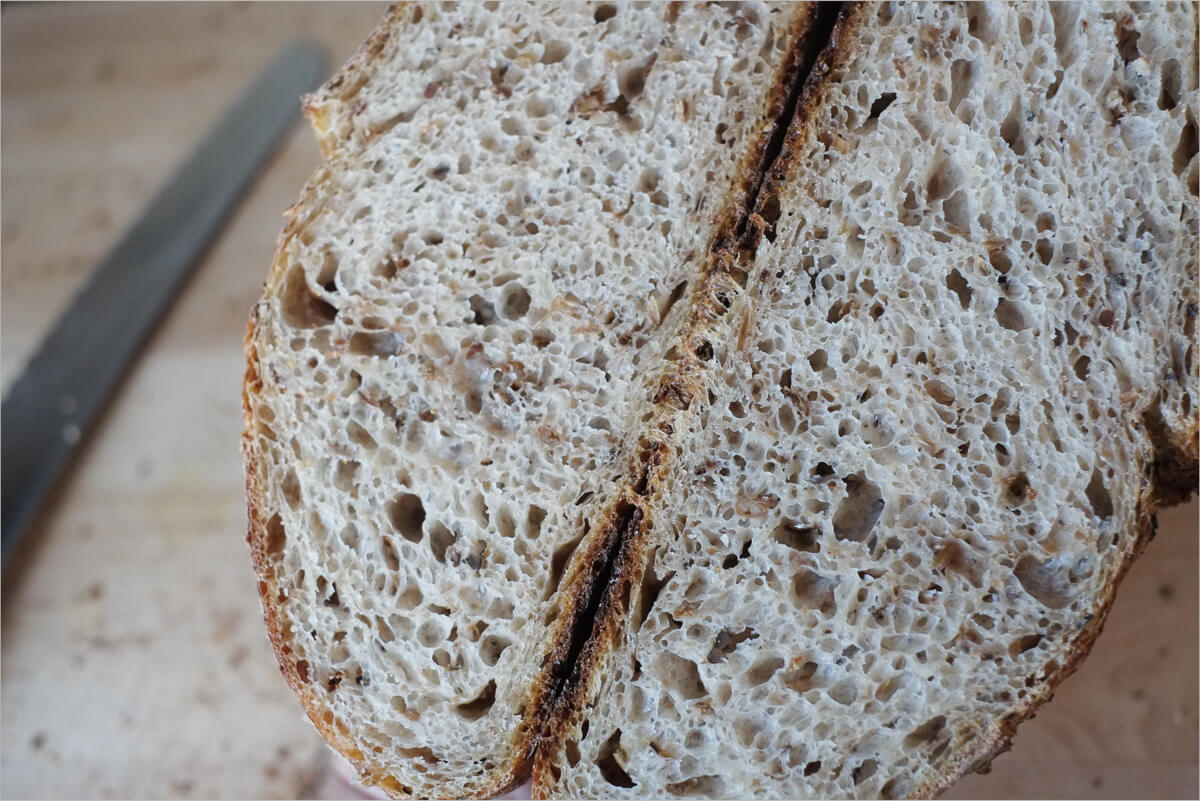
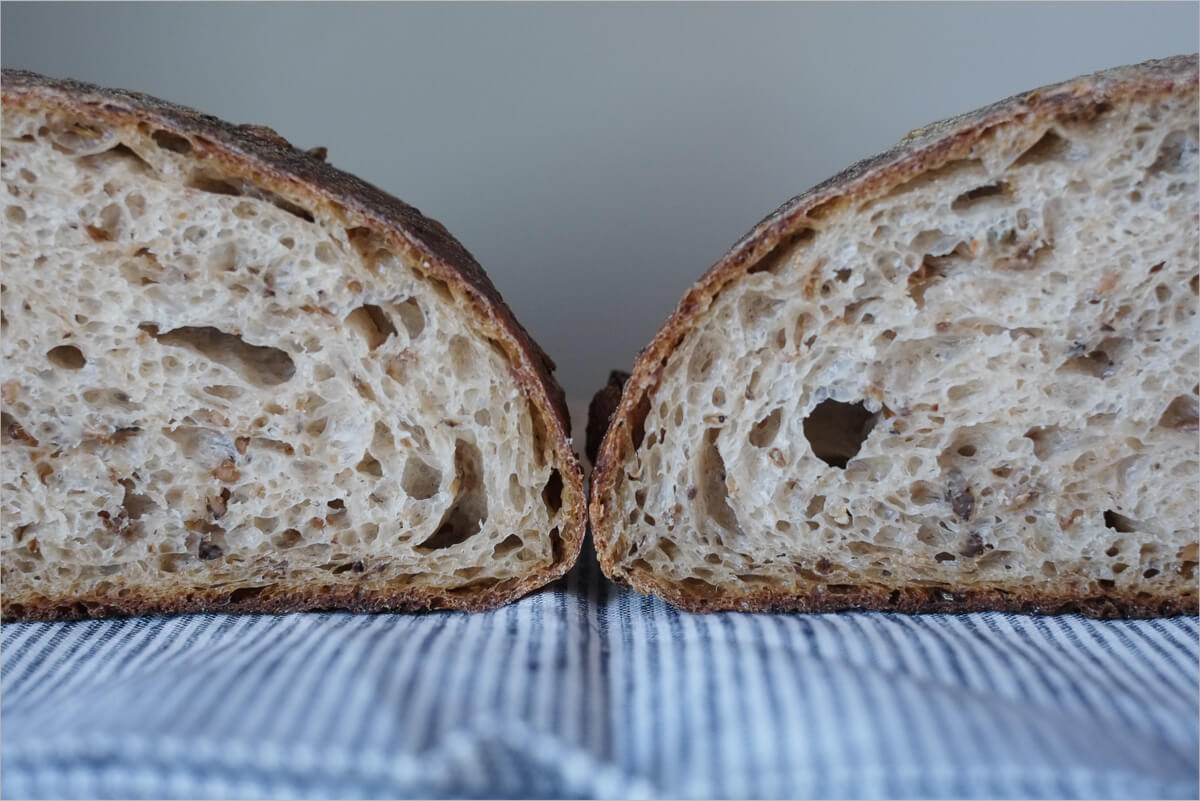
Crust
A dark and brooding crust. When you spot it you know you’re in for a substantial piece — it reminds me a bit of rye, if only by a hint. It was brittle no doubt about that, and crunchy in the mouth—fantastic. Because the grains held on to so much water, this bread stayed moist inside almost the entire week I was eating it.

Crumb
Tighter than my country bread, but understandably so given the addition of the sometimes sharp grain husks found within. To be forward, it is an excellent interior for this type of bread as it makes for the perfect vessel for that winter soup or stew. Heck, even a roast beef sandwich with heavy grain mustard, go all out with it.
Taste
A very hearty bake. I mentioned this in the beginning, and I wanted to reiterate that here. Spent grains impart a strong nutty flavor to the bread — in a good way. After baking this, I would hesitate to go any higher on the percentage of grains mixed in as it might overpower the other wheat and slightly-sour flavors in the bread. It almost has a whole wheat flavor to it, even though this was predominantly white bread.
Hopefully, I find some of you out there making this same bread, and I’d love to hear your thoughts on your results. Just remember to keep the added grain percentage at, or below, what I’ve used here to start. Additionally, if your spent grain source dries out the grains you’ll have to adjust the hydration of your bread to suit, and conversely, if you obtain grains in a “porridge” like consistency like myself be ginger with your dough hydration to start.
I think this is going to be one of my staples for this year. Well, as long as my friend keeps brewing and providing me with his grains, and I think he will if I keep offering him some of the sourdough bread.
What’s Next?
Want to bake with more beer? Check out my Hop Miche made with a Russian Imperial Stout. Rich, earthy, and surprisingly, a touch sweet. You’ll love it.
Buon appetito!
If you use this recipe, tag @maurizio on Instagram so I can take a look!


87 Comments
Wow made this recipe with a local brewery called Bummin Beavers spent grains – barley and oats and it was over the top @gratefulgrainsourdoughbakery! Next loaf is going in a loaf pan with oats on top. Beautiful!
My husband makes so much beer I have to wonder if some of his yeasts are in my sourdough starter? Anyone know the answer? I’m an avid breadmaker but a newbie w/sourdough TY!!
Who knows but it's definitely possible!
Husband makes beer- I dry the grain then pass it through my grain grinder! I make a multigrain brioche with it and its fabulous!
Great idea milling the dry grains, Melissa!
When I made beer I dried out the spent grains and blitzed it into flour in a food processor.
Then I used some that flour in bread. I imagine it gives a similar taste without the grains affecting the texture (not that that is a bad thing either)
thanks to my brother who makes excellent beer i made this wonderful bread
That’s awesome, Nina! A good match there, you make the bread, he makes the beer, then you both make bread together 🙂 Enjoy!
How curious! You are usually my reference site for recipes involving inclusions, but today I was visiting a home brewer to share processes. He was making some IPA, and I was planning to just demonstrate how I make some 20% whole grain loaves (5% Rye, 15% Whole Wheat). But seeing his huge pile of spent grains, I figured why not throw some in my sourdough? Normally I would consult the Internet to find out if this has been done, but I threw caution to the wind and just improvised.
I decided upon 20% (200g of spent grains for 1KG of flour), primarily based on other recipes that I have used from The Perfect Loaf, with inclusions. However, I took it a step further, and used some of my friend’s Witbier to hydrate the dough (all the hydration other than the water in the levain).
Now I come across your recipe and feel reassured about the use of the spent grains, as well as the quantity.
Tomorrow we’ll see how the two loaves come out. Hydrated with wheat beer, and fortified with spent malted barley and hops, this bread should pack a punch!
Update Post Bake:
Wow, what a wonderfully distinctive flavor! Literally the notes of craft beer, in a loaf of bread. A touch of sweetness from the malt, but still very tangy, and acute flavors of the Weissbier, the hops (from the spent grains of the IPA) and nuttiness of the grains, which were nice and soft, not dry and fibrous as I feared. A different sourdough entirely. A meal in a slice.
You’re right about that, this is a *hearty* bread! The flavors are amazing, too. I’ve been begging my friend to get me more spent grains but he hasn’t brewed in a bit—time to get on it! Enjoy, Lynn 🙂
Hi. Curious over here. Any reason for not using bread flour? Can you replace Central Milling Organic Artisan Bakers Craft (malted) for bread flour in other recipes? Will it have the same oven spring?
Thanks,
James
It’ll likely result in increased oven spring and volume overall. Personally, I prefer to use as little high protein flour as possible—I find it leads to a crumb that’s a little more chewy and tough. But it will work with no problem and your mileage may vary!
Thank you!!
Hi Mauritzio. I recently made a spent grain sourdough. The smell and flavour of the crumb undeniably memorable to the senses. The only thing I didn’t enjoy about eating it were the husk as it’s quite pleasant to chew on. What are your thoughts on this? And how can the husk problem be solved (ie.
drying in the oven and grinding, steeping overnight or cooking)? Thanks for your time. EM
Hello Mauritzio. With Southwest Grape and Grain right here in Albuquerque and personally having no source of spent grains, I was hoping for a suggestion for what kinds of brewers grains would be best suited for milling and adding to this recipe (in place of the spent grains). The great folks at SG&G were not able to help me with suggestions. Would you suggest grinding the grains into flour and substituting part of the flour in this recipe or would you suggest cooking/soaking the grains and using them whole? I love the idea of a nutty, whole grain addition to a loaf.
Hey, Stephanie! Sorry for the late reply. I’m not super familiar with brewer’s grains, I just use what my friend sends my way 🙂 I’d say cooking them would be the way to go to ensure they’re soft and edible when baked in the dough. I’d probably soak them in water overnight, then cook them in the morning you plan to mix until tender. Then mix them into the dough before bulk fermentation begins, or after the first set of stretch and folds.
Another idea is to coarsely crack the grains if you have a grain mill — I do this often and love it. Be sure to soak the cracked grains as well, but you don’t have to cook them.
Hope this helps!
I bought an assortment of brewers grains (all wheat varieties) and cooked the grains without soaking. WOW, the kitchen smelled like a brewery! That’s a good thing 😀 I hated to toss the unfermented wort (waste not, want not). Wasn’t sure what to do with the cooked grains so I just put them in the freezer for future use. I like the idea of coarsely cracking the grains. I’ll try my Mockmill on the lowest setting.
Thanks so much for this website! I have made about ⅔ of the recipes here during this COVID stay-at-home. I credit you with my sanity!
Hi! I’m an experienced baker, but I’m pretty new to sourdough. I live in Colorado so your blog is very helpful because of similar climate and altitude. I baked this bread today and am so pleased with the result. Probably the best sourdough I’ve made so far. I’ve baked with spent grain so I’m very familiar with how wet it can be. I cut back on the water and it turned out great! Thank you so much.
Super glad to hear this, Sharon!
I just made it and it was scrumptious! I had to do lotsa math to figure out the right amounts — and the math side of my brain gets sluggish at times….I only make minis, so my total amount of flour is 325g. It’s only the two of us–and we’re retired, so I can bake every other day. What I did different: I ran out of rye, so I only used turkey red wheat. I added coriander to the dough as a “Brotgewürz”, and all the liquid war beer. I also “spritzed” the dough with beer before I put it in the dutch oven. Nice! Thanks for the recipe! This rocks.
https://www.instagram.com/p/B0j3u5AgZ8M/
That sounds and looks great, Donn! Sounds like a serious flavor powerhouse right there. Baking (and brewing?) makes for the perfect medium for experimentation 🙂 Happy baking!
I usually like to do an overnight bulk ferment. Because of this, my levain is usually around 13-15%. Would it work to decrease it that amount with this formula? And, if I do, does that mean I also need to add more flour? Thanks!
Overnight bulk would also work for this, but I would stick it in the fridge after 2 hours of room temperature to get it going. I typically do this with ciabatta, baguette, and sometimes whole wheat, doughs.
Thoughts on making a starter using flour made from spent grain? I am trying it. Took a little of my regular flour and fed it 1/2 ounce reg flour, 1/2 ounce spent grain flour, then the 1 ounce water. It is definitely active. Anything forseen to be wrong with this? Was wondering about phasing out the regular flour and just having a spent grain flour starter.
That’s an interesting idea, I’m not sure how it would work out. I’d imagine there would still be plenty of starches available for fermentation but at 100% I’m not sure the end result. Definitely would require some experimentation!
When we bought some supplies for another batch of beer at the Homebrewers’ store last week, I bought a mix of grains to use in bread. I got Briess Caramalt, Great Western Malt, Briess Barley flakes, and Crisp Brown Malt. I put one cup of that grain mix into my flour mill and made some rough flour (kind of like pumpernickel flour) to add to my next bread. Have you tried that yet? I love the malty beers and am hoping for a malty bread as well. I usually add about 1/2 cup of spent grain to my bread dough as well, and 1 cup of room temp homebrew. Just curious about what you think! I love your recipes!
I just love this idea, Donn! Those grains sound awesome as well. I have not tried milling the grains myself as the ones I get from my brewer friend are always moist and I’d have to go the extra step of dehydrating them to work them into a mill. However, I think this would work very well! I’d be curious to hear how the flavor comes across in the end, please report back if you get to trying this out. I’ve been meaning to get to the local homebrew store to get some materials… Time to get on it!
I just realized you answered. Yeah, I have tried it several times and the flavour was always amazing. The bread did come out quite gummy though, until I started using less of the malted barley mix. The more whole grain home-milled I use and less bread flour, the more barley I can add, though. But even if the bread was a bit gummy, toasted it was just great. The best mix is with sprouted rye & turkey red. Also, just using the malted barley as a “crust enhancer” (during shaping) is perfect.😋
Right on, sounds awesome. Could be many things leading to that gummy interior — keep playing with the ratios and fermentation till you get it just right. And that’s the fun with baking anyway 🙂 Have fun!
Baked this today with spent grains from my homebrewed black IPA. The dough spread a lot after removing it from the banneton, and even a bit more as i scored the loaves, with oven spring varying from a little to almost none. I’ve had this problem with most of the recipes i’ve tried from this site: the taste, crust, and crumb are good, but they’re a bit flat. Any suggestions? Is this evidence that the dough is too hydrated?
Thanks for all the great information: I’m having a great time seeking the perfect loaf!
Yes, it sounds like it’s likely an over hydration issue. I’d recommend you hold back 10% of the water from this recipe next go. Were the spent grains moist or were they dried out? If they’re moist, and your flour usually has issues with the hydration percentages here, that will also make the issue worse.
Glad the taste is spot on, though! The rest can definitely be worked out, we’ll get there.
Thanks so much, Mauricio, for all of the details of both technique and underlying science. This makes it much easier for me to tweak and experiment, while still feeling anchored to reality. I baked my first batch last night, working from a printed copy of your blog. I was afraid I had overbaked the crust, but was delighted to see, when I went online, that your photos show an equally dark chocolate crust. What a wonderful dark, nutty flavour. I also brew beer and can’t wait to brew a stout and bake with that spent grain. At least now when friends see me brewing again and call me an alcoholic, I will be able to say: ‘No I’m not; I just love good bread.’
Hey Maurizio, I love the recipes you post. I gave this spent grain sourdough a run today and it turned out really well. I used all central Central Milling flour (bakers craft plus,
100% whole wheat hi pro, and their dark rye), and grains from Fisher Brewing here in SLC. I dried the grains out a bit in the fridge and the crumb turned out awesome. Any way, thanks for all the great recipes and detailed baking logs.
Thanks, Jamey! Drying out the grains is a really great idea, I need to that next time I get a batch from my brewing friend. The hydration can be pretty unruly when those grains are too wet!
Thanks again and happy baking!
I freeze some wet spent grain, dry some, and grind some of the dried into flour. The Brooklyn Brew Shop has some great recipes for spent grains: https://brooklynbrewshop.com/blogs/themash/tagged/spent-grain
That’s an awesome resource, thanks for sharing that!
Hola Maurizio, I’m so happy I found your blog! Thank you for your lovely and detailed recipes. I have been baking loaves for a few months now, following your recipes (as well as making pancakes, pizza, and banana bread :). They’ve all turned out great! I recently baked a loaf with spent grains (from our Oktoberfest brew!) and added sage, rosemary, and thyme to the recipe. My loaves develop a great crust and rise, but the inside is usually a bit gummy, and I can’t figure out why! I bake them in an iron dutch oven, and I have modified the water content in some recipes. Could it be the flour? I have been using King Arthur’s Bread Flour, and a local organic rye and whole wheat flour. I have been following the proofing schedule very closely and the bread is rising in the oven, so I don’t think the dough is under/over proven. I live in Michigan, so I’m not sure if the cold weather is affecting the bakes? I would appreciate if you have any advice! Gracias!
Hey, Marcela! Glad to have you along. I’m pleased to hear, for the most part, all of these recipes have worked out well for you.
I typically find a gummy end result is either due to the flour used (I think your flour choice is probably fine, though), over hydration, under proofed dough, or it’s not baked out fully. It doesn’t sound like your dough is over hydrated as you’d probably indicate it was too hard to handle or very wet, so I’m leaning towards dough that’s under proofed and/or under baked.
Cold temperatures will definitely affect your dough — fermentation will slow quite dramatically even if the dough is a couple degrees cooler than what you might be used to. Make sure you give the dough enough time in bulk and also when proofing. I’d say you could try letting the dough sit in the proofing basket after you shape it for 30 minutes or so before you place it into the fridge. This will give the dough more time at room temp to ferment before slowing things down drastically in the fridge.
From there, try to make sure you bake your loaves completely — the interior should be somewhere near 208°F – 212°F. If you find the exterior is coloring faster than the inside of the loaf bakes, reduce the temperatures so you can bake longer at a lower temp.
I hope these suggestions help, Marcela. Happy baking!
I live in a cool climate and keep my home cool too. I have found that have to be patient and extend my on-the-counter rise time as compared to Mauricio’s timings. I now pay close attention to the levain and dough to gauge its readiness instead of relying on timing. If I want to speed things up I put the dough in cold oven with the oven light on and that makes the air temp in the oven closer to what Maurizio suggests. Cheers, Teresa
My bread is rising overnight right now! I have to say, I found it incredibly wet the entire time, so much so that I could hardly handle it. I found myself adding a lot of extra flour and this was all before even adding the grain.
I hope the bake turned out well! Yes, depending on how much moisture is still in the grains it can cause for a very wet dough; and couple this with flour that might not be able to take on the same water as mine and you’ll have a super wet dough! I’d say cut the initial dough hydration down by 5-10% and that should clear it up. Have fun!
Made this with spent grains obtained from my local brewery, Honolulu Beer Lab (thanks, guys). I toasted the grains to see if I could get more of a malty aroma out of them, although I am not sure if it made much of a difference. I was mostly surprised at how robust the denser starter turned out to be – the dough rose well over my proofing basket in the fridge overnight, puffed up like a balloon. It turned out really well – just like your photos in fact, and super tasty. Very crispy, chocolate-brown crust, firm and flavorful crumb, close in flavor to a whole wheat. I’m going to try it again the next time they’re brewing a stout, I bet the darker grains will make for a special bread indeed. As always, thanks for maintaining such an informative and interesting site, it’s a pleasure to read.
Thanks for the feedback and kind words, Jedediah! I find the same thing when making this bread: the flavor is hearty and full, almost like a whole wheat loaf. I’d assume toasting wouldn’t do too much as there should be little sugars left in these grains (most is used in the brewing process). However, it certainly would be interesting to try with the stout grains! Thanks again for the update and have fun, sounds like you’re making some delicious bread out there!
Thanks for the recipe! Just made it, but tweaked it a bit, as follows. First of all, since I make beer too, besides the spent grain I had available to me the unfermented beer (called “wort”). I substituted 200 g of wort for some of the water. I also made an effort to dry the spent grain a bit, to lessen the hydration variable. Finally, after shaping I rolled it in flaked barley, to extend the beer theme a bit more. I think all these steps, besides the recipe, helped make this bread, (I’m happy to say) excellent! I found this bread a bit more moist than average and it perversely seemed to improve with time (who hears of bread aging?). Note: This “wort” is easy to come by for the brewer; when beer is made from grain the wort continues to filter through the grain well after the collected wort is set to boil, so I simply “harvested” this late runoff that otherwise would be tossed. The final result was a noticeable, and very pleasant, malty beer-like “nose” to the bread!
You bet! Great move on drying the grains. I just received another batch from my baker friend and I’ll do the same. I’ll probably leave them out in a colander to drain out thoroughly. Now that you mention using the wort I’ll have to request from my friend if he can save this for me next time! Great idea.
I find that some breads do actually age well and taste better a day or two after — 100% whole wheat loaves for example, do really well after a day (also rye!).
Your bread sure sounds delicious! Thanks so much for sharing your modifications, I’ll be trying them out myself soon!
Hi maurizio, so it’s funny you have this post because I do brew occasionally with my dad and brother. So I have a decent amount of malted grains. I actually have been using malted wheat for my diastatic malt powder that is called in recipes from time to time. I just use my food processor and flour it up best I can. That’s been working out pretty good actually.
So here’s my thought, doing the same sort of thing with other malts (dark malts in particular) just to add a different flare. I know dark Malts have no diastatic power so they won’t lend to the bread in that way, I just want to get a dark malty flavor in there. So I was thinking of grinding up the dark malts, sifting out the husks then flouring the remainder. That may be a way for you to get more of a malty flavor in there as well without all the actual graininess in there. What do you think?
I think this is an absolutely fantastic idea! I love the sound of using darker malt. I actually keep meaning to stop by my local brewer’s store to pick up some of their used grains, diastatic malt, and see what else they have that piques my interest. I’d love to hear how this turns out for you!
Hey Maurizio,
So I finally remembered to grab some darker malt from my dads house yesterday. I got a type of crystal/caramel malt called “cararoma.” It literally smells like if you mixed caramel and chocolate together with a little malt in the background. So I am going to mill it up into a flour and use it for my bake this weekend.
I’m not sure how much I should add in but I will play around with it. May go with 5-8% to start with and go from there. You think that’s too little or too much for a starting point?
Thanks again for all you do for us sourdough obsessive bakers haha!
Eric
That sounds AMAZING. Wow, what I wouldn’t give to have access to things like that. I really need to stop by my local brew store.
I’m not sure, I’d start with 5% and see how that goes. I’m assuming it’s not diastatic so it’s really just flavoring and it depends on how potent the malt is… 5% is usually my starting point (for example, with buckwheat, which is pretty strong, I started at 5% and eventually worked down to 3% for my liking).
Let me know how it goes!!
So I baked this weekend. Actually baked yesterday. Went pretty good. Would have liked for a bit more rise but it ended up pretty good. When I was shaping, I was thinking to myself, man I’m not sure if there’s enough strength. It had decent strength though.
About the cararoma malt, I actually went with 7%. Made a huge difference in color. I mean it looked darn near like an all whole wheat loaf (or darker). The taste that came through was a little more bitterness than anything, but the aroma of the malt came through more which was nice. Had a decently strong aroma of caramel. But the flavor for the most part was of sourdough. I definitely liked it a lot though! I would recommend trying it out. Just make sure you grind that malt up as fine as you can.. it was more grainy than the white or whole wheat flour. It may be a good idea to mix some flour in to just the malt flour and treat it almost like a soaker.. I may try that next time as well.
Right on, thanks for the update! I like the idea of grinding and then scalding like a soaker. I’m hoping to stop by that brew store sometime soon. If I find anything expect a post here at my site with maybe a question or two on the malt if I don’t know what is what there. 🙂
Love the write up! I will have to try this recipe with spent grain from my own homebrewed beer! One correction to your article is that the starch from the malted grains is converted to sugars during the mash and not the other way around. The yeast then metabolizes the sugary wort to create alcohol, co2 and flavours. Cheers!
Thanks, I appreciate that! Since you make your own beer you’ll have a nice consistent source of spent grains to make delicious bread from — envious!
Thanks for the correction, I’ll modify the above writeup. You’re right!
can i dry the spent grains and roughly powder them and use as additional flour in bread?
Absolutely. I have not personally tried this but it should work out quite well!
Thanks for your reply. I tried it and it turned out pretty good. love ur breads.. so inspiring. I am new in sourdough baking and loving every bit of it.
Super glad to hear that — happy baking Farzana!
What’s the purpose of having a thick starter??? I keep my 2 cup starter in a quart canning jar. (It’s about like pancake batter). It gives my starter to grow, and it allows me to have a extra starter to use when needed.
Whether your starter is “stiff” or “liquid” is really up to you. I’ve gone back and forth over the years, adjusting the hydration of my starter to test which I like more. I think it ends up being a personal preference and which is easier for you to maintain. Some suggest that a stiff starter makes bread that is more sour but I haven’t found this to be the case at all.
Thanks for replying so quick. I’ve noticed that when I use milk instead of water, my bread gets more sour.
Very interesting. I’ve never done this but I’m guessing perhaps the additional sugars in the milk are increasing the fermentation rate of your yeast/bacteria in your starter.
Try buttermilk….thats an interesting taste
I’ve occasionally replaced the liquid in my sourdough bread with Guinness (an Irish import). The sourdough bread came out really good.
That sounds fantastic! I’m going to attempt to bake my stout sourdough recipe again here very soon (given the chilly weather out here!). I was thinking about using some Guinness or some stout from a local brewery here in my area. I think these breads are a great compliment to the winter!
Im a little lost. I had left my recipe for sourdough bread for you. And now i can not find it. Do you know where it might be??
You left your recipe on my about page. Thanks for leaving it! I might have to try it out 🙂
thanks…….If you want to make regular roll, increase everything by half. After kneading the dough the first time roll dough out to 1/2 to 5/8 thick. Then cut rolls out with a biscuit cutter. Dip rolls in melted butter and place on a cookie sheet with rolls bearly touching. Cookie sheet needs to have a lip all the way around. Let rolls rise untill double in thickness. Bake untill golden brown at 350 degees.
I like the sound of that — thanks for sharing!
Maurizio how did you get interested in sourdough??
I think I’ve always had it in me, somewhere, but it didn’t really take hold until I received a copy of the Tartine cookbook about 4 years ago. The story really resonated with me, that searching for perfect bread. Once I started baking myself (after creating my starter) I was firmly hooked on the science & craft behind it.
Do have a seperete starter for each type of bread?? Or do you have one starter for all tpyes of bread?
Some bakers do keep a starter for different bread type (e.g. a 100% rye starter for rye bread), but I don’t do this. I modify the levain I’m building to suite the flavors/fermentation I’m after in my bread. I do tend to flip/flop between a “stiff” starter and a “liquid” starter. The only thing that changes there is the percent of water at each feeding.
I use one starter for every type of bread I make. If I have a little something left over from a meal (like mashed potatos, oatmeal, sour cream, milk, etc) I add it to my starter. That way if I need some extra starter for something, I’ve got it.
Do you still obtain consistant results with your bakes?
I’d like to think so, yes! Every now and then I push hydration too far, or mis-judge my starter/levain but not too often. Each bake is a clean slate so you never know. I believe consistency is one of the hardest things a baker has to master, but with experience you get closer and closer 🙂
Yes I do…… very consistant
Hi again! I actually have dehydrated spent grains (I dehydrated them myself after my boyfriend and I brewed some beer) and wonder about how much I should use? Please let me know! Thanks again. Looking forward to some bread baking this weekend!
Dehydrated grains should really act the same way, I’d start with 25% spent grains and go up from there on subsequent bakes. You could optionally soak the grains in some water during your autolyse step if you wanted to try to “reconstitute” them a bit, or just toss them in dry — either way just know you might need to adjust your overall hydration in your dough to suit (as I mentioned in the article above).
Good luck, let me know how it turns out!
Re: above question, more to the point, can i use unbleached white flour instead?
Janet,
Awesome! I should have made that clear, Central Milling Organic ABC is simply unbleached white flour (around 11.5% protein). Yes, unbleached white flour will work well here. If you have access to something local that’s great, but otherwise King Arthur All Purpose or even a mix of AP and Bread Flour will work well with this recipe.
Let me know how it turns out!
Going to try this tomorrow with spent grains from my husband’s home brew. Sorry if this is obvious to everyone else but here goes… Your recipe calls for 850g Central Milling Organic Artisan Bakers Craft. What is that?
Thanks for the help!
I’d be interested to hear how the taste differs. The spent grains might not be as sweet as the dried, fresh ones as the starches are boiled out — just a guess.
I want to start milling my own wheat hopefully later this year when I can find myself the perfect mill for my home. The search is still on.
Thanks — yes I’ve heard it takes you to a whole new place with baking. Just need to save up, or start selling some of these loaves 🙂
Excellent news! That’s interesting you had dehydrated grains, where did you get them from if you don’t mind me asking. My friend always gives them to me wet, but dehydrated would be nice to use for a change. Also, do you mill your own flour? What type of mill do you have?
I just love this bread, as you said the taste is fantastic! Happy baking, and you’re welcome 🙂
Thanks!
I’ve tried with stout and the flavor was great, yes, I’d say it really depends on the type of beer you are using. I’m going to attempt this bake again here soon using a different type of stout with a few modifications. I think a wheat beer would also be great.
O’douls… yes might as well be water!
I have used around 200g but never the full 100%. I’m going to be revisiting my stout country sourdough bake and up the beer to around 400g!