

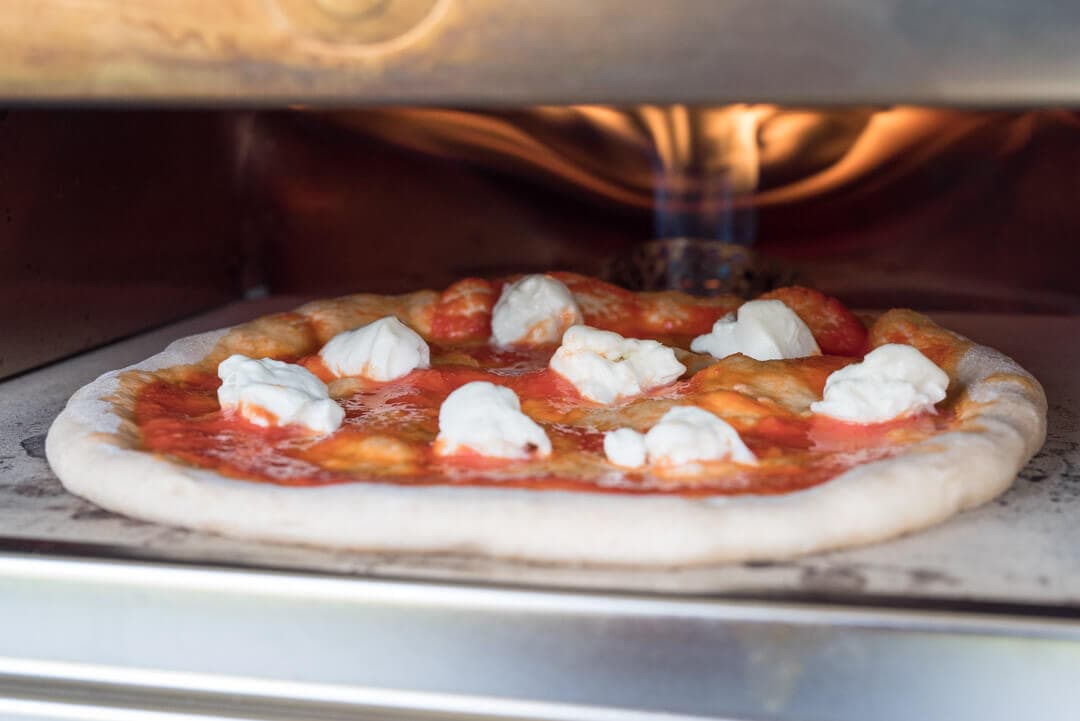
A pizza addict. Me. The person writing this post. The person slinging these pies and taking these photographs. I do have a problem, but do I need help? Asking for help is the first step. But I don’t want help, especially with pizza—a more whole wheat sourdough pizza dough—this good. And besides, I have some dough in bulk fermentation right now; I couldn’t possibly let it go to waste. Ok, one more round of pizza, I’ll write this post, then take a good long break, ok? Deal.
This is not because of some twisted gluttony I have for pizza; it’s just simply because it’s so good and so dang easy.
The Addiction (I talk about it like it’s sitting right here next to me as I write this) means I’ve made some form of this pizza dough at least once, sometimes twice—or even thrice—a week since midsummer. One might think my desire to eat all this pizza would wane. After all, how much pizza is too much pizza? As it turns out (and as evidenced on Instagram), my upper bound on pizza consumption never materializes.
This is not because of some twisted gluttony I have for pizza; it’s just simply because it’s so good and so dang easy.

The nighttime rote of mixing my ripe sourdough starter with flour, water, and salt—an all too common scene in my kitchen as the sun descends. The naturally leavened dough is just so easy to put together. It’s so forgiving and flexible. I mix everything in the mixer, do a short bulk fermentation on the counter, then toss it into the fridge. I take it out the next day when convenient. Then, I divide, shape, and proof the dough until it’s time to start the pizzaiolo dance in front of the fire. It’s an easy solution to lunch, dinner, or impromptu gathering at the house—the perfect food.
Thirty percent whole grains in this dough means not only increased nutrition but also significantly more flavor.
In all its perfection and potential for a myriad of toppings beyond what’s conventional, pizza also has another element that is only sometimes experimented with: the dough. I’ve talked about my sourdough pizza dough in the past, and I wanted to take that recipe and modify it to incorporate more whole grains for flavor and nutrition. I started with the modest 10% whole wheat of that recipe and slowly increased it over time. I finally settled at a point where the dough’s flavor was amplified, but the aesthetic of a traditional pizza was not compromised. Thirty percent, that’s a lot of whole grains by most pizza standards—and I know you’ll enjoy the additional flavor the added whole grains bring to each bite.
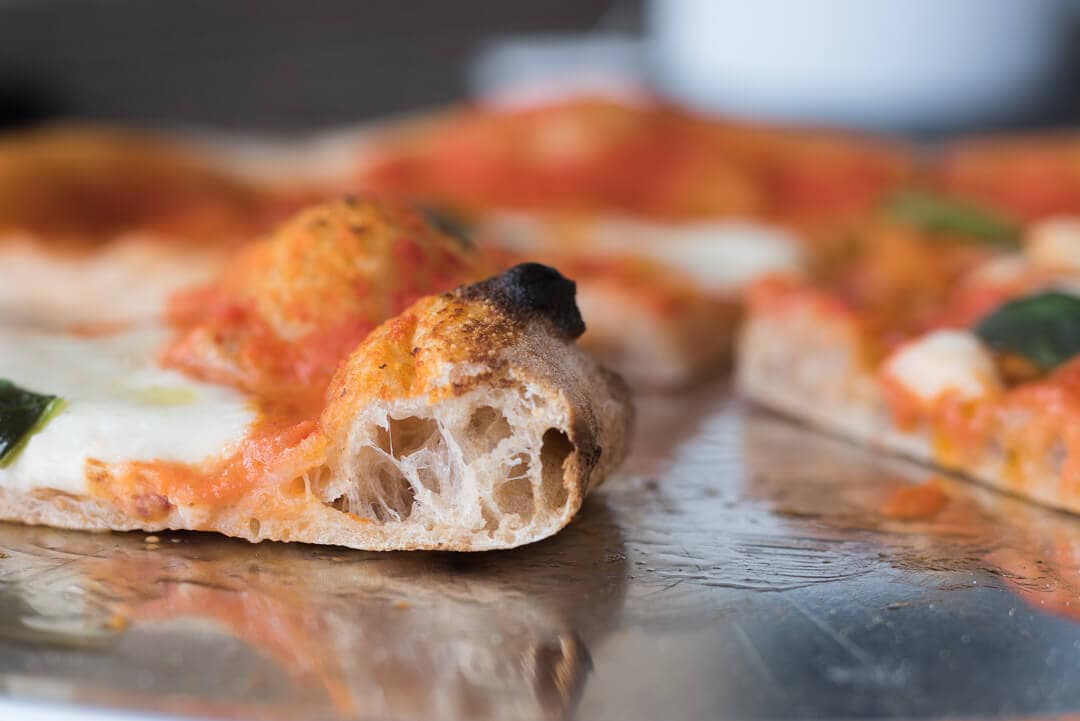
With all these added whole grains I taste a hint more acidity and sourness in the crust, not enough to be overwhelming but enough to add depth and interest. This added complexity plays well with just about every topping selection I could throw on a pizza. More on all of this below, but first let’s talk about ovens.
Oven Selection
Roccbox Gas/Wood Fired Oven
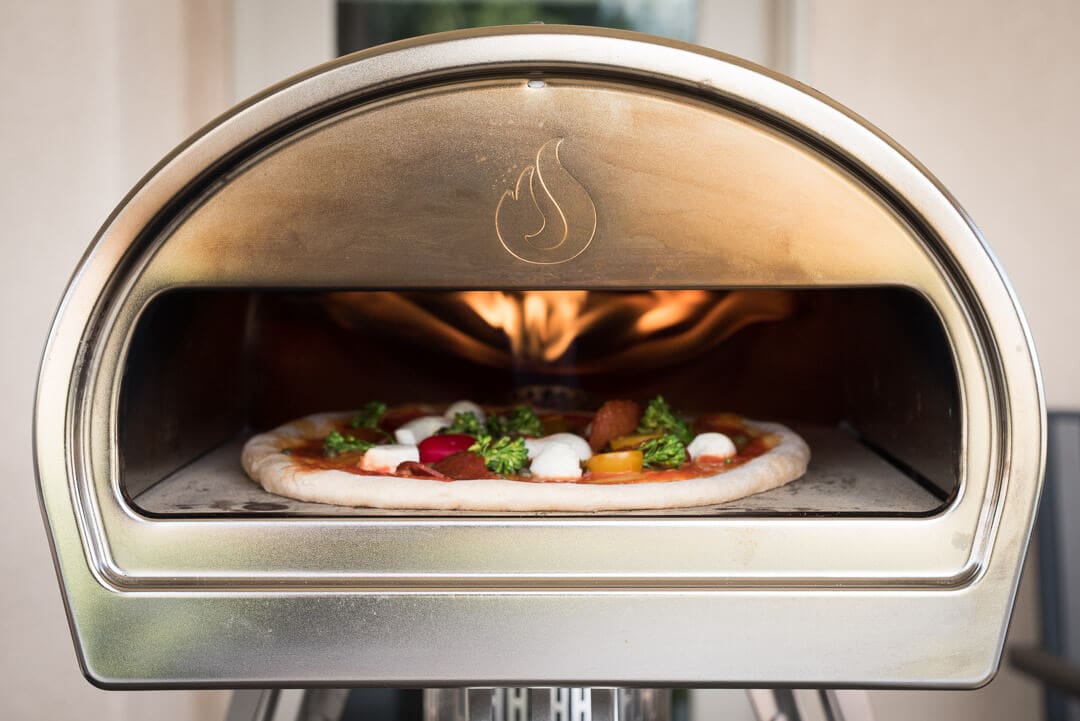
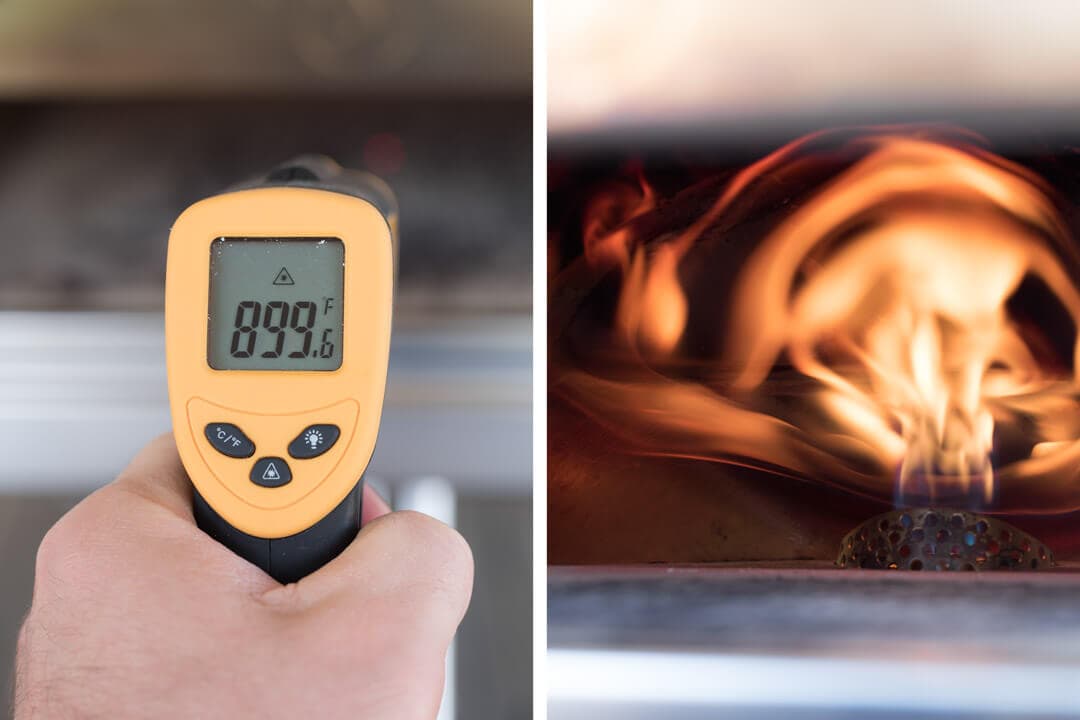
I was lucky enough earlier this year to get in on a preorder for a Roccbox, a small gas (and wood) fired oven that I’ve successfully brought up to temperatures nearing 950°F (510°C)—enough to cook a pizza in minutes. To say I’m in love with this little oven would be an understatement. It’s just a fantastically designed piece of equipment, and oh so convenient. Upon lighting, I can have the oven at max temp in 30-45 minutes and ready for the first pie. I prefer to keep the oven deck at 900°F (482°C), which usually means I turn the oven down midway through my bout of pizza slinging. That’s a novelty: having to turn down the oven because I want it cooler.
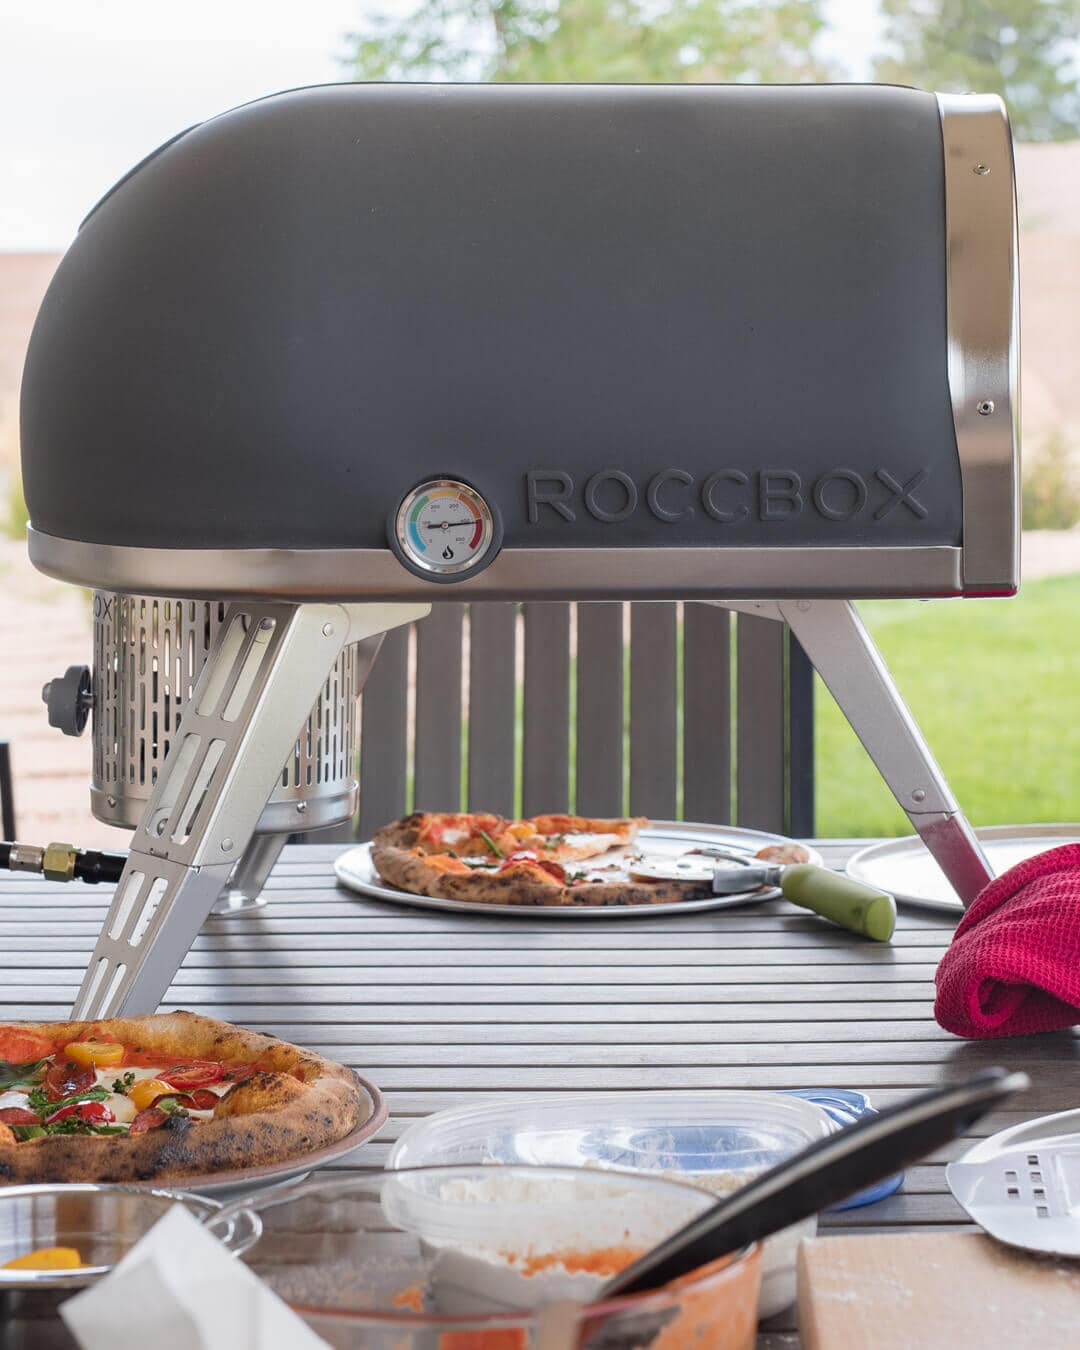
The oven is the perfect apparatus for cooking high fired pizza. I’ve tested making back-to-back pies and the recovery time (the time it takes for the deck to get back up to max temp) is surprisingly fast. The time it takes me to flour, stretch, top and load the next pie is all the oven needs to recover. Another neat feature of the oven is that it comes with two small canisters that swap in and out at the back. One canister provides fuel via propane and the other allows you to load wood pieces into a hopper for burning. I’ve not experimented with the wood hopper yet, the gas option gets so hot and provides such steady heat I’ve had little reason to experiment.
You’ll notice the oven is propped up on 3 extremely sturdy fold-out legs, this means it’s actually quite portable. It is heavy, but the included strap that hugs the deck means I can lug this oven with me to a “guy night” or weekend party at the park. It’s also convenient in that I can set up my pizza making station on my patio—or heck, in my garage in poor weather—in any way I want.
If you’ve been considering a wood-fired oven but haven’t yet made the plunge, I’d highly recommend checking out the Roccbox. I’ve been using it so, so often this summer for recipe testing and the weekend pizza party—it’s just fantastic.
Home Electric/Gas Oven
If you don’t have a Roccbox, know that this dough can easily be adapted for a typical home oven. As I mentioned in my previous sourdough pizza post, due to the longer cook time for a home oven I would increase the hydration of this dough by at least 3-5% (to about 71% hydration) to offset the longer cook time (the longer it takes the pizza to cook the more moisture will be cooked out of the dough). The dough will be slightly more tacky to the touch, but if you utilize parchment paper as an aid to load the pizza into your home oven you shouldn’t have any issues.
Flour Selection
I’m a big fan of Central Milling’s Type 00 ‘Normal’ flour as the white flour component of my pizza. If you don’t have 00 flour (that is, flour with a low extraction percentage and a very fine granulation) you can substitute in a general bread flour with lower protein, somewhere around 11-12%. Central Milling Artisan Baker’s Craft, Giusto’s Artisan Bread Flour, or King Arthur All-Purpose will all work well.
For the whole wheat flour component I chose one that’s milled to a very fine granulation (Giusto’s Whole Wheat Fine). Use what you have access to and feel free to experiment. You could substitute all, or part, of the thirty percent with Khorasan, spelt, or another variety of wheat.

A More Whole Wheat Sourdough Pizza Dough Formula
This formula was born from my previous sourdough pizza dough recipe, which was intended for a regular home oven. I modified it to suit a high-fired outdoor oven by significantly reducing the dough’s hydration. This makes for a dough that’s much easier to handle, but further, a high hydration dough isn’t necessary when the pizza fully cooks in under 2 minutes. In fact, over time, I’ve slowly reduced the hydration with excellent results (my current all-white dough is all the way down to 63% hydration).
Keep in mind that due to the relatively high percentage of whole grain flour in this recipe, expect that the dough will ferment at a slightly accelerated pace. Keep an eye on the dough balls after you shape them, and if they start displaying signs of extreme puffiness (so, so technical), place them in the fridge to slow the process until you’re ready to use them.
Vitals
| Total Dough Weight | 2040 grams |
| Hydration | 68% |
| Yield | 8 x 250g dough balls (8 x 12″ pizze) |
Dough Formula
The target final dough temperature (FDT) is 78°F (25°C). See my post on the importance of dough temperature for more information.
| Weight | Ingredient | Baker’s Percentage |
|---|---|---|
| 785g | Type 00 Flour (Central Milling Type 00 Normal) | 70.00% |
| 336g | Whole Wheat Flour, Fine (Giusto’s Organic Whole Wheat, Fine) | 30.00% |
| 762g | Water | 68.00% |
| 22g | Salt | 2.00% |
| 135g | Ripe, 100% hydration liquid starter | 12.00% |
Method
1. Mix – 8:00 p.m.
To the bowl of a stand mixer, add the ripe sourdough starter, salt, flour, and all but 30g of the water (a portion is held back through mixing to ensure the dough is not overhydrated).
Using the dough hook attachment, mix the dough on STIR setting (the first notch) until all the ingredients have come together. Turn the mixer up to speed 2 or 3 and continue to mix the dough for 3 minutes.
Turn off the mixer and assess the dough: does it look (and feel) like it can take more water? It should feel strong and dry, not soupy or weak. Add the water in slowly over the next minute if it looks like it can take it.
Continue mixing for 2-3 more minutes until the dough starts to ball up excessively around the dough hook. We’re not looking for full gluten development at this point, we’ll still perform a few stretch and folds during bulk to finish adding strength.
Transfer the dough to a thick-walled container for bulk fermentation.
2. Warm Bulk Fermentation – 8:05 p.m. to 10:05 p.m.
At 78°F (25°C) ambient temperature bulk fermentation should go for 2 hours.
Perform a total of 3 sets of stretch and folds during bulk, spaced out by 30 minutes. After the last set, let the dough rest until the full 2 hours for bulk.
3. Cold Bulk Fermentation – 10:05 p.m. to 9:00 a.m.
After the full 2 hour warm bulk fermentation dump the dough out to the counter and form it into a large, tight ball. Transfer the dough to a bowl lightly oiled with olive oil and cover. Place the bowl into the fridge until the morning.
4. Divide & Preshape – 9:00 a.m.
Ready one or two large rectangular containers to hold the 8 dough balls by lightly oiling them with olive oil.
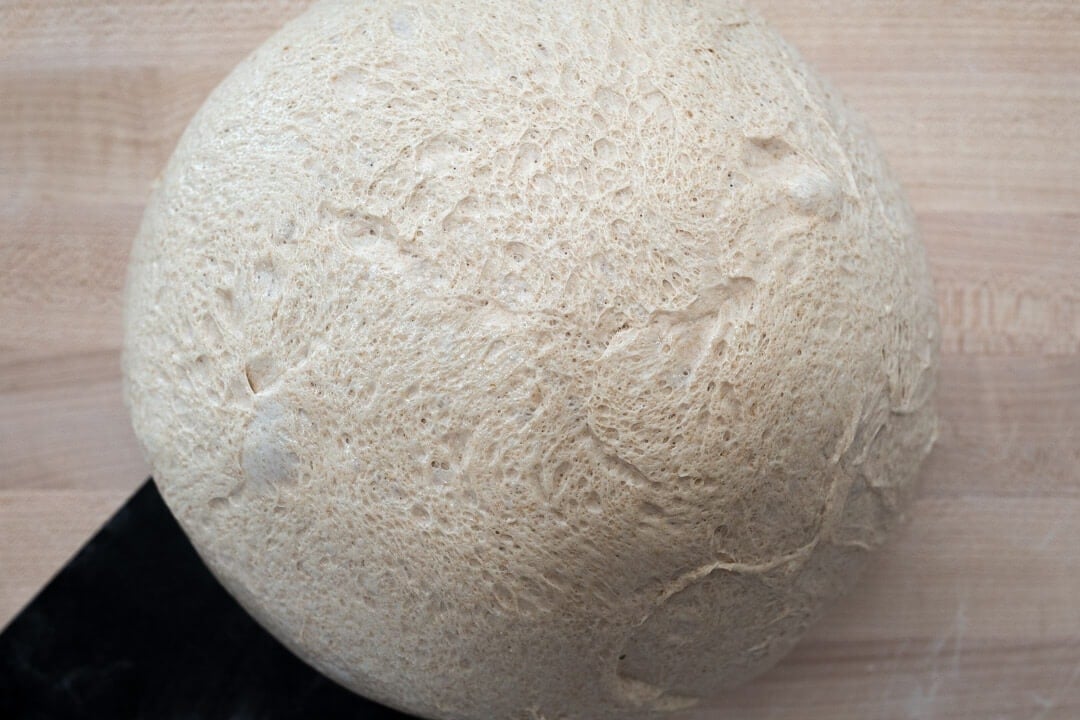
Dump the dough from the bulk container to an un-floured work surface (though flour isn’t really necessary to form these balls as the dough will be cold and very easy to handle). Divide the dough into 8 pieces scaled at 250g each (you might have a little leftover).In the above photo, you can see the underside of my dough after I removed it from the fridge and dumped it onto the workbench. Lots of beautiful activity happening there! The cold bulk at about 39°F (3°C) still allows for sufficient fermentation in the dough and you will notice a small rise from when you first placed it into the fridge.
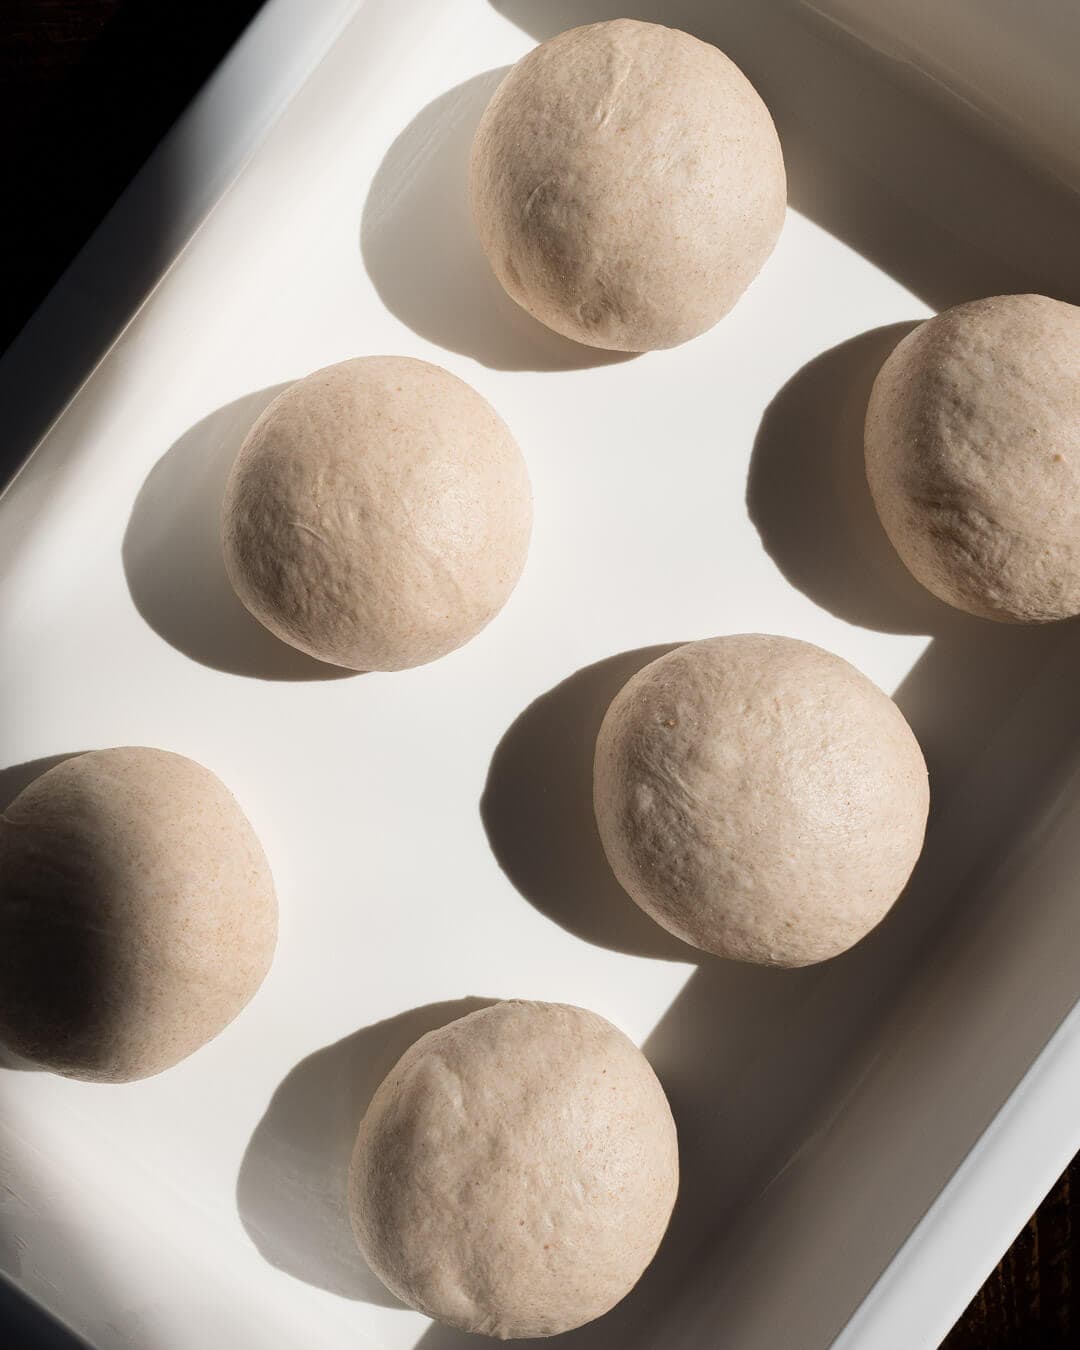
Use your preferred method to form the scaled pieces into very tight balls that have no seam on the bottom (important!). The smooth surface along the outside of the dough sets the stage for shaping a uniformly smooth disc before we top the pie. You can see a video of me balling this dough on Instagram.
When balled, place each into the lightly oiled container with plenty of room to spread as it proofs (see above). Cover the container and leave out at room temperature to proof.
5. Proof – 9:30 a.m. to 12:30 p.m.
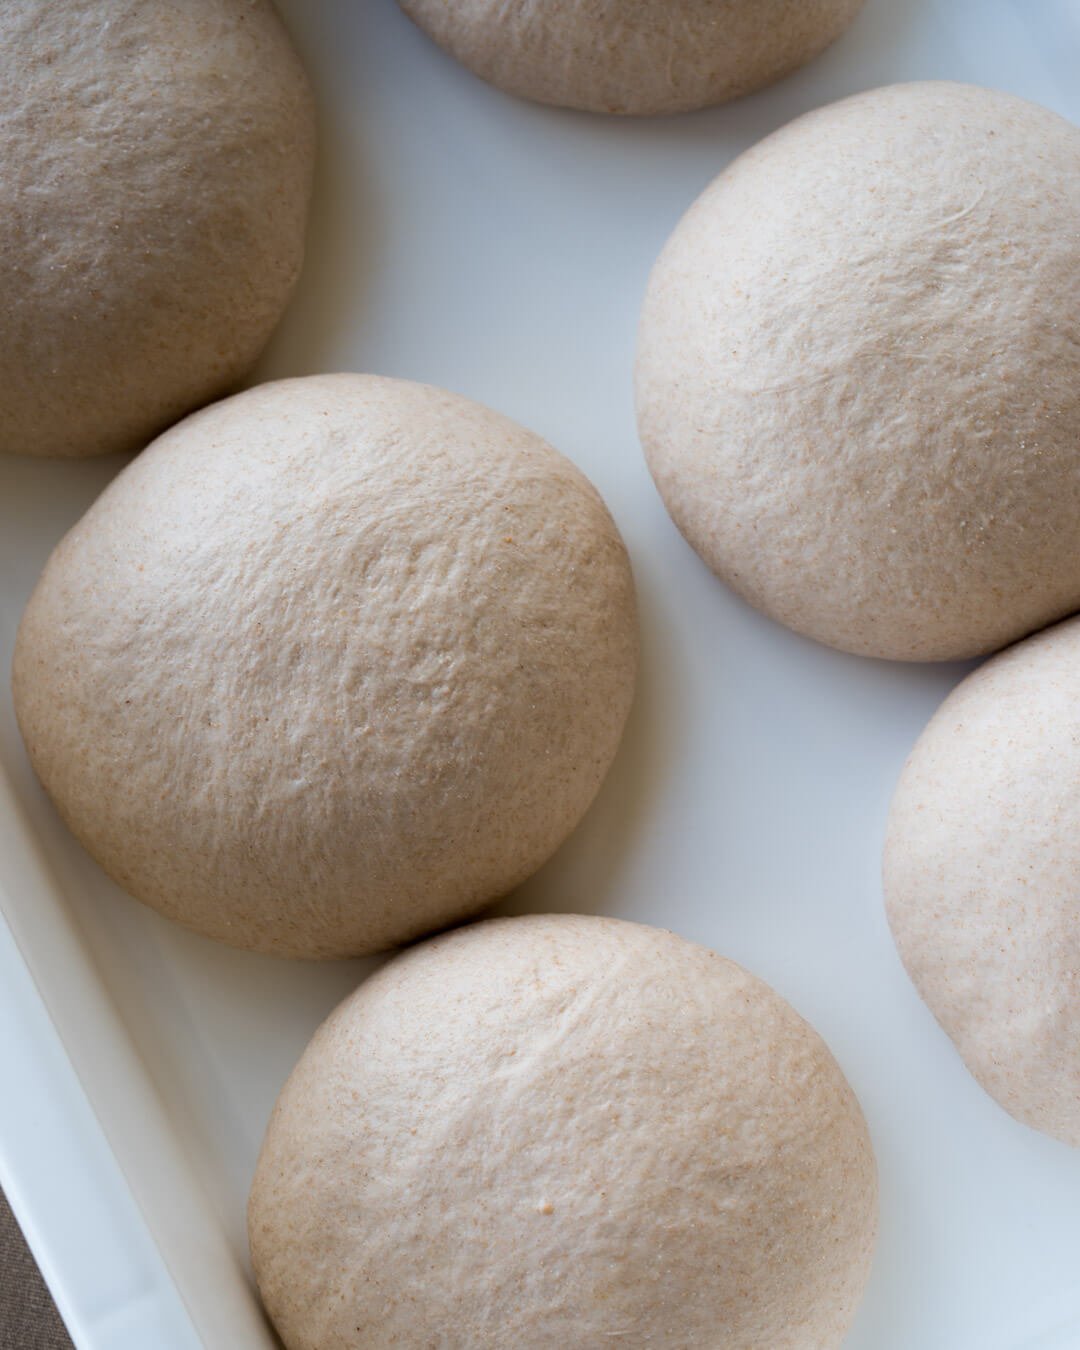
As I mentioned earlier, depending on the ambient temperature in your kitchen this dough can proof rather quickly. Check-in on it from time to time and make sure it’s not gassing up excessively, and if it is, place the containers into the fridge to slow the process. My kitchen was around 78°F (25°C) and these were ready to go after about 3 hours.
In the photo above you can see my fully proofed dough. Compare the way the dough looks at this stage versus the earlier, balled version when it was shaped. You’ll notice significant relaxation and a much more puffy result.
6. Shape, Top, and Cook – 12:30 p.m. onwards
Preheat your oven and ready your pizza station. If using a home electric oven, see my previous post on sourdough pizza for tips on cooking these. If using a Roccbox, preheat the oven 45 minutes before you plan to make your first pie.
Flour your workbench and carefully pull a dough ball out of the oiled container and flip it over onto the bench. Flour the top of the ball (which is actually the bottom) and begin pressing it out while keeping it in a circle. After a few presses, flip the dough ball so the smooth surface is now facing up. Now continue to press out the ball, turning it a few times to keep it symmetrical.
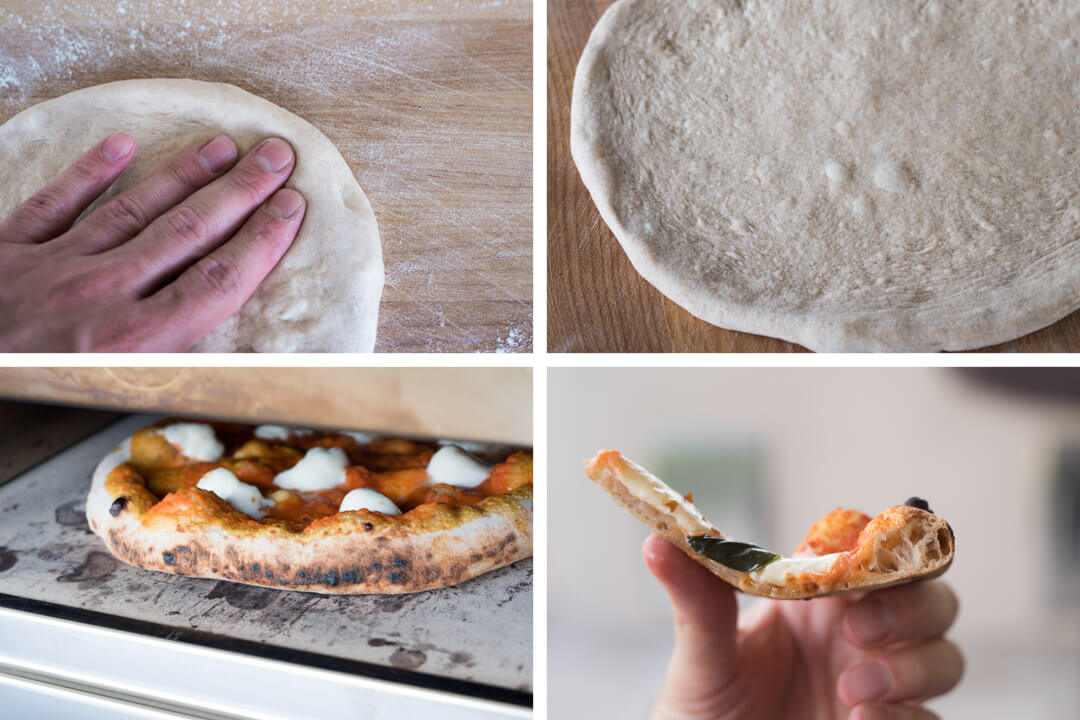
When pressing out I like to keep a small rim around the outside (see top-left, above). This small rim will eventually form the outside crust (cornicione) and I am deliberate to not stretch this area excessively. Once you have uniformly spread the dough, pick it up and drape it over top of the back of your knuckles and hands. Imagine holding two clinched fists up in the air (like a boxer) with the dough draped over them. Then, gently separate your fists as you stretch the dough out further. Rotate the dough around as you do this stretching until the dough is evenly enlarged.
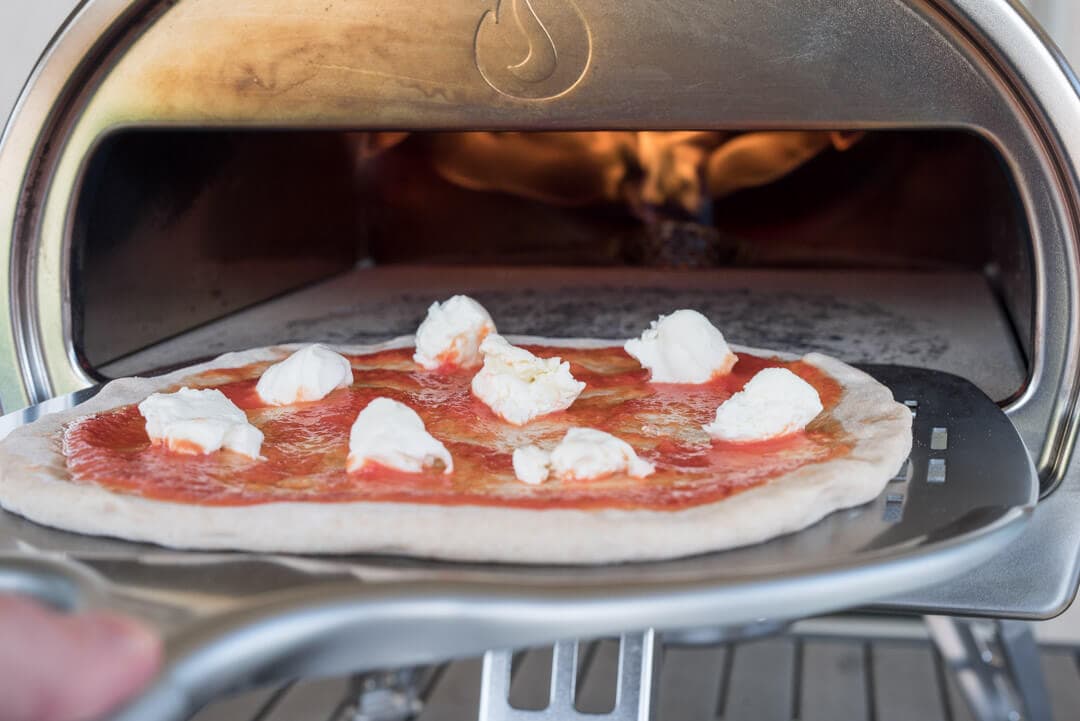
Using a shallow ladle, spread prepared tomato sauce on the pie and place whatever toppings you desire. Cook and enjoy.
See my guide to stretching and shaping pizza dough for more help →
Conclusion
The whole wheat flour used in this formula brings with it a new depth of flavor. Through proper fermentation, this dough has subtle acidity and complexity that’s not overpowering, but rather, a beautiful complement to any toppings littered on the surface. Additionally, the crust takes on a new texture versus using all white flour. It’s still very thin, light, and crunchy, but at the same time, it has more substance and depth. This is a nice change from soft, pliable pizza dough you usually get when a pizza is made with a high fired oven (neo-Neopolitan style, perhaps).

Expanding our pizza-making repertoire with various dough formulas seems a natural progression, and this whole wheat sourdough pizza dough is no different. There’s always going to be a place for a 100% type 00 dough, but it’s fun to explore. I started with my previous sourdough pizza dough recipe and by upping the whole grains a whole new pizza was the result. You’ll be shocked to discover how much of a flavor difference there is with a change to the whole wheat amount in this dough.
Pizza is the ultimate common denominator when deciding what to eat for a meal. When searching the depths for cravings, it sits, waiting patiently. It knows you know. It knows you’ll find it. And then, as if by some artificial happenstance, you proclaim to yourself: “Oh hey, I know! What about pizza?” The truth is, pizza, in its fundamentally simplistic nature, is the food everyone can agree on. It’s comfort food that morphs and accommodates any and (almost) all toppings. It’s the perfect food.
Ok, as I promised in the beginning, this will be the last pizza post for a little while… Just don’t keep tabs on me via Instagram. No, don’t do that.
What’s Next?
If you’re interested in a different take on pizza, check out my sourdough pizza al taglio recipe, which is pizza cooked in a sheet pan—rectangular is fun (and delicious)! Or, if you want to try my go-to and very flexible dough for a high-heat oven, check out my wood-fired sourdough pizza dough recipe.
Or, see my sourdough pizza guide page for more shaping and stretching tips plus a round-up of my favorite pizza tools and methods for adjusting flavor and more.
Buon appetito!
If you use this recipe, tag @maurizio on Instagram so I can take a look!
Thanks so much to Gozney/Roccbox for sponsoring this post. As always, the opinions and content here are my own.


110 Comments
Hi, im sorry if this was covered in the comments – i tried to scan all/most. Can sourdough pizza dough be frozen before the final proof? just mixed up my dough and excited to try this recipe!
thank you!
L
Some people have reported success with this but I haven’t tried.
Hi Maurizio and gang,
Thank you for all your advice and blogging about sourdough baking. Since I am at home helping teach school lessons for my son we have whatever he wants for lunch. His favorite is homemade pizza. I have used your more whole wheat pizza crust recipe with great success! And I do a quick par bake of 550 degrees for 4 minted and then I freeze those crusts until we have lunch pizza day and then top it and finish the bake for 4 more minutes and they still taste very goo
d!
That’s awesome to hear, Doug! A few other readers have mentioned they’ve had great success par-baking as well—I need to give it a try, super handy for the kiddos. Hope all is well and happy baking!
Thank you for this recipe! Best pizza dough/crust I’ve made so far! Mine still didn’t look quite as good as yours, I had to use a home gas oven with a bottom-drawer broiler which presents challenges, but still was the best to date. I will get better! Once I master this recipe, I want to start adding gradually more whole wheat, preferably white WW, or maybe spelt.
So glad to hear that!
I have been using your recipes for years now! You are the best when it comes to anything sourdough! Do you have any tips for the actual bake? I’m experimenting with the time right now, anything between 90 seconds to 3 minutes. What do you prefer?
I basically go until the crust is evenly brown, however long that takes. Usually around 90s – 120s.
Hi Maurizio, is there a reason why you don’t autolyse in this recipe? Thanks
I’ve not felt it necessary for my pizza dough lately!
Hey Maurizio – I hope you and your loved ones are doing okay in the Coronavirus world we find ourselves in.
I’d used your earlier recipe in the past and thought I’d try this one and my oh my this is good! I scaled down to 2 320g balls and did add about 1% diastatic malt since I like the caramelization boost the crust gets with it, but otherwise followed the recipe as written. All I can say is wow! this is one super-delicious pizza dough recipe!
Results can be seen here.
I missed your post — wow those came out great! The cornicone looks spot on and I’m a huge fan of your toppings. Thanks for sharing, Jeff, and I’d also have to say a bit part of that success was the hands at work 🙂
What I usually do is put any unused balls in the fridge immediately and then use them sometime the next day as a flatbread or just about anything really, even another pizza. You might have a little less rise in the dough, but it’ll still be great!
Hi Maurizio! I just made this pizza tonight halving the recipe and forming it into two large pies instead of four personal pies. I have been making pizza (sourdough and otherwise) for years and this is BY FAR the best crust in terms of taste and texture. It was also some of the easiest dough to work with! I cannot tell you how thrilled I am to have discovered your blog. This is the third recipe I’ve made with your guidance and one is better than the next. Keep up the fabulous work and I’ll keep telling everyone I know 😁 thank you so much!!
Kristen
Right on, Kristen! Super glad to hear it went so well for ya (and sorry for the late reply!) 🙂 Have fun!
I’m going to try to make pita breads from this dough. I’ll let you know how it goes. If you’re developing any recipes for flatbreads like pita and naan, I’d be appreciative. Thanks for your wonderful site!
That’s awesome! I will definitely be working on pita and naan here in the future!
You’re scaring me, it’s like a parallel universe. I just finished my wood fired oven. It’s a tad larger, but danged if there isn’t parallel evolution going on. 😀
All the cool kids are doing it 🙂
Hi Maurizio. I’m just new to sourdough baking and your blog has been a great resource. One thing I’ve struggled with is when it’s best to refrigerate my dough and how long I can keep it refrigerated. If I wanted to adapt the timings here, would you recommend doing a long cold ferment after mixing the dough (i.e. keeping in the fridge for longer than the overnight proof you suggest), or after shaping the dough (i.e. placing back in the fridge overnight)? Appreciate your assistance
Nicole — either way will work well for this pizza dough. I would recommend, though, that you at least give your dough an hour or two at room temperature after mixing before placing it into the fridge. Then, once you have it in the fridge it should stay fine in there till the next day when you can remove it, divide it, and then either stick it in the fridge again or finish proofing it at room temp before cooking it.
Hope that helps, have fun!
Hey M! We have pizza the first night at the beach every year. My friends brought already topped gf crust pizzas they vacuum sealed and froze. Do you think I could do the same with this recipe? If I have enough time between now and when we leave in two weeks, I’d like to. I tend to be a minimalist on my toppings, but my friends pile theirs high with stuff! I’m reading another French cookbook and saw a recipe for shaved asparagus with carmelized onions za and that sounds fantastic to me!
Hey, Gina! I’ve heard from some readers who have frozen my pizza dough and it’s worked pretty well for them. I haven’t tried, this though, and I’m not sure how it would do under very long term storage (like 2 weeks). Really the best would be to test this out! Perhaps try that with a few of the balls and see how they do. My issue is every time I make pizza I need to use them all — everyone keeps eating, and eating, and eating 🙂
I’m lucky enough to have a wood fired pizza oven but I’m struggling to find a perfect dough recipe. Do you think I could substitute white 00 flour for the wheat flour in this recipe? Or do you think It’d be better to use your white flour pizza dough recipe?
You can definitely sub the whole wheat out and use white in this recipe. I’d go with a hydration similar to the one here and then change the flour blend as you wish — this hydration is more suited for an oven like my Roccbox or a wood fired one. Enjoy!
Wow, what an amazing recipe! Best pizza i’ve ever had… Thank you Maurizio for all of the amazing recipes, and all of the work you put in to this blog. After having had a bit of trouble with getting a propper rise, your posts have helped me gain back a healthy and bubbly starter. Keep up the good work and happy Baking.
Best reggards, Jonas.
Jonas thanks so much for the comments! I’m really happy to hear this recipe worked out so well for ya — happy baking!
You’re very welcome, Katie! I agree, it’d be pretty awesome to have pizza dough at the ready. Keep me posted!
First off, thank you for this blog and making baking so approachable! Second, comparing this recipe to the 10% whole wheat one, I see you left out the diastatic malt. Is this only because the higher percentage of whole wheat increases the amount of enzymatic activity in the mixed dough?
Yes, I found that I really didn’t need to add the malt due to the added whole wheat. Additionally, I’ve been testing more recently with my pizza dough and I’ve found I get just as nice a flavor without the malt — totally optional!
Hey, Karen! Yes, you should be able to lengthen the ferment in the fridge with no problem. I’ve pushed it to three days and had great results. I haven’t tried going 4, though — do you suggest that’ll help with leoparding even further? Do you do a bulk fermentation at room temp, shape, then cold proof for 4 days? I’m always looking for tests to do!
I’ve been playing with longer times the past week or so as well, the dough has been much, much nicer (you can see an example sourdough pizza here). Five days would probably be too much for this dough, as you said 🙂
Had to read this for a final, actually quite enjoyed it liked it alot, thanks for the good read.
Glad you enjoyed it! Happy baking 🙂
I’ve been using a fermentation schedule like this for a few months, but for the past few weeks I’ve tried something that I think I like even better. Maybe you’ll wanna try it! After the cold bulk, I pull the dough out of the fridge, shape, and out back in the fridge as individual dough balls for another day, but I’ve had success up to 5 days in the fridge. Then I take them out and let them warm up while getting the oven ready. It seems like a looooong cold proof lets the dough blister and get leoparding on the crust a lot better. Not to mention cooler dough is easier to shape and slide in the oven with less flour.
Hey! I really like this idea, it also give some increased flexibility with the schedule. I’ll give this a try when I have a warm-ish day coming up. Thanks for the suggestions!
Hi Maurizio,
Bought a Roccbox a couple weeks ago but have not received it yet. Can’t wait to give it a try!
Random question: Do you mind sharing where did you get the stoneware plate used in some of the photos? I really like it and am looking for plates to put my pizzas in since I currently don’t have any large plates in my house.
thanks!
Excellent! You’re going to love it 🙂 I got that stoneware plate from East Fork Pottery in the USA — they have amazing stuff and it can all be ordered via their website.
Enjoy!
Hi Maurizio,
Looking forward to trying out this recipe this weekend, have loved everything else I’ve made of yours! I’m wondering about adjusting this schedule for an evening bake. I’m thinking of following your schedule but putting the dough into the fridge from 9:30am-4:30pm. Then taking them out for room temperature proofing from 4:30pm-7:00pm, then beginning to shape and bake around 7:00pm. I’m wondering if the fridge proof would just put everything on pause and then allow the dough to pick back up once it comes out of the fridge at 4:30pm. Might that work or would you suggest something different?
Thanks!
Matt — I hope the pizza turned out well! Glad to hear your other bakes have gone awesome. Yes, I’d say that schedule should work just fine. Just keep an eye on the dough and if it looks like it’s fermenting too fast pop it back into the fridge (in shape) to cool it down and slow the timeline. Conversely, if the dough doesn’t look active enough and it’s sluggish, place your proofing container in the oven with the light on and it’ll heat things up just a bit.
Hope this helps and enjoy!
Thanks Maurizio! I followed that schedule and they turned out really great, really appreciate your work.
Hey Maurizio!
Great recipe! I’ve been using 00 Caputo flour for my pizzas, and I’m wondering what effect 00 dough in the firdge might have on fermentation.
I’ve found that when using 100% 00, after cold retarding, the final proof is incredibly slow, taking longer than I typically have time for. Then, when I use 50% AP, fermentation speeds up significantly. But then, when I skip the retard, even 00 flour seems to ferment at a reasonable rate.
Have you noticed a discrepancy between 00 and AP flours when given a cold retard?
Hey, thanks Matthew! That’s a very interesting conclusion, one that I’ve never actually seen myself. Typically “00” flour is the one of the lowest extraction flours you can get; only the finest particles make their way into that flour, meaning most likely there’s very little bran/germ left. I’d guess that maybe fermentation rates between AP and 00 would be different (AP probably has a small amount of other parts of the wheat berry present) given they are at different extraction percentages.
All that said, I’m not a miller so I’m just speculating here. Back to your question: I have not noticed a difference personally but now I’ll have to keep an eye out for this!
I actually think it turns out that my levain was just acting oddly. Season’s changing in Texas so I think things were too young one day and ripe enough the next. I’m seeing good results from 00 now.
Ok, great! Seasonal changes always throw a wrench in the process… Happy baking!
Thanks, Cynthia! You’re totally right on with that iPod Roccbox analogy. The oven is just too easy to use and you get amazing results to boot. I love the dang thing! I just did more pizza last night and dropped the hydro down to 63% for my white dough again — I think it was my best attempt yet. Strong dough but very, very crispy and light. I did let the dough rest in the fridge for longer this time, from 11pm to 5pm the next day. It sure was great dough! I’m looking forward to seeing your pies. Enjoy!!
Is the oven tall enough to do a loaf of bread? Thanks for the write up and recipe 😃
You’re very welcome! It’s not tall enough for one of my typical batard or boule shapes. I actually wouldn’t really use this oven for bread unless you were looking to do something like focaccia (it would be awesome for this), pita, or some other type of flat bread. This oven really is amazing for high fired applications, and it can be turned down (of course) to do other things, you just have to make sure the pan or whatever you’re sliding in will come out after it rises up in the oven. Again, this would be great for focaccia and I’ll be trying that out here at some point!
Hello! I was hoping I could get this for pizza and bread! We are moving into an RV for 12 months to travel and I can’t imagine not having homemade bread! Any insight on what to use while we are in the RV?
There are many ways to bake rustic style bread, all you need is a Dutch oven and campfire! This oven could make focaccia and flat bread really well, but I’m not sure I’d use it for a large hearth style loaf. It isn’t sealed up too well and heat management might be difficult.
Thanks for your input…now to get some money together 😉
Great post Maurizio and just what I needed after taking delivery of my Roccbox recently!! Would you mind answering a couple more specific questions?
– Do you top your pizza on the paddle or elsewhere and then slide/drag it onto the paddle?
– You mention pre-heating the Roccbox for 45 minutes, assume this is on max gas? Do you leave it burning on max when you slide the pizza in or do you reduce the (very fierce) flame?
– Can I proof the shaped balls in the fridge for, say, double the amount of time and have them ready in time for dinner rather than lunch?
Thanks again!
Very cool to hear you have one as well! Get ready to have some fun — and eat a lot of pizza 🙂 Great questions, answers below:
– I shape out the dough ball on a wooden block with flour, then I ladle on tomato sauce, place cheese and whatever other toppings while it’s sitting on the board. Then, I place the peel right next to and under an edge of the dough and drag the dough (and all the toppings) onto the peel. As long as your dough isn’t sticky on bottom it’ll drag just fine.
– Yes, I preheat the Roccbox on max temp with the gas option. I leave it at max temp while I make a few pies but you’ll notice at some point it’ll start to get a little too hot (or not, depending on how hot you want the oven), at that point I turn the temp down just a bit so the deck stays around 900°F.
– You could try proofing in the fridge but I don’t think it would work out exactly in that time frame. A typical home fridge is so, so cold it almost stops all activity in there. Most of the fermentation activity will happen when you first load your dough into the fridge until it cools down to 38-40°F. That said, I do use the fridge to slow things down all the time. You could try proofing them for a little while on the counter, then toss them into the fridge to stop things until you’re ready to make the pies.
Hope that helps and enjoy your oven!
i saw a trick once where a guy lifted one edge of the pie and quickly blew air under the dough. it actually works incredibly well for dragging dough onto a peel. acts like a mini pizza hovercraft. can’t wait to give sourdough pizza a try.
Hey that’s a pretty good idea!
Congratulations on the purchase of the oven! Roccbox is great!
And many thanks for recipe!
It sure is an awesome oven, I’m in love. You bet, enjoy!
Hi. Thanks for another detailed recipe and for recalibrating it for RA Bis. I just cant get my head around the percentage conversions even after trying a few recommended articles – can you suggest a link to a simple (?) explanation?
You bet, glad I could help. Have you checked out my Beginner’s Sourdough recipe? I have a section in there on Baker’s Math where I try to explain how to do these calculations. Also, there’s a link on that post to the King Arthur site where they have a really great explanation as well.
Hope that helps, let me know if it’s still confusing!
Thanks for another great recipe! The funny thing is I previously modified your sourdough pizza recipe for 30% regular WW and again later for 50% white WW (both versions worked well, but with a less puffy crust). The fam loves the puffiness of the 100% WF, but we really need that WW nutrition. I’ll try this version now.
One question: our oven gets up to 550 degF. With a pizza steel, our pizzas cook in 5-6 minutes. Does it really make a difference cooking at 900 degF for 2 minutes?
You’re very welcome! Sounds like we were both on the same track here with this dough. I do like the idea of using white ww as well, nice thought!
Making a pizza on the Baking Steel works extremely well, I’ve been super happy with things that way for a long, long while. I have to say that there is something extra gained by having a super high fired oven like this. The crust is thinner, crispier and softer at the same time. It just takes less time to cook and leaves more moisture in the dough. That said, both ways work very well and it just comes down to what tools you have at your disposal 😃
I can’t buy a Roccbox in Australia. 😳😳😳. Can’t wait to try this recipe. Looks fantastic.
Ah, that’s a bummer! I’m sure they will bring them there at some point. Hope you enjoy the recipe!
Looking forward to trying this Maurizio! I use my home oven and also my Uuni which is lot of fun but definitely for those who like to putter – it’s not foolproof. Congrats on your Roccbox!
I had looked at the Uuni before buying the Roccbox, it looks great as well but yet, a little more work involved. I’m shocked at how little prep and work this oven requires, it really does just let you focus on the dough and what toppings you want 🙂 Thanks and happy baking!
You know it was during the depths of winter when my husband spotted the Roccbox and I talked him out of it. Now I simply sit hear shaking my head asking why? why? what was I thinking?! Because pizza….it has been the cure for heartbreak, hangovers and a general overall malaise. It has been the means for celebrating young love, inducing labor, and celebrating the births of our loved ones. In general in our family… pizza is the language that speaks love over all!
Ha ha, love this! You’re so right, pizza is the magical cure all, I think so at least. We eat so much of it here and I’ve had it so often when growing up — it’s definitely a language of love 🙂
Happy baking!
Oh so happy for you…oh so jealous as well!!!! I could eat pizza every day for every meal (eggs and leftover pizza are a glorious thing) and love the addition of whole grains to the dough. I have tried 100% whole wheat pizza crusts before, but they come out much more like bread than a good, thin chewy crust. I’m going to definitely try this soon…alas (now your turn to be jealous) will be on vacation for 2 weeks starting this week and am bringing only the Einkorn flour wild yeast, Myrtle, with me.
I haven’t made it to 100% ww for pizza yet but I’m going to shortly. I was thinking of trying some other flour types as well (Kamut for sure, I’ve had this in Italy before) — lots of potential!
Ahh, have fun on vacation! And I’m sure Myrtle will serve you well 🙂 Enjoy!
Let me know how it goes when you do try. I have Kamut, Spelt, Rye, Red and White wheat grains all waiting to be milled for a great try for perfect pizza dough! And thanks for your well-wishes M! Myrtle’s baby is coming with us actually…I think my friends decided the baby’s name is Gretel. If i were also bringing a baby of Essie’s, I’d definitely name it Hansel! Lol
Simply awesome, both Pizza and the Toy…You got me thinking, again 😉
Thank you, Jinal! The oven sure is awesome, I can’t recommend it enough 🙂
you and your toys!!! 🙂
Can’t stop, won’t stop 😀
I have made this in my home oven, and it is as easy and delicious as posted. Thanks again Maurizio!
Thanks, Margie! I’d be lying if I told you I wasn’t making pizza again, tomorrow 🙃
I’ll be using a home oven. Since my math skills are not so good, can you recalibrate the recipe for me? or do I just make it 800 grams H2O?
You bet. I’d first try 71% hydration and see if it needs adjusting up/down from there.
00 Flour:     770g

WW Flour:     330g

Water:        780g

Salt:         27g

Starter:      132g
Enjoy!
LOVE learning from you! Question: I bake my za on the BBQ in pre-heated cast iron frying pans in the past with SE or Baking Steel no-knead recipes at around 500 deg F. on parchment. Should I use your pizza oven recipe or the 71% hydration scenario above? Using stoneground/fresh AP (for the white flour) and WW. After re-reading things I assume 71% but please confirm. Mother’s Day pizza for the family…
The 71% hydration worked well on the BBQ at 500 deg F. Pulled when the bottoms started burning in the cast iron pans and moved to cookie sheet in 400 deg oven to firm up crust. Family gave the pies 2 thumbs up!