
The goal of this weekend bread baking schedule is to help you get into a routine for baking fresh, healthy bread more often without having to worry about refreshing your sourdough starter during the week. Ok, I know it’s hard to bake a sourdough recipe every weekend, but I believe this post outlines a manageable schedule for fresh bread most weekends. It can be challenging to carve out time from our busy work schedule day after day to devote to sourdough starter maintenance—with two kids at home, believe me; I get it.
Help! I don’t have time for anything bread during the week, how can I ignore my starter most of the time and just bake on the weekends?
I get the above question a handful of times during the week, thus motivating me to put together this entire post. The key to reducing the maintenance required for a sourdough starter, of course, relies on using the home refrigerator. I’ve mentioned many times in the past that a starter can be placed into the fridge and taken out when needed, but given the number of questions, I think this sample schedule might give some concrete ideas and instructions for how it can be done and still make great bread—and even sourdough pancakes.
A high-level timeline goes something like this (click the link on each day to jump down to that day’s schedule):
| Day of Week | Action |
|---|---|
| Monday | The starter is in the fridge, resting. |
| Tuesday | The starter is in the fridge, resting. |
| Wednesday | The starter is in the fridge resting. |
| Thursday | Take the starter out of the fridge after work, let ferment for a few hours, and refresh at night. |
| Friday | Refresh starter in the morning before work. Feed again at night before bed. |
| Saturday | Build the levain early in the morning. Refresh the starter and let ferment all day until night. Mix the dough in the afternoon and bulk ferment in the afternoon/ evening. Shape the dough and place proofing baskets in the fridge overnight. At night make my sourdough starter discard pancake or waffle batter. Then, refresh the starter before placing it into the fridge. |
| Sunday | The starter is in the fridge resting. |
Most people are turned off by sourdough baking at home, primarily because of the overhead in dealing with a sourdough starter. It does indeed take a few minutes each day to care for but believe me, this is a weekend baking schedule that’s manageable and one that you can work right into life’s hustle.
First, let’s talk about what I refresh my starter with when I keep it in the fridge.
Starter Maintenance Refreshment Before Refrigeration
I like to slightly reduce the hydration at the refreshment right before placing my starter in the fridge. The lower hydration helps to reduce the fermentation activity slightly, and I prefer it a little on the stiff side, so it’s not quite so gooey when I take it out the following week.
Refreshment Process
Before placing my starter in the fridge (you might also want to label your Weck jar “Sourdough Starter” to avoid someone inadvertently throwing it out!):
- Using a ripe sourdough starter, discard down to 20g
- Refresh the starter with the ingredients listed in the table below
- Let sit on the counter for 30 minutes to 1 hour
- Place in fridge for up to 3 weeks (I’ve done up to 3 weeks using this method, but it might be possible to keep it in there even longer. In this case, I’d reduce the hydration even further.)
Refreshment Ingredients
| Weight | Ingredient | Baker’s Percentage |
|---|---|---|
| 20g | Ripe sourdough starter (100% hydration) | 20% |
| 100g | 30g whole rye or whole wheat flour, 70g white flour | 100% |
| 100g | Water, warm room temperature | 100% |
For more, see my in-depth look at how I feed my sourdough starter daily.
Dough Proofer
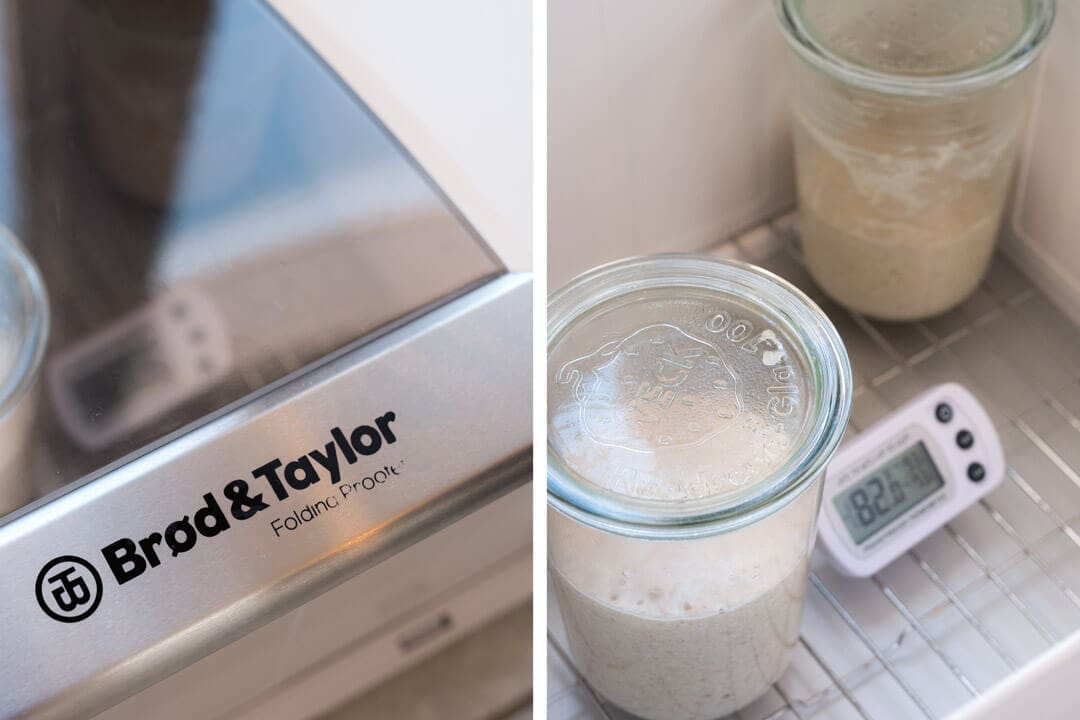
One tool I mention occasionally (and have been frequently asked about) is my proof box. In the past, I’ve considered building one of these on my own with a digital controller and ice chest, but in the end, I bought this Brød and Taylor dough proofer. It’s been plugged in and turned on ever since. I keep my starter in the box all day, every day, at just the right temperature—for me, that’s around 74-76°F (23-24°C).
Additionally, when making a levain for a single bake, I’ll place that in the center alongside my starter (also seen above). After I mix my dough, I can also easily fit my standard 2kg dough in the box, which is then also maintained at the right temperature during the entirety of bulk fermentation (the dough’s first rise).
The nice thing about this temperature-controlled box is that I can quickly get my starter back up to a warm temperature after taking it out of the fridge. Once I take it out, I place it into the proofer set to 76°F (24°C), and it will return to full activity in short order.
This proofer is one of those tools that help me achieve more consistency with each bake. If someone asks, I also keep a small thermometer next to my starter that tells me the current temperature at that spot and the highest and lowest temps recorded (handy to know if there were any spikes up or down).
See my post on using the Brød and Taylor proofer for more information. If it’s cold in your kitchen, refer to my guide on baking bread in the winter. Conversely, if it’s warm, my guide on how to bake bread in the summer will have tips for keeping your dough cool and under control.
Weekend Bread Baking Schedule: How do you schedule sourdough?
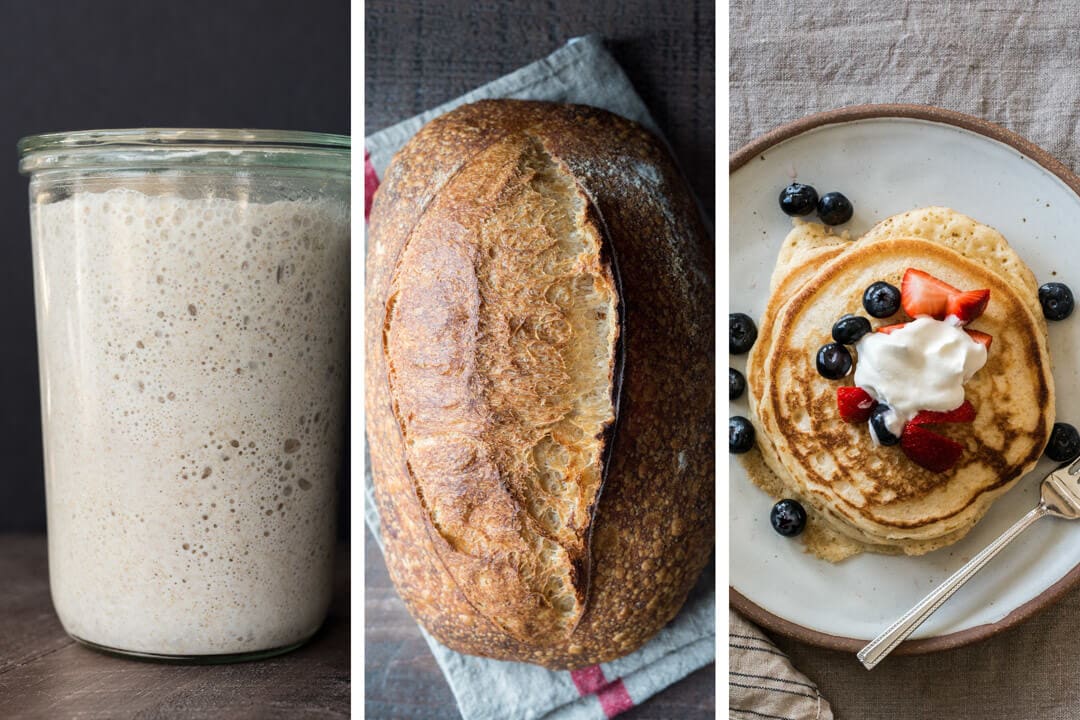
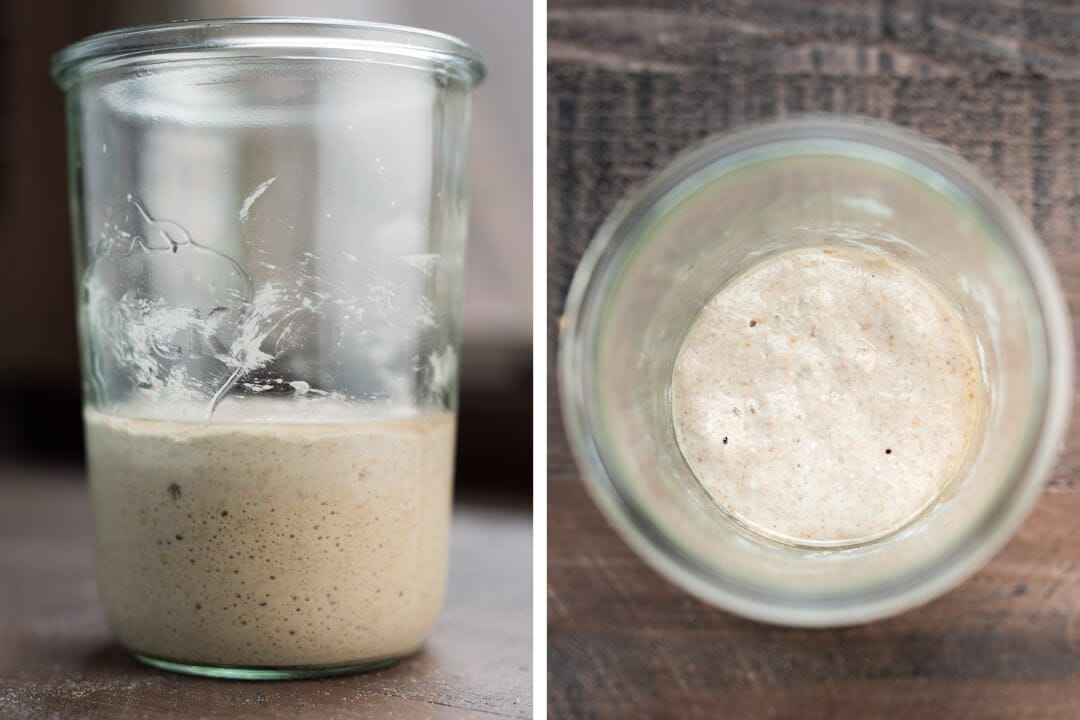
Before we begin, I want to show a picture of what my starter typically looks like when it’s at full strength, regularly receives refreshments, and I keep it at a warm temperature in my proofer:

Above, you can see the signs for vigorous fermentation: bubbles at the top and the sides, some rise height (it’s “peak,” as some bakers call it), and a loose and frothy consistency. My starter usually takes about 11-12 hours to get there using my typical refreshment (20g ripe starter, 100g flour, 100g water at room temperature) when it’s kept in my proofer at around 76ºF (24°C).
I followed the exact process I’m about to outline with my starter for a week, and I took photos of each step to illustrate the method better. In addition, I baked two loaves of Beginner’s Sourdough Bread and made sourdough pancakes to illustrate the effectiveness of my resuscitated starter. As a result, you’ll see my starter transition from states of high activity, reduced activity, “rest,” and the reverse when taken back out of the fridge. This progression will help me explain the cues and what to expect as your starter changes.
My stater performs best when given at least 2-3 refreshments after it’s taken out of the fridge but before being used to create a levain for baking.
Thursday
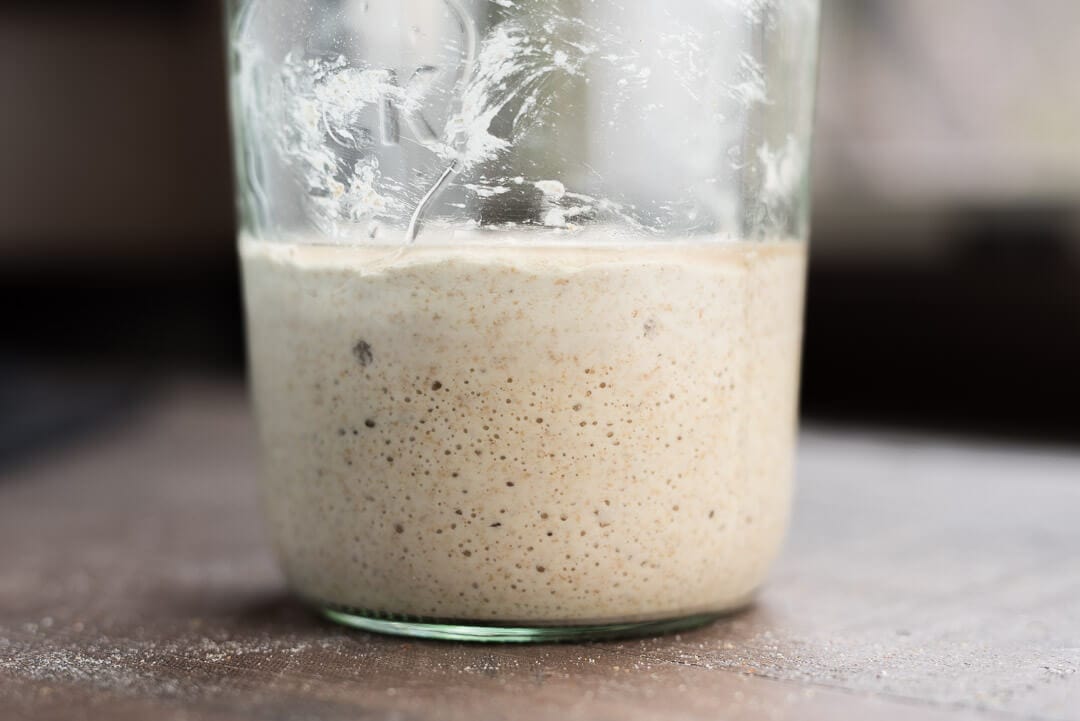
Our starter has been in the fridge for several days at this point (since last Saturday). Fermentation has continued, but it’s slowed due to the cold temperatures. Nonetheless, there will still be signs of fermentation (as seen above): some scattered bubbles and potentially a layer of thin liquid on the top that’s gathered. This liquid, sometimes called “hooch,” is a byproduct of fermentation and consists of alcohol. It’s not harmful, and I usually stir this down into the mixture during the first refreshment (you could also pour it off if you’d like).
Evening: Remove Starter from Fridge
When you get home from work, take your chilled starter out of the fridge and let it come to room temperature (or place it in a proofer set to warm temperature) for a couple of hours. I give mine enough time to warm up, become easier to stir, and potentially finish fermenting a bit longer.
You can see the transparent layer of liquid on top, some bubbles in the interior and on top, but overall nowhere near the vigor you’ll see in my starter when kept in my proofer.
Before going to bed, discard the contents of your jar down to 20g ripe starter and add 100g room temperature water and 100g flour (or your standard refreshment flour mixture). Place your starter in a warm location or a proofer, and let ferment until the morning.
Friday
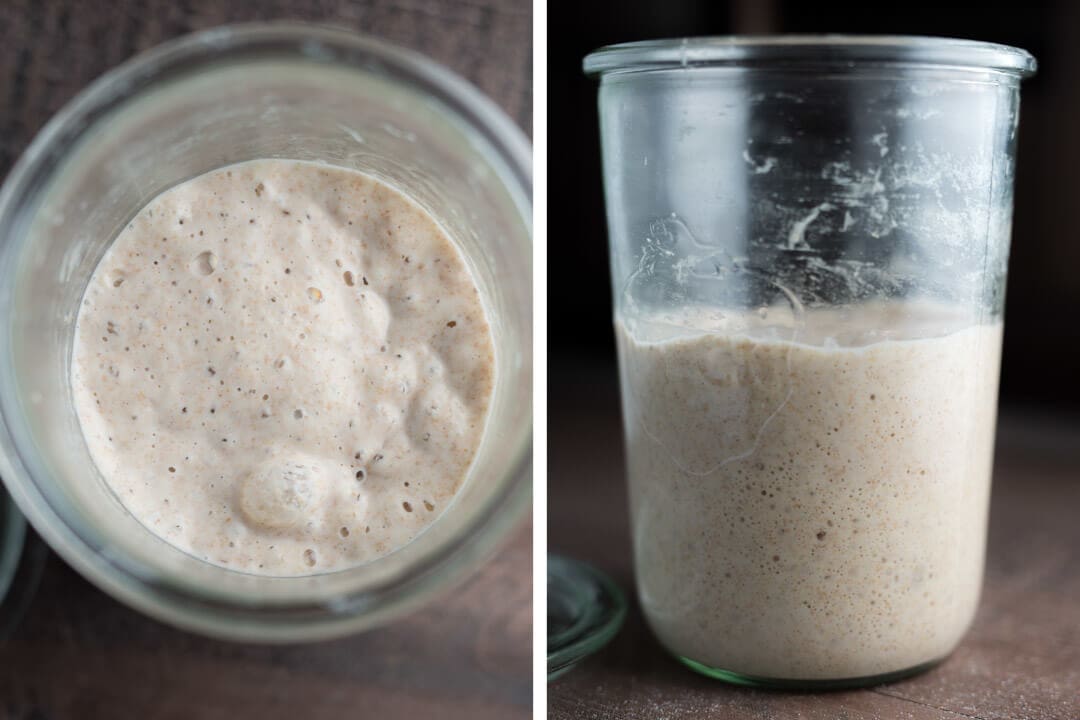
In the morning, you can see above that my starter is still a bit sluggish to rise and overall still not up to total activity (compare the above picture to the one at the beginning of the schedule). However, it has only had a single refreshment since you pulled it from the fridge, and with 24 more hours to ferment after this refreshment, we’ll see the activity pick up quite a bit by Saturday morning.
Morning: Refresh Starter
Before heading off to work, refresh your starter with whatever ratios you typically use to have your starter last for 12 hours before needing another refreshment. For me, I discard the contents of my starter container to 20g ripe starter and refresh with 100g flour and 100g water at room temperature. Then, stir, place the loose-fitting lid back on, and put the jar into your proofer or on the counter. Let ferment until later in the evening.

Evening: Refresh Starter
You’ll see that by the evening, your starter will display signs of even more vigorous fermentation—things are starting to pick back up to normal. So, in the evening, before bed (or when your starter needs refreshment), do a regular refreshment. I made the same refreshment as the morning.
In the morning, we’ll finally build a levain to mix the dough on Saturday.
Saturday
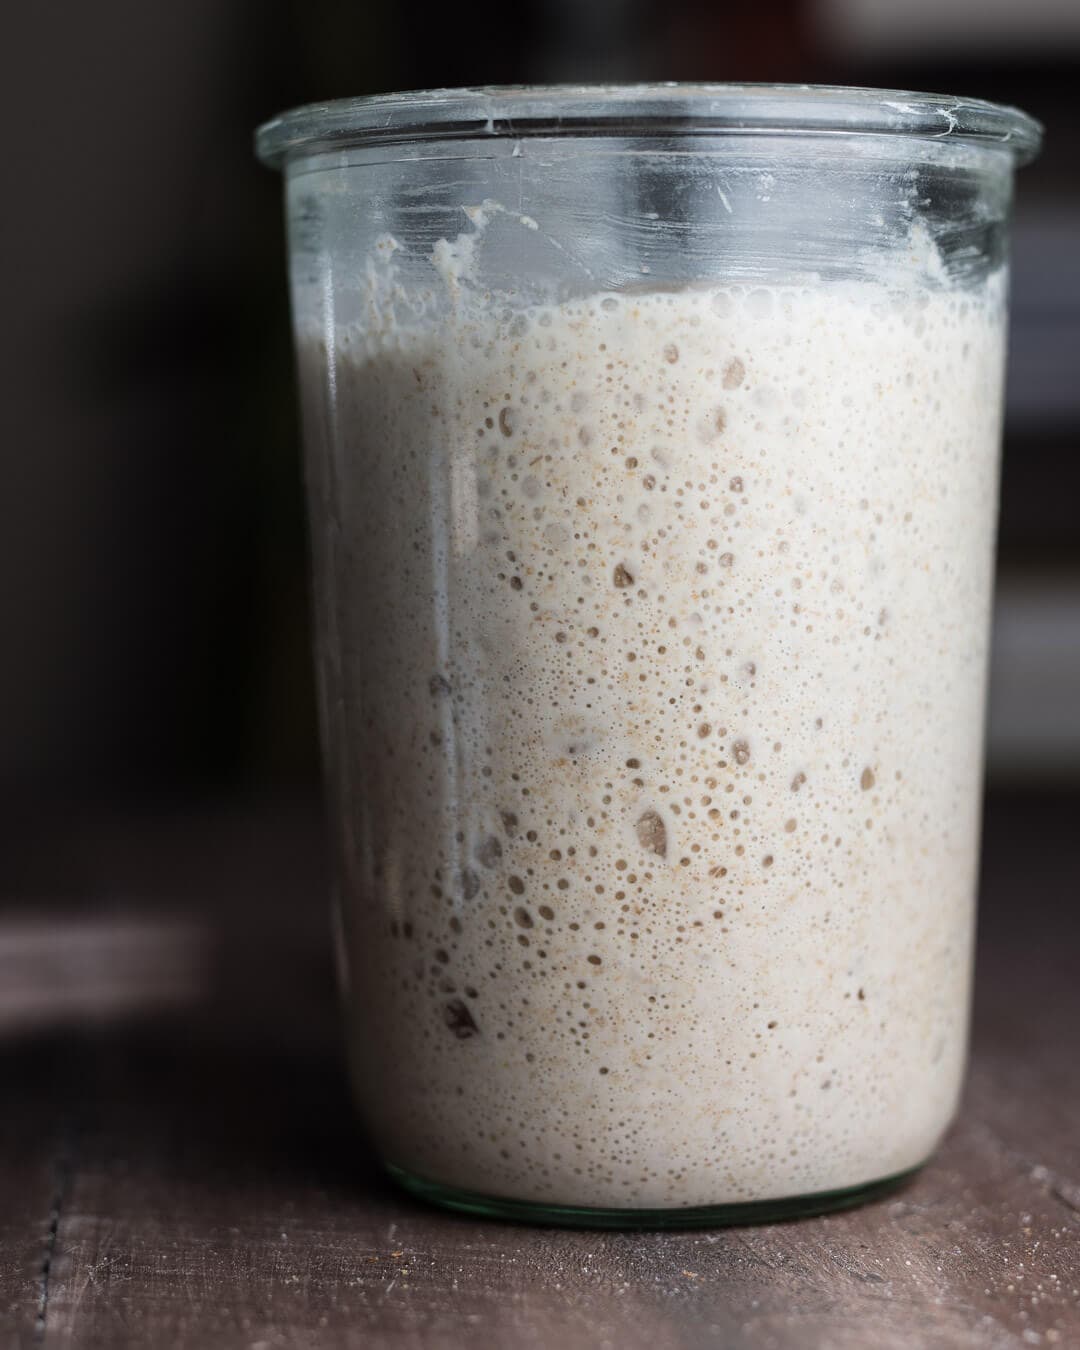
As seen above, my starter is back at full strength by Saturday morning. Super strong signs of fermentation occurred overnight with lots of bubbles, nearly the same height as usual, and a smell that’s ever so slightly sour and yet relatively mild—pleasantly reminiscent of creamy yogurt.
Morning: Build Levain
First thing in the morning, make a levain that will be used in a dough mix later that day. The recipe I decided to use here is based on my Beginner’s Sourdough Bread formula, but you could make a levain from any of the recipes here at my site.
After mixing a levain, place it in the proof box or somewhere warm in your kitchen, and let it ferment until it’s ready to be used later in the day. From there, autolyse (or not), mix, and continue to follow whatever bread recipe you’re baking.
Morning: Refresh Starter
After making a levain, refresh your starter and place it in the proofer or the counter until the evening. Why do we bother refreshing the starter? I do this to give my starter enough food to get through the day to nighttime, where I will prepare sourdough pancake batter for Sunday morning. If you want to skip making pancakes (why would you?), refresh your starter (as outlined Sunday morning, below) to prepare it for cold storage until next week.
Afternoon: Mix, Bulk, Pre-shape, Shape and Retard Dough
Proceed to follow whatever sourdough bread recipe you started this morning, then place the dough in the refrigerator for an overnight retard for increased flavor (you will bake the bread Sunday morning).
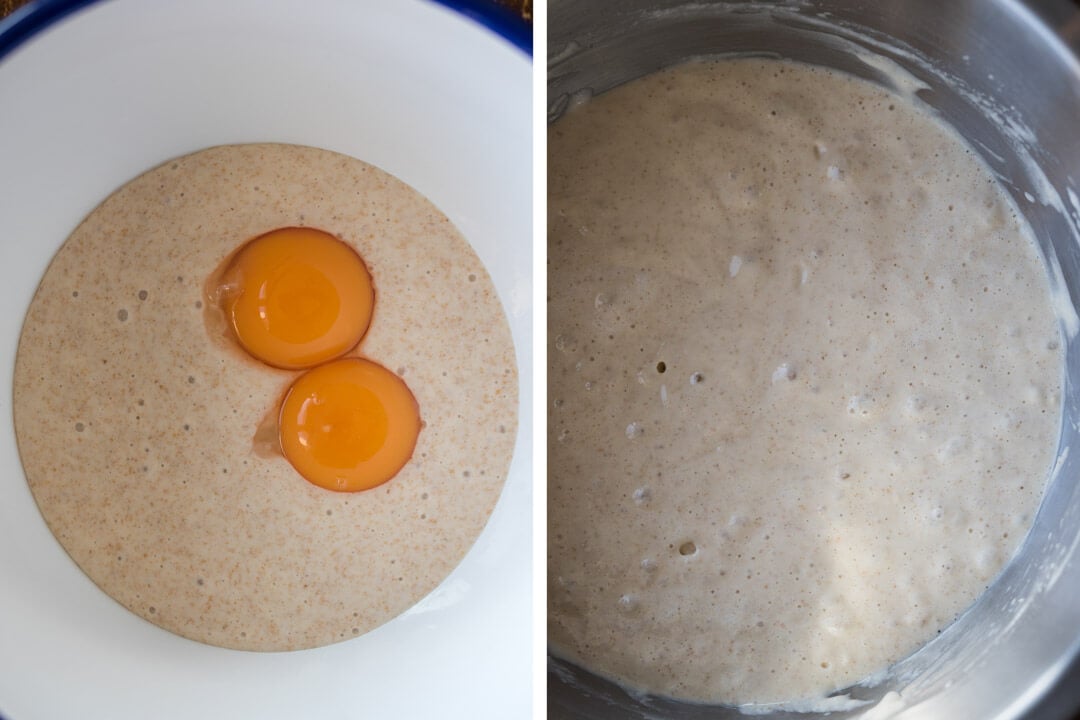
Evening: Make Pancake or Waffle Batter
If you feel like light and fluffy pancakes, use my overnight sourdough starter discard pancake recipe to make the pancake batter at night and let ferment until the morning. Alternatively, if you feel like something crunchier, make my overnight sourdough waffles.
Evening: Refresh Starter with Maintenance Ratios and Refrigerate
After making the pancake batter, refresh your starter using the maintenance ratios I described at the beginning of this post. Let sit out 30 minutes to 1 hour and then finally place back into the refrigerator until next week (or whenever you want to bake again).
Sunday

The past few days have built up to this final day, the day we get to enjoy not only fresh sourdough pancakes but also fresh sourdough bread later in the afternoon. Remember, at this point, your starter is in the fridge and resting until next week. So there’s no need for refreshment this morning.
Morning: Make Pancakes, Preheat Oven
In the morning, preheat the oven to prepare bread after breakfast. Additionally, get that smoking hot griddle (or 12″ steel skillet like I use) going and get ready to make some pancakes. Finish making the pancake batter, cut up some fresh fruit, and whip some heavy cream. Finally, make the sourdough pancakes and enjoy while the oven preheats.
Afternoon: Bake Bread
Continue to follow whatever bread recipe you started and bake the sourdough bread once the oven is preheated. Let cool and enjoy just in time for lunch. Again, your starter is still resting in the fridge, waiting until you want to bake again.
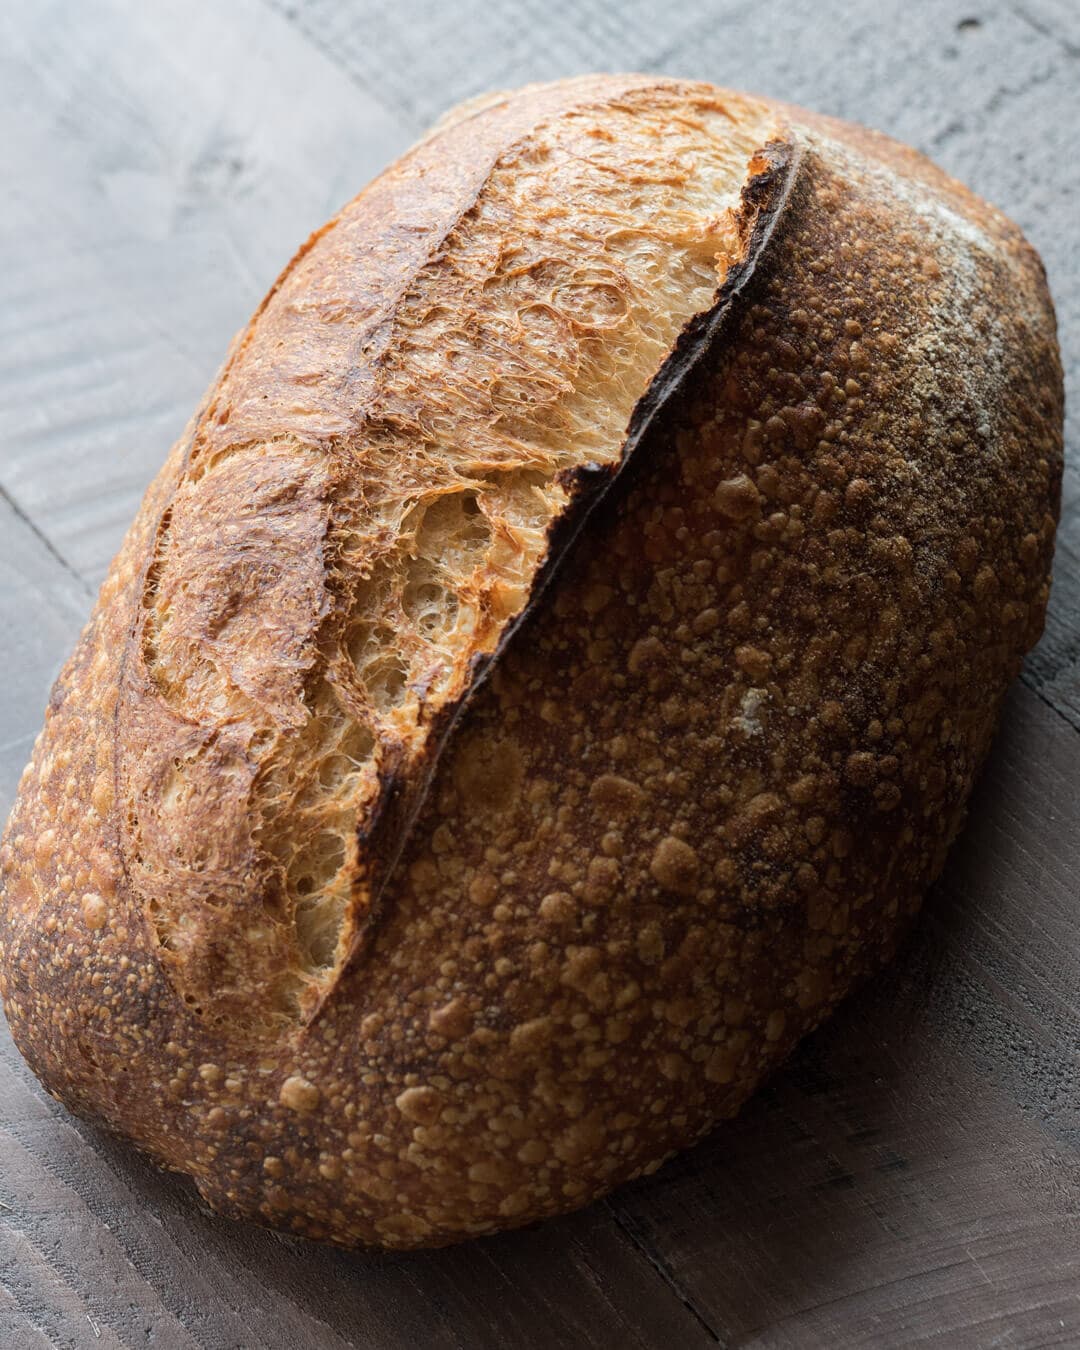
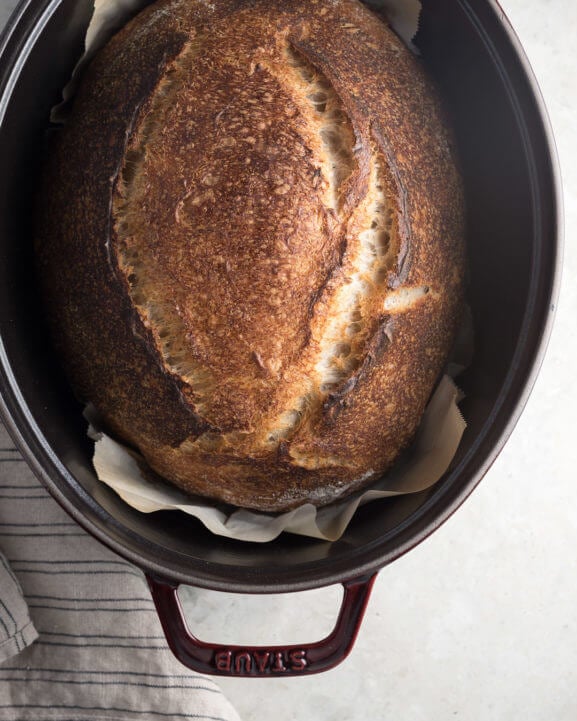
Lately, I’ve also been experimenting with baking my usual 900-950g batard shape (instead of being forced to make a boule in a combo cooker) in a 5.75 qt Staub Cocotte and, as seen above, the resulting bakes have been fantastic. The steam trapped inside is sufficient to blister the crust and the radiating heat from the cast iron colors the crust beautifully. I will continue using this, especially for single loaf bakes (it’s also pretty amazing in the kitchen for roast chicken!) when steaming the entire oven isn’t necessary.
Alternatively, you could use your typical Dutch oven or even the Challenger Bread Pan for long, oval loaves.
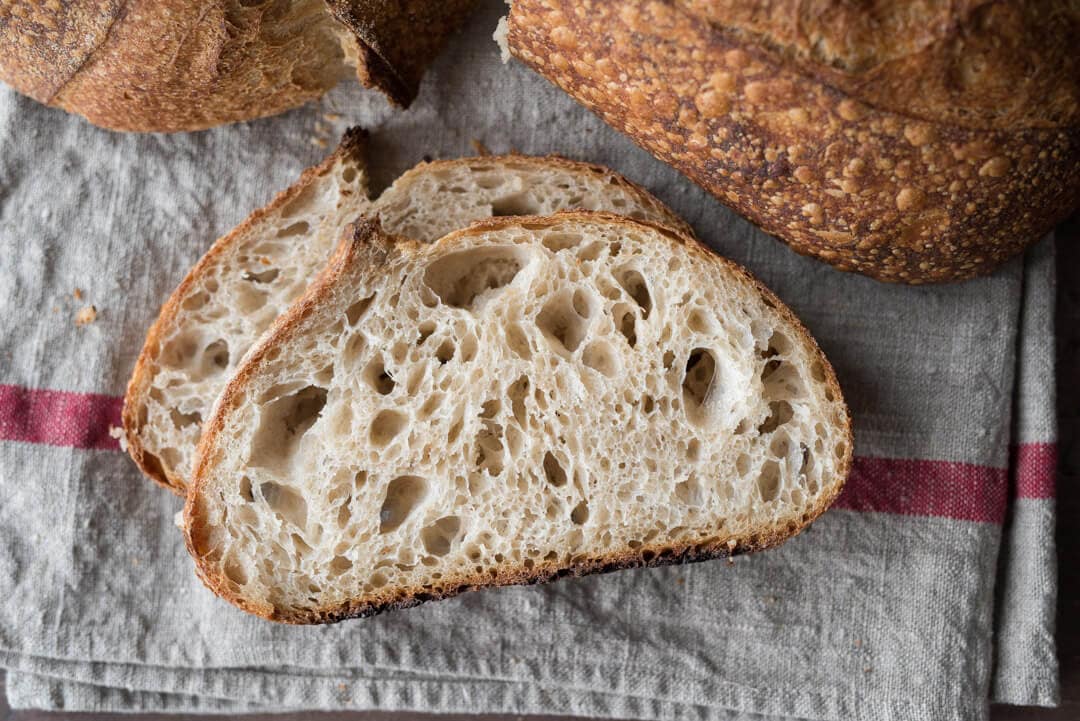
The various bread shots used my refrigerated starter throughout this post—all fantastic bakes! I’ve found using a schedule like this to help offset workload during busy weeks while still ensuring I enjoy fresh bread on the weekend and into the following week.
At first glance, this weekend baking schedule post might come across as packed with many steps, but the fridge does most of the work. This way, our starter only needs attention a few days at the end of the week, removing many maintenance refreshments while still allowing us to make great bread. The key is using the cold temperature of the fridge to slow fermentation Saturday through Thursday and then only three refreshments before baking. And while our starter is out for bread, we might as well make some sourdough pancakes that make the weekend go from great to excellent. Buon appetite!
Weekend bread baking schedule FAQ
How do you schedule sourdough?
In most cases, your starter can be kept in the fridge, taken out a day or two before you need to use it, given two to three feedings, then used to make a levain or mixed directly in the dough.
How can I increase my sourdough activity?
To increase sourdough starter activity, keep it at a warm temperature and give it timely feedings. I like to feed it every 12 hours and kept around 74-76°F (23-24°C).
How do I make my sourdough schedule fit?
In the end, this is a personal thing! Your starter can go 12 to 24 hours between feedings when kept at warm room temperature, and at each point when you feed it, it can be used to mix into bread dough. This gives you multiple opportunities throughout the day to make fresh sourdough bread.
What’s Next?
Now that you have a go-to method for a weekend bread baking schedule check out my weekday sourdough bread for when you want to try and squeeze a loaf of fresh sourdough in during the busy workweek.
If you use the tips in this post, tag @maurizio on Instagram and use the hashtag #theperfectloaf so I can take a look!


234 Comments
Hello Maurizio, I began my starter with a rye/all purpose mix. However, the weekend baking schedule and the beginners sourdough recipe calls for a whole wheat/all purpose mix. Is it okay that I switch the flour I use for the levian build from the rye mix to the whole wheat mix or should I stay consistent with rye?
Chris, it’s totally up to you. It’s ok if you change over to ww/apw or you can keep going with rye, either way works really well. There’s also no issue with changing flours abruptly one day, your starter will adjust just fine.
Hope that helps and happy baking!
Hello Maurizio, I have been following you on Instagram for some time and only now discovered this amazing site. I am a bread fanatic myself, recently totally switched to sourdough and loving it! Amazing enough I follow almost the same weekly routine as you describe here. Was so pleased to see that I am not alone on this planet 🙂
Hey, Victor! Thanks so much for the kind words and the note — it’s great to hear you’re following the same schedule! Super convenient and gives us plenty of fantastic bread, right?! 🙂
Happy baking!
Hello Maurizio, can you please retype the post on the beginners recipe because I’m having a problem understanding the way you wrote it on there I really appreciate it thank you so much..
Rosa, not sure what you’re asking? If you’re looking for my Beginner’s Sourdough recipe you can find it here: Beginner’s Sourdough Bread.
Maurizio Leo , Is this the recipe:-)
Levain:
40 grams Mature liquid starter (100% hydration
40 grams Stone ground Whole Wheat
40 grams Bread Flour or unbleached white flour
80 grams warm water/room temperature
Levain–8:00 a.m. Mix together everything called for in the “Levain Build” section above in a clean jar in the morning and store somewhere around 74-76ºF ambient for 5-6 hours.
Final dough:
748 grams bread flour or unbleached white flour
110 grams Stone ground Whole Wheat Flour
49 grams Dark rye flour
641 grams warm water plus 50 grams @ 90ºF
18 grams fine sea salt 184 grams Mature, liquid levain
Final dough – 12:00 p.m. Using your hands mix all the flour and most of the water (save 50g water for mix, later) called for in the “Dough Mix” section above in a bowl until all dry bits are hydrated. Cover the bowl and store somewhere warm (near your levain is convenient, 75ºF) for 1 hour.
Mix–1:00 p.m. Now add salt, 50 grams water, and levain to your already mixed flour & water (the autolysed dough). Mix thoroughly with your hands and do the pinch, Transfer dough to a tub or thick-walled bowl for bulk fermentation.
Bulk Fermentation–1:10 p.m. to 5:10 p.m. 76-82ºF about 4 hours. Perform 3 sets of stretch and folds during bulk, every 30 minutes, each set consists of 4 folds, after that third set of stretch and folds, let the dough rest the remainder of bulk fermentation.
Divide & Preshape – 5:15 p.m. Lightly flour the counter and dump the dough. With your bench knife divide the dough into two parts. Lightly flour your other hand and using both the knife and your hand turn each half of dough on the counter while lightly pulling the dough towards you forming a round circle. Cover with an inverted bowl or moist towel, let rest for 10 minutes. After, remove the towel or bowl and let the dough rest 10 more minutes exposed to air.
Shape – 5:35 p.m. Lightly flour the top of your dough rounds and counter. Working with one at a time, flip the round so the floured top is now down on the floured work surface. After shaping, let the dough rest on the bench for a few minutes and then place seam-side-up into a towel-lined kitchen bowl or baskets that are lightly dusted with white rice flour.
Proof – 5:40 p.m. to 9:30 a.m. Place your shaped dough in plastic bags, covered, let dough rest on the counter for 20 minutes. Then, put into the fridge 16 hours.
Next Morning: Preheat oven at 8:30 a.m. Preheat your combo cooker or Dutch oven inside your oven for 1 hour at 500ºF. If you’re using a combo cooker, place the shallow side face up on one side and the heavier, deep side, face-down on the other.
Now turn oven down to 475ºF and bake for 20 minutes. After 20 minutes, very carefully remove the top, large part of the combo cooker. Leave the large side of the combo cooker in the oven to the side of the shallow part. Close the door and turn the oven down to 450ºF, bake for 30 more minutes, until the loaf looks well cooked, use your thermometer to test the internal temperature, it should register 212ºF.
Maurizio,
I’ve had no luck with the getting the elusive, gorgeous blisters on my sourdough loaves. I’ve spritzed them and never any luck. Any advice?
I find the blisters are a combination of things. The first is to use very little dusting flour in your baskets used for proofing, Next, you want to have sufficient fermentation in the dough (the blisters are, after all, a sign of fermentation). From there you need to make sure the dough is shaped tight enough so the outer skin on the dough is taut and strong, if your dough is insufficiently shaped or over proofed this could compromise the chance for getting blisters. And last you need a hot oven and a very moist environment at the beginning of the bake (ample steam in the oven and a spritz or two on the dough helps quite a bit).
Hope that helps!
Hi Maurizio. I just wanted to say thank you for reigniting my love of baking! Baking sourdough bread has always been on my bucket list but I was always too intimidated to try my hand at it until I came across your site. I followed your weekend baking schedule and made my first loaves last weekend and they were amazing! So inspired to tackle more of your recipes!
Ahh really glad to hear that, Michelle! I’m super glad my site has helped — happy baking!
Hello Maurizio, you talk about the cookies to add 1 cup of starter, when do you mix it in?
Hi Maurizio again, jut want to ask you about the (tartaine bread ) book, on pg. 275/ the Leavened Waffles , have you made them before and what do they taste like????
I have not tried making them but I should!
Maurizio, I have a Cuisinart cast iron Dutch oven, can it go up to 500F or what do you think because I’m not sure..
The actual pot should be fine but sometimes the handle on top cannot exceed 475ºF or so. You should check the website for your pot and see, it will certainly list the maximum temperature.
Ok????
Hi Maurizio, it Rosa, you talk about about the overnight sourdough starter for the pancakes, so do you mean at the very end put in the whipped egg whites or after the baking soda and salt?????
Hey! Fold the egg whites in at the very end, the very last thing you do before making the pancakes. Gently fold them in until you don’t see any white remaining but don’t over mix.
Ok sweetie, ????
Hey Maurizio! I love your blog: the pictures, the recipes, the colours,… all of it!! So much, that I actually went all the way back and read all of your posts hahaha. 🙂 I’m trying to tackle the art of sourdough bread (been at it for about a month an a half now) and I’m slooooooooowly getting there. Beginner’s SD was a success, but the Best SD recipe left me with a watery shapeless blob all over my counter (oh well). 😀 Thank you and I’m looking forward to new recipes/advice/posts. 🙂
Hey, Lea! Thanks so much, I really appreciate that. Sourdough takes a bit of effort but I’d say just about each time you bake the result is at least delicious 🙂 It sounds like my Best SD recipe was too high of a hydration for the flour you’re using. I’d scale back the water next bake 10-15% and see if that helps!
Happy baking!
That’s true, it’s worth all the wait and all the mess on the counter (I think flour is already embedded in every single nook and cranny in the kitchen). 😀 Thank you for the advice, will try it with my next batch! o/
Maurizio, sorry, two more questions 🙂 – is there any indicator/factor by which we can judge which type flour can take a higher amount of water and which one can’t? And can we spot that early on in the process, since it’s not good to add more flour after pre-shaping (when you figure out that it is just a shapeless blob)?
Generally whole grains and flour that has higher protein (like bread flour) can take on more water (again, generally). The best way to test this for sure is to mix it up and see! Hold back some water, I like to hold back 10-20%, and add it in slowly through the entirety of mixing and feel how the dough changes with each addition. As we know, it’s easy to add water in but impossible to take it out 🙂
You almost always can tell by the end of mixing if you’ve over hydrated: the dough will feel very, very slack with almost no strength to it — kind of like a soup. Sometimes even then you can rescue the dough with lots of folds during bulk but sometimes the flour just cannot handle the hydration. In all my years of baking I’ve probably run into this issue only two or three times where I couldn’t save the dough.
I usually advise people to try and stick with a single flour for a few bakes in a row. This way, you can adjust the hydration and kneading/strengthening during bulk with each bake and see how far you can take things.
Hope that helps!
Yep, thought as much. 🙂 I’ve read it on forums as well (but thought to ask you as well, since you always have such beautiful doughs) and they all agree that higher protein flour takes more water, but like you said, not in all cases. It’s a matter of trial and error.
Yes, I completely agree! I think that one option of saving the dough is using a mixer instead of your hands, but at the same time risking losing all those precious bubbles and overworking it.
I manage to save it this time, because I baked it in my pan, which is veeeeeeery forgiving. 😀 You can throw in any sort of watery blob and it will still have a beautiful shape in the end. But I’d like to rely more on making it hold its shape from the beginning and not just in a pan. 🙂 I guess it will come with trial and error, using the same recipe and flour for a while.
Something I’d like to learn (my long-term goal) would be learning how to make bread without a recipe from scratch and knowing how much starter and other ingredients to use. At that point I think I’ll have my foot in the intermediate baker’s door hahaha. 😀
Thanks again! 🙂
You’re right, a tin is such a wonderful tool! If the dough is crazy wet and sloppy, you can always shape it as tight as possible and do whatever it takes to get it in there — you’ll have a wonderful loaf of sandwich bread every time 🙂
Making up formulas from scratch comes with time, you’ll get there I’m sure of it!
Happy baking 🙂
Hi, first off, thank you for your amazing blog. Absolutely love it, I have made some fantastic bread using your recipes.
I have question regarding scoring and transferring your proofed dough to the dutch oven and baking. I have a high walled dutch oven and I find it somewhat tricky deciding when to score, how to transfer the dough into it without damaging it and what order is best. What have you found being the best method? Currently I’m scoring pre transfer and then using a baking sheet to transfer the dough. I feel like this somewhat ruins the integrity of the shaping, this might be poor shaping on my part though..
You’re very welcome, Petter! Glad to hear you’ve had some awesome bakes. When I use a high-walled Dutch oven I do the same: I score the dough before dropping it into the DO. What I do, though, is I turn out my dough onto a piece of parchment paper that’s cut so it acts kind of like a “sling” (to it doesn’t ruffle up too much on the edges when it’s in the pot). After I turn the dough out onto the paper, I score it and quickly and gently (and carefully because it’s hot!) lower it into the DO.
Hope that helps!
Hello! Thank you for your post! I want to begin building my starter but I go to school at 7am and I usually only get home at 7pm. This is going to be a problem especially when I start feeding it more than twice daily… plus I live in a really warm climate so I really need to monitor the starter closely. Do you think I can bring it to school and feed it there (once it starts needing more than two feedings)? Will all the moving around affect it? It will be at room temperature all the time.
You bet, Megan! You can bring it to school if you’d like, sure. I don’t like to jostle mine around too much but I wouldn’t think it would be a huge problem. It might be an inconvenience though! You could try reducing the amount of mature starter left in your jar to a really small amount, perhaps even 5g, and this way it should last until you get home. Place it into a cooler spot in your kitchen if you need to slow things down even further.
Hope that helps!
If I slow it down does that mean the starter won’t be very strong for the bake? I’ve stored the starter in a dark cupboard for the time being.
No, not at all. Just be sure to refresh and use the starter when it’s mature (as described above).
Hah! It’s ok, this is totally normal in the beginning 🙂
Hope the bake went well! A big part of making fresh bread, and sourdough especially, is scheduling. With some pre-planning we can make things easier but it still does require time throughout the day to check in with the dough, even if we’re not actually doing much during the entire process. My wife can attest that sometimes she gets annoyed with me because I need to “turn the dough in 30 minutes” — hah!
Ah very cool! I chatted with them at Barton Springs a bit on Instagram a while back, they are up to some awesome stuff!
What an awesome bake, Glenn!
Hi Maurizio,
I’ve made some fantastic loaves following your recipes. Thank you!
I’m having trouble shaping my batards- specifically, once I turn them out onto my combo cooker’s surface, they lose all their shape and go flat, baking up to be a semi-longer boule rather than the batard shape. I do the folds in intervals, and give the dough a 20 minute bench rest. Any ideas what I could be doing wrong here?
You’re welcome, glad to hear that Andreas! Sounds like you might not be imparting a tight enough skin on the dough during shaping. But further than that, it might just be because the combo cooker is more of a round shape than oval. I’d try to go for an even tighter batard shape if you can, here’s a video of me shaping a batard. Hope that helps!
Hi
I love the idea of sourdough bread, but find it a bit to sour, is there a way to reduce the sourness.
Many thanks
Hi! My bread has very little sourness overall. I find with proper maintenance of your starter (frequent feedings with large discards, as I describe on my starter maintenance page), a small levain percentage in the dough (I am usually at 10-15% or so, sometimes a little higher) and a final proof that’s not overly long the resulting bread is not overly sour in any way. One additional important factor is the timing when you use your starter to build your levain, and when you use your levain in your dough. You want to time both of these just right so they are not overly “ripe” (lots of fermentation, very acidic). Try to use them just before they get to the point where they rise up to their peak and will start to fall in the jar.
Hope this helps!
Maurizio
Thank you so much for your reply, I shall have another try, I love baking bread and look forward to getting successful with sourdough
Hey Maurizio! This is a great new update! I have been finding myself shifting toward some of these changes in my maintenance routine as well in the last few months. I am curious though.. I just got a brod and taylor proofer and am a bit confused about what temp to set mine at. You usually go by ambient temp, but in order to get the proofer to the correct ambient temp I find I have to crank the temperature setting way higher on the proofer. In the manual is states that the temperature setting will keep whatever is in the proofer at that temp through “radiative heating” so I’m worried that turning the temp too high will affect fermentation. What do you usually do?
Hey Fabiano! I’ve noticed through extensive usage of the B&T proofer that the temp you input on the controls doesn’t always match what’s inside the unit, that’s why I recommend placing that little thermometer inside next to your starter/levain/dough. I’ve found, with mine at least, a reading of 76ºF on the unit means an interior temp in the center to be around 81-82ºF. This is where i keep mine almost all the time, just a bit above 80ºF is where I want to be for my starter and my dough. I really try to avoid cranking the temp up then reducing it and so on, that causes some temp spikes inside there for sure.
Hope that helps!
This is very helpful information. Thank you!
You’re very welcome, Karen!
Excellent. I’m a beginner, and so lucky to have found your blog! I and enjoying the journey of sourdough baking thanks to your wonderful descriptions. I followed your recipe for making your own starter. It’s coming along nicely! Thank you!
Glad you’re enjoying my site, Michelle! Sounds like you’re off to a great start, enjoy and happy baking 🙂
Hi Maurizio,
This is a very helpful post! I have already been following a similar schedule but may tweak it closer to this to see if I can improve my starter strength.
I just have a question about the starter itself, mine is almost 4 months old and I am getting good results. I made it according to your “7 steps” post and use a mix of AP and rye flour for feedings, reducing to 40g starter and feeding 40g flour mix and 40g water. I notice in this post that you maintain your starter with a larger reduction of starter (down to 15g) and feed a much larger amount of flour and water (100g). Is this something I should try with mine now that it is established and strong?
Thanks so much!
John — my reason for using less starter and giving it more flour is to lengthen the time before I need to feed it again. It all depends on your schedule. For me and my starter in my proofing box at a warm temp, those are the ratios that work best. The key is always to time things just right with your starter so it matures right when you are about to feed it. I am constantly tweaking those numbers to lengthen or shorten the interval between feedings. So to answer your question: you can try it out and see if that works for you but ultimately change the ratios to suit your schedule and your starter!
Hope that helps 🙂
What a wonderful post! Thank you for taking the time to put this together.
You’re welcome, Connie! Happy baking 🙂
Maurizio – thanks for posting this schedule. My work schedule is pretty crazy so this is how I’ve had to bake since I started about a year ago.
Since I am relatively new to this I have wanted to maximize my weekend baking opportunities to allow for more trial and error. I have been building my levain over night, mixing / bulking in the morning, and doing a ~3 hr warm proof in the afternoon so that I can bake in the afternoon around 4 or 5 and have bread with dinner Saturday. Then I can either do it all again Sunday, or make a larger batch Saturday and retard a couple of loaves to bake Sunday. I’m sure I am making some sacrifices in flavor and texture, but I think the accelerated schedule lets me get the extra reps I need.
Just wanted to throw this out there in case it helps anyone. I need to try those pancakes now!
You’re very welcome, Sam! What you’re doing sounds totally fine, and doing two bakes a week is a nice thing indeed. The benefit of your approach is you’ll get exposure to dough that’s prepared in two different ways which can sometimes lead to faster discoveries (as I call them).
Thanks for the comments!
I follow similar process and it actually works for any day. Just need to combine it with job schedule. I usually make levain in the morning and after the job prepare dough. At the evening I just put it in a fridge and bake next day before going to work. Great post – need to try pancakes ????
Yes, that will work very well! Baking sourdough is as much about trying to fit it into your schedule as it is the rest of the process 🙂 Thanks so much and enjoy those pancakes, they’re awesome!
Fantastic photos! Love your blog. Your process is very clearly outlined here, and I think I can do this!
How many hours is that pancake batter proofing with the raw eggs in it? I’m NOT one of those that worries in any way over whole eggs sitting out – we have had chickens for years, never refrigerated our eggs, an have never had one go bad. In Europe they rarely refrigerate eggs.
Once they are cracked it’s usually a different story though. Eggs seem to go bad very quickly once they are cracked. Have you ever had that batter sit around longer than you intended, and did you still use it? Does the fermentation of the batter protect from pathogens in some way?
Morgana, thanks so much, I really appreciate that! You know, you’re right about the egg comment. Even though I’ve done this many times it’s safer to NOT add the eggs and let them sit overnight. In the US eggs are washed after they are harvested which removes the protective coating and can cause issues if left out of the fridge (this washing doesn’t happen in Europe or usually with local eggs).
I’m going to modify the post to make it clear to add the eggs in the morning and not the night before, just to be safe! Thanks so much for pointing that out.
So I made a mistake! I’ve actually been making my sourdough waffle recipe this entire time without even thinking about it. I’ve been using the overnight sourdough waffle batter as my sourdough pancake base — that batter does not leave the eggs out on the counter overnight, just buttermilk and the sourdough starter (there’s enough acidity in there to be safe). Glad I double checked this, thanks again. I’ve updated the post above to make it clear to use my waffle batter, not pancake batter 🙂
Thanks Maurizio for taking the time to document and explain all of this! Sent it straight off to a new SD baker 🙂
You’re very welcome Margie and thanks for spreading the word! Hope it helps 🙂
Hi Maurizio,
I’ve noticed the combo cooker you are using is the lodge llc3. If that’s the case I just wanted to point out that it bakes batards very well, given your proofing basket is the medium 10″ length. I find it easier for scoring and free form baking.
Yes! The round Lodge I have also work very well for shorter batards. This loaf was a larger 900g batard proofed in a 14″ basket (it didn’t proof all the way out to the edges, though). It might have fit in the Lodge but it would be a tight fit! Thanks for the comments, I do love my Lodge as well.
hi Maurizio, just like to know about the sourdough pancake , the last pictue of the pancake are they do with whole wheat??
I usually make these pancakes with whole wheat, yes (usually whole white wheat or fresh milled sonora), but the ones pictured here are 100% all purpose white flour.
Thank you so much Maurizio, I just need someone else to say yes you can use white whole wheat, 50%? Right..
Sure, 50% works. I usually do 100% whole white wheat!
Oh ok , so do you mean 1/2 cup or 3/4 cup of white whole wheat. .????
You can use any ratio you’d like — my favorite is just all white whole wheat.