
Walnuts, being some of my favorite nuts, are used all over the place in my kitchen: banana bread, oatmeal for breakfast, a yogurt snack with strawberries and cinnamon, tomato and avocado salad with arugula, dried cherries & figs, and of course, my 100% whole wheat walnut loaf. And the list goes on. Perusing through Tartine Bread the other day, I stumbled on Chad’s Tartine Country Walnut Sourdough recipe. I thought walnuts in my sourdough bread sounded incredible (and walnuts with cranberries, even better), and thus the impetus for this journal entry.
While the recipe calls for unshelled walnuts, I couldn’t find them in my area for the life of me. After searching for a few days, and at a few different markets, I had to settle for shelled walnuts eventually. A little bit of a spoiler here, but the resulting loaves from this bake are genuinely exceptional; however, I think with roasted and unshelled walnuts, the flavor would be even more rich and complex. I ended up roasting the shelled walnuts in the oven, and because they don’t have a shell, it was easy to overdo it. Watch those walnuts like a hawk, and I’d venture to say even under roast them by a few minutes to stay safe.

Prepare the leaven – 10:00pm
In my typical fashion, I start the process with a 100% whole wheat leaven. My starter just loves whole wheat flour and shows some real activity by the morning it’s very easy to tell when it’s ripe and ready to mix. The night before, mix and set out covered:
- 55g ripe starter
- 200g whole wheat flour
- 200g water
Once your leaven is mixed, get some rest and we’ll start in the morning.
Mix the flour and water, autolyse – 7:30am
A little bit of a late start to my Sunday morning, but you can’t blame me for wanting to sleep in just a bit. I typically work at home a little on the weekends and try to plan things so I can tend to making bread when I take frequent breaks. This Sunday was no exception. Between typing on a keyboard and doing design work in Photoshop, I was giving my dough a turn here and there. The dog is always at my heels asking to play, but there’s bread to start, espresso to drink, and a little work to do. She’s just going to have to wait until later in the afternoon — trust me, she just sleeps comfortably without a worry until then.

Upon waking, check your leaven’s progress, you want it to be a little bubbly on top and, if you used a glass container, tiny little visible air pockets throughout. If you see these signs, and after pulling back a little bit with your finger, there is a slight smell of ripe fruit, you’re set to mix your dough.
Alternatively, many will use Chad’s “float test” to determine when the leaven is ready. Grab a small glass of room temperature water and toss in a small chunk of your leaven. If it floats there’s a good chance it’s ready to go. Essentially the yeast has created enough small air bubbles and pockets in the leaven to keep it afloat. I stopped doing this method a while ago after I was able to visually tell when things had progressed enough to have high fermentation activity in my dough.
Gather your ingredients and get ready to do some mixing.
Ingredients:
- 250g (25%) of your new leaven
- 900g (90%) white bread flour
- 100g (10%) whole wheat bread flour
- 20g (2%) salt
- 700g water for Step 2, and 50g water (75%) in reserve for step 5
- 2 cups walnuts (preferably unshelled but this recipe uses shelled)
Method:
Walnut Prep:
- Preheat your oven to 400°F (200°C)
- Break up the walnuts to your preference and spread on a baking sheet
- Bake for about 8-10 minutes until they just start to turn a darker brown
- Set out to cool
Dough:
- Add 250g of your leaven to a large mixing bowl
- Pour in 700g water and mix with your hands until the leaven is completely dissolved and bubbly
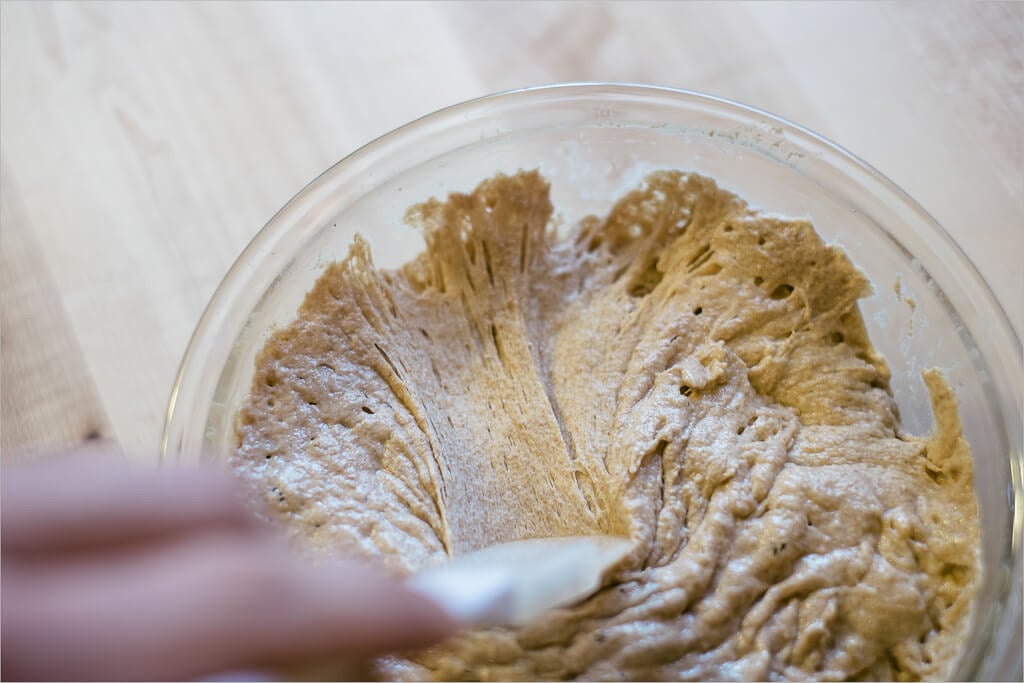
- Add 900g white flour and 100g whole wheat flour and mix with your hand until all the dry flour is wet
- Cover your bowl with a towel and let it autolyse for 40 minutes
- After 40 minutes, add the salt to the dough and slowly pour your reserved, 50g water on top. Squeeze the dough with your hand to incorporate the salt throughout
- Now reach your hand under the dough and pull the side up and over onto itself. I’ve started doing this step a bit more vigorously these days and do it until the dough really comes together and becomes sticky. I believe this adds a bit more strength to the dough early on
- Transfer your dough to a bowl or container large enough to hold the mass of dough, plus all those walnuts you’re going to incorporate. Set your timer for 30 minutes
Final dough temp was 76°F (24°C). See my post on the importance of dough temperature for why monitoring this temperature is important.
Bulk Fermentation – 8:45am
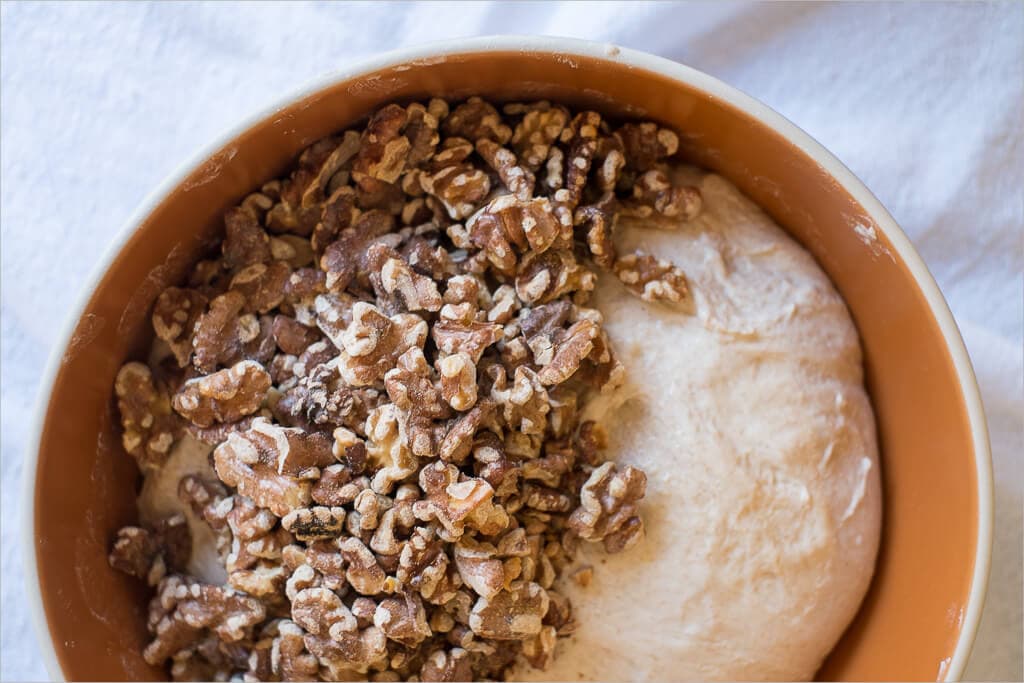
During the bulk fermentation step you want to do 6 turns spaced out 30 minutes apart. The first 4 turns should be vigorous, you really want to grab the dough from the bottom of the container, pull it up high, and then tuck it in on the other side. The last turn, number 6, will be a more gentle turn as we don’t want to knock out the air pockets that have formed thus far. We will add in our toasted walnuts after doing the second turn.
- 9:15am – Turn 1
- 9:45am – Turn 2 (After the second turn is complete, add all your walnuts and mix them into the dough by cutting them in the dough with your fingers. If things feel a bit dry, add just a tad of water. )
- 10:15am – Turn 3
- 10:45am – Turn 4
- 11:15am – Turn 5
- 11:45am – Turn 6 (this turn should be done gently)
- 11:45am – 3:00pm – Rest on counter untouched
This weekend was one of the first where I could feel winter starting to show its cold face. No more waking up at 6:00 am to go running in the warm sunrise, more like 10:00 am after the sun has been up a few hours to heat things up. Colder weather means for longer bulk times so watch your dough and adjust as necessary. For me, this means I might have a little more time after my usual few hours of untouched bulk time sitting on the counter.
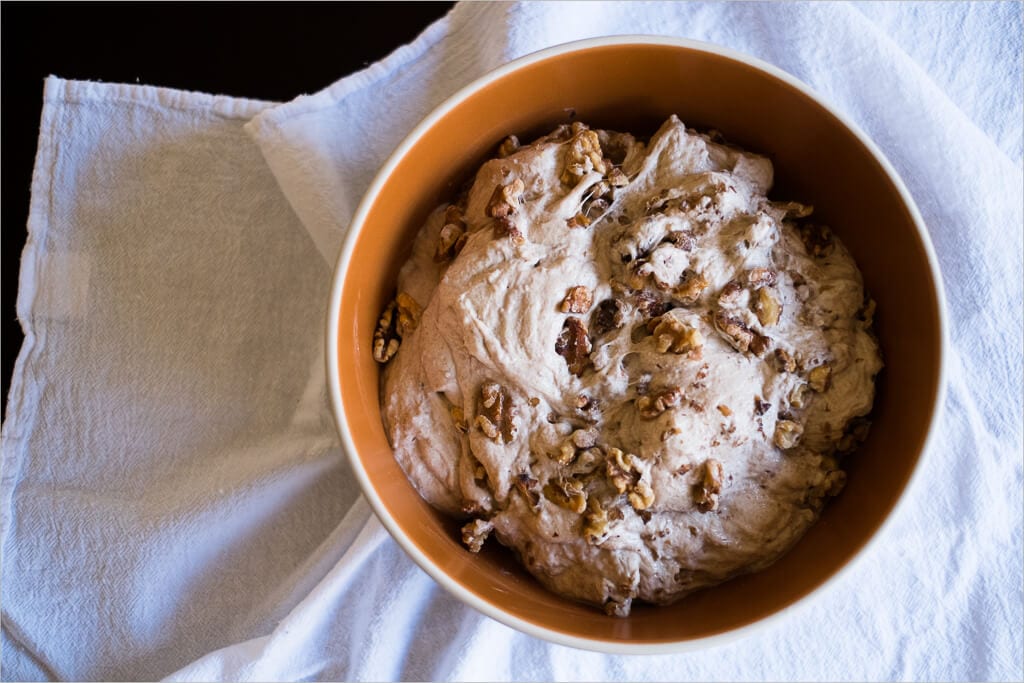
It’s hard to sometimes tell when your dough is strong enough and has had enough time to build sufficient gluten development. I usually determine this by the amount it has risen (around 30% is good), small bubbles throughout, and the amount it resists snapping back after you turn it. But, there is another popular way of determining gluten strength: the “windowpane” method. To do this you can tear off a small chunk of your dough and stretch it out between your two hands. If the dough stretches out so thin that you can see light passing through but no tears, then your dough is ready.
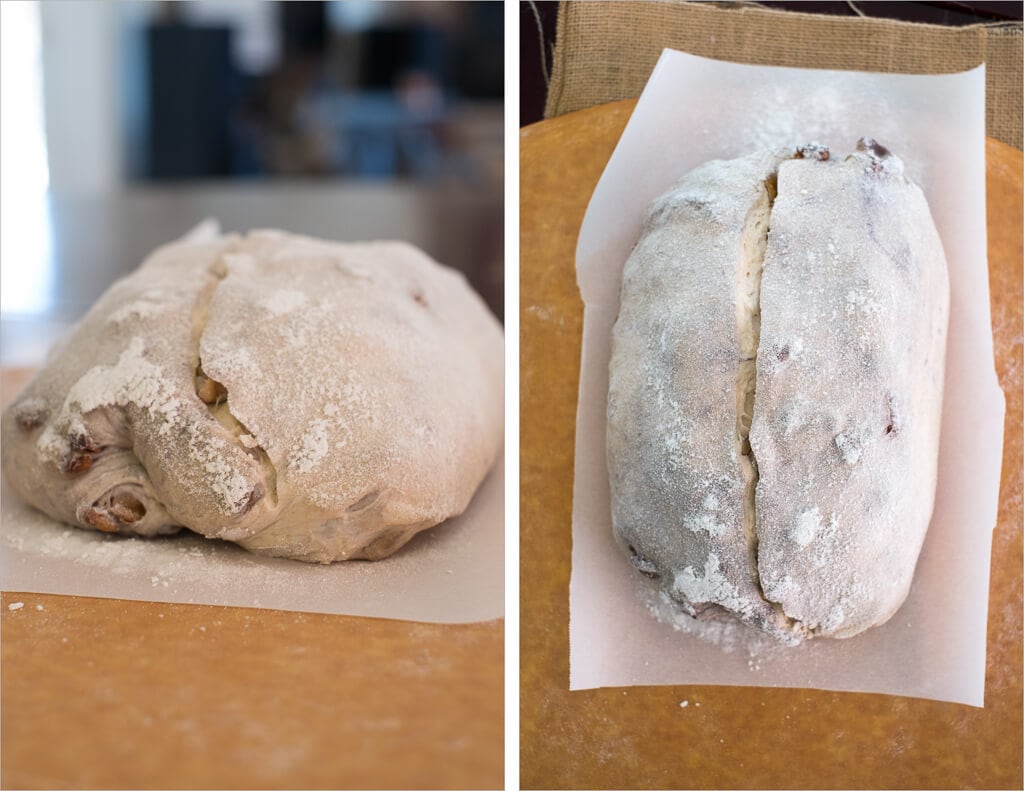
Pre-shape – 3:15pm
Take the dough out of the container onto your unfloured work surface and sprinkler some flour on top before dividing. Divide the mass into two halves and flour the top of each half. I made one half slightly larger than the other as I wanted a longer rectangular loaf. Flip one half over using your dough knife and your hand, then gently bend the 4 sides of the dough from under to the top. Using the knife flip the mass so the new seam is on the counter and spin it a few times to create a bit of tension. Set a timer for 40 minutes and let it bench rest.
Shape – 3:55pm
With the larger half of dough, I wanted to try a different Tartine shaping technique (it was worth it) in an attempt to get a longer loaf that is more of a batard than a boule. Check out my guide to shaping a batard for shaping photos and a video. It takes a bit of practice, but I believe the results are worth it.
Take the other smaller half of dough and follow my usual boule shaping method outlined here. This method is pretty tried and true and not super difficult, even with higher hydration doughs such as this.
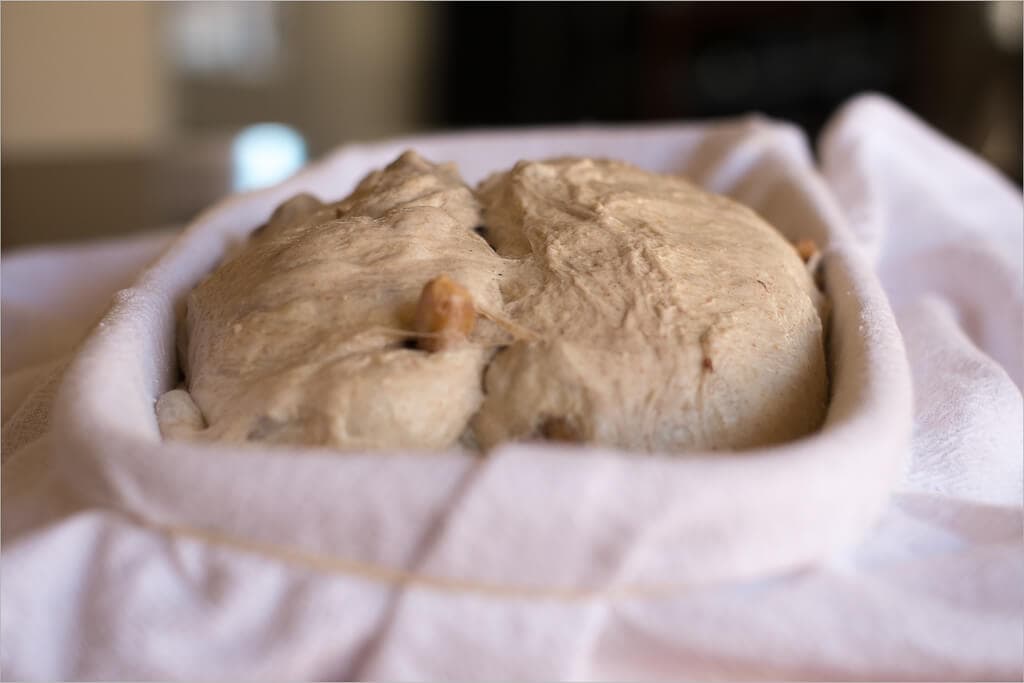
Proof – 4:00pm
Place towels into small mixing bowls, or bannetons, and dust with white rice flour. These baskets will hold the dough as they proof in the fridge overnight. Take your dough and place them into the baskets, then place both of the baskets into the fridge for an overnight proof.
If you follow the times I’ve listed here you can generally see my proof times are around 16-18 hours long. That’s a long time! I think normally when you go this long, even in a cold environment, you would get a more sour loaf than what I end up with. One reason my loaves end up having just a hint of sourness is because of the way I manage my starter. I feed it regularly 3 times a day, once when waking, once in the mid-day, and once before bed. These frequent feedings, combined with only transferring a small amount of starter to the new feeding, keeps the acid load very low. In my previous post I outlined exactly how I keep my starter “young” by following this method, if you’re interested head over and read about my feeding schedule and for a more “advanced” discussion, how I manage my starter.
Score + Bake – 9:00am
Gather your tools (for a complete list of the tools I used most, check out my baking tools page):
In the morning, preheat your oven to 450°F (230°C) with your empty combo cooker inside, deep half to one side and shallow lid to the other. See my post on baking with a Dutch oven (or combo cooker) for an in-depth discussion on this process.
Take one of your loaves out of the fridge, cut a piece of parchment paper and place on top of the basket. I then place a the pizza peel on top of the parchment paper (and basket) and invert the whole thing quickly to get the dough out of the bowl and onto the paper and peel.
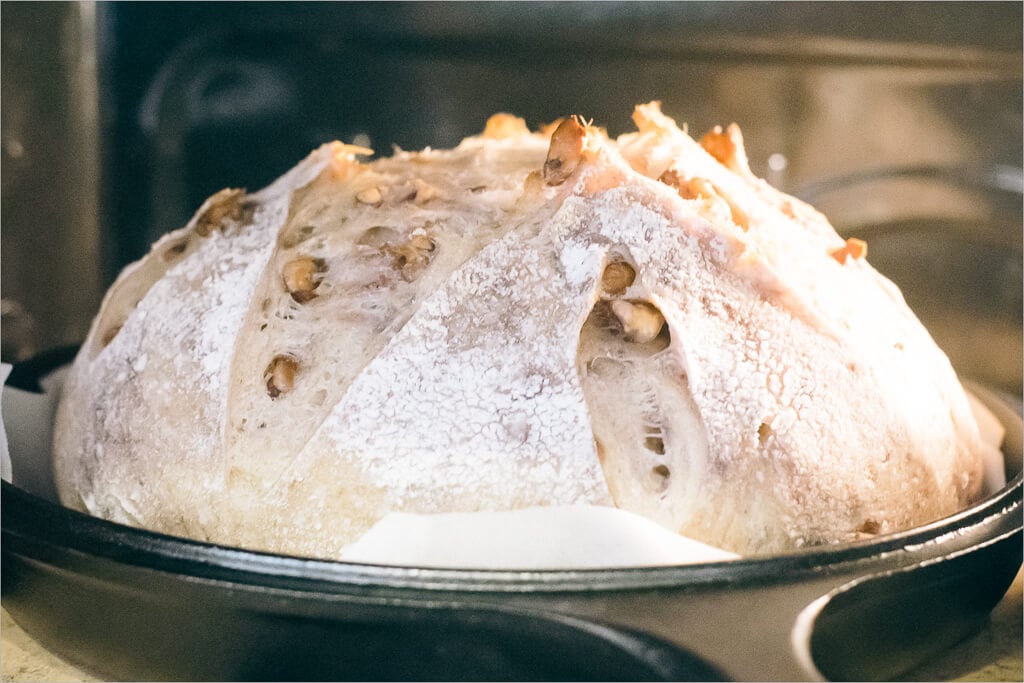
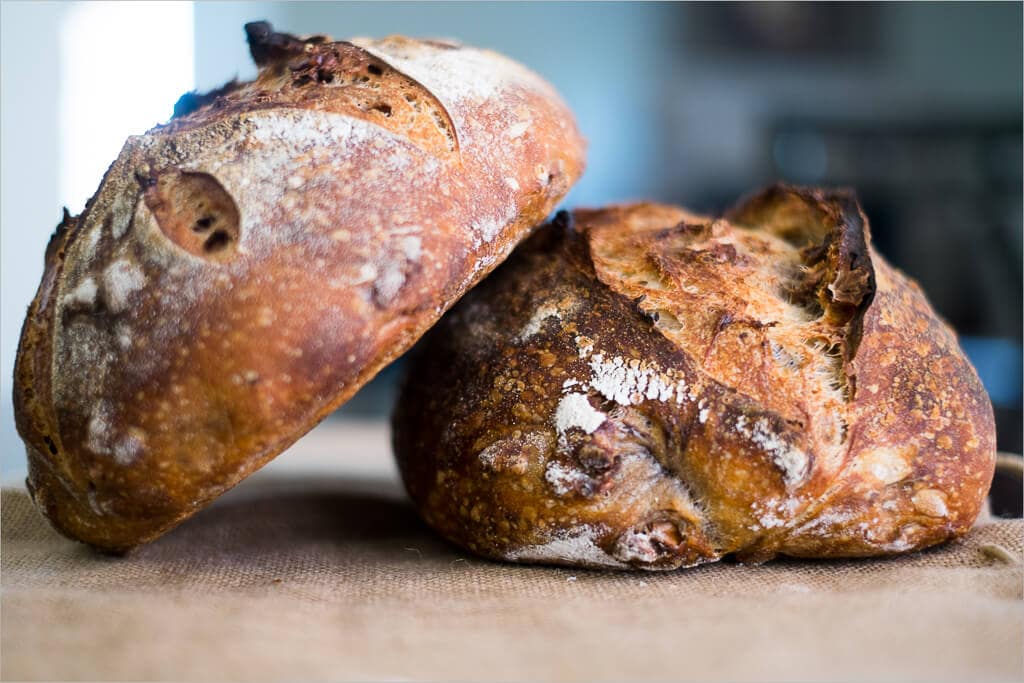
Get your razor blade out and score the top of the loaf to allow the bread to expand while rising in the oven. For the rectangular loaf, I did a single slash down the middle starting from the very top to the very bottom. This long slash lets the dough rise upward only through the score, creating an excellent stretching look as the loaf expands in the oven.
Place the dough into the combo cooker, cover with the lid, and bake for 25 minutes. After this time, remove the lid of the combo cooker (you can place it in the oven next to the bottom half or remove it) and bake for an additional 35 minutes. Below you can see the loaf I shaped into a boule in the cooker just after taking off the lid—excellent oven spring. I was tempted to pluck out a few of those walnuts, only the fear of searing my arm on the pan kept me at bay.
Conclusion
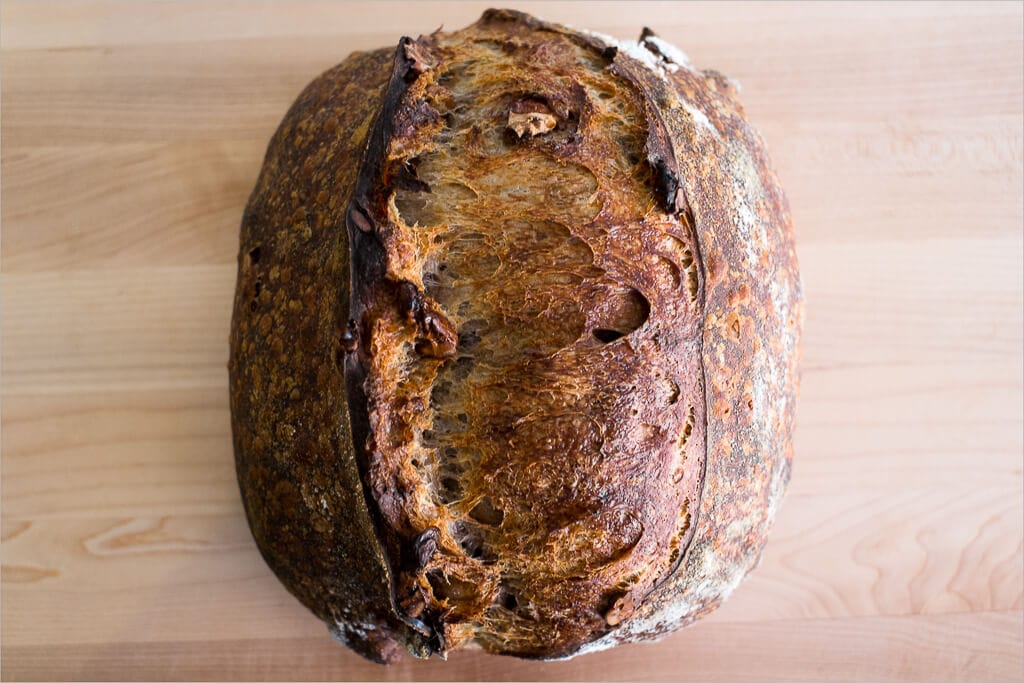
Crust
Both loaves had incredibly brittle crusts. The rectangular batard had beautiful coloring due to the long score, causing the inside of the score to remain a lighter color while the “ears” colored much darker. The small air bubbles on the skin also contributed to the brittle outside.
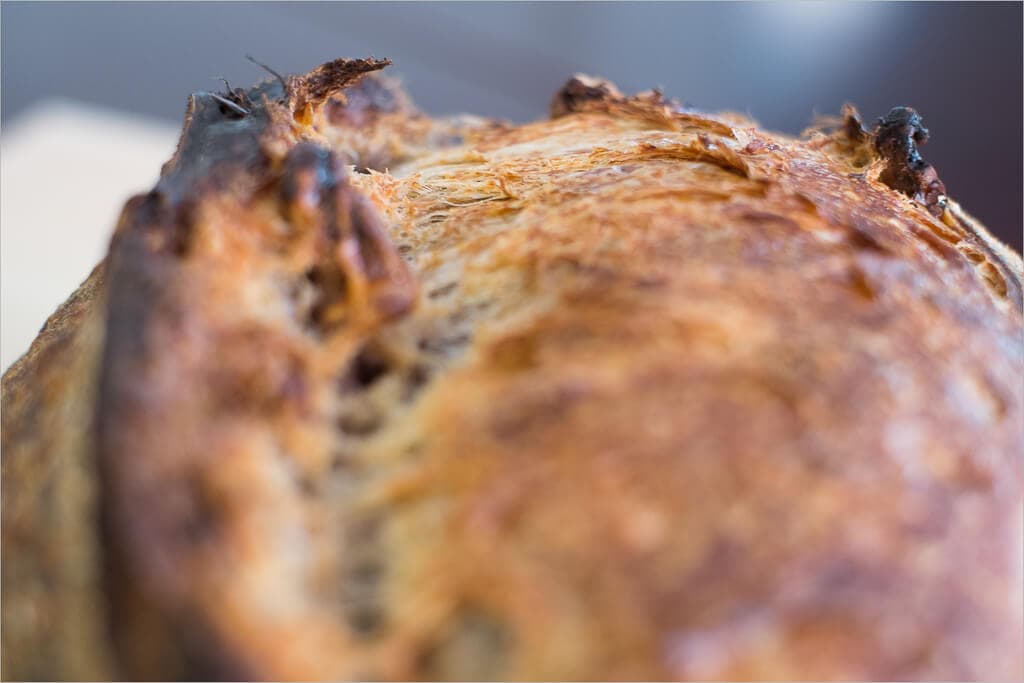
These two had the crust I was looking for: thin and brittle, but crunchy and substantial. Cutting into a crunchy crust like this is just so satisfying!
Crumb
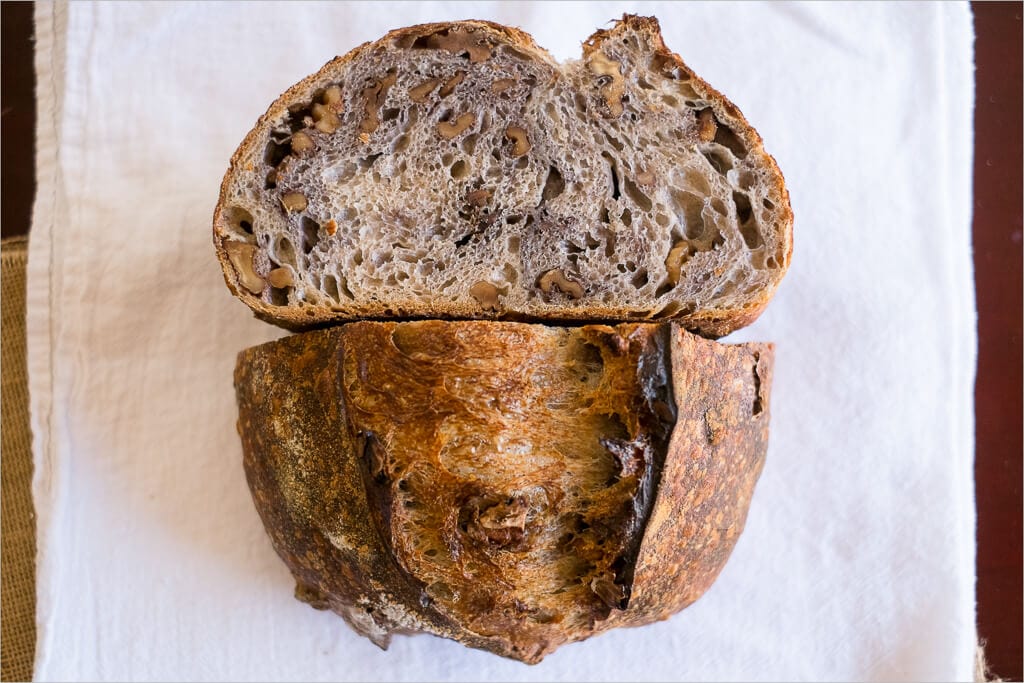
Nice and open, but not overly so. The walnuts, I believe, prevent a super airy crumb but I don’t think one can complain about these results. I’m happy with this. Also, note the purple color throughout the dough, this is caused by the tannins in walnuts that seep out during the entire process.
Taste
Just fantastic. All I can say is that I absolutely love the taste of the walnuts with the slight hint of sourness present in this bread. I ate one loaf with just about everything my kitchen could throw at it and it left me wanting more each time. This recipe is a definite keeper. The other (smaller) loaf was a gift to my parents, they devoured it in no time with a request for another.

What’s Next?
Check out my 100% whole wheat with walnuts for your next nutty adventure!
Buon appetito!


110 Comments
Hi Maurizo,
This walnut recipe is amazing!!! I also enjoyed listening to you on the sourdough pod cast.
I followed the recipe exactly, will post later today on instagram and had a bit of a problem getting the dough to be firm at the end before refrigerating. When it was time to shape I could not get a shape to hold but still put both loaves in a Benetton and fridge overnight. When placing in my dutch oven, the dough splattered and flattened, I had one round and one in a loaf pan, however they rose enough and taste delicious. I was pleasantly surprised by how sour the notes were. This was such a good challenge, I have been making a sourdough recipe that works form me but adding a variety of other recipes into that recipe because they turn out. I am ready to venture out. It was not totally a flop because of the taste, crust, and crumb but not the best because it kind of looked like a blob before the bake. Any suggestions would be helpful! I am only a new baker since working from home in April and will for sure try again until perfect, my neighbors are loving being my official taste testers.
Hi Maurizio, thanks for the detailed write-up and photos! I found your post after having embarked on it following Tartine’s method, which looks very similar to yours.
I’m at the bulk ferment stage having just incorporated the walnuts after the second stretch and folk, but noticed that with the added bulk the dough is ripping as I handle it, and it’s basically impossible to do a window pane test with all these lovely nuts studded in the dough! I’m wondering how the gluten structure with be, I agree that yours look great even without the large airy holes we normally associate with this loaf’s crumb.
More importantly though, I noticed you used 250g levain instead of the 200g called for in the basic country loaf (which the book told me to follow for this bread and just add in the walnuts), and I wonder if it’s too late to add that in at this stage (going onto the 2nd hour of bulk ferment)? Perhaps I could push the bulk ferment to compensate?
Any ideas gratefully received for this beginner but intrepid home baker!
Hi Maurizio! For the Tartine Country Walnut Sourdough recipe I’m wondering about the method for Bulk Fermentation process. For Bulk Fermentation the recipe indicates you want 6 turns. Does that mean 6 sets (north, south, east, west) or just one turn up and over 6 times every 30 minutes? Kind of a dumb question I realize but I’ve had a lot of trouble getting the recipes right. I really enjoy your site and the challenge of working with sourdough. Thanks!
Delada,
Based on the recipe for this bread in the Tartine Bread cookbook, each turn is a set (north, south, east, west).
Jeremy
Thank you Jeremy! I will give that a try.
Also can you half this recipe similar to how you can half the beginners recipe? Would you half both the Levain and dough recipes?
Yes, you can certainly do that! Yes, half both the levain and dough mix parts.
Does the combo cooker just get put on top of the pizza stone?
Yes, but lately I’ve stopped using the pizza stone when baking with a Dutch oven. Check out my guide to baking in a Dutch oven for more information!
I don’t have a dutch oven — but I have a cast iron skillet — could i invert a pot over the cast iron skillet to act as the top of the combo cooker?
That’ll work! You could also invert that pot on top of a baking stone and skip the iron skillet.
Could any pot work as a cover? Including a stainles steel?
Did the beginners bread yesterday and it so yummy! Thanks for a great blog!
Yes, that’ll work. As long as it’s tall enough and oven-proof, you’re good. Glad you’re enjoying the site, happy baking!
Can you use regular flour instead of bread flour?
Yes, that will work just fine!
Thanks! Will a bleached all purpose flour be okay to sub for the white bread flour? Hard to get hands on non bleached flour right now!
That could work, I’ve not used bleached white flour, but it should be just fine (although I prefer not using it, but I know times are tough right now for flour).
Okay Thank you. I was asking because I don’t have two cooking vessels.
Thank you for such a detailed and helpful recipe/baking map! Can I make one large loaf in my dutch oven?
It really depends on how large your Dutch oven is… But if you think the dough will fit you can certainly do that. You might have to adjust the baking time (longer) as well.
Roger — glad to hear that! Regarding the hydration difference: it might just be that your flour needed additional water. Each flour is different and requires minor (or sometimes larger) adjustments!
Hi! I’ve been attempting to make sourdough bread for the past 2 months and I tried this recipe because my mom wanted to eat a nut bread. I had to make a few adjustments since I did not have a dutch oven. I used a non-stick anodized steel pot and cold started the bake at 450 degrees. With so many drastic changes, I was worried it wouldn’t turn out right… But it ended up being my first success! The oven spring wasn’t as great and the botton was burnt and quite thick but those are things I could adjust for in my next attempt. The bread was delicious: chewy, tangy and open crumb! I can’t stop eating it! Thank you for your recipe and detailed instructions!
Right on, Clara! Happy to hear it turned out pretty well. Yes, those minors can be fixed easy next go — happy baking and thanks for the feedback 🙂
I am a rookie sourdough baker trying to understand how I can adjust the whole process timeline to fit into my schedule.
I have a question regarding to the bulk fermentation. Comparing to the method/schedule for “Apricot, Lavender, and Walnut Sourdough”, there is almost 3 hours rest between the last S&F and time doing pre-shape. In “Apricot, Lavender, and Walnut Sourdough”, you pre-shape the dough right after 4 turns S&F. Could you please kindly help why there is a difference, and how it affect the dough/result?
Thank you!!
Hey, Lilian! The difference in the recipes really has to do with several factors: the type and activity level of the levain, the amount of salt in the recipe, the flours used, and the other ingredients. I found through testing the apricot loaf ferments incredibly fast (most likely due to the sugars in the apricots) and thus the dough really couldn’t withstand a long bulk fermentation. Therefore, the dough needed to be divided earlier than in this recipe.
The key is to divide the dough and stop bulk when the dough needs it, not based on a time table. The times I give here are always a guideline but not a hard and fast rule — if the dough looks like it has risen enough, is strong enough, and has lots of activity, use the times I list here as a guidepost on about when bulk should finish, but make the call based on how the dough looks.
I hope this helps!
First batch of bread made in the new (temporary) house! They’ve only been out of the oven for 5 hours, so I’m waiting a bit longer to cut them open but am So excited! First, because it’s been far too long since I’ve had fresh bread, although I had frozen a few loaves earlier during the spring to save for the move and they were still quite good. Second, because I know it’s going to be delicious with those walnuts in there. If I had walnut oil, I’d have made your recipe with all whole wheat and the walnuts. That one will be made at least once a month because it’s so wonderful. I think this one will be as good in it’s own way tho! I finally felt just a little back to normal this weekend and it was so relaxing and fun to work with the dough again!
Glad to hear you’re back in the saddle baking again! It does start to gnaw on you when you’ve been away for a while, doesn’t it!? This is still one of my favorite recipes after all these years, yes the ww one is awesome, but there’s a clean, simple flavor to this bread that’s so seductive. I hope it turned out well and the move is going ok! Happy baking 🙂
The move was a bit hectic…long story…and all our boxes were piled up in the garage. I moved and shifted every one until I could find the one with my mill in it! And you know me….I still did this with mostly ww but sifted about half of it to remove some of the bran. It is SO good! I want to eat it all at once but have been holding myself back!
Thanks Maurizio. I am cooking them now. In the instructions it also says to open the door of the oven and cook at 440 for the last 35 minutes. Is that correct. This method is different than what I open see on your website.
No, I’ll check and fix if that’s how it sounds. Remove the lid of the combo cooker after 20 minutes and place on the rack next to the bottom part (or remove from oven), reduce the heat of the oven to 440ºF and cook for the las 30-35 minutes until done to your liking (the door is closed during this time for sure).
That’s what I did. That’s what made sense.
Maruizio, Can you clarify for me that you cooked one of these loaves on the pizza stone and one in the combo cooker? If you did use the pizza stone, did you do the spraying and the stones and such?
Kim, it’s been quite a while since I posted this but if I recall correctly I baked both in the combo cooker. I used the pizza stone on the bottom. However, if I were to have baked these directly on the stone I’d definitely spray them with the bottle (I also do a light misting on top of the dough right after I place the dough in the combo cooker) and nowadays I’d use my current oven steaming technique. Hope that helps, this sure is tasty bread!
can you give me a recipe for a sourdough bread with half or more rye flour and with walnuts?
I haven’t worked on a recipe like that just yet but will eventually!
and should i stretch and fold more?
can you recommend me for a recipe, with half or more whole weat or rye flour?
thanks..
can you recommend me for a recipe, white half or more whole weat or rye flour?
thanks
I have a recipe here that’s a 50% whole wheat 50% white if that’s what you’re looking for. I outline how many stretch and folds there at the post!
can i convert the white flour into rye flour of whole wheat flour?
Those are pretty different things but you could swap out the rye for sure. I’d go with whole wheat instead of white!
Ciao Maurizio,
Every time I put the dough in the fridge, I tend to get a very large air pocket right under the top of the bread. Thermic shock? But a lot of people don’t seem to get this issue. What am I doing wrong? I recently found out your website and I’m going to peruse it, as it looks like I can learn a lot from it. Thank you for sharing!
If you see this large hole when you bake off your loaf it’s actually most likely related to dough that’s either under or over proofed. If you notice the rest of your crumb to be very dense but with scattered large holes your dough is probably under — let it proof a bit longer, or at a warmer temperature, during bulk and/or in the fridge. If your crumb has lots and lots of small holes and it’s hesitant to rise in the oven it’s probably over proofed a bit. Dial back the fridge proof 2-4 hours and see if that helps.
Glad to have you along, hope this helps!
I love this bread. I just made it for the third time. It is one of my favorites. Thank you so much!
Super happy to hear that! It’s definitely one of my favorites 🙂
Maurizio, a dumb question, what is a tartine, what is the difference with the rest of loaves? you should write a book on sourdough for dummies, lol
No dumb questions here! Tartine is a bakery in San Francisco and their book is actually what got me started baking sourdough so long ago.
I’d love to write a book one day, we shall see! Thanks and happy baking!
I always thought a more frequent feeding of starters result in less sourness, not more.
Yes, that’s correct: more frequent feedings helps keep your starter more mild and less acidic. This flavor profile does eventually transfer over to your final baked bread.
How wonderful. An art form that can be eaten and savored.
There certainly is something captivating about this beautiful, and humble, food 🙂
Can’t wait to try this recipe! Your bread looks beautiful and delicious!:)
– Just wondering about the time of baking, you bake for longer than what is mantioned in Chad’s recipe, what’s the difference?
– Can I incorporate the walnuts in the first steps when incorporating all the ingredients (after adding the salt)? Would that make a difference in the rising and fermentation?
– Can I dissolve the salf in the warm water instead of adding those separately? Would that make any difference?
Thanks!!
Thanks I appreciate that!
Each environment and each oven is different. I’m at a little higher altitude than where Chad is in California so this could be the reason, but it could also be due to the oven differences. Finally, I like to bake my bread pretty dark, maybe darker than his? Not sure 🙂
You can incorporate the walnuts earlier if you’d like, sure, but I prefer to do this after the gluten has been developed a little. When adding in early it’s hard to adequately develop the gluten in the dough because the nuts sort of get in the way of doing the stretch and folds. That said I know some bakers do add the mix-ins earlier. I think it’s a personal preference!
Yes you can certainly dissolve the salt in the water. Just make sure you get all the water into the dough so you aren’t missing too much salt.
Hope that helps — happy baking Keren!
I made this delicious loaf today Maurizio. Thankyou fir a wonderful recipe.
You’re very welcome, glad the recipe worked well for you! Happy baking 🙂
My first time making sourdough, so thanks a lot for all the instructions and tips on this site. I’m about to start the bulk fermentation stage. Two questions:
1. Is there a difference between starter and levain? Some websites treat them as the same thing, while your recipe here has an extra step to make the levain from the starter. Can’t we just use the starter directly in the autolyse?
2. Since the starter has been bubbling away for 6+ days now, is it possible to use more starter in the dough to compensate for less rising/proofing time? I understand that a long cold proof adds complexity of flavour; can something similar be achieved with more starter since it’s been fermenting for days? (I ask mainly because I work away from home and trying to figure out how to fit this recipe into a weekday schedule…)
Would appreciate your insights!
You’re welcome!
1. Traditionally your “starter” is an on-going culture that you feed regularly and never completely use in a bake. Sometimes called a “mother” or “chef”. We build a “levain”, which is an off-shoot of your starter that will be totally consumed in a coming bake, so we can create it with potentially a different blend of flour depending on the characteristics we’re looking for in our final loaf. You can certainly use a portion of your starter as the levain in a bake.
2. Yes, you can increase the amount of levain you use in a bake to speed things up (fermentation will happen faster) but the flavor profile will be different, like you mentioned. I don’t typically like to go above 20% levain in my recipes as I’m not a fan of overly sour bread, and this could happen (there are other factors that go into this as well). So, yes, you can definitely increase the levain percentage just keep an eye on the dough as it will definitely move faster than the timetable I have listed here.
Hope that helps! Happy baking 🙂
hi – This is one of the best recipes I have tried. I make this bread often, both with and without walnuts and it hasn’t failed me yet.
I maintain my starters (yes, I have three with different flavor profiles) at a 50% water/50% flour ratio, so I add the “fed” starter (i define “fed” as 8-14 hours after i add the flour and water) directly to the recipe and it worked fine, particularly when I use the dutch oven. One thing I like best about this recipes (which I haven’t found in others) is that the crumb has a moist elasticity to it, which I think is an essential quality of this kind of bread – probably due to the high hydration of the dough?
Glad to hear that! Yes, the higher hydration of the dough definitely imparts a certain texture and elasticity to it, to some degree. The flour also plays a big role there. Happy baking!
Hi Maurizio thanks for the recipe one q can i use all Ap flour instead of wheat flour for this recipe? What is the ratio for the H2o and for a smaller loaf for this recipe? I’m a newbie in SD
You can definitely replace the 10% whole wheat with more all purpose in this recipe. If you’d like to replace the “bread flour” I’m using here with all purpose you can do that as well but know that all purpose flour has lower protein than bread and your bread might require additional folds during bulk fermentation to have the same strength at the end. I’d say give it one or two more “stretch and folds” as I’ve described above during bulk fermentation to add in some more strength.
If you want to make only a single loaf of this bread instead of two, just take all ingredients and halve them.
Hope that helps! Sorry for the late reply, i was out on travel 🙂
I’m gonna bake this tomorrow. Currently prepping my leaven. I’m using my new bread proofing box.
Fantastic! I use a proofing box as well, definitely a savior! Let me know how it goes 🙂
It came out amazing. I let it bulk rise 4 hours then made two balls and fridge fermented till the next day. YOu can see the photos here. I also added porridge to make a porridge walnut bread.
http://tinyurl.com/jfu2nbv
Just fantastic! Wonderful looking bread — great idea with the porridge walnut bread.
I have the same box. I find it runs slightly hotter than the indicated temp. What temps do you use ?
Yes I’ve noticed it does over-heat a tad. My temperatures depend on what I’m doing, if it’s cold in my kitchen I’ll leave my starter in there for extended periods @ 75ºF. If I’m preparing a levain it’s usually between 75F and 78F and my dough bulks in there around 80ºF.
Hello Mauriziu. Th E LOAVES LOOK JUST AMAZING. i am going to bake some tomorrow. I have aquestion to you, if i may, about the stage of ‘Prepare the leaven’. How do you decide of the ratio at that stage? At some recipes you would use 1 starter to 2 flour to 2 water. Here you used 1 starter to 4 flour to 4 water. And also – , was it an a.p.flour and rye flour starter, mixed with whole wheat? I hope I my question is clear enough :)). Thank you very very much!
Thanks, I really appreciate that! This is definitely one of my favorite recipes — I love walnuts in sourdough.
Several factors go into deciding on how I’m going to prepare the leaven, and the ratio of flours used will impact the outcome in various ways (increased fermentation, increased/decreased acidity, etc.). I will almost always use a mixture of whole wheat (“ww”) flour and apw (“all purpose white”) flour. More recently I’ve started doing a 1:2:2 ratio build for my leaven and that works really well for me. If you increase to, say 1:4:4 as it’s done here, this will give your levain a longer window for which it can be used (meaning you could let it ferment longer before you need to use it in your mix) because there is more flour and water available for your starter. You could use either ratios.
Good luck and happy baking, Lilach!
Thanks alot!
just a tiny more question, to be sure i understood the recipe. you Prepare the leaven with 55 ripe starter. is it an apf and wh wh flour starter?
It’s really fine to use your starter at whatever flour ratio it’s built with, whether that be ww/apw, apw/rye or even just apw. I typically keep my starter fed with 75% apw and 25% rye flour.
Step 2 and step 5 are redundant. I assume you messed up on step 5?
Which two steps do you mean?
I think she’s referring to steps 2 and 5 under “Dough” — both refer to adding the water. Step 2 specifies 700g, and step 5 does not specify an amount– is this the 50g reserved? I’m hoping to try this recipe this weekend (after making your Beginner’s Sourdough successfully several times now!), and was confused about this repetition as well.
Thank you! I fixed the post to clarify 🙂
Just FYI the youtube link does not work…
Oops, it looks like they’ve taken the video down. Can’t seem to find another link to it either…
Great work Maurizio. Impressive even. The original recipe didn’t call for the overnight incubation time in cold, right? would you say that it influenced the taste? Thanks for sharing.
Thank you! The original recipe does call for a long, cold proof. The long rise in a cold environment does influence the taste; with a cold rise like that you get a much more subtle and complex “sour” flavor.
Thanks for the comments!
Maurizio – I have a poolish starter that I’ve been using and feeding for a while (1:1) ratio. It’s a year old.
Most of the breads I made are with a tiny bit of fresh yeast on top of the starter; I’ve never made a load which is purely based on the starer.
I’m interested in trying to elevate my breads and my starer and maybe try one of your formulas. Would you mind sharing your email? It’s just that I have too many questions and I feel an email address will be better. Let me know please sir! thanks,.
Absolutely, no problem.
maurizio (at) theperfectloaf.com
Are you heating only the pizza stone and placing the loaf into the cold combo cooker?
Elizabeth,
No, I heat the stone with the combo cooker on top in the oven @ 510ºF for almost one hour. I then (carefully) take out the bottom of the combo cooker and quickly place in the scored dough, cover with the other larger end, and stick on top of the stone to bake.
Thank you. I’ve cooked in a dutch oven or on a pizza stone with an inverted bowl, but I haven’t tried pizza stone with dutch oven before. I live at 6000 ft, so I’m going to try your version of these recipes. A problem I’ve had with cooking in the dutch oven, is my bottom crust gets too thick and hard to cut, have you had this problem, it doesn’t sound like you have because you mentioned a thin crackly crust. I wonder if the combo cooker works differently than a dutch oven with higher sides, maybe I should buy one?
Elizabeth,
I’ve had a few loaves here and there with a crust like you are describing. I can’t say I know 100% what is causing that. To me, I wouldn’t think the combo cooker would be that much superior to the dutch oven, but I would imagine it does have thicker sides (I haven’t used a dutch oven for this before).
What temps & times are you cooking at?
Thanks, and fixed. It truly is one of those breads where you are just in awe after baking.