

Sourdough cinnamon rolls: the new every-weekend tradition? I began work on this recipe with the intention that these would be a wonderful Christmas morning indulgence, the birth of a new holiday baking custom. But after making them several times for testing, I’m convinced they should perilously be a weekend indulgence. Why limit ourselves and declare these only for special events and holidays? Seriously, let’s make them every weekend.
Cinnamon rolls fit so perfectly with the cold weather. They’re like that warm blanket you left on the radiator, that puffy wool sweater you wear around the house, or that cup of hot chocolate that breaks through the cold. Layers of tender dough segregated by ribbons of gooey cinnamon sugar and topped with a creamy, white sugar glaze—it’s enough to make you completely forget it’s cold outside or perhaps stop caring about winter altogether.
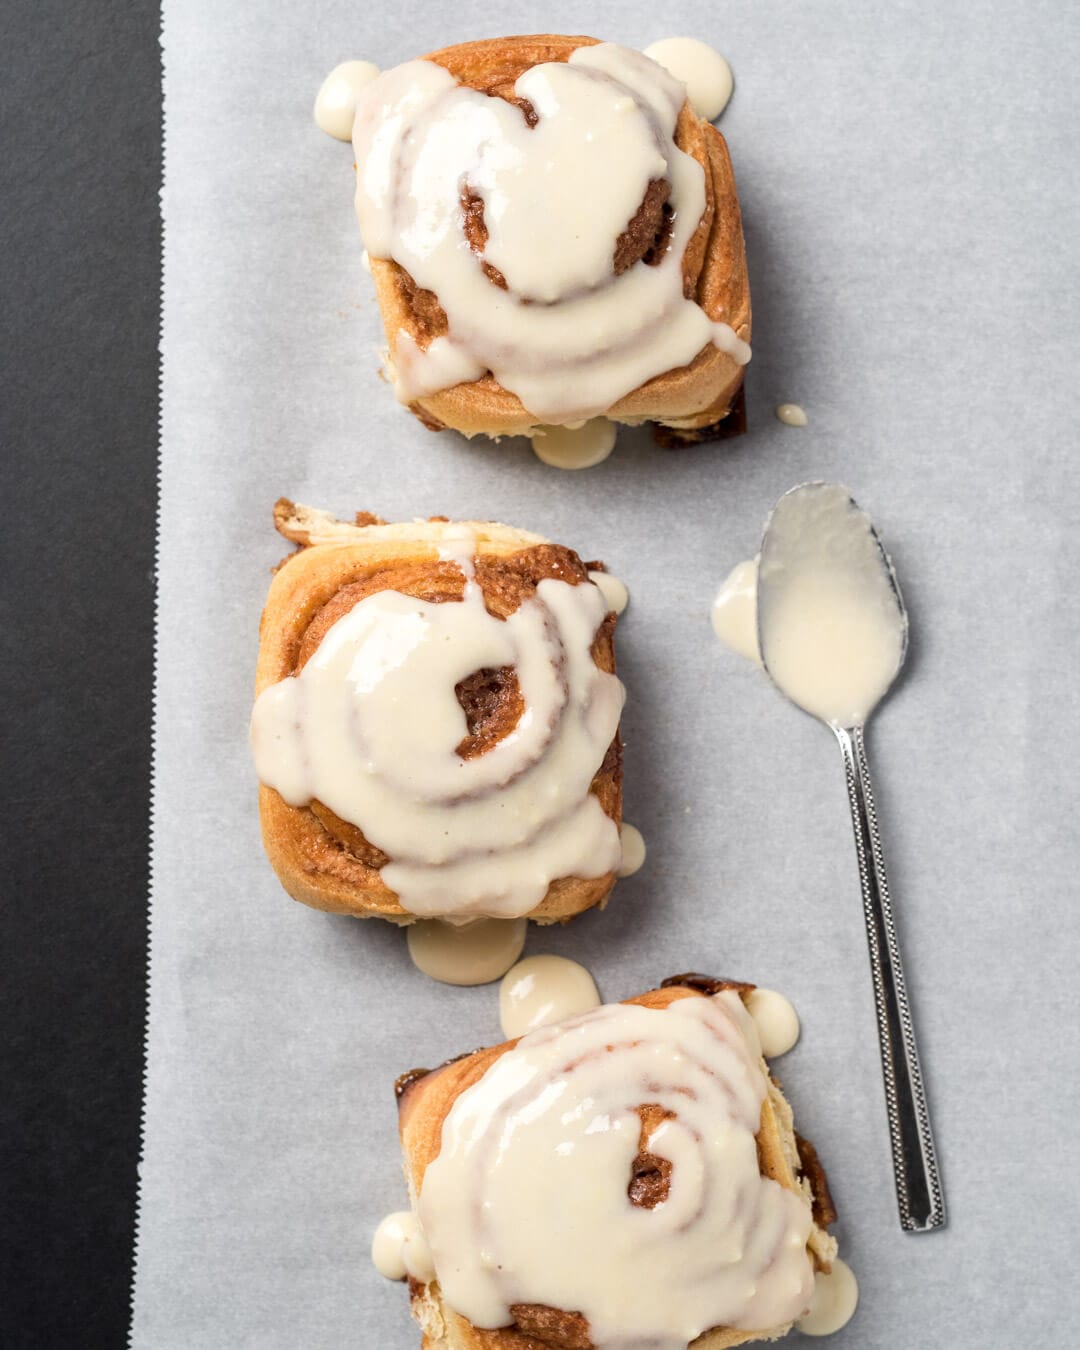
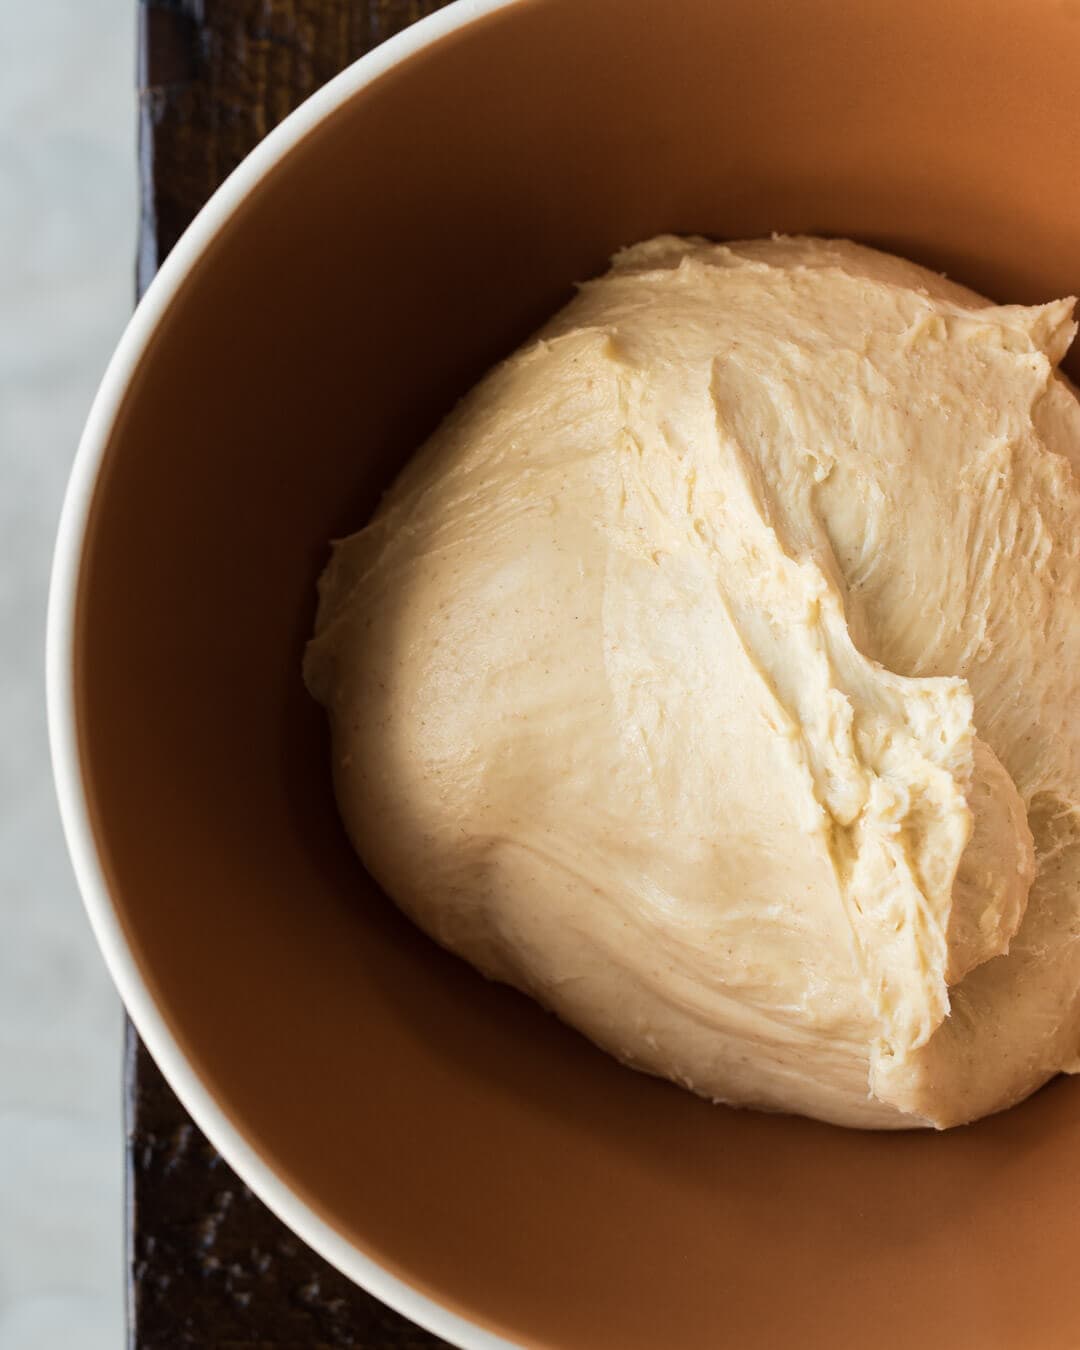
Brioche dough is the base for these sourdough cinnamon rolls, which is dough enriched with butter, sugar, and eggs. These ingredients make for an incredibly tender and mouth-melting crumb when added to a deep yellow dough. When pulled, these rolls shred apart almost like cotton candy, the only resistance provided by the melted brown sugar cinnamon near the bottom—they’re like a warm, gooey cloud of pure enjoyment. When presented with the opportunity, there’s nary a chance anyone will decline one of these on a plate.
These sourdough cinnamon rolls require a little extra effort, but once you get the hang of the process, it’s pretty straightforward—and, of course, totally worth it. The dough is also very versatile: you can adjust the mixing and baking schedule so they’re finished in a single day or spread out over three. The dough can be retarded in the refrigerator after bulk fermentation, shaping, and cutting, or both. I prefer a two-day process where I place the dough in the fridge after bulk fermentation. The next day I wake and get to work on the rolls, and I bake them fresh for breakfast (or brunch if late to rise).
Brown Sugar Cinnamon Spread
This spread has the right level of delicate sweetness and a comforting bite from the cinnamon. The mixture is more crunchy and thick than it is spreadable, which is my preference. When baked, swaths of the spread caramelize and other smaller areas stay crunchy, providing a subtle contrast of textures.
- 215g light brown sugar
- 40g all-purpose flour
- 2 tablespoons unsalted butter, melted
- 2 teaspoons cinnamon
- 1/4 teaspoon salt
Mix or whisk everything together in a bowl, so there are only a few clumps remaining. Keep covered until used (brown sugar dries out very fast).
Cream Cheese Glaze
The cream cheese added not only makes this glaze extremely velvety, but it also pairs wonderfully with vanilla. I’ve also tested various iterations, swapping out the cream cheese for maple syrup, adding orange blossom water, a dash or two of Angostura bitters… The options are endless.
- 114g cream cheese softened to room temp (4 oz, half a standard block)
- 62g (1/2 cup) powdered sugar
- 37g (3 tablespoons) whole milk
- 1 teaspoon vanilla extract
Add everything to a mixer fitted with the whisk attachment and whisk until creamy and soft. It’s best and easiest to use a mixer or handheld beater for this, but a handheld whisk will work if you want a workout. The mixer will ensure there are no stray clumps of cream cheese lingering about.
Sourdough Cinnamon Roll Recipe
It’s best to make this brioche-style dough in a stand mixer (like the one I have) due to the dough’s soft nature and relatively long mix time required. Most of the strength in this dough will be developed upfront at mix time with just a few more stretch and folds during the bulk to finish it off.
This recipe yields 12 sourdough cinnamon rolls but you can halve all the ingredients to make half a dozen (in this case, you’ll want to use a smaller pan). I’m using a USA Pan 9” x 13” rectangular pan to hold these 12 buns and because the pan is coated in silicone there’s no need for any parchment paper (it’s magic, really). If you don’t have this pan I’d recommend using parchment under the buns for easy removal.
You will need a rolling pin for this recipe (in a pinch, you could use an empty wine bottle). I am very partial to my rolling pin: it’s a non-tapered solid block of maple wood that’s functional, used in countless tasks around my kitchen, and just a beautiful tool (and made in the U.S.A.).
Sourdough Starter Notes
I know when some read this recipe title and see the word “sourdough,” thoughts of sharp sourdough cinnamon rolls might enter the mind, but this is definitely not the case. I maintain my sourdough starter with frequent refreshments to ensure acidity is kept low. Additionally, when I call for a mature starter in the ingredient list, “mature” means when my starter is just about to its peak height and has not yet fallen. If the starter is used at a state that is overly ripe (perhaps it’s fallen and has been that way for an hour or more) then the resulting rolls might be a touch sourer.
If you’re interested in how I maintain my sourdough starter head over to my Sourdough Starter Maintenance Routine post for in-depth details.
Dough Formula
The target final dough temperature (FDT) for this dough is 70-73°F (21-22°C).
| Total Dough Weight | 1,250 grams |
| Pre-fermented Flour | 42.00% |
| Yield | One dozen rolls |
| Weight | Ingredient | Baker’s Percentage |
|---|---|---|
| 477g | All-purpose or bread flour (King Arthur All-Purpose Flour) | 100.00% |
| 133g | Whole milk, cold from the fridge | 28.00% |
| 191g | Unsalted butter (Kerrygold) | 40.00% |
| 191g | Whole eggs (about 4 large) | 40.00% |
| 48g | Fine white sugar (caster sugar) | 10.00% |
| 11g | Salt | 2.3% |
| 200g | Ripe, 100% hydration liquid sourdough starter | 42.00% |
Method
1. Mix – 9:00 a.m.
First, take out the butter and cut it into 1/4” to 1/2” squares; let them sit in a bowl to warm to room temperature while gathering and mixing other ingredients.
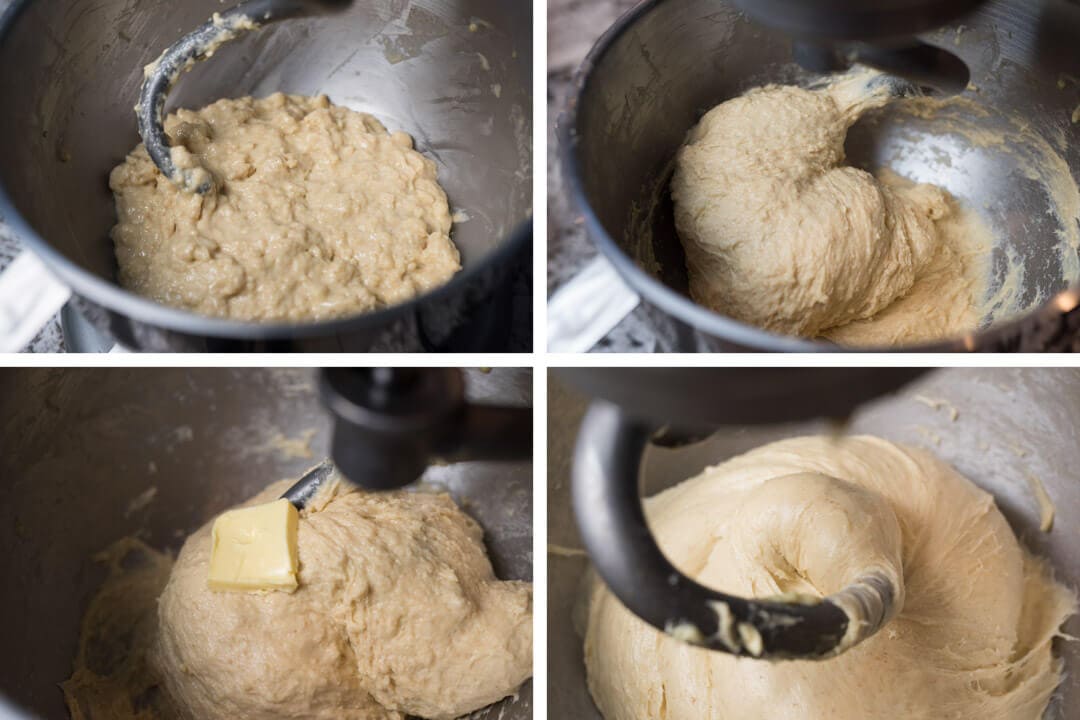
Mixing will occur in three stages (clockwise starting in the upper-left in the image above, the last image is the final dough). The first stage involves the initial incorporation of all the ingredients, followed by a 10-minute rest. The second stage will be strengthening the gluten in the dough before adding butter. The third and final stage will be adding the room-temperature butter blocks to the strengthened dough.
Initial Incorporation
In a medium bowl, add the cold eggs, cold whole milk, sugar, and mature sourdough starter. Whisk together until incorporated.
Add the flour and salt to the bowl of a stand mixer fitted with the hook attachment. Set the mixer to low (level “1” on my machine, one notch above “STIR”), and slowly start to pour the liquid into the mixer bowl. Add a little at a time over the course of 3 minutes. Once finished the dough will look very wet and have clumps, let it rest for 10 minutes before further strengthening.
Strengthen Dough
After the 10-minute rest, turn the mixer to medium speed (number “4” on my machine) and mix for about 5-6 minutes until the dough starts to come together and all clumps have disappeared. The dough should start to pull away from the sides of the bowl, but it will not completely detach from the bottom. If the dough doesn’t want to come together and it’s overly wet, add a little flour, a tablespoon at a time, until it comes together.
Incorporate Butter
Butter temperature is important. It should be slightly cold to the touch but easily pliable. If the butter is too cold, it won’t incorporate easily into the dough; if it’s too warm (almost melted), it will result in a greasy dough. Don’t fret if the temperature is off. Pop the bowl with butter in the microwave for 10 seconds to warm slowly, or place it into the freezer for a minute or two to firm up. Adjust as necessary.
Add the butter to the dough one square at a time, waiting until the previous block is absorbed before adding the next. It is easiest to place it right where the hook meets the dough. Continue until all the butter is added and there are no visible butter patches; this may take 8-10 minutes at a low to medium mix speed.
2. Bulk Fermentation – 9:30 a.m. to 11:30 a.m.
Transfer the mixed dough to a bulk container and let it ferment for 2 hours at 75ºF (23°C). Just as when baking sourdough bread, perform 3 to 4 sets of stretch and folds during the bulk fermentation stage, spaced 30 minutes apart. To perform a set, grab one side of the dough, stretch it upward, and fold it over to the other side. Fold once at each side, North, South, East, and West. If the dough is firm after the third set, skip the last set but let the dough rest for a full 2 hours.
3. Chill Dough – 11:30 a.m. to 2:00 p.m.
Place the covered bulk container into the fridge for at least 2 hours (I like 3-4 hours).
Overnight option: The timing is very flexible at this point. Once the dough is covered and refrigerated, it can rest overnight, and the rest of the process can be completed in the morning for fresh rolls early in the day or for brunch.
Roll the dough out to a rectangle only when it’s completely chilled.
The dough needs to be completely cold and firm to the touch before rolling out; do not skip this step.
4. Shape Rolls – 2:00 p.m.
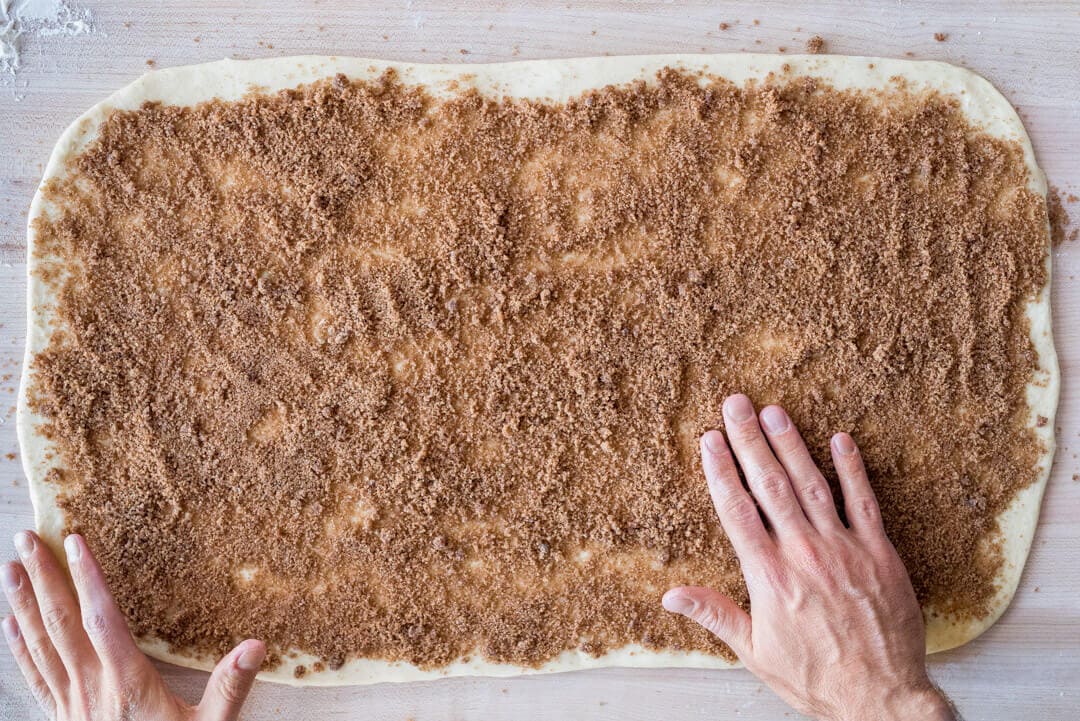
Before rolling out the dough, make the Brown Sugar Cinnamon mixture (see recipe, above).
Flour your work surface. Then, remove the chilled dough from the fridge and turn it out onto the floured surface. Flour the top of the dough and the rolling pin, and begin rolling the dough. Roll it out to an 11” x 21” rectangle that is oriented so one of the long sides is near your body and the squat ends are to the sides. Use a bench knife and dust the surface with flour wherever the dough sticks.
Try to keep your warm hands off the dough as much as possible to avoid heating it. Sprinkle the dry Brown Sugar Cinnamon mixture evenly over the dough, but leave a small margin at the very top bare. When the dough is rolled up, that small margin will help seal the roll.
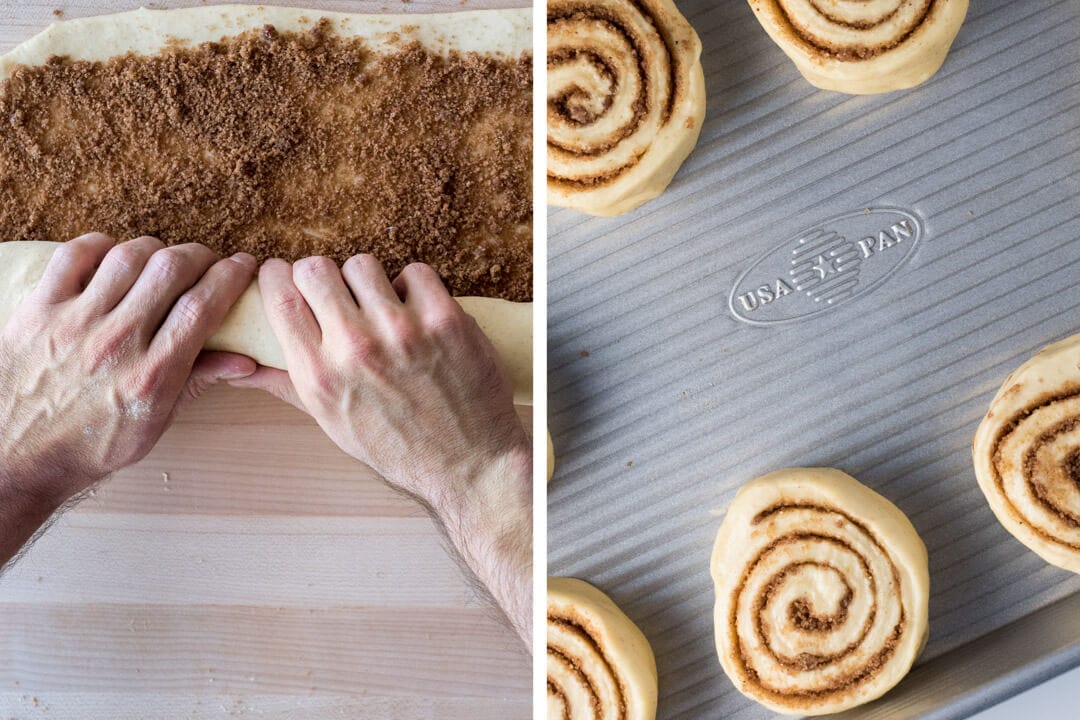
Starting at the long end nearest you, fold up a small portion of the dough all the way across. Then, roll the dough one revolution at a time, starting at the left side and moving to the right. During the first few rolls, it’s important to roll things up sufficiently tight to make cutting and transferring easier later.
Continue rolling from left to right, one revolution at a time, until the dough is completely rolled up into a “log.” Lay a ruler and using a sharp knife or bench scraper, cut the dough every 1 3/4” inches. You can go smaller if you want squatter rolls or up to 2” for taller rolls (if you cut smaller, you’ll have more rolls and taller you’ll have fewer).
Transfer the cut discs to a baking pan with some space around each one.
A few tips to help with this step:
- Place the rolling pin in the freezer while the dough is chilling to help keep it cold
- If the dough warms up excessively while rolling out, transfer to a baking sheet and place in the fridge for 15 minutes to cool
- If the dough is very pliable and warm after it’s completely rolled up, place the entire rolled “log” into the fridge on a baking sheet before cutting
7. Proof – 2:30 p.m.
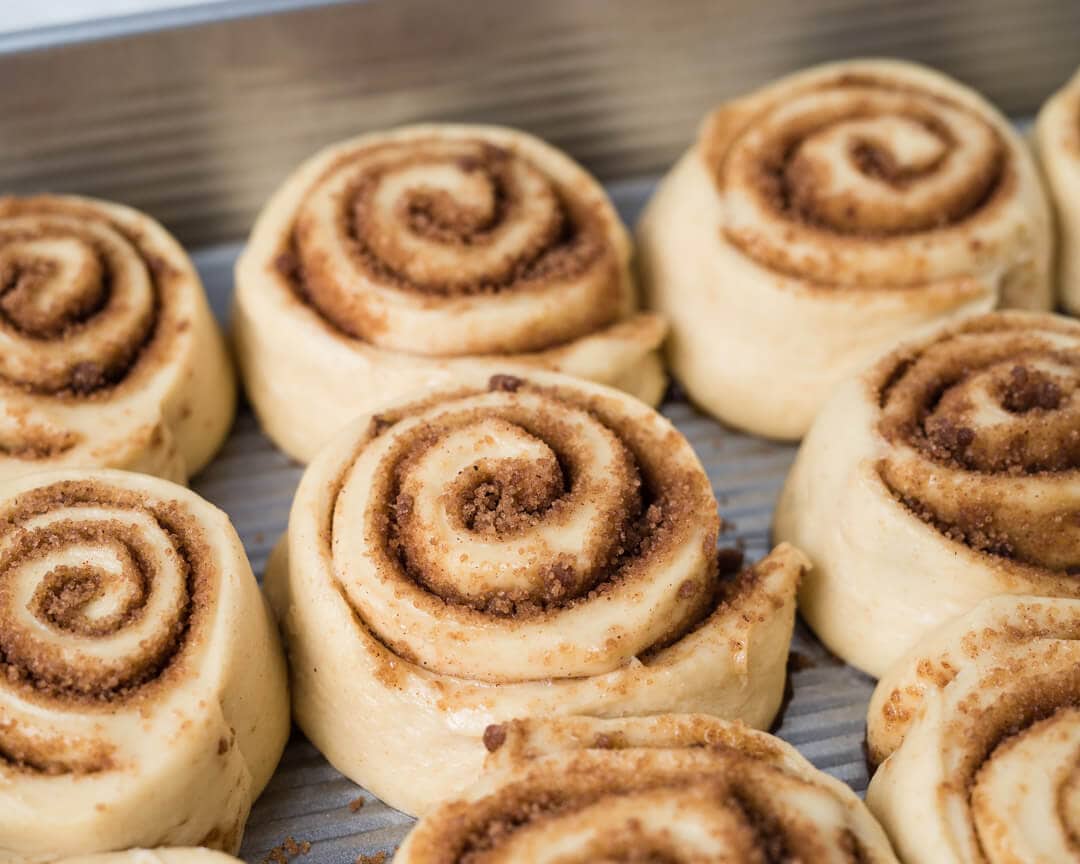
Place the baking pan with cut dough somewhere warm, around 77°F (25°C), to let proof for 2 hours. During proof, the rolls will relax out and start to puff up, eventually, they may touch each other but it depends on how much space you have between rolls.
Don’t be alarmed if you see any sugary liquid leaking out of the rolls, it’s totally normal. Additionally, if any of the layers develop gaps between them it only means when they rise in the oven they’ll be a little more interesting with pieces jutting up and out—beautiful.
8. Bake – Preheat oven at 4:00 p.m., Bake at 4:40 p.m.
Preheat oven to 400°F (200°C) during the last 30 minutes of proof. Place the baking pan in the oven and bake for 20-25 minutes until the rolls are well colored.

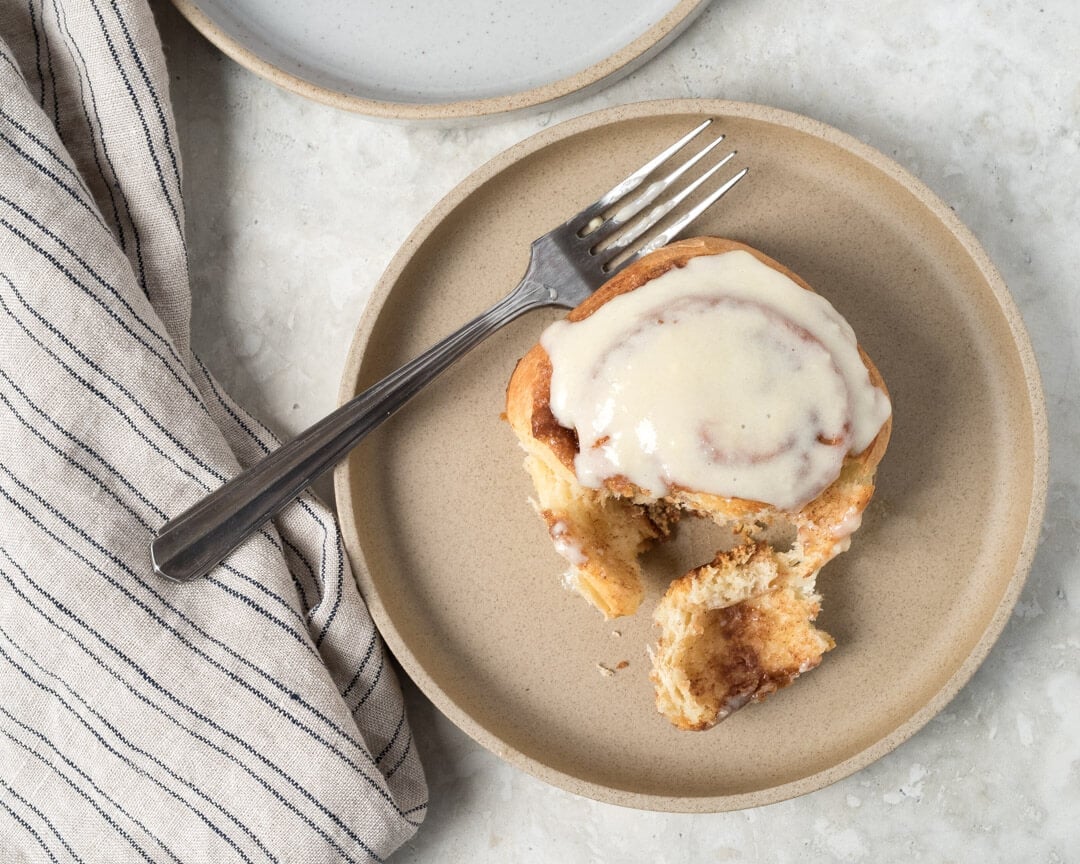
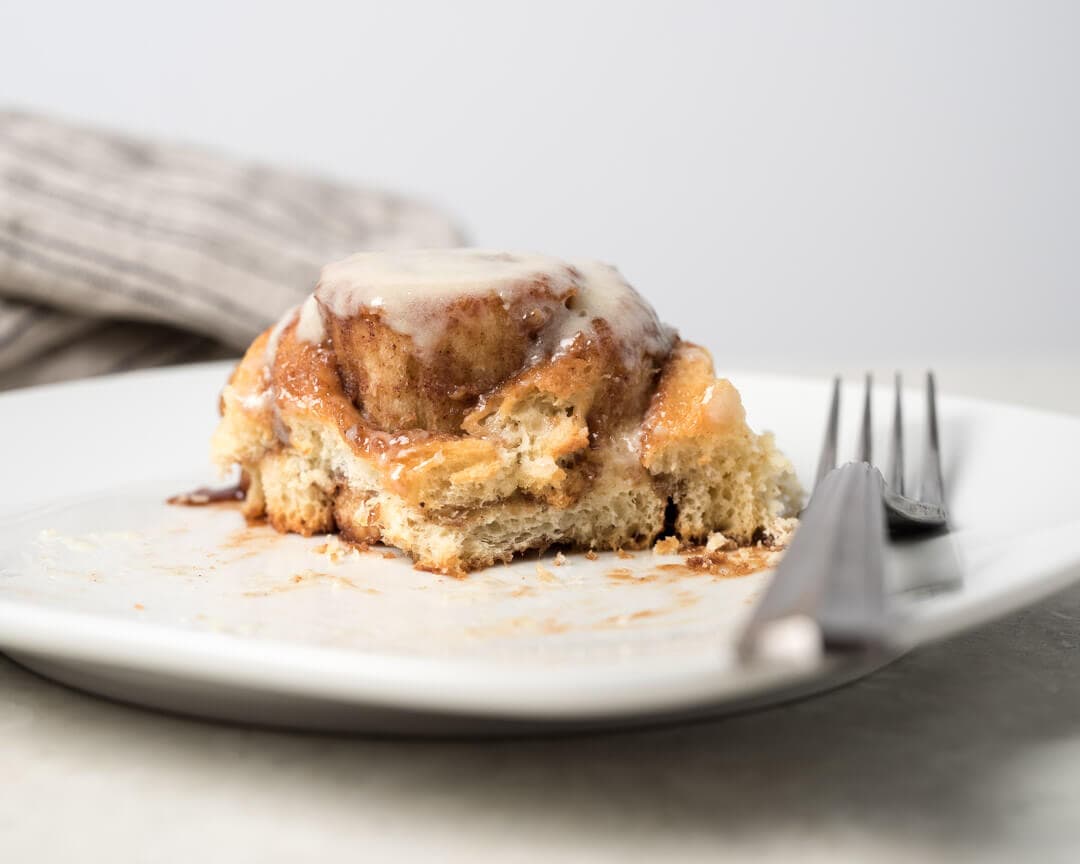
Spread the glaze over the rolls once cooled. These sourdough cinnamon rolls stay great for a few days in the fridge, and I always reheat them (without glaze) in the oven or microwave to warm back up before eating. They fill the kitchen with that intoxicating aroma once again and always seem to come out as if they were freshly baked.
Conclusion
Whatever the distraction, whatever the work being done—even if a bath is drawn—the kitchen’s aroma when these are baked is sure to draw out all. It reminds me of those old cartoons where they put out a piece of cheese, and you see everyone floating toward it in a trance—just like that.
These sourdough cinnamon rolls are addicting. The brioche interior is extremely tender and silky, interrupted only by warm, gooey brown sugar cinnamon. As I alluded to earlier, the cream cheese glaze is tremendous, but the possibilities here are endless, each change bringing on a whole new dimension to these sourdough cinnamon rolls.
Well, I know I’ll be making these sourdough cinnamon rolls for Christmas morning! But now that the word is out and everyone knows what I’m baking every other weekend after that I might be expecting a few more surprise visits from friends and family. I’m completely fine with it, though, because I’m happy to share with any and all who stop by—it may just mean I sneak off with one or two before they do. Buon appetito!
Now that you have experience working with enriched dough, the next step is my naturally leavened bomboloni (doughnut) recipe! They’re based on a similar dough with just a few changes—they’re absolutely incredible. Or, if you’re looking for more rolls, have a look at my ultra-tender sourdough cardamom rolls for a different take.
Print
Sourdough Cinnamon Rolls Recipe
- Prep Time: 7 hours 30 minutes
- Cook Time: 25 minutes
- Total Time: 7 hours 55 minutes
- Yield: 12 cinnamon rolls
- Cuisine: American
Description
These sourdough cinnamon rolls are addicting. The brioche dough is extremely tender and silky, interrupted only by warm, gooey brown sugar cinnamon. If you’re looking for the perfect weekend treat, these cinnamon rolls are the ticket.
Ingredients
Dough
- 477g all-purpose or bread flour
- 133g milk, whole
- 191g butter, unsalted
- 191g eggs (about 4 large)
- 48g sugar, caster
- 11g salt
- 200g sourdough starter
Filling
- 215g light brown sugar
- 40g all-purpose flour
- 2 tablespoons butter, unsalted and melted
- 2 teaspoons cinnamon, ground
- 1/4 teaspoon salt
Cream Cheese Glaze
- 114g (4oz, half a block) cream cheese softened to room temperature
- 62g powdered sugar
- 37g milk, whole
- 1 teaspoon vanilla extract
Instructions
- Mix (9:00 a.m.)
Cut the butter into 1/4″ pats and let warm to room temperature while mixing the rest of the ingredients. In the bowl of a stand mixer fitted with the dough hook attachment, add the eggs, milk, sugar, and sourdough starter. Whisk together until incorporated. Add the flour and salt and mix on speed 1 for 3 minutes until incorporated. Let the dough rest for 10 minutes. After the 10-minute rest turn the mixer to speed 2 and mix for about 5-6 minutes until the dough starts to come together and all clumps have disappeared. The dough should start to pull from the sides of the bowl but it will not completely remove from the bottom. If the dough just doesn’t want to come together and it’s overly wet add a little flour, a tablespoon at a time until it comes together. With the mixer set to speed 1, add the butter one pat at a time, waiting to add each until the previous is absorbed. Continue until all the butter is added and the dough is shiny and smooth, this could take around 8-10 minutes. - Bulk fermentation (9:30 a.m. to 11:30 a.m.)
Transfer the mixed dough to a bulk container and let ferment for 2 hours at 75ºF (23°C). Perform 3 to 4 sets of stretch and folds at 30-minute intervals. - Chill dough (11:30 a.m. to 2:00 p.m.)
Place the covered bulk fermentation container into the fridge for at least 2 hours to thoroughly chill. - Shape rolls (2:00 p.m.)
First, make the filling. In a bowl mix together the filling ingredients and set aside. Next, take out your dough from the fridge, lightly flour your work surface and the dough, and roll out to an 11×21″ rectangle with a long side closest to your body. Spread the filling evenly over the dough. roll the dough up away from you into a tight log. Cut the log into pieces every 1 3/4″. Transfer the cut pieces to a baking pan with space around each one. - Proof (2:30 p.m. to 4:30 p.m.)
Cover the pan and proof somewhere warm, around 77°F (25°C), for 2 to 3 hours. The dough will relax and puff up during this time. They’re ready to bake when the dough feels very soft and light—give the dough additional time to proof if necessary. - Bake (4:30 p.m.)
Preheat your oven to 400°F (200°C). Slide the rolls into the oven once preheated and bake for 20-25 minutes. Spread the glaze over the rolls once cooled.
Notes
These sourdough cinnamon rolls are best the day they’re made, but can be reheated the next day (without glaze) and then topped with freshly mixed glaze.
If you use this recipe, tag @maurizio on Instagram and use the hashtag #theperfectloaf so I can take a look! Thanks so much to USA Pan for sponsoring this sourdough post! As always, all opinions and thoughts here are my own.


673 Comments
I tried your recipe and it turned out well. Soft and nice. However, when it’s not warm, it’s still nice to eat but it will become dry. Is this normal?
Btw, i stay in south east asia where our temperature is around 30C all year long 🙂
Yes, these can dry out quickly if left out. I’ll usually reheat them on low in the oven, then spread more of the icing on top after they soften. Works pretty well!
You’re very welcome, Richard! Yes, I’d definitely butter or oil the tub to ease removal. As far as butter, standard American style butter will work just fine — just be sure whatever butter you use it’s unsalted. I would use the same amount as European style butter, they might just not be quite as rich (but will still be amazing!).
Have you made this dough into boules?
I’m fairly new to sourdough, and this is my first time making cinnamon rolls with my starter. They were amazing! They are so tender and flavorful! Thanks for sharing this recipe! My dough sat in the fridge overnight, and then I rolled and shaped this morning. I put them in a warm spot, and they were almost touching a little over an hour into proofing. When I baked them, the layers didn’t stay tight together, they developed gaps in between the layers. I’m just curious if you have any idea why that might have happened? I made the filling from a different recipe, and it didn’t have flour in it. Could that have been the issue? Thanks for sharing this wonderful recipe. I can’t wait to try some more recipes!
Hey, Aubri! Glad to hear my recipe worked out so well for you. In my experience those gaps happen when the dough isn’t rolled quite tight enough. If the filling was very liquid I could see that also pose a problem where it would prevent the layers from sticking together properly. Perhaps a combination of the two?
Even if they do separate a bit, they’re still awesome! Enjoy 🙂
I made your standard sourdough bread at least 2-3 times a week and have great success (so thank you!) but every time I do a dough that has milk in it (sandwich bread, brioche, cinnamon rolls), I notice an incredibly “off” taste in the dough–almost like spoiled milk or strong cheese, even a little metallic. I’ve been really curious about the science behind this as my starter doesn’t seem to be the issue…as soon as I go back to basic sourdough, all is well. I’ve been googling but I have had no luck with finding anyone that’s posting about this issue. And through experimenting and repeating recipes, the addition of milk seems to be the factor that’s causing this. Do you have any insight? One thing I’m noticing in this cinnamon roll recipe is that you only have a 2 hour rise room temp and then a longer rise in the fridge. The recipe I’ve been using is an 8-12 hour overnight bulk rise at room temp (my recipe is 160g milk/100gstarter/300g flour). Is it possible that the milk is spoiling overnight? Is there a reaction with the lactic acid and my specific starter? I see people in your comments talking about adding baking soda to help with acidity. Is there too much acid in my dough? This dough handles well and the rising/baking turn out well…but this flavor….what is it!? Would love to hear your thoughts as I think it’s troubling (but also fascinating!) I also see that in the comments, no one is mentioning this taste so I’m definitely going to try this recipe this weekend!
Happy to hear that, Jeni! That’s interesting, I’ve never personally experienced an off flavor like this when using milk (or butter). I’ve made these many times at this point, and even other breads with milk in them, without any issues. I suppose it’s possible the milk could spoil if left out for too long, but I am skeptical it would happen during the bulk fermentation rise in a dough — especially since acidity built up in the dough should stave off unwanted pathogens.
One random thought: have you tried using a different source of milk?
I don’t have an answer for you, unfortunately. I’ll have to see if I can ask around to other bakers and get an answer for you, or at least some suggestions. If I run into anything I’ll drop another comment here!
Also, please let me know if you get the same flavor with my recipe here, I’m curious. Happy baking, Jeni!
Yum! I made these this morning. Deicious! I made up a bourbon maple glaze. The rolls are light and airy and soak in the glaze and cinnamon sugar filling just perfect. I used King Arthur all pupose flour and my starter was 25% rye and 75% King Arthur all purpose flour. I have tried a few other recipes. This one is superior! Thank you Maurizio! I now have more courage to try the Bombolini’s!
Ooh, now that sounds like an awesome glaze. Great idea. This is the perfect recipe to start with, then “graduating” to bomboloni. The dough is similar but it takes a bit longer during bulk and proof, mostly to make sure you get them super, super light and airy before frying. Let me know how it goes — enjoy!
I’ve been thinking about using this as the recipe for a cinnamon babka – so instead of slicing the rolled-up log into buns, I’d slice it in half the long way and then braid the two halves. Maybe a streusel toping and the traditional sugar syrup glaze instead of the icing, and voila – babka!
Would it be better to let the dough chill longer after bulk fermentation or after cutting and shaping? I want to bake these Friday around 2:00pm, and will be out of town from Thursday 4pm until Friday 1pm.
You could let the dough rest in bulk (when it’s still one single mass in a bowl) longer, then divide and continue with the process. I prefer this way if it works for your schedule!
They turned out delicious, thank you! Next time I’m going to try and use a little orange juice and orange zest 🙂
This recipe has been fantastic. I’d like to adjust it to do a portion of the prep ahead of time – would you recommend freezing the rolls before they rise, then thawing for 8ish hours and baking? Parbaking then freezing? Baking, then freezing?
Glad to hear that, Donald! I’ve never tried freezing this dough but others have said it’s worked pretty well. I’ve also never parbaked anything, I can’t comment on that approach. I’d say try freezing the rolls in shape, then bring up to room temp and finish proofing until ready to bake. This way you can serve them fresh.
You’ll have to experiment with freezing, though. I’m not quite sure what effect this’ll have on natural leavening — I know commercial yeast handles it a bit better, but sourdough should work also. Let me know how it goes if you would!
Thank you for the great recipe! I’ve frozen them right after shaping them at Step 4. The night before, I put in the fridge to thaw overnight (8 – 12 hours), then bake straight away in a pre-heated oven. I’m still experimenting with thaw times, but 8 hours later they were still pretty fluffy.
Right on, thank you for that update! Such a flexible dough 🙂
Heya! I’ve done some experimenting. Freezing and thawing for 8ish hours at room temp makes decent rolls…..but nothing touches proofed and risen on the same day! Have you used this dough for anything other than cinnamon rolls? I made mini slider buns recently.
Yes, that’s what I figured would be the case as well. I haven’t used this exact dough, but similar enriched doughs I have used for buns and other things currently in testing 🙂 Thanks for reporting back!
i just made these. Took a long time, a bit more work than usual but the result is AWESOME!!!! I left the dough in the fridge over night after all that tedious (but fun) bulk fermenting. Rolled it out around 5am, couple hours to rise, popped them in a 350° oven, and voila! They are fantastic.
It is a bit of a process but so worth it! Happy to hear they worked out so well for you, they’re such a great treat. Enjoy!
Yes, that’s definitely possible. Shape and cut them, place them into the final baking vessel, cover, and place into the fridge. The next day, take them out and let them finish proofing as long as necessary (they should be pretty puffy). Then right into the oven 🙂
Would you put them into the fridge immediately after cutting and shaping or would you let them proof before putting them in the fridge? I would like to bake these early in the morning before I go into work.
Yes, I’d probably put them immediately after cutting and shaping. You’ll have to take them out in the morning, see how far along they are, and let them finish proofing on the counter before baking.
Just used the dough recipe and filling to make Stella di Natale. Thank you for the exceptional recipe. I have been looking for a suitable sourdough, dough.
What a great idea, Mary!
Just finished eating the best homemade cinnamon rolls. EVER! My neighbors love Maurizio ‘cuz I shared. Not difficult to make, just difficult to wait. I used the overnight retard because I don’t have a great history with the wetter doughs and I was really hoping to see that make a difference. It worked out perfectly. Easy to roll up. I had no problems. One question. I weighed the eggs, for the first time ever (I wanted to see how close my eggs would come to the 191g). My 4 eggs didn’t even come close, totaling 97g. I doubled checked that they were large eggs, they were, so I went ahead with the 4. The dough was way too dry so I knew I had to do something. So I got my scale out again and started weighing more eggs. I stopped at a total of 7 eggs, still being slightly under the 191g, but the dough now looked great. I finished the recipe, and as I said, the rolls came out perfectly, and the flavor was very egg/custard forward. My question is related to the flavor of Brioche style dough, which I have never had before to compare to. I am wondering if the strong custard flavor is what is wanted or is it because I added so many more eggs that this occurred. Or, is it possible they weren’t fully incorporated (even though they appeared to be after such a long kneading process) because of adding the last three one-at-a-time after the initial mix. If this happens again, to try and soften the egg flavor so it’s not such a predominant flavor, should I use less egg yolks and maybe just the whites in 1 or 2 of the eggs? Or just add them all at the same point to ensure full incorporation in the dough? Or add milk to reach consistency? Or, …..? Thank you for a wonderful recipe. This will become a staple in my house.
Glad to hear they turned out well for you, Bobby! That’s interesting about your eggs. Typically an egg without shell weighs around 50g. If you find you’re adding way too many eggs over the 4, I’d say use milk instead. You are right, adding too many egg yolks will definitely increase the richness of this dough!
I made these yesterday morning, starting the day before. After shaping, I let them rise on the counter overnight at a out 68°F RT, because I needed them done by 8 am for a meeting. They were nice and puffy but didn’t look overproofed. I live at 5600 ft elevation. Baked for 40 min. They were tasty, but I had some problems. First, they were stuck to the pan so bad I had to chip them out, which didn’t work very week. Second, they were very dry. A little disappointing. Any suggestions for a better outcome?
Very interesting, Devona. You could try buttering the pan more liberally inside if they stick, or pick up a pan with a nonstick coating inside (the pan I use in the post has this). Also, be sure to keep your pan completely covered during the proof (well, during the entire process!) so the dough doesn’t form a skin or dry out. I also live at high altitude (5280ft) and things get dry here very, very quickly.
Additionally, you could try increasing the liquid portion of this recipe to make a dough that’s a bit more moist. Perhaps a 5% increase in water (or even milk) will help. Since you’re at an even higher altitude than me, you might need a little more hydration. Caution: add the water in slowly through the mix so the dough doesn’t get too wet, the butter will slacken the dough even more.
Let me know how this goes!
Thanks so much for your reply. OK – true confession… After I messaged you, I went back and re-read the recipe, and realized I didn’t grease the pan at all. I guess in my mental calculation I figured the butter in the recipe would be enough… Lesson learned. I will try a smidge higher hydration next time. I imagine my flour is pretty dry – as the air is pretty dry here. I also think I could cook them a tad bit less… Despite being at a higher altitude, I have not needed to increase the baking time of things. I think I did them 40 min (not looking at the recipe at the moment) but I think that’s what I did. I will watch them a little more closely. I’ll let you know how it goes!
Devona
Ok, sounds good Devona, let me know how the next attempt goes!
I don’t have a stand mixer at the moment, but I’d love to make these anyway. Is there any way I can make them by hand?
It’s definitely possible to make these by hand, it’ll just take some work getting the butter into the dough. I’ve talked to many bakers now who’ve done successfully made these by using the “slap and fold” kneading technique I talk about here and work the butter in through stages. Give it a go!
Thank you for this recipe! It’s my ‘go-to’ for cinnamon buns. Everyone raves about them. I’ve even left them for long bulk ferment for over 24 hours in fridge and I thought there was no way they would be ok, but they still managed to turn out delicious! I’ve also tried several of your other recipes with mixed outcome. People regularly request them! I live in Ireland and I think climate, humidity, even water! and flour (I’m afraid I have to buy mine online from a Welsh mill to get the kind of taste I like) have a massive bearing on the final outcome. I’ve read Ken Forkish’s book, but so many of the recipes are ‘variations on a theme’. Maybe I’m wrong, but I think if you find a formula that works, you should maybe just stick to it? I’ve tried every variation under the sun – oven temperatures, hydration levels, different mixes of flours, using diastatic malt and sometimes I think it’s just a kind of lottery ‘luck’ that all will meld and produce that ‘perfect loaf’! Your bread and photos are amazing! Thank you again for your recipes and inspiration!
I just made these as my birthday treats… I didn’t much like working with that sticky dough but the result was surprisingly soft rolls (now I realised I never had done it properly before :P) I baked it at slightly higher temp 200C at for 20 minutes- it was a mistake but it worked. Thanks so much for the recipe.
Do you think we could use kefir instead of milk in the recipe? Could add a touch of baking soda to get rid of the acidity in the kefir. Just not sure if it would work in a brioche dough. What do you think?
Hi Maurizio,
I’ll be making these for the second time over the weekend and having just made your bombolini recipe, noticed how similar the recipes are except for the milk and percentages for enrichments. But the timings between the two are very different and I thought maybe I’d give these a try more closely following the other timings since i really felt I hadn’t fermented and proofed my dough enough. Have you ever made these with the longer (6 hours each) timings for bulk fermentation and final proof with 12-hour cold retardation between?
Hi, if i don’t have a mixer, do you think I could do that part by hand?
You can certainly do this by hand but it is challenging to work the butter in. Some commenters below stated they were able to mix by hand using the slap/fold method (there’s some videos of this with brioche dough on YouTube).
ABSOLUTELY DELICIOUS!!! Unbelievably light and fluffy cinnamony goodness. This is the only way I’ll be making cinnamon rolls from now on. I just cannot believe how delicious these are. Thank you sooooo much Maurizio!!
Hey! I’ve made these once and they were super. I’m currently trying it again but will make the dough into a babka!
I am wondering, how do you determine when bulk fermentation is finished for an enriched dough? The past time I made these buns, and the prior times I’ve made the Tartine brioche, I’ve pretty much blindly followed the bulk schedule (which is not the case when I’m making straight sourdough loaves). Am I looking for the same signs as a lean dough to tell when things are done? It’s kind of a dumb question. Anyhow, thanks!
thank you for sharing this recipe! it looks really wonderful and I can’t wait to try making it. quick question – do you think it’d be possible to use buttermilk instead of whole milk? i have some left back from a previous recipe, and i’d like to use it up soon if possible.
Hmm, this is a great question. Buttermilk tends to have a level of acidity in it that regular milk does not and I’m not sure how this will impact fermentation in the dough. I’d have to say “maybe” and it really would come down to just testing it out and seeing the result! Sorry, I’ll have to do this experiment myself to say for sure yes or no 🙂
These are REALLY rich even without a glaze. Fantastic. I varied one step – I worked the butter into the flour with a pastry cutter before adding the wet ingredients as I didn’t think my stand mixer could handle the dough. I then hand mixed in the wet ingredients and proceeded per the recipe. Still came out great. The chilling is REALLY necessary. The other trick I did was to spray the work surface with some cooking spray before dusting it with flour, and then dumping the dough out to roll. This worked really well, it didn’t stick at all. Even cold, I ended up just patting out the dough without a rolling pin. I used my dough scraper to help roll it up and then to cut it. I made 16 rolls instead of 12 and they are still pretty big. Completely filled a lasagna baking pan. Great recipe.
Thanks for the feedback! I agree, they have lots of flavor and the glaze is totally optional. Interesting idea with the pastry cutter, almost like making pie dough. Yes, chilling the dough is so, so necessary. Not only does it let it relax a little bit but it helps firm up the dough (and butter) to make it easier for handing.
Thanks again and happy baking!
Divine! I admit I was skeptical when I made these. I’ve tried so many sourdough sweet roll recipes before and none ever delivered what I was looking for. But this recipe — WOW. I didn’t even follow the recipe exactly as written (I only have a handheld mixer and didn’t feel like standing there mixing for 10 minutes so I shortened the time considerably so not all of the butter incorporated) and they still came out delicious. I didn’t make the frosting. They’re perfect “naked.”
Troy — glad to hear that! Thanks for the feedback. I’ve made these without the frosting as well (I forgot to buy the stuff at the store, oops!) and they were delicious just the same. All depends on how sweet you prefer them.
Thanks again and Happy New Year!
In your experience, can you always just replace yeast with sourdough? As I said above, I’ve tried many times to make sweet rolls using sourdough and they just never turned out quite right.
I do everything with natural leavening so for me, yes, I usually just do substitution (you’ll have to figure out exactly how much levain to use, though, it’s not 1-to-1). Commercial yeast does yield a different result in some ways, though. For example, some bakers prefer commercial yeast only in croissants, pizza, etc. as it will usually result in a less sour result (although my bread and pizza is usually not very sour) and produce more rise. It all depends on what you’re after. For me I use 100% natural leavening.