

Sourdough cinnamon rolls: the new every-weekend tradition? I began work on this recipe with the intention that these would be a wonderful Christmas morning indulgence, the birth of a new holiday baking custom. But after making them several times for testing, I’m convinced they should perilously be a weekend indulgence. Why limit ourselves and declare these only for special events and holidays? Seriously, let’s make them every weekend.
Cinnamon rolls fit so perfectly with the cold weather. They’re like that warm blanket you left on the radiator, that puffy wool sweater you wear around the house, or that cup of hot chocolate that breaks through the cold. Layers of tender dough segregated by ribbons of gooey cinnamon sugar and topped with a creamy, white sugar glaze—it’s enough to make you completely forget it’s cold outside or perhaps stop caring about winter altogether.
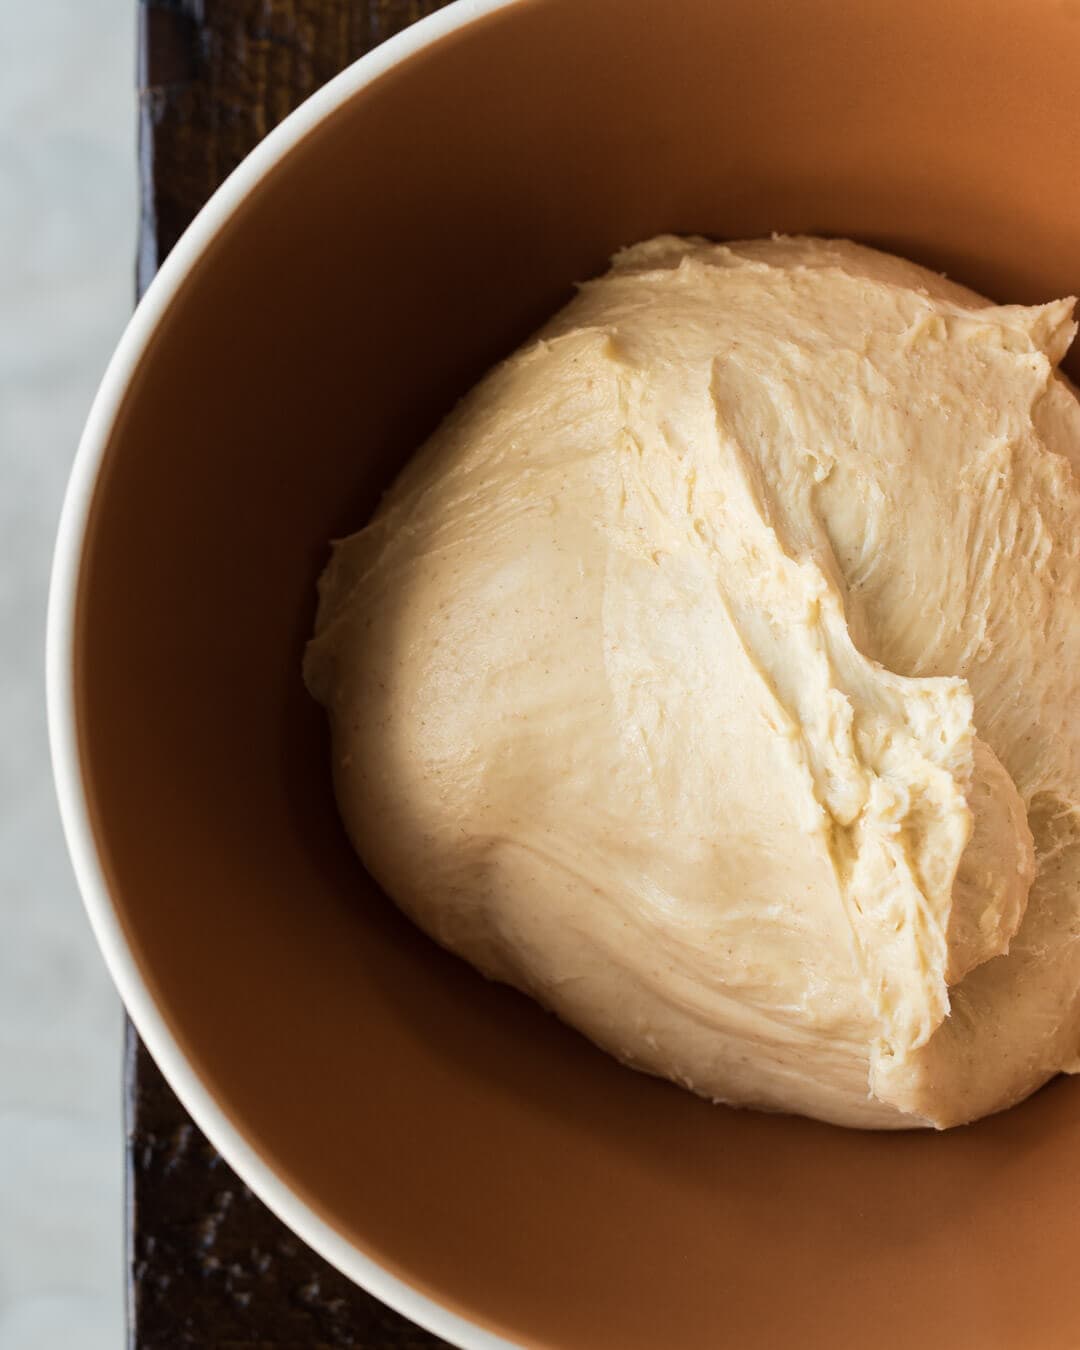
Brioche dough is the base for these sourdough cinnamon rolls, which is dough enriched with butter, sugar, and eggs. These ingredients make for an incredibly tender and mouth-melting crumb when added to a deep yellow dough. When pulled, these rolls shred apart almost like cotton candy, the only resistance provided by the melted brown sugar cinnamon near the bottom—they’re like a warm, gooey cloud of pure enjoyment. When presented with the opportunity, there’s nary a chance anyone will decline one of these on a plate.
These sourdough cinnamon rolls require a little extra effort, but once you get the hang of the process, it’s pretty straightforward—and, of course, totally worth it. The dough is also very versatile: you can adjust the mixing and baking schedule so they’re finished in a single day or spread out over three. The dough can be retarded in the refrigerator after bulk fermentation, shaping, and cutting, or both. I prefer a two-day process where I place the dough in the fridge after bulk fermentation. The next day I wake and get to work on the rolls, and I bake them fresh for breakfast (or brunch if late to rise).
Brown Sugar Cinnamon Spread
This spread has the right level of delicate sweetness and a comforting bite from the cinnamon. The mixture is more crunchy and thick than it is spreadable, which is my preference. When baked, swaths of the spread caramelize and other smaller areas stay crunchy, providing a subtle contrast of textures.
- 215g light brown sugar
- 40g all-purpose flour
- 2 tablespoons unsalted butter, melted
- 2 teaspoons cinnamon
- 1/4 teaspoon salt
Mix or whisk everything together in a bowl, so there are only a few clumps remaining. Keep covered until used (brown sugar dries out very fast).
Cream Cheese Glaze
The cream cheese added not only makes this glaze extremely velvety, but it also pairs wonderfully with vanilla. I’ve also tested various iterations, swapping out the cream cheese for maple syrup, adding orange blossom water, a dash or two of Angostura bitters… The options are endless.
- 114g cream cheese softened to room temp (4 oz, half a standard block)
- 62g (1/2 cup) powdered sugar
- 37g (3 tablespoons) whole milk
- 1 teaspoon vanilla extract
Add everything to a mixer fitted with the whisk attachment and whisk until creamy and soft. It’s best and easiest to use a mixer or handheld beater for this, but a handheld whisk will work if you want a workout. The mixer will ensure there are no stray clumps of cream cheese lingering about.
Sourdough Cinnamon Roll Recipe
It’s best to make this brioche-style dough in a stand mixer (like the one I have) due to the dough’s soft nature and relatively long mix time required. Most of the strength in this dough will be developed upfront at mix time with just a few more stretch and folds during the bulk to finish it off.
This recipe yields 12 sourdough cinnamon rolls but you can halve all the ingredients to make half a dozen (in this case, you’ll want to use a smaller pan). I’m using a USA Pan 9” x 13” rectangular pan to hold these 12 buns and because the pan is coated in silicone there’s no need for any parchment paper (it’s magic, really). If you don’t have this pan I’d recommend using parchment under the buns for easy removal.
You will need a rolling pin for this recipe (in a pinch, you could use an empty wine bottle). I am very partial to my rolling pin: it’s a non-tapered solid block of maple wood that’s functional, used in countless tasks around my kitchen, and just a beautiful tool (and made in the U.S.A.).
Sourdough Starter Notes
I know when some read this recipe title and see the word “sourdough,” thoughts of sharp sourdough cinnamon rolls might enter the mind, but this is definitely not the case. I maintain my sourdough starter with frequent refreshments to ensure acidity is kept low. Additionally, when I call for a mature starter in the ingredient list, “mature” means when my starter is just about to its peak height and has not yet fallen. If the starter is used at a state that is overly ripe (perhaps it’s fallen and has been that way for an hour or more) then the resulting rolls might be a touch sourer.
If you’re interested in how I maintain my sourdough starter head over to my Sourdough Starter Maintenance Routine post for in-depth details.
Dough Formula
The target final dough temperature (FDT) for this dough is 70-73°F (21-22°C).
| Total Dough Weight | 1,250 grams |
| Pre-fermented Flour | 42.00% |
| Yield | One dozen rolls |
| Weight | Ingredient | Baker’s Percentage |
|---|---|---|
| 477g | All-purpose or bread flour (King Arthur All-Purpose Flour) | 100.00% |
| 133g | Whole milk, cold from the fridge | 28.00% |
| 191g | Unsalted butter (Kerrygold) | 40.00% |
| 191g | Whole eggs (about 4 large) | 40.00% |
| 48g | Fine white sugar (caster sugar) | 10.00% |
| 11g | Salt | 2.3% |
| 200g | Ripe, 100% hydration liquid sourdough starter | 42.00% |
Method
1. Mix – 9:00 a.m.
First, take out the butter and cut it into 1/4” to 1/2” squares; let them sit in a bowl to warm to room temperature while gathering and mixing other ingredients.
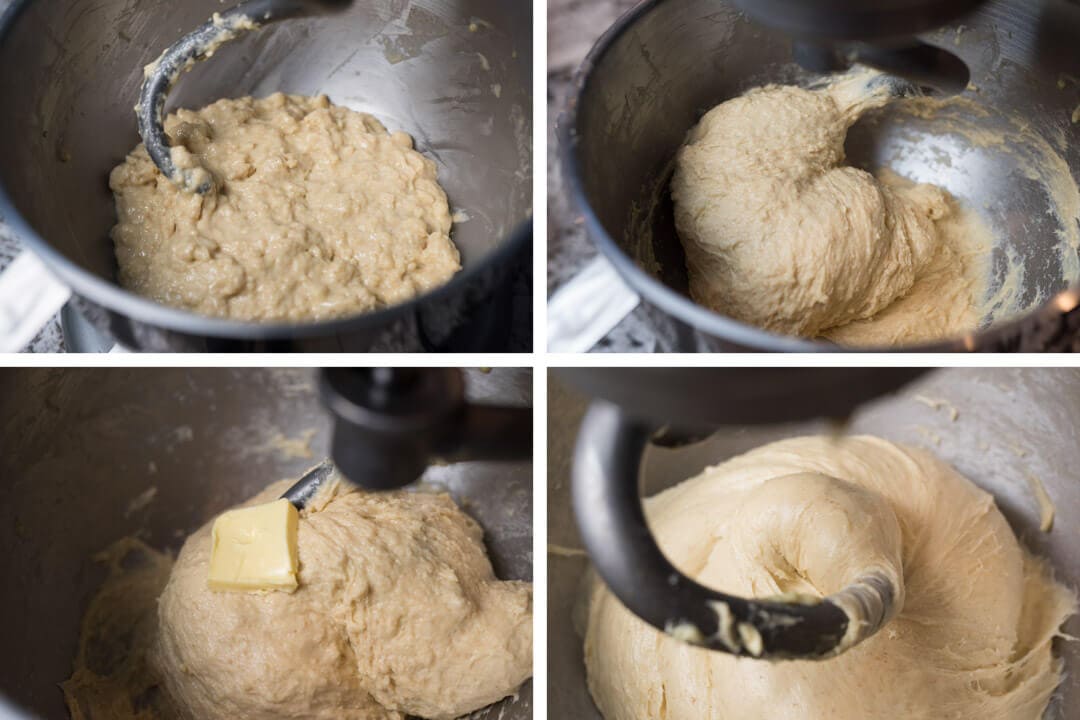
Mixing will occur in three stages (clockwise starting in the upper-left in the image above, the last image is the final dough). The first stage involves the initial incorporation of all the ingredients, followed by a 10-minute rest. The second stage will be strengthening the gluten in the dough before adding butter. The third and final stage will be adding the room-temperature butter blocks to the strengthened dough.
Initial Incorporation
In a medium bowl, add the cold eggs, cold whole milk, sugar, and mature sourdough starter. Whisk together until incorporated.
Add the flour and salt to the bowl of a stand mixer fitted with the hook attachment. Set the mixer to low (level “1” on my machine, one notch above “STIR”), and slowly start to pour the liquid into the mixer bowl. Add a little at a time over the course of 3 minutes. Once finished the dough will look very wet and have clumps, let it rest for 10 minutes before further strengthening.
Strengthen Dough
After the 10-minute rest, turn the mixer to medium speed (number “4” on my machine) and mix for about 5-6 minutes until the dough starts to come together and all clumps have disappeared. The dough should start to pull away from the sides of the bowl, but it will not completely detach from the bottom. If the dough doesn’t want to come together and it’s overly wet, add a little flour, a tablespoon at a time, until it comes together.
Incorporate Butter
Butter temperature is important. It should be slightly cold to the touch but easily pliable. If the butter is too cold, it won’t incorporate easily into the dough; if it’s too warm (almost melted), it will result in a greasy dough. Don’t fret if the temperature is off. Pop the bowl with butter in the microwave for 10 seconds to warm slowly, or place it into the freezer for a minute or two to firm up. Adjust as necessary.
Add the butter to the dough one square at a time, waiting until the previous block is absorbed before adding the next. It is easiest to place it right where the hook meets the dough. Continue until all the butter is added and there are no visible butter patches; this may take 8-10 minutes at a low to medium mix speed.
2. Bulk Fermentation – 9:30 a.m. to 11:30 a.m.
Transfer the mixed dough to a bulk container and let it ferment for 2 hours at 75ºF (23°C). Just as when baking sourdough bread, perform 3 to 4 sets of stretch and folds during the bulk fermentation stage, spaced 30 minutes apart. To perform a set, grab one side of the dough, stretch it upward, and fold it over to the other side. Fold once at each side, North, South, East, and West. If the dough is firm after the third set, skip the last set but let the dough rest for a full 2 hours.
3. Chill Dough – 11:30 a.m. to 2:00 p.m.
Place the covered bulk container into the fridge for at least 2 hours (I like 3-4 hours).
Overnight option: The timing is very flexible at this point. Once the dough is covered and refrigerated, it can rest overnight, and the rest of the process can be completed in the morning for fresh rolls early in the day or for brunch.
Roll the dough out to a rectangle only when it’s completely chilled.
The dough needs to be completely cold and firm to the touch before rolling out; do not skip this step.
4. Shape Rolls – 2:00 p.m.
Before rolling out the dough, make the Brown Sugar Cinnamon mixture (see recipe, above).
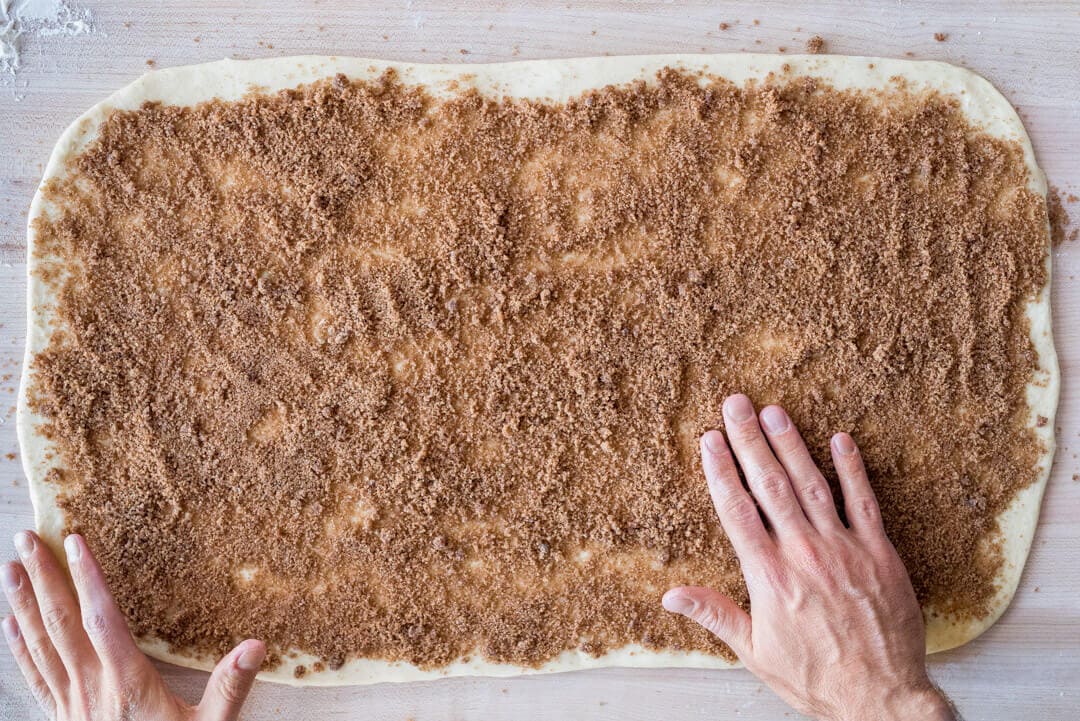
Flour your work surface. Then, remove the chilled dough from the fridge and turn it out onto the floured surface. Flour the top of the dough and the rolling pin, and begin rolling the dough. Roll it out to an 11” x 21” rectangle that is oriented so one of the long sides is near your body and the squat ends are to the sides. Use a bench knife and dust the surface with flour wherever the dough sticks.
Try to keep your warm hands off the dough as much as possible to avoid heating it. Sprinkle the dry Brown Sugar Cinnamon mixture evenly over the dough, but leave a small margin at the very top bare. When the dough is rolled up, that small margin will help seal the roll.
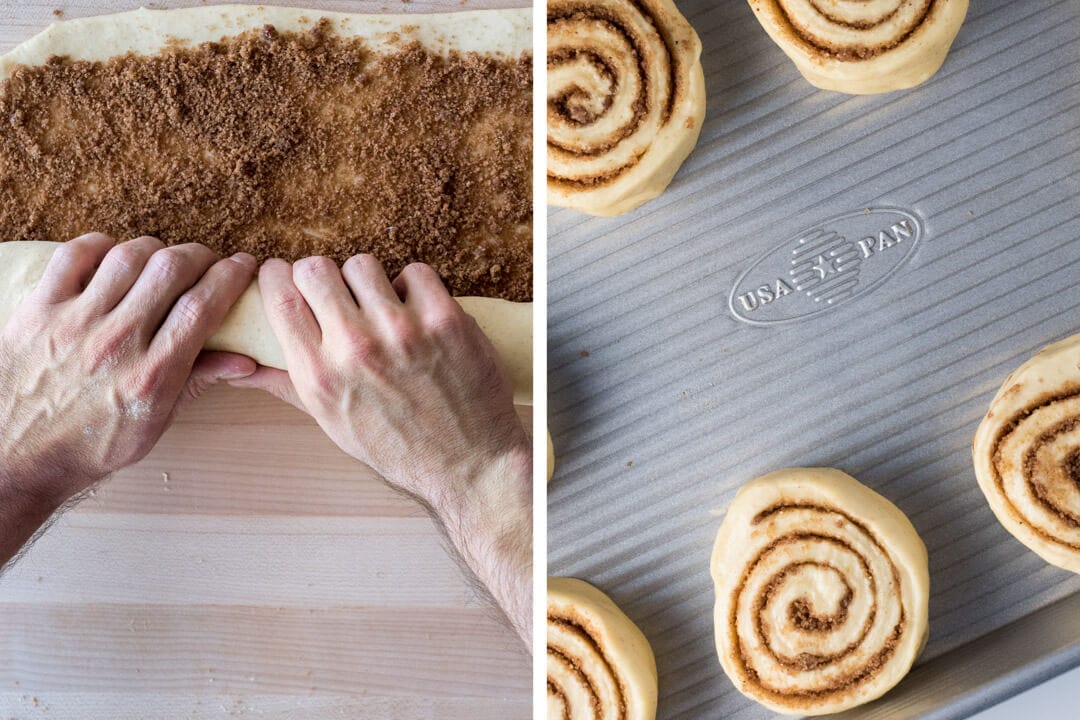
Starting at the long end nearest you, fold up a small portion of the dough all the way across. Then, roll the dough one revolution at a time, starting at the left side and moving to the right. During the first few rolls, it’s important to roll things up sufficiently tight to make cutting and transferring easier later.
Continue rolling from left to right, one revolution at a time, until the dough is completely rolled up into a “log.” Lay a ruler and using a sharp knife or bench scraper, cut the dough every 1 3/4” inches. You can go smaller if you want squatter rolls or up to 2” for taller rolls (if you cut smaller, you’ll have more rolls and taller you’ll have fewer).
Transfer the cut discs to a baking pan with some space around each one.
A few tips to help with this step:
- Place the rolling pin in the freezer while the dough is chilling to help keep it cold
- If the dough warms up excessively while rolling out, transfer to a baking sheet and place in the fridge for 15 minutes to cool
- If the dough is very pliable and warm after it’s completely rolled up, place the entire rolled “log” into the fridge on a baking sheet before cutting
7. Proof – 2:30 p.m.
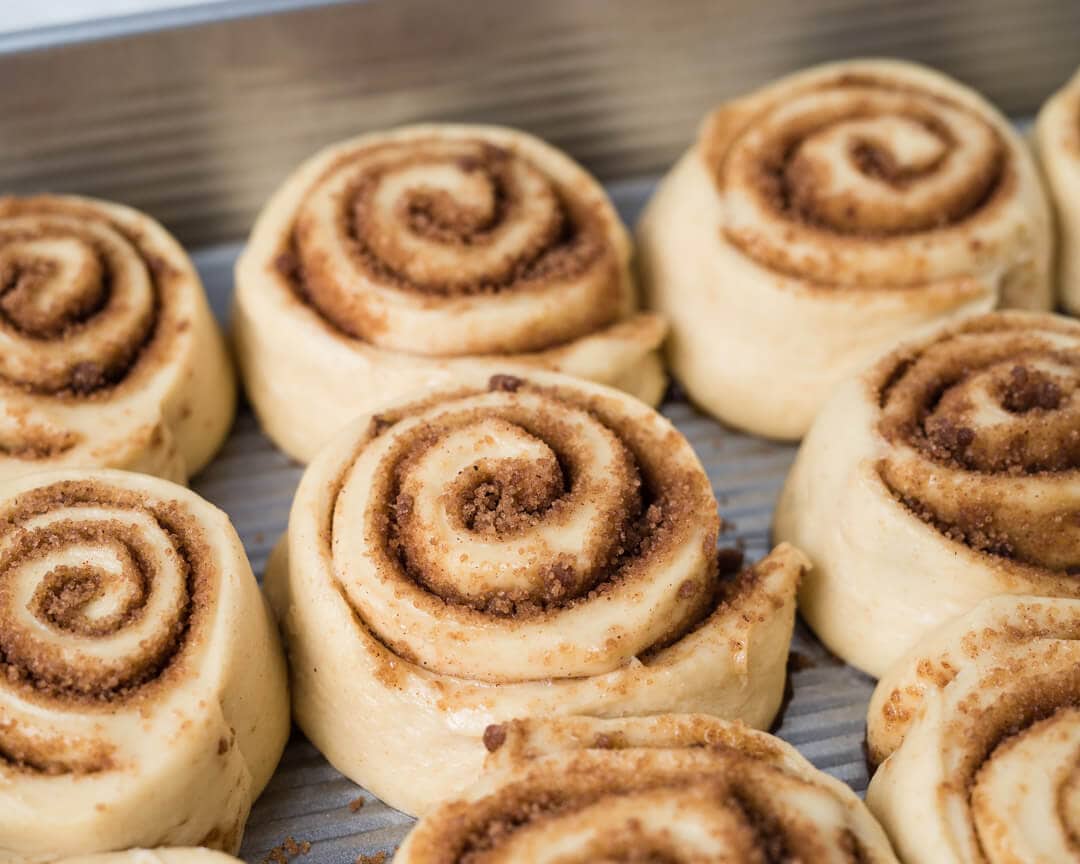
Place the baking pan with cut dough somewhere warm, around 77°F (25°C), to let proof for 2 hours. During proof, the rolls will relax out and start to puff up, eventually, they may touch each other but it depends on how much space you have between rolls.
Don’t be alarmed if you see any sugary liquid leaking out of the rolls, it’s totally normal. Additionally, if any of the layers develop gaps between them it only means when they rise in the oven they’ll be a little more interesting with pieces jutting up and out—beautiful.
8. Bake – Preheat oven at 4:00 p.m., Bake at 4:40 p.m.
Preheat oven to 400°F (200°C) during the last 30 minutes of proof. Place the baking pan in the oven and bake for 20-25 minutes until the rolls are well colored.

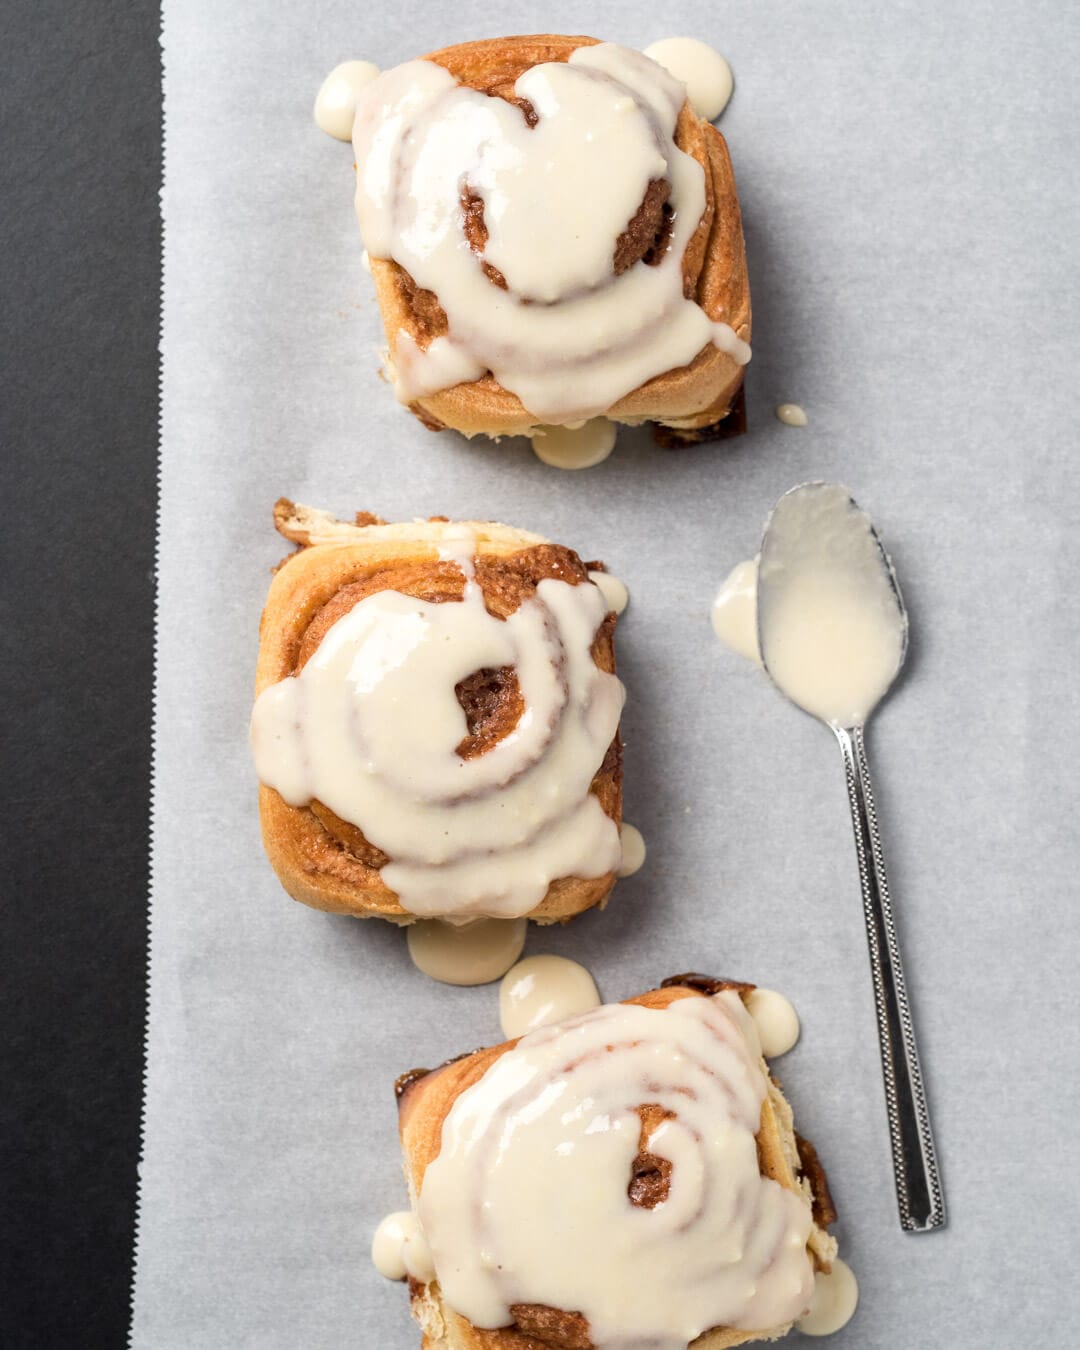
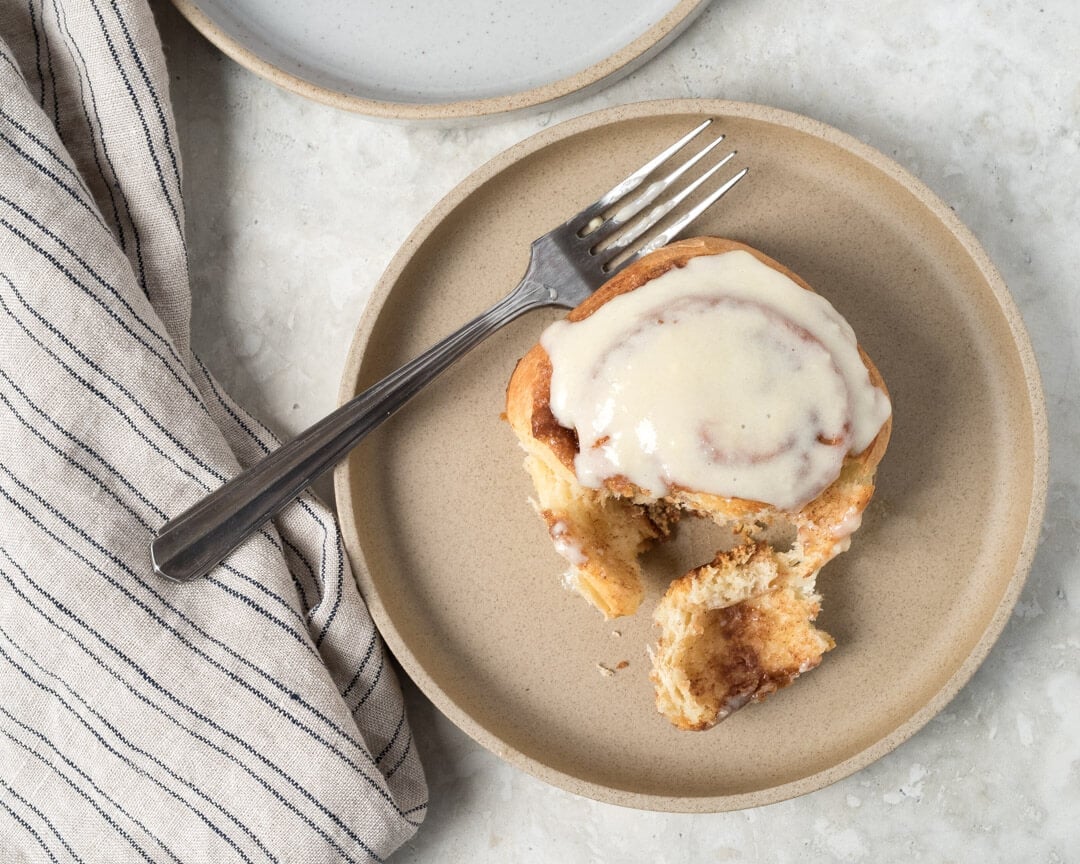
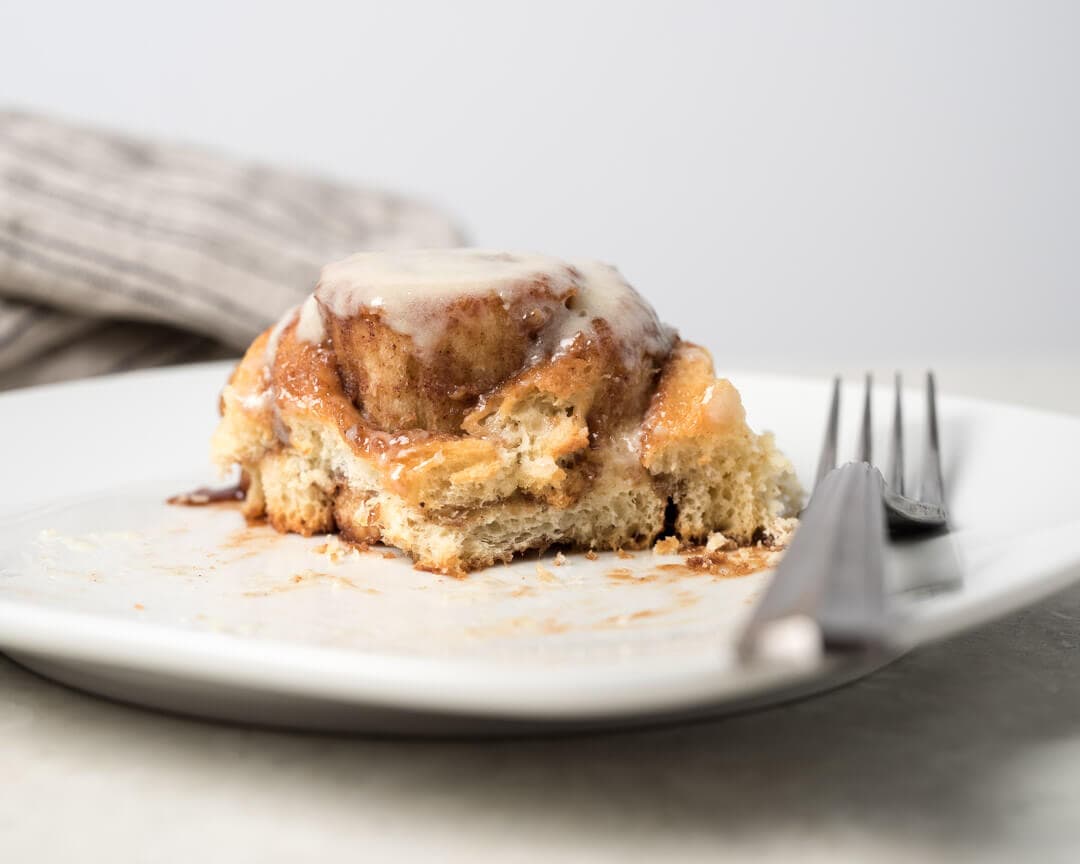
Spread the glaze over the rolls once cooled. These sourdough cinnamon rolls stay great for a few days in the fridge, and I always reheat them (without glaze) in the oven or microwave to warm back up before eating. They fill the kitchen with that intoxicating aroma once again and always seem to come out as if they were freshly baked.
Conclusion
Whatever the distraction, whatever the work being done—even if a bath is drawn—the kitchen’s aroma when these are baked is sure to draw out all. It reminds me of those old cartoons where they put out a piece of cheese, and you see everyone floating toward it in a trance—just like that.
These sourdough cinnamon rolls are addicting. The brioche interior is extremely tender and silky, interrupted only by warm, gooey brown sugar cinnamon. As I alluded to earlier, the cream cheese glaze is tremendous, but the possibilities here are endless, each change bringing on a whole new dimension to these sourdough cinnamon rolls.
Well, I know I’ll be making these sourdough cinnamon rolls for Christmas morning! But now that the word is out and everyone knows what I’m baking every other weekend after that I might be expecting a few more surprise visits from friends and family. I’m completely fine with it, though, because I’m happy to share with any and all who stop by—it may just mean I sneak off with one or two before they do. Buon appetito!
Now that you have experience working with enriched dough, the next step is my naturally leavened bomboloni (doughnut) recipe! They’re based on a similar dough with just a few changes—they’re absolutely incredible. Or, if you’re looking for more rolls, have a look at my ultra-tender sourdough cardamom rolls for a different take.
Print
Sourdough Cinnamon Rolls Recipe
- Prep Time: 7 hours 30 minutes
- Cook Time: 25 minutes
- Total Time: 7 hours 55 minutes
- Yield: 12 cinnamon rolls
- Cuisine: American
Description
These sourdough cinnamon rolls are addicting. The brioche dough is extremely tender and silky, interrupted only by warm, gooey brown sugar cinnamon. If you’re looking for the perfect weekend treat, these cinnamon rolls are the ticket.
Ingredients
Dough
- 477g all-purpose or bread flour
- 133g milk, whole
- 191g butter, unsalted
- 191g eggs (about 4 large)
- 48g sugar, caster
- 11g salt
- 200g sourdough starter
Filling
- 215g light brown sugar
- 40g all-purpose flour
- 2 tablespoons butter, unsalted and melted
- 2 teaspoons cinnamon, ground
- 1/4 teaspoon salt
Cream Cheese Glaze
- 114g (4oz, half a block) cream cheese softened to room temperature
- 62g powdered sugar
- 37g milk, whole
- 1 teaspoon vanilla extract
Instructions
- Mix (9:00 a.m.)
Cut the butter into 1/4″ pats and let warm to room temperature while mixing the rest of the ingredients. In the bowl of a stand mixer fitted with the dough hook attachment, add the eggs, milk, sugar, and sourdough starter. Whisk together until incorporated. Add the flour and salt and mix on speed 1 for 3 minutes until incorporated. Let the dough rest for 10 minutes. After the 10-minute rest turn the mixer to speed 2 and mix for about 5-6 minutes until the dough starts to come together and all clumps have disappeared. The dough should start to pull from the sides of the bowl but it will not completely remove from the bottom. If the dough just doesn’t want to come together and it’s overly wet add a little flour, a tablespoon at a time until it comes together. With the mixer set to speed 1, add the butter one pat at a time, waiting to add each until the previous is absorbed. Continue until all the butter is added and the dough is shiny and smooth, this could take around 8-10 minutes. - Bulk fermentation (9:30 a.m. to 11:30 a.m.)
Transfer the mixed dough to a bulk container and let ferment for 2 hours at 75ºF (23°C). Perform 3 to 4 sets of stretch and folds at 30-minute intervals. - Chill dough (11:30 a.m. to 2:00 p.m.)
Place the covered bulk fermentation container into the fridge for at least 2 hours to thoroughly chill. - Shape rolls (2:00 p.m.)
First, make the filling. In a bowl mix together the filling ingredients and set aside. Next, take out your dough from the fridge, lightly flour your work surface and the dough, and roll out to an 11×21″ rectangle with a long side closest to your body. Spread the filling evenly over the dough. roll the dough up away from you into a tight log. Cut the log into pieces every 1 3/4″. Transfer the cut pieces to a baking pan with space around each one. - Proof (2:30 p.m. to 4:30 p.m.)
Cover the pan and proof somewhere warm, around 77°F (25°C), for 2 to 3 hours. The dough will relax and puff up during this time. They’re ready to bake when the dough feels very soft and light—give the dough additional time to proof if necessary. - Bake (4:30 p.m.)
Preheat your oven to 400°F (200°C). Slide the rolls into the oven once preheated and bake for 20-25 minutes. Spread the glaze over the rolls once cooled.
Notes
These sourdough cinnamon rolls are best the day they’re made, but can be reheated the next day (without glaze) and then topped with freshly mixed glaze.
If you use this recipe, tag @maurizio on Instagram and use the hashtag #theperfectloaf so I can take a look! Thanks so much to USA Pan for sponsoring this sourdough post! As always, all opinions and thoughts here are my own.


673 Comments
Hi Maurizio,
What an awesome recipe! It made a great breakfast and there weren’t even leftovers left to reheat! For the second batch, I was thinking about some soaked toasted wheat bran for an extra nuttiness but without the heft a higher proportion of whole wheat flour brings. Would that make for a lighter, airier dough than say, a 50-50 brioche?
Thanks for creating such an inspirational blog with amazing photos every step of the way.
Alex
Really glad to hear that, Alex! I think that sounds delicious — toasted wheat bran does bring a nice depth of flavor. If it was added later in the mixing process it could help produce a lighter result than if using more whole wheat in this dough. That said, I’ve been meaning to experiment with more whole grains in this recipe, I think it would taste great!
Hope that helps and thanks for the kind words!
Hi,
A quick question if you can answer on New Year’s Eve so I can have sourdough cinnamon rolls on New Year’s Day:
Im unclear about how to roll the dough. Do I roll it from the long side closest to me upwards? Or do I roll the rolls from left to right? Thank you so much!
Sorry, it’s now just past NYD, but I’ll still explain here. You can really roll whatever way is easiest for you, but for me it’s easiest to have the long side of the rectangle closest to my body, then roll the entire long side up toward the top (farthest from you). You can work from left-to-right and roll a small bit of the long rectangle at a time until you complete one revolution. Keep going, a little at a time, until the entire rectangle is rolled up.
Hope that helps and Happy New Year!
Cinnamon rolls are the traditional Christmas breakfast in my house. I grew up on the kind popped out of a cardboard tube. Since then I’ve been trying to convince my family that homemade is better using various recipes with…various results. These are the best rolls I’ve ever made!!! I’m not going to lie, I wasn’t super confident that my starter could raise such a hefty dough, but it pulled through in the final hour. What a treat. Will be making these again and again!!!
Hah! We had those rolls-from-a-tube as a kid as well. Happy to hear these turned out so well for you! I made them recently (with the intention of making them on Christmas but tried my hand at making canelé instead) and they’re just so good, every time.
Thanks for the feedback and enjoy!
Merry Christmas, Maurizio, and best wishes to you and your family for a great 2018!
I made these last night so they’d be ready to go on Christmas morning. My first try, and YUM! I was expecting them to be a little sweeter than they are, without the icing – I usually skip the icing on Cinnabons and things like that because it makes them too sweet, but my family and I agree that they really benefit from the added sweetness of the icing.
I was surprised by how strong the dough was even before the stretch & folds – I guess from the extended mechanical kneading while the butter was being incorporated. I used KA AP flour, and the final product was just a little tougher than I expected – I might try a lower protein flour next time – I have a big bag of Gold Medal AP flour I got at Costco for cheap, which is only ~10.5% vs KA’s 11.7%
Jeff, glad to hear they turned out pretty well! Yes, the dough strengthens up really quick with the aid of the mixer. If you find it’s strong enough, skip the stretch and folds altogether. I do find that KAF AP can be a strong flour at times, increasing the liquid in the dough or even a longer autolyse will help counter that. Using a softer flour is also nice for these since we’re really looking for a super tender result.
I hope the next batch turns out even better for ya! I hope you had a Merry Christmas and Happy New Year!
Can you give me a timing that results in the rolls being ready to eat at 10am?
You could pause the process right before you shape them into rolls. Leave the dough in the fridge overnight until early in the morning, then take it out, shape them and let them proof until just before they need to bake to be ready by 10:00 a.m.. The other option is you could shape them and place them into the square tray then pop that tray into the fridge. The next morning, take it out and fully proof them until ready to bake.
Hope that helps!
Hello! So my rolls are cooking now. They are flattening out quite a bit in the oven. Any tips?
Hopefully they puffed up for you! Sometimes they’ll slacken out and then once the heat really gets going they pop right up.
hi, i just made these rolls. everything was perfect til i took them out of the oven. there was some shrinking and some uncooked dough, i think. a couple of notes though: i cut them 1.5 inches and used a 9×13 pan and a loaf pan to fit them all. i added chopped pecans inside the filling. the flour i used was a combination of mostly all purpose flour, small amounts of bread flour and whole wheat bread flour. can you shed some light to what the cause might be? overproof? underproof? not mature starter? i just read that ur elevation is at 3000ft, ours is 1100, and i did bake it for 40mins., maybe i overbaked? would love to try and make them again.
Hey! Interesting about the unbaked dough. Perhaps the added pecans require the entire thing be baked a little longer (they’ll absorb heat) to ensure a thorough bake. There’s a difference between under-baked and under-proofed, though. If they were dense and not airy then my inclination is to say they need more time in bulk and/or proof. But if the dough was light and airy but not “set” then I’d say a longer baking time is required! Those are my guesses, let me know how the next attempt goes! I make these quite often and I feel like it’s just a matter of dialing in your oven and environment.
You stink!!!!!! Grams??? How about you add the cup amounts to recipe!!!!!
Sorry about that! These baked goods, as well as all the recipes here at my site, turn out much more consistently when the ingredients are weighed instead of using volume measurements. There’s a few converters online, if you’re so inclined. Happy baking!
Stinks? That’s a bit harsh….well, more than a bit, actually. And I strongly beg to differ. Grams are ever so much more precise, and I adore recipes that use them for measurements.
I made these today, and they turned out terrific. Can’t wait to have the leftovers for breakfast tomorrow. Kudos, Maurizio.
I especially loved the tip about rolling out the dough once it was thoroughly chilled. Easiest time I’ve ever had making cinnamon rolls. I also loved that the filling was not loaded with butter. However, I did taste the flour a bit. I’m afraid to cut back on the amount because the caramel was a nice consistency leaning toward too loose and am afraid it might be too runny with less flour to thicken. Any suggestions? Cornstarch or arrowroot powder, perhaps?
Yes, a true Baker uses a Scale to measure!
Really glad to hear they turned out well for you, Miquela! And thanks so much for the kind words. Arrowroot would be a great idea, it should help thicken it up with minimal taste. Maybe even more sugar… but that might make it more runny when it gets baked. I’d say arrowroot, great idea!
Hi Maurizio,
Great Recipe ! the rolls turned out lovely. Thanks
Right on Deepa, thanks for the feedback! Enjoy ????
Maurizio, thank you so much for sharing your method. And thanks for being so connected to your visitors, the discussion that happens in the comments area is just as enlightening as the post itself.
I’ve made your cinnamon rolls twice already, and even though I see that the quest for the “perfect” roll is just beginning, I’m already pretty pleased with the flavour I obtained so far. I’m struggling with the baking bit. In my first attempt, I followed your instructions literally to gauge the necessary adjustments (if any), and I noticed that I needed more time or more heat. I removed the baking ban from the oven at the 50th minute and they looked pale but the filling had caramelized and stuck to the pan like superglue. In the second attempt, I went for higher temperature to achieve the desired brown-ness in 45-50 mins: 200 C. Bad decision, because even though I achieved the right colour, the filling made the whole batch stick to the pan once again and this time even harder, to the point I just couldn’t take them out with breaking. So, what am I possibly doing wrong? I’ve coated the pan with butter (and flour, in the second turn) but my pan doesn’t have these nice dents yours has. A silpat would help? The parchment papers available where I live burn in the oven (go figure…).
My guess is that temperature must not be fiddled with and the real variable here is TIME. However, I don’t seem to be able to avoid the sticking to the pan. Can you shed any light on my problem?
I’m a big fan. Thanks a lot for your attention and efforts to spread the sourdough culture around the world.
You’re very welcome, Matheus! Thanks for stopping by.
Glad to hear you’re on your way with these, sound like they do need some fiddling. I’d say yes, a silpat would work well (just don’t exceed the max rated heat for the pad). The pans I use are coated in natural silicone and essentially are non-stick — I should have made that more clear in this post. The filling can caramelize and burn much faster than the dough itself, so this is a concern.
I’d say go with a silpat if you have one, this will fix that issue, I believe! Also, I agree, I’d keep the actual temperature lower like you originally did and just lengthen the time. The filling that sticks to the pad will be discarded but the filling inside and on top of the buns should bake up slower and be just right when finished.
Let me know how it goes! Thanks so much for the kind words and happy baking ????
Can i freeze it for more than 24 hours? I added a sprinkle of yeast because planned at the beginning to bake it on the same day.
Thank you!
I’ve not tried to freeze this dough but it should work very well — brioche style doughs refrigerate and freeze nicely!
hey there, so i dont have a stand mixer. Any suggestions or tips in regards to just using a standard electric hand mixer and incorporating the butter? I am really intimidated to try this for that reason,but I feel like i NEED to make these! thanks!
Hey, Chenoa! I’ve never used a hand mixer for this. If you’re talking about a beater style mixer I don’t think this will work too well — it’ll likely not even be able to mix the dough and will just get stuck.
No need to be intimidated by this! You can definitely hand mix this dough, it’ll just be a little sticky and that’s just fine. Make sure to keep the dough cold during mixing, if it starts to feel very greasy then plop it into a bowl, chill it in the fridge for a bit, take it out and continue mixing. I’ve heard others using the “slap and fold” mixing technique with great success! You could search YouTube for a video on “mixing brioche by hand” or “slap and fold brioche” — some videos should show up to give you an idea!
You’ll love this recipe!
I used this dough to make donuts and even fried a couple of the side cinnamon rolls. They were amazing!!!!
I am SO trying this!
Hi Maurizio , thank you for the wonderful recipe. I tried it with SD discard and it came out wonderful ! Looking forward to more wonderful recipes.
Excellent, glad to hear that! More recipes coming ????
Hi Maurizio – Any ideas for what to sub for whole milk? I’m thinking whole coconut milk… I don’t know of any other plant based milks that would have the body that the whole milk does…
That’s a very good question. I’ve never tried this recipe with other types of milk but I would *guess* that coconut milk should work, it will definitely have the body of whole milk. Almond milk might also be a possibility!
Hi! Thanks for the recipe and the comprehensive guide. I made 3/4 of a batch and got 10 massive rolls! I think I’ll have to reduce the amout of liquid next time. I live in South East Asia where it’s really humid so the dough was too soft and it spread a litle too much while proofing. But I still got great results! Love this recipe!
You’re welcome! Yes, adjustments will have to be made especially if you’re at a very humid location. No worries, though, simple changes. Hope the next batch turns out even better — happy baking!
Thank you for a fabulous recipe! This will be my “go to” recipe when we want cinnamon rolls. I baked these this morning after starting the process about mid day yesterday. Once the rolls were sliced and in the baking pan, I did a “partial proof” for about an hour, then covered and refrigerated them. I pulled them out of the refrigerator this morning (they continued to proof in the refrigerator) one hour before putting them in the oven. They baked to perfection in thirty minutes. (I wish I could post a picture so you all could see how perfect they are.) While they baked I made the cream cheese topping. My family and neighbors were eating them just an hour and forty five minutes after taking them out of the refrigerator. Thank you again. Your recipe made ten people very happy this morning.
I’ve been baking with my own wild yeasts for just over seven years and I bake two or three (or four) times a week. I tend and bake with two different sourdoughs. The oldest is seven and the younger is four years old. I’m always looking for great recipes and so glad to have found your site. Pizza tomorrow night – can’t wait to try your recipe!
You’re very welcome! That’s awesome to hear about the partial proof method, very nice technique. Adjustments like that can be done throughout the process, it’s a pretty forgiving dough! Timing is key with these, too, hungry people will only wait for so long in the morning 🙂
Super glad to have you along and I hope the pizza recipe turned out well for ya!
Rita, what a great idea you had. I am just getting ready to make the dough for tomorrow (my mom always made cinnamon rolls for Easter when growing up and now the tradition has fallen upon me) and your process fits perfectly into my schedule for the day of shopping, baking and cleaning up!
Wishing you and your family a joyful Easter … and great cinnamon rolls!
Have a wonderful Resurrection Day Rita! Thanks! And they were so good! Maurizio, the crumb is as tender as you said!
I made cinnamon rolls a few weeks ago with another wild yeast of just Einkorn flour for my friends and they were quite sour and it was too rich with the cream cheese icing in my opinion. So, I decided to use sour cream for the icing instead. What a nice, delicate creamy taste!
Wish I could take a picture of them, the Einkorn loaf (for family later today) and the 2 loaves of M’s sourdough whole wheat sandwhich bread for us this week all that got baked this morning. I’m rockin it!
Sounds like being a guest at your house is a GREAT thing!! Glad to hear this 🙂
Lol! If I ever get to build a house around the kitchen I have in mind, it will be made for guests and you are welcome ANY time if you ever want to venture to Ohio!
Hello M! I’m making a batch as we speak and while I’m sure they’re going to turn out tasting great, they have chosen to more or less…melt. Rather than having a nice 2×2″ish bun, I have fairly flat looking cinnamon roll cookies. I wonder what happened! Any ideas? PS: I used about half the ammount of Levain partly because I didn’t have enough and partly because I needed to leave my dough in the fridge overnight; Is this a possible cause?
Hey there, Sarah! So sorry for the late reply. Some “melting” is ok, as the dough proofs the filling will kind of ooze out (and it’s incredibly delicious when baked). It’s possible you proofed for a bit too long or at too high of a temperature OR you might not have rolled everything up tight enough so it all stays inside. Those are my guesses! I hope they turned out great.
Hi Maurizio would it be ok to use the excess sourdough starter(discard) that has been stored in the fridge to use for the buns?
You could try but there are a lot of variables there. You want your starter to be strong enough to leaven the dough, if it’s been in there for a long time without refreshment I’d be hesitant to use it. You could use that discard to try and make a specific levain for these buns and therefore use all the discard plus a little extra to ramp it back up — that’s another option!
Thank you for this recipe. I am making it for the second time today. I wonder if your baking time is correct, though? Mine came our rock hard and dry. I found a similar recipe on another website and they only bake for 20 to 25 minutes. I am going to bake it for the shorter time as I loved the taste anyway.
Please, adjust as necessary for your environment and oven. I live at a very high altitude so I tend to have to bake things a little longer than most! Pull back the bake time until they look “done” to you 🙂 Happy baking!
Hello Maurizio, I am so thankful for your sourdough obsession and truly feel it is an Art of baking! I have been baking with sourdough for 6 months now and I’m thoroughly enjoying the entire process. Especially seeing as we have had one cold winter here in Canada. I recently made your pizza and my husband and I both agree it’s the BEST pizza we ever had! Now I need to try more of your recipe’s and wondering if there’s another timeline I can follow so that I can wake up and bake your cinnamon rolls? Any suggestions would be greatly appreciated. Thanks again for all your efforts! Jojo Tosh
That’s really great to hear! Happy to hear the pizza went over so well also, it’s a staple over here and gets lots and lots of use!
You can use the refrigerator at most points in the process to “pause” the dough. One thing you could do is shape the cinnamon rolls and place them in the pan, the next morning (very early) get up, take them out and put them somewhere really warm to speed up the proof time. Then could be ready in a few hours if warm enough. Play with the times and temps for that final proof to suit. You could also try proofing partway the night before, toss them into the fridge, then finish the proof in the morning (maybe half time the night before and half in the morning). I’ve not tried this but it should be possible…
Hope that helps and happy baking!
Thanks, I will try your suggestions!
And yes, your pizza recipe will be added to our Saturday nights!!!
Another quick question, I’ve read somewhere that to test if the starter is active enough to use you drop a little bit of it in a glass of water and if it floats, it’s ready. Do you believe this to be true?
The “float test” works pretty well in some circumstances. It works if you have a liquid starter, a “stiff” starter (one that’s like 65% hydration) doesn’t really float so it’s not very reliable in that case. But yes, as a general rule once your starter floats it usually has enough activity to leaven your dough.
I really want to try making some cinnamon rolls like these but i don’t have a stand mixer. Do you think that i can successfully make these by hand and a danish dough whisk?
You can certainly make this without a stand mixer! The dough might be a bit challenging as you’ll have to mix for more time than I list here but keep at it until it comes together, incorporates all the butter, and looks like I have in my pictures above. I’ve had reports from other readers who have made these successfully without a mixer!
I am so glad I found your blog and looking forward to starting very first starter, so thank you for devoting so much of your free time to developing and maintaining this site; it is wonderful. This cinnamon roll and the waffle recipes are the first two my husband and I are looking forward to trying. To that end can you please confirm the oven temperature and time for this recipe? Under step number 8 it states to preheat the oven to 400 degrees but right underneath that it says 350 degrees and to bake for 40 – 50 minutes which seems like it might be a long time for a fully-risened roll.
Again, thanks again!
Joyce
You’re very welcome, glad to have you along! The title of that section says to “Preheat oven at 4:00 p.m.” but I can see how it does look like “preheat to 400”! Preheat your oven to 350ºF and bake for about 40 minutes. It takes that long here but I’m also at 5280 ft. elevation (things take longer to bake), keep an eye on your rolls near that time to cut the bake earlier if you notice they are coloring too fast.
Happy baking, Joyce!
I am ready to try to make the cinnamon rolls but am having a hard time converting the measurements. (Please people, don’t judge me.) Can you please list the flour, milk, butter, sugar, salt and sourdough in tablespoons, cups or whatever is equivalent? Thank you.
No worries, Gloria, no judgement shall happen! Unfortunately I’ll have to go back and convert these to be 100% accurate. There are calculators online, though, that should get you in the ballpark!
Thank you for the suggestion. I will keep snooping around to see what I can figure out. I thought King Arthur Flour had posted your recipe with the conversion but had no success on finding it. I will continue to look. Thanks again. Enjoy your site with all your information.
I wrote an article for King Arthur Flour for a naturally leavened kugelhopf (which also uses brioche dough as the base). They did the conversion for me to Imperial units! They do have a really nice conversion table at their website and it works very well with their flour. If you search for it at their site you’ll find it.
Thanks and glad you’re enjoying my site!
Must have figured something out correctly cause the rolls turned out fantastic!! I’m not even kidding. They were huge, tender and oh so delicious. Thank you so much for doing all the work figuring it out for us. Also I challenged myself to try your pizza crust and that was just to die for. It turned out as you described it. Thanks again for the step by step success.
Ahh that’s so, so great to hear! Glad these turned out so well for you 🙂 I love that pizza dough recipe, like I’ve said here a bunch, I make it just about every other week and it’s a huge hit with my family (and guests)!
You’re welcome, happy baking!
Hi Maurizio! I mixed this cinnamon roll dough last night. Planned on baking this morning. Unfortunately while baking sourdough bread last night, the heating coil in my oven broke! Was wondering if I could freeze these once in my pan before proofing? Thanks for any advice!
Hey Ashley! Super sorry to hear about your oven, that’s a real bummer (I have nightmares of this happening to me!). I have not tried freezing the dough but I have high hopes it will work well; I seem to remember reading other bakers freezing their dough. Please give it a try and let me know how it works out for you! I could see myself doing this in the future to always have these rolls on hand 🙂
Will do, thanks so much!