

Sourdough cinnamon rolls: the new every-weekend tradition? I began work on this recipe with the intention that these would be a wonderful Christmas morning indulgence, the birth of a new holiday baking custom. But after making them several times for testing, I’m convinced they should perilously be a weekend indulgence. Why limit ourselves and declare these only for special events and holidays? Seriously, let’s make them every weekend.
Cinnamon rolls fit so perfectly with the cold weather. They’re like that warm blanket you left on the radiator, that puffy wool sweater you wear around the house, or that cup of hot chocolate that breaks through the cold. Layers of tender dough segregated by ribbons of gooey cinnamon sugar and topped with a creamy, white sugar glaze—it’s enough to make you completely forget it’s cold outside or perhaps stop caring about winter altogether.
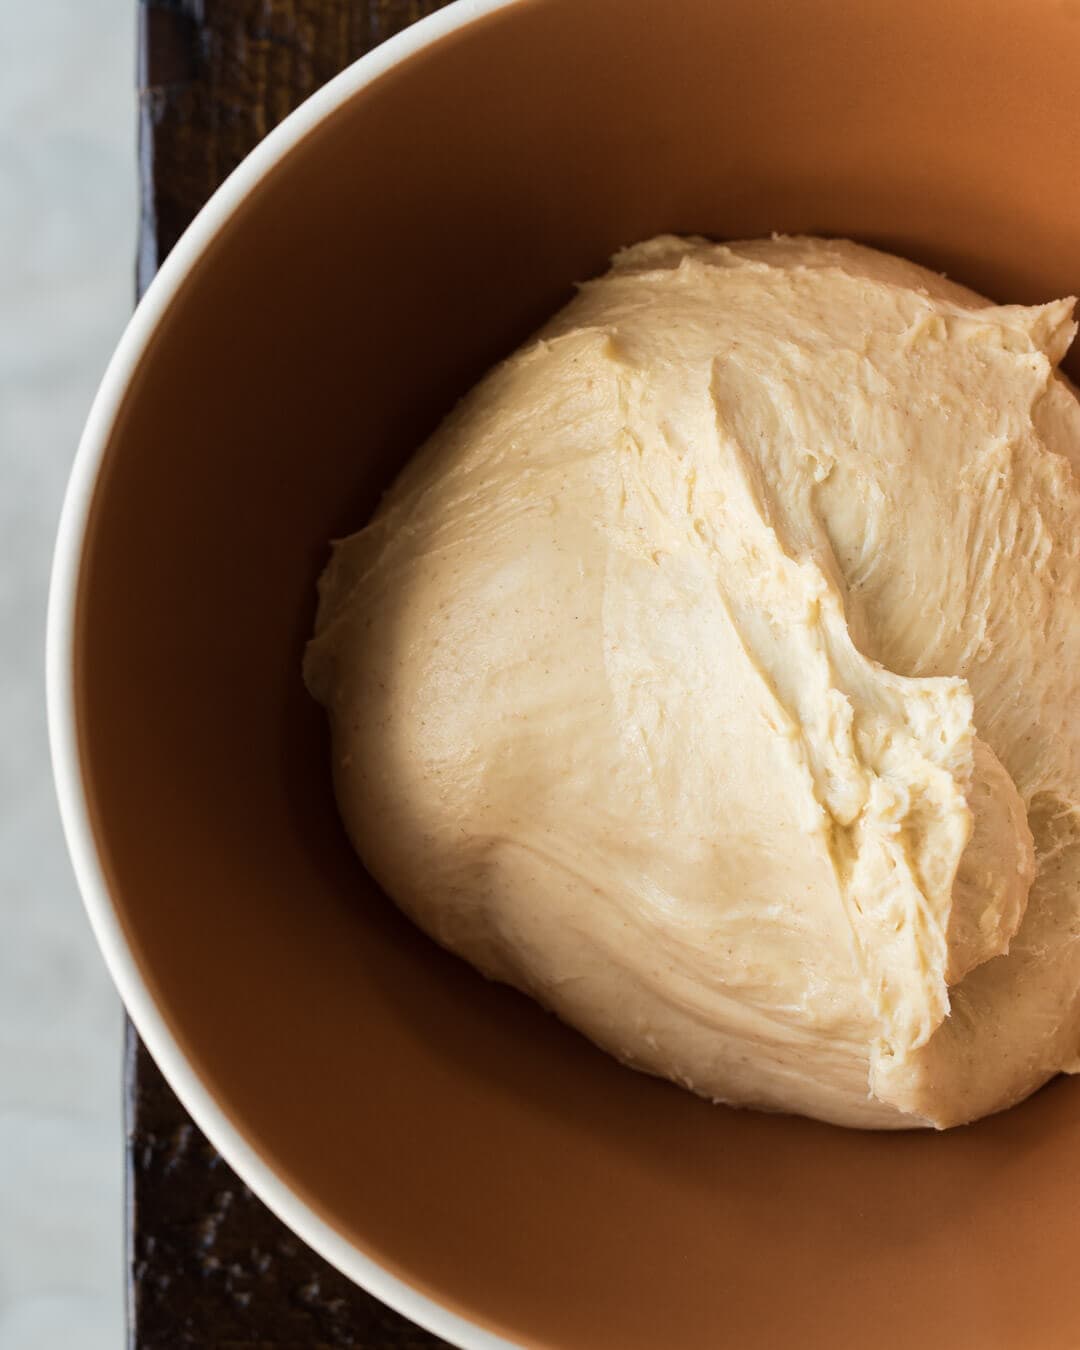
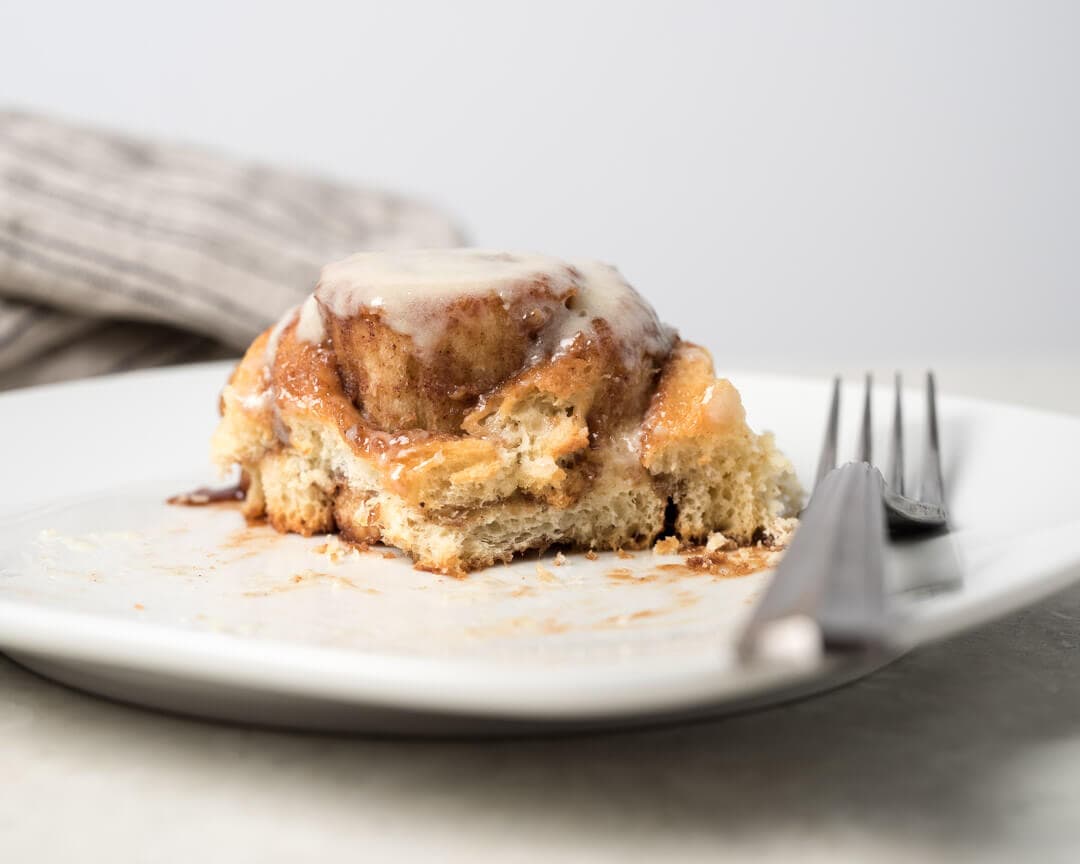
Brioche dough is the base for these sourdough cinnamon rolls, which is dough enriched with butter, sugar, and eggs. These ingredients make for an incredibly tender and mouth-melting crumb when added to a deep yellow dough. When pulled, these rolls shred apart almost like cotton candy, the only resistance provided by the melted brown sugar cinnamon near the bottom—they’re like a warm, gooey cloud of pure enjoyment. When presented with the opportunity, there’s nary a chance anyone will decline one of these on a plate.
These sourdough cinnamon rolls require a little extra effort, but once you get the hang of the process, it’s pretty straightforward—and, of course, totally worth it. The dough is also very versatile: you can adjust the mixing and baking schedule so they’re finished in a single day or spread out over three. The dough can be retarded in the refrigerator after bulk fermentation, shaping, and cutting, or both. I prefer a two-day process where I place the dough in the fridge after bulk fermentation. The next day I wake and get to work on the rolls, and I bake them fresh for breakfast (or brunch if late to rise).
Brown Sugar Cinnamon Spread
This spread has the right level of delicate sweetness and a comforting bite from the cinnamon. The mixture is more crunchy and thick than it is spreadable, which is my preference. When baked, swaths of the spread caramelize and other smaller areas stay crunchy, providing a subtle contrast of textures.
- 215g light brown sugar
- 40g all-purpose flour
- 2 tablespoons unsalted butter, melted
- 2 teaspoons cinnamon
- 1/4 teaspoon salt
Mix or whisk everything together in a bowl, so there are only a few clumps remaining. Keep covered until used (brown sugar dries out very fast).
Cream Cheese Glaze
The cream cheese added not only makes this glaze extremely velvety, but it also pairs wonderfully with vanilla. I’ve also tested various iterations, swapping out the cream cheese for maple syrup, adding orange blossom water, a dash or two of Angostura bitters… The options are endless.
- 114g cream cheese softened to room temp (4 oz, half a standard block)
- 62g (1/2 cup) powdered sugar
- 37g (3 tablespoons) whole milk
- 1 teaspoon vanilla extract
Add everything to a mixer fitted with the whisk attachment and whisk until creamy and soft. It’s best and easiest to use a mixer or handheld beater for this, but a handheld whisk will work if you want a workout. The mixer will ensure there are no stray clumps of cream cheese lingering about.
Sourdough Cinnamon Roll Recipe
It’s best to make this brioche-style dough in a stand mixer (like the one I have) due to the dough’s soft nature and relatively long mix time required. Most of the strength in this dough will be developed upfront at mix time with just a few more stretch and folds during the bulk to finish it off.
This recipe yields 12 sourdough cinnamon rolls but you can halve all the ingredients to make half a dozen (in this case, you’ll want to use a smaller pan). I’m using a USA Pan 9” x 13” rectangular pan to hold these 12 buns and because the pan is coated in silicone there’s no need for any parchment paper (it’s magic, really). If you don’t have this pan I’d recommend using parchment under the buns for easy removal.
You will need a rolling pin for this recipe (in a pinch, you could use an empty wine bottle). I am very partial to my rolling pin: it’s a non-tapered solid block of maple wood that’s functional, used in countless tasks around my kitchen, and just a beautiful tool (and made in the U.S.A.).
Sourdough Starter Notes
I know when some read this recipe title and see the word “sourdough,” thoughts of sharp sourdough cinnamon rolls might enter the mind, but this is definitely not the case. I maintain my sourdough starter with frequent refreshments to ensure acidity is kept low. Additionally, when I call for a mature starter in the ingredient list, “mature” means when my starter is just about to its peak height and has not yet fallen. If the starter is used at a state that is overly ripe (perhaps it’s fallen and has been that way for an hour or more) then the resulting rolls might be a touch sourer.
If you’re interested in how I maintain my sourdough starter head over to my Sourdough Starter Maintenance Routine post for in-depth details.
Dough Formula
The target final dough temperature (FDT) for this dough is 70-73°F (21-22°C).
| Total Dough Weight | 1,250 grams |
| Pre-fermented Flour | 42.00% |
| Yield | One dozen rolls |
| Weight | Ingredient | Baker’s Percentage |
|---|---|---|
| 477g | All-purpose or bread flour (King Arthur All-Purpose Flour) | 100.00% |
| 133g | Whole milk, cold from the fridge | 28.00% |
| 191g | Unsalted butter (Kerrygold) | 40.00% |
| 191g | Whole eggs (about 4 large) | 40.00% |
| 48g | Fine white sugar (caster sugar) | 10.00% |
| 11g | Salt | 2.3% |
| 200g | Ripe, 100% hydration liquid sourdough starter | 42.00% |
Method
1. Mix – 9:00 a.m.
First, take out the butter and cut it into 1/4” to 1/2” squares; let them sit in a bowl to warm to room temperature while gathering and mixing other ingredients.
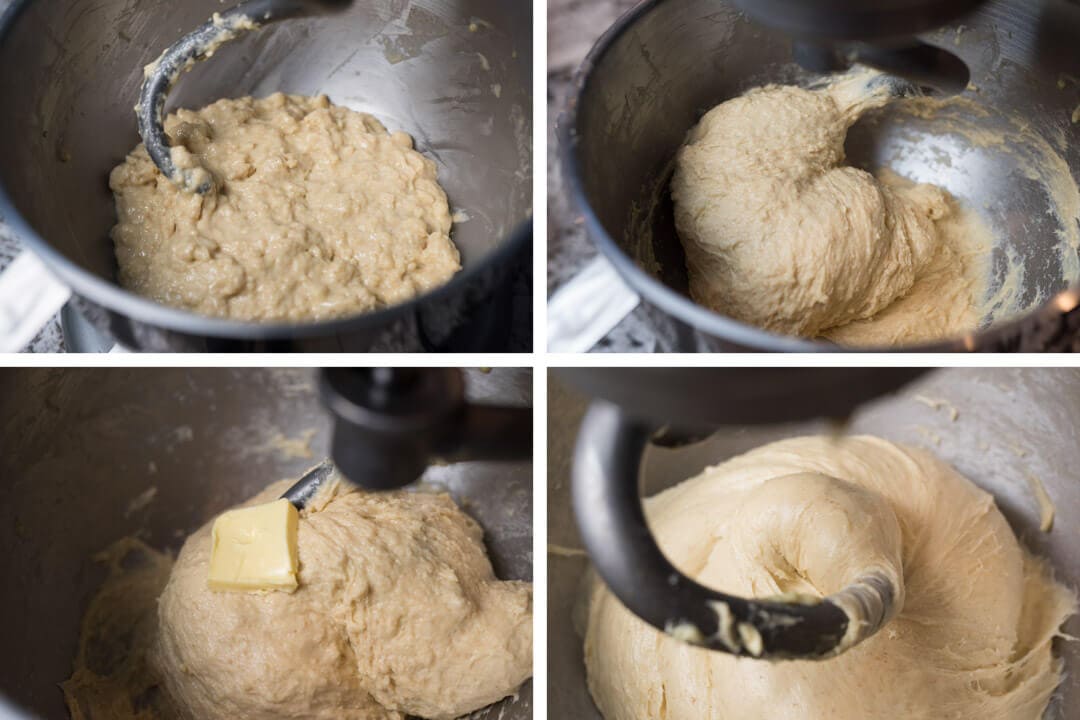
Mixing will occur in three stages (clockwise starting in the upper-left in the image above, the last image is the final dough). The first stage involves the initial incorporation of all the ingredients, followed by a 10-minute rest. The second stage will be strengthening the gluten in the dough before adding butter. The third and final stage will be adding the room-temperature butter blocks to the strengthened dough.
Initial Incorporation
In a medium bowl, add the cold eggs, cold whole milk, sugar, and mature sourdough starter. Whisk together until incorporated.
Add the flour and salt to the bowl of a stand mixer fitted with the hook attachment. Set the mixer to low (level “1” on my machine, one notch above “STIR”), and slowly start to pour the liquid into the mixer bowl. Add a little at a time over the course of 3 minutes. Once finished the dough will look very wet and have clumps, let it rest for 10 minutes before further strengthening.
Strengthen Dough
After the 10-minute rest, turn the mixer to medium speed (number “4” on my machine) and mix for about 5-6 minutes until the dough starts to come together and all clumps have disappeared. The dough should start to pull away from the sides of the bowl, but it will not completely detach from the bottom. If the dough doesn’t want to come together and it’s overly wet, add a little flour, a tablespoon at a time, until it comes together.
Incorporate Butter
Butter temperature is important. It should be slightly cold to the touch but easily pliable. If the butter is too cold, it won’t incorporate easily into the dough; if it’s too warm (almost melted), it will result in a greasy dough. Don’t fret if the temperature is off. Pop the bowl with butter in the microwave for 10 seconds to warm slowly, or place it into the freezer for a minute or two to firm up. Adjust as necessary.
Add the butter to the dough one square at a time, waiting until the previous block is absorbed before adding the next. It is easiest to place it right where the hook meets the dough. Continue until all the butter is added and there are no visible butter patches; this may take 8-10 minutes at a low to medium mix speed.
2. Bulk Fermentation – 9:30 a.m. to 11:30 a.m.
Transfer the mixed dough to a bulk container and let it ferment for 2 hours at 75ºF (23°C). Just as when baking sourdough bread, perform 3 to 4 sets of stretch and folds during the bulk fermentation stage, spaced 30 minutes apart. To perform a set, grab one side of the dough, stretch it upward, and fold it over to the other side. Fold once at each side, North, South, East, and West. If the dough is firm after the third set, skip the last set but let the dough rest for a full 2 hours.
3. Chill Dough – 11:30 a.m. to 2:00 p.m.
Place the covered bulk container into the fridge for at least 2 hours (I like 3-4 hours).
Overnight option: The timing is very flexible at this point. Once the dough is covered and refrigerated, it can rest overnight, and the rest of the process can be completed in the morning for fresh rolls early in the day or for brunch.
Roll the dough out to a rectangle only when it’s completely chilled.
The dough needs to be completely cold and firm to the touch before rolling out; do not skip this step.
4. Shape Rolls – 2:00 p.m.
Before rolling out the dough, make the Brown Sugar Cinnamon mixture (see recipe, above).
Flour your work surface. Then, remove the chilled dough from the fridge and turn it out onto the floured surface. Flour the top of the dough and the rolling pin, and begin rolling the dough. Roll it out to an 11” x 21” rectangle that is oriented so one of the long sides is near your body and the squat ends are to the sides. Use a bench knife and dust the surface with flour wherever the dough sticks.
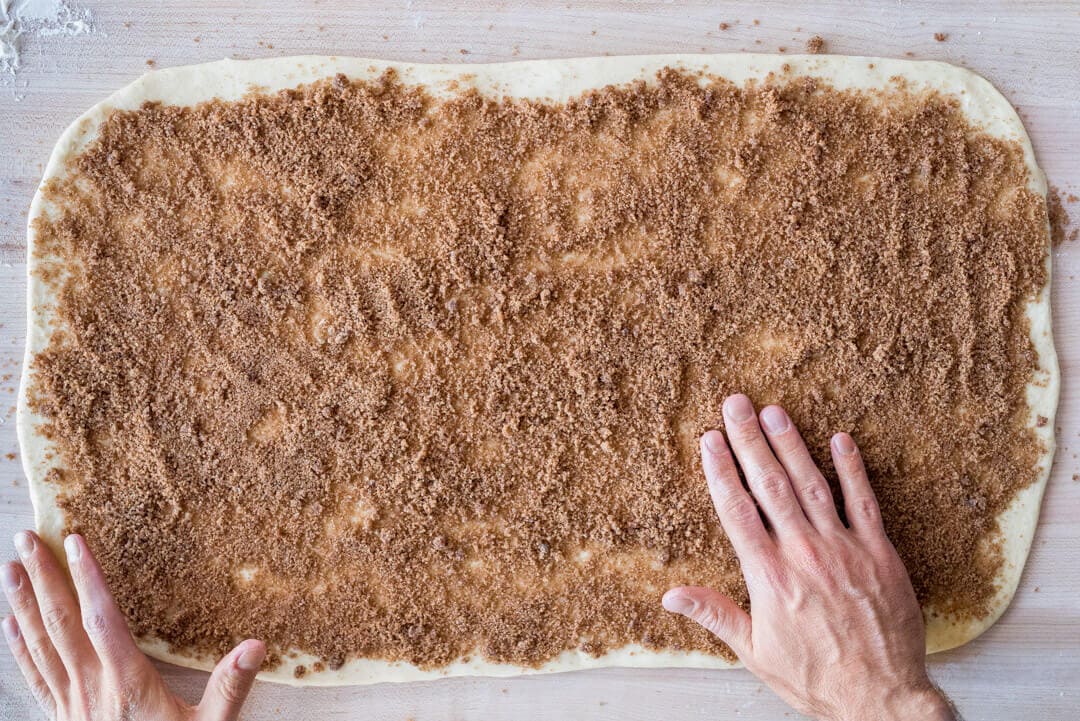
Try to keep your warm hands off the dough as much as possible to avoid heating it. Sprinkle the dry Brown Sugar Cinnamon mixture evenly over the dough, but leave a small margin at the very top bare. When the dough is rolled up, that small margin will help seal the roll.
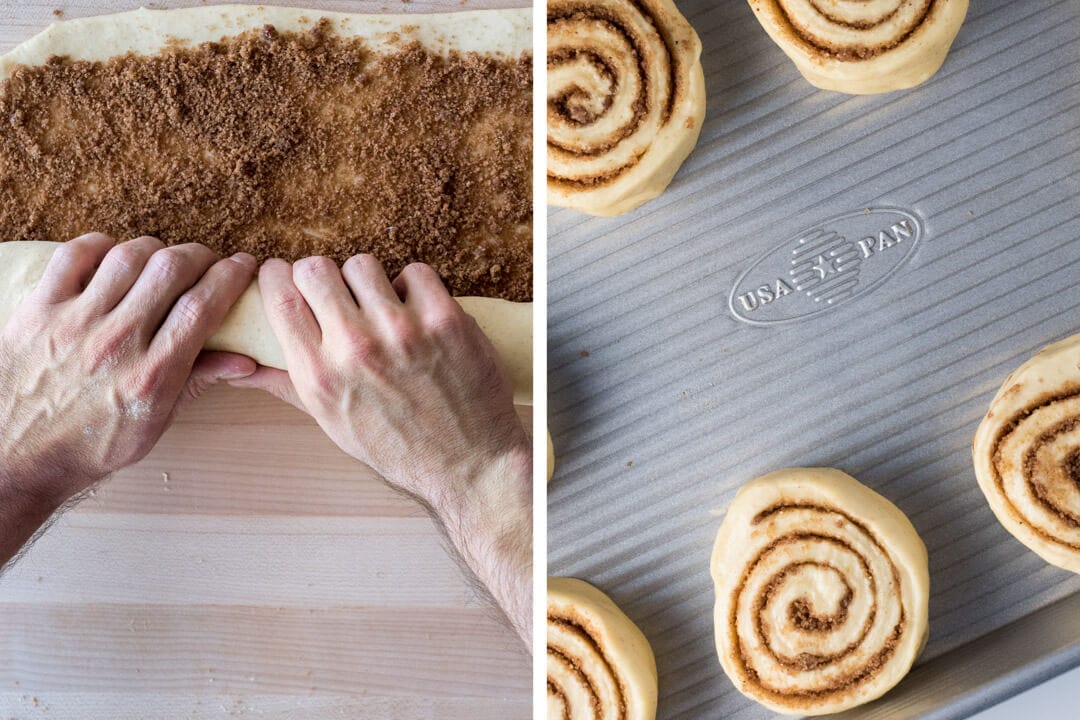
Starting at the long end nearest you, fold up a small portion of the dough all the way across. Then, roll the dough one revolution at a time, starting at the left side and moving to the right. During the first few rolls, it’s important to roll things up sufficiently tight to make cutting and transferring easier later.
Continue rolling from left to right, one revolution at a time, until the dough is completely rolled up into a “log.” Lay a ruler and using a sharp knife or bench scraper, cut the dough every 1 3/4” inches. You can go smaller if you want squatter rolls or up to 2” for taller rolls (if you cut smaller, you’ll have more rolls and taller you’ll have fewer).
Transfer the cut discs to a baking pan with some space around each one.
A few tips to help with this step:
- Place the rolling pin in the freezer while the dough is chilling to help keep it cold
- If the dough warms up excessively while rolling out, transfer to a baking sheet and place in the fridge for 15 minutes to cool
- If the dough is very pliable and warm after it’s completely rolled up, place the entire rolled “log” into the fridge on a baking sheet before cutting
7. Proof – 2:30 p.m.
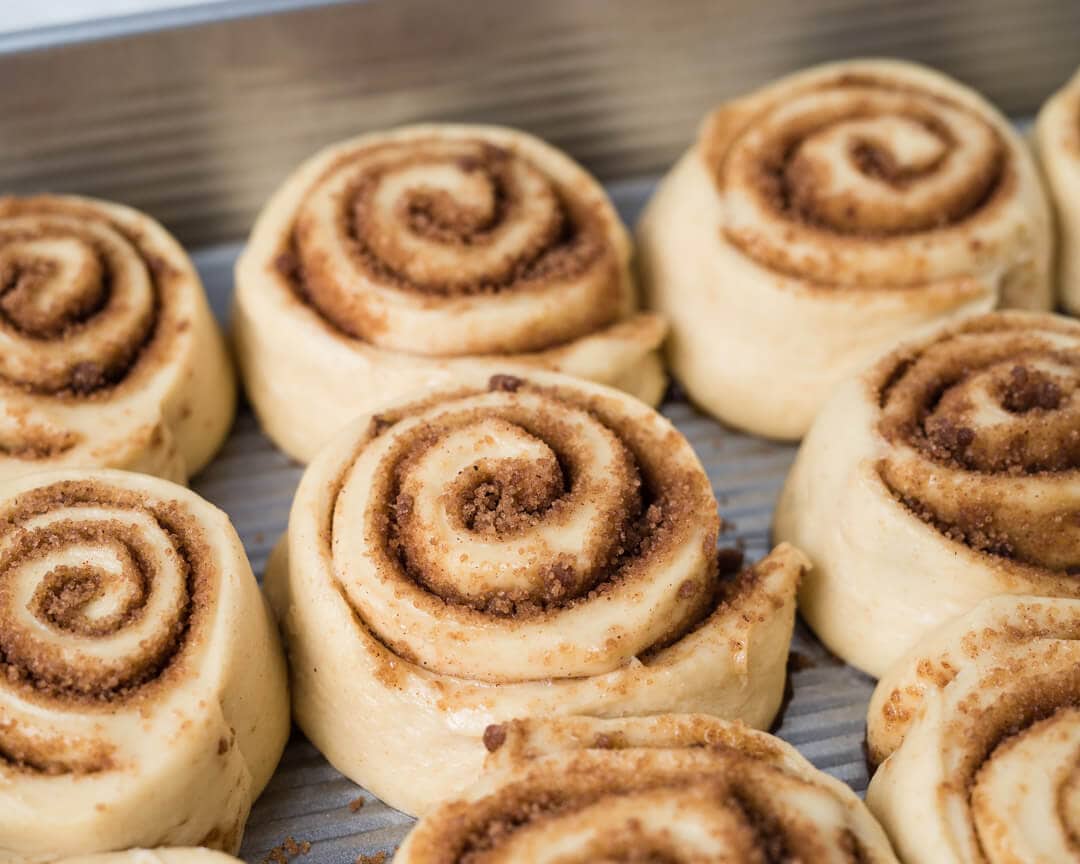
Place the baking pan with cut dough somewhere warm, around 77°F (25°C), to let proof for 2 hours. During proof, the rolls will relax out and start to puff up, eventually, they may touch each other but it depends on how much space you have between rolls.
Don’t be alarmed if you see any sugary liquid leaking out of the rolls, it’s totally normal. Additionally, if any of the layers develop gaps between them it only means when they rise in the oven they’ll be a little more interesting with pieces jutting up and out—beautiful.
8. Bake – Preheat oven at 4:00 p.m., Bake at 4:40 p.m.
Preheat oven to 400°F (200°C) during the last 30 minutes of proof. Place the baking pan in the oven and bake for 20-25 minutes until the rolls are well colored.

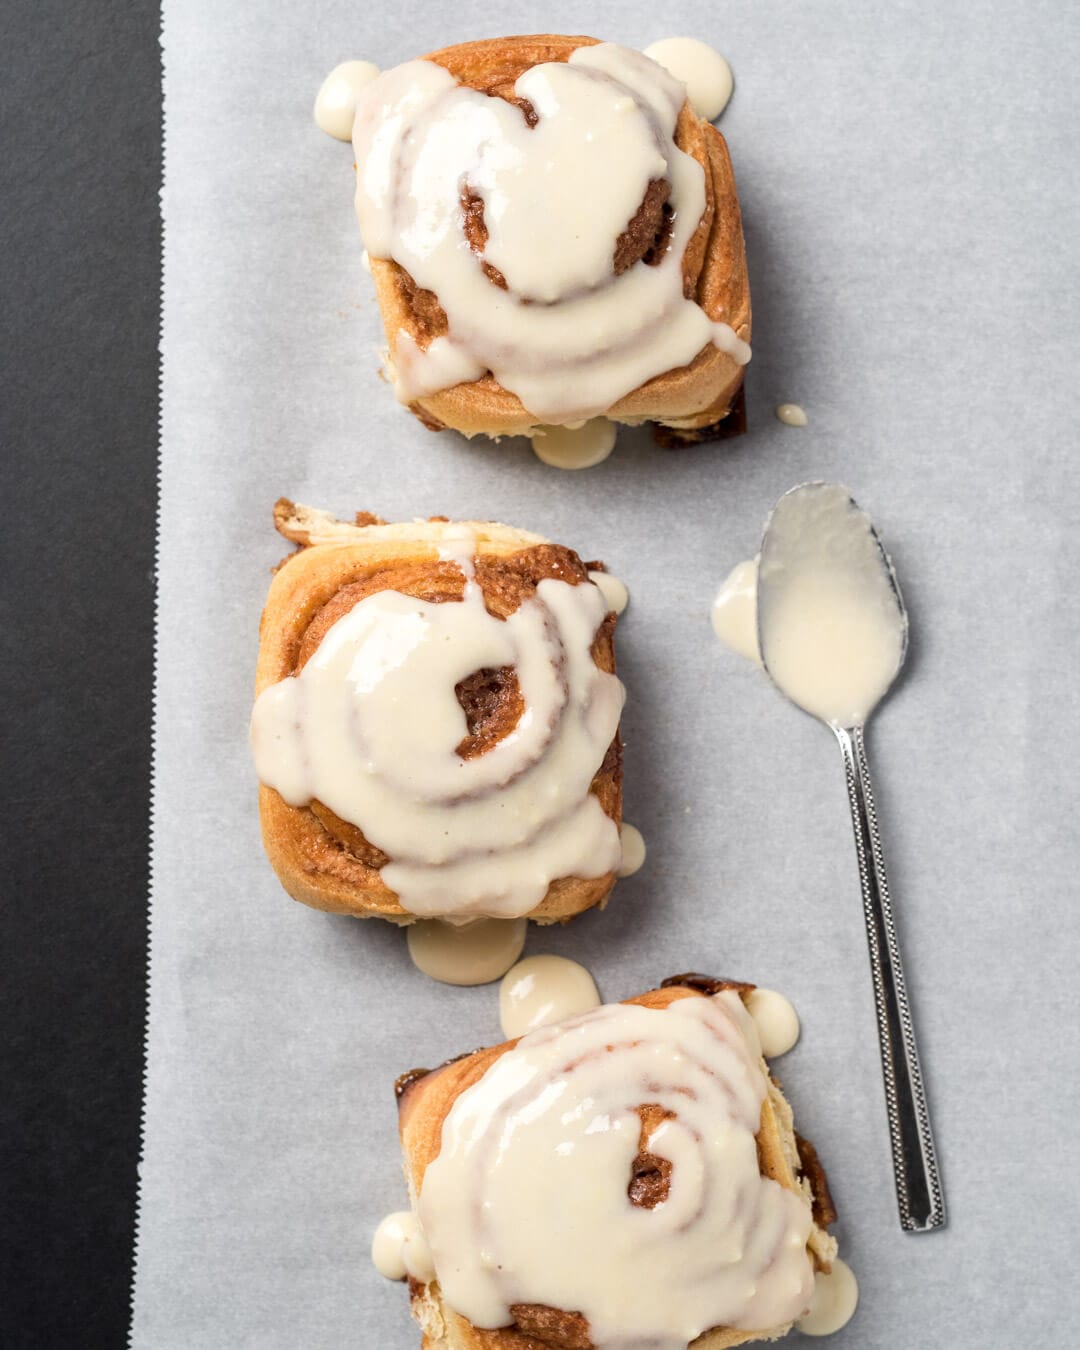
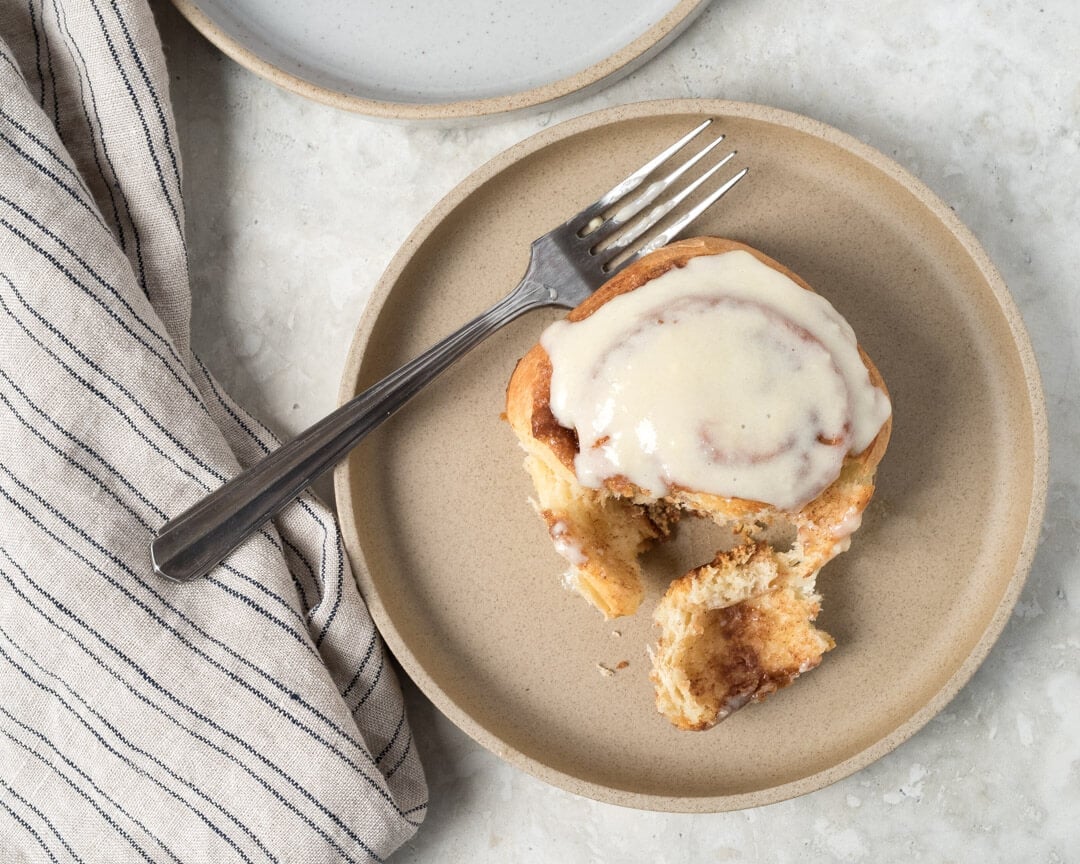
Spread the glaze over the rolls once cooled. These sourdough cinnamon rolls stay great for a few days in the fridge, and I always reheat them (without glaze) in the oven or microwave to warm back up before eating. They fill the kitchen with that intoxicating aroma once again and always seem to come out as if they were freshly baked.
Conclusion
Whatever the distraction, whatever the work being done—even if a bath is drawn—the kitchen’s aroma when these are baked is sure to draw out all. It reminds me of those old cartoons where they put out a piece of cheese, and you see everyone floating toward it in a trance—just like that.
These sourdough cinnamon rolls are addicting. The brioche interior is extremely tender and silky, interrupted only by warm, gooey brown sugar cinnamon. As I alluded to earlier, the cream cheese glaze is tremendous, but the possibilities here are endless, each change bringing on a whole new dimension to these sourdough cinnamon rolls.
Well, I know I’ll be making these sourdough cinnamon rolls for Christmas morning! But now that the word is out and everyone knows what I’m baking every other weekend after that I might be expecting a few more surprise visits from friends and family. I’m completely fine with it, though, because I’m happy to share with any and all who stop by—it may just mean I sneak off with one or two before they do. Buon appetito!
Now that you have experience working with enriched dough, the next step is my naturally leavened bomboloni (doughnut) recipe! They’re based on a similar dough with just a few changes—they’re absolutely incredible. Or, if you’re looking for more rolls, have a look at my ultra-tender sourdough cardamom rolls for a different take.
Print
Sourdough Cinnamon Rolls Recipe
- Prep Time: 7 hours 30 minutes
- Cook Time: 25 minutes
- Total Time: 7 hours 55 minutes
- Yield: 12 cinnamon rolls
- Cuisine: American
Description
These sourdough cinnamon rolls are addicting. The brioche dough is extremely tender and silky, interrupted only by warm, gooey brown sugar cinnamon. If you’re looking for the perfect weekend treat, these cinnamon rolls are the ticket.
Ingredients
Dough
- 477g all-purpose or bread flour
- 133g milk, whole
- 191g butter, unsalted
- 191g eggs (about 4 large)
- 48g sugar, caster
- 11g salt
- 200g sourdough starter
Filling
- 215g light brown sugar
- 40g all-purpose flour
- 2 tablespoons butter, unsalted and melted
- 2 teaspoons cinnamon, ground
- 1/4 teaspoon salt
Cream Cheese Glaze
- 114g (4oz, half a block) cream cheese softened to room temperature
- 62g powdered sugar
- 37g milk, whole
- 1 teaspoon vanilla extract
Instructions
- Mix (9:00 a.m.)
Cut the butter into 1/4″ pats and let warm to room temperature while mixing the rest of the ingredients. In the bowl of a stand mixer fitted with the dough hook attachment, add the eggs, milk, sugar, and sourdough starter. Whisk together until incorporated. Add the flour and salt and mix on speed 1 for 3 minutes until incorporated. Let the dough rest for 10 minutes. After the 10-minute rest turn the mixer to speed 2 and mix for about 5-6 minutes until the dough starts to come together and all clumps have disappeared. The dough should start to pull from the sides of the bowl but it will not completely remove from the bottom. If the dough just doesn’t want to come together and it’s overly wet add a little flour, a tablespoon at a time until it comes together. With the mixer set to speed 1, add the butter one pat at a time, waiting to add each until the previous is absorbed. Continue until all the butter is added and the dough is shiny and smooth, this could take around 8-10 minutes. - Bulk fermentation (9:30 a.m. to 11:30 a.m.)
Transfer the mixed dough to a bulk container and let ferment for 2 hours at 75ºF (23°C). Perform 3 to 4 sets of stretch and folds at 30-minute intervals. - Chill dough (11:30 a.m. to 2:00 p.m.)
Place the covered bulk fermentation container into the fridge for at least 2 hours to thoroughly chill. - Shape rolls (2:00 p.m.)
First, make the filling. In a bowl mix together the filling ingredients and set aside. Next, take out your dough from the fridge, lightly flour your work surface and the dough, and roll out to an 11×21″ rectangle with a long side closest to your body. Spread the filling evenly over the dough. roll the dough up away from you into a tight log. Cut the log into pieces every 1 3/4″. Transfer the cut pieces to a baking pan with space around each one. - Proof (2:30 p.m. to 4:30 p.m.)
Cover the pan and proof somewhere warm, around 77°F (25°C), for 2 to 3 hours. The dough will relax and puff up during this time. They’re ready to bake when the dough feels very soft and light—give the dough additional time to proof if necessary. - Bake (4:30 p.m.)
Preheat your oven to 400°F (200°C). Slide the rolls into the oven once preheated and bake for 20-25 minutes. Spread the glaze over the rolls once cooled.
Notes
These sourdough cinnamon rolls are best the day they’re made, but can be reheated the next day (without glaze) and then topped with freshly mixed glaze.
If you use this recipe, tag @maurizio on Instagram and use the hashtag #theperfectloaf so I can take a look! Thanks so much to USA Pan for sponsoring this sourdough post! As always, all opinions and thoughts here are my own.


673 Comments
I've been baking cinnamon rolls for over 50 years and every once in a while I choose to stray from my tried and true sourdough recipe to see what else is out there. Sadly this recipe just did not work well for me. First, trying to "whisk" ingredients with a dough hook doesn't work. After several minutes of trying the egg yolks were still intact, so I stopped the machine and whisked by hand. Second, using King Arthur all-purpose flour and weighing ingredients, this dough is very wet. I'm guessing I added at least 4 or 5 additional ounces of flour before I could finally get it to look like your photo pulling away from the bowl. Incorporating the softened butter took over 45 minutes following your instruction. The end result was an overly sweet dough with a light and lovely texture but the filling turned into almost a hard caramel. Nothing ooey or gooey. There is definitely something off kilter here with liquid vs dry ingredients using all purpose flour.
Super sorry to hear that, Lisa! This is definitely a challenging dough, but it results in a super tender roll that I just love. The recipe in my cookbook is a little more balanced in terms of liquids to flour, but still this is a great one! It's really, really important the dough is strengthened significantly before adding in the butter, otherwise it'll take forever to get in there, like you experienced. It does sound like there was too much liquid for your flour (even using KAF AP like I do requires adjustment based on the bag you have and your location, as I am sure you know!). I hope you do give it a try again sometime, I know it's hard to stray. Another option might be trying this with KAF Bread Flour, which is stronger and will take on more liquid.
Best cinnamon roll recipe! I've been baking these for the past 5 years to enjoy with my family on Christmas morning and it's what the kids look forward to every year. I also love to add some crushed pecans and raisins in the filling.
Oh love that add, Eric! So glad this recipe has been your go-to this time of year 🙂 Happy holidays!
Made this recipe using 100% einkorn flour. Reduced liquid by 20% , taking out of the milk. Otherwise followed your recipe and they turned out amazing. Thank you for all your recipes!!!! Mark
Whoa, that's a big flour swap there, Mark. Glad to hear it turned out great!
Im planning to make this for Christmas morning but I wanted to prep in advance. Would the best results be from retarding the bulk fermentation in fridge for a couple days? Or putting in fridge for proofing? Or should I half bake then freeze the rolls or…? It's 6 days till christmas. Or, is it best to wait a couple days and make closer to christmas?
I would wait and make them closer to Christmas!
Hi there, this recipe looks great! I would love to make these cinnamon rolls and am wondering if you have any substitution suggestions for the white sugar, light brown sugar and powdered sugar? For a family member’s health reasons, I am trying to make these as low glycemic as possible. Also would like to use less of the refined flour, any rye or other type flour combinations you suggest?
Thanks again! Love The Perfect Loaf! 😉
Tammie
Hmm. That's really hard to do with cinnamon rolls and to keep the same effect. You could definitely try using more whole grains for the flour, and try swapping some of the sugar for date syrup, though I haven't tested this!
Hey Tammie,
I know I’m 3 weeks too late but I have some suggestions for future cinnamon rolls if you’d like to give a try. For my bakery, I make a refined sugar free cinnamon roll. I use honey in the dough and then a combination of maple sugar and coconut sugar for the filling. This works great for me. For this recipe, you’d need to take some milk out to substitute honey for white sugar in the dough. I’d start by decreasing the milk by at least 2 tbsp (and up to 4 even) and then only add in 3 tbsp honey which should weigh about 57 g. Honey weighs more than sugar so it looks like you are adding in more but you aren’t. The recipe uses about 1/4 cup sugar and honey tends to be sweeter so you can use less. Also, use pasteurized honey as raw honey will affect fermentation significantly.
The filling for my rolls which makes a crazy amount as I go for the extra gooey rolls is 170 g butter, 85 g maple sugar, 120 g coconut sugar, and 18 g ceylon cinnamon. I cream this together for 5-10 minutes and spread it on. You can do it that way or just spread butter on and then mix all the sugars and cinnamon together and sprinkle over top of butter. If you don’t want filling exploding out of your rolls, maybe try half of these amounts to start.
Hope this helps you!
Hi Gina,
Thanks so much for the recipe suggestions! I will give it a try soon!
Happy Holidays,
Tammie
Could I use this dough for challah?
No, I don't think it will work well for challah, it's far too soft of a dough. Stay tuned, I'm working on a challah recipe—will be posted soon 🙂
Made these with the overnight in rolls option. I sprinkled some mini chocolate chips inside with the cinnamon mix & added 1 Tbs cocoa powder to the cream cheese frosting. The rolls were slow to reach room temp & rise and I ran out of time, so pushed as far as I could & baked. Oven is always slow, so baked longer. I wasn't sure about the bake but took them to office anyway (risky, I know!) I was asked for the recipe and especially what the chocolate topping was! I wonder if, rather than room temp proof, I could push the rise by putting them in a warmer place, like the oven with light on, about 80 degrees?
Fantastic! Yes, you could keep them warmer to help speed up. But you could also leave them out after cutting for an hour before putting them into the fridge, then take out early to finish the next day.
Not better, yet:( Did the hour proof before fridge, 3 hr proof next day, still not rising well, heavy finished rolls.
Do you think a more mature levain would help? Baked extra long but still doughy.
You definitely want to use your levain when it's very ripe: sour smelling, very bubbly, risen. I feel like they needed more time to proof!
Ok, went by the 5 hr levain in book, but will go with an overnight next time. Thanks!
This recipe worked great with fresh milled flour. I followed recipe as is, just switched out the flour for fresh milled and it came out wonderful!
Absolutely loved that you did this, Natalie. I'm playing with adding in more whole and high extraction flour into all these recipes (updates will come!).
But how to make the day before and cook in the morning? Could you follow the recipe and after shape put them back into frig for bake the next morning?
Yup, exactly. Put them in the fridge after you've cut them, then take out early to finish proofing before baking.
Hi! Is it possible de make them vegan? (swapping butter with vegan butter, milk with plant-based) but what about the eggs? would it work without?
Yup, absolutely. I know other bakers have swapped the eggs for a "flax egg" and it's worked really well!
Thank you for this amazing recipe! It was so easy to execute and the end result was mwah!!! I left my dough in overnight and rolled it out cold with no issues. I can't wait for my family to enjoy these rolls. I can't wait to test out the recipe in your cookbook too ; )
Right on, Shannon. Super happy you liked these. The cookbook ones are wonderful, too, and slightly easier to work with. Enjoy 🙂
I've made the book's version of this recipe several times. They get gigantic when I bake them. Is there something I might need to do differently? Thanks.
A gigantic cinnamon roll… I don't think that's a problem 😉 JK. I would say, try proofing them longer. If they're kind of blowing up in the oven, it could be a sign of underproofed dough.
Thanks! I’ll try proofing longer. Great recipe. They’re fun to make.
I've literally just got these out of the oven. This recipe is out of this world!
Fantastic, Sara. Glad you liked 'em!!
Has anyone used the dough recipe for dinner rolls? Looking for recipe sourdough / brioche for Thanksgiving dinner rolls.
Your ideas are welcomed!
That'll work, but I might suggest these, instead, they're amazing:
https://www.theperfectloaf.com/super-soft-sourdough-rolls/
Hi Maurizio! I was wondering if these could be frozen before baking? I’ve made the recipe a couple of times and absolutely love them! I’m planning on making them for a school fundraiser and was hoping I could make them ahead of time!
Hey Camryn. Freezing them can work, but I'm skeptical. It's very stressful and you'd likely get less rise the next day. What you could do is parbake them: bake until about 75% done, take them out, let them cool. Then freeze. When you want to make them, defrost in the fridge overnight, finish baking in the oven. then top with icing.
Trying that right now! Thank you for your professional advice, it's very much appreciated! Merry Christmas and Happy New Year to you and your family!
PS Your hint about freezing my (marble) rolling pin to keep the dough cool was genius! It really helped avoid working with warm, slack dough!
How would i make these into pumpkin? Would i just add pumpkin puree? How much?
You could do very similar to how I do my pumpkin dinner rolls:
https://www.theperfectloaf.com/sourdough-pumpkin-dinner-rolls/
Would this dough fit in a 4.5 qt stand mixer?
@maurizioleo:disqus
Yes, it should!
@maurizioleo:disqus why is this recipe different than your cookbook? (Which is my BIBLE btw!!) Which one is your favorite? (This one or the cookbook one)
My cookbook version is a little easier to work with and, honestly, I think just as delicious! This dough is softer, though, it results in a slightly more tender roll. But again, I think my cookbook version is fantastic.
Thanks, means a lot to hear that!
Most of the cinnamon rolls I've made previously have been leavened with yeast, but I've also tried a few recipes with sourdough starter as the leavener. The dough for these rolls was definitely the most enriched I've made so far. The rolls are delicious, but not noticeably better than most of the cinnamon rolls I've made before, despite the additional butter and eggs. I used room temperature eggs and milk, then noticed in the narrative that the eggs and milk should be cold (that wasn't specified in the recipe). I don't know if the warm eggs and milk would have had an impact on the dough. I used my KA mixer, and it took almost 20 minutes to incorporate the butter. The dough was silky smooth and soft. I bulk fermented at room temperature for 2 hours, with 4 stretch and folds, then fermented in the fridge overnight. There was no rise in the fridge. The recipe doesn't stipulate whether the dough should be doubled, or almost doubled before rolling and filling. I let the cold dough sit at room temperature for about an hour to soften before rolling. It rolled and sliced easily. The final proof was slow, almost 4 hours. The rolls were puffed and touching. They baked for 20 minutes to an internal temperature of 203° but I feel that maybe they should have baked a few minutes longer. Instead of the filling and frosting in the recipe I used ones that I've developed through trial and error.
Hi Sadie,
I've made these many times now, and I think they improve every time, as I gain confidence and am able to read the dough better now.
I actually just finished baking a new batch of these! Everyone here agrees, they're the best "ever" haha Someone even compared them to the Cinnabons from back in the day, when they still tasted like food, especially for their gooeyness.
I also use a KA stand-mixer and follow the instructions of Maurizio's book. For me too, it always takes about 20min to incorporate the butter, which should be very soft but not melted or wet.
Then after refrigeration of the dough, we should expect to see a 20-30% rise but, honestly, the best I've had so far is a 10%. But I don't despair as the last pan proving step always gives a good rise and buoyancy.
If you feel like you could increase baking time next time, you could probably add 8min at 350F? That's exactly what I do and I'm very happy with the result. On the other hand, if they're a bit under done, they tend to stay extra soft for another day (if they last that long!) and this also allows to warm them up in a hot oven for a couple minutes, without drying them up.
My personal preference, I opt for a simple syrup glaze at the end, brushed over the rolls when they're just out of the oven. It almost locks the moisture in and it makes them look so pretty for my photo album haha But this creature of habit here knows that the cream cheese frosting for these would be to die for, so maybe next time!
Anyway, hope this helps, Sadie 🙂
Thank you, Leslie!
Hey Sadie! Have you given this dough another chance? Like Leslie said below, they make pretty amazing rolls. The cinnamon roll recipe in my cookbook is more along what you described, an easier dough to handle, and they also make for fantastic rolls. But I do think these are more tender when fully proofed!
Can you freeze then bake when desired? If so, what is the recommendation for thawing out?
Hello Theresa,
You can freeze after bulk rise, roll and cut, separating with dry wax paper or parchment.
Remove from freezer and place in refrigerator (I use the warmer upper shelf) the night before you're ready to bake.
Let them come to room temperature before baking and be prepared for beautiful results.
This is from proven experience.
HTH
Just as Joe says below!
Love your recipes on the whole, refer other SD bakers to your blog frequently, but wish you would just say "3 eggs" or 3+ a yolk, or 4 eggs, in your recipes instead of putting eggs in as weight in grams. So what does one do with 1/2 of an egg (in grams)? Weighing in grams is not an issue for me, it's just the eggs. Thanks.
Hey Sandy! Thanks for spreading the word, appreciate that 🙂 So I do add the appx amount of whole egg to the ingredient lists, I just noticed in this one it wasn't in the recipe card (the printable section at bottom), but it is up top. I just fixed it.
It's "about 4 large eggs" for this recipe!
Thanks, Maurizio. I knew that and know how to convert. I just think it would be easier for most users to have eggs, just eggs, not measured in gms. LOL! P.S. Loved the chocolate knots recipe but end product was more sour than I expected. Absolutely loved the chocolate filling, even had Valrhona chocolate which I brought back from France. And I was picking the pot!
Ah yes, okay, I gotcha. The reason I do it this way is because I create my recipes with baker's percentages so they can scale up and down easily (to make more or less bread). This means it rarely ends up being in whole-egg increments.
What I do is crack the specified number of eggs into a bowl, then scramble the eggs. Then, pour out the eggs into a container on the scale to weight. Any leftover, I eat for lunch 🙂
Like that!!
And really happy to hear about the knots!! To make them less sour, try reducing the overall fermentation time and/or using your starter just a bit earlier before it's overly ripe. This may help!
Thank you!
Hi Sandy.
A trick I do is zero my bowl on a scale and empty the egg in it . If it weighs 48g then you know 4 will be around 192g total.
If they're extra large eggs they may weigh 55g or so.
HTH
Exactly my point. Tks.
I love this recipe and I stick to it every time, but I want to add pumpkin to it!? How should I go about that? Adjust the milk maybe?
So happy to hear that, Katie! Yes, it's going to take a little work to make that happen because pumpkin puree makes the dough very soft. I'd try just adding 10-15% to the total flour to start, reduce the milk, and see how the dough feels. (Also, I've been working on a pumpkin version of these 🙂)
Hello, I made these rolls last night. I’ve tried a lot of recipes on the Internet, and they’re good. I wasn’t expecting a lot when I tried this one. But oh my God help me, these are absolutely phenomenal. I will definitely be making them again. My technique was a bit off, and they did not turn out beautiful like the pictures on this page, so I have to practice more. But thank you, my family loved this
So happy you liked these, Grace! They've been up here at The Perfect Loaf for probably 6 or more years at this point, a reason they've stuck around! Enjoy 🙂
BLOCKED at step 1.
not everyone has a standing mixer. (My counter is cluttered enough.)
(and for what it is worth – likely nothing – I really dislike Disqus. it seems to just make commenting difficult or impossible.)
Hey Peter! I totally get you on the stand mixer. You can mix this dough by hand; just be sure you hold back the butter until the dough is strengthened and smooth. Then smear the room-temperature butter into the dough and finish mixing until it's fully absorbed.
(Yeah, I'm not a huge fan of Disqus either. Unfortunately, it's the best option I've got at the moment!)
I made these rolls last weekend, and they turned out wonderful! My family loved them, they were so soft and gooey. The best part is, I used 100% home-ground flour! (a combination of Hard Red wheat, Soft White wheat and Spelt grain). So for anyone who wants to try all home-ground flour with this recipe, I say try it! Mine turned out great.
Also, I made these without a mixer, I did it all by hand. Don't be afraid to try this if you don't have a mixer. The process takes a little longer than the recipe says, and you'll need some strong arms, but it is doable. : )
Shalom!
Oh that's amazing, Jorie! I haven't tried these with freshly milled flour, but now I want to ASAP 🙂
Jorie what percentages did you use for your wheats? I'd like to try a combo of hard white and soft white.