


I’ve been using the autolyse technique since I started baking bread many years ago. And while I don’t use it in every single bake, in this post on how to autolyse I’ll show how it’s a handy tool that can help reduce mixing time, increase extensibility, and in some cases, can lead to increased flavor in your bread.
And while I think performing an autolyse can make things easier and improve your bread baking in some instances, I don’t think it’s necessary for every single bread. As I said above, it’s a tool that you can use if your formula and process deem it useful, but just like a hammer, it might not be suitable for every job at hand.
At the start, this post is primarily geared toward sourdough baking. If you’re baking mostly commercially-yeasted or hybrid doughs, you might find your dough behaves differently when you autolyse.
What is the Autolyse Technique?
An autolyse (“aw-toe-lease”), sometimes written as autolyze, autolysis, or dough autolysis, combines the flour and some or all of the water in a recipe and then leaves the mixture to rest for some period. During this time, gluten bonds begin forming, and the dough takes on a smoother texture and strengthens overall.
Also, in the presence of water, enzymes in the flour begin to function. Somewhat paradoxically, since the dough feels stronger overall, protease enzymes start breaking down protein bonds, slackening the dough. This slackening increases a dough’s extensibility: the ability for the dough to stretch out without tearing.
Extensibility is an essential quality for bread dough. Having the right extensibility—counter-balanced by elasticity or the tendency for the dough to resist stretching—means a dough can expand and be filled with the gaseous byproducts of fermentation.
Your Ultimate Guide to Sourdough
This guide is part of a series, tap to learn about each step of the bread-making process from starter to finished loaf.
What is the Difference Between Elasticity and Extensibility?
It’s often said that a well-strengthened sourdough bread dough is both elastic and extensible. These two forces can be seen to both work against each other but also complement each other.

Elasticity is the dough’s ability to stretch and then return back to its original shape. Imagine pulling a rubber band and then releasing it; if the rubber band goes back to how it was before you stretched it, that’s similar to the elasticity in the dough. This property helps the dough to hold its shape and structure, especially when it rises and expands due to fermentation.
Extensibility is the capacity of the dough to stretch without breaking. Returning to the rubber band analogy, if you can pull the rubber band longer without snapping, that shows good extensibility. In bread dough, extensibility allows it to expand and accommodate the gases produced by yeast in a sourdough starter, leading to a nice rise in your bread without tearing.
How to Autolyse Bread Dough
To autolyse bread dough, combine the flour and water in a recipe and leave it to rest for some period of time. After this rest period, add the preferment (levain), salt, and any additional water, and continue mixing and strengthening.
How long should I autolyse?
The autolyse period ultimately depends on the flour and recipe at hand. If you’re developing your recipe and feel an autolyse will help, I prefer to start conservatively at 15-30 minutes. There are no set periods one must adhere to.
For many of my recipes, I tend to stick to quarter-hour increments: 15, 30, 45, or 60 minutes. With high percentages of aged whole wheat flour, I might increase to 2 hours or more, depending on the dough’s consistency. If the dough were very stiff and elastic, I’d increase the autolyse period (while keeping everything else the same) and re-test.
For many of my mostly-white flour “country” loaves, I like to do a 1-hour autolyse. This lengthy period gives the dough significant extensibility. Then, I sufficiently develop the dough through mixing and stretch and folds during bulk fermentation. This combination results in a strong dough that traps gasses but is also extensible enough to expand optimally in the oven.
Is it ok to autolyse overnight (or for many hours)?
With some doughs it’s just fine. I’ve done this with recipes that have a large percentage of aged whole wheat and have seen great results. But I’ve found once you go too far with an autolyse, it’s hard to reverse the slackening of the dough. I approach a long autolyse like this with caution and thorough testing.
If you’re short on time and are trying to do the autolyse “ahead of time,” I’d instead skip the autolyse altogether.
Do I include my levain in an autolyse?
Typically, no.
Remember, an autolyse is simply the combination of the flour and water in a recipe—that’s it. However, in some cases, it might actually be necessary to include the levain, or preferment, in the autolyse.
Always remember, once a preferment (levain, biga, poolish, etc.) is added to a dough, fermentation begins.
If you have a liquid preferment and your dough is low hydration, you might have to include your levain in the autolyse mix. Why? Otherwise, there won’t be enough total water in the autolyse mix to incorporate and hydrate the flour effectively.
Think about how hard it would be to mix a 50% hydration dough! The liquid preferment, especially when a recipe has a high prefermented flour percentage, has a relatively large portion of the recipe’s water in the preferment itself. In this case, I’ll add the liquid preferment to the rest of the flour and water and do a short autolyse.
When and When Not to Autolyse
First, let’s look at a high-level comparison of when I might, and might not, autolyse:
You might autolyse when…
- The bread dough formula has a high percentage of high-protein flour
- The formula has a high percentage of whole wheat flour
- Additional extensibility is desired
- You’re hand mixing the dough
- You want to preserve maximum flavor in your dough at all costs
You might not autolyse when…
- The formula has a high percentage of freshly milled whole-grain flour
- The formula has a high percentage of flour known to be highly extensible (such as spelt)
- Would add increased complexity to the baking schedule
- The flour has a low falling number
I discuss this often in my cookbook. The essential fact about baking is that you have to look at the formula and process holistically. Nothing can be examined in isolation. So, while the above table of when and when not to autolyse generally holds, it’s certainly not written in stone.
When to Autolyse Bread Dough
I find it helpful to autolyse a dough comprising a large portion of high-protein bread flour. While there’s no clear protein percentage cut off, if you find your dough to be very strong, tight, and lacking extensibility when it’s mixed, an autolyse can help.
If the dough contains a high percentage of aged whole wheat flour, an autolyse can help soften the mixture. Additionally, an autolyse will reduce the mixing time required for the dough to reach maturity. Because whole wheat flour contains large bran and germ particles, the longer it’s mixed, the more opportunity these particles have to cut through any developed gluten matrix. In the end, this could achieve a more open interior.
If I’m mixing a dough completely by hand, I’ll often include at least a short (15-30 minutes) autolyse period. This helps reduce the time I have to physically mix and knead the dough.

Should I Autolyse a Pizza Dough?
I thought I’d include my thoughts on using the autolyse technique with pizza dough: I think it’s just fine! I’ve done this occasionally in experimentation, and it works as it would with any other dough. When I autolyse a pizza dough, which isn’t often, I usually keep it shorter (10-20 minutes).
When Not to Autolyse Dough
I prefer not to autolyse doughs made up of a large percentage of freshly milled flour. While it’s not a hard and fast rule to not autolyse when baking with freshly milled flour, that’s typically my approach. I’ve found that long autolyse periods can result in a dough that’s weaker and, assuming all else is equal, a dough that’s sticky and hard to work with. My theory is the autolyse provides too much time for unbridled enzymatic activity, specifically, an increase in proteolytic activity[footnote]The Monitoring of Enzyme Activity of Protease on the Bread Dough[/footnote] will cause the already delicate dough to lose elasticity (strength).
As discussed above, an autolyse gives enzymes, in this case, amylase, a chance to work efficiently (especially since there is no salt in the dough) and for longer. Because enzymes can be quite active in this environment, performing an autolyse with flour with a low falling number can lead to a troublesome bake. A low falling number indicates high amylase enzymatic activity in the flour itself. If you autolyse for too long, it can result in a sticky, weak dough that potentially degrades through extended fermentation.
Finally, when a formula has significant spelt flour, which is known to typically be very extensible, I’ll skip the autolyse.
Potential Benefits of an Autolyse
Reduced mixing time
A dough that undergoes autolysis will usually require less mixing and kneading time (either by hand or mechanical mixer). By letting the mixture of flour and water rest, gluten bonds will begin forming, and the dough will start to smooth out and soften. Because this happens without mechanical mixing, we can minimize the amount of dough oxidization.
Oxidization (oxidation) generally gets a bad rap. But with bread, some oxidization is good and necessary when mixing and developing a dough—to a point. Oxidization is necessary to develop the gluten matrix in a dough. And as we know, the development of gluten is essential to trap gasses and gain loaf volume. But go too far, and over oxidization from excessive mixing degrades carotenoid pigments, which bring desirable flavor and color to bread crumb and crust[footnote]The Taste of Bread by Calvel[/footnote].
Dough oxidization through mixing is good and necessary, up to a point.
But what are over-mixing and over-oxidization? In my experience, it’s tough to oxidize a dough to where color and flavor are stripped from the dough. However, this might happen if you’re mixing at high speed in a professional mechanical mixer for many minutes. If you’re hand mixing, I’d say it would be extremely difficult to reach this state, if not impossible.
So, if it’s tough to over oxidize if you’re not mixing excessively, why autolyse? Besides the list of benefits yet to come, a reduction in mixing time can be helpful in its own right. Mixing at high speed can affect the final dough temperature if not monitored closely. And if you’re mixing by hand, reducing the time you need spent physically mixing the dough can be a blessing. And while the slap and fold technique is very effective at developing a dough, adding even a short autolyse reduces the time needed for mixing.
Flavor and color preservation
This is related to the section on reduced mixing above. When faced with a situation where lengthy mixing is required, adding in a autolyse can help reduce over oxidizing the dough. This helps to preserve overall flavor and crust and crumb color.
Increased extensibility
The balance between extensibility and elasticity is incredibly essential in bread baking. Extensibility allows the dough to stretch out farther and avoid tearing. This stretchy characteristic lets the dough fill with gasses created during fermentation for optimal volume. An open and light loaf of bread is vital for the best eating quality.
Potential Drawbacks of an Autolyse
Hard to incorporate ingredients
After you mix the flour and water and leave it to rest, the dough begins to smooth and strengthen. Thus, it can be hard to work additional water and salt into the dough, especially by hand. This mixing difficulty isn’t tremendous (I do it all the time!), but it might be a burden for some.
Added mixing complexity
Depending on your baking setup, it might be challenging to add a step to your baking process. This seemingly small step can add additional scheduling complexity. This complexity is especially evident if you’re baking in a commercial setting mixing multiple doughs each day.
Performing an autolyse requires you to mix your dough to let it rest. If you can’t let the dough sit in the mixer, you have to remove the dough and store it somewhere. Later, you put the dough back into the mixer to finish mixing (and then clean the mixer yet again).
Overall, performing an autolyse is just another step to the baking process that adds up over time.
Can cause excessive enzymatic activity
When a formula calls for significant freshly milled flour, an autolyse can degrade the structure of the dough. This might mean an overly sticky dough and a challenging bake. While I wouldn’t say an autolyse is completely out of the question here, it’s just something to be aware of when planning your bake.
In a similar vein, when the flour has a low falling number—which indicates high amylase enzyme activity—an autolyse can mean a sticky dough that’s gassy and hard to handle. This might happen regardless, but an autolyse can intensify the problem.
Autolyse Test Bake Comparison
I decided to do a quick test of two doughs: both are my Beginner’s Sourdough Recipe, one had the called for a one-hour autolyse, and in the other dough I skipped the autolyse altogether.
Admittedly, this is a very small sample size. But I think it is illustrative of the differences between using an autolyse and not when working with a dough formula like this. Keep in mind that the primary flour used in my Beginner’s Sourdough Recipe is high-protein bread flour, so an autolyse is very beneficial in this formula for all the reasons discussed above.
The two doughs were both mixed by hand only until everything was incorporated. They were not developed in a mechanical mixer and were not strengthened with the slap and fold or other kneading techniques. They were both given the same number of folds during bulk fermentation (3 sets).
Click on the photos below to see a larger version.
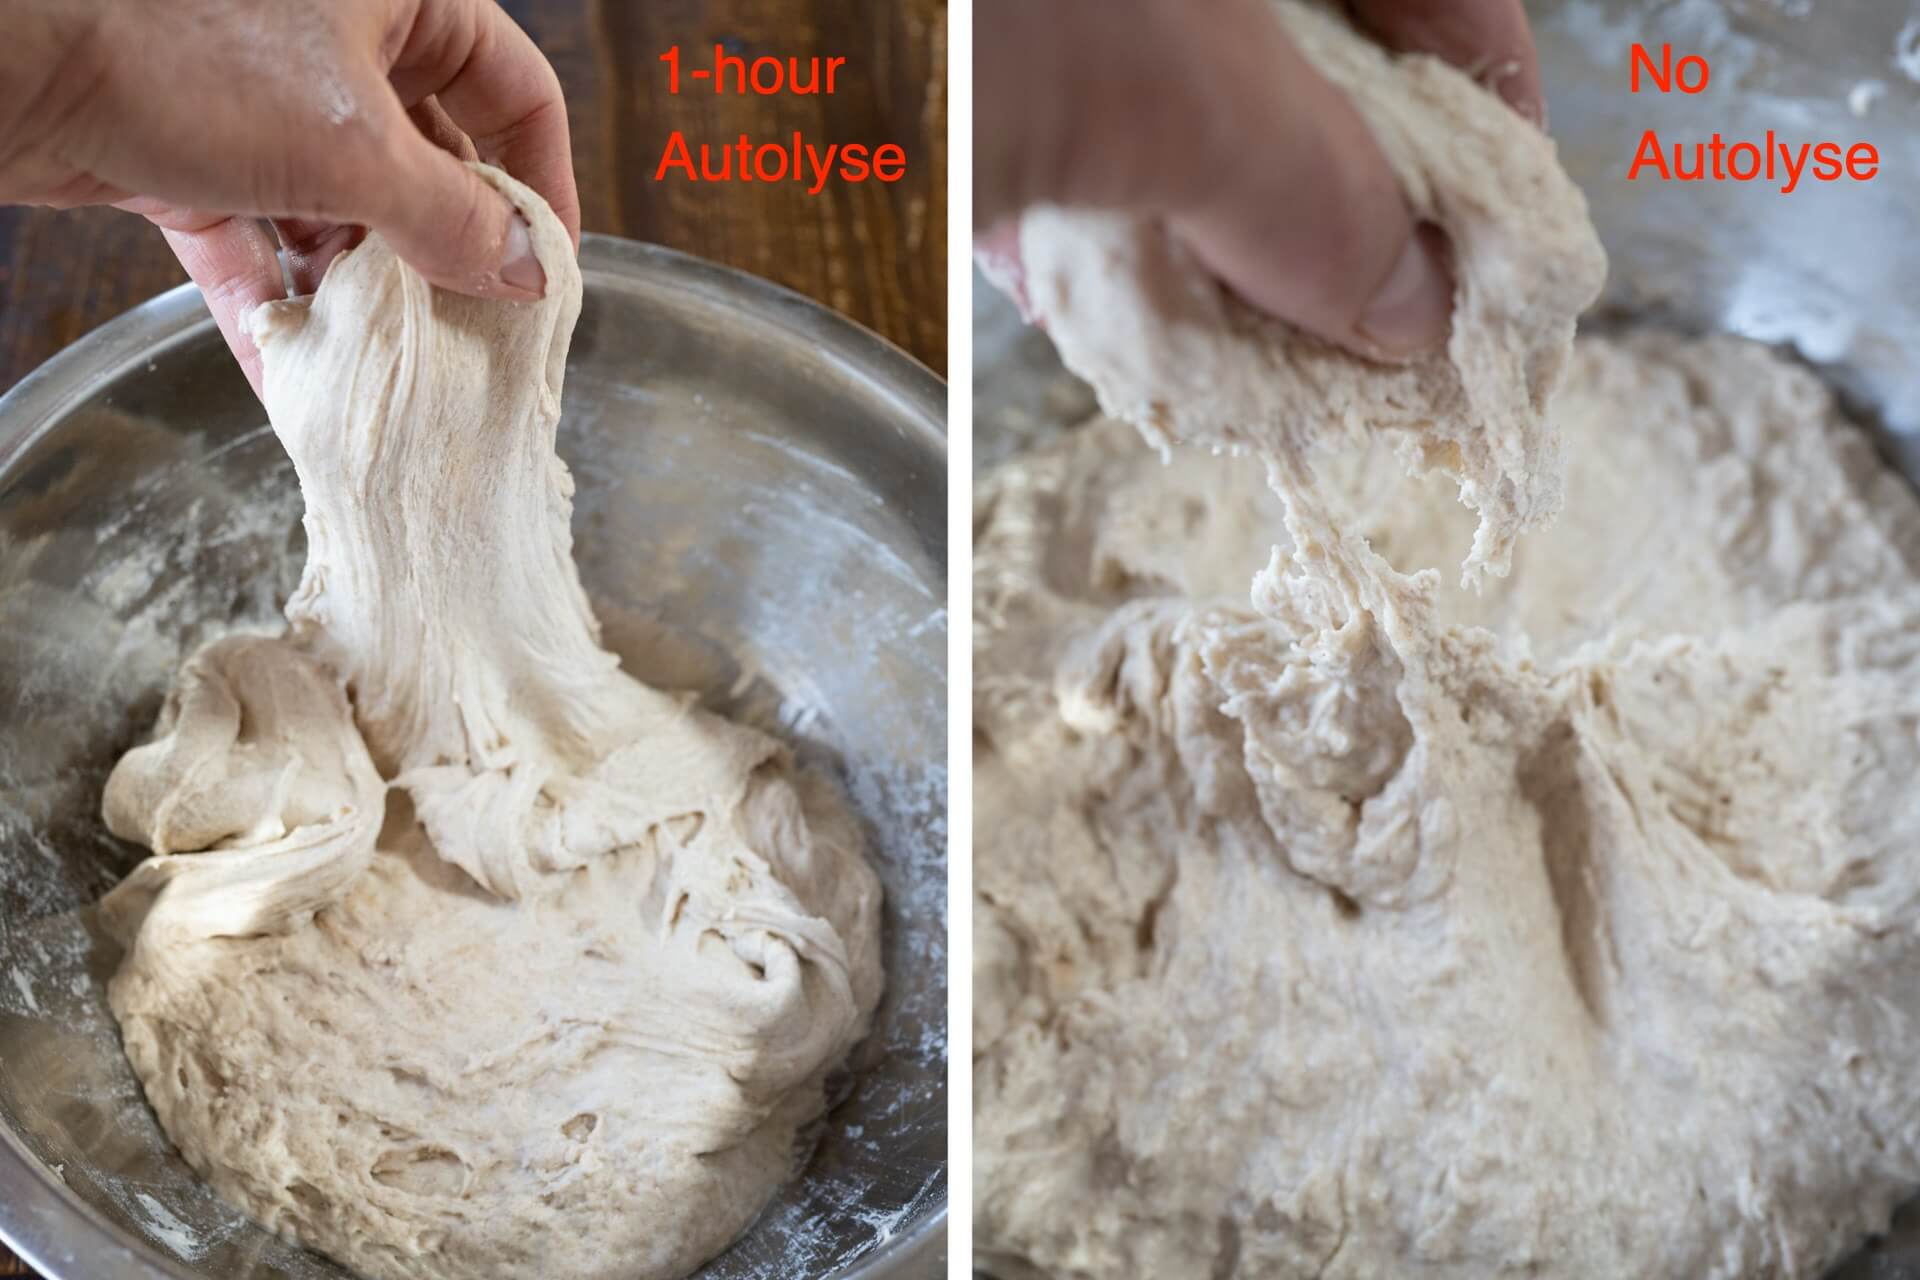
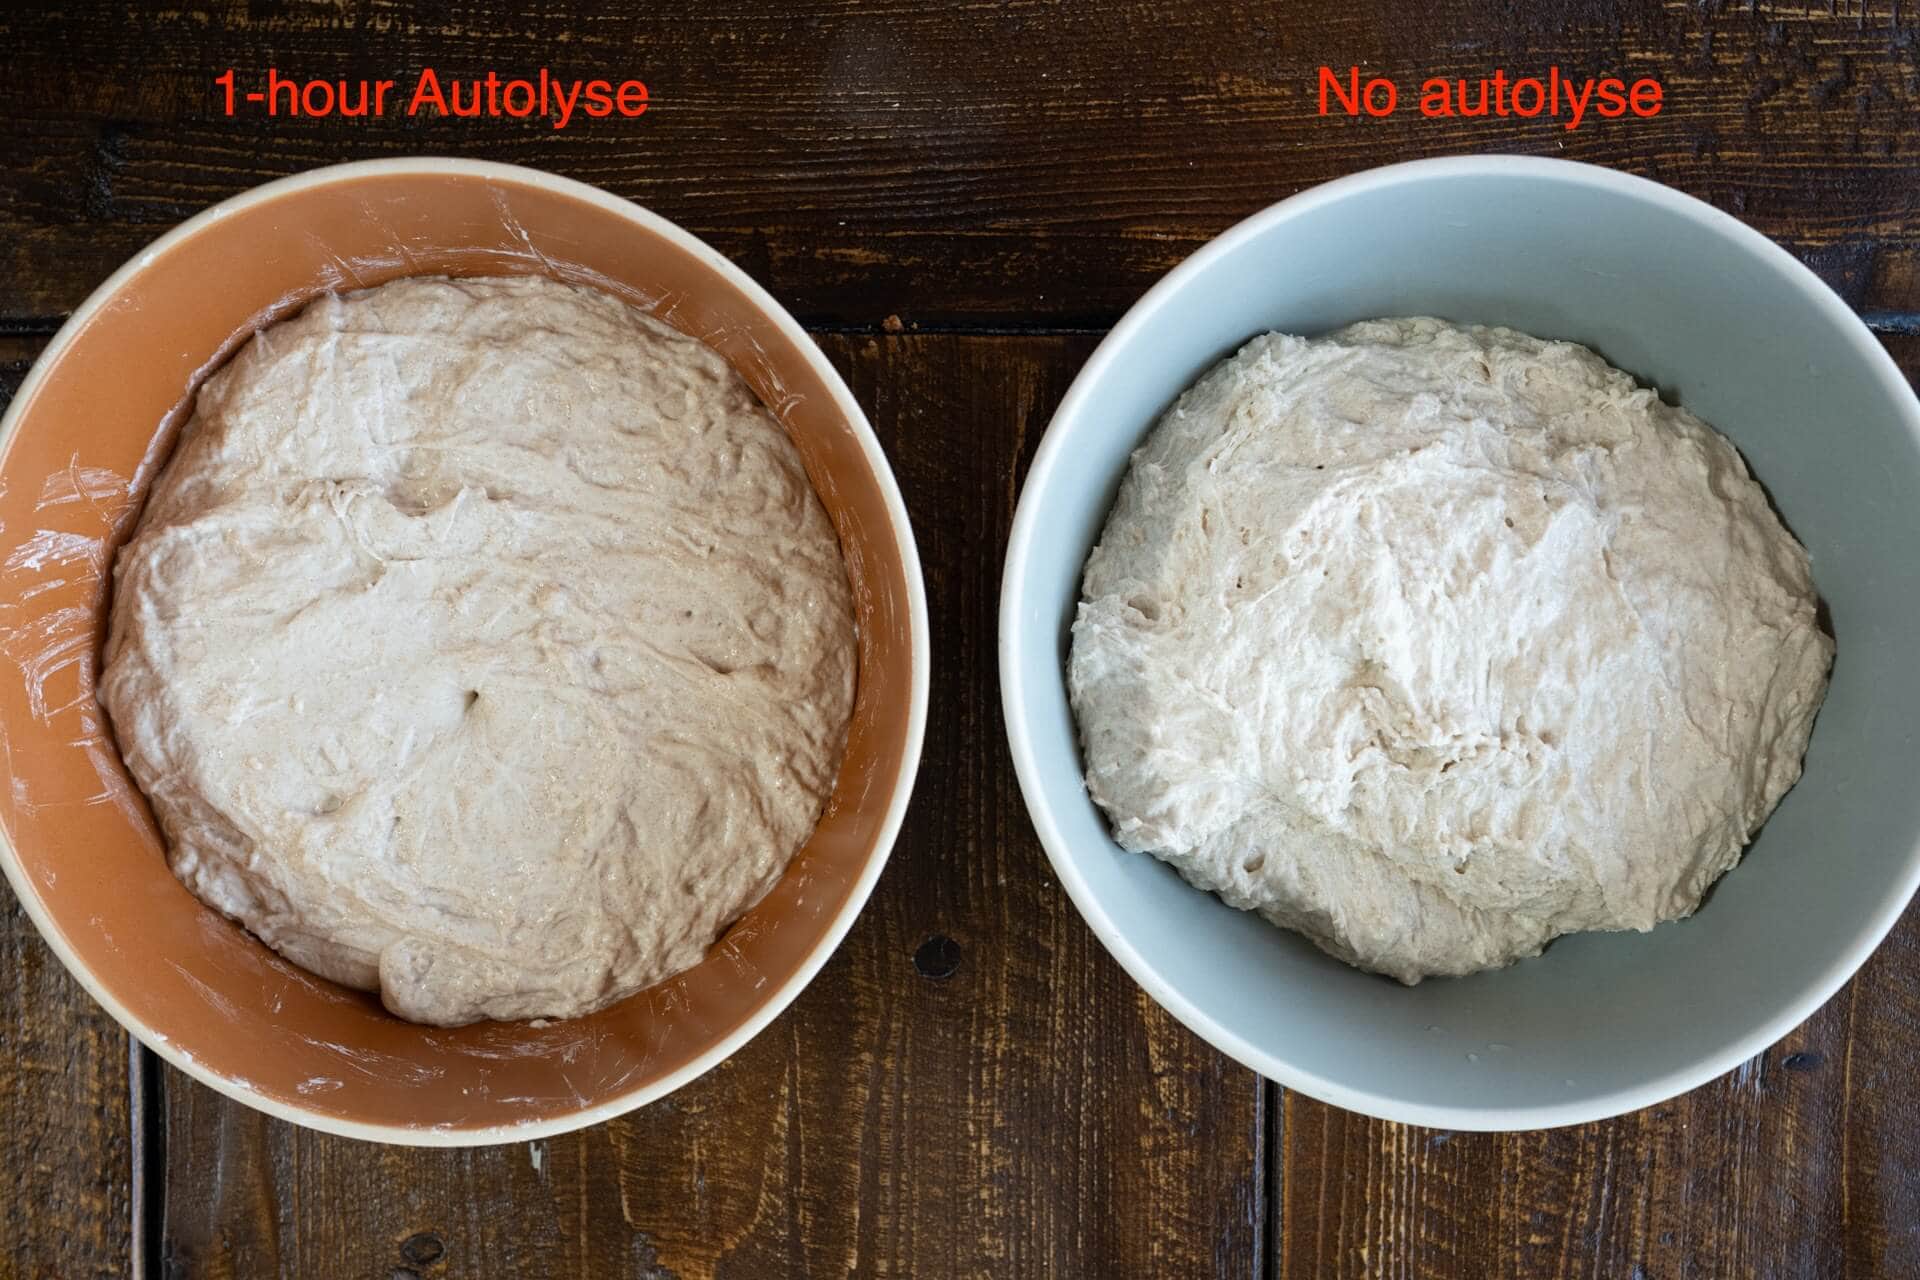
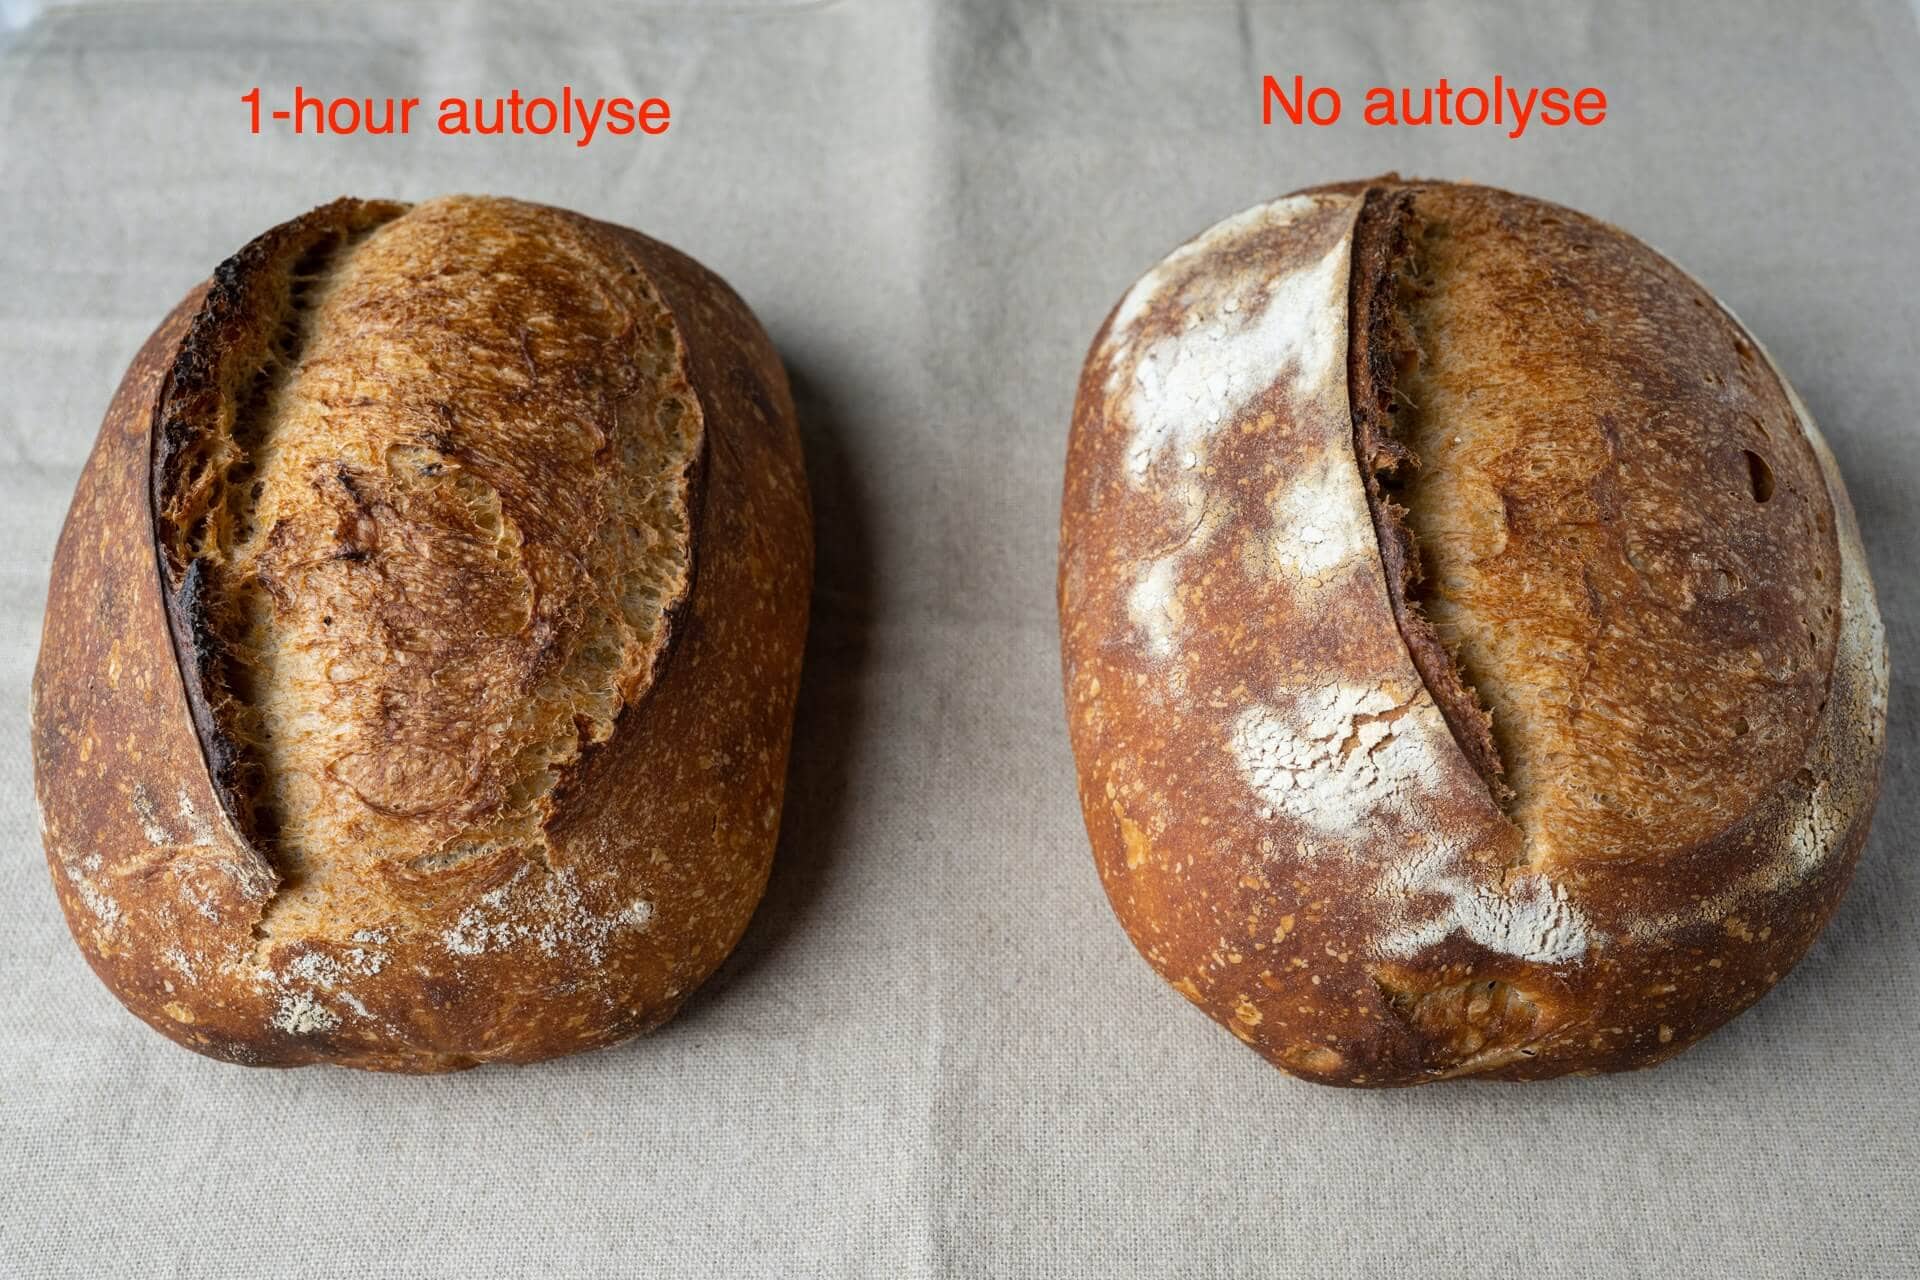
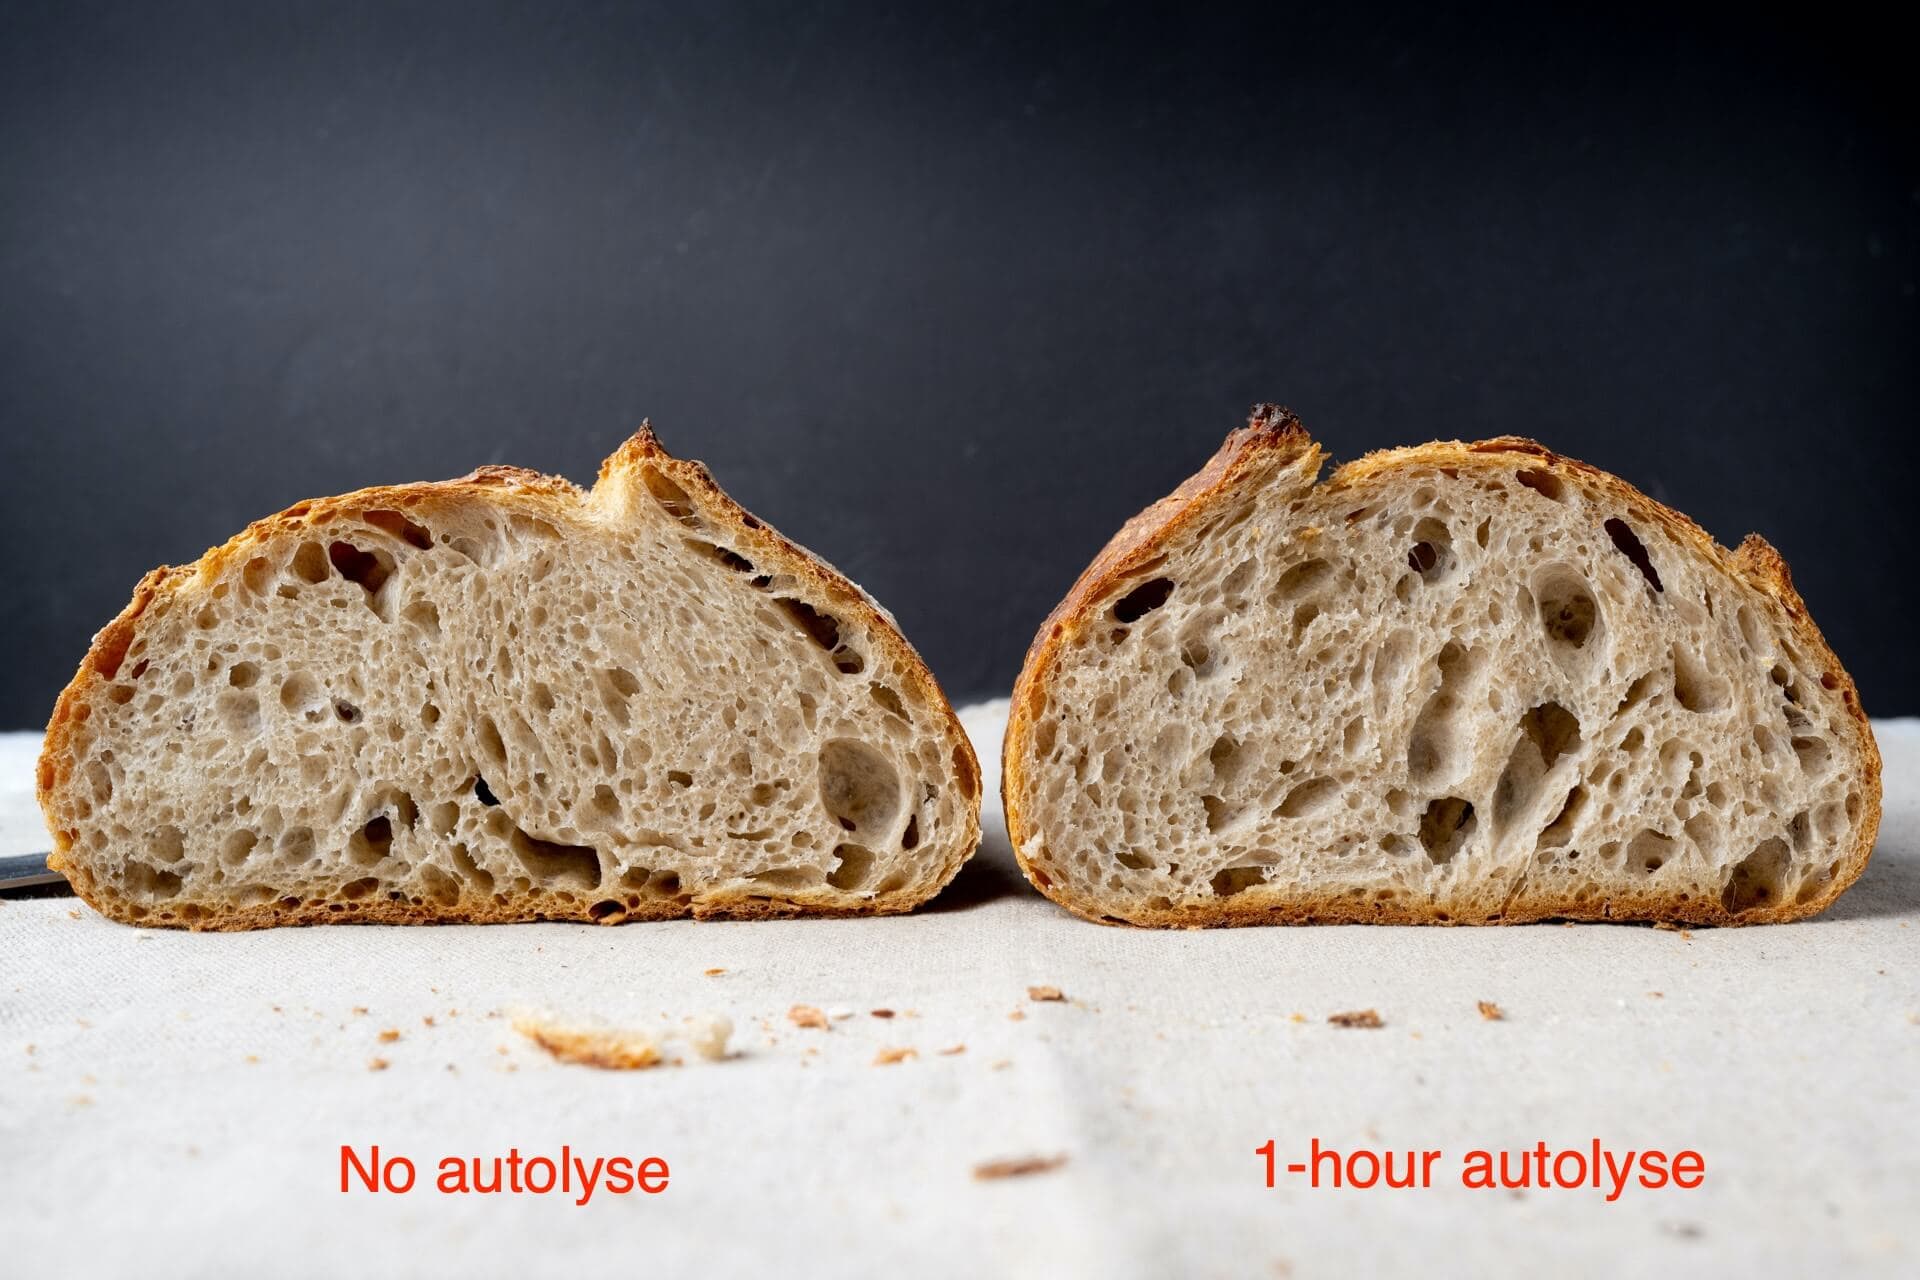
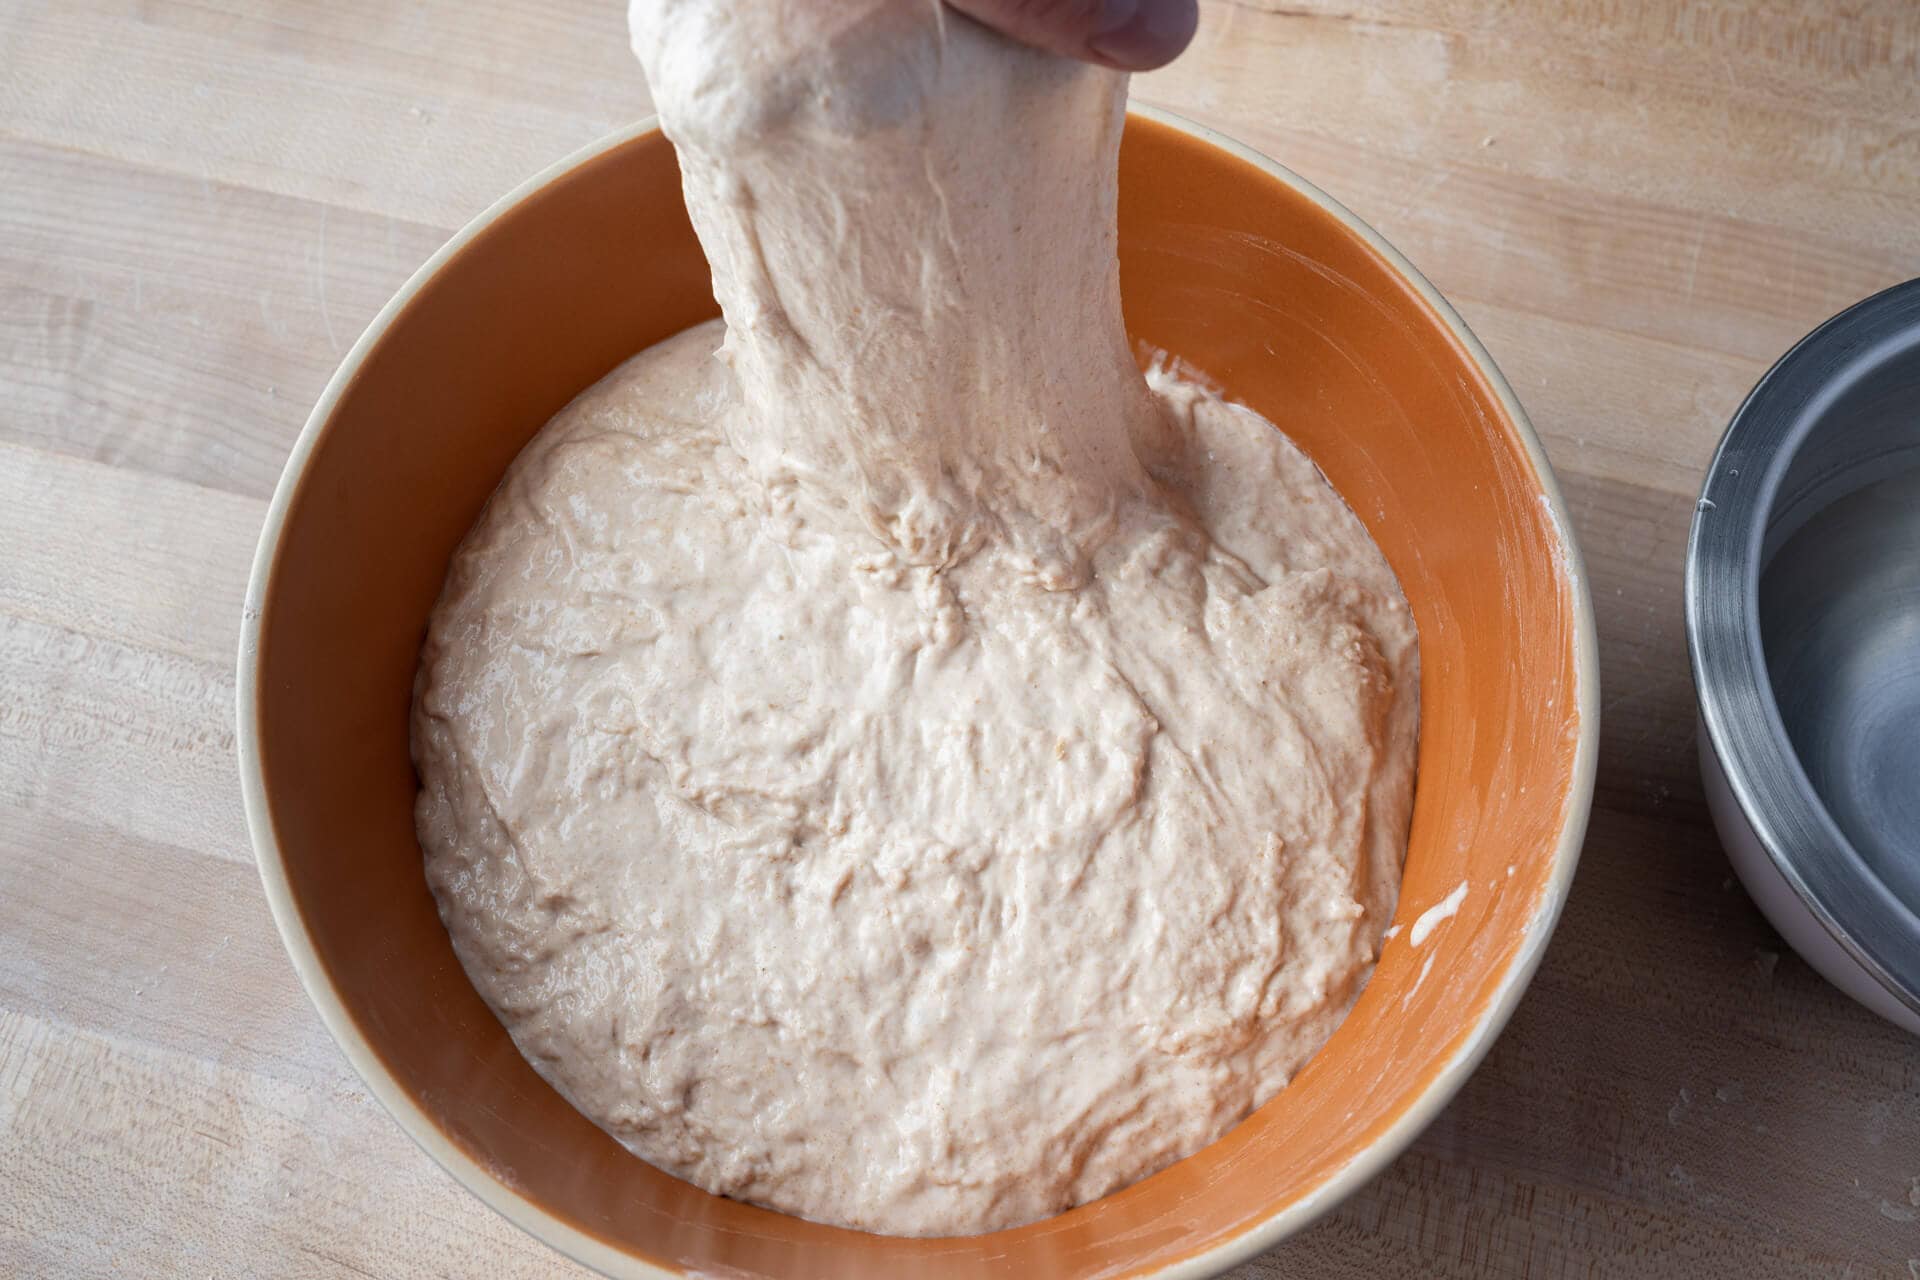
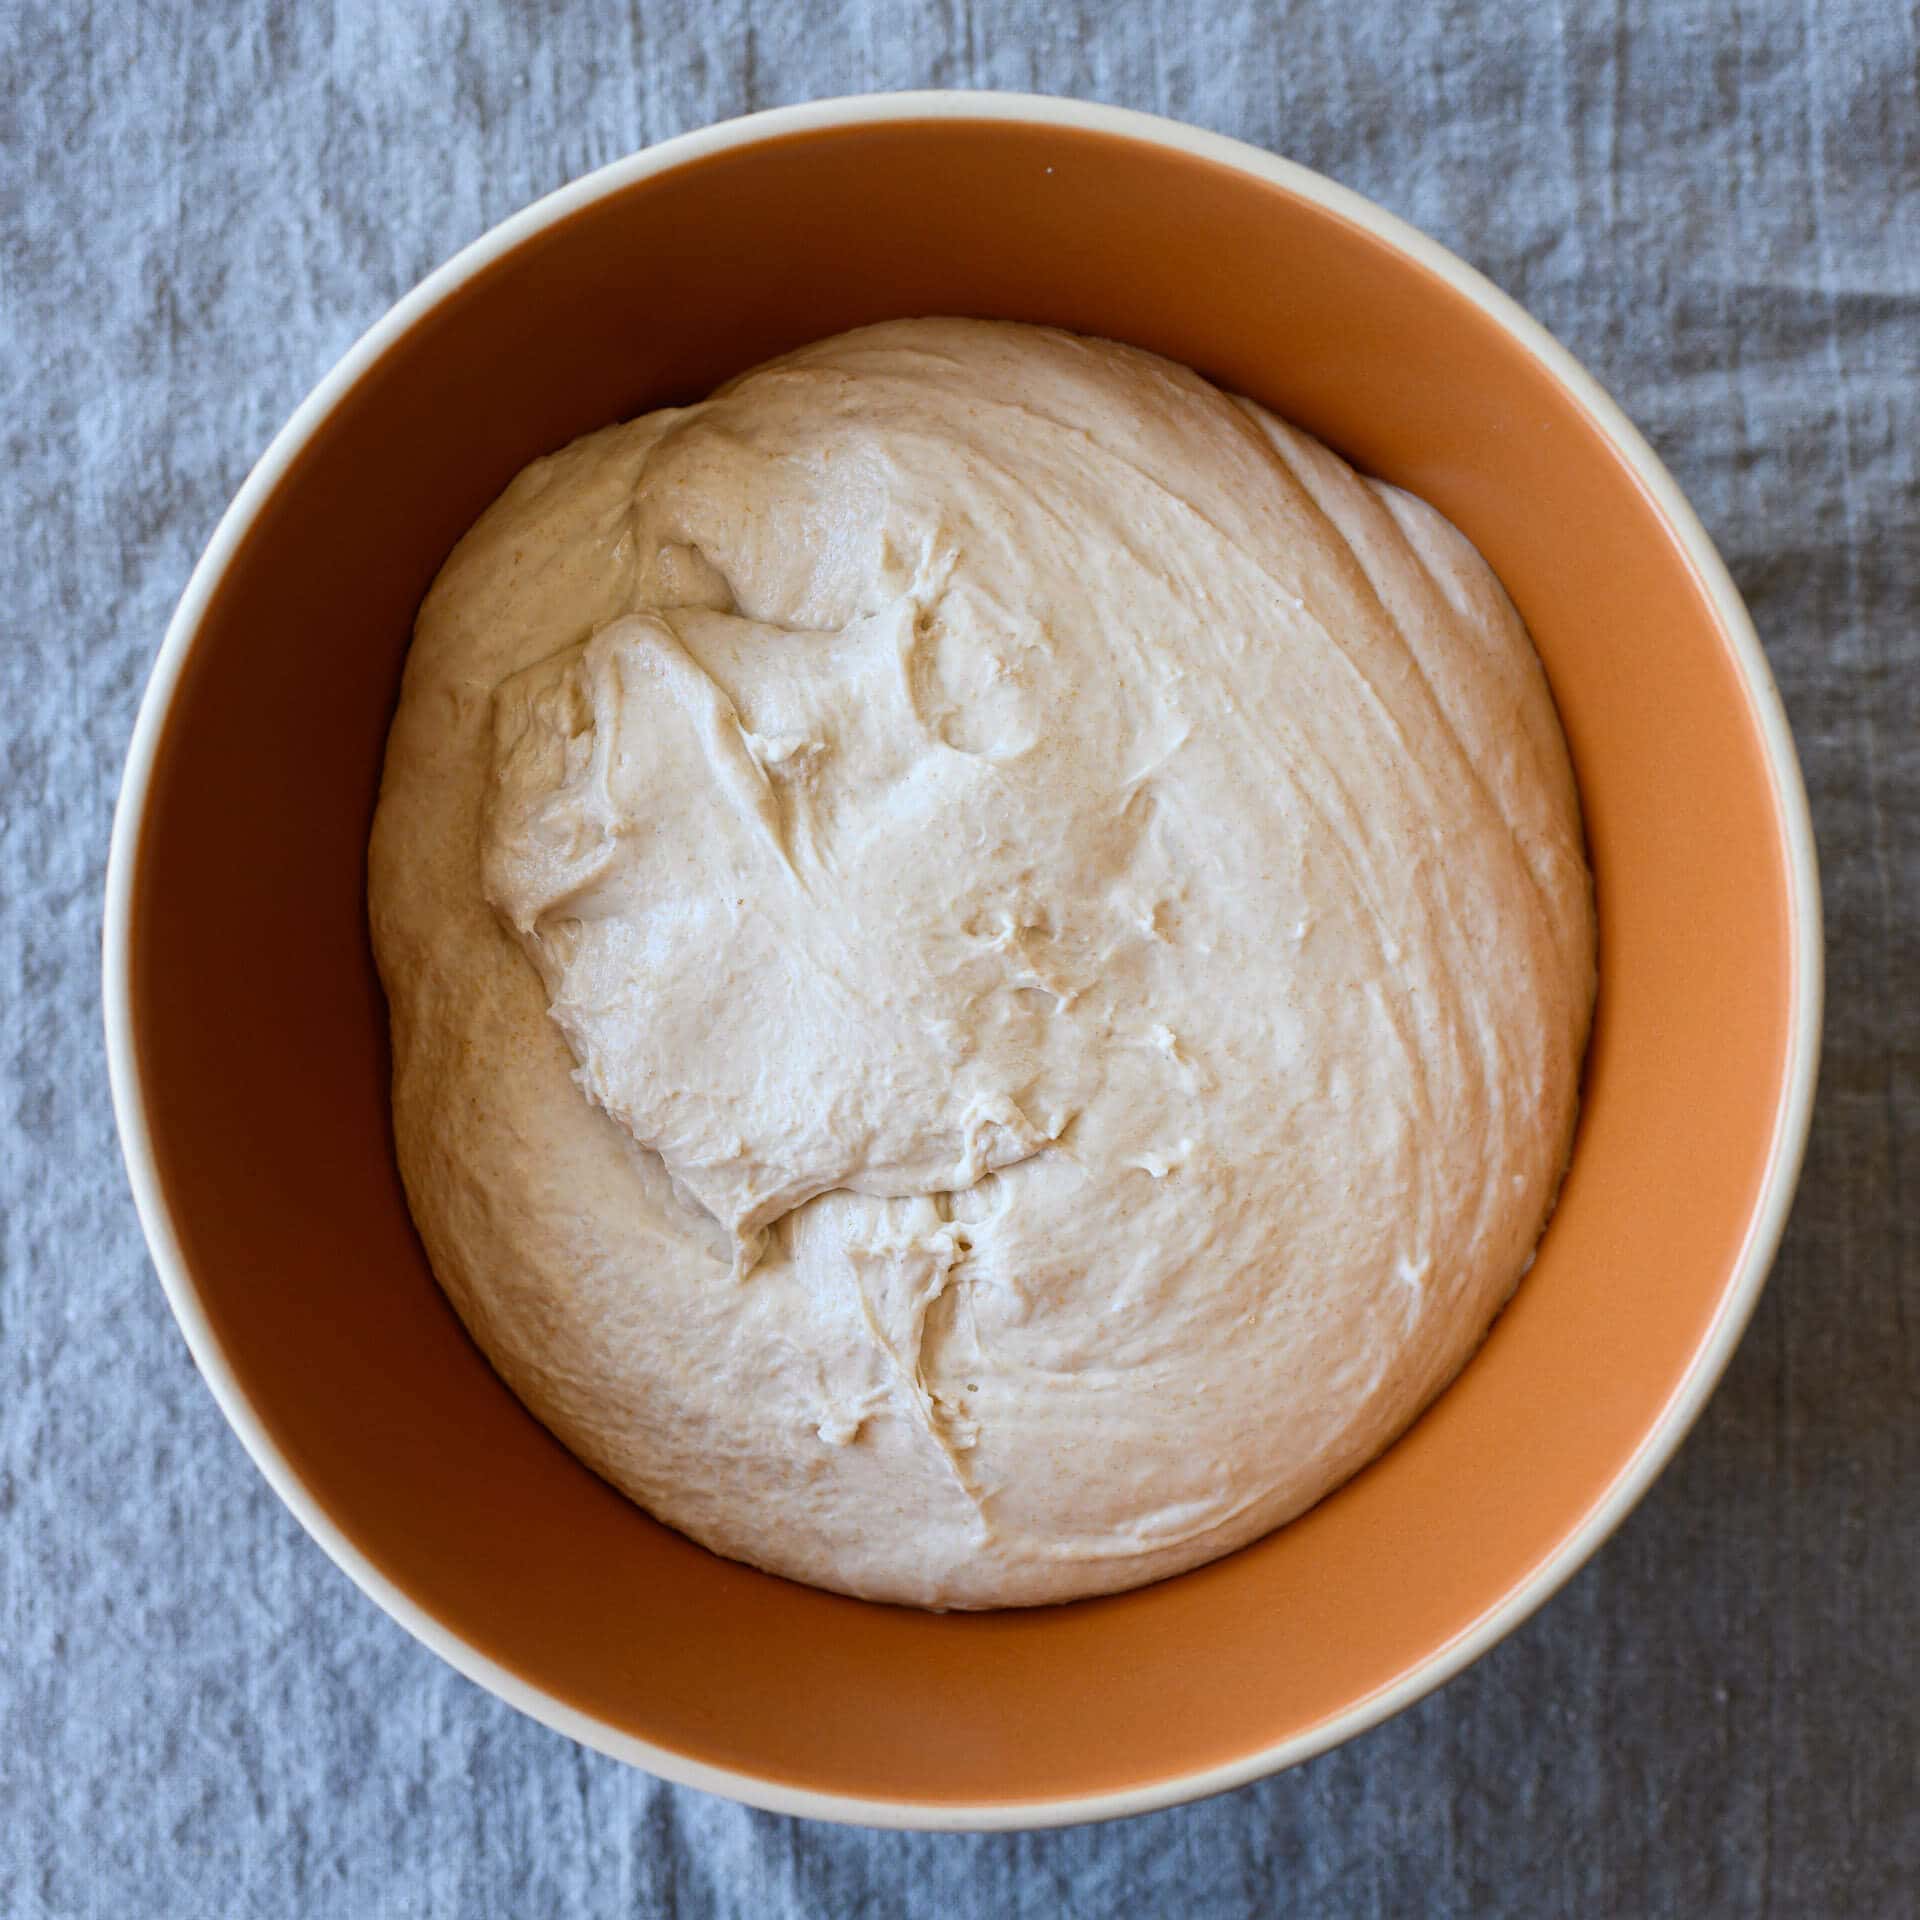
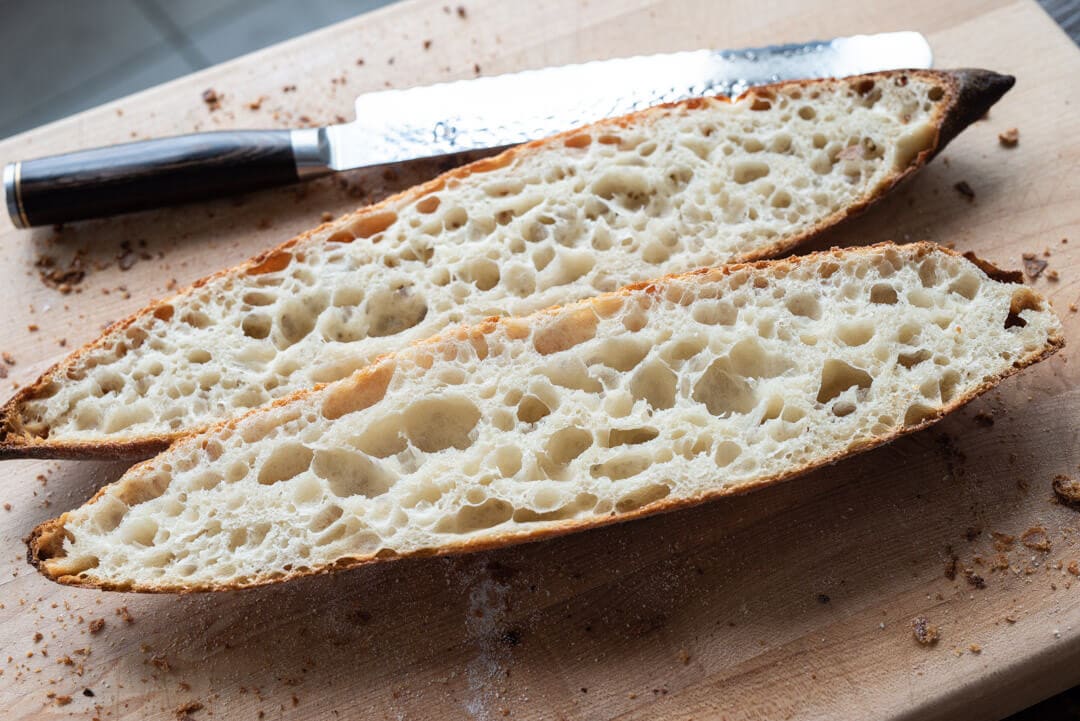
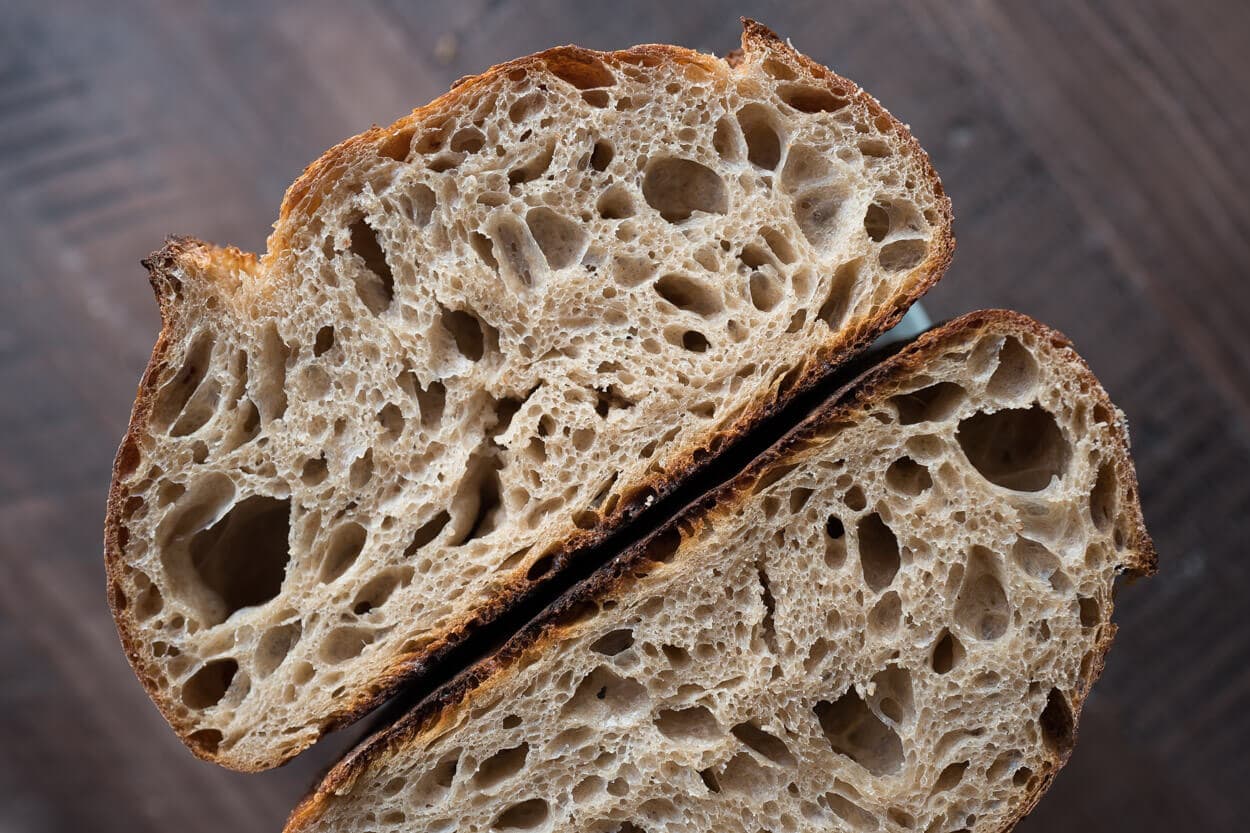
Starting at the left-most image, you can see the difference between the dough with the 1-hour autolyse and the one without. The dough with the autolyse was smoother, stronger, and very extensible, stretching out significantly before resisting and tearing. The dough without autolyse was shaggy and tore apart readily. This difference continued into bulk fermentation in the second photo, where the dough on the left (in the orange bowl) had the autolyse; it was smoother and more cohesive. In the last two pictures, you see the loaf with the autolyse had slightly more dramatic crust colors, and it had a little more volume with a more open interior.
When I was preshaping and shaping the doughs, it was immediately apparent the dough without autolyse was shaggier and weaker. This dough required more input to get it into proper form. If I were not doing a side-by-side test with this dough, I would have either mixed it longer or given the dough more stretch and folds to compensate for the lack of strength.
The dough that had the autolyse was smooth, elastic, and more comfortable to shape. Because it was easier to handle, it helped me be gentle with it during preshaping and shaping. More delicate handling during preshape and shaping helped me ensure a better final shape and a more open interior. Further, the increased extensibility in the dough allowed for an improved rise during proof and bake.
While this comparison is illustrative of the processes at work with an autolyse, it doesn’t outright mean an autolyse will get you better volume, crust color, and a more open interior. An autolyse can help you along the way to achieving these things, but it still requires you to tend to the necessary parts of any bake: strong fermentation, sufficient dough strength, and a full, complete proof.
A Brief History of the Autolyse Technique
I wanted to include a brief history of the autolyse technique to firmly plant where it came from and why it was “invented.” It’s vital with baking (and many things) always to see the context for why things are done so we can understand where and when they are appropriate.
In the case of the autolyse technique, Professor Raymond Calvel, author of The Taste of Bread (which is an excellent book for any baker’s bookshelf), outlined the autolyse technique to help combat the intensive mixing that was commonplace during his time (around 1970). These intensive mixing practices led to bakers producing bread with a bleached-out crumb color and bland flavor profile. Most of this was due to excessive mixing and the use of dough enhancers. His goal was to return optimal color, taste, and texture to the bread.
By implementing a short autolyse period before mixing, it was possible to reduce the overall mixing time. In doing so, excessive oxidization was eliminated. And as discussed above, having the appropriate oxidization when mixing means improved crumb color, flavor, and texture.
What’s Next?
I hope this guide covers all the basics of how, when, and when not to autolyse your sourdough bread dough. For more foundational techniques, be sure to read the beginner’s guide to sourdough bread—which uses the autolyse technique!
Or, head back to learn more about all 8 steps to making sourdough bread.
A big thanks goes out to Ian Pope for all the great discussions on this topic!

89 Comments
Hi Maurizio
First thanks for your fabulous resources, made even better by your book Santa recently delivered!
Quick question on autolyse temperature: I tend to autolyse on the counter top, which can be pretty cool here at this time of year in a stone cottage in the UK. So after getting the dough to DDT at the first mix it usually cools during autolyse; depending on the recipe there may be little or no additional water to add to warm it up again. So would I be better off autolysing in the proofer box with its temp set around DDT?
Thanks in advance
Peter
Peter, thanks for getting my book! Yes, definitely use your proofer during autolyse – this will help maintain a consistent dough temperature, especially in that cool stone cottage. It'll give you much better control over fermentation from the start. Let me know how it goes!
Hi Leo
First thanks for your fabulous resources, made even better by your book Santa recently delivered!
Quick question on autolyse temperature: I tend to autolyse on the counter top, which can be pretty cool here at this time of year in a stone cottage in the UK. So after getting the dough to DDT at the first mix it usually cools during autolyse; depending on the recipe there may be little or no additional water to add to warm it up again. So would I be better off autolysing in the proofer box with its temp set around DDT?
Thanks in advance
Peter
I too just purchased your book and can't wait to receive it. I have been watching your videos, using different water temperatures to autolyse and being very mindful of the bulk fermentation stage. The loaf turns out good and edible, but the inside is a little gummy as i try to slice the loaf, the holes are not spread out evenly, only at the top and the base is too hard to cut through. Again, i am working in an environment that is 80 degrees Fahrenheit. Where did i go wrong?
It sounds like perhaps your dough was slightly underproofed. There are a few indicators your dough could be under: explosive rise in the oven, dense spots in the interior with potentially scattered large holes, and a gummy texture to the interior. Finally, it’s possible the bottom of the loaf might be slightly bowed upward (like the letter “U” — the top will kind of dome).
Make sure to build your levain from a starter that’s strong and mature (meaning it’s risen to it’s peak height before you take some to use). From there, bulk fermentation is very important! Make sure your bulk fermentation goes sufficiently far, you want the dough to look smooth, it should have risen considerably, and have bubbles here and there — it should look alive. If you tug on the dough a bit it should offer resistance to your tugging, it’ll feel stronger. Give the dough the time it needs in bulk fermentation! If you have to give it another 30m or hour to see these signs, do so. It's important for this step to go sufficiently far for the dough to have enough fermentation activity before its proof.
Check out my guide to proofing for a bit more help, too:
https://www.theperfectloaf.com/guides/proofing-bread-dough/
I just purchased your book and ready to start my first loaf on Friday. My starter is about ten days old and I’m pretty sure it’s ready. My question is, I don’t actually see a recipe for a starter sourdough. I did make the crackers from some discard and that was fun. They turned out ok. And I did the banana bread today, but I’m still confused on the bread. Am I just missing something?
Hey Jilly! There's a beginner sourdough in the front part of the book, it's called "A Simple Sourdough." It's a large section at the front with a recipe for you to get started with. That's the one to look for!
Hi, Maurizio! My go to recipe is your "Spelt, Rye, and Whole Wheat Sourdough Bread" and I find that a 1 hour to maybe 1.5 hours autolyse (while I eat breakfast and whatnot) very much creates strength in the dough and helps me with mixing later. However, after I shape my boule, I always feel like it could hold its shape better. This happens at different BF stages (meaning I've tried giving it more or less BF to see if I was over or under fermenting it). My hydration is more on the 75% realm. I'm wondering if that recipe would accept a much longer autolyse, say, for example, building the levain as soon as I wake up, and doing the autolyse already, so it would autolyse for maybe 6 or 7 hours. Or is it possible to let the dough autolyse overnight in the fridge? And take it out the minute I wake up to let it come up to room temp. Thank you!!
Hey there, Angela! I love that recipe, too 🙂 No, I don't think a longer autolyse will help you there, it may actually make things worse. I would suggest trying to mix the dough longer or give it another set or two of stretches and folds in bulk fermentation. What you're describing is what I might expect with doughs that have spelt, though, given its extensibility.
Interesting, I mill all my own flour now and I find that it *requires* an overnight autolyse in order to be workable. It’s like playing with wet sand when I initially mix it with water. Most people aren’t working with flours they mill themselves, but they’re really their own beast and require a lot of special handling (including the aforementioned O/N autolyse).
I mill often, here, too, but rarely autolyse. I could see a need for it if the dough needs more time to properly hydrate!
Hi Maurizio, thanks for the article! Was a nice read.
Is there a proper way to recover from an overnight autolyse that ruined my dough? Recipe I used was this: 450 bread flour 14% protein with high falling number (430 IIRC), 50g whole wheat, 350ml water, mixed them at around 21 in the evening. At 7AM the dough was wet and sticky as hell. After incorporating everything I’m doing frequent S&f but they don’t seem to help much.
Any tips? Thanks!
I haven’t found a way to undo what’s been done in this way!
Same here. I think I’m just going to have to spread the dough on a baking sheet, sprinkle with sesame seeds, and make crackers!
Hi Maurizio, Thanks for all the great wisdom you share and your patience for all the questions! I started my sourdough journey last August, and am about 20 loaves in. You were one of the first resources I found and have reliably provided valuable guidance. I have been using the Tartine Country Loaf recipe but with a bit of adaptation(s) which I’d like to get your guidance on.
Due to my schedule, I have been mixing the flour/water for a long(ish) autolyse of 2.5-3 hrs (I go to the gym during this time which is another necessary part of my life). Then I proceed to add in starter/rest 20-30 min; then add in salt/remaining water; rest a few min, then complete mixing / developing gluten before 6 S&Fs as in the Tartine method.
BUT – I am also now playing with flours and have found Barton Springs Mill delivers quickly to us (we are in area). I love the Rouge de Bordeaux “00” and also have ordered the RdB whole wheat version. My last bake I used RdB “00” 550g; King Arthur bread flour 150g; and RdB WW 300g (purposely increased whole grain also).
I increased hydration to 78% (780g) due to “thristy flours” and wanting to find the open crumb/pudding texture. Now I am reading more about how the “fresh milled flours” may not do so well with such a long (if any) autolyse and I am wondering if this is perhaps why my recent bake spread out (rather than springing up).
If I order from a local mill and the flour is in my pantry for several weeks… is that “fresh milled?” or is “fresh milled” only when you mill it directly ahead of use? My bake was delicious and texture was wonderful. I’m just missing the higher rise and more open crumb. Advice?
Great questions here. Yes, I classify flour milled within a few weeks “fresh.” It’s I would definitely try reducing the autolyse time of the dough, it likely doesn’t need any extra time! From there, reducing hydration will also help. But that would be my order of operations: 1) reduce auto time, 2) reduce hydration. Sorry for the delay and so glad to hear I’ve been a help!
For what it's worth, and some people are just naturally well adept, but it took me a lot more than 20 loaves before I was even consistent and happy with Tartine. Straight out of the book. The only thing I couldn't do was emulate his temperatures, but eventually bought a Brod Taylor proofer and remedied that. Still, I have off days, and off starters and just don't have the results I wish for. That's with bread flour (I've used various brands) and some commerical over the counter whole wheats. It was a couple years later that I actually bought a mill and started to incorporate Fresh Milled Flour (I guess it's called now!) and my results started to be shockingly different! I find it hard, and it takes a really really good starter I've come to learn. I've had mine for over 20 years. But I didn't start making Tartine style bread until about 2010.
Hi Maurizio, thanks for the great article.
New baker here and I find it quite difficult to examine the differences when I do this and this, what if I do that and that… At the moment, struggling with the dough basically; still delicious though 🙂
I autolyze with ice cold water. I do this because the dough warms quickly with a Kitchenaid mixer. And my kitchen is quite warm… Is this a good idea? Would it negatively effect my dough and make it harder to work with?
Totally find to use cold water!
There is an enormous amount of difference in variables from one kitchen to the next. Because of this, getting info from the internet about how someone in a different climate using differently sourced flour gets specific results after making bread at a specific ambient temperature is only helpful for those few who share enough of those variables to get similar results. Someone from Tucson, AZ, for example, could brag about their 80% hydration dough, when, in scientific terms, in Plymouth, England, I start with as much as 20% more ambient water in my “dry” flour than they do, which is never measured. My dough can be much more like theirs at 60% than 80% hydration. Unfortunately, reinventing the wheel and doing the science fresh for yourself is necessary for any serious baker in every kitchen. Knowing what an autolyse is, however, is useful for everyone. You did a good job explaining it.
I’d like to point out that dough flat-out develops better without yeast and salt. Anyone can do that experiment. Mix up a ball of dough with just flour and water, and then one with flour, water, yeast, and salt. Mix them both the same. The flour and water develops far faster and better than the one with yeast and salt. You’ll be able to reach a passable window-pane test with flour and water, by hand with no machinery, very quickly. If you struggle with getting dough to develop, use an autolyse. If not, skip it.
Yes, you’re absolutely right, Chris. That’s why I almost always call for holding back some water, adding it in through mixing. This lets the baker adjust the hydration of the dough to suit their environment. And as I talk about in my cookbook, pushing the hydration number high just for the sake of saying it, isn’t necessary 🙂
Thanks so much for the comments and happy baking!
not sure why you got a thumbs down on this, but I think autolyse is one of the most misunderstood concepts in the home baker bread baking world. It was developed to save energy in the industrial bread factory. It wasn't until about 2010 that autolyse became part of my lexicon and that came from the Fresh Loaf forum when everyone was making "Tartine" bread. I don't know when I started reading this forum, but it seemed to matter. I have been baking bread for many years without it. A lot of my bread books don't use it either.
This is exactly correct: "The flour and water develops far faster and better than the one with yeast and salt. You'll be able to reach a passable window-pane test with flour and water, by hand with no machinery, very quickly. If you struggle with getting dough to develop, use an autolyse. If not, skip it."
When I autolyse the simple sourdough recipe using Central Milling All Purpose, my dough ends up rather lumpy… Between 1,000g flour and 600g water, the autolyse is a bit dry and leaves chunks of flour, but after the levain it’s basically perfectly wet, however the lumps remain even after mixing and kneading for 8 minutes.
Any suggestions or comments?
You could try adding a bit more water to the autolyse to ensure all the flour is completely hydrated!
I’ve already attempted to post this once but it has apparently been denied approval. Are you unwilling (afraid?) to admit that you’re simply pronouncing a word incorrectly? How disappointing. Here is a second link for confirmation.
https://www.dictionary.com/browse/autolyze
Hey, DB! Not unwilling, not afraid, your comment was just sent to comment purgatory. Whenever there’s a link attached it flags it as spam and I missed it.
So there are many conflicting sources on the pronunciation of this word, I totally agree with you there! I learned by pronouncing it how I have it spelt above as “auto-leese”, but I can see how in the West we’d pronounce with a “z” sound at the end there.
I wouldn’t say dictionary.com is the end all source for all things words and pronunciation, though. Again, it’s very much up to interpretation and just about every baker I’ve met pronounces it the way I have it written. Not sure which way is right!
You are a gracious man, sir!😉
I’m making your beginner sourdough and I forgot to add the rye and whole wheat flour with the bread flour for autolyse. l only mixed the water and bread flour and let it sit an hour. Can I then add the rye and whole wheat flours and let it go another hour or should I start over? (I tried adding it with a couple TBS of water and it’s now resting again) Thanks!
I’d just proceed with mixing and skip the autolyse for the other flour!
Hi Maurizio, What is the temperature of the water in your typical autolyse?
It depends on the kitchen temp… If it’s cool in my kitchen I’ll warm the water to about 78F to help ensure the dough meets the final dough temp for the recipe!
Thank you!
I tried autolysis and I had far worse results. When comparing to those images above, I have the exact opposite of how they are labelled (my ‘no autolyse’ looks like the ‘1-hour one’ etc etc). Anyone have any idea why this is the case?
Hmm, that’s very interesting. It’s possible your flour was not suitable for using the autolyse technique?
Has anyone used a poolish (say30%) and autolyse in the same dough? Or also a 5% Tangzhong?
I have not!
Is there a reason autolysis does not occur after adding yeast or starter? If you have a long bulk-ferment, would not all the changes that occur during autolysis happen anyway?
Once you add the preferment (or yeast), fermentation begins. I typically do not add the preferment to the autolyse and simply let the flour and water rest until mixing. I use the autolyse to help me reduce the amount of time needed for mixing, but also to bring the dough a little extra extensibility. If I were to add the preferment at the time of autolyse, in my case the dough might over proof given the rest of the schedule for this bread.
Hi, doesn’t this suggestion of problems with autolyzing with fresh milled flour contradict what you say here: https://www.theperfectloaf.com/baking-sourdough-with-fresh-milled-flour/ ? (You suggest three hour autolyse if I interpret it correctly.) Or is it just that you’ve learned a lot throug experimentation over the 5 yrs since you published that post? And could you define “fresh” – I purchased some flour online that was milled last week – is that still fresh?
You can certainly autolyse with freshly milled flour, I just tend to prefer not to due to the weakening effect it can have. But yes, I’d say that’s mostly an evolution of my baking over the years! I’d consider anything milled within a week or so “fresh,” but when I refer to freshly milled flour here at the site I’m usually talking about flour I’ve milled either that day or the day before. Hope that helps!
Hi….thanks a lot for the insight into this. Can we leave the dough with all the ingredients mixed in including the yeast for autolyse in friz for 5 hrs. The dough has 1:1 ratio of wwf and apf.
How do you recommend mixing in the levain to the autolyse. I am using your ‘My Best Sourdough Recipe’. It comes out really good but the initial mix of the levain leaves me wondering if there is a better way to incorporate it successfully?
Thanks in advance.
I simply spread the levain out on top of the autolysed dough, then mix it in with my hands in a pinching action all the way. After that, it works itself all the way through the dough during subsequent mixing.
When I do the initial flour + water mix using my digital scale, it seems much drier than what it looks like on your picture – doing the beginner sourdough recipe. What should the initial mix consistency be like? should be sticky? tacky? mine feels dry and can form a ball. Thanks for sharing your expertise.
During an autolyse, it’s only important that all the flour is sufficiently hydrated—there should be no bits of dry flour anywhere after mixing at that point. If you need additional water, take some from the reserve (the amount I usually hold back from autolyse to add in during mixing) and add it in during the autolyse to help hydrated the flour. Then, when you’re mixing, if the dough still feels super dry you might need to add in additional water to the recipe if your dough still feels too stiff and dry.
Thanks for the quick response Maurizio. The bread is looking great so far. In the oven cooking right now. I left the recipe as is for this time. But I’ll follow your advice for the next loaf. From what I read on your posts, I may need to adjust the hydration level based on the brand of flour used. By the way, amazing site you have here. I am big instant yeast baker but this year with the pandemic I decided to give sourdough a try and your sourdough starter is the only one i was successful with. I also love the technicality of your posts and the explanations of the whys behind the steps. So THANK YOU.
You’re very welcome, Helene! Happy to have you here and happy baking 🙂
hello, thank you for the great info! I was wondering, does auto-lysing affect the test of the dough? Like would it be more sour? thanks!
Hi. I love this site. You give lots of great advice, and I think many mistakes have been avoided by just following the step-by-step guidance. One thing that gets me, though, is that I always seem to get the wrong meaning when you use the word “elastic” to mean “inelastic” and you use the word “extensible” to mean “elastic”. Is this just me, or is this some baking language that I have to get used to? When something is elastic it stretches without tearing. When something is inelastic, it stretches but then rips or tears.
Thanks, Fred, happy to hear my site has helped! Sorry about the confusion, and I see where you’re coming from. However, this is the accepted upon baking terminology for the two states of a viscoelastic dough: elastic implies the dough is strong and wants to return to original form, extensible is a dough that can stretch out without ripping. Check out this article on the two topics, as one example!
Hi Maurizio, always great advice from you. Thankyou and I hav e recently signed on as a subscriber….
Re your advice on atuolyse, what is ” flour with a low falling number ” ? Do you mean protein content ? I think you have mentioned that 11-12 % protein is the best. Organic tends to be 13 % or more..
Thank you, I appreciate that! Falling number helps with determining how enzymatically active (specifically alpha amylase) a flour is, which has important implications in baking. A low falling number means high amylase activity which converts starches to sugars to feed fermentation. If there’s too much amylase activity, you’ll end up with a very sticky and slack dough that’s extremely gassy.
As much as I love this site/blog, it grates on my nerves to see you propose that “autolyse” is pronounced “auto-lease”. If you are imitating French pronunciation, then yes, it is “lease” — but it must also be “oh-toe” as in “oh-toe-lease”. If you are giving it the English pronunciation, then, like analyze, paralyze, and dialyze (substitute “s” for “z” in British spellings), the word should be pronounced “otto lies”, not “otto lease”. Sorry to be picky, but it’s “I” not “E”!!!
Hey there! Ahh, I’ve had this conversation so, so many times with various bakers over the years, it’s always a point of contention 🙂 The pronunciation for words that are steeped in culture from another language always gets mirky… I don’t think there’s any one, right way to say it, and I’ve gone with how I learned it (and how I’ve heard many prominent bakers pronounce it as well).
The way I’ve heard it pronounced most is the French way, “oh-toe-lease,” but my English speaking nature twists it a bit to “auto-lease.” Unfortunately, now when I read it that’s how I hear myself say it in my head 🙂 But you’re absolutely right, “oh-toe-lease” would be most accurate! I’ll update the post to reflect that, even though I have a hard time sticking to it myself. Thanks for the comments!
Hai, just a question. If the hydration rate is 50%, can i autolize?
Yes, you can. You might have to do a shorter autolyse with the levain due to the very low hydration.
Great, Thank you
Is there any down side to autolysing with the levain for a higher hydration dough? I’ve found that it’s a bit easier to integrate the salt and extra water after the autolyse if the levain’s been hanging out with the autolysing dough. I know you don’t have to for a higher hydration recipe, but what happens if you do?
That’s just fine. As always, once the levain is added, fermentation begins, so keep that in mind!
Hi Maurizio,
I would have one question here as I’m before converting to a stand mixer. Do we autolyse with the stand mixer? It’s not very clear to me. Thanks in advance.
The same rules apply: you can autolyse using a mixer if you’d like, but it’s never mandatory. You’ll get the same benefits as listed above, with the same drawbacks. The only difference is the autolyse typically sits in the mixer bowl.
Thanks a lot Maurizio, it helps a lot, much appreciated! 🙂
Hey, Danny! It really depends on the flour you’re using as different flour has different absorbency. That’s ok! Use some of that reserved water and move it over to the autolyse. When you go to mix after the auto, if the dough still feels dry, add more water as necessary until the dough loosens up.
Do you have an olive loaf recipe using the autolyse technique?
I sure do, see my olive sourdough bread recipe right here. Happy baking, Michele!
I did find it!!
I made a similar loaf a few yrs back using the autolyse method.
I loved it.
And this method.
Thank you
This was very helpful, Maurizio. Could you elaborate a bit more on the overnight autolyse? To achieve improved flavor and health benefits, I’ve been baking a higher percentage whole grain sourdough over 3-days. I start on Day 1 with an overnight autolyse, staying up late to mix the flour & water in one bowl and my levian in another. Then on Day2, I wake-up early to mix the two together, proceed to an overnight refrigerator rise, and then bake on Day 3. Challengers are:
1) My overnight autolyse can get too dry at the top and sometimes harder lumps in the dough develop. (So now I double wrap the autolyse bowl and more thoroughly mix the flour & water.)
2) But still with dough that is a bit slack and loaves that have a disappointing rise, I wonder if the levian or autolyse has just gone too long when mixed together in the am after 7-8 hours?
Hey, Mary. My thoughts:
1. Yes, definitely wrap the dough so it’s airtight. On my baking tools page I have a link for reusable airtight covers, I highly recommend those! I use them to always keep my dough bowl covered airtight.
2. My first thought would definitely be to eliminate the overnight autolyse. I’d dial that back, try a 2 hour autolyse instead and see if that helps. The longer the dough sits the more slack and “degraded” the dough will become. It’s ok to some degree, but I find if it goes too far the effects are almost irreversible.
Let me know if that helps!
Hello! New baker and came to this post in search of lump troubleshooting. I don’t overnight my autolyse, I just follow whatever your recipe says. So far it’s been 30 min for the first sourdough recipe in your book. I do find that I’m still ending with a somewhat lumpy dough, and I think I see tiny pockets of the lump in the finished crumb. I am kneading more than you recommend hoping it will help, but it hasn’t completely prevented the lumps. Any ideas?
Very interesting. Maybe the dough needs more water? I have never seen this issue!
Great article! Just curious about the term “aged whole wheat” flour. I buy fresh whole wheat flour from a local mill that is ground the week I receive it. At what point does it become “aged”. Mine might sit in the refrigerator for a month. Or does fresh mean just milled in your home mill prior to mixing?
Thanks, Jeff! Sorry, yes that’s a very ambiguous term… I mean freshly milled as in the same week or so. You might be just fine doing an autolyse with that flour, it all depends on the flour itself. But for me when I mill the day of (or day before), I typically do not autolyse that dough. That said, there are bakers who do!
As is always the case in baking, it’s worth experimentation to see how it works for you 🙂
A great read about something I have never quite understood…might take a couple of re-reads & happy to be on my way. I Also don’t see the above mentioned recipes for autolyse
Thanks, Ken! If you refresh the page you should now see them, sorry about that. Happy baking!
I don’t see the “recipes which use and autolyse?
Am I missing something?
Great article, thank you.
Sorry about that, Steve! All is fixed now. Happy baking!
Pictures don’t open when clicked
Hey, Margie! Oops, was an error there—all fixed now.
Thank you Maurizio, best regards!