
I’ve been thinking about this recipe for some time, and I’ve been tinkering with it for just about as long. I wanted to create a whole wheat sourdough bread that wasn’t all the way 100% whole grain, but still enough to bring out that assertive wheat flavor, gentle yet complex sourness, and also one that packs a nutritious punch. I wanted it to be light in hand, soft of texture, and be the right starting place for those who might not have had much experience with bread boasting a majority of whole grains.
This recipe is a beginner’s sourdough recipe but with more whole grains than not. A fifty-fifty whole wheat sourdough bread to get you and your family on the whole-grain train without them missing the characteristics of white flour. Typically, bread with a significant amount of white flour is lighter, more open, and loftier.
As you might know, I always like to experiment. To tinker. To change. Even when things are already working well I seem to dig in and just have to adjust. My previous work with whole wheat almost always utilized a stiff levain (around 65% hydration) but here I opted for 100% hydration liquid levain. I made this change mostly to see if the result would be all that different, but also because I wanted to add flexibility to this bread—knowing that I, or you out there, could make it with a stiff or liquid levain just the same. I find there are advantages and disadvantages to both but when it comes down to it as long as you adjust the total water in your recipe you’ll get a great result no matter which type of starter you maintain or levain you use.
Instead of a long levain build period, this formula calls for a shorter time from levain mix to using it in the dough. This is a handy thing to be comfortable with, it means you can get a strong, reliable levain ready to go in a shorter time period (about 3-4 hours instead of 6-7). Nothing groundbreaking here, but I like to highlight it upfront as something to add to your baking toolbox. The ability to adjust your levain to suit your schedule is handy and it means baking can revolve around our busy schedules and hectic weekends.
And finally, I played with baking this bread at a much higher temperature for a shorter period overall—I baked these fast and hot (and you can see that in the image above, a little more color all around and especially on top). Instead of baking on thick baking stones, I opted for a Baking Steel as my “deck,” which gets incredibly hot. More on this later, and before we delve into these things any further, let’s talk about flour.
Flour Selection
My whole wheat selection here is pretty straightforward, just a good quality stoneground whole wheat (and it’s actually the whole wheat flour I use most often here in my kitchen). In experimenting between stoneground and roller milled whole wheat flour I’ve found the flavor of stoneground whole wheat to be more assertive, deep and much tastier overall. Due to the method of milling, stoneground whole wheat preserves more of the bran and germ and these particles are clearly evident when passing the raw flour through your fingers. If you don’t have stoneground whole wheat a roller milled whole wheat (this is typically what you’ll find at the market) will work just as well, perhaps with a slightly different flavor profile and less assertive whole wheat taste overall.
Generally, I prefer the texture of lower protein white flour like Giusto’s or Central Milling Artisan Baker’s Craft (both which are around 11-12% protein). To me, these generally have less of a gummy texture and perform very well for extended fermentation times. If you don’t have access to this flour any “all-purpose” flour would work well here, including King Arthur all-purpose.
Fifty-Fifty Whole Wheat Sourdough Bread Formula
Vitals
| Total Dough Weight | 1,800 grams |
| Pre-fermented Flour | 5.00% |
| Hydration | 82.00% |
| Yield | 2 x 900g loaves |
Total Formula
Target final dough temperature (FDT) is 78°F (26°C).
This recipe is highly hydrated because there’s a high percentage of whole grains, which require more water in the mix (the bran and germ present in the flour can take on quite a bit more). If this is your first time trying this loaf, reserve 100g of the mixing water and only add it in if the dough feels like it can handle the addition.
| Weight | Ingredient | Baker’s Percentage |
|---|---|---|
| 476g | Whole wheat flour (Giusto’s whole wheat) | 50.00% |
| 238g | Medium-protein bread flour or All-purpose flour (~11% protein, Giusto’s Artisan Bread Flour) | 25.00% |
| 238g | High protein flour (~12% protein, King Arthur Bread Flour) | 25.00% |
| 781g | Water | 82.00% |
| 18g | Salt | 1.90% |
| 48g | Sourdough starter (100% hydration) | 5.00% |
Method
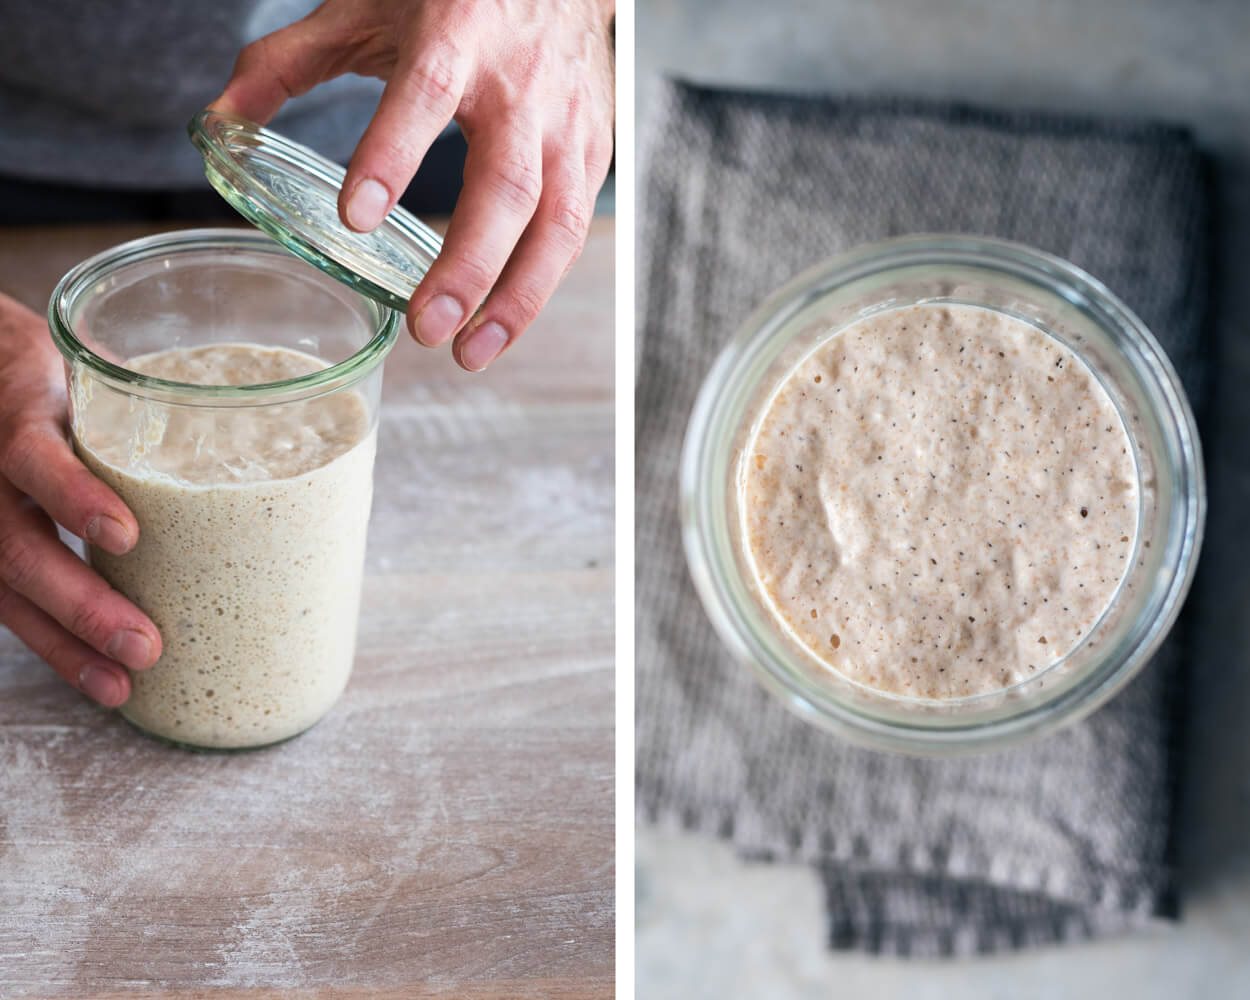
1. Levain – 12:30 p.m.
| Weight | Ingredient | Baker’s Percentage |
|---|---|---|
| 48g | Ripe starter | 100% |
| 24g | Giusto’s Stoneground Whole Wheat | 50% |
| 24g | Giusto’s Artisan Bread Flour | 50% |
| 48g | Water | 100% |
As mentioned earlier, I worked with a shorter levain build for this bread. To adjust for the reduced build time, we’ll increase our inoculation of ripe starter and the water temperature. This gets the whole process moving faster, and by the time you’re ready to use this levain, you’ll notice some significant activity. See my post on the importance of dough temperature for more information.
Build the liquid levain (everything listed in the Levain Build section above) in the morning or afternoon and store somewhere around 78°F (26°C) ambient for 3 hours.
2. Autolyse – 1:30 p.m.
Usually, with high percentages of whole wheat and/or bread flour, I lengthen the autolyse time, sometimes up to 5-6 hours. The two-hour autolyse in this recipe, while not as long as 5-6 hours, helps the high percentage of whole grains fully hydrate and starts the gluten development process without mixing. This will help reduce the total mix time required later in the process.
See my guide to the autolyse technique for more information on its benefits and why I used this technique in this recipe.
| Weight | Ingredient |
|---|---|
| 453g | Whole wheat flour |
| 214g | Medium-protein bread flour or all-purpose flour |
| 238g | High protein flour (“bread” flour) |
| 634g | Water (100g was held back until Mix) |
Mix the above ingredients in a bowl until all dry bits are hydrated. Cover the bowl and store somewhere warm for 2 hours.
3. Mix – 3:30 p.m.
| Weight | Ingredient |
|---|---|
| 143g | Ripe levain |
| 18g | Salt |
| 100g | Water (reserved from Autolyse step) |
Add the called for ripe levain to your autolysed dough and using about half of the reserved 100g of water mix thoroughly with your hands. You want the levain to be pretty well mixed through the dough and the added water absorbed.
Let’s mix/knead. I chose to do slap and fold for about 4 minutes, just until the dough started to show signs of a smooth surface and it was catching some air. If you aren’t comfortable with slap/fold method or don’t like it, you can do stretch and folds in the bowl until your dough tightens up and becomes slightly hard to stretch out and fold over. Medium development.
When finished mixing spread the salt on top of the dough and the remaining water to help dissolve. Pinch through the dough thoroughly and fold the dough over itself to help incorporate and absorb the remaining water. When finished transfer the dough to a tub or thick-walled bowl for our first rise, or bulk fermentation.
4. Bulk Fermentation – 3:40 p.m. to 7:10 p.m.
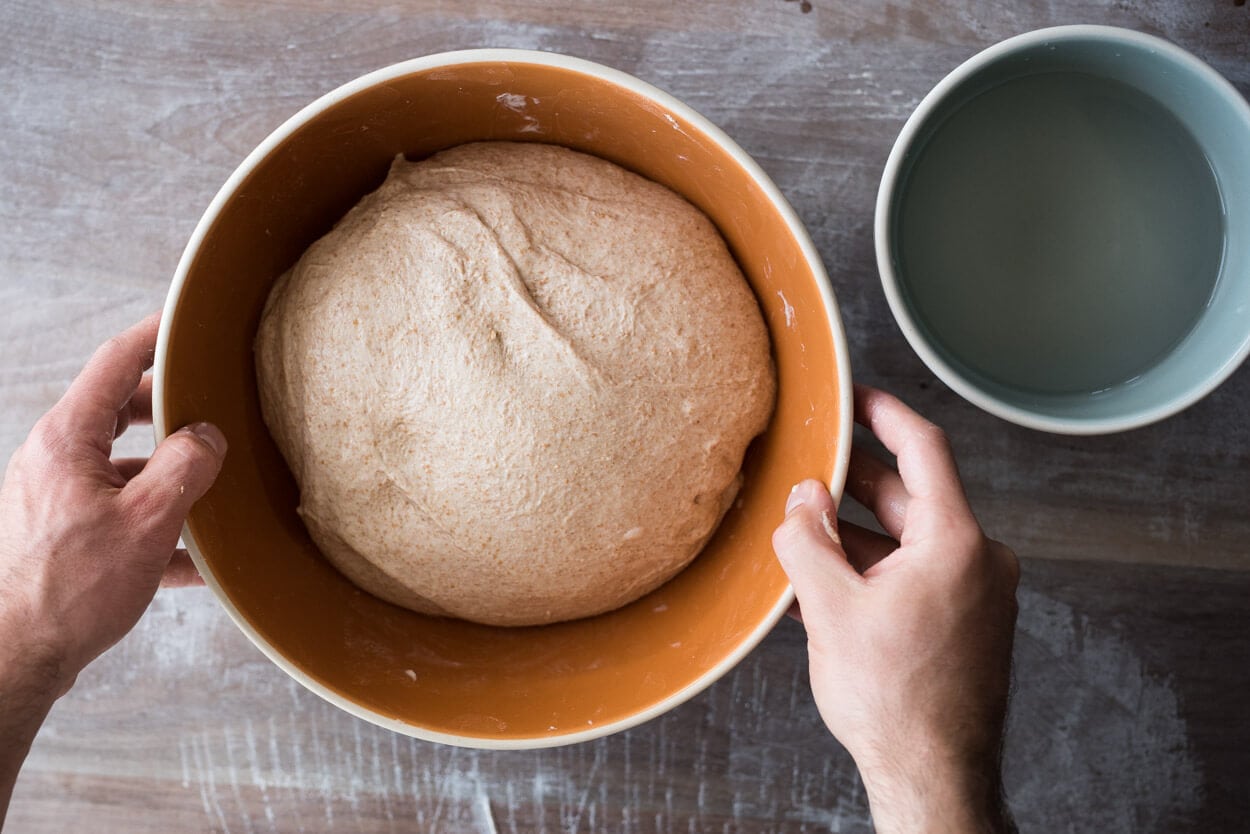
At 78-80°F (25-26°C) ambient temperature, bulk fermentation should go for about 3 hours and 30 minutes. Give the dough 5 sets of stretch and folds during this time, spaced out by 30 minutes. Keep an eye on the dough as it approaches the three-hour mark. It will rise a bit and be quite active! See my sequence of images below to get a feel for how the dough should look and feel during the 3.5-hour rise.

Above is a picture of my dough after mixing and right at the beginning of bulk. You can see how shaggy the dough is, how wet and lifeless—it’s just sitting there in a single flat layer. There’s no rounding between the edges of the dough and the bowl, no bubbles anywhere, and if you jiggled the bowl you wouldn’t see much movement.
Above is my dough after the fifth, and last, set of stretch and folds. Look how strong the dough has become compared to the picture above. It’s holding its shape in the bowl extremely well—this is a sign for me that the dough is now strong enough and no further strengthening is needed. I will now let the dough rest, relax and rise the remainder of the time specified for bulk fermentation.
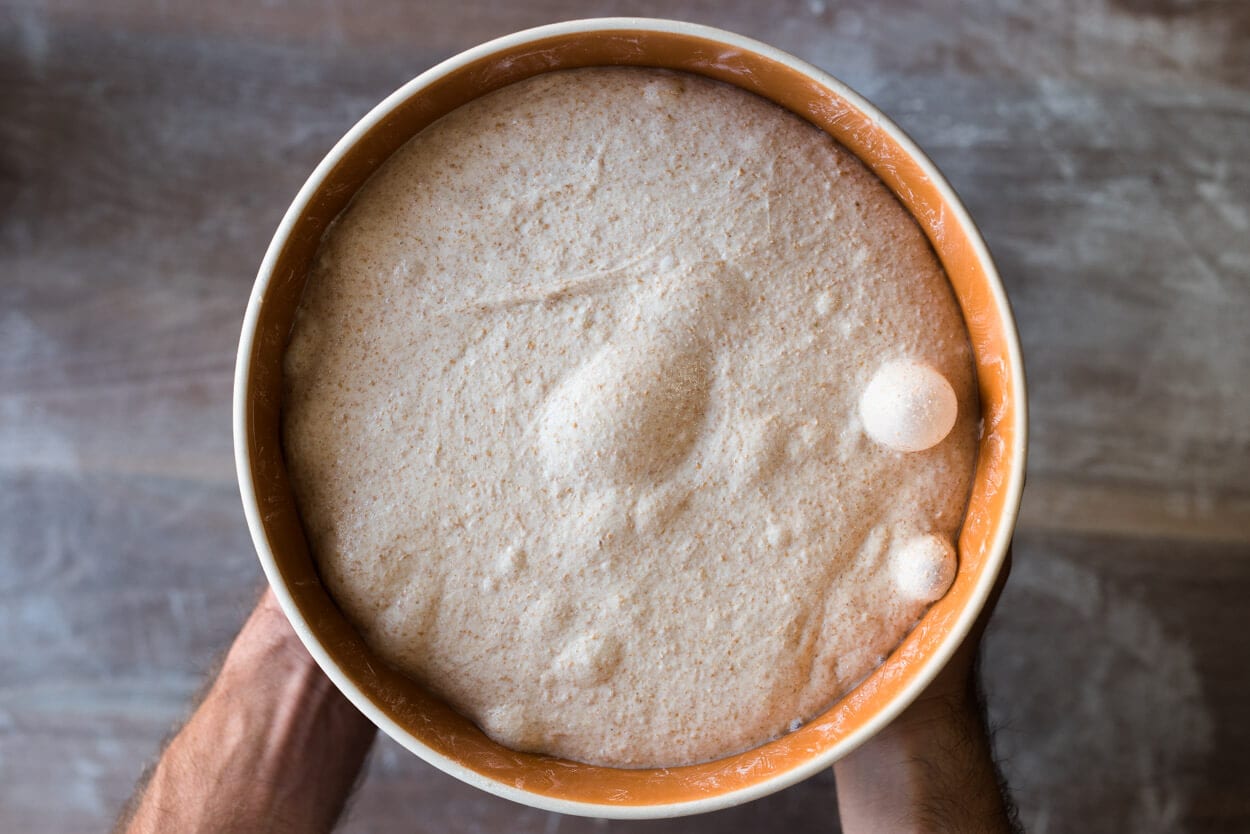
I called bulk fermentation quits when I saw the dough reach the point seen in the picture above. You can see it’s risen significantly, there are plenty of bubbles on top and just below the surface, and most importantly, the edge where the dough meets the bowl is domed & convex.
If I were to wet my hand and tug on the dough a little I’d feel much more resistance and elasticity—the ability of an object or material to resume its normal shape after being stretched or compressed. It’s gained strength and can hold its shape much more than at the beginning of bulk. These are all good signs your dough is strong enough and ready to be divided.
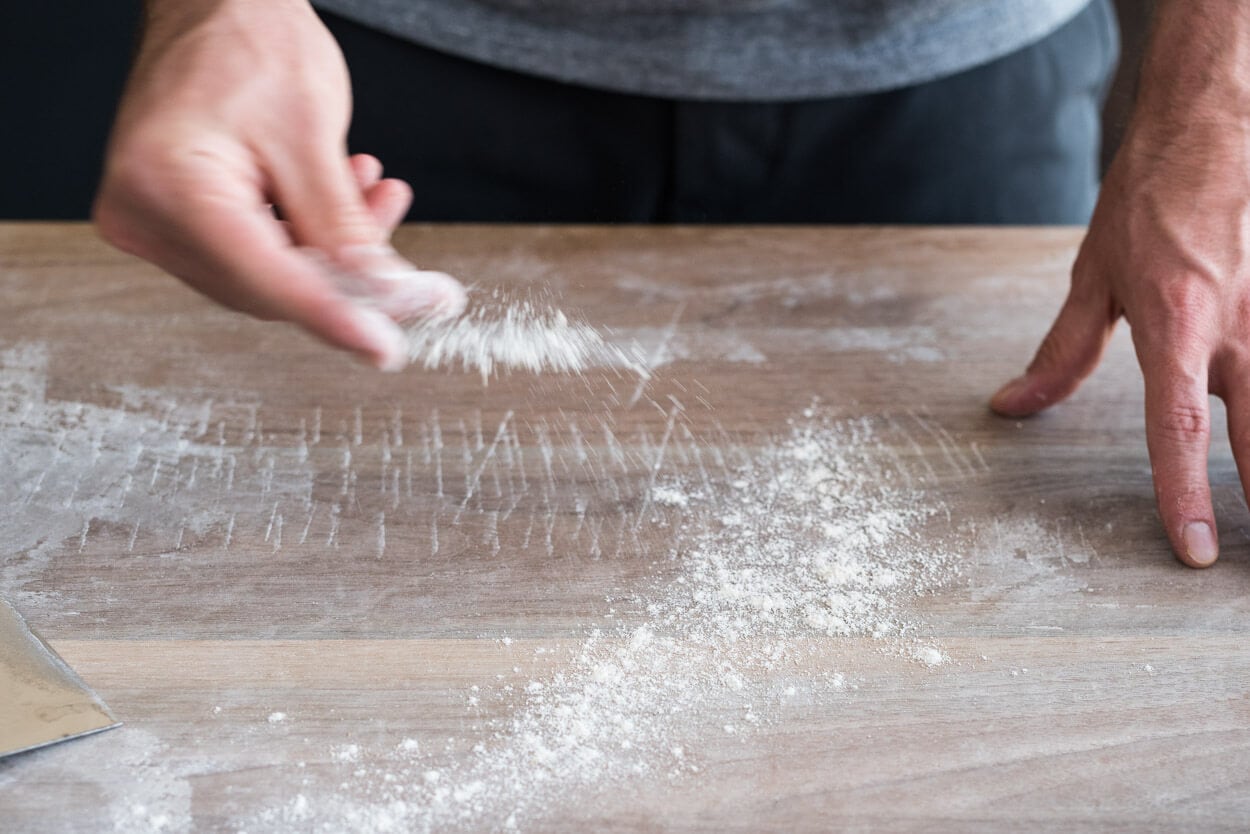
5. Divide & Pre-shape – 7:10 p.m.
Gently dump out the dough from your bulk container onto an un-floured work surface. Divide in half and pre-shape the dough into two round boules. Let the rounds rest 20 minutes uncovered.
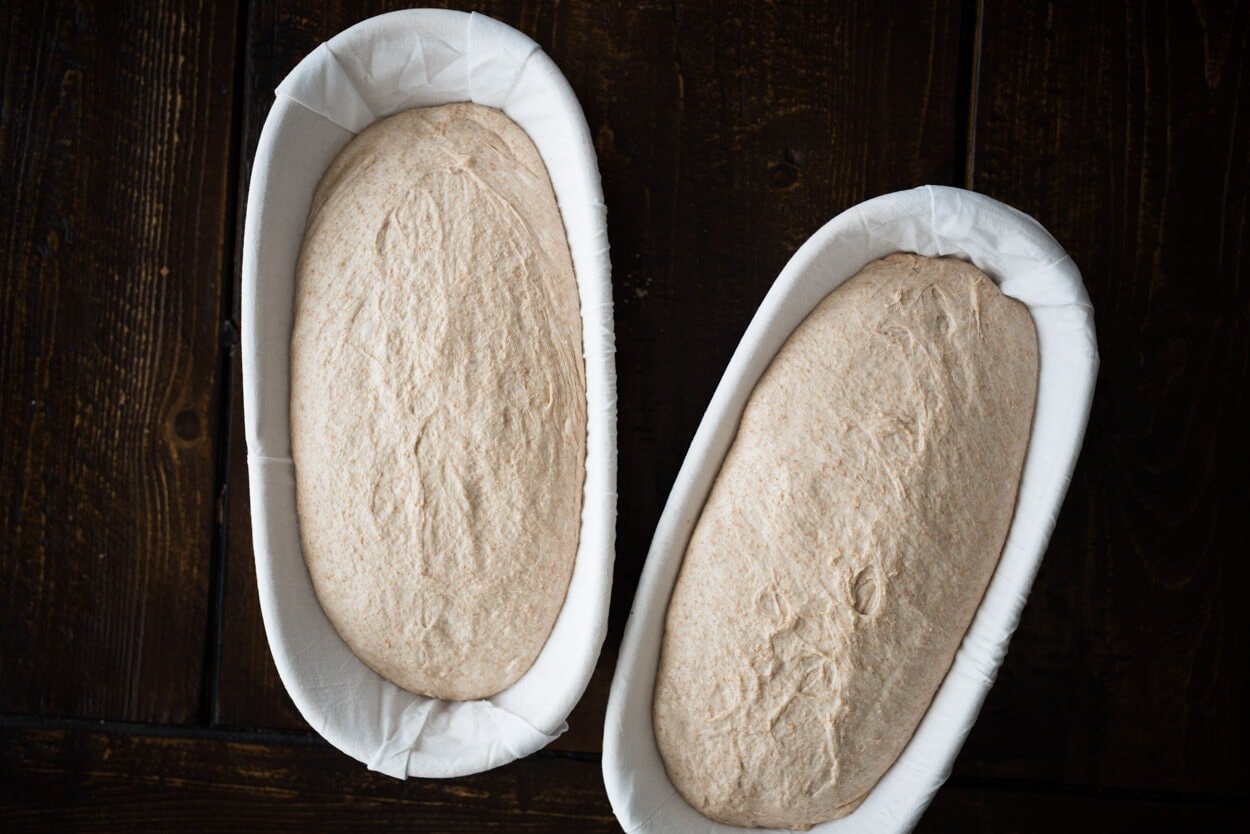
6. Shape – 7:30 p.m.
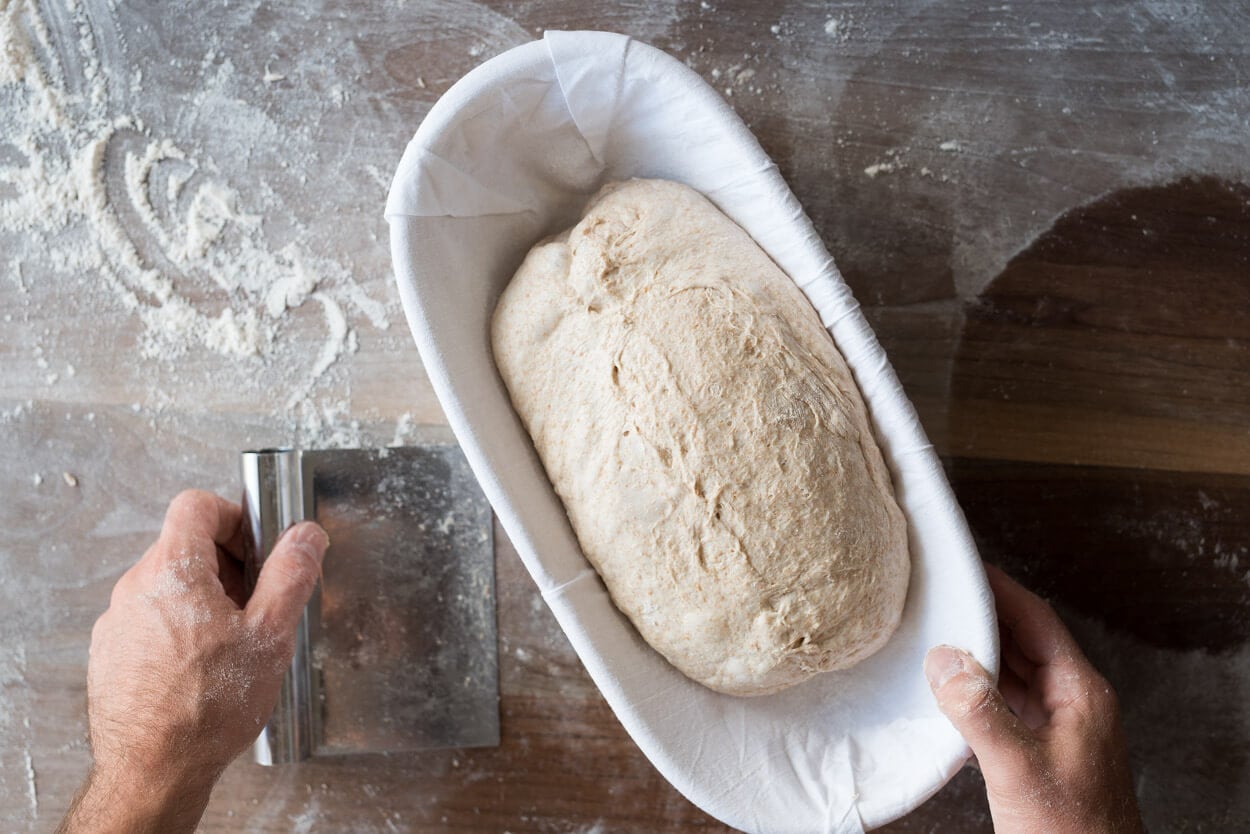
Prepare two baskets that will hold your dough during its long cold proof overnight. If you decide to shape the dough as two boules (rounds), find two round kitchen bowls, and if you decide to shape it as a batard (ovals), use two bread baskets. Line the baskets with cotton or canvas liners if you have them, clean kitchen towels if not, and dust them lightly with white rice flour to prevent the dough from sticking during the proof.
Moderately flour the top of the dough and flour the work surface. Flip one resting round over, so the floured side is down on the work surface. Fold the dough’s top up and over to the middle and repeat for the bottom (you’ll now have a long slender rectangle in front of you). Pickup the rectangle and rotate it 90º, so it’s now lengthwise facing you. Grab the dough at the very top and fold over a little way, press to seal with the dough’s central mass. Now grab this rolled over the top and gently continue to roll it down towards the bottom, tucking in the dough as you go (imagine rolling down a beach towel). At the end of this, you’ll have a tube that has essentially been rolled downward. Once shaped, transfer each to their floured shaping basket with the seam side facing up.
For an in-depth guide to shaping like this, see my batard shaping guide.
Repeat with the other round.
7. Rest & Proof – 7:35 p.m.
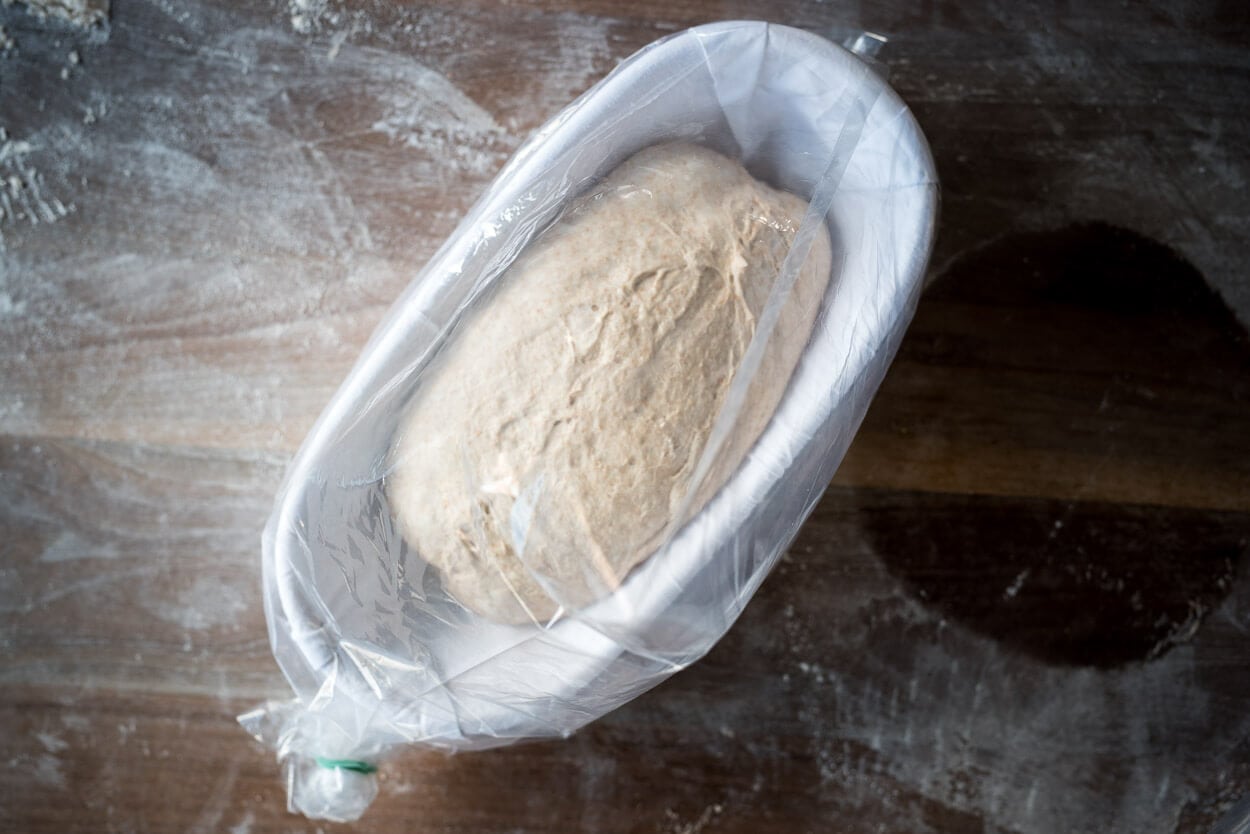
Cover your baskets with plastic and then place them in the refrigerator to proof at 39°F (4°C).
8. Bake – Next Morning: Preheat oven at 8:30 a.m., Bake at 9:00 a.m.
Place your Baking Steel in your oven and preheat for one hour at 450°F (230°C). Once preheated, take out both of the baskets from the fridge and remove the plastic wrap.
You’ll notice my dough has risen somewhat but not a significant amount. Instead, the dough has relaxed to fill my proofing baskets and is perhaps a little puffier (the loaf on the right was a slightly higher final dough weight and will result in a larger loaf).
Cut a piece of parchment paper to fit over the top, place it over the basket, and then place a pizza peel or small cutting board over the top. Quickly invert each basket onto the parchment and peel/board. Using a sharp razor blade fastened to a stick, scissors, or a very sharp knife, carefully score the top of each loaf at a shallow angle to the dough, just deep enough to cut below the top skin created at shape time. I like to score whole wheat loaves with my bread lame at a very shallow angle; this helps the loaf attain maximal rise when in the oven. If you score at a straight 90° angle with the dough, then as the dough rises, it sort of splits open instead of peeling back.
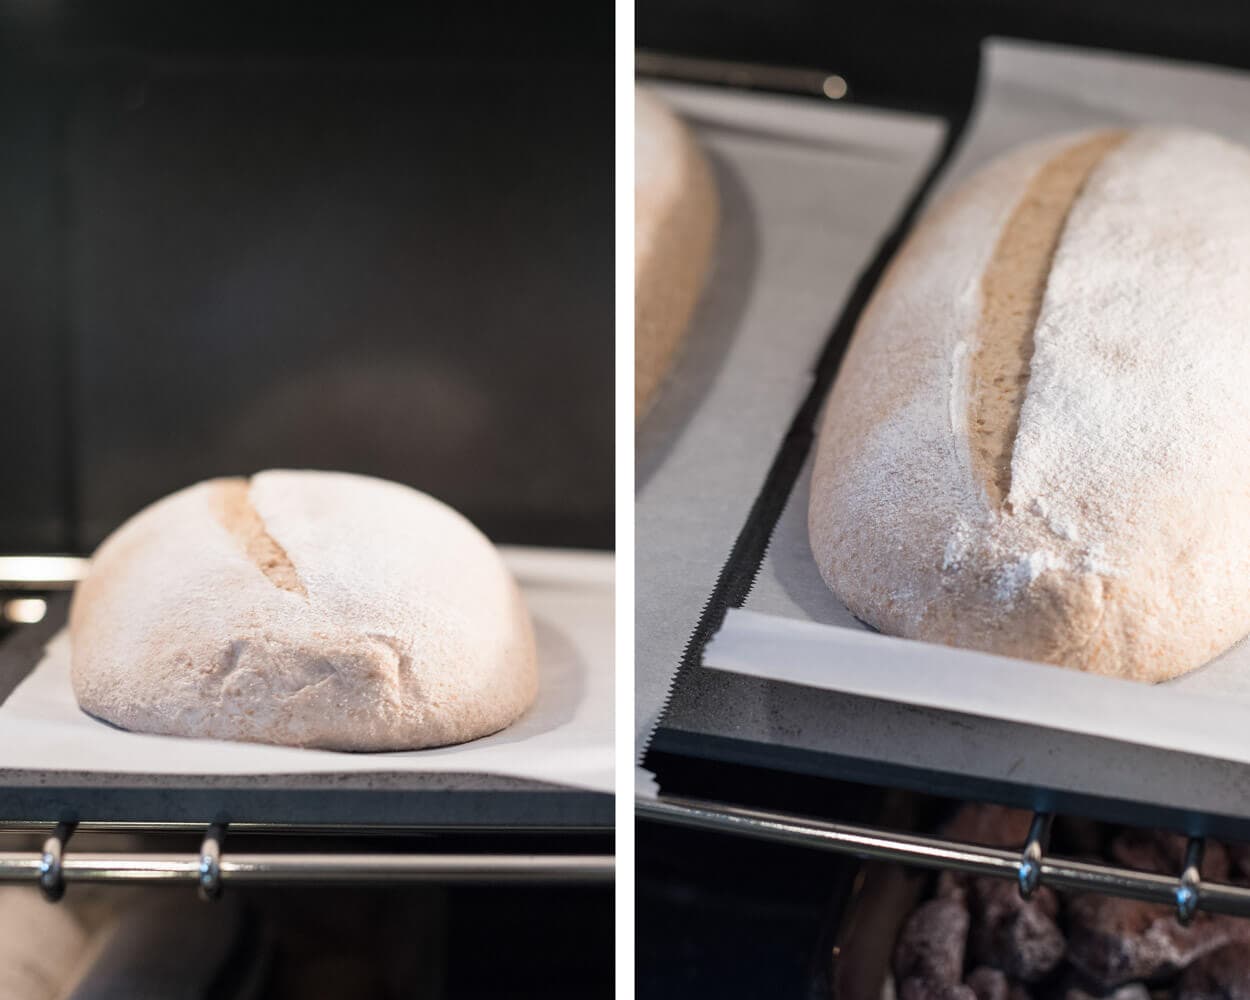
I steamed my oven in my usual way, described here in my post how to steam your home oven for baking. I baked these loaves hot and fast. The goal was to bake the exterior to a nice dark color, and also bake the interior, but take the loaves out before they completely dried out inside. I like my loaves with whole wheat to be much more tender and moist, and I found this baking schedule achieves that.
Bake for 20 minutes, then remove the steaming pans from inside the oven. Then, bake for an additional 30 minutes until the internal temperature registers around 206-210°F (96-98°C). Keep an eye on these from the middle of the bake all the way to the end as the prolonged high temperature can quickly scorch the outside of the loaves.
Note: these times and temperatures work well when baking here at a high altitude (about 5280 ft. above sea level) and in my environment. The first time you try this recipe, keep a close watch over the dough in the oven to adjust as necessary.
For an alternative to baking on a hot surface, check out the Challenger Bread Pan, which is a large cast-iron pan able to bake these batards with no problem.
Remove from the oven and cool on a wire rack for at least 2 hours. Be sure to store the bread properly to keep it fresh for a week or longer.
Conclusion
With this much whole wheat, it’s always a challenge to get a tall and airy loaf, but the addition of the bread flour, high hydration, and relatively tight shaping have helped achieve that. Along with the nice rise, the soft and tender interior and dark, crunchy crust play off each other to create a balanced bread that is flavorful and light in hand.
One modification I’d love to try is to use white wheat instead of red wheat for the 50% whole wheat portion. White wheat is one of my favorites to use, mainly because of its mild, laid-back flavor, but also I conveniently have a new 25-pound bag of raw white wheat berries sitting in my pantry ready to go (and nowadays it’s almost always used in my weekly sourdough sandwich bread). This change might reduce this bread’s overall assertiveness, but it would be exciting to see the flavor profile difference.
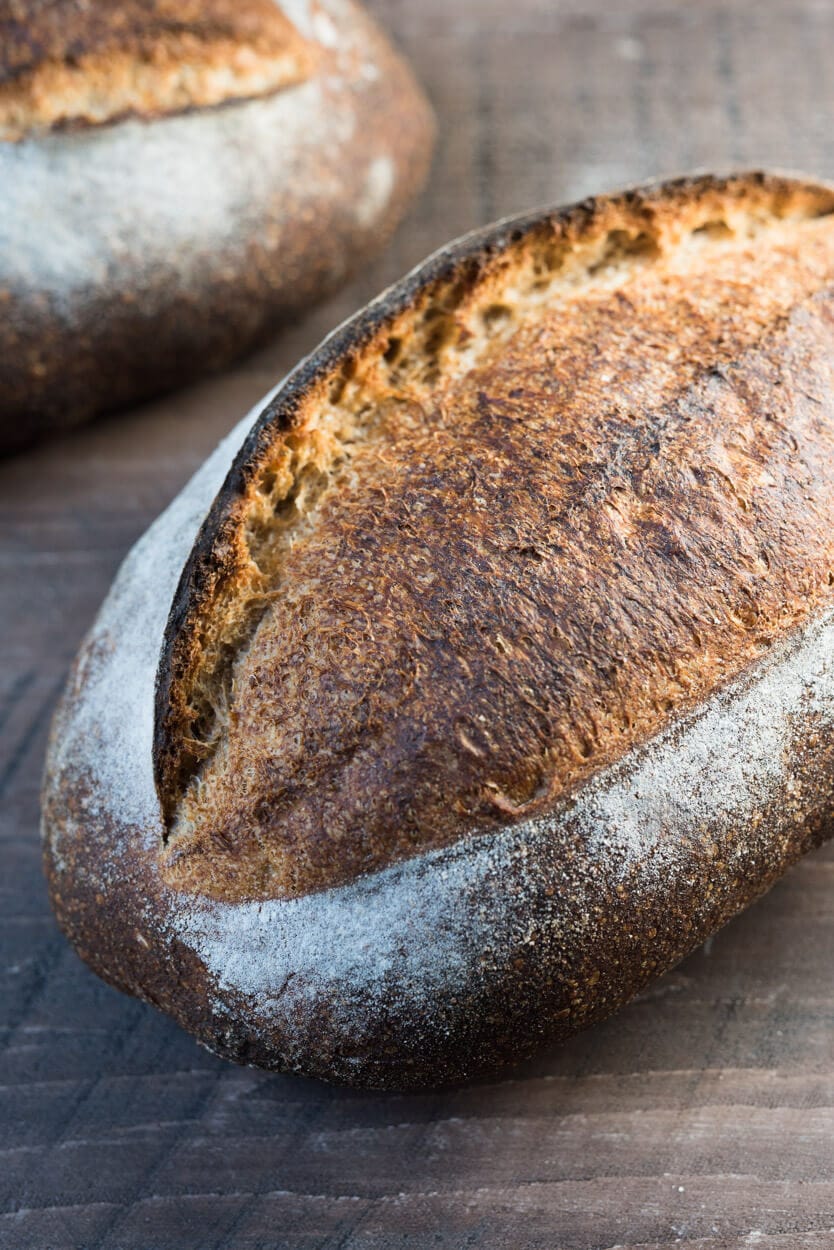
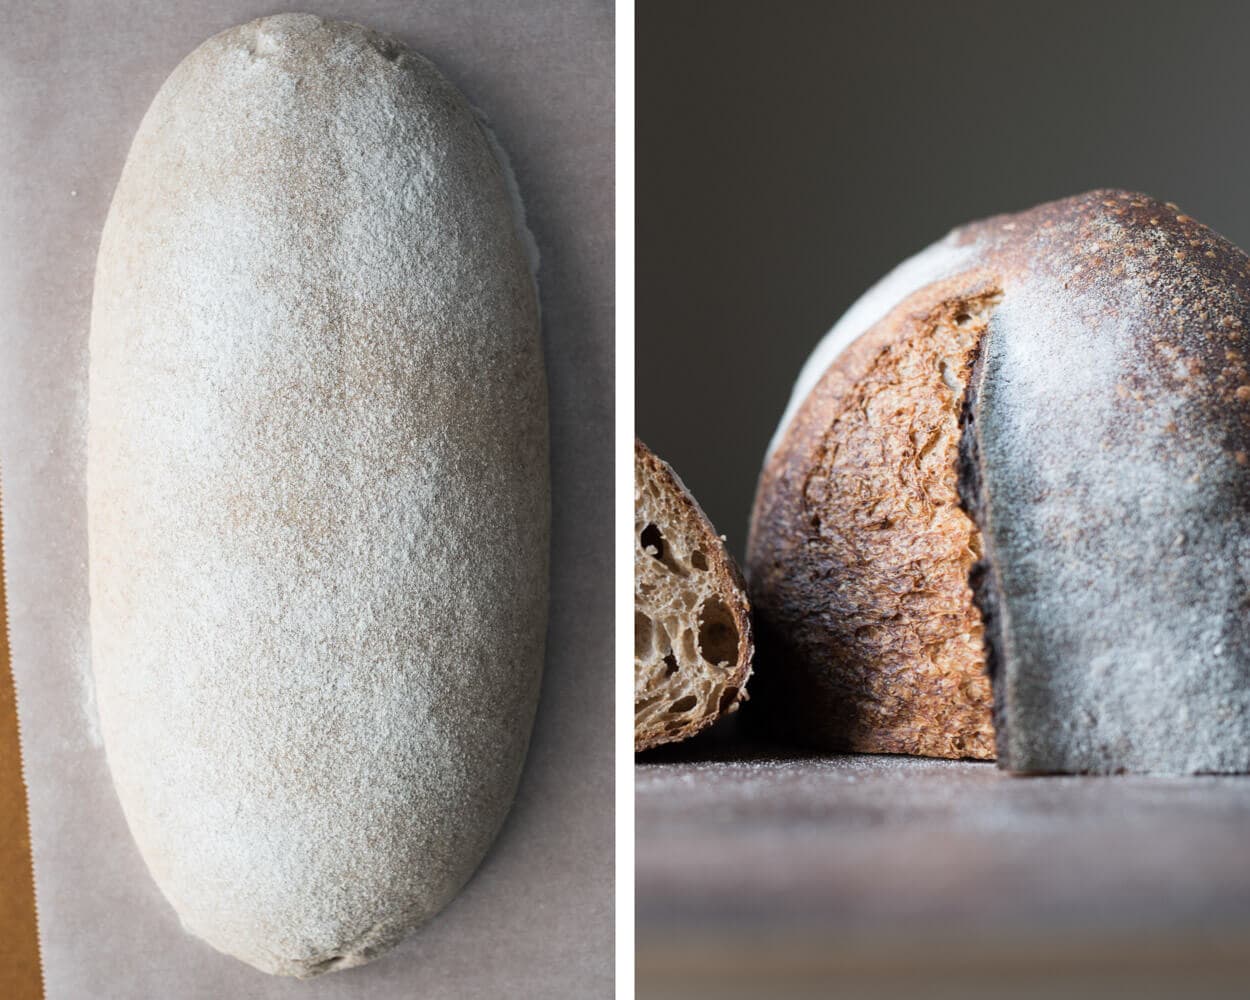
Crust
I love this dark crust, and because of the hot bake, the interior did not dry out in the slightest. Sometimes it can be hard to achieve this, but a minor tweak to the baking schedule really did the trick. I plan to try this in the future with my other recipes. The crust results speak for themselves!
I almost always prefer the batard shape over a boule, mainly because of how the bread slices up (not too wide and a little taller), and this bread is no exception. I enjoy how the crust peels back as the bread opens in the oven. It contributes to that tall loaf with a really pleasing aesthetic.
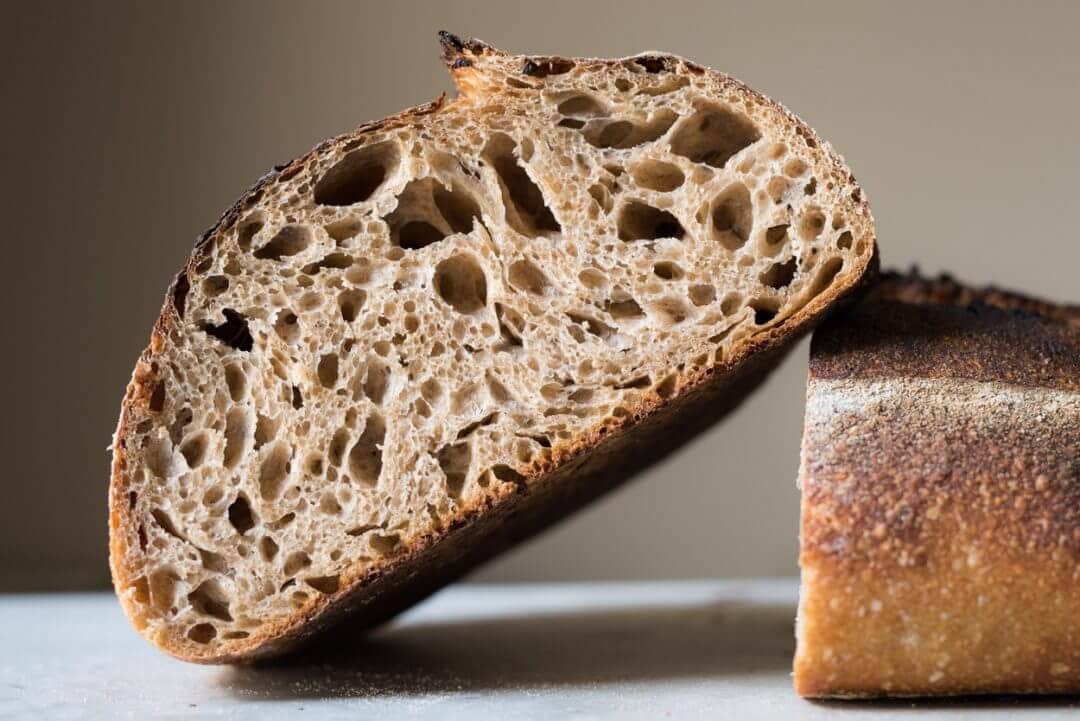
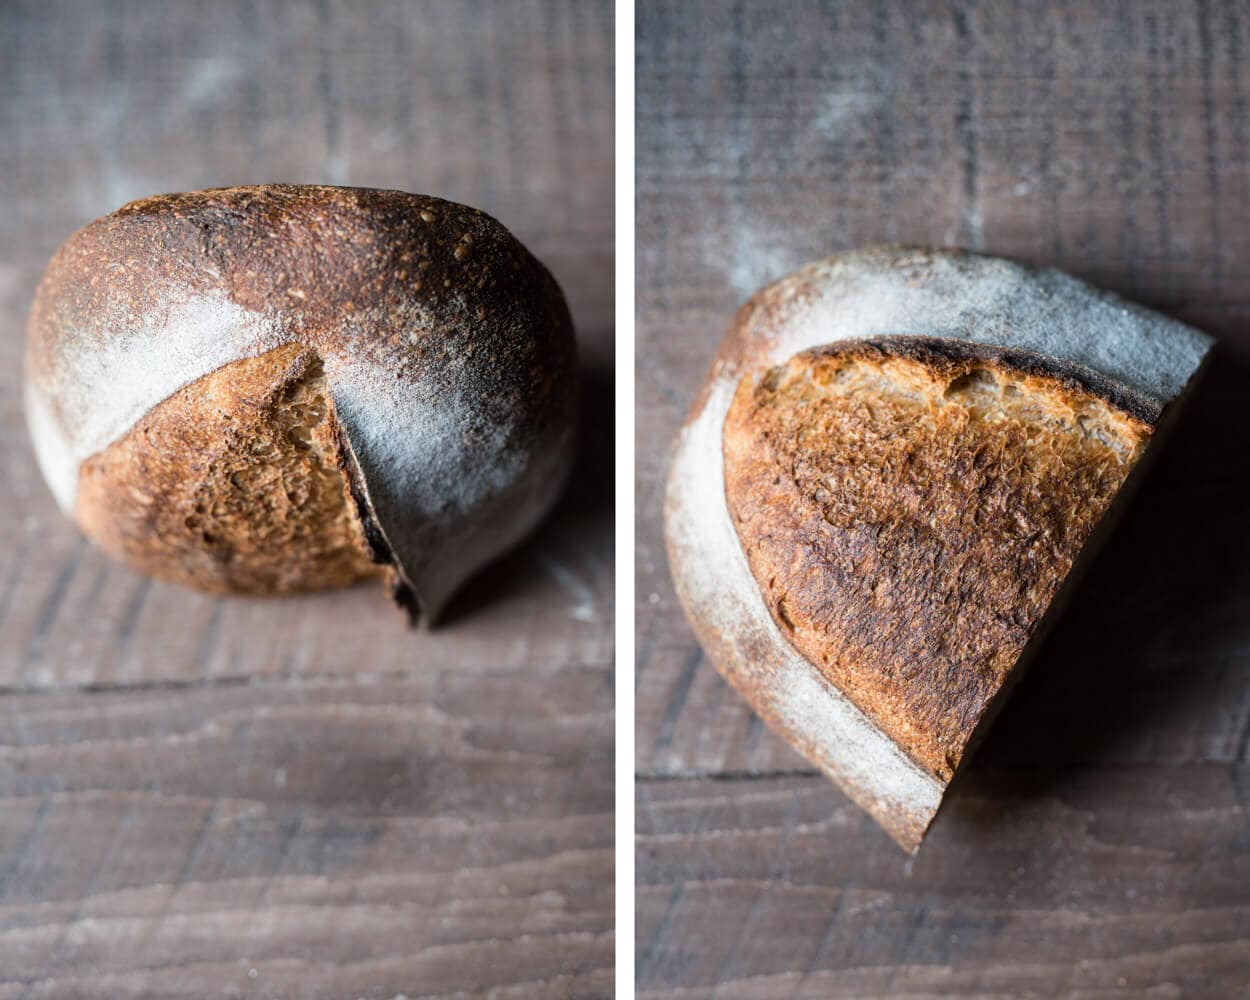
Crumb
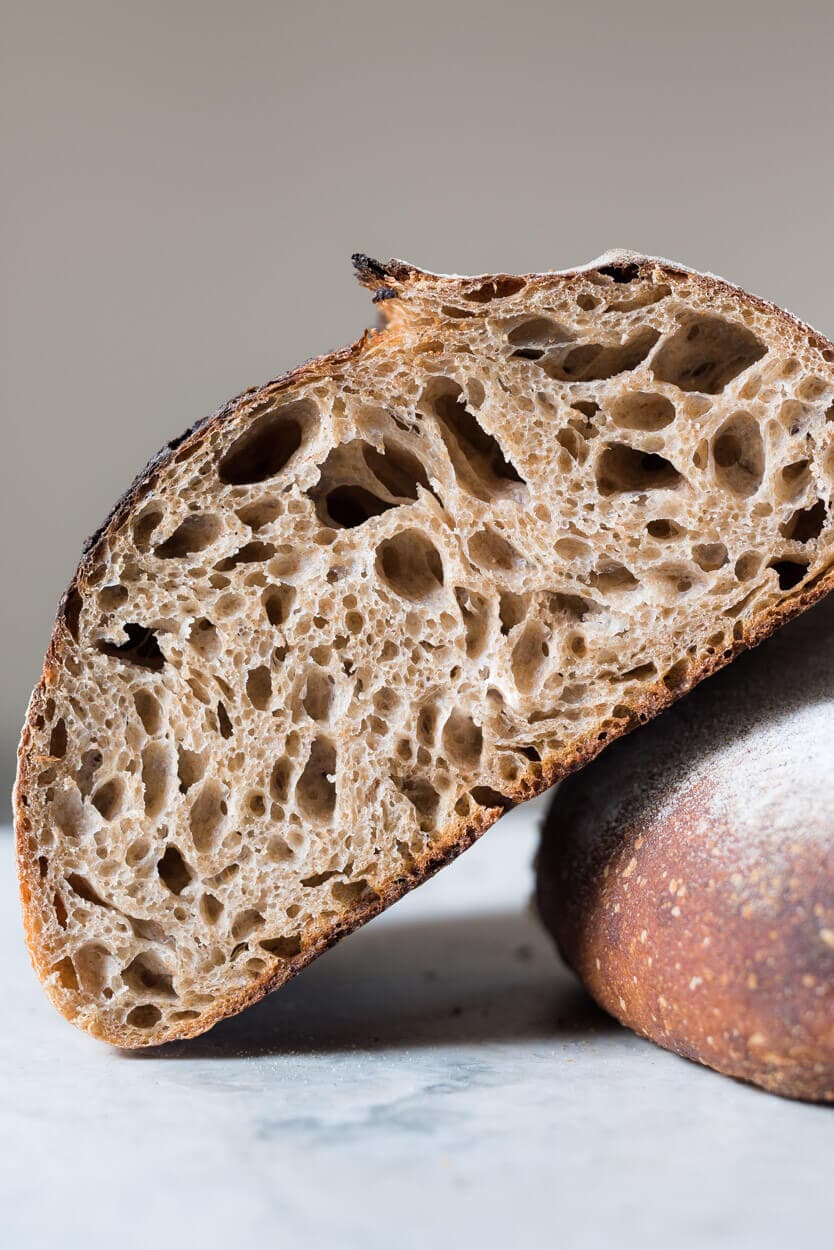
For 50% whole wheat, I couldn’t be happier with the crumb. As you know, the higher you go in whole grains, usually, the denser your bread will be, but I think the relatively high hydration and a mix of flours have helped achieve a really light loaf that has uniform openness throughout.
Taste
This bread has an assertive wheat flavor but not so much that it’s overpowering; it really showcases the stoneground wheat and doesn’t let it play the second role here. There’s a tad more sourness peeking through, but it’s actually a very complimentary flavor to the wheat, adding a touch more complexity and depth. I’m not big on overly sour bread, and for me, this was just right.
If you’d like more sourness, try to proof a bit longer or add even more whole grains, and if you’d like less, do the opposite. Just be wary of the timetable I’ve laid out here when modifying the whole grain percentage. As you know, more whole grains means increased fermentation activity.
I like the idea that this recipe is a starting point for those who might not have a lot of experience working with whole grains (or even if you do!). With this gateway bread, you can adjust the whole wheat percentage up or down to suit you and your family’s tastes. It’s a good jumping-off point with a majority of whole grains and a base formula for our endless tweaking and testing in search of that perfect loaf.
Buon appetito!
Print
Fifty-Fifty Whole Wheat Sourdough Bread
- Prep Time: 24 hours
- Total Time: 24 hours
- Yield: Two 900g loaves
Description
A delicious loaf of sourdough bread with 50% whole grains. This bread is airy, light in hand, and it has a deep, complex flavor profile from the assertive wheat and fermentation flavor.
Ingredients
Levain
- 24g medium protein bread flour (or all-purpose flour)
- 24g whole wheat flour
- 48g water
- 48g ripe sourdough starter
Autolyse
- 453g whole wheat flour
- 214g medium-protein flour (or all-purpose flour)
- 238g high-protein bread flour
- 634g water
Main Dough
- 18g salt
- 143g ripe levain
- 100g water
Instructions
- Levain (12:30 p.m.)
In a small container, mix the Levain ingredients and keep it at a warm temperature for 3 hours. - Autolyse (1:30 p.m)
In a medium mixing bowl, add the autolyse ingredients and mix until no dry bits remain. Cover the bowl and let rest for 2 hours. - Mix (3:30 p.m.)
To the mixing bowl holding your dough, add the levain and a splash of water. Mix thoroughly and strengthen the dough for about 4-5 minutes. Add the salt, another splash of water, and mix until incorporated. Strengthen the dough further if necessary until it’s elastic and smooth. Transfer the dough to a bulk fermentation container and cover. - Bulk Fermentation (3:40 p.m. to 7:10 p.m.)
This dough will need 5 sets of stretch and folds during bulk fermentation, at 30-minute intervals. After the last set, let the dough rest for the remaining time in bulk fermentation. - Divide and Preshape (7:10 p.m.)
Lightly flour your work surface and scrape out your dough. Using your bench knife, divide the dough in half. Lightly shape each half into a round shape. Let the dough rest for 20 minutes, uncovered. - Shape (7:30 p.m.)
Shape each piece of dough into a round (boule) or oval (batard) and place the dough in proofing baskets. - Proof (7:35 p.m. to 9:00 a.m. the next day)
Cover proofing baskets with reusable plastic and seal shut. Then, place both baskets into the refrigerator and proof overnight. - Bake (The next day, bake at 9:00 a.m.)
Preheat your oven with a baking surface or combo cooker/Dutch oven inside to 450°F (230°C).When the oven is preheated, remove your dough from the fridge, score it, and transfer it to the preheated baking surface or combo cooker. Bake for 20 minutes with steam. After this time, vent the steam in the oven or remove the lid (you can keep it in the oven or remove it) and continue to bake for 30 minutes longer. When done, the internal temperature should be around 206°F (96°C).
Let the loaves cool for 2 hours on a wire rack before slicing.
If you use this recipe, tag @maurizio on Instagram so I can take a look!


646 Comments
Greetings from Norway! I find this site extremely helpful, and I appreciate the way you explain the rationale behind your chosen formulas and method in such great detail.
I am at the point where I am experimenting with water and ambient temperatures + starter ratios for my levain, to better suit my weekend baking schedule. Moving on from the Beginner’s Sourdough recipe, I do have one question. Compared to your suggested schedule for the fifty-fifty (starting at 12:30 pm), I like to get going a bit earlier, mixing my levain around 9 or 10 am. Supposing the rest of the process goes according to plan, I should be ready to put the dough in the fridge somewhere around 5 or 6 pm. You mention that this dough can easily overproof, recommending a final rest of 10-11 hours. With my 9 am start, this means I would have to wake up at 3 am on a Sunday to bake the bread, which I think is very unlikely to happen 😅 So while I love the way I can tweak the levain build on the Saturday to make things go faster (giving me time in the evening to be out and about), the problem seems to be the longer overnight rest and the risk of overproofing. Is there any way to change things up on baking day to slow down this final stage? Shorter fermentation? Since the fridge is already cold, I’m not sure how I can delay things further. Any thoughts would be much appreciated!
Hey there, Marlene! Thanks for the kind words and I’m glad my website has helped. I think the dough will likely be just fine going a little longer in the fridge in proof — as you said, it’s very cold in there. I’d recommend you try shifting the schedule and see how things turn out, if you’re not getting a lot of rise out of the bread and it’s getting close to over proofing, you can try cutting bulk fermentation just a bit early, perhaps only 15 minutes or so, to try and give your bread a bit more “runway” before it over proofs. Let me know how it goes and sorry for the late reply!
Thanks for the reply! So I followed your suggestion, cutting down bulk fermentation by 15 mins. Not for this recipe, but for the Spelt, Rye and Whole Wheat Sourdough. Put the dough straight in the fridge to proof overnight, which ended up being almost 18 (!) hours. With not much rise during this time, I let it rest on the counter for an additional 2 hrs 45 mins, until bubbles started to form on the surface. Scored and baked with steam according to the recipe. It had good oven spring and the taste was DIVINE! I will continue to experiment, but it looks like the cold proof method can be quite flexible. Then again, I guess it depends on the dough/formula.
Awesome, Marlene. Yes, definitely flexible. I actually prefer pushing the proof really far like that, the texture is much more tender and the flavor is, well, divine like you said 🙂 Enjoy and happy baking!
Hey thanks for the great recipe and all the fantastic info and insights on your site its been a great help. Just wanted to ask about your basket proofing after shaping do you go straight in the fridge and bake straight from the fridge the next day? Does that tend to give you enough of a proof or do you leave the dough out at room temp before retarding? Thanks
You’re very welcome, Anna. I almost always place the dough right in the fridge after shaping and also bake it straight from the fridge. The only time I would deviate from this is if I divided the dough from bulk too early, in which case letting it sit out after shaping can be a way to try and get more fermentation in the dough before it cools in the fridge. Additionally, if I pull the dough from the fridge and it feels dense and looks like it could take more time at room temp, I’ll let it sit out while the oven preheats to finish proofing.
Hope that helps and happy baking!
I love this recipe! I used it all of the time when I lived at sea level, but I recently moved to the mountains and am now at 10,000 ft elevation. I plan on holding back on the flour, and a few bakers here recommend punching the dough down two extra times due to the much quicker rise times, but I thought I’d ask you directly… do you have any recommendations for tweaking this recipe at this high an elevation?
Jamie — glad to hear that! I live at 5280 ft so this recipe works really well at that altitude. I’ve never punched down the dough in this recipe, just keep an eye on it during bulk and if it looks like it’s fermenting quickly divide a little earlier (though, not much as the dough does need sufficient time in bulk fermentation to develop). If you find the dough ferments too quickly, you can always reduce the percentage of levain in the recipe, I’d say 4-6% would work well. Finally, watch the dough as it’s baking in the oven, at such a high altitude — and depending on your oven — you might actually need to bake it longer to be fully baked through. Hope that helps and sorry for the delay!
I just made this bread but used golden buffalo wheat flour in place of the whole wheat. I also used CM AP and KAF bread flour as directed in the post. It turned out beautifully. I was looking for one to use the golden buffalo and thought it would work. It did! Thank you for the recipe.
That’s great to hear, Chris. I haven’t used Golden Buffalo, sounds like it worked a treat. Enjoy!
Hey Maurizio!
I see you use Central Milling High Mountain Flour to give the dough some strength, a lot. It is around 13.5% Protein tough, which is quite high and very hard to find, locally sourced and organic in the UK. The max I can get is around 12.6%.
Would you say it’s a good idea to up it’s percentage in the formula?
Perfect recipe btw! Some of the best results I’ve gotten 🙂
Hey, Ricardo. Yes, CM HM is quite high in protein, as is a lot of the flour we have access to in the United States. I’d say your flour is probably good, though! Use what you have, what’s good quality, and local. You could certainly try to use a higher percentage if you wanted to increase volume and lightness, but you’d compromise the beautiful flavor of whole wheat in doing so. My advice: test it out! Try a mix of 60% white with 40% whole wheat, see how it bakes up and tastes, and go from there. Hope that helps 🙂
Sounds like an excellent idea!
Thanks Maurizio, you’ve been a tremendous help 🙂
Nice approach; durum has a wonderful flavor and for me usually lends a really rustic, craggy crust. Enjoy!
Glad to hear that! Yes, It’s likely an altitude difference (I’m at 5280 ft) causing the differing bake time and hydration levels. Your adjustments are spot on and, as with many things in baking, are required! Thanks for the feedback and happy baking 🙂
Maurizio — Thoughts on adapting this recipe to be closer to 75%WW? I love, love, love this recipe — and have had great results — but would love more WW for this bread which I eat several days a week! I’ve done your 95%WW recipe a few times — unsurprisingly, I got not as much spring — so I thought maybe a middle ground of 75% might work? But not sure how to adapt.
Glad to hear it’s worked pretty well for ya, Kelly! I like the idea of 75% whole wheat. If I made this change I’d likely up the water 2-5% (or more, depending on how it felt), that should be in line with the increase in whole grains. You’ll likely get less rise, but that’s to be expected to some degree!
Have you ever used this recipe for sandwich bread? I’m curious if the quantity would work in my USA loaf pan or not
I have not! Check out my guide to pan loaves for some options for pan sizes and dough weights.
Hi Everyone! I have been working with this recipe for a while and I have been getting great results in general. One problem I have encountered is that sometimes (as in this morning, for example) the high hydration dough does not release from the well floured banneton (the moisture seems to seep into the basket) and the dough goes slack when it hits the parchment for baking. I have been reshaping it, and it still tastes and looks delicious, but I wonder why this happens.
I am using a scale and measuring everything, but my starter varies in moisture content so maybe that is the problem..
My total bulk ferment time was about 1 hr less than usual, as I started the process later than usual, but it was such a hot day that the bread was proofing fast. I wonder if the shorter bulk ferment time somehow made the dough less “perky” in the morning after its night in the fridge! I appreciate any tips or feedback. It is so satisfying when the dough comes off the banneton perfectly shaped and so sad when it sticks and flops.
One other side note is that I am looking for tips on maintaining and cleaning the banneton covers. When the bread sticks to them, it seems near impossible to get them clean (I have tried hot water soaking, soap, washing machine, everything). They emerge from the washing machine with tiny pill shaped dough bits! How often do you wash yours? Any tips> or do you just flour them well in between bakes???
Thank you so much!
Susanna
I’ve had more success using tea towels or cloth napkins than the banneton covers for the reasons you mentioned. Re: stickage, have you tried rice flour? Rubbed generously on the tea towel? I haven’t had any sticking . . .
Hey, Susanna! A light, even dusting of white rice flour definitely helps ensure the dough removes cleanly from your baskets, but it’s also important that your dough is strong enough and shaped tightly enough to remove cleanly, Next time, try dusting on flour as usual, but then shape your dough a little more tight so the final loaf is very smooth and strong (it should hold its shape on the counter after you shape it). That smooth, strong surface will help it remove cleanly from the basket.
For your covers: make sure they dry after you use them to prevent mold buildup (I put mine near my oven when it’s hot, just be sure not to put them anywhere they might catch fire; another option is to put them in direct sunlight). I do wash mine once they starter to get too much flour caked on, probably once every 2-3 weeks depending on how much I bake.
Hope this helps!
Hi Maurizio! It has been such a delight to follow your baking guides and recipes these last couple months. I have been thrilled by the results, as well as family and friends with whom I have shared my loaves! After achieving consistent results using your dutch oven method, I am eager to start shaping my loaves into batards and bake using a baking stone along with your oven steaming method. One quick question. I’m looking at a highly rated baking stone online called the Old Stone Oven Rectangular Pizza Stone that will fit in my oven nicely. It’s 16 x 14 x 0.8 inches. I’d like to bake my oval-shaped loaves on the baking stone such that they run parallel with the 14″ side of the stone (perpendicular to my oven door). I’m looking up proofing baskets for these loaves, and I like the 14″ proofing basket you recommend from the San Francisco Baking Institute, but I’m concerned this size proofing basket will result in a loaf that is too long and that will not fit on my baking stone! Before I invest in some proofing baskets that end up being the wrong size, is there a size proofing basket that you would recommend for my size baking stone? I’m currently trying my skills on your fifty-fifty whole wheat recipe that yields loaves that are about 950 g. Thanks as always!!
Glad to hear that, Ethan! I’d say you should be just fine with that baking stone and the SFBI baskets I use (the 14″ long ones). I really like those baskets! In practice you want to ensure your loaves don’t actually fill the entire basket, you should try and shape them tight enough so they don’t fill the entire thing, but gradually taper off before reaching the end of the basket (assuming you’re doing around 900g -1kg loaves or less). If you want to do larger loaves, you’ll need a larger baking stone or bake one diagonally at a time.
I’d say buy one or two of those baskets at a time, see how you like them, then get more if desired. Gradual is best when buying new baking gear!
Hope this helps, let me know how it goes.
Maurizio, thanks for your reply! In the interim time since my initial post, I opted for a set of four 10 x 6 x 4 proofing baskets from Saint Germain Bakery. I ordinarily agree wholeheartedly with your principle of gradually adopting new baking gear, but I only occasionally have time to bake and when I do, I like to bake four loaves at a time. That way, by the time I get to loaf number four I have usually significantly improved upon whatever new technique or method I may be trying out with a new recipe. That’s why I went ahead and got four baskets at once.
So far I have been very happy with my results! The importance of tapering off the shaped loaf so it doesn’t fill the whole basket had not been impressed upon me. My loaves (~950 kg) easily fill my 10″ baskets after shaping. You have encouraged me to buy one of those longer baskets just to try it out and compare the results.
Thanks again for your marvelous website. The joy of baking bread need never be exhausted!
Hi Maurizio. I just made this recipe – my first foray beyond the beginner’s sourdough! I used KA Stone Ground WW at 50%, and a mix of bread flour and all-purpose for remainder as recommended in instructions; I am at 5,800 feet elevation. Here is what i learned:
(a) The flour i used can take even more hydration. I had no problem with the slap-and-fold method (though it was a little intimidating watching your video), and my dough seemed to be a little drier than your pictures. So next time i think i will increase H2O a little to see if i can bump this up to a higher hydration. Does that make sense?
(b) The loaves were really dark after the first 20 minutes in my dutch-oven (I used the dutch oven method). After about 15 minutes uncovered, they were REALLY dark so i took them out. The dough seemed a little under-cooked in center, but the bottoms and outsides were very dark brown/black. Maybe next time i will try a little lower temperature? What would you recommend?
Thanks for everything you do to support our community!
Congrats, Steve!
Answers:
A) Yes, that sounds right. If you feel like the dough could take more, by all means add some in. I’d recommend taking it up slowly, though: once you put that water in, it’s not coming out 🙂
B) Yes, I’d recommend dropping my bake temperatures by 25°F and see if that helps. Sounds like it’s just too high.
Hope that helps and happy baking!
Thanks for the detailed recipe! You mention that you often use a cast iron dutch oven. Can this recipe yield good results using a dutch oven instead of the lava rocks and wet towels? If so, would you alter cook time? Oven temp? How long covered / uncovered? I have the dutch oven and don’t have the lava rocks nor pans for the suggested method. Thanks!
Yes! This recipe will work very well with a Dutch oven. I’d likely do my typical bake time and temp, check out my guide to baking in a Dutch oven for tips, times, and temperatures. Happy baking, Michael!
Awesome! I’ll give it a shot. Thanks Maurizio!
i made this bread yesterday. I only used 705 grams water. after the bake the bread is still a little on the wet side — I have trouble with the hydration & getting the bread to have a regular crumb. next time will use 650 gram H20 to see if this helps. super tasty though!
Right on, glad to hear it mostly came out well! Yes, sounds like a reduction in water will definitely help. Let me know how it goes!
I’ve made this recipe many times and experimented with different hydration levels, but I always have the same problem. When I bake the loaf, it goes out rather than up. They’re all pretty flat. Any suggestions for what I might be doing wrong?
Anna — it could be a few things. I’d first check that when you’re scoring the dough on top you score in deeply enough to encourage the dough to open and expand where you want — scoring is our way of directing that potentially erractic rise in the oven to where we desire. From there, make sure when you’re shaping you shape tightly enough and with even tension across the entire surface of the dough. If you pinch or compress one area too much it could cause a “stronger” piece of dough, inhibiting rise. Finally, if your loaves are close to a top heating element it might harden off the top of your dough before the sides do, forcing expansion out to the sides instead of allowing the dough to open evenly across the entire surface.
I hope this helps, happy baking!
Hey Maurizio, quick question regarding fermentation. Our flat is around 19-20°C in general (old building with massive stone walls) and fermenting at those temps takes a lot longer than you suggest – maybe 6-7 hours instead of 3:30. Any thoughts on using the oven to ferment? My oven has a “keep warm” function at 30°C minimum.
Thanks for your continues support 🙂 Phillip from Germany
Phillip — 20C is pretty chilly indeed. I use my oven when it gets cold here as well, but I try to keep it cooler than 30C which is a little on the warm side. If you can turn the oven on and off to target 26-27C that would be ideal, otherwise you’ll have to adjust the recipe (less levain, lower final dough temp) to compensate — at 30C bulk will move along rather fast!
Yep… I’ll have to experiment with my oven a little then. Unfortunately it is new and fancy with too many buttons and power save functions. An old oven would be perfect as I could control it with a temperature controlled power plug like an Inkbird.
Unfortunately my beer fermenter fridge is 3 flights of stairs into the basement and therefore too far for stretch/slap&folds every 30 minutes…
Yes, my oven also has a “proof” setting but it’s minimum is 32C which is way too hot. The light is the answer for me! Good luck, temperature management is always a challenge.
Thanks to this recipe, I finally have a successful loaf of sourdough! After weeks of frustration and failed loaves I’ve made a breakthrough. This recipe is so helpful with the pictures and times – thank you!
Right on, Sophia, that’s awesome to hear. Enjoy and happy baking!
Hey Maurizio,
Thanks for posting this recipe! I made it last weekend and got some great bread. I made it again this week but the bread lacked the sour taste that the first batch had. I didn’t change anything this time around except for the autolyse, which I started simultaneously with the levain. Do you think this would cause the sourness to go or would something else (need to refeed starter, etc.) be the culprit?
Hey, Eric! Glad to hear you had a great bake from this recipe. I would not say the change in autolyse would effect sourness, but I’d rather attribute it to a change in starter maintenance, ambient temperatures, levain timing (if you use it too late), or a change in the final proof. Try to focus on those other parts of the process and keep them as consistent as possible!
Thanks for the reply, Maurizio! I tried this recipe a few more times, each with a longer bulk fermentation period and that really seemed to do the trick.
As a side note, I made this recipe with olives + herbs last week and it was fantastic. Thanks again!
Hey Maurizio! Quick question – whats the diameter of the ceramic bowl you use? I’d like to use one like it for bulk fermentation.
It’s the Heath Ceramics Large Serving Bowl: 10″ diameter. Happy baking!
Thank you!
Thanks so much for creating this site and all the hugely helpful information. It gave me confidence to step into this crazy sourdough baking world and give it a go, and I am having fun. After 8 attempts, I am acheiving decent results! This 50/50 recipe is a challenge, what I learned is based on my flour (King Aurthur Bread and KA Whole Wheat flours) I have to dial back the H2O big time, as in holding back 80g total. In this last attempt, when shaping my boules the dough was sticky and I could tell I couldn’t get much surface tension. They pancaked soon after I removed them from their proof baskets, so I cheat by baking them in preheated ceramic bowls; that gives support to the sides during the spring. Even with 80g less water, the crumb is rather sponge-like with medium-high moisture content (but super delicious so who cares). I think next time I’m going down even lower on the water content, like -100g. You really have to adjust everything in this recipe based on your local ingredients and environment which I guess is the whole point of the sourdough baking experience!
Happy to help, thanks for the message! Yes, what you said is exactly spot-on: you have to adjust the water based on your flour (and environment)! That’s super, super critical. Definitely try dropping the water a bit and see if that helps alleviate the lack of spring and soft interior.
Hope that helps and happy baking!
I’ve had fairly good success with this recipe but always have an issue when adding the salt. When I mix the dough and then do the slap and fold kneading, it looks really nice. But then I add the salt and other 50g of water and it turns back into a wet and sloppy mess. Do I knead for a while longer until the dough comes back together like it did before the addition of the salt and extra water?
That’s exactly as expected and used to give me problems as well. Stick with mixing after adding the salt, it’ll eventually come back together and then you can do a few more minutes of slap and fold to really strengthen it up, or stop after it comes back together and wait through bulk — it’ll smooth and strengthen after the first set or so.
If you really don’t like how the dough breaks up you can add the salt in at the very beginning with the sourdough starter. I like to delay adding salt just a bit until the dough strengthens up through mixing, but it’s not 100% mandatory.
Really helpful to know, thank you!
I had a similar question to build off of this: If you used the full levain amount, would you be able to still just directly halve the amounts for the dough? Or should you makes adjustments to flour and water to account for the larger percentage of levain being used? Hopefully that makes sense, as I am still working on getting the hang of baker percentages.
If you used the full levain amount you’d effectively be doubling it if you halved everything else.
I was saying I still recommend you build the levain quantity as is indicated, but then only use half of that amount in the dough mix (because everything else was halved, also).
Hope that makes sense!
A liquid levain is usually a levain that can be anywhere above, say, 85% water to flour. For example, my liquid levain is usually 100% hydration (meaning there’s as much water as there is flour in the starter). If your levain is 50% hydration (e.g. 50g water to 100g flour) then you’ll likely need to add a bit of water to the dough mix to compensate for that lack of water in the levain.
Yes, that’ll work just fine. In that case I usually recommend still building the same levain as for the full dough, but it should still work with that halved as well. Happy baking!
Hello Maurizio: I’ve been experimenting with your left over liquid levain with some interesting results. I wanted to see if I could make a loaf not following any fixed recipe but rather from experience and ‘touch’. I recently made a loaf from a robust levain following your 25% rye, 75% white (KAAP). During the folding process, the dough felt like it wanted to break-out into a full-throttle sprint – it was very responsive and seemed to have a lot of energy. The dough felt silky, spongy and elastic and handled really well. It went through the bulk ferment stage like a champ and was very easy to shape. I stuck it into the frig overnight and set the oven at 475F for 8am. In the morning when I pulled the loaf out of the plastic bag in preparation to score it, I noticed two oval openings at the top that looked like a picture of a city street that caved in and a car teetering to fall in. Inside, the dough looked like moist thick cumulus clouds stuck together. The loaf had a nice oven spring and generally looked great. I noticed that the crown did exhibit the cloud-like folds as it opened but the crumb was super soft and elastic with mid-size holes…and the taste spot-on. My question to you is why did the dough open like that during the long fermentation process? Give or take a few grams on either side I used: 800g bread flour, 500g H20, 200g levain, 20g salt. My hunch is that I used too much levain?
That’s very interesting. I’m trying to visualize what you’ve written and it’s a bit hard for me to see it — I personally haven’t had anything like that happen to my dough. It should be fine to use that much levain assuming the other parts of the process, and ingredients, are setup correctly. My guess here, and it’s very much a guess without seeing pictures, is perhaps the dough fermented a bit too far and perhaps an issue with shaping. If you have photos and would like me to take a look sent them over via email (the Contact link up top). Regardless, I feel like this is likely a random occurrence…
Hi Maurizio, I can’t seem to locate the ‘Contact Link’ at the top you referenced. I do have the photographs of the dough. Sorry. Actually, this opening at the top of the dough just before baking has happened a couple of times. Thanks!
Feel free to email them over: maurizio (at) theperfectloaf.com. I’ll take a look!