
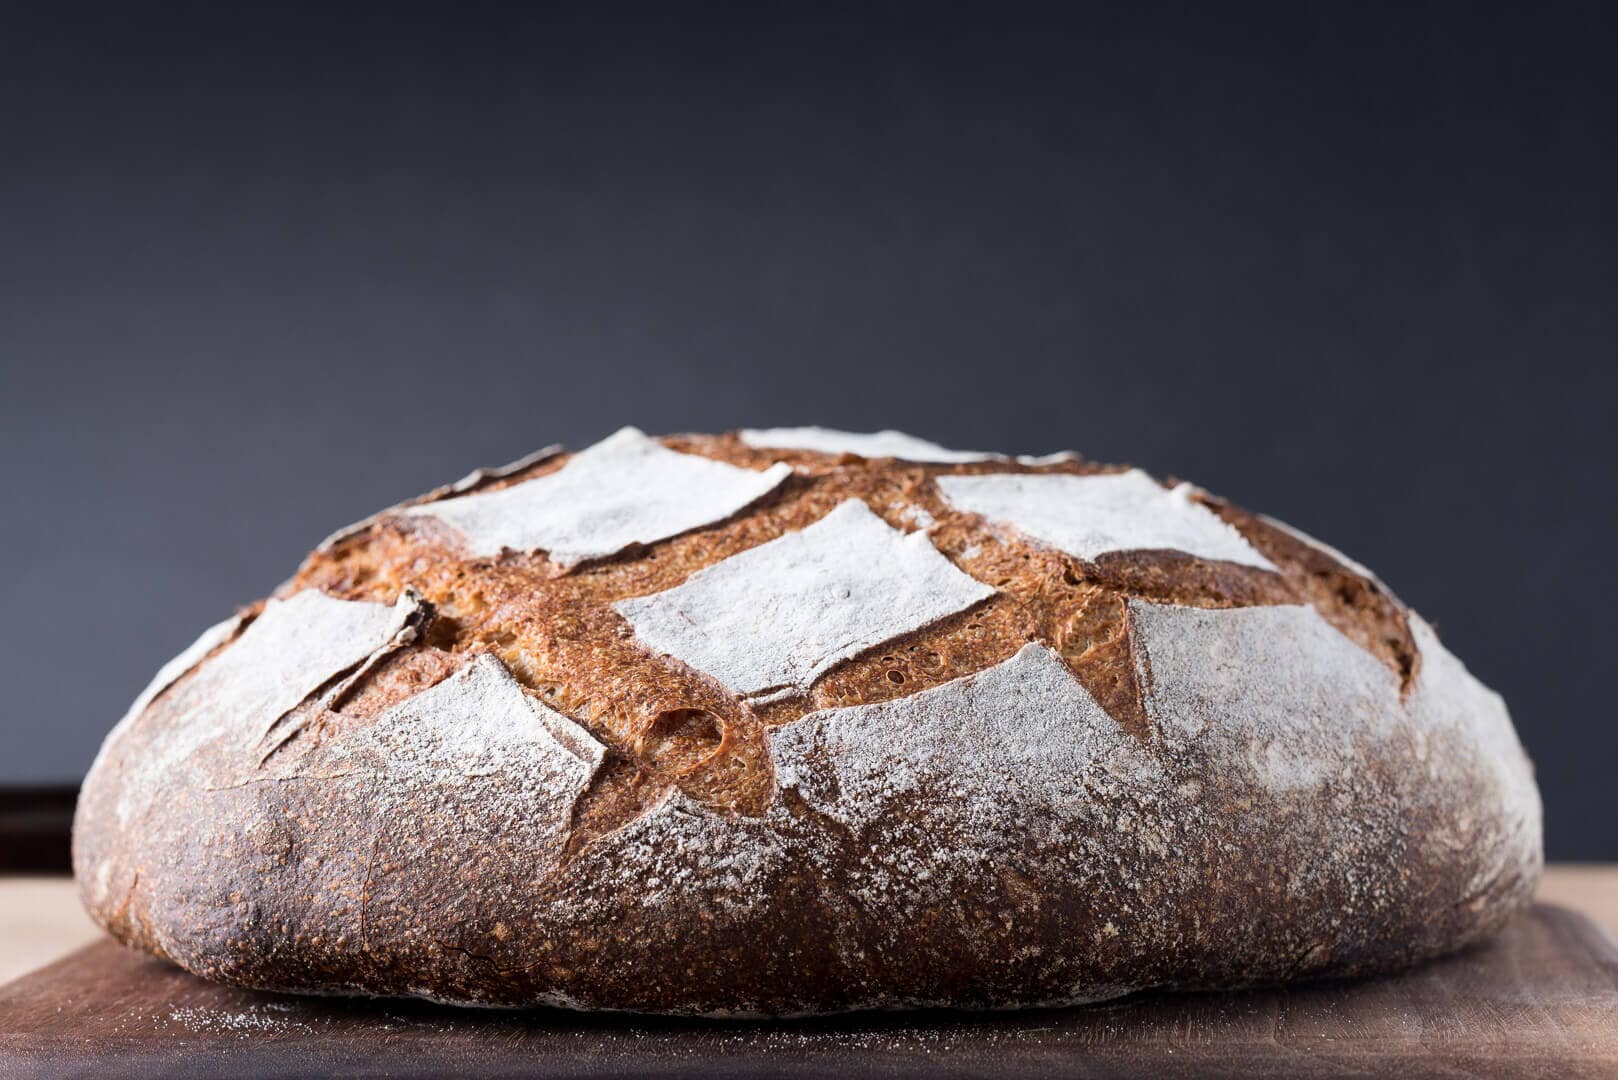
A boule is bread dough shaped into a round. Shaping a boule is usually the first shaping technique a baker learns, making it a staple in any baker’s toolset and one I return to often for many types of bread.
As with most things in bread making, there are many ways to shape a boule. Some styles are more intensive and impart more structure to the dough, while others are very gentle and just barely gather it up before placing it into a proofing basket.
In this guide to shaping a boule, we’ll look at my preferred approach to shaping dough into round loaves.
What is a Boule?
Boule is a French term meaning bread in a round shape. It’s a simple shaping style. Typically, it’s the first shaping technique new bakers learn. It requires only a few motions to transform a shaggy, divided dough into a uniform round that will bake beautifully in the oven.
I tend to shape certain types of bread as boules:
- loaves with high whole grain percentages (like this 100% whole wheat sourdough)
- porridge bread (like this oat porridge)
- loaves with other mix-ins (like my malted sourdough)
- very large loaves like a miche
Due to the nature of shaping dough this way, I tend to find the interior of boules are more closed than shaping bread dough as a bâtard. But this is not bad; it’s a different approach to shaping with a different end goal.
Watch Me Shape a Boule Two Ways
The video below shows my two methods for shaping bread dough into a boule (round) shape. I take one of two approaches when shaping a boule:
- The first method is for a dough that’s more slack and weak, requiring more structural support.
- The second method is for a stronger dough that requires only a light hand when shaping.
Proofing Baskets for a Boule
Below is a list of the dough sizes I like to fit in various proofing basket sizes.
| Basket Diameter | Divided Dough Weight |
|---|---|
| 8-inches | 500 to 650 grams |
| 10-inches | 700 to 1000 grams |
| 12-inches | 1100 to 1300 grams |
I like to use round proofing baskets, either cane or wicker. If you’re baking in a closed pot like a Dutch oven, I’d recommend a dough weight of 700-900g.
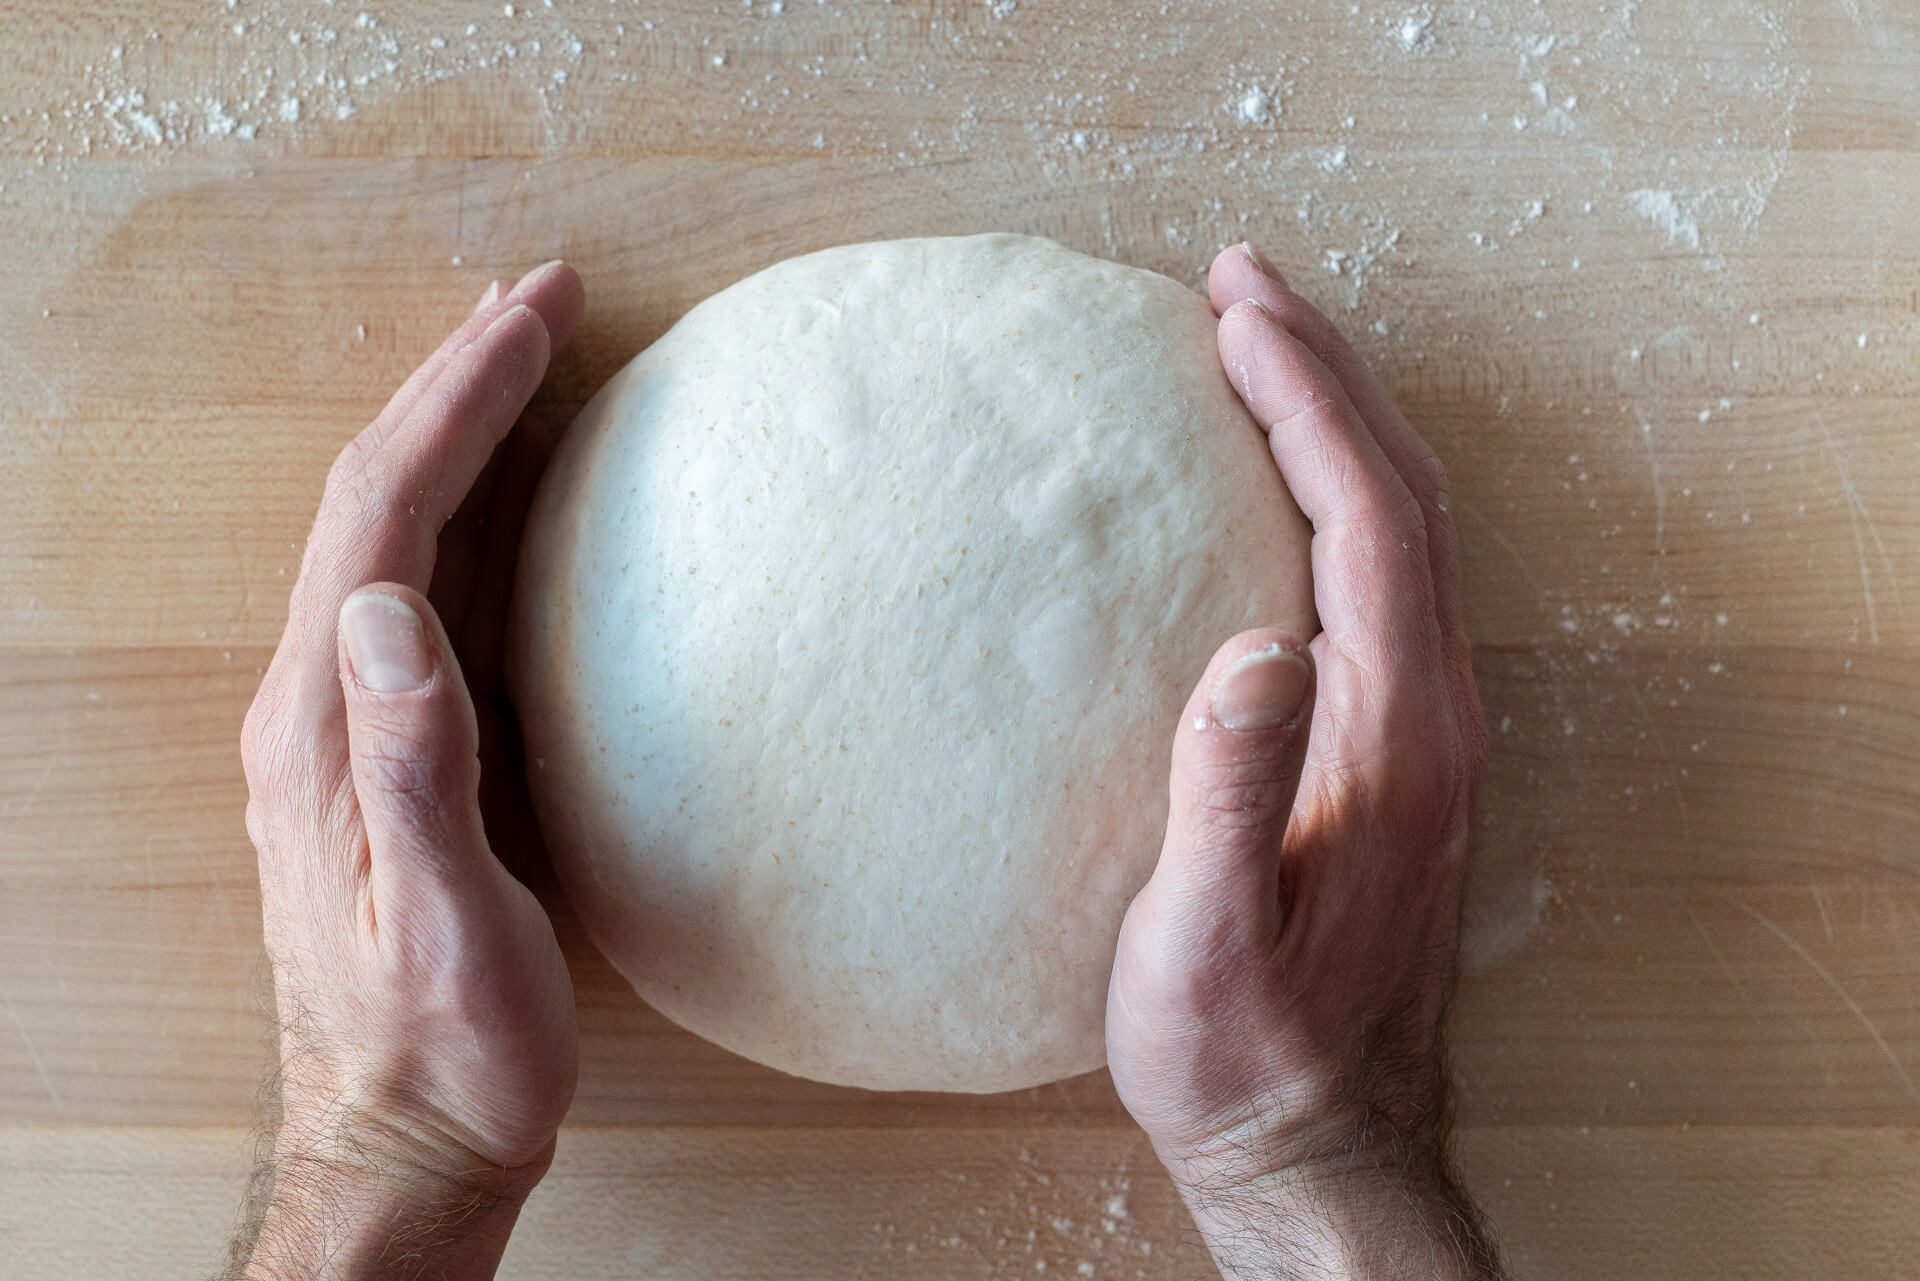
Shaping a Boule: Step by Step
To begin shaping a boule, start with a rested and preshaped round. Flip the round over onto your work surface and spread it out gently.
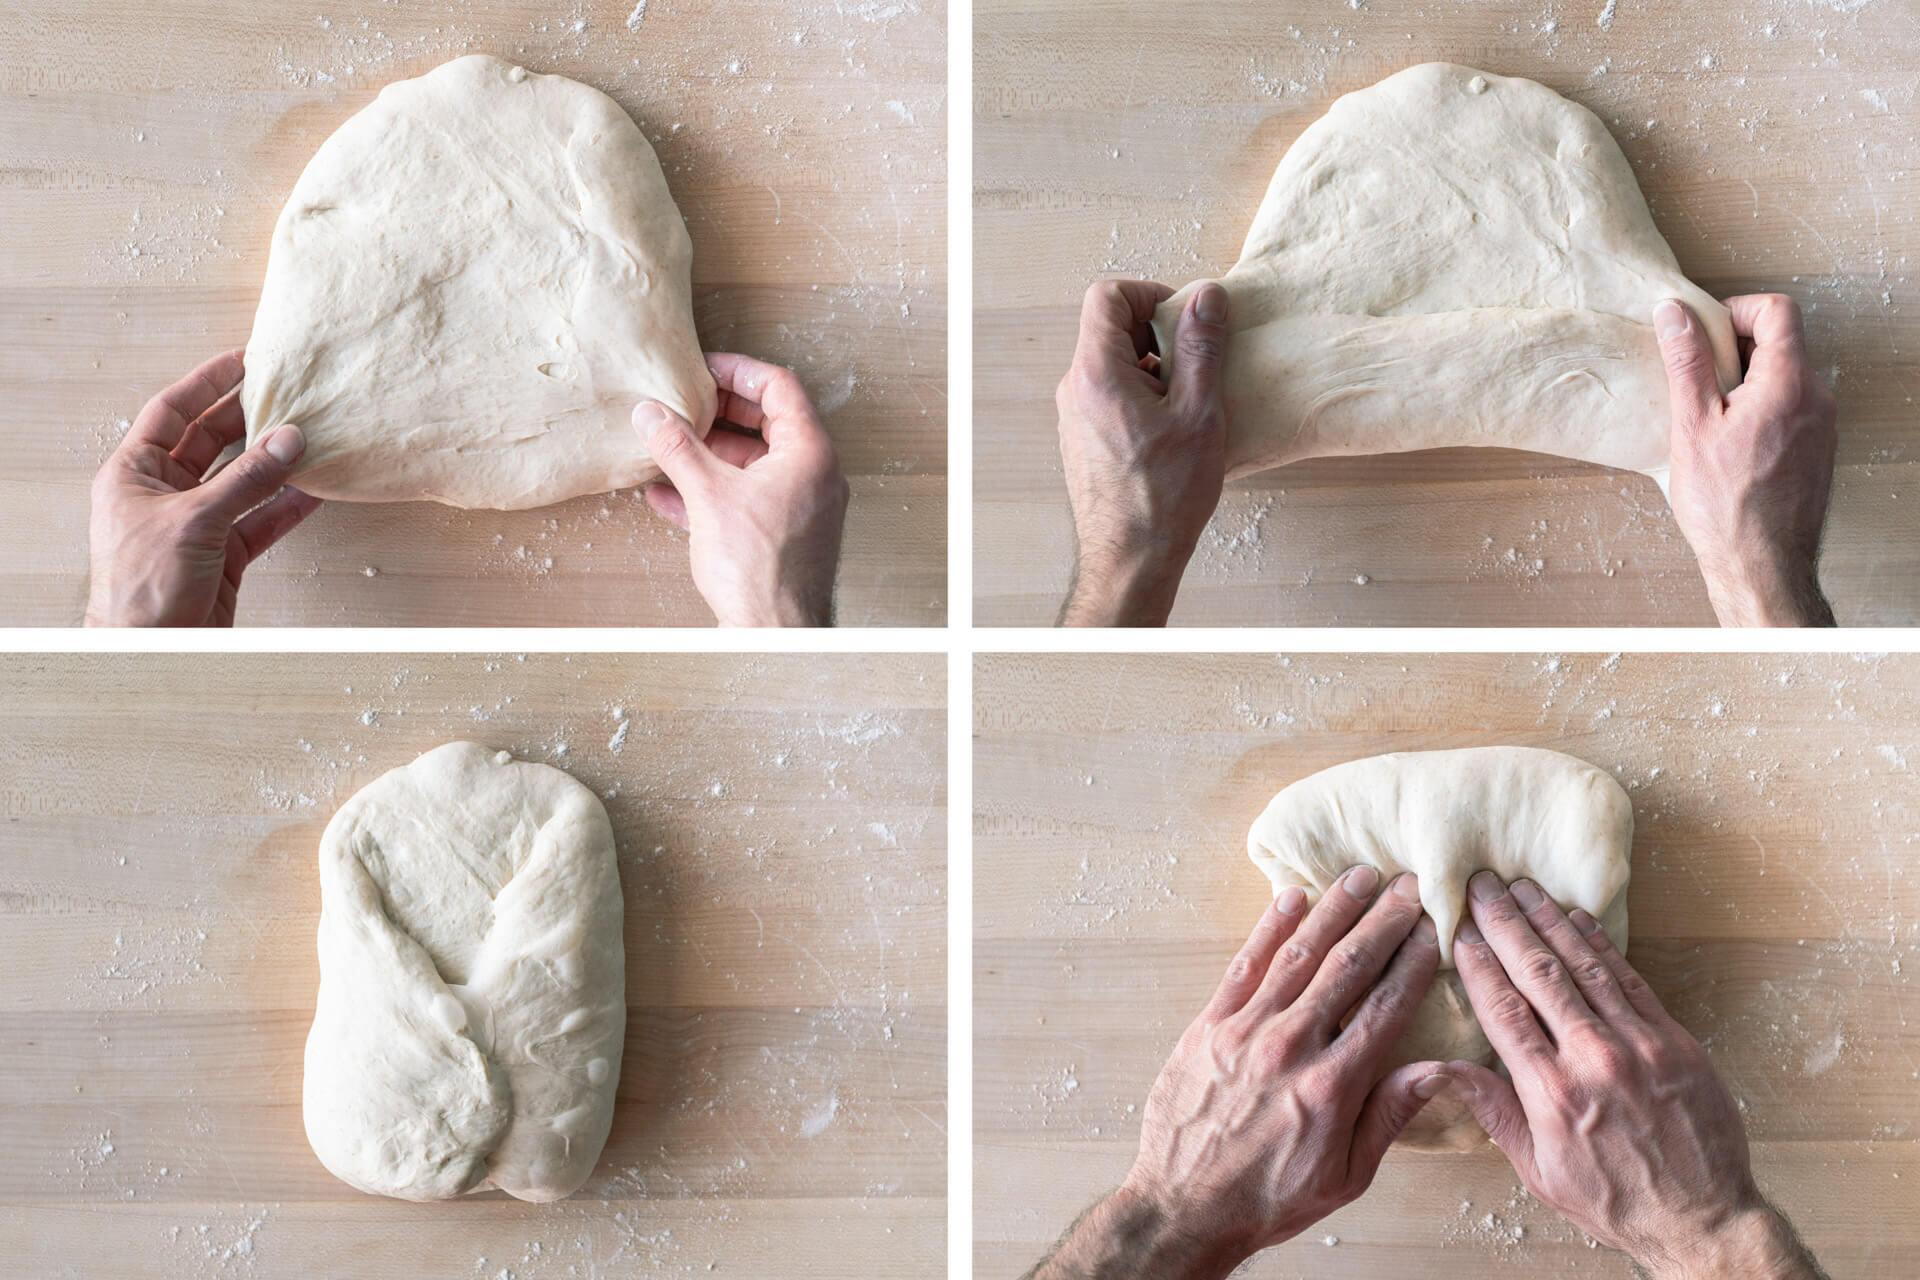
- Pull the two sides at the bottom away from each other, making two “wings” (top-right, above)
- Fold the right side over to the middle and the left to the middle over the right (bottom-left, above)
- Using both hands, pull the top of the “envelope” up and away from your body just a bit, then fold it over and down to the middle, sealing it against the dough (bottom right, above)
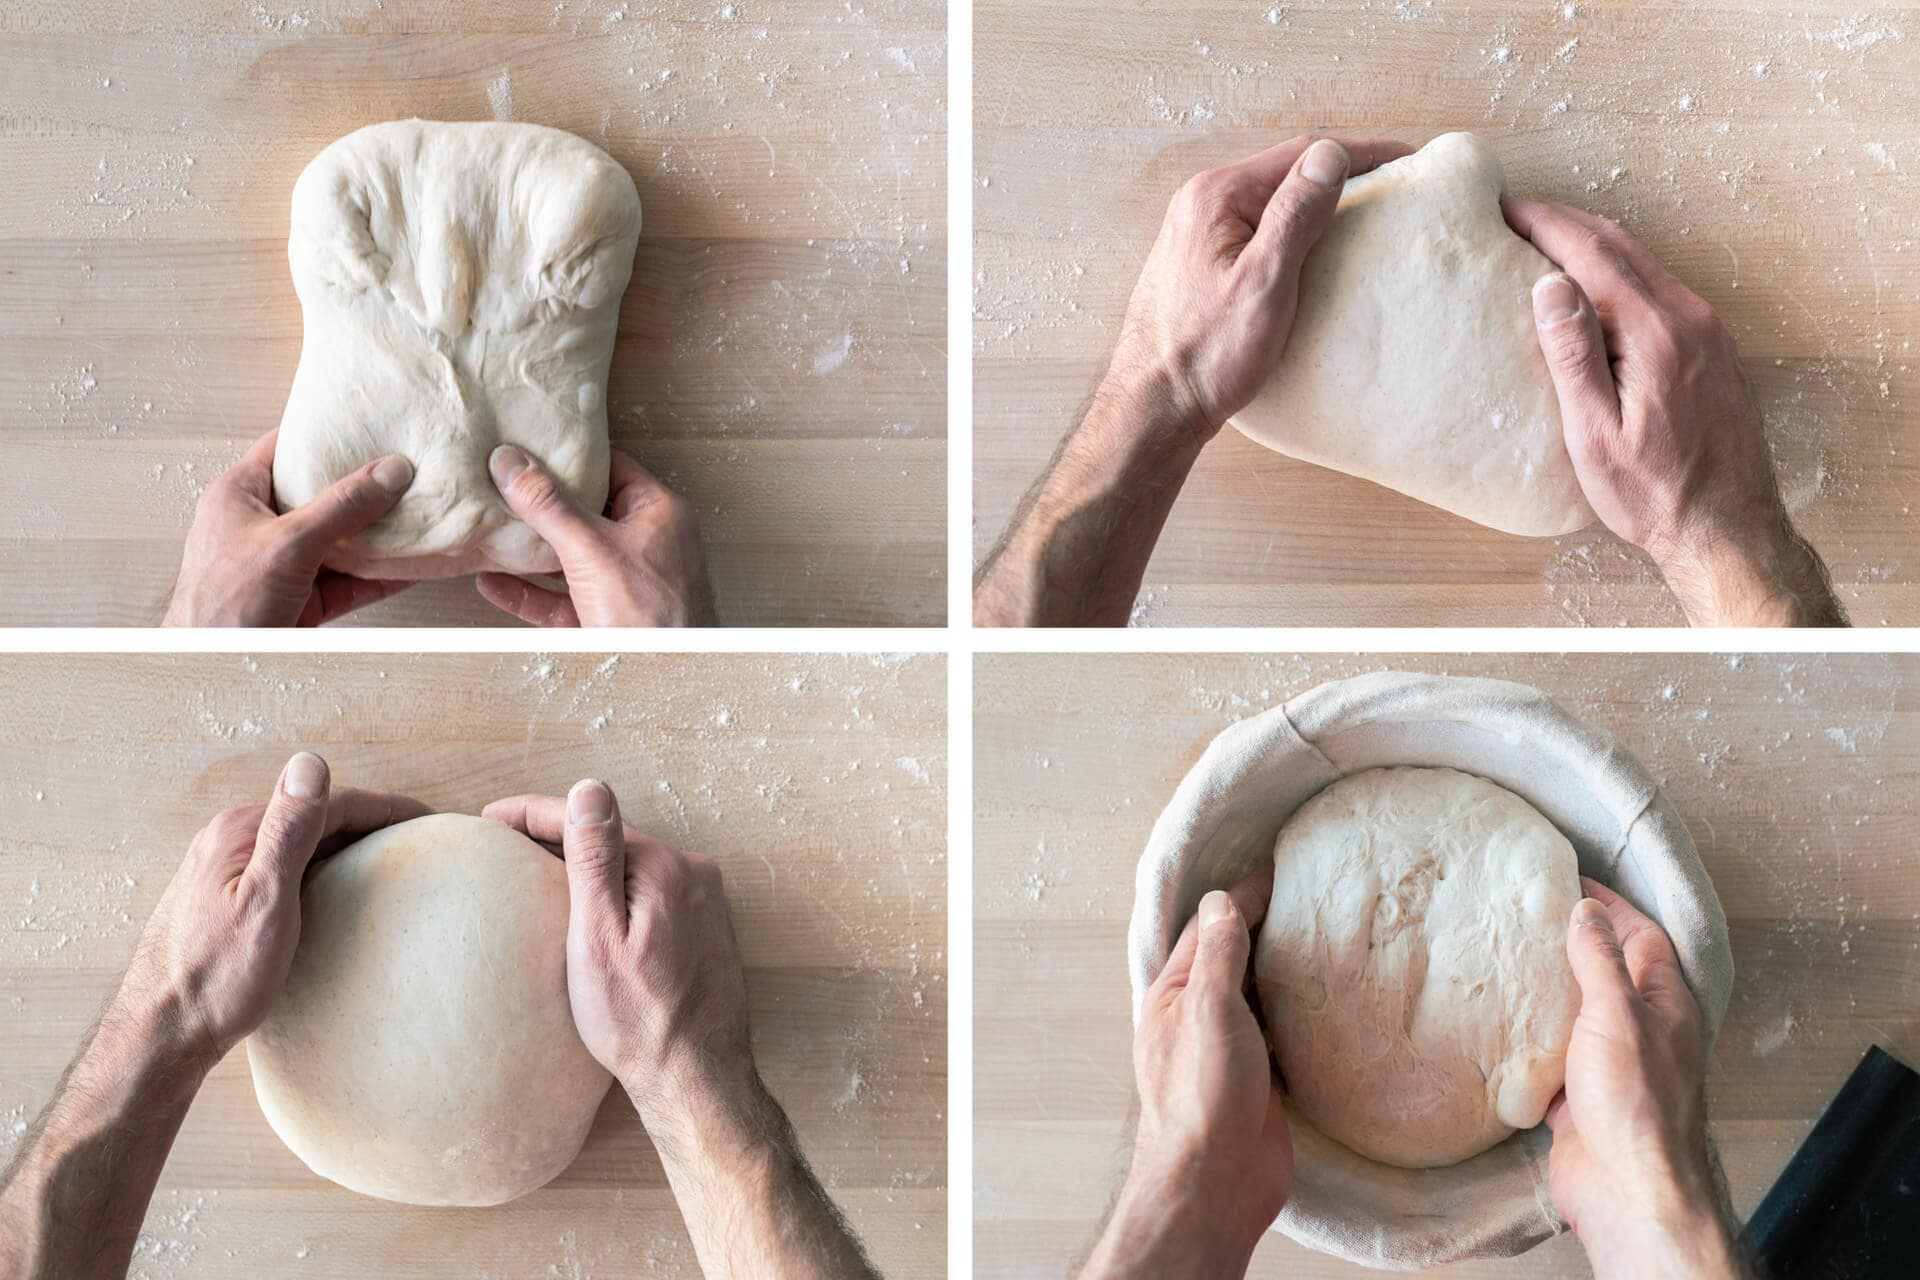
- Using both hands, grab the bottom and pull up and over to the top (top-left, bottom)
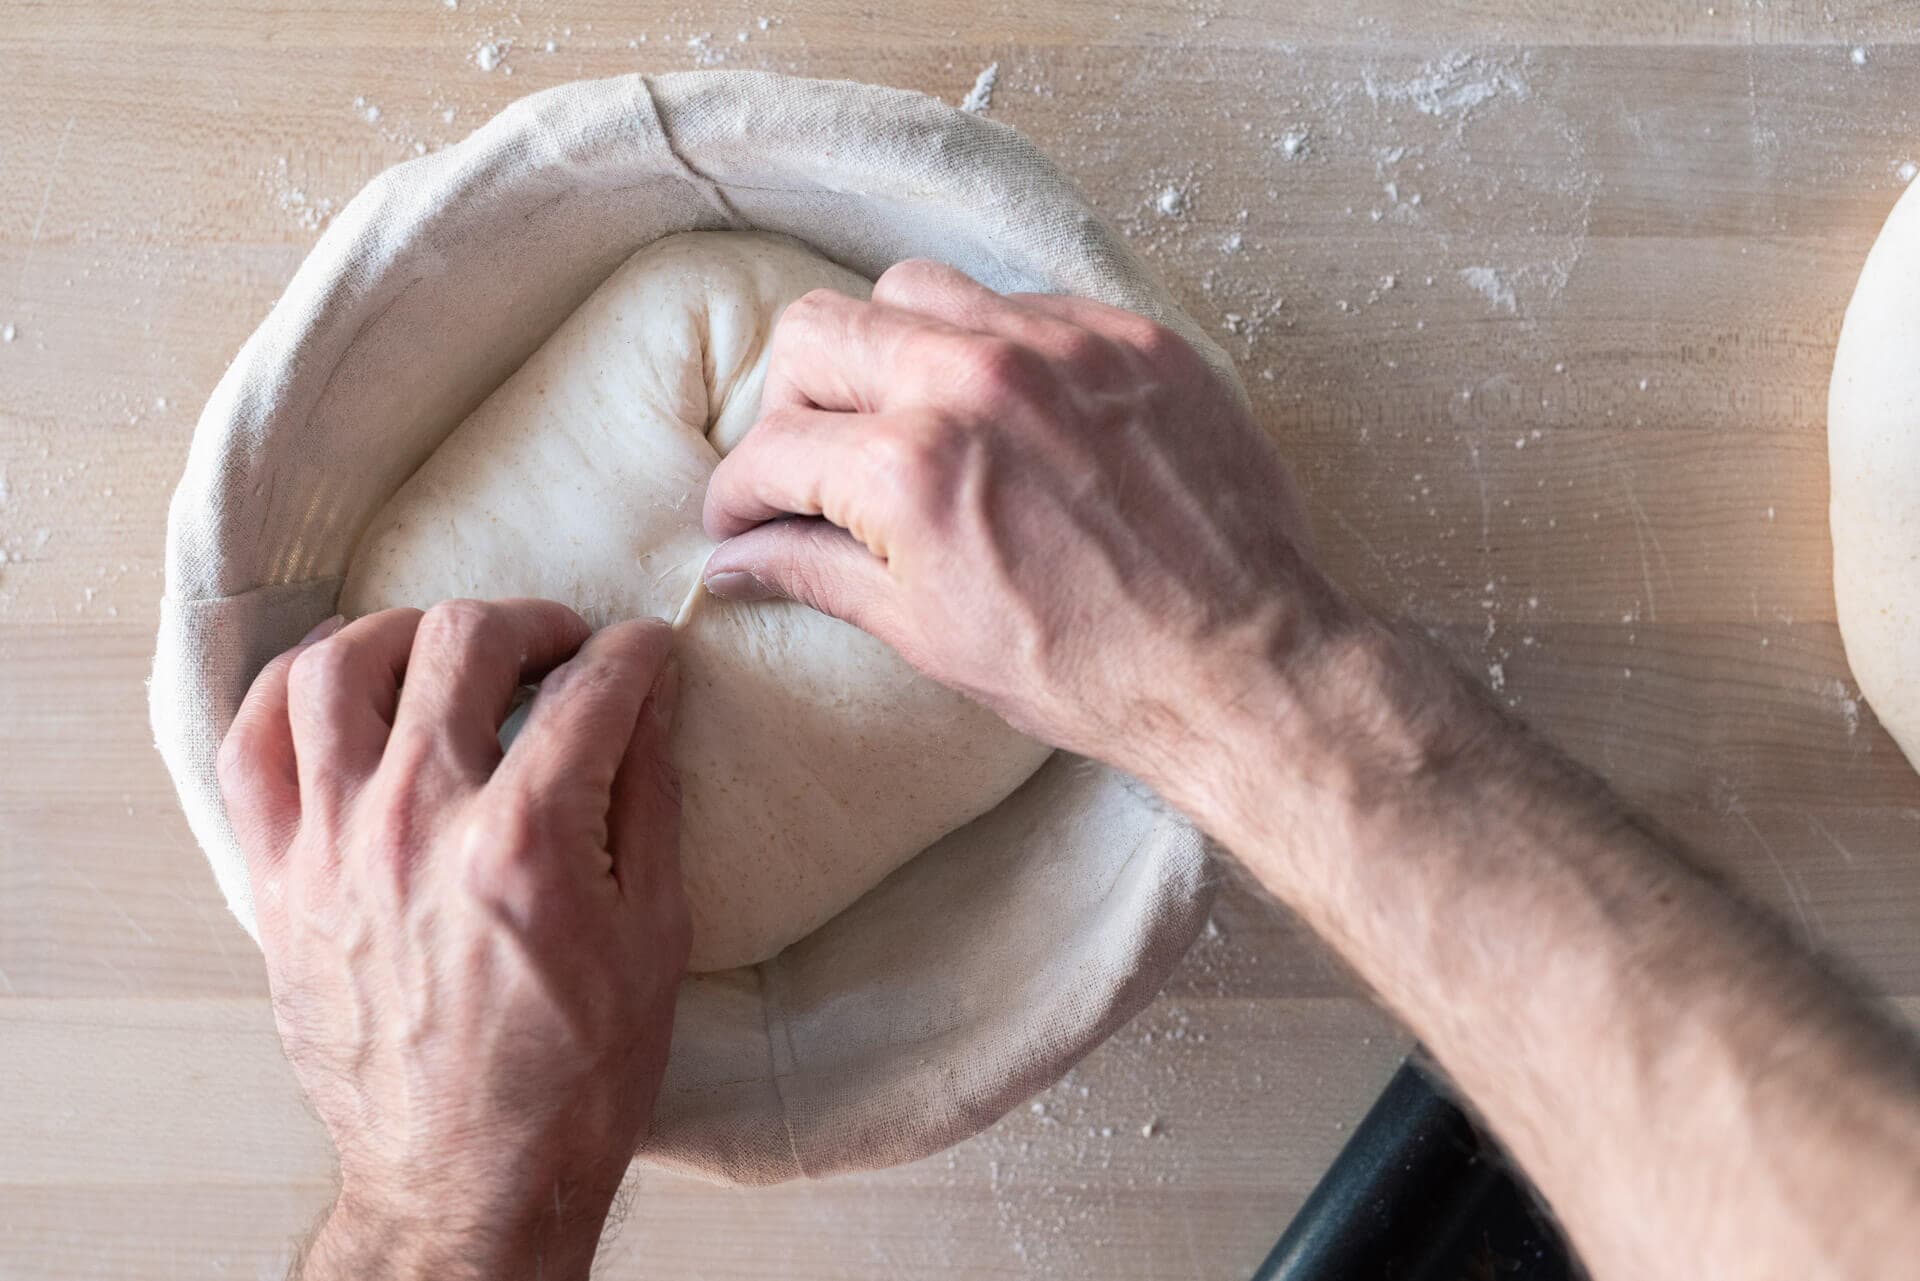
- With both hands, tuck and drag the dough down towards your body to create tension on the outside of the dough. After each drag, spin the dough on the work surface and continue dragging until the dough is uniform in shape and the outside of the loaf is smooth with no tears or bulges (top-right and bottom-left, below).
- Using your bench knife, flip the dough and place it in the proofing basket with the seam side up
Add Structure by Pinching a Weak Dough
If your dough is excessively slack and weak after shaping (perhaps you needed to mix the dough longer), you can add a little structure to the dough by pinching the top. After you transfer your dough to the proofing basket, let it rest for a few minutes while you clean up.
Then, use wet or floured hands to grab the dough’s very outside edge and fold it over to the middle. To create a little package, do this at four sides, where each “flap” is opposite another one.
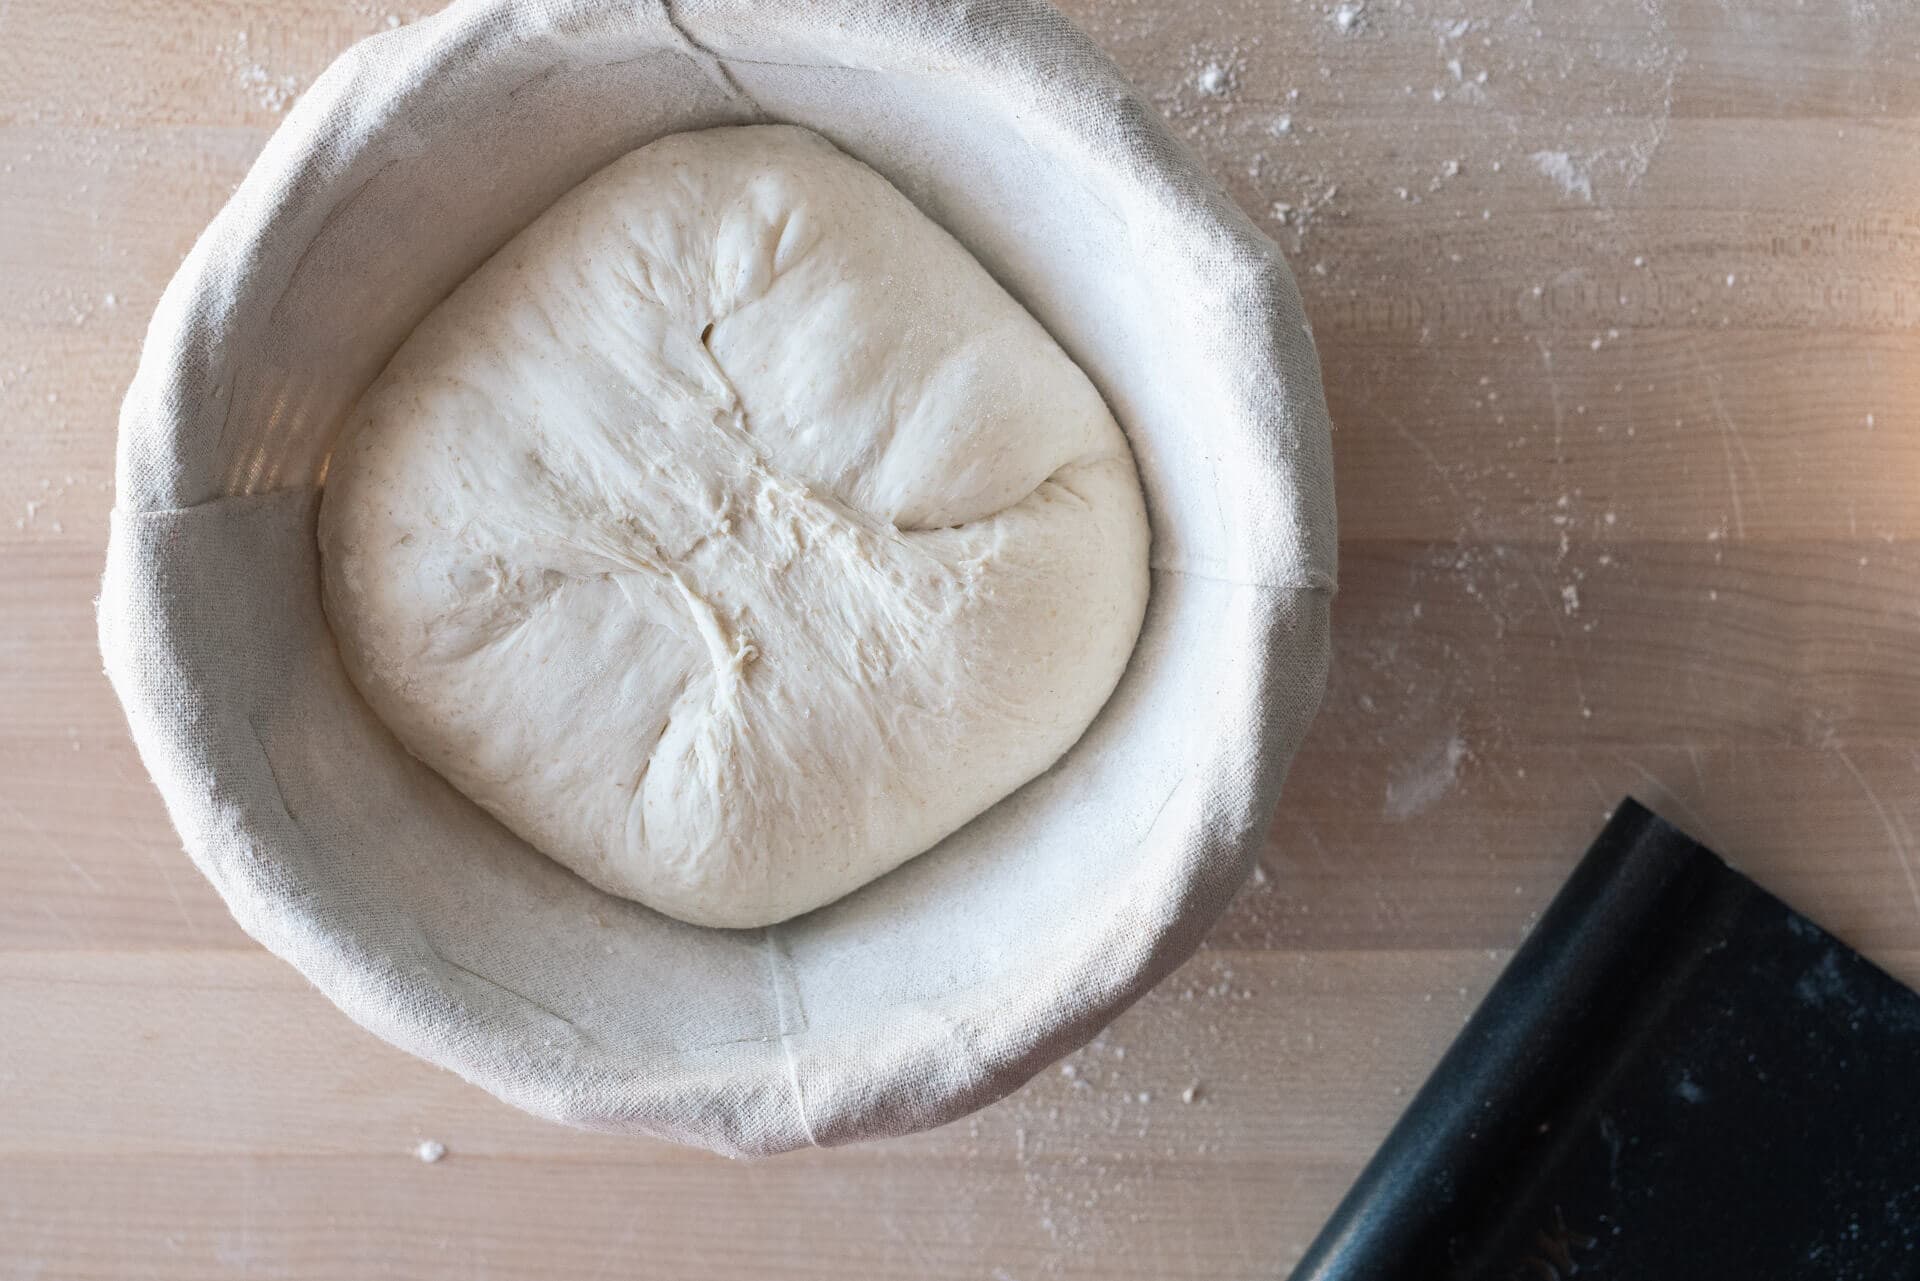
After the four folds, you’ll have an even tighter round. This last-minute pinching will create quite a bit of tension in the dough, adding strength to a boule that might otherwise spread significantly in the oven.
What’s Next?
To learn how to shape an oval bâtard, baguettes, pan loaves, or even buns and rolls, see my guide to shaping bread dough.
The perfect recipe to try this shaping method on is my Beginner’s Sourdough Bread recipe. That dough is relatively low hydration and just wonderful to work with; it springs up with a beautiful, craggy crust when shaped as a boule.
Happy baking!

27 Comments
Another observation: I basically have been shaping my Boule with the envelope fold, flipping over on the counter and tightening the boule with a few edge tucks. I then use two scrapers to gently pick the Boule up and set it on floured parchment paper with the folds down. The Boule is then transferred into the proofing basket, lightly floured, enclosed within a plastic bag and put in the frig overnight. The next morning, I score the Boule in the proofing basket and then set Boule into the D-oven by using the parchment paper. Keeping the seams down throughout the prep and during baking seems to work very well for me.
I used to put the Boule directly into the proofing basket with the folds facing up as recommended but I felt I often lost dough strength either immediately or over night in the frig. The next day I would flip the Boule over into the DO with the seams down and then score the new top and consequently usually had a average or poor oven rise.
My results in getting a more open crumb improved when I kept the seams down.
Love this, Pete. Really great method there for opening up that interior some! I hope this helps other readers, giving them a few other things to try.
I have been making sourdough Boules with a Dutch oven. I want to try Botards(sp?) but I am afraid to switch because I feel I would have to buy an oblong Dutch oven to accomodate the oblong shape . Is that true or will the round DO work for both the Boule and the Batard. I usually make a 900 g Boule?. You mention that the Botard might give a more open crumb which I prefer
Thank you
Pete
The DO will work but the batard will have to be quite small, which is fine. Try doing a 600g tapered batard in your larger DO, there might be enough space!
What discussion??? I have already asked my query and am waiting for help!
Hey Joe—
Where did you post? I don't see it.
I did this loaf OK full of holes etc but no rise only 2 ins. Is it because of shaping?
Tks.
Could be a shaping issue. If the dough wasn't shaped tightly enough, it'll spread instead of spring up.
I've preshaped my dough, but forgot to shape them before putting them in the banneton to proof overnight. Is it too late to shape the dough after they've proofed in the fridge for 12 hours?
I'd just try baking them!
Hi Maurizio, I think your shaping tutorial is the gold standard and I return to it time and again. Thanks so much for this content! However, I have an unrelated question – how do you get such a nice flour dusting on your baked loaves like the one at the top of this page? I use rice flour but it never comes out so consistently coated as yours. I do bake in a dutch oven and wonder if the steam is the culprit. Thanks!
Thanks, Percy! Appreciate that 🙂
What you can do is dust on the flour with a fine mesh sieve just before baking. After dusting this on, give the dough a gentle rub to smooth out the flour.
Happy baking!
Source for the proofing baskets used in your shaping video? (especially interested in something NON-amazon)
Check out SFBI.com!
Hi Maurizio, I feel like everything is going to plan (nice and strong dough, that gradually becomes less sticky during stretch and fold, that holds its shape but then when I tip it out of the banneton it stretches out and becomes flat. When I score it, it doesn’t tare but rather the places I scored it widen and look glossy after baking.
Any idea as to why that happens?
Usually spreading in the oven when scoring is a sign of under-strengthened or over-hydrated dough (or a combination of both, as they are related). If you find you’re still getting significant spreading, try first to add in another set or two of stretch and folds during bulk fermentation (or you can knead the dough a bit before bulk begins, check out my guide to the slap and fold kneading technique). If that doesn’t help, reduce the hydration of the dough by 2-5% to bring more strength.
Finally, it’s also possible your dough is over proofing, leading to a breakdown and excessive spread in the oven. If your dough felt strong and you shaped it tightly, try pulling back that final proof time a few hours (if you’re cold-proofing) to see if that helps. If it does, continue to dial in that proof time until you have a strong dough when baking.
I hope this helps!
HI and thanks for this helpful information. If proofing on the countertop, generally how many hours in roughly an indoor temp between 72-75 degrees? And if cold proofing, generally how long should it be in the fridge?
I usually make four loaves at a time but they go in the oven one at a time. If cold proofing, should I take them all out at the same time or leave the remaining in the fridge until it’s their turn? I always feel like a cold loaf is easier to score but maybe it’s because my dough doesn’t have enough general tension in which I will adopt the methods in your video. Thanks so much!
On the counter at that temp, I’d guess 2-4 hours. They should pass the poke test when ready to bake.
When cold proofing, take out only the ones you want to bake right then, leave the others in the fridge 🙂
Hi Maurizio!
Is it okay to weigh the dough after bench rest, then cut into two, and then cut off pieces to ensure equal weight between two loaves. Will chopping off a piece from one loaf and adding it to the other affect the structure or rise?
Sure, you could do that. It’s more common to weigh as your dividing, though, so you only have one point where the dough is handled (potentially more aggressively) in that way before shaping.
Yep. That’s basically what I was doing. For some reason I seem to “miss” cutting the dough evenly into two equal weight loaves. Then I end up with one big one and one smaller one. Instinctually I didn’t want to over handle. So I weighed the total dough, cut in what looked like half then weighed one of the halves and adjusted by cutting off a little from the bigger one to even out. Then shape and bench rest. Just wasn’t sure if I was damaging my rise by piecing in some dough to even out the weight.
It’s actually quite challenging to divide by eye directly in half! Invariably, one part of the dough elongates coming out of the container and dividing becomes misleading. It’s ok, though, just get it as close as you can. If you have to scale each piece that is absolutely okay, too. When I’m dividing 4kg+ of dough, that’s what has to be done!
Hi Maurizio,
My last few attempts at baking have produced wonderful bread, but they’re all misshapen, with obvious folds on the bottom and strange shapes bursting out of the top!!! What am I doing wrong with the shaping? The last few times the dough felt a bit dry, and no matter how much I dragged it to erase the seams on the bottom, it didn’t work. Help! And thank you!
Hey there! It sounds like maybe your dough needed more water to make it more workable, although that might not have been the case. Shaping really does take practice! Just keep at it, and you’ll find yourself improving. I have a few videos posted around the site that should help, too!
Please help! When I make my sourdough if I use a very vigorous Slap & Fold technique, my boule holds its shape well but still comes out rather dense when baked. If I make them using stretch & folds, my boule spreads on slashing just before being placed into the DO but gets good oven spring and comes out with a light and airy crumb.
Where am I going wrong in being unable to achieve the boule holdiing its shape?
Hey, Lorraine! It sounds like perhaps you’re not shaping your dough tightly enough. If you have sufficient dough strength from kneading and stretch and folds during bulk, you should have correctly set the stage for shaping. But it still is important to shape the dough tightly enough so it holds its shape on the counter after you’ve shaped. I’d suggest trying to shape the dough tighter to see if that helps it keep itself together when you go to bake.
Thank you for getting back to me, I’ll let you know on my next bake.