

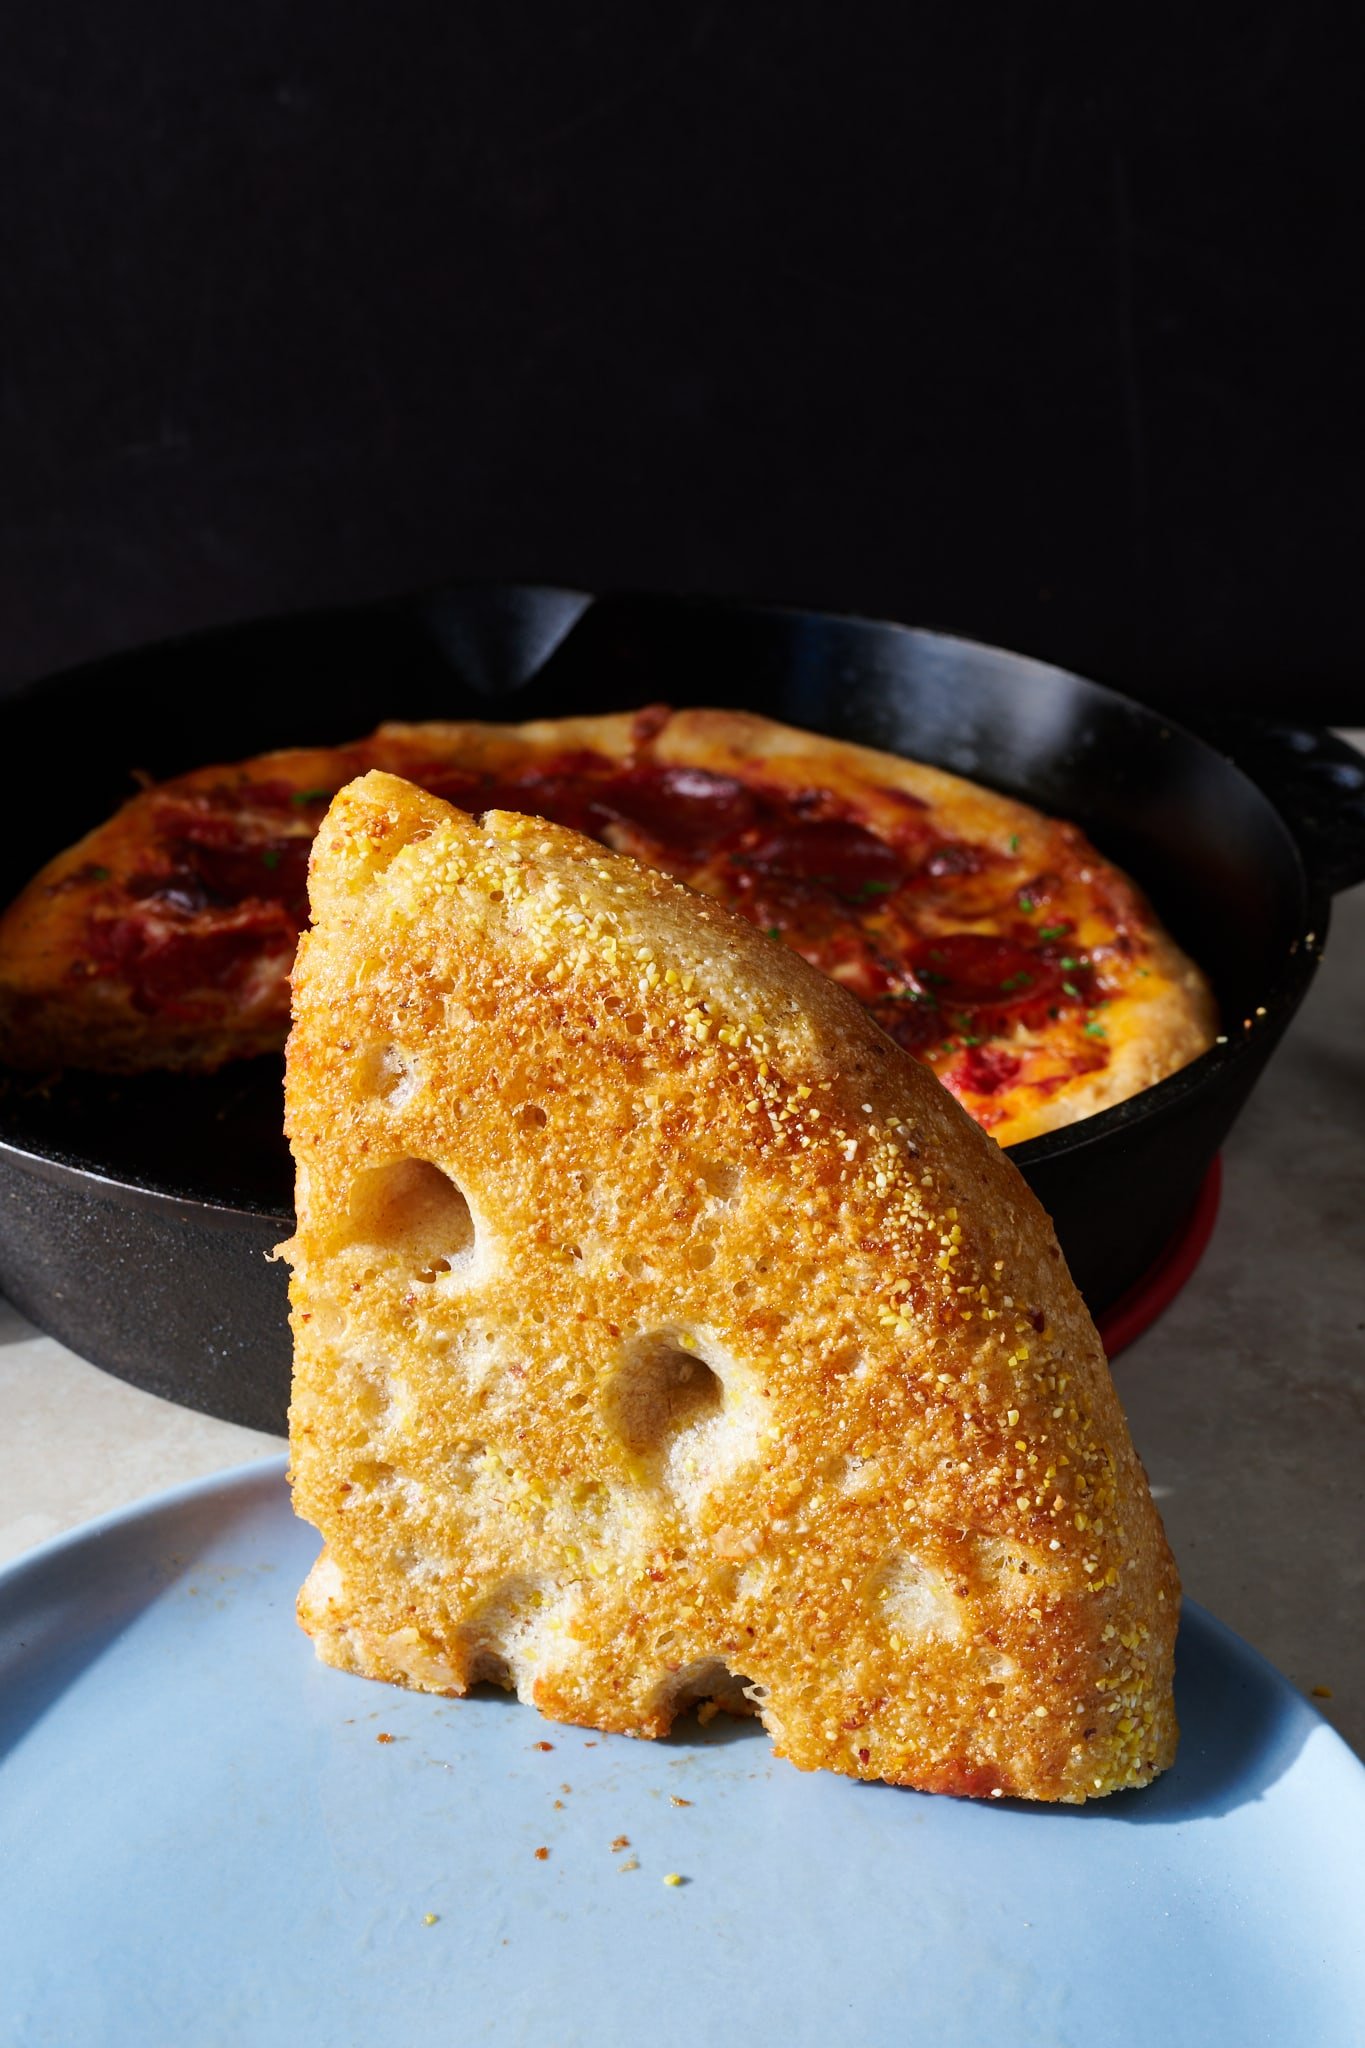
I think we might starve in my house without weeknight pizzas. As much as I love a good outdoor pizza oven party with a toppings bar and a prolonged session of baking and chit-chatting, sometimes you just need something easy and hearty to throw in the oven. Enter this cornmeal skillet sourdough pizza.
This pizza takes some inspiration from one of my favorite country loaf variations, the polenta porridge country loaf. I love a cornmeal pizza, but adding dry cornmeal to the dough can sometimes give you a dry dough. I decided to approach this one with the general philosophy of country sourdough, but since you’re not making a finicky free-form hearth loaf, you can add everything at once and mix well.
This dough is designed to be on the wet side, which gives you a really fluffy, crusty pizza.
I use Cairnsprings Trailblazer bread flour for this (which tends to be a thirsty flour). Because this flour is essentially a Type 85 flour, which makes it more whole grain, I usually add another tablespoon or two of water. If you’re using King Arthur Bread Flour, which is a high-protein white bread flour, or another similar, this will probably be the right amount of water. This dough is designed to be on the wet side, which gives you a really fluffy, crusty pizza. It also makes it easy to spread out in the pan.

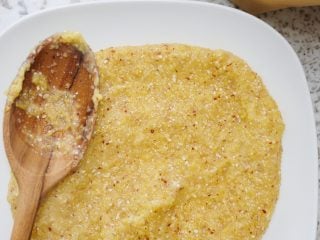
You can use cornmeal or polenta for the porridge addition, but be sure to use cornmeal when you dust the pan. They are both made from ground corn, but polenta is coarser and will be too toothy on the outside of the pizza.
Cornmeal Skillet Sourdough Pizza Recipe
For tips on calculating baker’s percentages or modifying this formula, see the guide to baker’s percentages (baker’s math).
Vitals
| Total dough weight | 800 grams |
| Prefermented flour | 12.5% (Assumes a 100% hydration starter.) |
| Sourdough starter in final dough | 25.0% |
| Hydration in final dough | 50.0% (Does not include the water in the cornmeal porridge.) |
| Yield | Two 400g pizzas |

Total Formula (Everything You Need to Make the Recipe)
Desired dough temperature: 82°F (28°C) (see my post on the importance of dough temperature).
Note that in the final recipe, the cornmeal porridge is scaled up slightly to cover loss during cooking, just to ensure there is enough porridge to cover the dough requirements. The table below shows the final dough percentages and ingredients, but you’ll need slightly more cornmeal (or polenta) and water to make the porridge.
| Weight | Ingredient | Baker’s Percentage |
|---|---|---|
| 337g | Type 85 Bread Flour (Cairnsprings Trailblazer Bread Flour) or High-Protein White Bread Flour (King Arthur Baking Bread Flour) | 100.0% |
| 41g | Cornmeal or Polenta | 12.3% |
| 329g | Water (Soaker and Mix) | 97.5% |
| 8g | Fine sea salt | 2.5% |
| 84g | Ripe sourdough starter, 100% hydration | 25.0% |
Additional ingredients
Cornmeal for sprinkling in pan
Olive oil for greasing

Cornmeal Skillet Sourdough Pizza
- Prep Time: 5 hours
- Cook Time: 30 minutes
- Total Time: 5 hours 30 minutes
- Yield: 2 pizzas
- Category: Lunch, Dinner
- Cuisine: Italian, American
Description
This cornmeal skillet sourdough pizza recipe makes for an easy, hearty meal. The choose-your-own-adventure of topping your pizza is always fun, and the convenience of cooking it in a skillet eliminates the headache of shaping the rounds and trying to shimmy them off of a peel. The dough borrows some of the principles from sourdough country bread, such as a high-hydration and adding a porridge. This means the substantial crust is packed with flavor and has a pleasing, tender texture.
Ingredients
Cornmeal Porridge
- 41g Cornmeal or Polenta
- 202g Water
Main Dough
- 337g Type 85 Bread Flour or High-Protein White Bread Flour
- 127g Water
- 8g Fine Sea Salt
- 84g Ripe Sourdough Starter (100% Hydration)
- All of the Porridge
Instructions
- In a medium saucepan over medium-low heat, combine the cornmeal and 202g soaker water. Cook for 10-12 minutes, stirring often, until the cornmeal has thickened and is tender. Remove from the heat and let cool.

- In a medium mixing bowl (or in the bowl of a stand mixer fitted with the dough hook attachment), combine the remaining 127g water, sourdough starter, cooled porridge, salt, and flour. Mix until everything is combined. Cover with a clean dish towel and let rest in a warm, draft-free spot for 20 minutes.
- Knead the dough in the bowl. To do so, lift up one side, fold it over the middle and press down. Rotate the bowl a quarter-turn and repeat. Continue lifting and folding for about 5 minutes. The dough should be pretty wet and sticky but cohesive. If the dough seems very stiff, you can add another tablespoon or two of water.
- Let the dough rest for three hours in a warm spot—the dough temperature should remain about 82°F (28°C). Turn the dough in the bowl twice at regular intervals during bulk fermentation by lifting and folding (as you did for kneading) a few times.
- After three hours, the dough should have increased noticeably and have bubbles on top and throughout.
- Scoop the dough from the bowl onto a clean work surface. Divide in half and round gently into balls. Let rest on the worksurface for 5 minutes.
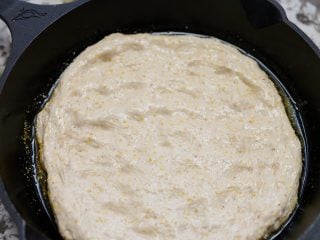
- Prepare two 10-inch cast iron skillets (or the shallow end of a Dutch oven/combo cooker) by coating them very well with a few tablespoons of olive oil. Sprinkle a tablespoon of cornmeal over the bottom of each pan. (Alternatively, save one dough ball for later, see Notes.)
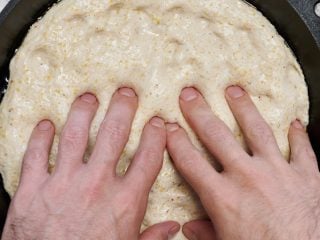
- Coat the dough balls with olive oil, either using your hands or a pastry brush. Set one ball in the middle of each skillet. Gently spread the dough flat in each pan, pressing and stretching with your fingertips. Don’t worry if it doesn’t quite stretch all the way; you can stretch it more just before cooking.
- Let the dough proof for about an hour (you don’t need to cover them, as the olive oil coating will keep them from drying out). During this time, preheat an empty oven with a rack in the middle to 500°F (260°C).
- After an hour, if the dough hasn’t spread all the way to the edges, you can gently press it out a little more.
- Top as desired, using a generous amount of toppings. (I usually start with a big spoonful of Bianco crushed tomatoes straight out of the can.)
- Cook the pizzas for about 20 minutes until the edges are golden brown. Check the pizzas after 10 minutes. If the toppings seem to be getting dark too quickly, turn the oven down to 450°F (230°C) and finish cooking.
- Remove the pans from the oven and let cool briefly. Carefully use a spatula to loosen the edges and remove the pizzas from the pans. If they stick, just take your time and use the spatula to loosen any stuck bits.
- Serve immediately.


Notes
One dough ball can be saved for the next day or up to two days later. After dividing the dough and balling each piece, place one in a small, oiled container with an airtight lid. Place the container into the refrigerator. To use, remove the dough from the refrigerator an hour before you want to use it, following Step 8 onward, above, with the dough.
Cornmeal Skilled Sourdough Pizza FAQs
Can I keep one pizza dough in the refrigerator to use later?
You can keep one of the sourdough pizza dough balls in the refrigerator overnight or for up to two days.
What’s Next?
For more tips and tricks to making the perfect pizza at home, be sure to read through the Ultimate Guide to Sourdough Pizza.


47 Comments
This sounds like an awesome way to get a crunchy crust including the corn polenta. I will definitely try that. I have some corn to mill that I used for cornbread; would that work instead of polenta? I used the bottom of my Challenger Pan for Pizza before, but I preheated it in the oven and then just slid the dough (which was on a piece of parchment paper) onto the hot pan. I'm surprised you actually don't preheat the pan. Maybe the challenger pan is thicker; I doubt it would get hot enough without preheating. What do you think?
Made this yesterday. Fantastic dough. The dough took a bit longer to ferment than I had planed so I made the 2 dough balls and placed them in fridge overnight. Took it out around 8AM the next morning, placed it I the pans and gave it about 3 hours to finish proofing. Stretched them a bit, in the pan, By noon we were eating pizza. Method, dough flavor, all perfection.
The toppings I used were a fresh raw tomato sauce, about 3oz of Taleggio cheese per pie, then I added some diced red bell pepper, sliced castelvetrano olives, fresh basil, and Parmigiano Reggiano. Two pieces ea of one pie were a full me for us.
Cheers and thank you. This is a keeper.
PS, I used the stand mixer for kneading.
Thanks for sharing your process and adaptations – the overnight cold proof is a great way to work with extended fermentation times. Those toppings sound like a great combination, especially with the Taleggio. Glad the stand mixer method worked out for you, it's an easy way to mix for sure 🙂
This is the pizza crust recipe I’ve been looking for! I love cast iron, cornmeal, and of course sourdough. As a a fan of thin crust (and owner of about every size skillet made by Lodge), I used a 14 inch and 10 inch which yielded a crispy crust very much to our liking. Next time I may try getting a third — smaller, thinner — pizza out of it. Thank you for this simple and infinitely adaptable delicious recipe.
Happy you like this one!
Can I do the 5 minutes mixing with the mixer or it’s better be done by hand? Thank you
Mixer totally works for this!
This was spectacular!
I think so too, Meaghin! Glad you liked it 🙂
This was delicious and is now my go-to pizza dough! For those asking, I did try freezing half of the dough and just made it for dinner tonight after defrosting it overnight in the fridge and proceeding with the pan proof before cooking. It definitely didn’t get as airy or crispy, but we still ate it happily. I’m not sure if that was related to the freezing or some other variable, so I do plan to try cooking it from frozen again!
Amazing, thanks for the feedback, Rachel! Glad to know freezing worked, I know others will ask 🙂
I notice this recipe doesn’t have a suggested timeline. I’m hoping to make the dough and bake same day for dinner. Guessing it would be ideal to not have to put the dough in the fridge. Considering it has around a 4 hour proof and rise, when would u suggest mixing the sourdough so that it’s ripe to be added for step 2. Would u suggest morning of or night before? This part always confuses me when it’s not specific. Thanks for any guidance Maurizio!
Sorry about missing this message, Greg! I don’t know how I did. I hope you figured out a good schedule to work for your dough, I would mix in the morning most likely.
Any reason not to slap n fold in step three? Seems like it would be easier with the wet dough in this small amount.
You can certainly do this! The dough is very high hydration, which can make it a little challenging, but not a problem at all.
So amazing! Will be a weekly rotation in our house! Fed my starter this morning and had a delicious pizza at dinner. Thank you!
Amazing. So glad you liked this, Debbie!
Can this recipe be cut in half? Thanks
Yes, absolutely. Just halve all the ingredients 🙂
I just made this for lunch. It was delicious and my kids couldn’t stop complimenting it between each bite. I made a few changes: I used 237g fresh milled hard spring wheat and 100g all purpose flour. I spread all the dough on an oiled half baking sheet instead of a skillet. I baked it at 475F for 20 minutes. I’m not sure if it is exactly how it was intended but it was delicious. Thank you so much for this recipe! I’ve been in search of a simple and tasty one for a while.
Lovely changes, Coralee. So glad you like this one, and I like it for the exact same reasons! It’s a really easy recipe to have in the back pocket 🙂 Thanks for the comments!
Yum…In your preamble you mention “soaker” water. Do you soak the polenta before cooking in the same water? There’s no mention of this, and 10-12 minutes seems a short cooking time for polenta (crunch, crunch). I’m going to give this a try some day.
Sorry, Paci, and great Q. It’s not a soaker, it’s just cooked. I would say cook as long as you need to soften the polenta, for me it was about 15 minutes here, depending on the variety you have.
Wouldn’t it be better to use semolina instead of cornmeal? Semolina contains gluten while cornmeal doesn’t. I alway add about 20% semolina to my pizza bases
Semolina is another way to go, and I use it in my wood fired pizza dough, well durum at least. It brings awesome flavor and crispness to the crust!
This has a decide corn flavor with the porridge, though, so a bit different!
Can you mix the dough (step 3) in a mixer with dough hook instead of by hand?
Yes, absolutely Karen!
Thanks Mauricio – I’ve got a question about the cast iron skillet method.
The skillet goes in the oven cold (or room temp), and will cause the top of the pizza to bake more quickly than the bottom, which will wait for the skillet to get to 230C. This is the opposite of baking on the hearty hot stone floor of a pizza oven. Can you explain the logic (or benefit) in this case?
Thanks!
That’s a really great question. When doing this recipe, though, I found both ended up baking up perfectly at the same time. I think it’s because the tall sides of the skillet help the top from coloring too fast (but if you do notice this happen, either turn down the oven, or tent some foil over the top to help).
I think there’s a typo in the ingredients in the recipe section–the water in the baker’s percentage table is 329g total, but in the ingredients with the recipe, it’s 202g with the polenta and 337g with the dough (this results in a soup 🫣). The water with the dough should probably be 127g (329 minus 202).
I think you’re right. Mixed as per recipe and looks like pan de cristal right now. Going to be interesting as it is now. Making balls is going to be tough. Will keep you posted.
Gosh, so sorry, John! Yes, it was a typo, the recipe card is now fixed: it’s 127g water in the main dough.
Oh geez, that’s why my dough was soup! I was totally thinking I’m just a failure at working with high hydration dough 😂. Added flour and we’ll see how it goes.
Sorry, Jen! It’ll still turn out great, the pan is a lifesaver 🙂
Two pies: One margherita style-bianco crushed tomatoes, sliced garlic, oretano, Fluor di latte mozzarella, EVOO, fresh basil in last 5 minutes . . .
One Mangieri style, best of season cherry and golden tomatoes, smoked mozzarella, topped with garden arugula tosssed in EVOO, lemon juice and grated parmigiano
Tweeks: seeing the dough was so wet, I treated it like pan de cristal. During 3 hour bulk, did coil folds every 30 minutes for first two house then let it bulk in proofed at 80 degree dough temperature
Turned (poured) it out on well floured counter like a pan de cristal or high hydration ciabatta. Balled the best I could and placed each ball in sealed containers.
Refrigerated for two hours.
Took out of refrigerator and let rise in containers for 1 hour.
Then placed in oiled and cornmeal dusted cast irons for 1 hour as per recipe while oven preheated.
Said prayers.
Baked for 25 minutes, middle rack @ 500
Verdict: . . . Delicious with great tooth to the crust. I mill my own polenta from Anson Mills Heirloom Corn. Wish dough featured its incredible flavor more. Will lower hydration and up polenta next time. This was great. Just could have been fantastic.
Have photos, but can’t seem to post them here.
Amazing, John! Glad to hear it turned out well. The crust recipe is extremely good, and the added water, well, it maybe for a fluffier crust I’m sure 🙂
Next time with a little less water (sorry about that!), it’ll be easier to handle and just as delicious. Until then, enjoy and thank you for your understanding about the typo!
Had to chase them across the counter, but I got two 100% hydration polenta sourdough pizza (focaccias?) in the oven right now. It was too late to turn back. Pictures to follow.
Eek, you’re absolutely right. Sorry about this, I’ve fixed it!
I believe there is also a typo in the instructions section. In step 2, it states to add the remaining 129g of water; shouldn’t this be 127g (329 – 202 = 127)? Probably not a big deal…
Thank you, fixed 🙂
Thank you, Maurizio–this looks like supper for tomorrow night!
Can the second dough ball go into the freezer for a later date?
You’re going to love this one! I havent tried freezing it, but it should work. I’d freeze right when the dough is divided.
Alternatively, you could put the second one in the fridge, like we talk about up in the post, and it’ll keep for 1-2 days there.
Enjoy!
Thank you!!!!
Anne—if you printed the recipe, be sure to re load it, I had a typo. The water for the main dough (after making the porridge), should only be 127g.
Thank you, Maurizio—no wonder it was so gloppy! I will let you know what happens when I bake it for supper tonight! Meanwhile, I have your sourdough sandwich bread (Tanzhong/sp?) cold proofing overnight. I substituted your Hayden Perfect Loaf blend for the two flours in the dough itself. Can’t wait to bake it in the morning!!!
Ooh, that’s a great use for that flour. LMK now they both turn out. Fun day tonight/tomorrow!
Will do! I am obsessed with that flour!!