

Sourdough cinnamon rolls: the new every-weekend tradition? I began work on this recipe with the intention that these would be a wonderful Christmas morning indulgence, the birth of a new holiday baking custom. But after making them several times for testing, I’m convinced they should perilously be a weekend indulgence. Why limit ourselves and declare these only for special events and holidays? Seriously, let’s make them every weekend.
Cinnamon rolls fit so perfectly with the cold weather. They’re like that warm blanket you left on the radiator, that puffy wool sweater you wear around the house, or that cup of hot chocolate that breaks through the cold. Layers of tender dough segregated by ribbons of gooey cinnamon sugar and topped with a creamy, white sugar glaze—it’s enough to make you completely forget it’s cold outside or perhaps stop caring about winter altogether.
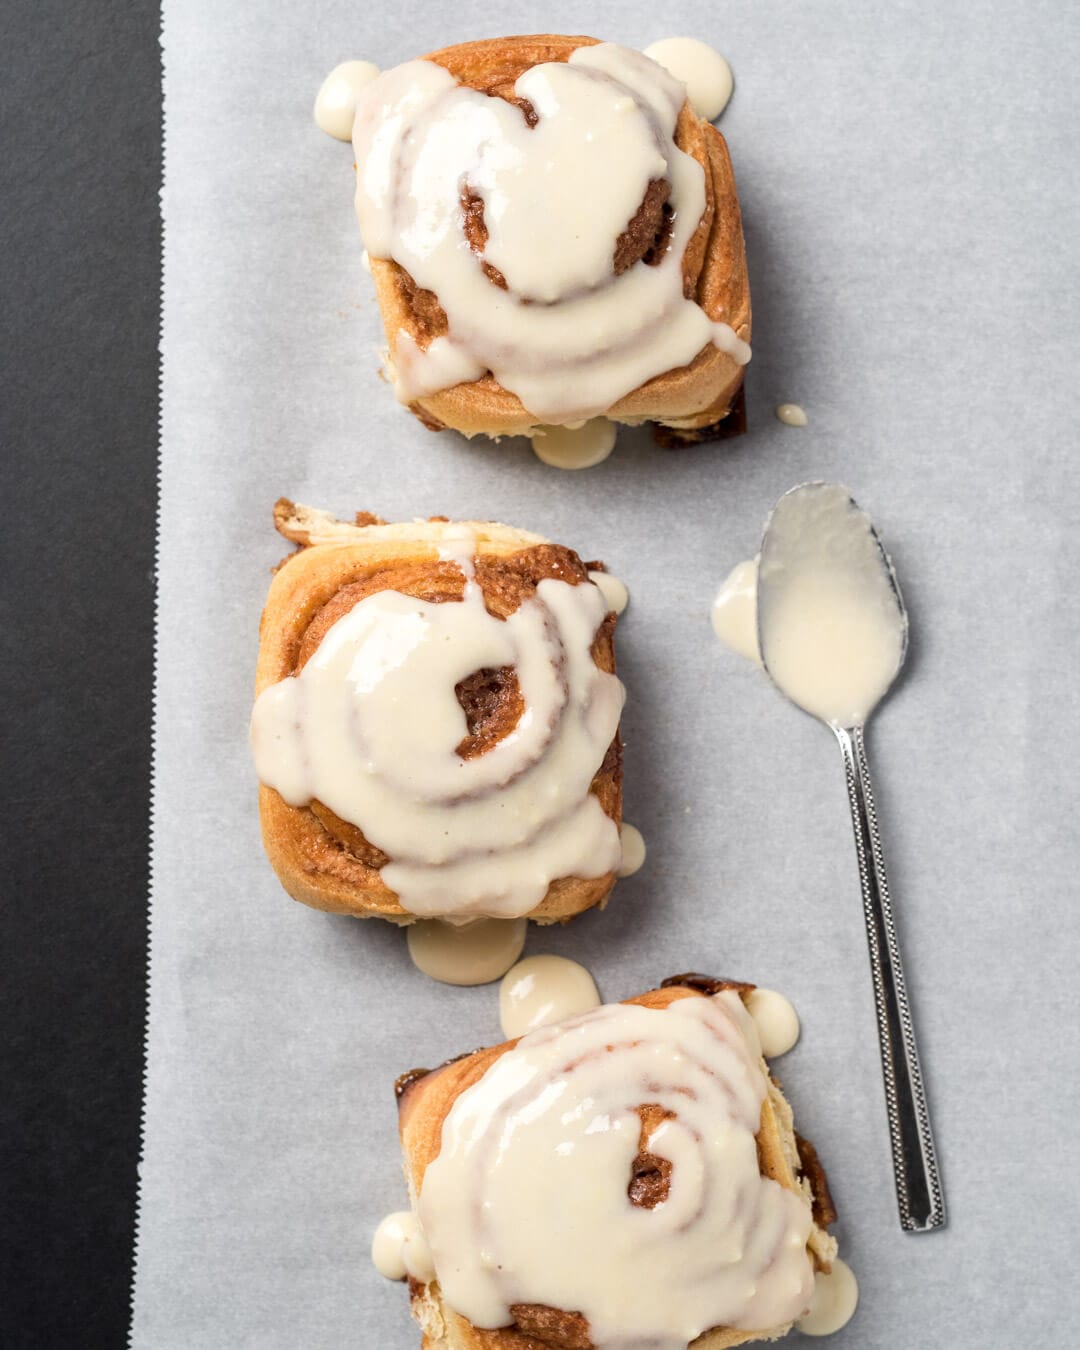
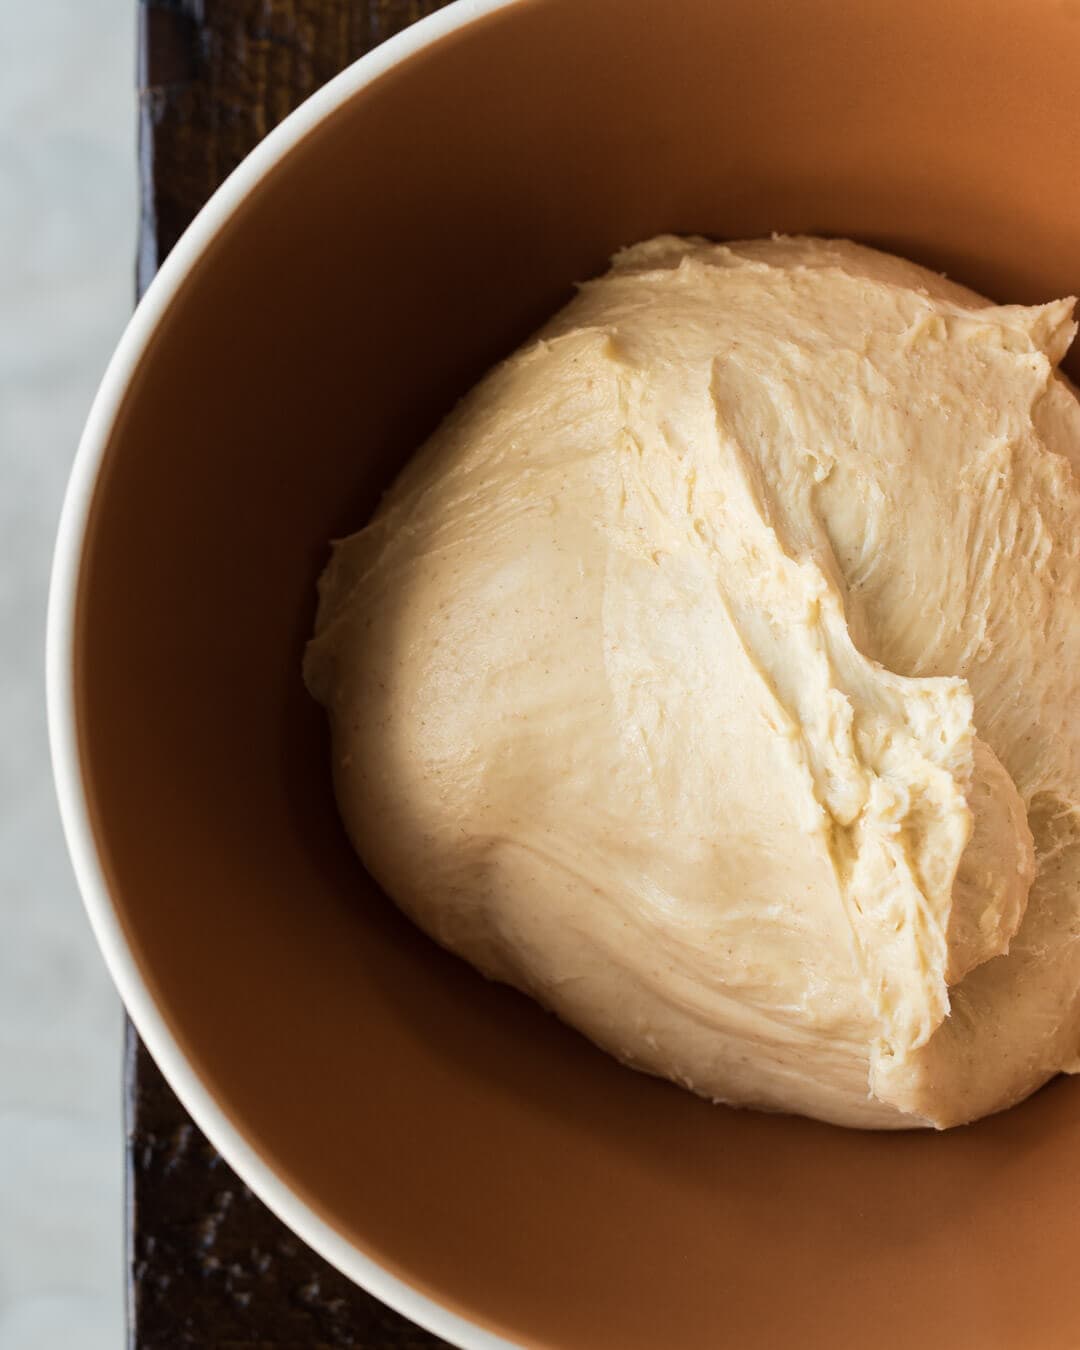
Brioche dough is the base for these sourdough cinnamon rolls, which is dough enriched with butter, sugar, and eggs. These ingredients make for an incredibly tender and mouth-melting crumb when added to a deep yellow dough. When pulled, these rolls shred apart almost like cotton candy, the only resistance provided by the melted brown sugar cinnamon near the bottom—they’re like a warm, gooey cloud of pure enjoyment. When presented with the opportunity, there’s nary a chance anyone will decline one of these on a plate.
These sourdough cinnamon rolls require a little extra effort, but once you get the hang of the process, it’s pretty straightforward—and, of course, totally worth it. The dough is also very versatile: you can adjust the mixing and baking schedule so they’re finished in a single day or spread out over three. The dough can be retarded in the refrigerator after bulk fermentation, shaping, and cutting, or both. I prefer a two-day process where I place the dough in the fridge after bulk fermentation. The next day I wake and get to work on the rolls, and I bake them fresh for breakfast (or brunch if late to rise).
Brown Sugar Cinnamon Spread
This spread has the right level of delicate sweetness and a comforting bite from the cinnamon. The mixture is more crunchy and thick than it is spreadable, which is my preference. When baked, swaths of the spread caramelize and other smaller areas stay crunchy, providing a subtle contrast of textures.
- 215g light brown sugar
- 40g all-purpose flour
- 2 tablespoons unsalted butter, melted
- 2 teaspoons cinnamon
- 1/4 teaspoon salt
Mix or whisk everything together in a bowl, so there are only a few clumps remaining. Keep covered until used (brown sugar dries out very fast).
Cream Cheese Glaze
The cream cheese added not only makes this glaze extremely velvety, but it also pairs wonderfully with vanilla. I’ve also tested various iterations, swapping out the cream cheese for maple syrup, adding orange blossom water, a dash or two of Angostura bitters… The options are endless.
- 114g cream cheese softened to room temp (4 oz, half a standard block)
- 62g (1/2 cup) powdered sugar
- 37g (3 tablespoons) whole milk
- 1 teaspoon vanilla extract
Add everything to a mixer fitted with the whisk attachment and whisk until creamy and soft. It’s best and easiest to use a mixer or handheld beater for this, but a handheld whisk will work if you want a workout. The mixer will ensure there are no stray clumps of cream cheese lingering about.
Sourdough Cinnamon Roll Recipe
It’s best to make this brioche-style dough in a stand mixer (like the one I have) due to the dough’s soft nature and relatively long mix time required. Most of the strength in this dough will be developed upfront at mix time with just a few more stretch and folds during the bulk to finish it off.
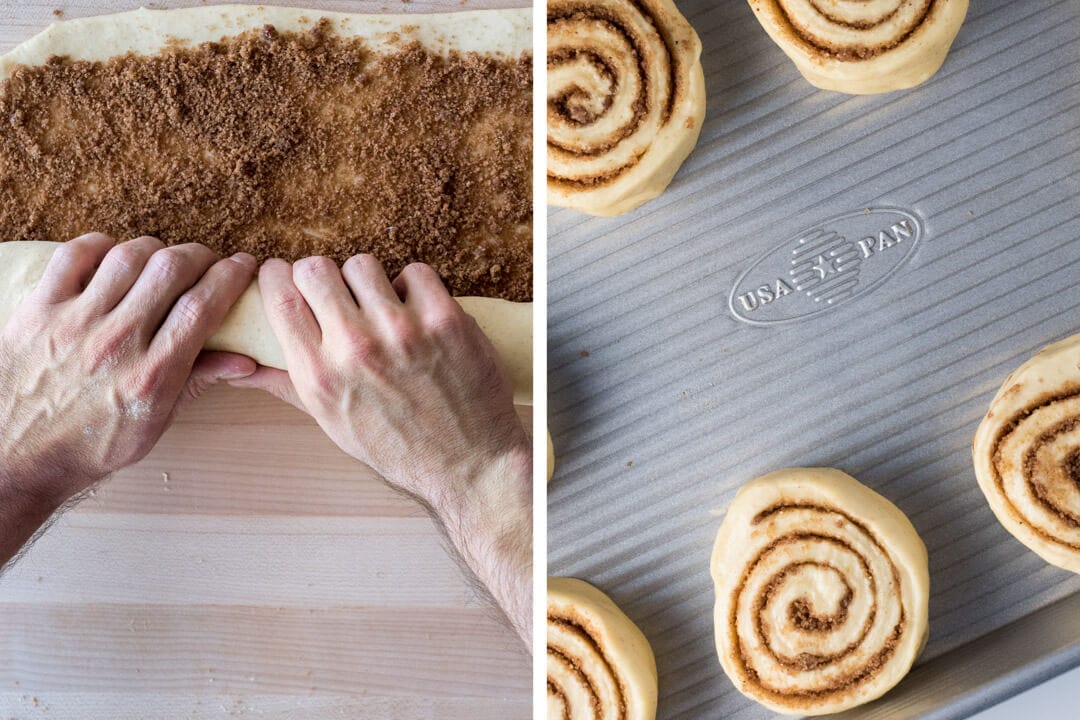
This recipe yields 12 sourdough cinnamon rolls but you can halve all the ingredients to make half a dozen (in this case, you’ll want to use a smaller pan). I’m using a USA Pan 9” x 13” rectangular pan to hold these 12 buns and because the pan is coated in silicone there’s no need for any parchment paper (it’s magic, really). If you don’t have this pan I’d recommend using parchment under the buns for easy removal.
You will need a rolling pin for this recipe (in a pinch, you could use an empty wine bottle). I am very partial to my rolling pin: it’s a non-tapered solid block of maple wood that’s functional, used in countless tasks around my kitchen, and just a beautiful tool (and made in the U.S.A.).
Sourdough Starter Notes
I know when some read this recipe title and see the word “sourdough,” thoughts of sharp sourdough cinnamon rolls might enter the mind, but this is definitely not the case. I maintain my sourdough starter with frequent refreshments to ensure acidity is kept low. Additionally, when I call for a mature starter in the ingredient list, “mature” means when my starter is just about to its peak height and has not yet fallen. If the starter is used at a state that is overly ripe (perhaps it’s fallen and has been that way for an hour or more) then the resulting rolls might be a touch sourer.
If you’re interested in how I maintain my sourdough starter head over to my Sourdough Starter Maintenance Routine post for in-depth details.
Dough Formula
The target final dough temperature (FDT) for this dough is 70-73°F (21-22°C).
| Total Dough Weight | 1,250 grams |
| Pre-fermented Flour | 42.00% |
| Yield | One dozen rolls |
| Weight | Ingredient | Baker’s Percentage |
|---|---|---|
| 477g | All-purpose or bread flour (King Arthur All-Purpose Flour) | 100.00% |
| 133g | Whole milk, cold from the fridge | 28.00% |
| 191g | Unsalted butter (Kerrygold) | 40.00% |
| 191g | Whole eggs (about 4 large) | 40.00% |
| 48g | Fine white sugar (caster sugar) | 10.00% |
| 11g | Salt | 2.3% |
| 200g | Ripe, 100% hydration liquid sourdough starter | 42.00% |
Method
1. Mix – 9:00 a.m.
First, take out the butter and cut it into 1/4” to 1/2” squares; let them sit in a bowl to warm to room temperature while gathering and mixing other ingredients.
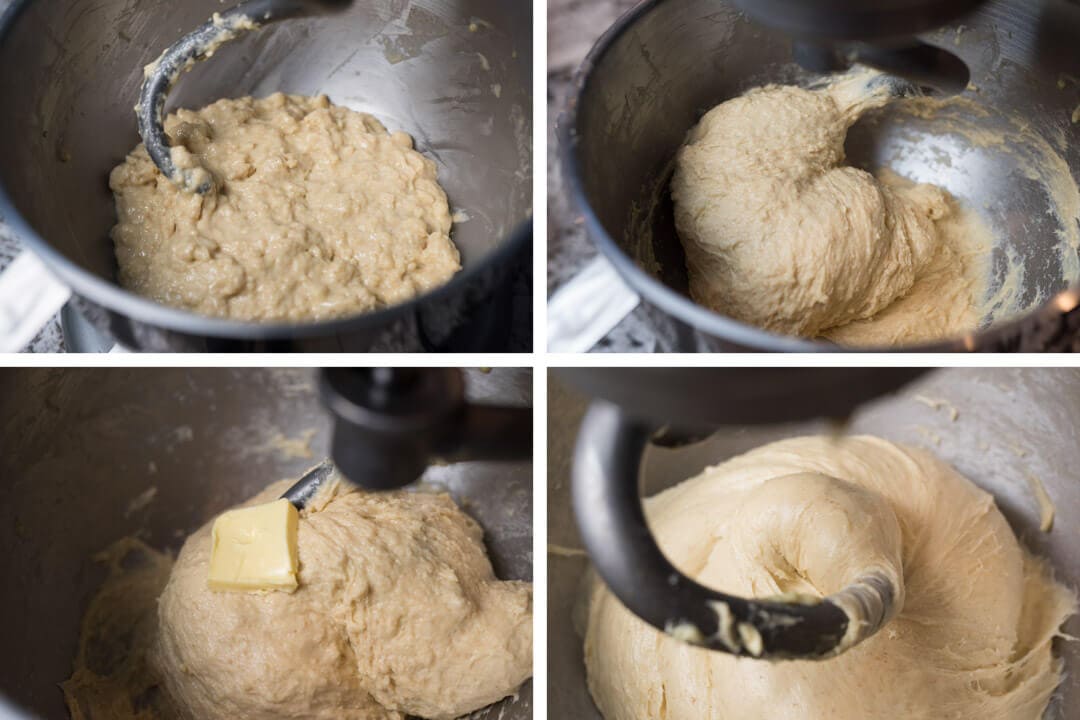
Mixing will occur in three stages (clockwise starting in the upper-left in the image above, the last image is the final dough). The first stage involves the initial incorporation of all the ingredients, followed by a 10-minute rest. The second stage will be strengthening the gluten in the dough before adding butter. The third and final stage will be adding the room-temperature butter blocks to the strengthened dough.
Initial Incorporation
In a medium bowl, add the cold eggs, cold whole milk, sugar, and mature sourdough starter. Whisk together until incorporated.
Add the flour and salt to the bowl of a stand mixer fitted with the hook attachment. Set the mixer to low (level “1” on my machine, one notch above “STIR”), and slowly start to pour the liquid into the mixer bowl. Add a little at a time over the course of 3 minutes. Once finished the dough will look very wet and have clumps, let it rest for 10 minutes before further strengthening.
Strengthen Dough
After the 10-minute rest, turn the mixer to medium speed (number “4” on my machine) and mix for about 5-6 minutes until the dough starts to come together and all clumps have disappeared. The dough should start to pull away from the sides of the bowl, but it will not completely detach from the bottom. If the dough doesn’t want to come together and it’s overly wet, add a little flour, a tablespoon at a time, until it comes together.
Incorporate Butter
Butter temperature is important. It should be slightly cold to the touch but easily pliable. If the butter is too cold, it won’t incorporate easily into the dough; if it’s too warm (almost melted), it will result in a greasy dough. Don’t fret if the temperature is off. Pop the bowl with butter in the microwave for 10 seconds to warm slowly, or place it into the freezer for a minute or two to firm up. Adjust as necessary.
Add the butter to the dough one square at a time, waiting until the previous block is absorbed before adding the next. It is easiest to place it right where the hook meets the dough. Continue until all the butter is added and there are no visible butter patches; this may take 8-10 minutes at a low to medium mix speed.
2. Bulk Fermentation – 9:30 a.m. to 11:30 a.m.
Transfer the mixed dough to a bulk container and let it ferment for 2 hours at 75ºF (23°C). Just as when baking sourdough bread, perform 3 to 4 sets of stretch and folds during the bulk fermentation stage, spaced 30 minutes apart. To perform a set, grab one side of the dough, stretch it upward, and fold it over to the other side. Fold once at each side, North, South, East, and West. If the dough is firm after the third set, skip the last set but let the dough rest for a full 2 hours.
3. Chill Dough – 11:30 a.m. to 2:00 p.m.
Place the covered bulk container into the fridge for at least 2 hours (I like 3-4 hours).
Overnight option: The timing is very flexible at this point. Once the dough is covered and refrigerated, it can rest overnight, and the rest of the process can be completed in the morning for fresh rolls early in the day or for brunch.
Roll the dough out to a rectangle only when it’s completely chilled.
The dough needs to be completely cold and firm to the touch before rolling out; do not skip this step.
4. Shape Rolls – 2:00 p.m.
Before rolling out the dough, make the Brown Sugar Cinnamon mixture (see recipe, above).
Flour your work surface. Then, remove the chilled dough from the fridge and turn it out onto the floured surface. Flour the top of the dough and the rolling pin, and begin rolling the dough. Roll it out to an 11” x 21” rectangle that is oriented so one of the long sides is near your body and the squat ends are to the sides. Use a bench knife and dust the surface with flour wherever the dough sticks.
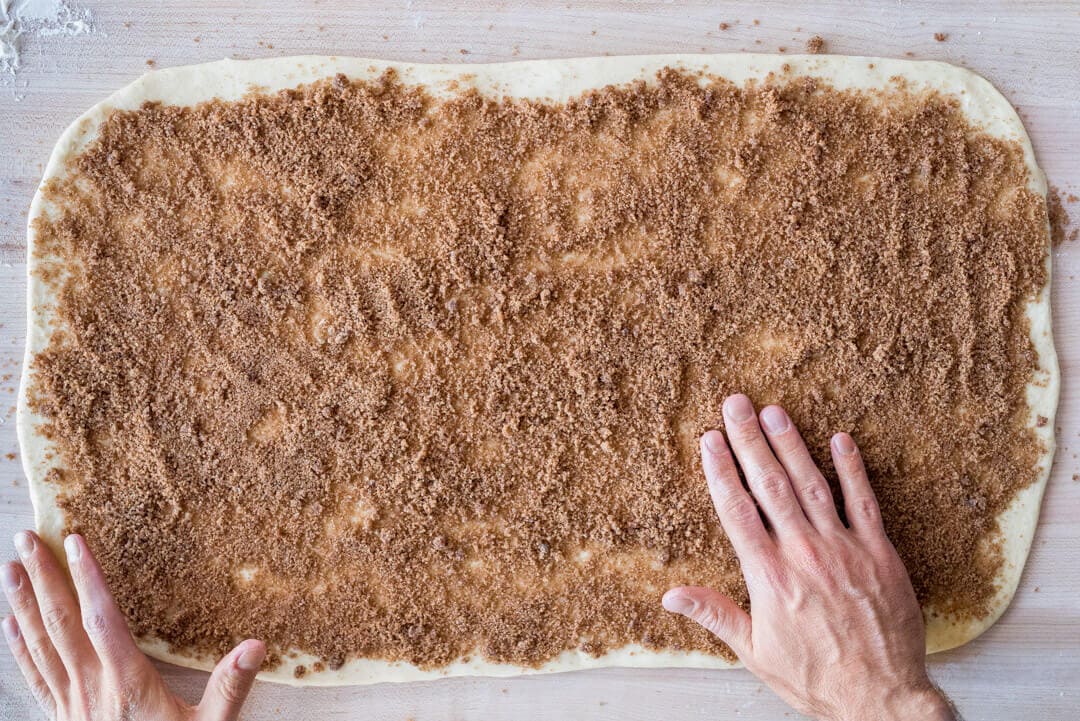
Try to keep your warm hands off the dough as much as possible to avoid heating it. Sprinkle the dry Brown Sugar Cinnamon mixture evenly over the dough, but leave a small margin at the very top bare. When the dough is rolled up, that small margin will help seal the roll.
Starting at the long end nearest you, fold up a small portion of the dough all the way across. Then, roll the dough one revolution at a time, starting at the left side and moving to the right. During the first few rolls, it’s important to roll things up sufficiently tight to make cutting and transferring easier later.
Continue rolling from left to right, one revolution at a time, until the dough is completely rolled up into a “log.” Lay a ruler and using a sharp knife or bench scraper, cut the dough every 1 3/4” inches. You can go smaller if you want squatter rolls or up to 2” for taller rolls (if you cut smaller, you’ll have more rolls and taller you’ll have fewer).
Transfer the cut discs to a baking pan with some space around each one.
A few tips to help with this step:
- Place the rolling pin in the freezer while the dough is chilling to help keep it cold
- If the dough warms up excessively while rolling out, transfer to a baking sheet and place in the fridge for 15 minutes to cool
- If the dough is very pliable and warm after it’s completely rolled up, place the entire rolled “log” into the fridge on a baking sheet before cutting
7. Proof – 2:30 p.m.
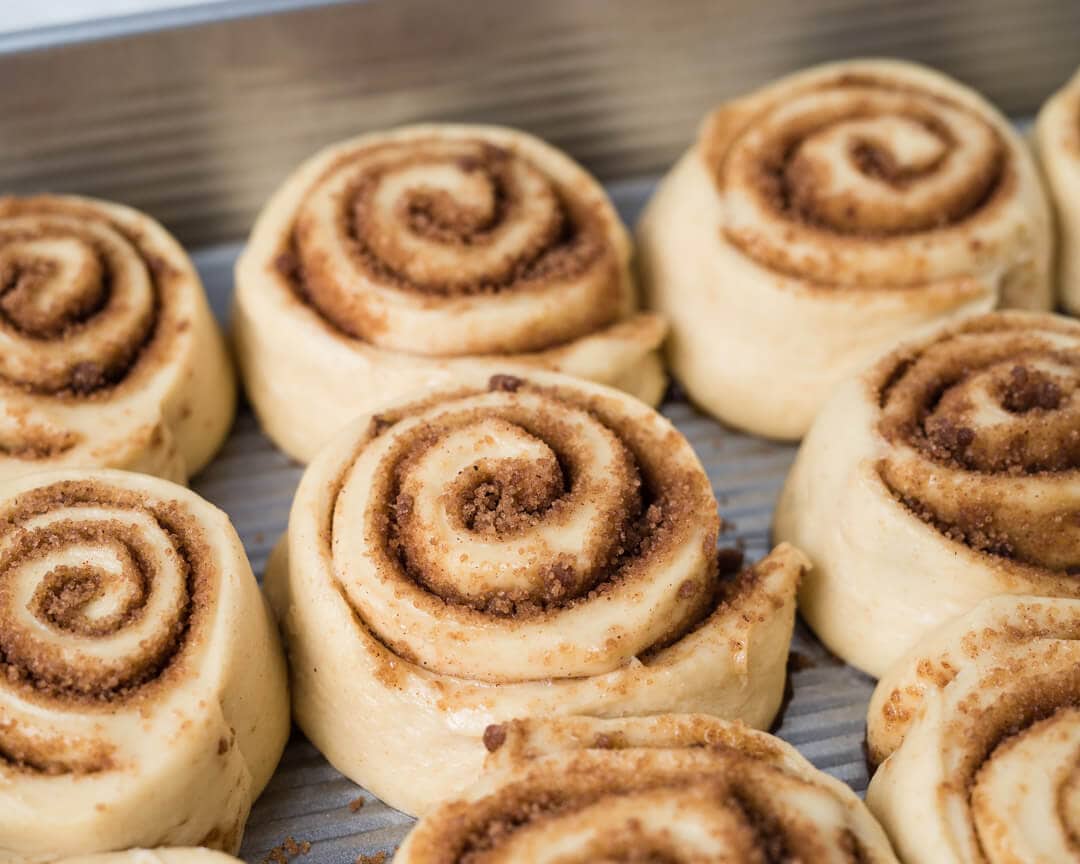
Place the baking pan with cut dough somewhere warm, around 77°F (25°C), to let proof for 2 hours. During proof, the rolls will relax out and start to puff up, eventually, they may touch each other but it depends on how much space you have between rolls.
Don’t be alarmed if you see any sugary liquid leaking out of the rolls, it’s totally normal. Additionally, if any of the layers develop gaps between them it only means when they rise in the oven they’ll be a little more interesting with pieces jutting up and out—beautiful.
8. Bake – Preheat oven at 4:00 p.m., Bake at 4:40 p.m.
Preheat oven to 400°F (200°C) during the last 30 minutes of proof. Place the baking pan in the oven and bake for 20-25 minutes until the rolls are well colored.

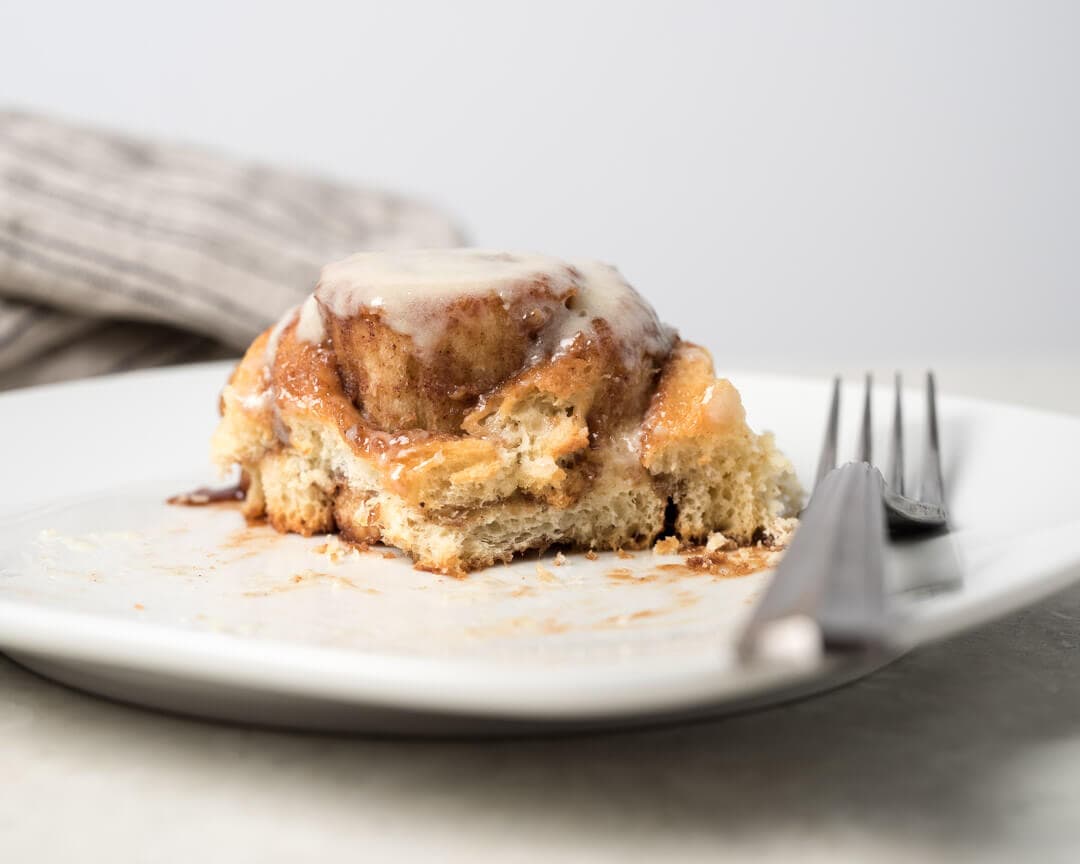
Spread the glaze over the rolls once cooled. These sourdough cinnamon rolls stay great for a few days in the fridge, and I always reheat them (without glaze) in the oven or microwave to warm back up before eating. They fill the kitchen with that intoxicating aroma once again and always seem to come out as if they were freshly baked.
Conclusion
Whatever the distraction, whatever the work being done—even if a bath is drawn—the kitchen’s aroma when these are baked is sure to draw out all. It reminds me of those old cartoons where they put out a piece of cheese, and you see everyone floating toward it in a trance—just like that.
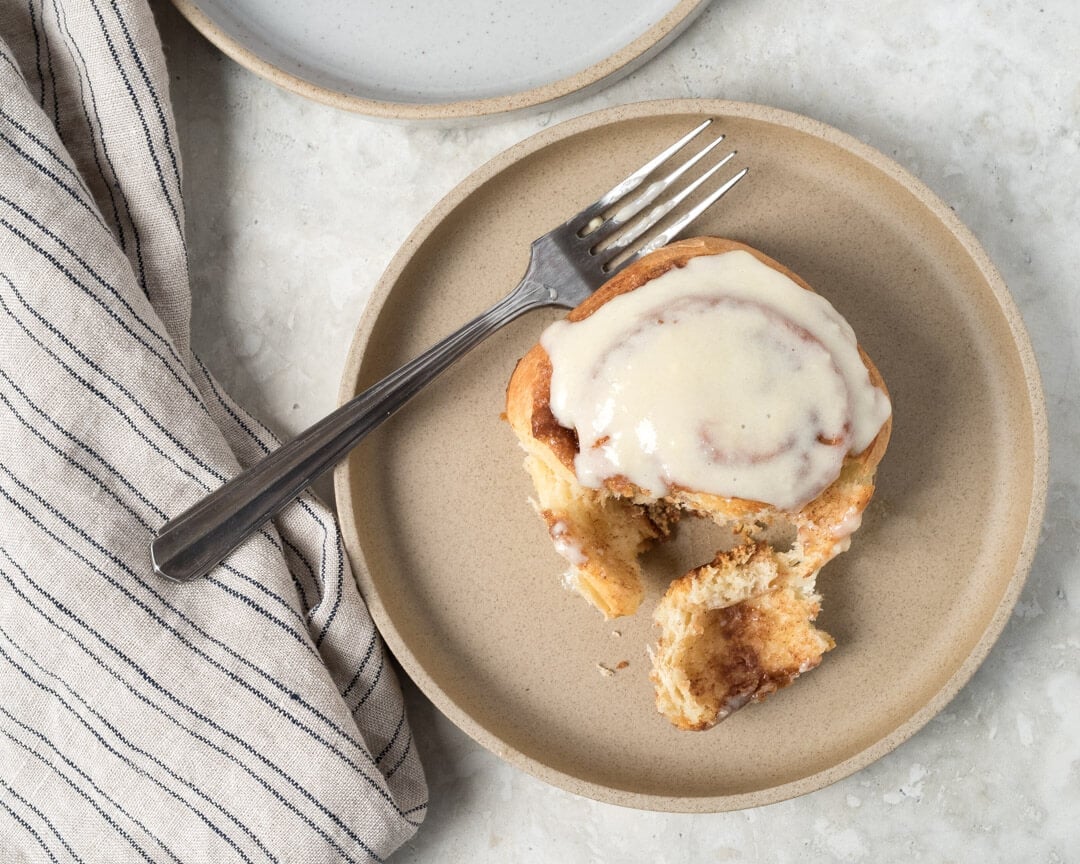
These sourdough cinnamon rolls are addicting. The brioche interior is extremely tender and silky, interrupted only by warm, gooey brown sugar cinnamon. As I alluded to earlier, the cream cheese glaze is tremendous, but the possibilities here are endless, each change bringing on a whole new dimension to these sourdough cinnamon rolls.
Well, I know I’ll be making these sourdough cinnamon rolls for Christmas morning! But now that the word is out and everyone knows what I’m baking every other weekend after that I might be expecting a few more surprise visits from friends and family. I’m completely fine with it, though, because I’m happy to share with any and all who stop by—it may just mean I sneak off with one or two before they do. Buon appetito!
Now that you have experience working with enriched dough, the next step is my naturally leavened bomboloni (doughnut) recipe! They’re based on a similar dough with just a few changes—they’re absolutely incredible. Or, if you’re looking for more rolls, have a look at my ultra-tender sourdough cardamom rolls for a different take.
Print
Sourdough Cinnamon Rolls Recipe
- Prep Time: 7 hours 30 minutes
- Cook Time: 25 minutes
- Total Time: 7 hours 55 minutes
- Yield: 12 cinnamon rolls
- Cuisine: American
Description
These sourdough cinnamon rolls are addicting. The brioche dough is extremely tender and silky, interrupted only by warm, gooey brown sugar cinnamon. If you’re looking for the perfect weekend treat, these cinnamon rolls are the ticket.
Ingredients
Dough
- 477g all-purpose or bread flour
- 133g milk, whole
- 191g butter, unsalted
- 191g eggs (about 4 large)
- 48g sugar, caster
- 11g salt
- 200g sourdough starter
Filling
- 215g light brown sugar
- 40g all-purpose flour
- 2 tablespoons butter, unsalted and melted
- 2 teaspoons cinnamon, ground
- 1/4 teaspoon salt
Cream Cheese Glaze
- 114g (4oz, half a block) cream cheese softened to room temperature
- 62g powdered sugar
- 37g milk, whole
- 1 teaspoon vanilla extract
Instructions
- Mix (9:00 a.m.)
Cut the butter into 1/4″ pats and let warm to room temperature while mixing the rest of the ingredients. In the bowl of a stand mixer fitted with the dough hook attachment, add the eggs, milk, sugar, and sourdough starter. Whisk together until incorporated. Add the flour and salt and mix on speed 1 for 3 minutes until incorporated. Let the dough rest for 10 minutes. After the 10-minute rest turn the mixer to speed 2 and mix for about 5-6 minutes until the dough starts to come together and all clumps have disappeared. The dough should start to pull from the sides of the bowl but it will not completely remove from the bottom. If the dough just doesn’t want to come together and it’s overly wet add a little flour, a tablespoon at a time until it comes together. With the mixer set to speed 1, add the butter one pat at a time, waiting to add each until the previous is absorbed. Continue until all the butter is added and the dough is shiny and smooth, this could take around 8-10 minutes. - Bulk fermentation (9:30 a.m. to 11:30 a.m.)
Transfer the mixed dough to a bulk container and let ferment for 2 hours at 75ºF (23°C). Perform 3 to 4 sets of stretch and folds at 30-minute intervals. - Chill dough (11:30 a.m. to 2:00 p.m.)
Place the covered bulk fermentation container into the fridge for at least 2 hours to thoroughly chill. - Shape rolls (2:00 p.m.)
First, make the filling. In a bowl mix together the filling ingredients and set aside. Next, take out your dough from the fridge, lightly flour your work surface and the dough, and roll out to an 11×21″ rectangle with a long side closest to your body. Spread the filling evenly over the dough. roll the dough up away from you into a tight log. Cut the log into pieces every 1 3/4″. Transfer the cut pieces to a baking pan with space around each one. - Proof (2:30 p.m. to 4:30 p.m.)
Cover the pan and proof somewhere warm, around 77°F (25°C), for 2 to 3 hours. The dough will relax and puff up during this time. They’re ready to bake when the dough feels very soft and light—give the dough additional time to proof if necessary. - Bake (4:30 p.m.)
Preheat your oven to 400°F (200°C). Slide the rolls into the oven once preheated and bake for 20-25 minutes. Spread the glaze over the rolls once cooled.
Notes
These sourdough cinnamon rolls are best the day they’re made, but can be reheated the next day (without glaze) and then topped with freshly mixed glaze.
If you use this recipe, tag @maurizio on Instagram and use the hashtag #theperfectloaf so I can take a look! Thanks so much to USA Pan for sponsoring this sourdough post! As always, all opinions and thoughts here are my own.


673 Comments
Wow these are amazing. I ended up cold retard. A bit longer due to work schedule about 8-12 hr longer than should. Still good. I have made these several times and the centers of several during the bake poof up very high. When done I just push the center back into place. Is that expected? Also I use convection back 25 min. The centers are moist but the tops I think are a little too brown. Should I reduce the heat or the time so tops aren’t so dark? Thanks in advance.
Glad they turned out great, Robin! Yes, I would reduce the heat a bit and bake a little longer. The tops should be golden and firm, but in the little nooks and crannies they’ll still be a little pale.
Hi Maurizio, does the dough need to pass the window pane test at the end of the bulk (before being refrigerated)?
I would say it actually should be pretty well developed before bulk, before you work in the butter during mixing. I’ve never tested for a windowpane at the end of bulk, but yes, I’d imagine it would pass by that point!
Thanks! I tried the recipe (started the dough yesterday,
did overnight proofleft the dough in the fridge overnight after bulk, and baked this morning). They turned out very good!So glad to hear that, Alex! Thanks for coming back with your results. Enjoy!!
Hi Maurizio, apologies if this has been asked before – to make 6 rolls rather than 12 – is it a matter of simply halving all quantities? Thank you
Yes, halve everything! Check out my guide to baker’s percentages for an in-depth look. Happy baking, Andrew!
Thank you!
Hi ! Nice recipe. I am wondering, can we cut the log, and let it proof in the fridge overnight and only cook them next morning ?
Yes, that works! Just be sure they’re fully proofed in the morning, leaving them out to finish proofing as/if necessary.
Hi! I’ve loved using your recipes and learning more about sourdough. I’m wondering if I can make these all the way to the stage right before baking but then keep them in the fridge overnight after they have been cut and proofed? I know the overnight option before cutting them is possible but since they still need 2 hours after that I’m hoping for something I can wake up and pop in the oven.
Yes, you can certainly do that, Hannah!
Hi Maurizio. I found your recipes last week (what a night, was glued to the screen until 4 am!), and having a ball since. I wanted something savoury, so used this recipe with 1/2 the amount of sugar and added salt and pepper, a heaped teaspoon of grainy mustard and a couple of pinches of garlic powder at the bulk stage (before adding butter), and when at the rectangle shaping (stage 4) stage, gave a thin coat of a good chutney, scattered lightly sauteed onions, cheese, finely sliced shaved ham and rolled up and cut as per recipe. Delicious! I love experimenting like this, and am so glad to have found this brioche sourdough recipe as it’s so versatile made 3 times in 8 days! Thank you for your detailed explanations and recipes.
Glad to hear you like my site! Oh that sounds absolutely wonderful, I like the savory additions! If you’re up for another savory sourdough recipe, check out my savory pesto knots over at Food52—they are great, too! You could use this dough and knot it up like I do in that recipe 🙂 Have fun!
Hi Maurizio! Thank you for all your recipes, I’ve been enjoying my sourdough journey. I wanted to give the rolls a try, and followed everything exactly how it is until bulk fermentation. My dough is just ‘too wet’, I tried to do stretch and folds, but it’s just so so wet. I measured all the ingredients on a scale, so no mistakes there, I used all purpose flour. What do you think went wrong?
It might be your flour isn’t able to take on as much liquid… You could try refrigerating the dough in bulk, then the next morning take it out and shape it into a loaf and bake it in a tin. It’ll be delicious, almost like a brioche loaf!
Next time, try reducing the liquid in the recipe to suit your flour.
Hi Maurizio! Thanks for this great recipe:) I was wondering if it’s possible to half this recipe or will the mass be to small for a good mixing and bulk fermentation?
Thank you!
I think it’ll work. The other option would be to make the full batch and then freeze half once they’re baked! They reheat really well 🙂
Hi Maurizio, many thanks for all the amazing recipes in your website, the explanations hit the sweet spot with enough info on the science behind it and the straightforward instructions; I have tried most of those for beginners and I’ve gotten great results! 🙂
Just wanted to ask how you would do the initial stages, incorporating all the ingredients, if you hadn’t a mixer – my kitchen is rather small and I don’t own one. Any advice for those like me that only have bare hands and elbow grease???
Many thanks again.
You’re very welcome, Gigi! I’d still do a similar approach of strengthening the dough by hand (the slap and fold technique is one way), then once the dough is strong enough, work in the room temp butter by massaging it into the dough. It’ll be sticky and perhaps a little greasy, but keep mixing until it all come together. It will smooth and strengthen further during bulk fermentation as well.
Hi, Maurizio. Thank you for coming up with this fabulous recipe. It worked out perfectly 😉
Now my question is… would I be able to use Strong Bread flour (type 60) instead of all-purpose? I used up all my all-purpose flour to make these yesterday and the kids are asking for another batch 🙂
Super glad to hear that! Yea, for this, bread flour will work just fine. Happy baking!
Duh! You say “or bread flour” in the recipe. I don’t feel so smart right now. >facepalm<
And I’m happy to report it worked with Bread flour. However, it worked better with All-purpose. It was fluffier with all-purpose.
I’ve made this recipe multiple times and it is universally adored. My twist is to increase the cinnamon to 1 tbsp and add the finely grated zest of an orange to the filling. The orange-cinnamon combination is fantastic. To keep with the orange theme, I replace the vanilla in the glaze with orange blossom water.
The biggest and only complaint I’ve received is that now no one can go back to Cinnabon or store bought.
That’s one of the best complaints ever! Glad to hear these have worked so well for you 🙂 I like those changes. I’ve played with adding orange zest to this and my babka—always a winner!
I used this recipe halved (I can only eat so much sugar before going crazy). My twist was using ceylon cinnamon and adding coffee in the filling (a teaspoon or so of lightly roasted brazilian coffee). I also topped with a coffee butterscotch. I infused the same coffee with heavy cream in a 1:10 ratio by bringing the cream to a boil with the ground coffee twice. Then I passed the mixture through a shieve. The butterscotch was 1 part sugar, 1 part infused cream, 1/3 parts butter. The result is slightly more bitter
Whoa, that sounds amazing, Kostas! Really love those changes, would have never thought to use butterscotch…
What would be the longest amount Of time I could leave these in the fridge?
I would only do overnight!
If I’m proving overnight, should I do it during step 3, or after shaping the dough?
I like to do it with the dough in bulk, that way it’s easy to roll out and fill (the dough will be cold).
Thanks for this detailed recipe! Any recommendations to keep the filling from seeping out into the pan? I’ve made these the last two weekends – second batch was much better than the first – but in both instances, most of the filling has ended up on the pan during baking.
You could try mixing up the filling to be a little more dry and firm, adding a little flour might help. Proofing at too warm of a temp will cause it to leak a little more as well–I know, it’s a balance there because we do want fermentation strong!
Thanks! I’ve tried a few different methods in the last few weeks.
In one instance, I whipped butter and made more of a cream that I piped onto the rolled out dough and then spread with a spatula. Great taste! Only trouble was it took a little too long to get onto the dough and everything got too warm.
Trying again tomorrow!
Love that idea!!
Just take the filling that leaked out when it cools put it on top and gently warm it in the microwave and melts right down into the role really good
I have been making cinnamon rolls (yeast) for years. They are a HUGE hit. Since working with sourdough this year, I have been looking for a SDCR recipe. This one is PHENOMENAL!! By far, the best CR recipe EVER!!! I thank you…and my family thanks you! ❤️
So glad to hear that, Karen! Thanks for the feedback 🙂
Hi Maurizio! I’m new to working with enriched dough recipes and they aren’t quite working out right. I’ve have success at your regular sourdough recipes. With this recipe, the cinnamon rolls end up slightly doughy in the interior. I am using a mature starter that is close to peak and baking at 400f for 30 minutes. What could I be doing wrong? Many thanks
My guess is under proofed dough! These take a little longer to get going, be sure to really push the proof!
It’s more about the texture with these. Look for the dough to be very, very soft, almost like a marshmallow when you poke at it, no dense spots or resistance. You’ll definitely see puffing and some rise, but I like to go more by feel.
These are my favourite! I just used the dough hook on my little hand mixer- it took a bit longer but worked well. They came out beautifully golden- crunchy on the outside and soft on the inside. I used treacle sugar instead of brown sugar for the filling which made it over caramelize on the bottom (oops), but was delicious regardless. Thanks from South Africa 🙂
Happy to hear they turned out well, Destiny! Enjoy 🙂
Have you tried converting this recipe to use a tangzhong? According to KA when coverting to tangzhong you want a 75% hydration, which mean if this is true it would nearly triple the hydration on this recipe. That just seems like a lot. Wanted to hear your thoughts and/or experience. Thanks.
At the end of last year I did make a dough similar to this but with tangzhong/yudane: my cardamom rolls. They’re fantastic! Yes, with that dough I dropped the enrichment level as the pre-cooked flour brings quite a bit of tenderness without the need for high milk/water/eggs.
Loved this recipe @maurizioleo:disqus ! Dough was tender and the flavors were on point, especially the cream cheese glaze. My only issue was that my filling leaked out and pooled around the bottom, eventually resulting in a stiff caramel toffee consistency. I did not have the proper pan, so baked on a standard half sheet lined with parchment. Any help on how to avoid that?
Glad to hear it turned out well! Some leakage is to be expected, but if it was excessive, you could try rolling the dough out thinner so there’s less filling per “layer” or you could mix up the filling so it’s more stiff and less liquid-y.
Thanks @maurizioleo:disqus . My suspicion is the thickness of the dough. I halved the recipe so the dimensions might have been off and left it a little bit too thick. The mixture was perfectly crumbly, just ended up pooling and caramelizing into the thick toffee like I described. Appreciate your response!
Any advice on how to make these without a stand mixer? I just spent 30 minutes kneading by hand with a bench scraper to incorporate the butter.
That’s the way to do it. I’d likely slap/fold the dough significantly until very strong, before adding the butter. You want that dough really strong and firm so it’s easier to work in the butter. That said, it’s still going to be more work than a typical bread dough!
This is a god-tier cinnamon bun dough recipe.Thank you so much for sharing!
Thanks for the comments, Megan! Huge praise 🙂 Enjoy!
Hi Maurizio, now that I have done your pizza dough successfully these cinnamon rolls are my next try… I am currently mixing the dough and working on my timeline for these. I have been trying to mix things during the week when my little guy is at school. It is easier for me to concentrate on things like this when I have this time. My question is I am wanting to make these on Saturday morning and I am doing my dough today, Thursday. Once they bulk fermentation and chill and I roll them out and cut. Is it possible to refrigerate the rolls at this point until Saturday morning so they are ready to bake as soon as we get up (so they will be in fridge tonight and tomorrow)? If so should I cover them (airtight)?
Thank you so much
My apologies for asking this question. I didn’t scroll far enough down in the comments to see you already responded to a similar question. Before finding the answer below, I did my second proof last night and then put them in fridge we will see how that goes.
No problem, Michelle! I hope they turned out awesome (and I can totally understand scheduling around a little one at home!).
Hi Maurizio! I love your website! I’ve made many of your breads but I am trying this recipe for the first time. Is it OK to use sourdough discard starter that I have had in the fridge for a few days? Or do I need a ripe fully fed starter at its peak? Thank you
I don’t know what he’ll say, but I use the same starter that I feed / use once a week and store in the fridge. I take it out of the fridge, feed it, and once it’s ready I use it in this recipe and it turns out great. My favorite cinnamon roll recipe for sure!
Thank you! I did exactly what you said and they turned out perfectly.
I just baked these and although I made a mistake at the beginning, resulting in a very slack dough when rolling and longer 2nd proof, the texture is amazing. Soft, fluffy, light – unbelievable. However, I would like to resolve some things to improve the next time around. First of all, I read all the reviews, but clearly didn’t read the instructions clearly enough. Instead of adding the liquid ingredients to the flour at the beginning, I had the liquid ingredients in the mixer bowl, and added the flour all at once. I think as a result the dough wasn’t coming together properly, even after adding a couple of tablespoons of flour. Then because I was concerned about overworking the dough, I went ahead and started adding the butter, but I don’t think the dough was strengthened enough. As a result the dough was very soft, and not really pulling away from the bowl as I thought it should (like when I make brioche). I hoped it might strengthen during the bulk fermentation which I did overnight, but alas, it was very difficult to roll neatly. My rolls were a bit sloppy…I therefore needed to proof after shaping for about 3.5-4 hours. The resulting texture is perfect as I mentioned, but the taste is a tad too sour for me. I love the tang but if you get a bite without much filling it is a little too sour. I love sourdough, and bake it every week for my family so its not an aversion to sourdough flavor. But for this treat, it was a bit too sour. Would this have been the result of the too long of bulk fermentation or the longer 2nd proof? I’m definitely going to bake this again, following that first step carefully, but what can I do to tone down the sour tang flavor just a bit? Perhaps less starter? As I mentioned my starter is pretty active, I feed it once a week, and keep it in the fridge, so its pretty fresh.
Hey, Tess. Yes, sounds like you needed to mix the dough longer before adding the butter in. I’d say mix until full development (like brioche) if you can.
For the sourness, they might have gone too long in proof. Also, be sure to use your sourdough starter before it’s very ripe and acidic, you want to keep that on the mild side. I would not use it directly from the fridge, either. Keep it out on the counter and fed at least once a day. Keep it out like this and use it after 2-4 days of regular feedings to keep the acidity low.
Thank you so much, Maurizio! I thought the same thing, that I didn’t strengthen the dough enough before adding the butter. As for the sourness, I’ll try that next time. I actually did feed my starter from the fridge and let it sit out for about 5-6 hours before using it, but I’ll feed it for a couple days this time at room temp to moderate the tang. But even this first time around, delicious and the light fluffy texture was absolutely amazing. I have read your recipes on KA Baking, but I do love this site so much now that I’ve discovered it! Thank you!
Happy to help, Tess!
Hello,
I’m thinking of adapting this recipe to make a king cake (tis the season!). My plan is to shape the rolled dough log in a ring, rather than slice the log into individual cinnamon rolls. Any advice on what might need to change in terms of oven temperature or baking time, to ensure the king cake gets cooked through all the way?
Thanks!
That should work just fine! Hard to say on the bake time… I’d bake until the interior temperature was 200F.