
With the Big Move finally coming to a close I can now return to baking full-on. There are still things to do, for sure, but at least now I have some time during the day to fold the dough, feed my sourdough starter, and bake in earnest. During the downtime between moves, I had the opportunity to bake for the family, but it wasn’t in my kitchen, with my tools and my timing. It’s a challenge to be heaved into unfamiliar territory and expect processes to run as they have before. Regardless, I adapted, and several bread bakes turned out great. It feels good to have a kitchen I know I can settle into for a while, and with a double oven. Finally, it is time to bake this seeded whole wheat sourdough bread.
Some call flax seeds one of the most powerful plant foods on the planet.
This seeded whole wheat sourdough recipe, while relatively straightforward, builds on my 95% whole wheat sourdough recipe with a few changes and with, of course, the integration of two different types of seeds. I’ve been eating raw flaxseeds for a good while now and have used them in everything from banana bread, my morning oats, protein, and fruit shakes and even sprinkled in my yogurt from time to time. They have a specific desirable nutty taste to them and, as research suggests, are quite good for you. Sesame seeds, well, they taste good in and on bread, no doubt about that. I’d say even more so with this whole wheat bread, a combination I had yet to try until now.
Look at this spoiled dog, I mean really. I just had to share this, the light is sublime, and my two ladies lined up for just a perfect shot.

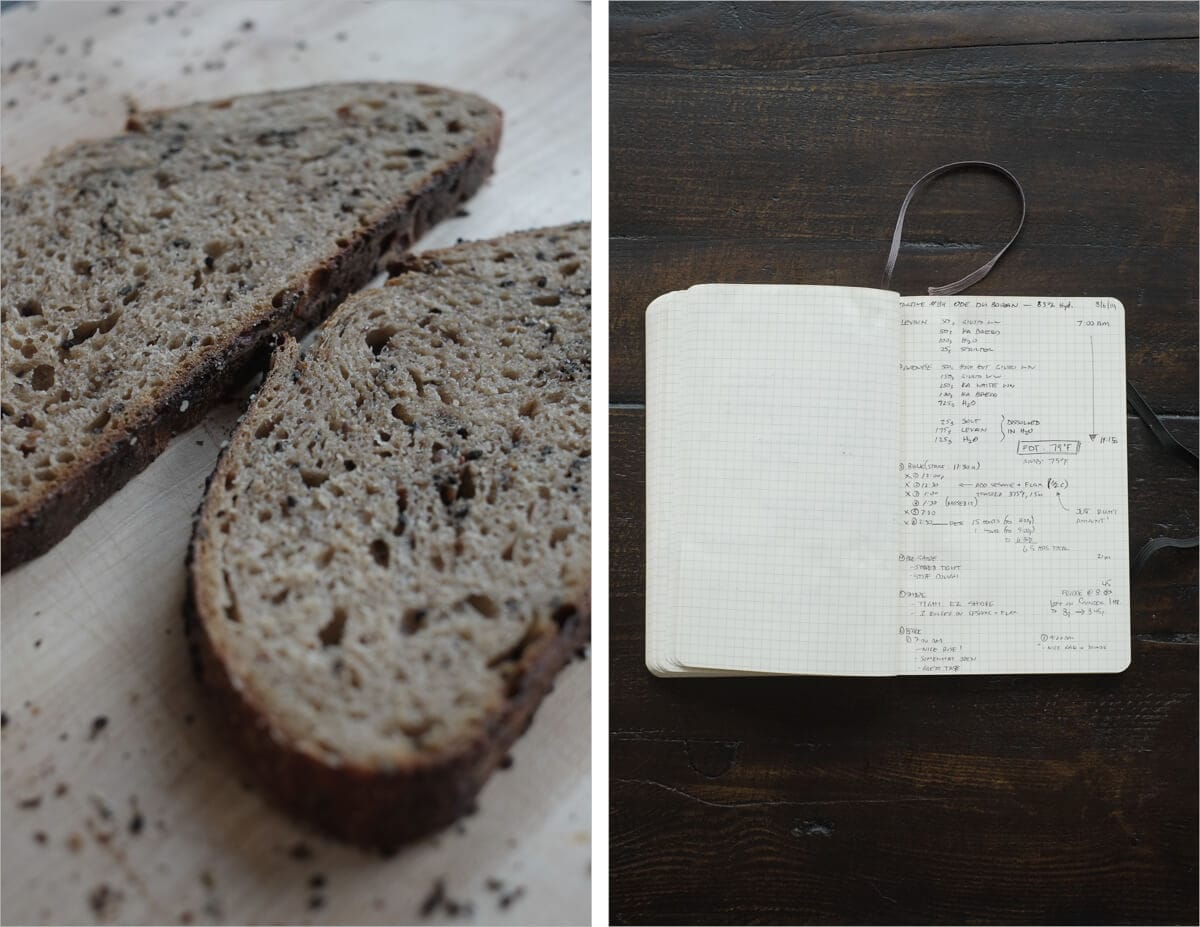
Prepare the young levain – 7:00 a.m.
I’ve come to utilize a young levain almost exclusively these days. Preparation is much more comfortable, the taste is very mild due to low acid content, and it leavens my dough just as strong as an overnight build.
Chad Robertson talks about this young levain in more detail in his book Tartine No. 3, and that was my impetus for experimenting with just how quickly I can use a levain build after mixing. Of course, this will invariably depend on your ambient temperature, flour type, and the vigor of your starter, but for me, it’s been pretty consistent this summer at around 5 hours ferment time. The weather has been incredibly hot here recently, and this levain build was ready in just over 4 hours. A little shorter than usual.

Prepare the following right after you get up in the morning:
| Weight | Ingredient |
|---|---|
| 25g | Ripe sourdough starter |
| 50g | King Arthur whole wheat flour |
| 50g | King Arthur white bread flour |
| 100g | Water |
Keep it in a warm area in your kitchen for about 5 hours. Check on your levain from time to time, you want bubbles around the sides, some visible on the top, and if you peel back a little bit a slight smell of ripe fruit.
Run your morning errands, get a cappuccino, walk the dog, hit the gym, as you do. Come back in 4-6 hours, and we’ll get the seeds toasted.
Toast Seeds – 11:00 a.m.
You’ll want to place the following seed mixture into a baking pan and bake in the oven for around 15 minutes, tossing every 5 minutes or so. Be careful not to burn your sesame seeds! I might have gone 2-3 minutes too long on mine, and they take on a robust taste when overcooked.
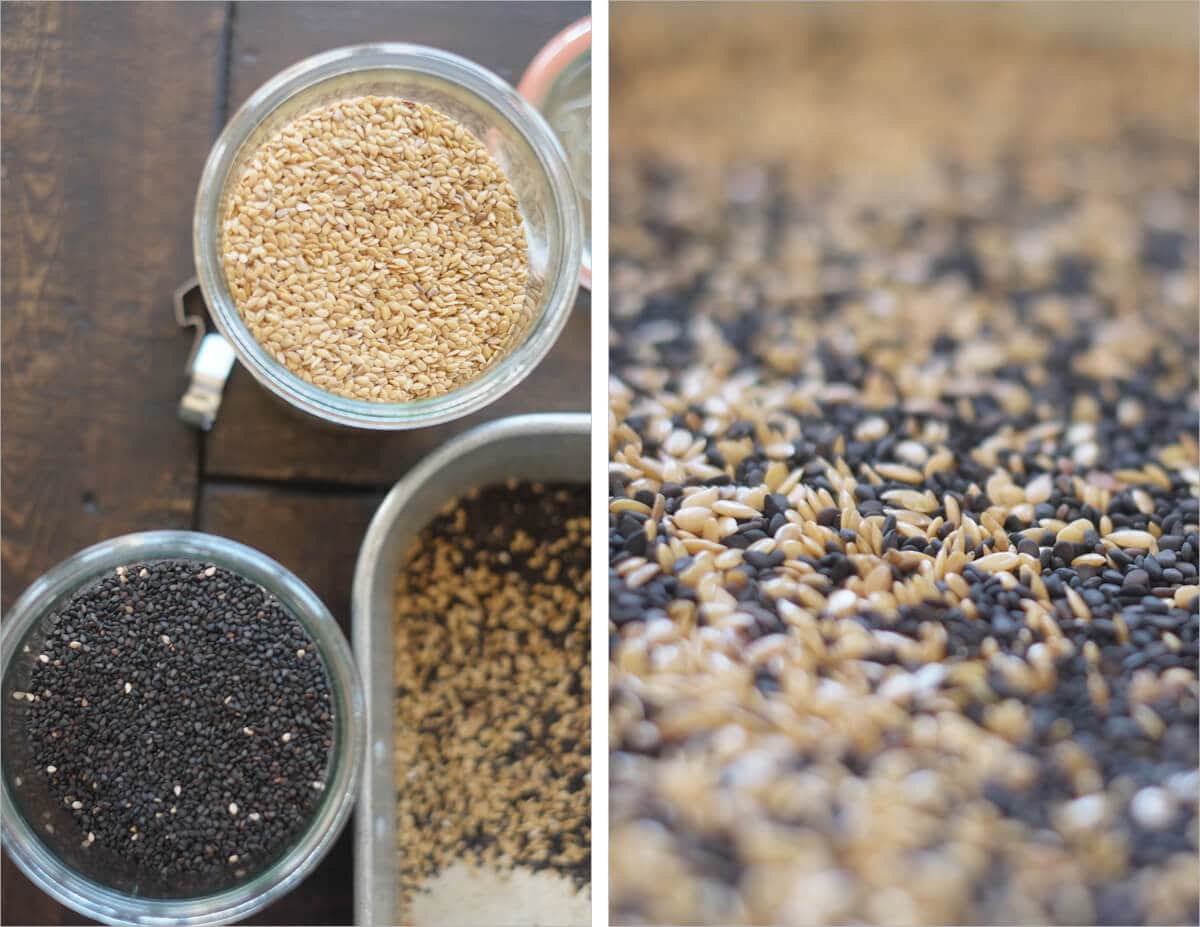
I gathered a total of 1/2 cup of seeds, about 50% sesame seeds, and 50% flaxseeds. You could go up or down on this depending on your taste, but I think this turned out just right for this bread. You’ll want to keep a little extra sesame on the side (do not toast) for coating the outside of your loaves if desired.
Once cooked remove from the oven, pour the seeds into a cup or bowl and let cool. Set aside for later.
Autolyse & Mix – 11:15 a.m.
Just like my previous entry detailing a 95% whole wheat sourdough, we will autolyse for the entire duration your levain is fermenting. This autolyse is without any levain added (obviously, your levain isn’t even ready yet!). This makes things pretty easy: your levain will be ready, and your dough will have undergone a long autolyse, increasing extensibility to allow for a nice rise with a normally stiff whole wheat dough.
Dough Mix:
Gather the following for your dough:
| Weight | Ingredient | Baker’s Percentage |
|---|---|---|
| 500g | Type 85 flour (high extraction flour, Giusto’s high extraction whole wheat) | 50% |
| 150g | Whole wheat flour (Giusto’s whole wheat flour) | 15% |
| 250g | White whole wheat flour (King Arthur organic white whole wheat flour) | 25% |
| 100g | King Arthur bread flour | 10% |
| 850g | Water | 85% |
| 25g | Fine sea salt | 2.5% |
| 175g | Ripe levain | 17.5% |
Perform the following:
- In a thick bowl add 500g high extraction whole wheat flour, 150g whole wheat, 250g white whole wheat, and white bread flour
- Add 725g of your water (the rest, 125g, is reserved until later when we add in the levain after the autolyse)
- Mix by hand until all the dry ingredients are incorporated
- Cover with wrap and keep covered near your levain for 4-6 hours
After your 4-6 hour autolyse – 11:15 a.m.
In a separate bowl, mix thoroughly together with your remaining 125g water and 175g levain that is now ready. Place your 25g salt on top of the original dough mixture and slowly pour on this levain/water mix. Cut the salt through your dough with your hand and mix everything until it comes back together and becomes sticky.
| Final dough temperature: | 79°F (26°C) |
Bulk Fermentation – 11:30 a.m.
Transfer your dough to a clear container to be used during bulk fermentation and let rest for the first 30 minutes. I’ve started to occasionally use Cambro containers to perform my bulk (per suggestions in Ken Forkish’s book Flour Water Salt Yeast this is an incredible book if you do not already own it). While my wife and I try to use as little plastic in our lives as possible, these have helped me judge when my bulk fermentation is nearing completion. The containers have markings on the side that easily help spot a 20-30% increase in volume.
- 12:00 p.m. – Turn Set 1
- 12:30 p.m. – Turn Set 2
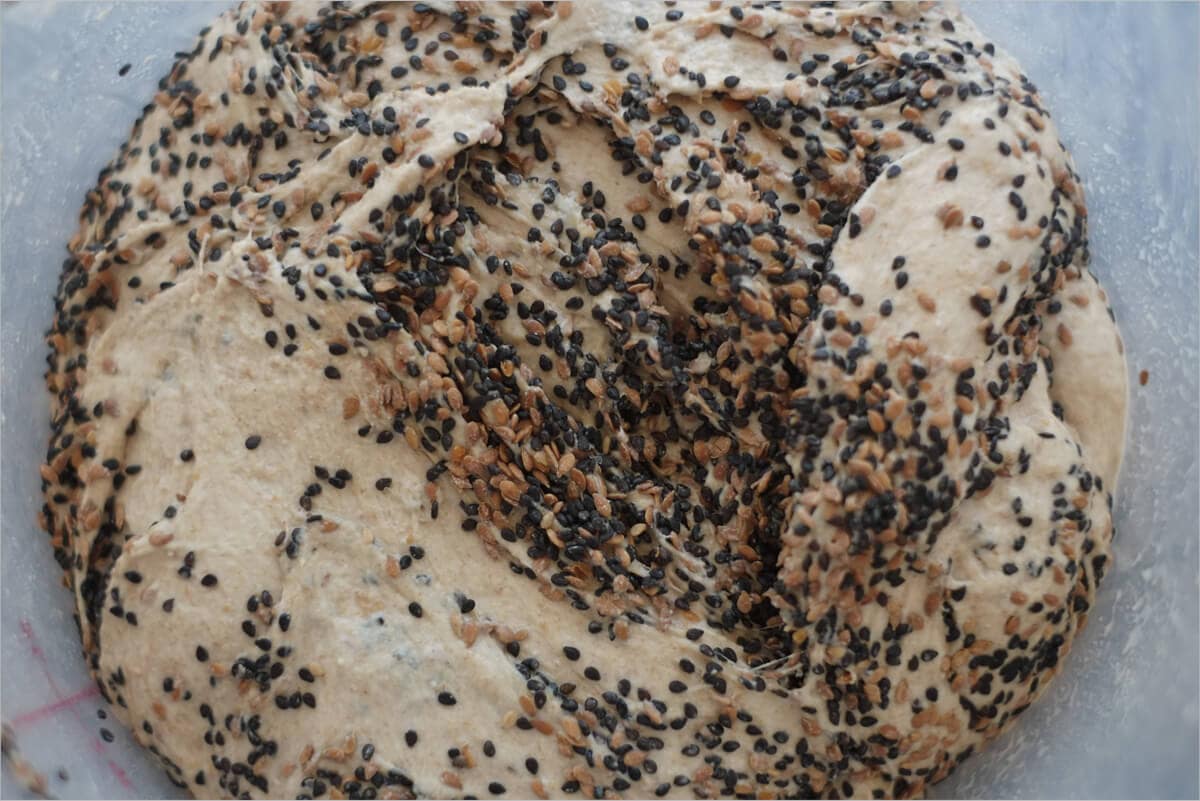
After the turn at the second 30 minutes, add in your toasted seed mixture and fold to incorporate thoroughly.
- 1:00 p.m. – Turn Set 3
- 1:30 p.m. – Turn Set 4 (missed this)
- 2:00 p.m. – Turn Set 5
- 2:30 p.m. – Turn Set 6
- 2:30 p.m. – 6:30 p.m. – Rest on counter untouched
Because our house has contractors coming day-to-day to finish up small things, I missed my 1:30 p.m. set of turns. No worries, things happen and our environment changes, we have to adapt to our busy schedules and work in the dough where we can.
Stay observant with your dough, keep an eye on how it develops and mentally take note of its subtle changes over time. You will start to build an intuitive sense for when your dough starts to strengthen at each set of turns so that even if you miss a set, you move on and keep going until it looks strong enough.
Pre-shape – 6:35 p.m.
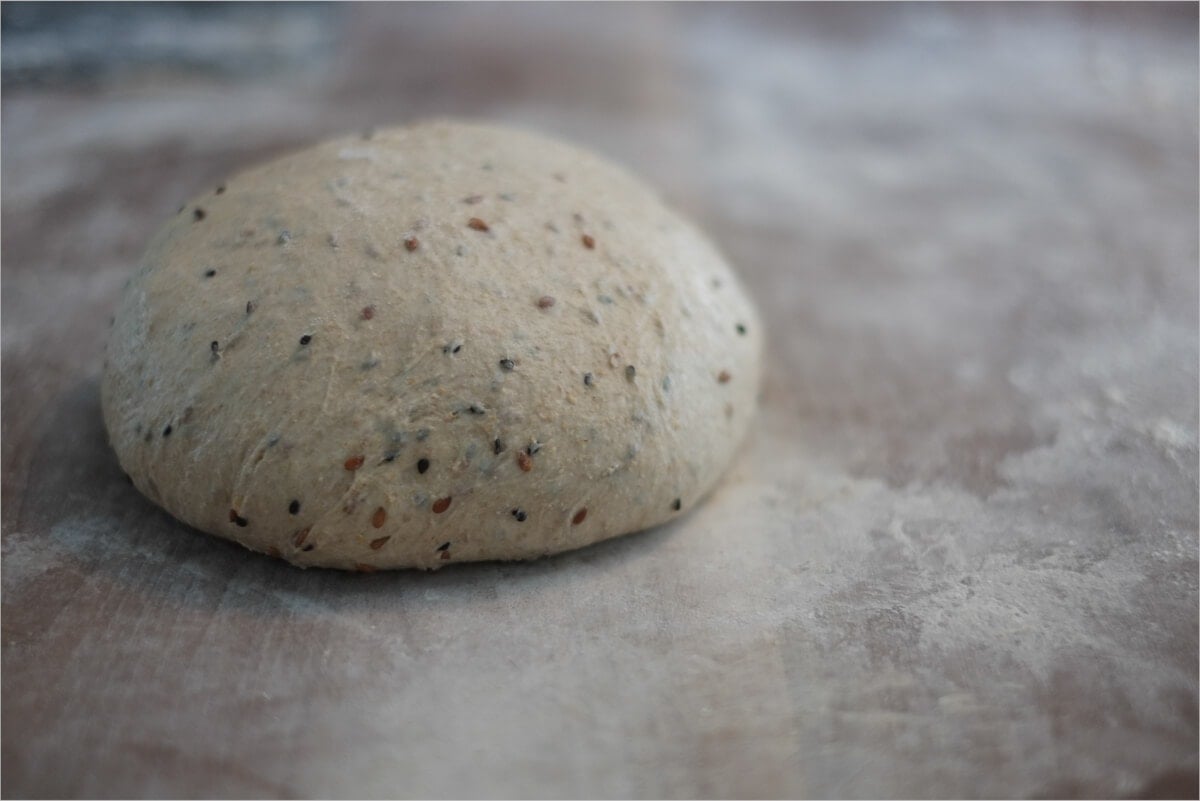
Take the dough out of the container onto your work surface and sprinkle some flour on top before dividing. Divide into two halves and lightly spin the dough in little circles across your work surface with your bench knife in one hand and your other empty hand. Let this pre-shape rest, covered with a damp towel or inverted bowls, for 20 minutes.
My dough here was quite stiff, like whole wheat usually is by this point. This stiffness makes shaping very easy, but you want to avoid shaping too tight for the pre-shape. Just a few scoots to get a nice taut outer surface and that’s all. Look at that, isn’t it beautiful? There’s something so peaceful about shaped dough resting on a wood counter.
Lightly dust your proofing bowls/baskets with white or brown rice flour in preparation for the next step.
Shape + Proof – 6:55pm
Take a clean kitchen towel and lay it on the counter. Spread flat some of the raw sesame seeds on the towel in a circle about the size of your desired finished boules. After shaping, you’ll quickly plop the shaped boule on top of these seeds to coat the surface before placing into your proofing baskets. I decided not to top these with flax seeds, but you could certainly do so.
First, flour the top of each boule, and, working with one at a time, invert it and start your shaping. Gently pull the bottom toward you and fold up about midway, take the right side and stretch outward and then up and over about midway, repeat with the left and top sides. When the top is folded down and across, gently pull the boule towards you with two hands, so it slightly pulls on the counter. This pulling creates a tight outer skin, adding structure to the result.
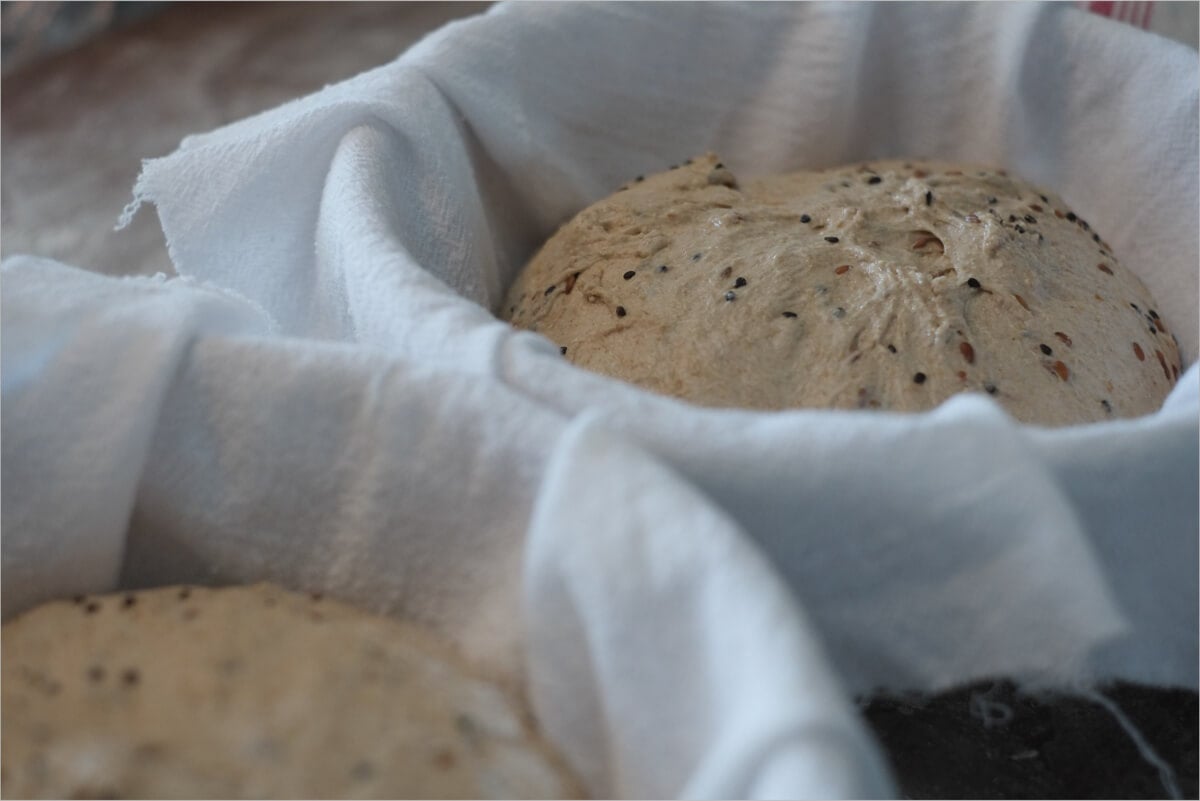
After each round has been shaped, gently pick it up and roll the smooth side down on top of the towel with resting seeds. Rotate the dough around so the seeds stick to the entire bottom surface and sides. Transfer your topped rounds, seam-size-up, to their proofing baskets.
Finally, place your baskets in plastic bags and into the fridge to proof overnight, we will bake these in the morning.
Score + Bake – 7:00 a.m.
In the morning, preheat your oven to 450°F (232°C). I usually leave the shallow side facing up on the left, and the deeper side on the right facing down. This way when it’s time to load the bread I can quickly grab the shallow side, slide in the dough, and then place back on the stone and cover with the deep side of the Dutch oven. See my post on baking with a Dutch oven for more instruction.
After one hour, take one of your baskets out of the fridge and cut a piece of parchment paper to place on top. Take your peel and then put it on top of those two and quickly invert it, so the dough is now resting on the parchment paper and the peel.
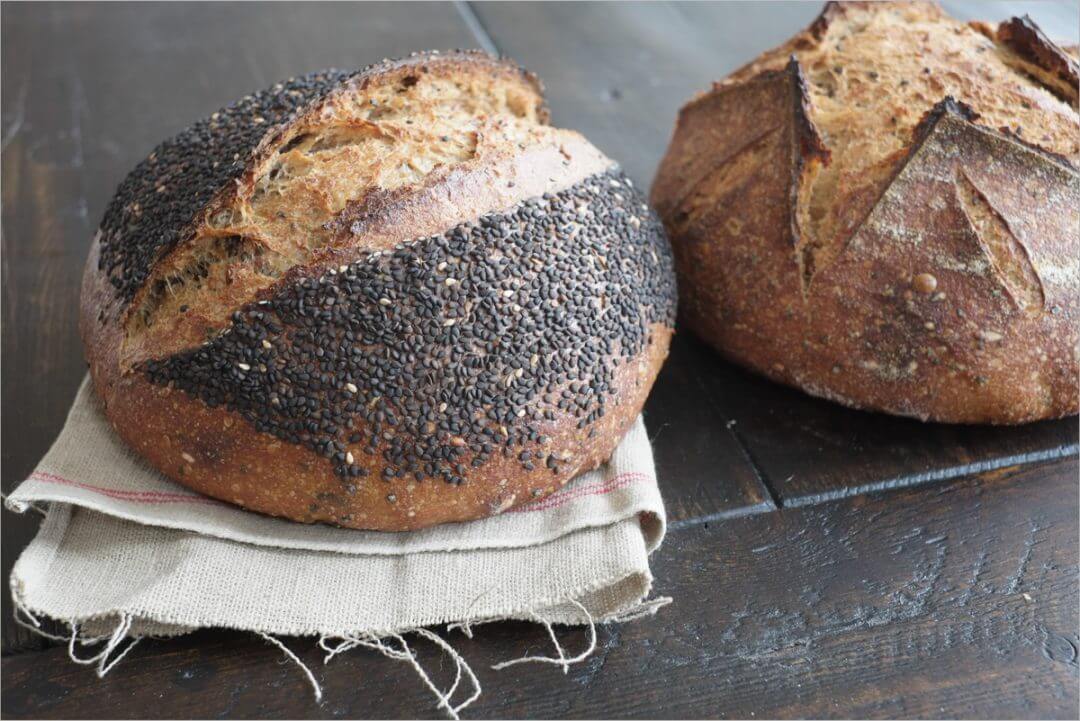
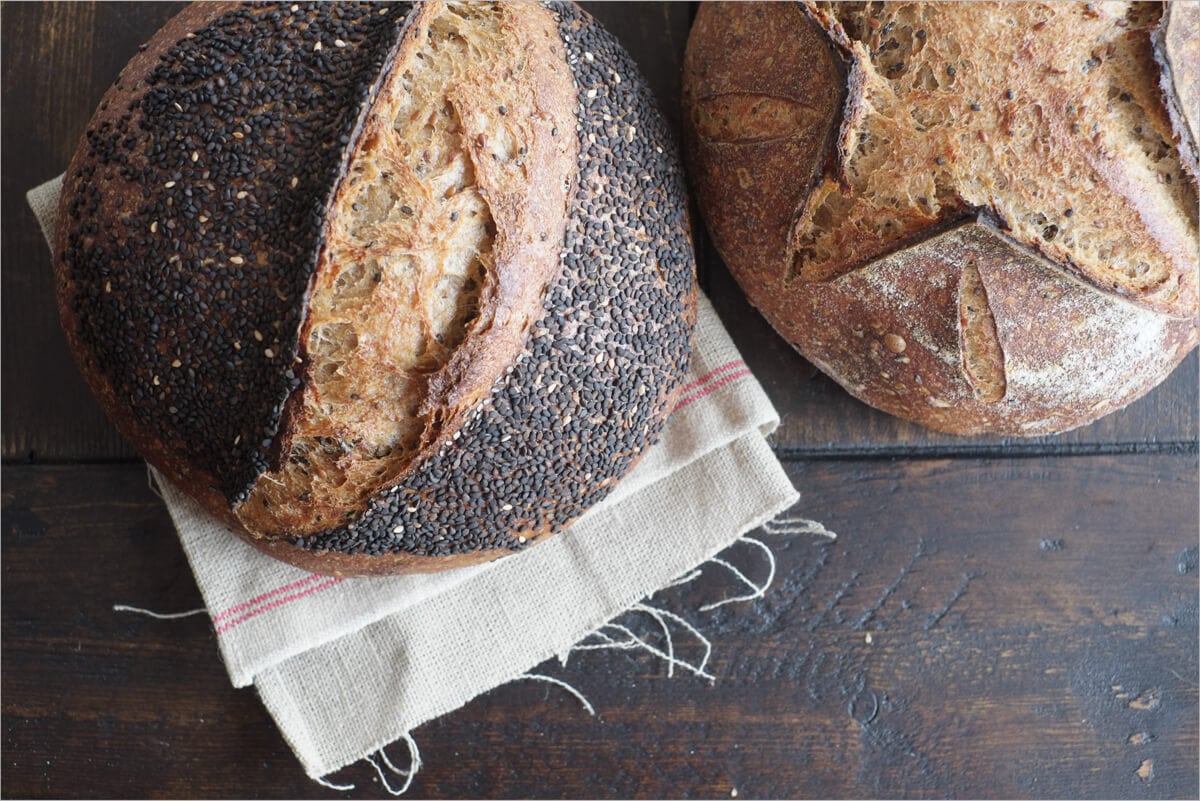
Score the top of the loaf with your desired pattern. One of these boules I did just my normal crescent slash and the other, without sesame seeds, I did an “X” with smaller slashes between each line in the “X.”
Take out the shallow side of your Dutch oven and drag in your boule. Quickly place the pan back in the oven, cover with the deep side, and bake for 20 minutes. After 20 minutes, open the oven and take off the deep lid of the Dutch oven (set it next to the other half inside the oven, which will help regulate oven temperature for the rest of the bake). Then, bake for an additional 35 minutes or so, until the bread is to your desired doneness.
Conclusion
Whole wheat bread ranks high on my list of favorite bread to eat, and the added seeds gave this bake an added twist of flavor. Flax seeds add quite a bit of nutrition to this already wholesome bread while the touch of sesame seeds adds some depth and complexity. This bread is a delicious “everyday” bread with a modification to keep things interesting. If you make whole wheat sourdough often try out this combination of seeds I promise you won’t be disappointed.
If you’ve baked my 95% Whole Wheat bread recipe with no problems this will be an easy bread for you: minimal changes with just a few things tweaked to accommodate the added seeds.
Crust
Crispy, thin, with excellent color and ears. Sometimes it can be hard to get that oven spring we all look for, but this recipe shows the way. The loaf with sesame seeds coating the outside had an extra level of crunch to it and looked spectacular to boot.
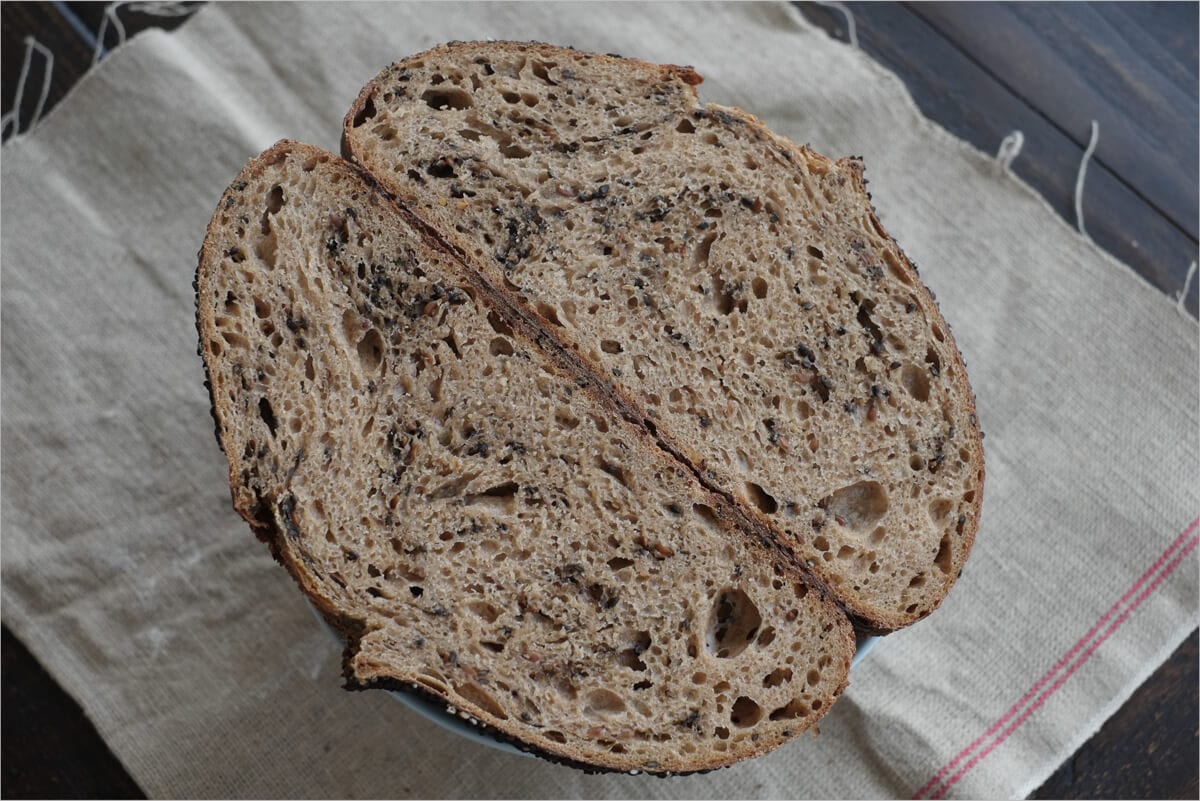
Crumb
Light, airy, and very tender. It’s quite open. This bread makes for awesome sandwich bread, the tight crumb holds in all of your ingredients with nothing escaping.

Taste
The mix of whole wheat flours in this bread is very, very tasty. I have been using a few sacks of Giusto’s whole wheat here and there, and I like the quality and taste of their flour. I believe if you’re in California you can find this around town but I ordered a case of it online. I’ll be placing an order for some of their white flour sometime soon to experiment.
The flax seeds do add a slight nuttiness to the bread, which is subtle but enough to remind you there’s something else going on. As I mentioned earlier, I might have toasted the sesame seeds just a tad too long, and they do take on a strong flavor. Make sure you do not use toasted seeds to coat the outside of your bread before baking!
If you’re looking for whole wheat sourdough, check out my latest 100% whole wheat recipe that has us making a completely whole grain bread — nutritious, super healthy, and easy enough.
What’s Next?
For another take on seeded sourdough that’s been recently updated, have a look at my new Seeded Sourdough post that uses less whole wheat flour like the recipe here. The new recipe produces an incredibly light and airy seeded loaf with the added flavor of fennel and semolina.
Or, for another recipe using semolina, have a look at my Sicilian sourdough that’s made from 100% durum wheat (semolina) and topped with white sesame seeds. It’s incredible.
Buon appetito!


54 Comments
Hi Maurizio
LOVE YOUR BREAD!
this recipe has a 6.5 hour bulk.. Is this correct?Can i ask why it is so long?
thanks very much
Hey thanks Flora! It's so long because of the reduced levain % in the dough and the final dough temp was lower.
I didn't see any nutrition information breakdown, did I miss it or is it not listed? My husband is a type-1 diabetic and I'm specifically looking for sourdough recipes that have diabetic-friendly macros and hopefully a lower glycemic index. Any information would be super helpful!
Hey Annie, I dont have any nutrition data listed, sorry!
Giusto no longer sells type 85 high extraction flour. Central Mills has a type 85 and several whole wheat flours. Can you advise on what to purchase for the 100% seeded whole wheat bread?
Thank you in advance,
Carol
Central Milling T85 is great. I also like Cairnspring Trailblazer .
Hello Maurizio, my wife bought me the book for Christmas and I love your content. Trying this one for the first time this morning and I wanted to mention, the “Toast Seeds” section 11am, is before the “Autolyse & Mix” section 7:15am. I usually read the entire recipe before I start to be sure, but if someone were not, they may finish the levain, and think their next step is not until 11. Also, in the section “Dough Mix”, step 1 does not list the 100g of bread flour, I read through the recipe again and assumed I was supposed to add it to the dough mix, because it was not listed in any of the following steps. Hope I was correct. I’m sitting between dough mix and toast seeds at the moment. Again, love the content and the book. Amazing stuff. Cheers!
Ah, thank you, Ryan! Appreciate that and hope you’re loving my book. Yes, this is an older recipe and needs an overhaul. Working on it soon!
Hi Maurizio, I am trying this recipe for the second time with 80% hydration, since the first time at 85% yielded a very wet dough that failed to ferment properly (my experience was like those of Zoomerland and Ben), and a complete bread failure, my first in years.(keeps one humble.)
Questions: why so many turn sessions? Is fermentation time really 7 hrs? I think I will watch the bread, and use visuals as my guide. Thanks for your dedication to the process!
Super glad to hear it helped, Paci!
Hi Maurizio, my dough is very sticky and wet after bulk fermentation.I only used one type of Wholemeal flour and followed the Reston the recipe. What have I done wrong? How much water should I reduce if I am going try this recipe again? Many thanks, Ethan
Like you’ve probably guessed, Ethan, it sounds over hydrated to me. I’d leave out maybe 50g and give it another go!
Hey Maurizio, have you made this with ground flaxseed (flaxseed meal) rather than seeds? If so, do you have suggestions for how to use flax meal? I have a request to use ground flax rather than seeds, and I’m curious what adjustments to make. Thanks, John
Hey, John! No, I have not. I’d likely reduce the amount to start, just to test. Maybe half? I’d then probably toss it in at the very end of mixing because it would act more like a flour than a mix in—I’d want to be sure it was fully distributed throughout the dough. Unless you wanted a kind of marbling effect, where it weaved through the dough, in that case I’d spread it on the dough during bulk fermentation kind of like a paste, a little throughout the first set of folding so it touches all the sides, top, and bottom. If that makes sense. Hydration might also need to be adjusted as I’d expect it to suck up a little water, but it might not be significant. I’d really have to test this myself!
Ciao Maurizio, I live in Italy and i was wondering what type of flour the Type 85 corresponds to? We have 00, 0, 1 and 2.. maybe type two is what I need for this bread?
Grazie!!
Ciao, Isabella! I’m not sure of the direct equivalent. Type 85 is kind of like 33% whole wheat, 66% white flour. So my guess would be Type 2 as well. Happy baking!
Can you replace the ‘High extraction Giusto’s whole wheat flour’ and ‘Giusto’s whole wheat flour’ with King Arthur whole wheat? Also, can you replace the King Arthur bread/white whole wheat flour with AP flour? I only have KAF whole wheat/AP on hand, so just wondering if it would work well with this recipe. Thanks!
King Arthur flour will work well in this recipe. For the “high extraction” component, I’d do a mix of 50% KA AP and 50% ww. For the ww component, I would do KA whole wheat flour, but their white whole wheat flour would also work well!
Hi Maurizio, first of all I’m a big fan and I love your recipes! You do a great job with the instructions and details!
First, I have a general question: is there no slap & fold or kneading on this dough before the 6 sets of stretch-and-folds? It seemed strange to me since other recipes usually have some more man-handling before settling in for the bulk fermentation.
Secondly, I have a specific question to my loaf: I had trouble getting this loaf to expand during bulk fermentation. Even after the final round of stretch and folds, we didn’t see any expansion. Also, the final baked product (while beautiful in its own right) didn’t expand upwards. I scored cross-wise on top but the slices didn’t catch; there is no ear and virtually no sign of where I scored the dough. The top is generally smooth with tiny bubbles (and of course, the flax seeds). Might it be that the sourdough yeast didn’t quite activate during bulk ferment? I did use a young bubbly active levain that was at its peak growth about 4 hours after feeding. Any thoughts on what could have been the reason for the loaf to not rise?
Thanks, Ben! Sorry for the delayed reply. This is an older recipe and lately I’ve been doing a little more strengthening of the dough before bulk fermentation. You can do either: slap/fold a bit with fewer sets of stretch and folds during bulk or as prescribed above in the recipe. It’s a balance, more strengthening upfront means less is needed to sufficiently strengthen the dough by the end of bulk fermentation.
It sounds like it may have needed more fermentation time overall. I’d say try using your levain when it’s more mature (risen to its peak, bubbly, sour smelling) to give your dough a good start. Then, be sure to keep your dough warm during bulk fermentation, 78F would be ideal!
Do you flour the banneton before putting the seed coated dough into it after final shaping? It isn’t necessary if the dough is covered with seeds, is that correct?
That’s right — I typically don’t sift on any flour into those baskets these days, unless the dough is exceedingly wet and I’m worried it won’t come free (not common). Happy baking, Benito!
I’m in the midst of the stretch-and-folds for this recipe now, and am unclear about a portion of the next step: when do you place the carpet of seeds on the top of the loaf? In your second paragraph of the “Shape + Proof” section, you say to “flour the boule, stretch the right side,…then left, etc…..gently pull the boule towards you with two hands so it slightly pulls on the counter creating tension.” Is at this point you plop the dough onto the layer of untoasted seeds? Your picture shows dough in the baskets with a smattering of distributed seeds; is there a carpet of seeds on the “bottom” of the boule that is in the proofing basket? Also, I think your timestamp for the autolyse is incorrect, maybe? You say to Autolyse + Mix at 11;15, but that same time is also noted at the “After your 4-6 hour autolyse” section. Not trying to point out “typos”, but as a newbie to sourdough bread baking, I’m just trying to make sure I understand things.
Thanks,
Mark
Mark, that’s right, you coat the loaf with seeds after it’s been shaped but right before you place it into the final proofing baskets. I’ll update the post with that and the other correction you’ve found. Thanks for spotting those!
I made this over the weekend. But switched around some of the flours. I milled spelt and wheat and did bulk of the flours with them. I sifted some of the wheat for high extraction, but used only 100 grams of it. Spelt, 500 grams and all the rest whole wheat. Beautiful loaves and so yummy. Crumb is so pretty and much like your pictures. I can’t stop eating it actually! With butter, with cheese and garlic marinated olives, toasted or not. Am heading to have a piece now before bed!
Love the idea of using spelt with this recipe… I need to try that! I also love that you always bake with so much fresh milled grain, very cool. Thanks for the suggestion Gina, now I know what I need to bake soon!
Hi Maurizio,
I’m in the midst of an experiment: using the proportions of the Emmer/Maple/Beer recipe in Tartine 3, but instead of using beer/maple, I just used water, and instead of adding sprouted emmer, I added the seed mix from the Tartine 3 “Seeded Wheat” recipe (flax, sesame, toasted ground caraway, pumpkin, sunflower). I just finished the 30 minutes of covered baking and the dough seems to have really spread, which leads me to believe it was too wet. It had been a pretty stiff dough, and my seeds had really soaked up the water, so I didn’t think I’d have a wetness issue. Now with the lid off, I see dampness in the bread, in addition to it not having much oven spring. Do you think it was a mistake to experiment with the emmer recipe? Or where do you think I might have gone wrong?
Would love your take,
Sarah
I don’t think it was a mistake at all — that’s part of the fun of baking and making recipes your own! Based on your description it does sound like the dough was over hydrated, especially if it has a “wet” appearance. The seed mixture probably held onto water that was then released into the dough. I’d say if you are going to try this again reduce the overall hydration of your dough to anticipate the seeds releasing some water. Also, make sure you train the seeds completely to make sure and remove any water that way as well.
That’s my 2 cents! I’d definitely give it another try, sounds delicious!
Thank you so much for the encouraging words, Maurizio! Good point on holding back on the hydration of the dough overall next time. The seeds were merely damp when I added them to the dough, so I guess they must have released a lot of liquid during baking.
Key question: I only baked one of the loaves so far. Any adjustments you think I could make in baking the other loaf to achieve better results? Should I bake it in a loaf pan? Or cook it covered longer/at higher heat?
Thank you!
Sarah
Thanks, really appreciate that!
Hah! Yes, the lady is my wife 🙂
Fantastic post. Your loaves look beautiful! We’ve also recently started making Tartine-style seeded loaves, but have not yet figured out how to prevent the seeds on the top of the loaf from burning without compromising the brown-crispness of the top crust. Have tried soaking the seeds before-hand, as well as putting a piece of aluminum foil on the top. Both work OK, but not great. Any suggestions? Thanks again for an awesome post.
Thank you! What seeds are you using? Some seeds have a lower temperature threshold and will burn easier. These black sesame seeds were just fine on top of my bread by the time it finished cooking. Note that I do *not* toast the seeds used as a topping beforehand, they are raw.
Aside from the suggestions you’ve already put forth I can’t recommend anything else, I would have said use a bit of tin foil perhaps 🙂 Another thought: are your loaves near the top of your oven or where heat is generated? If so try moving your rack down some away from that heating element (or the top of the oven). You might also want to try a lower starting temperature when baking to prevent that initial scorch. Your bread will take longer to cook but it should prevent that initial burning of the seeds.
Just some thoughts… Let me know if you discover anything else, sorry I could not suggest more. Happy baking and thanks again for the comments!
How did it turn out? It’s possible the autolyse was too long and there was too much water incorporated in your dough. Next time we can reduce one, or both, and try to prevent some of that slackness!
There should now be a little checkbox below where you make your comment, I think if that’s checked you should get an email now.
I know how it is, excitement builds!
Okay, so I know I posted asking for a good starting point on IG after you posted gorgeous photos of your most recent 100% ww loaf… after searching a bunch of places online, I stumbled upon your site so I think I’ve found the base from which to start for my 100% ww. 😀 Yaaay! I have a Komo (<–love it! Best birthday present ever!) and am going to mill up some org white ww for this and leave out the seeds to start. I still have some slices of a flax and sunflower seeded loaf that I'm working through from my freezer and want a minimalist ww loaf with unencumbered crumb for now. 😉 Can't wait to dig in to mixing tonight when my starter is revived! Thank you for sharing your process and recipe.
Glad you found my site via multiple avenues, I must be on to something 🙂 This recipe makes some really great whole wheat bread but keep in mind what I posted on IG was a true 100% whole wheat sourdough, even the levain was whole wheat. I’m in the process of writing it up and it should be here on the site in the next week (have you subscribed to new posts at the top-right? This way you’ll get an email right when I post new articles).
That said, give this a shot, it makes some great bread! I’m totally jealous of your KoMo, I’ve been wanting a mill for a long, long time. That is on my list of potential winners for when I make the purchase later this year.
Love to hear how this loaf turns out for you, let me me know — happy baking Lisa!
I definitely plan to keep at it, I love writing here and documenting my bakes — plus helping people where I can is great!
You can definitely do an overnight autolyse, especially with whole wheat. I prefer around a 4 hour autolyse for this bread, but it does depend on your flour as well. What flour are you using? It’s pretty flexible really, you can start your autolyse in the morning or the night before, usually the longer the autolyse the more extensible (stretchy-without-breaking), up to a point of course.
I have been having an issue with people not getting replies to comments. I just flipped some switches, hopefully that fixes things! (if you get a notification please let me know it’s working!)
Maurizio, I just baked the seeded bread this morning, and it came out beautifully. I had been taking shortcuts in baking my bread lately (mixing the flour and water without weighing, leaving out the autolyse), and it just wasn’t coming out very good. I decided to go back to following your recipe to the letter. What a difference! The raw dough had that elasticy spongy quality that I had been missing, so I knew it was going to be good. Once baked it gave me a beautiful rise with great ears.
I started mulling over buying a flour mill again, and noticed your discussion here. Did you buy one yet?
Excellent! Good bread takes time, as they say 🙂 Adding that little bit of autolyse time really does wonders, especially for whole wheat breads where extensibility can be a bit low.
I haven’t made the leap yet to buy my own grain mill but I hope to sometime this year. I’ve been looking at the Hawos, KoMo and even the Grain Maker (makes you work for that flour but has some really great qualities to it). Once I pick one up I’ll definitely do an entry here on how I use it, etc.
Thanks for the comments and happy baking!
That sounds like a fabulous mix my friend! I might have to give that exact loaf a try sometime soon. I haven’t attempted Rene’s Rye just yet, but again, it’s on the list 🙂
One thing I’m always weary about with seeded bread is that the seeds sometime are too overpowering. That mix you have there sounds great, though, I’ll have to pick up some caraway at the market!
Thank you very much! Tasty too 🙂
Yes, I find I need to increase hydration when grinding my own flours as they are thirstier because all the components (germ, bran and endosperm) are present. Store flours have a lot of the grains goodness sifted out to make them shelf stable, otherwise it would go rancid fairly quickly.
If you don’t mind me asking, what type of home mill do you have? This is something I hope to get later this year.
Ask away! I am using a Komo XL mill and love it.
I was looking to get a Komo as well, they look solid and like they will last a lifetime. I think milling must add a whole new dimension to baking as now you have to manage flour shelf life (when to use, etc.), granularity, and probably more than I realize.
I’ve heard people say milling your own flour is akin to a coffee drinker who grinds their own beans. If that is the case then I need a mill ASAP — grinding your coffee beans fresh makes a HUGE difference.
I am in total agreement. Comparisons are like apples and oranges 🙂 There is a whole wide world of info out there when researching your mill which I found to be invaluable.
Questions arise like what mill is suitable for my needs? I went with the XL rather than the Classic because, it having a larger motor it will outlast the Classic. I also have a customer base whom I bake for so that was a huge factor in my decision making.
The advantages are tremendous when grinding your own flour. You get to grind only what you need…just weigh out your grains! Your grains will also last a long time if stored properly. I also love to sprout my grains which gives a different depth of flavor to my breads
Now you’ve really convinced me… I just bumped up the priority on buying a mill now. 🙂 Thanks for the information!
Am trying this weekend with fresh ground flour and increased hydration…
Let me know how it turns out. You’re going to up the hydration more than what I have here? This bread could definitely handle it. Have fun!
This looks terrific! Thanks for posting!
You’re very welcome!
Magnifico, grazie!
Thank ya!