
The following quote, a poignant and relatable statement from Lapo Elkann in a recent Monocle magazine interview. In a relatively jovial and concise article, he discusses what good food means to him and his family, and how it is the center of his daily ritual. In the same way, food is usually the center of my day and my interactions with my family and friends. I take care to plan and prepare food each week and generally plan my week’s worth of baking and cooking well before it arrives. My kitchen tends to revolve around what I receive from our farmers’ market co-op, which makes things interesting—you never know what you’re going to get. Similarly, baking high-hydration sourdough bread offers a place for experimentation, and this bread is the result of several rounds of tweaking and adjusting until it came out just right.
I think it’s important to add some pleasure to your life; without it, your creativity won’t be at its best. When the stomach calls, satisfy it. Don’t eat a lot but eat well.
Lapo Elkann
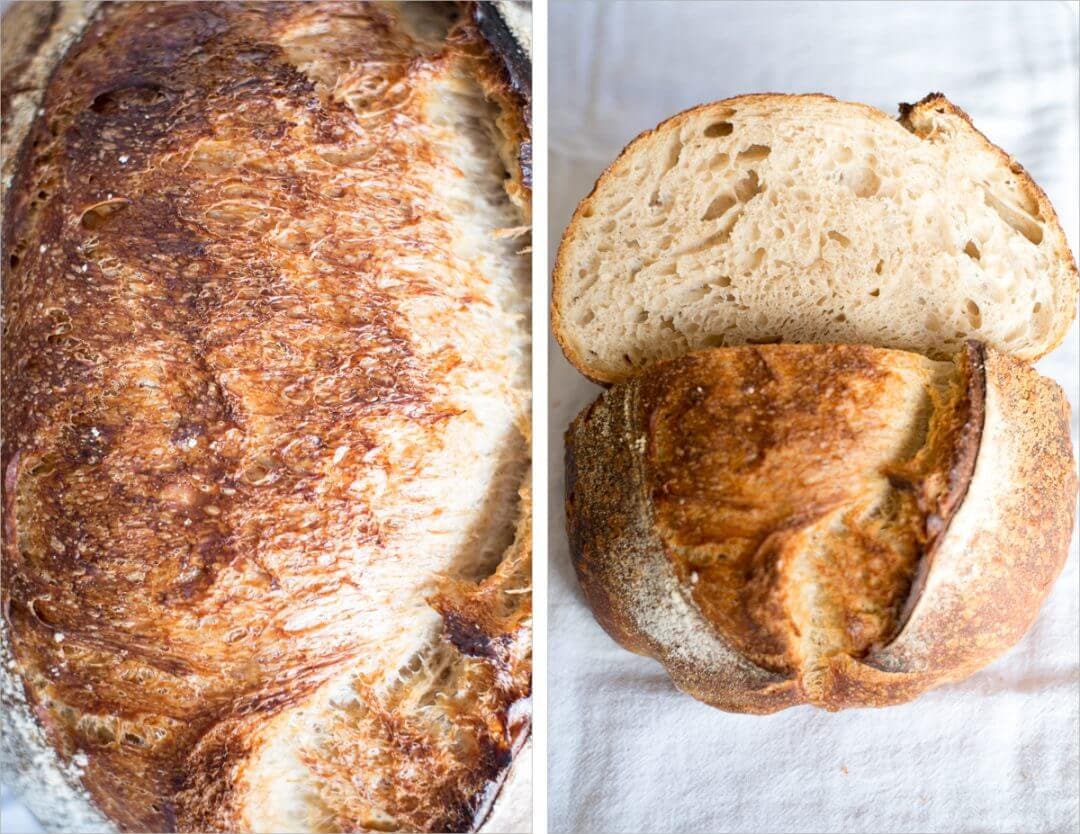
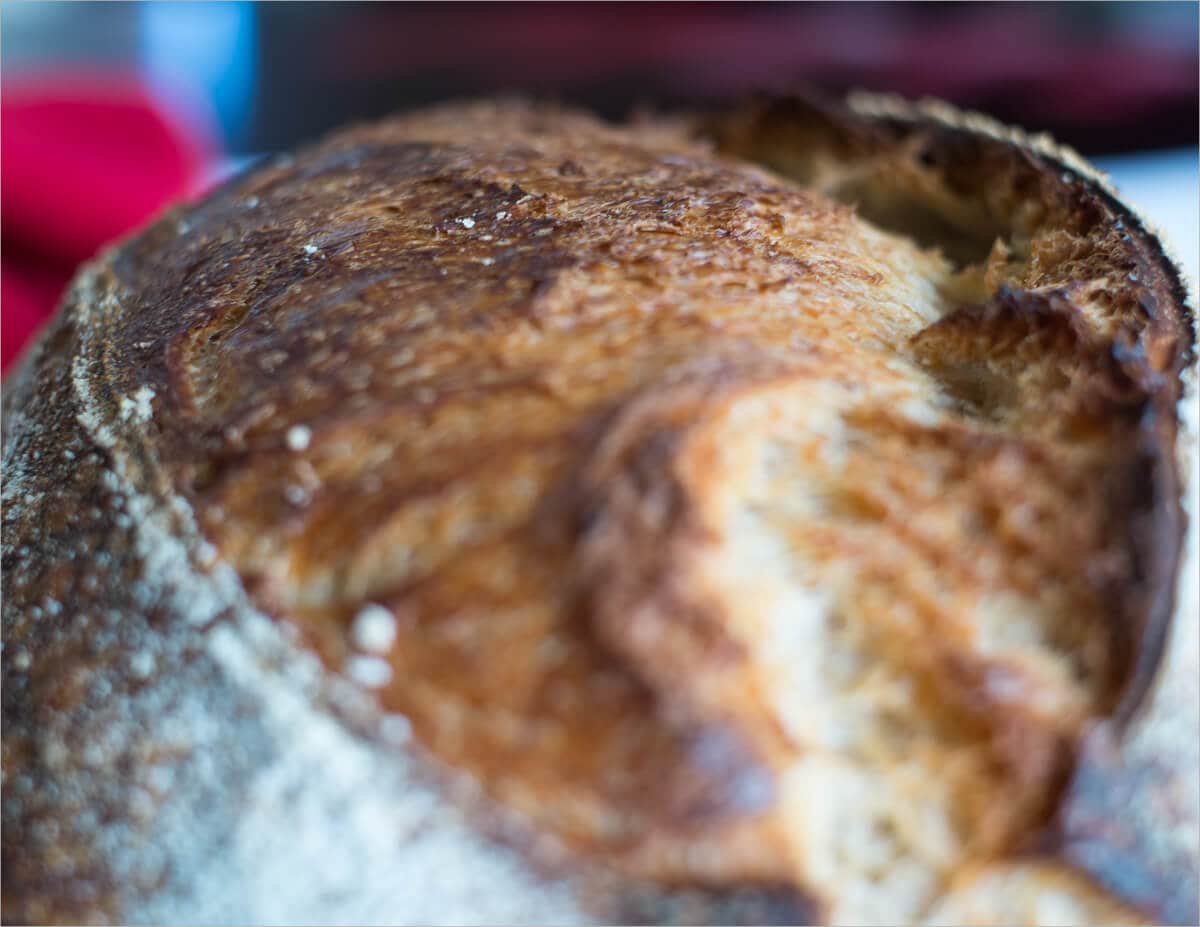
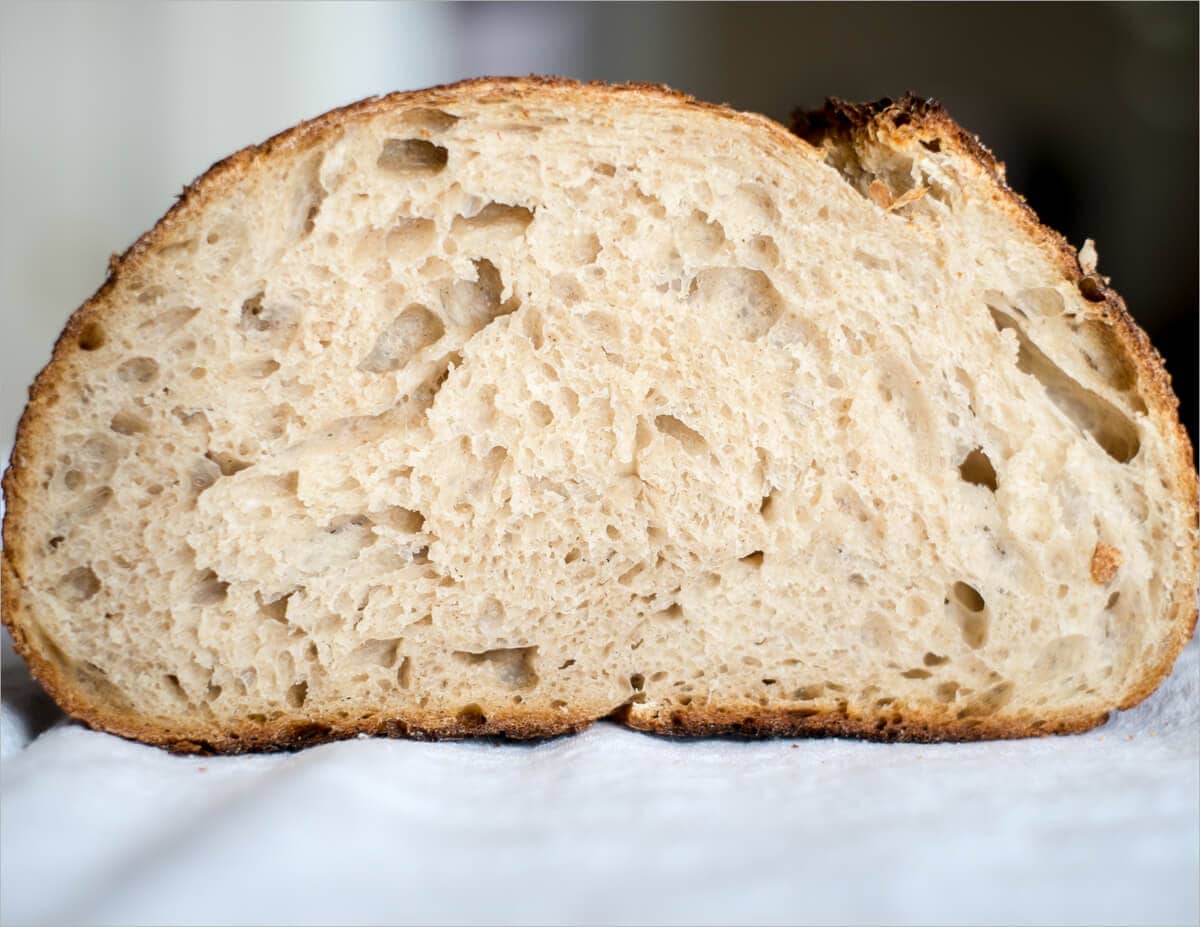
Each week my bread is a chance for me to improve on my tireless quest for the perfect loaf—a search that will likely never end, but it’s the journey that’s the critical part. The perfect loaf, that bread you pull from the oven and sit there for a minute to watch as it cools. The loaf, that when cut, shows a crumb so light and airy you can’t help but poke at it in disbelief. The dark, brittle crust, blisters and cracks on the outside, dynamic tears and rips on top, and an open, light crumb with an even interior from front to back.
Of course, they don’t all end up that way. That’s the hard truth of baking: every bake begins anew. Did bread flop last time? Well, take what you did, modify a single variable, and give it another try and compare what worked and what didn’t. This truth is both very frustrating and also very comforting.
Ok enough of the philosophical treatise on bread and artisan crafts, let’s get on to the actual baking!
The bread I set out to bake for this entry pushed my comfort zone with hydration, a high-hydration sourdough bread at 80%. I know that to get the open crumb I’m looking for, hydration has to increase, so I’ve decided to increase it without making any drastic changes. Shaping becomes incredibly difficult as you get up past 80%. It becomes very sticky and a little slacker. The next few entries, much like this one, will result in some less-than-perfect results (still tasty, however).
As we know, dough hydration is critically important, but to be clear, I’m not increasing the dough’s hydration just to push it high in an attempt to reach some number (because we all know that’s not The Way). It’s an experiment to see how the increased water affects the texture, fermentation, and eating quality of the final loaf. Does it make things better? If so, we’ll keep moving in that direction. If it doesn’t make things better? Back off and reevaluate.
Prepare the leaven – 10:15 p.m.
My typical 100% whole wheat leaven, prepared the night before:
- 30g ripe starter
- 120g whole wheat flour
- 120g water
After mixing the above in a glass container, cover and set in a slightly warm area in your kitchen. If it’s cold at night at your place like mine (around 65°F/18°C at night), you’ll need to experiment with an area that’s a bit warmer in your kitchen. For me, it’s on top of my refrigerator.
If you haven’t yet created your sourdough starter, don’t fret, it’s very simple. Head over to my post where I discuss creating a sourdough starter from scratch very easily in 7 steps.
Mix the flour and water, autolyse – 10:00 a.m.
Even with the warmer temperatures on top of my fridge, my leaven still needed more time to mature. I’ll usually start around 8:00 or 9:00 a.m. but the “nose” of my starter was not quite sour enough, and it could use a few more visible bubbles. At around 10:00 a.m. things looked much better and I started for the day.
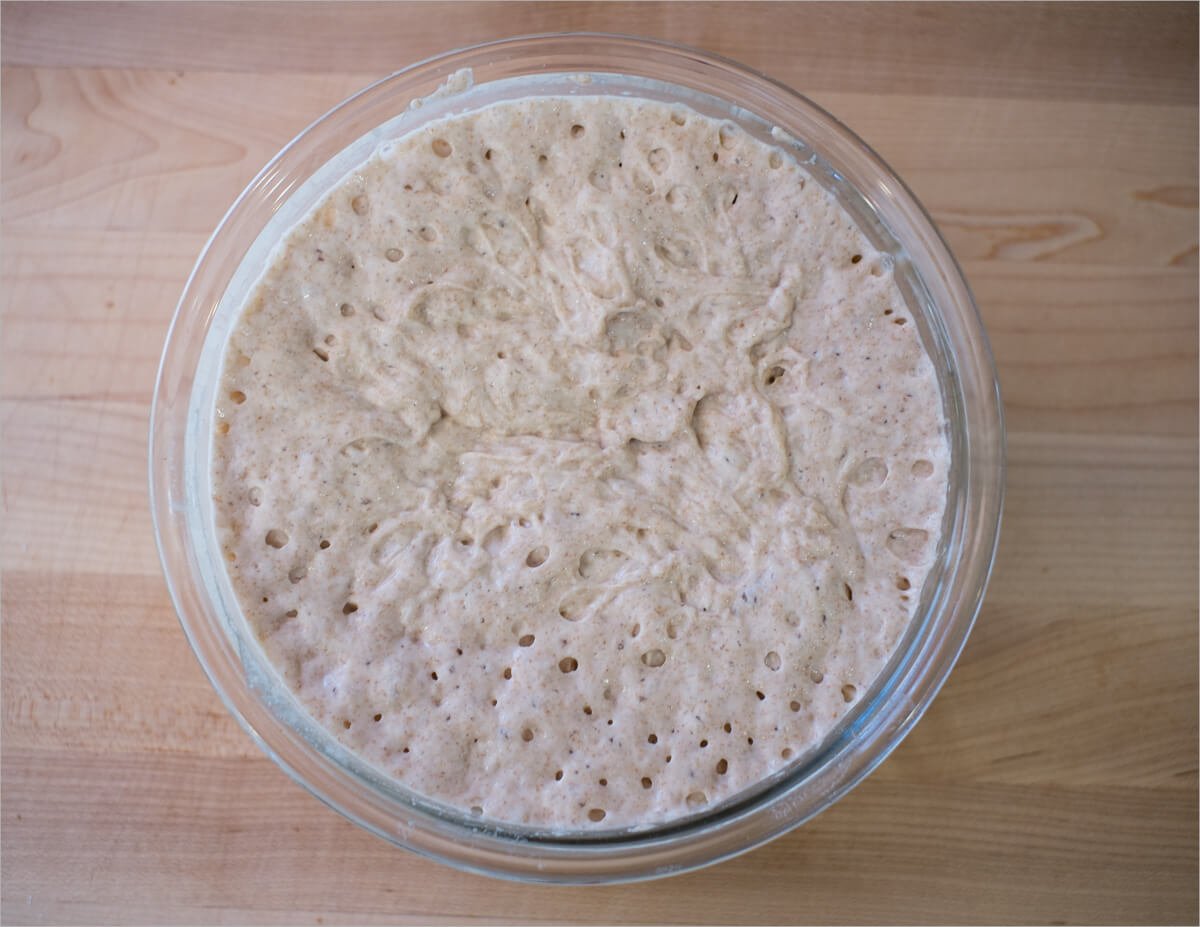
I did a quick verification with the “float test,” scooping just a bit of my starter into a glass full of room temperature water – looks like it’s floating, we are ready to go. I don’t usually do the float test at this point anymore, but sometimes it’s a good sanity check to make sure things are progressing as expected.

Ingredients:
- 250g (25%) leaven
- 800g (80%) King Arthur bread flour
- 200g (20%) Great River Organics whole wheat flour
- 20g (2%) salt
- 750g and 50g water in reserve for the next step
I recently discovered that I’m a bit lucky here in New Mexico as we have a tremendous local flour mill that produces white flour from wheat grown up north around Taos. This Sangre de Cristo flour is available at some local co-ops, and I hope to have some to test with for the next entry. I thought I was out of luck and would have to eventually buy my small home mill to have complete control over that part of the process… To be honest, I’m still pining for a home mill and hope to have one in the future.
Method:
- Add the 250g of leaven to a large mixing bowl
- Pour in the 750g water and mix with your hands until the leaven is completely dissolved
- Add 800g of the bread flour and 200g whole wheat flour and mix with your hand until all the dry flour is incorporated
- Cover your bowl with a towel and let autolyse for 50 minutes
- After 50 minutes add 20g salt to the dough and slowly pour the remaining 50g water on top. Squeeze the dough with your hand to incorporate the salt
- Now reach your hand under the dough and pull one side up and over onto itself. Do this several times until you notice the consistency of the dough to turn sticky
- Transfer your dough to a large bowl for the bulk fermentation step
The final dough temperature after mixing in the salt was 78°F (25°C). Perfect.
Bulk Fermentation – 11:00 a.m.
During bulk fermentation, you want to do about six turns spaced out 30 minutes apart. The first four turns should be fairly vigorous with the last two being more gentle as not to push out all the precious gasses built up.
- 11:30 a.m. – Turn 1
- 12:00 p.m. – Turn 2
- 12:30 p.m. – Turn 3
- 1:00 p.m. – Turn 4
- 1:30 p.m. – Turn 5
- 2:00 p.m. – Turn 6
- 2:00 p.m. – 3:30 p.m. – Rest on counter untouched
During the bulk fermentation step, taking place over several hours is usually a perfect place for me to take my dog out for a quick 30-minute walk and a post-walk espresso.

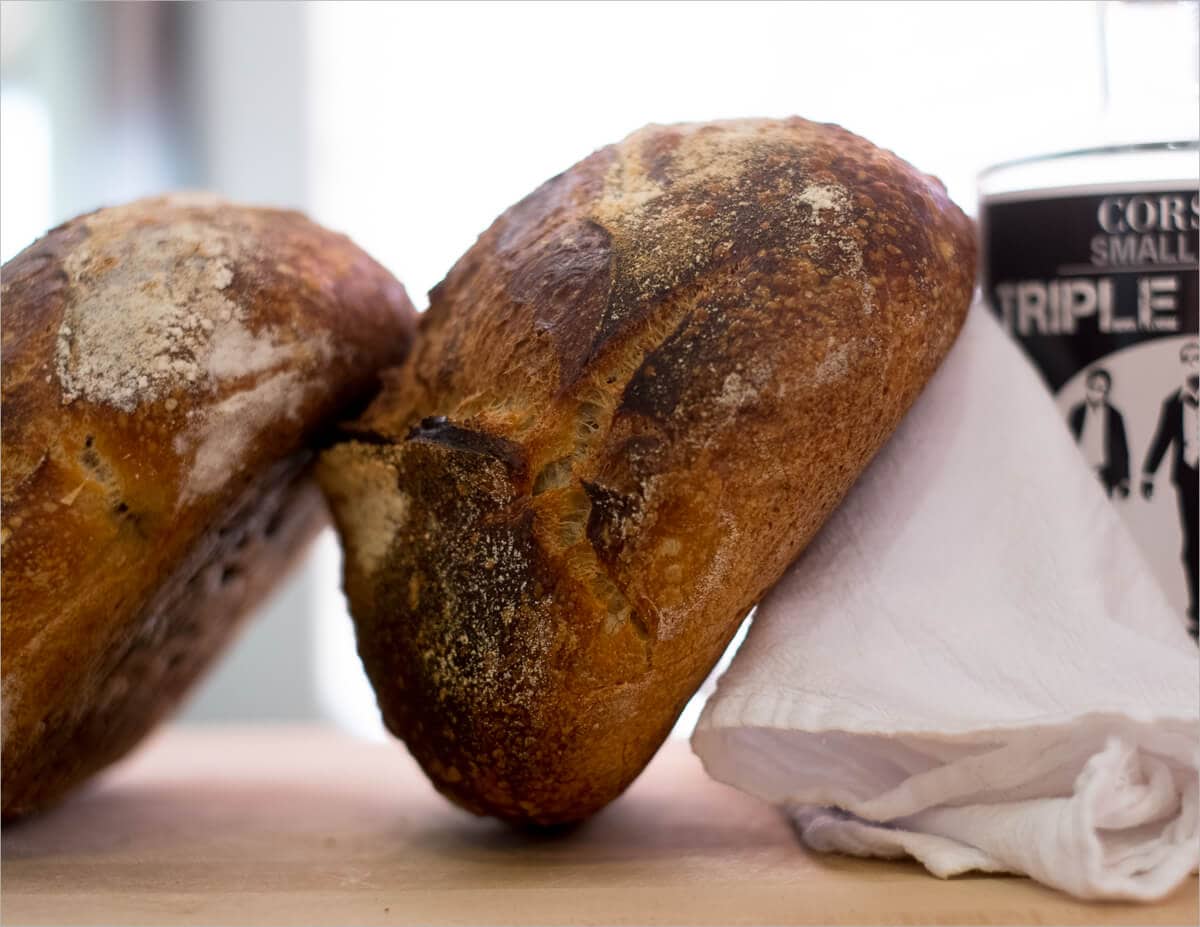
By 3:30 p.m. the dough had risen almost to the top of my bowl, was very bubbly throughout, and was ready to be shaped.
Pre-shape – 3:40 p.m.
Take the dough out of the bulk container onto your work surface and sprinkle some flour on top before dividing. Divide the mass into two halves and lightly spin each half with your dough knife in one hand and your other hand. This will very lightly create tension as the dough sticks to the work surface. Invert a bowl on top of each shaped mass to keep it from drying out and set a timer for 30 minutes.
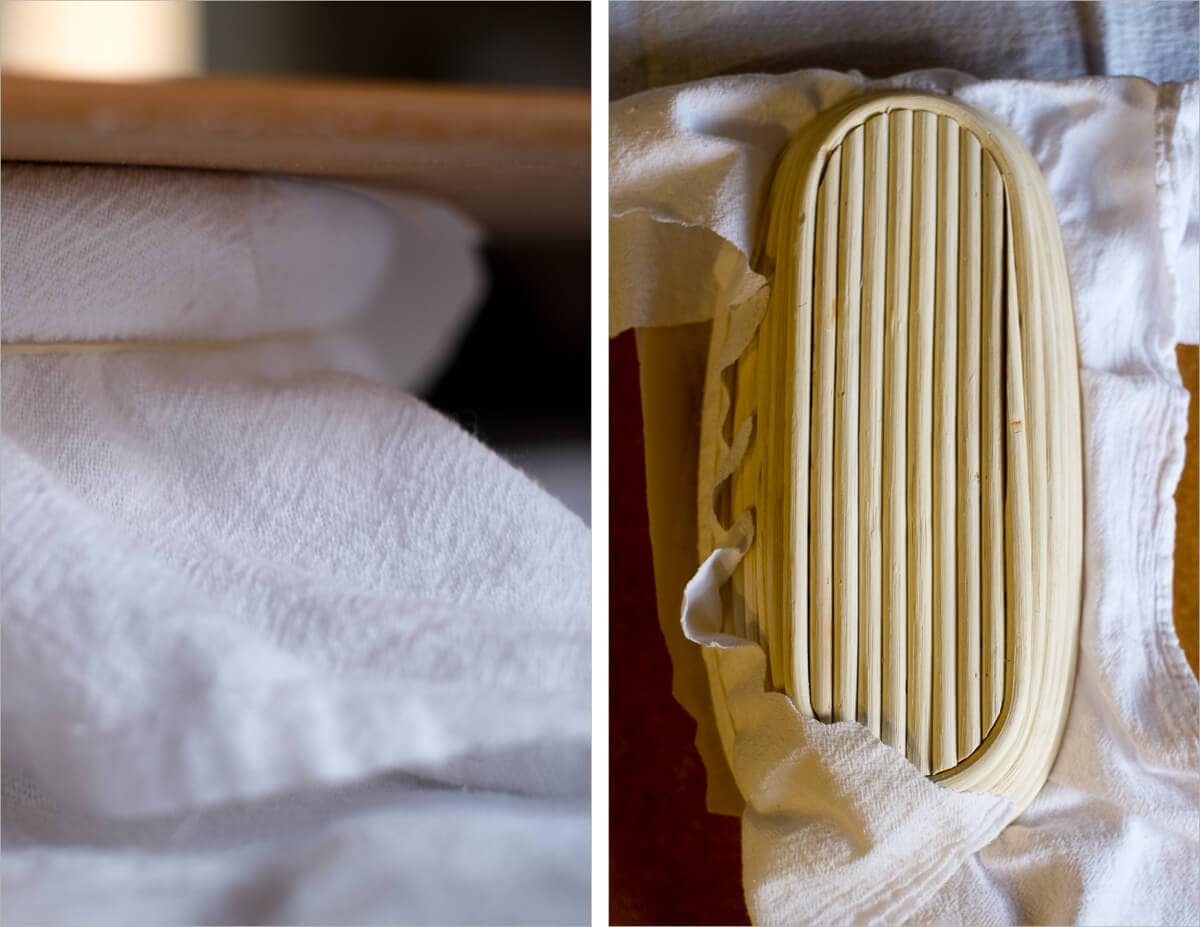
Lightly dust your two linen-lined bannetons with white rice flour. These bowls will hold our fermenting dough overnight in the fridge to proof (final rise).
Shape – 4:10 p.m.
Due to the 80% hydration of these loaves, I had to be very quick and gentle handling this dough. I floured my hands frequently, but I try not to flour the dough excessively. If you take too firm a hand, you’ll push out built-up gasses, but you still need to shape enough to form that taut outer skin that eventually creates the crust of your loaf.
First, I lightly flour the top of one of the rounds, slide my bench knife under and with my other hand flip the round over so the floured side is now resting on the work surface. I then fold the bottom 1/3 up to the middle, the right 1/3 out and on top over to the left side, the left 1/3 out and on top over to the right side. Then, I finish the “envelope” by taking the top 1/3 out and down over to the middle. At this point, I grab a little of the right side near the top, fold it over to the middle, grab a little of the left top and fold over to seal. I then repeat a little below that and continue onward down the mass. Visually it would look like little “X”‘s running down the top of the loaf. When you reach the bottom, pull up the top and roll it down to the bottom.
Have a look at my boule shaping guide for more pictures of the process, or you could shape this dough as a batard (an oblong or oval).
Proof – 4:30 p.m.
After shaping, gently place the dough into their baskets and the fridge for overnight proof.
Score + Bake – 8:30 a.m. (the next day)
Gather your tools:
Place your empty combo cooker in your oven (I like to place the shallow side to one side and deep side to the other), and preheat to 450°F (230°C).
After one hour, take one of your loaves out of the fridge and cut a piece of parchment paper to place on top of the basket containing the dough. Take your peel and then put it on top of those two and quickly invert it, so the dough is now resting on the parchment paper and the peel.
I had a request in my last post to show what this looks like, and here it is. I’ve found this to be the easiest, safest, and best way to transfer dough to your combo cooker without dropping it in and causing gasses to press out. On the left side you can see my linen-lined banneton on the bottom, a piece of parchment paper above that, and finally, the pizza peel on top. After you quickly invert, you’ll see the right side picture below. Then you lift the banneton off, and your dough is ready to be scored and slid into your pan from the oven.
Get your razor blade out and score the top of the loaf to allow the bread to expand while rising in the oven.
Place the dough into the combo cooker and bake, covered, for 20 minutes. After 20 minutes, take the lid off and bake for an additional 35 minutes, until done. This modified baking schedule is something I’ve adapted from Tartine No. 3, their newest book. I’ve noticed this helps to caramelize the crust and cook the dough more thoroughly.

Conclusion
Being one of my first takes at such a high hydration sourdough bread, I’m pleased with the results overall (see my next post on even higher hydration for some better results!). I need to focus on shaping more confidently for the next round to hopefully achieve an even more open crumb. The taste here was an unexpected revelation, the hydration level brings out more of the subtle flavor of the flour used and make the crumb nice and moist for days after baking.
Crust
The crust on this loaf was nice and thin, and colored so exceptionally well. I believe the slightly longer autolyse time of 50 minutes helped out to bring out more of the sugars in the flour leading to more caramelization. The increased baking time also helped to color the loaf a little darker without burning the outside. Those dynamic “tears” on the top of the loaf between the sides of the slash are precisely what I’m after.
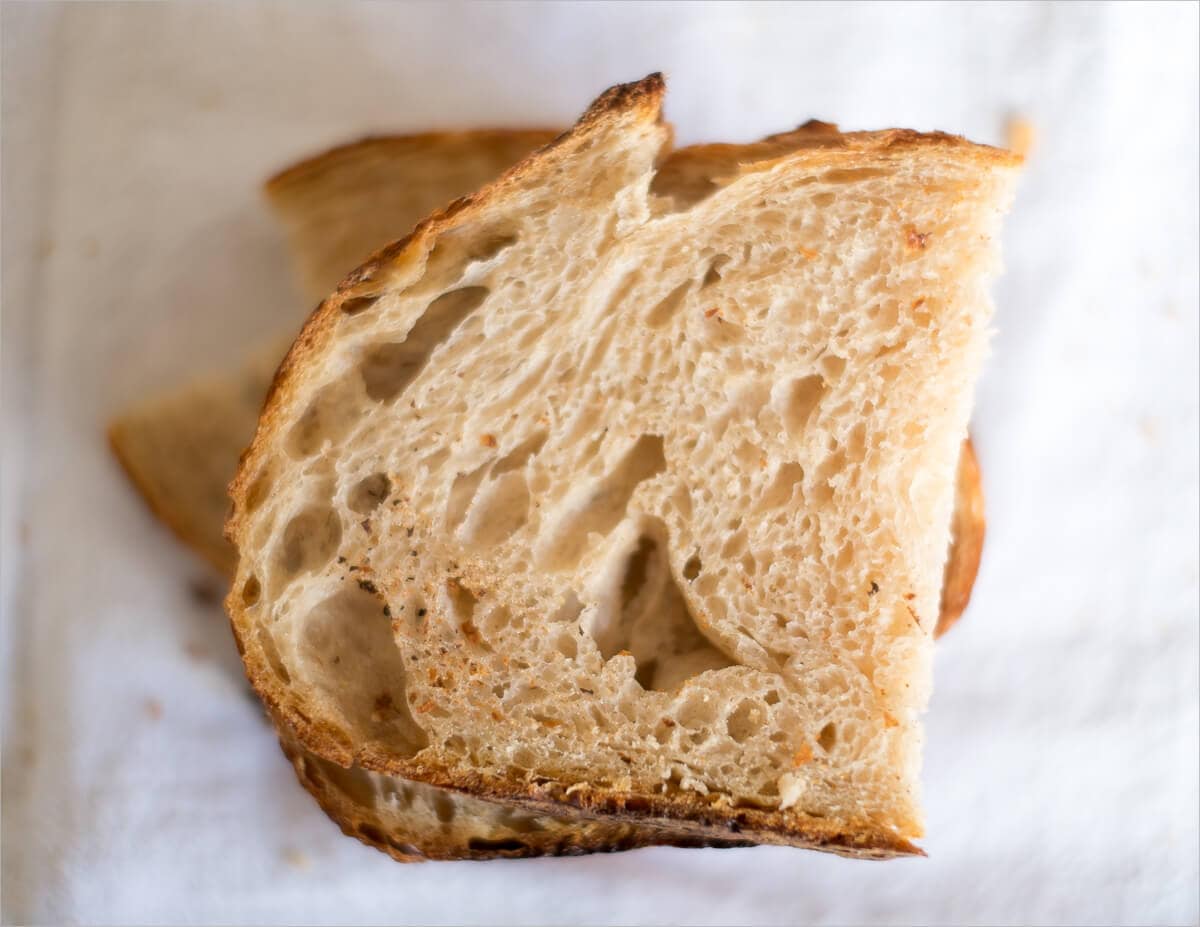
Crumb
The loaf overall was light and airy, but I wanted more openness and evenness to the crumb. While the texture was nice, next time I’m going to test out an even gentler and lighter set of turns for the end of my bulk fermentation.
Taste
Very, very good! The taste is always just great, but this one tasted better than usual. I’m attributing this great taste to the nicely caramelized and thin crust. Additionally, the higher hydration imparted a very moist and tender crumb that has me swearing off bread less than 80% hydration in the future.
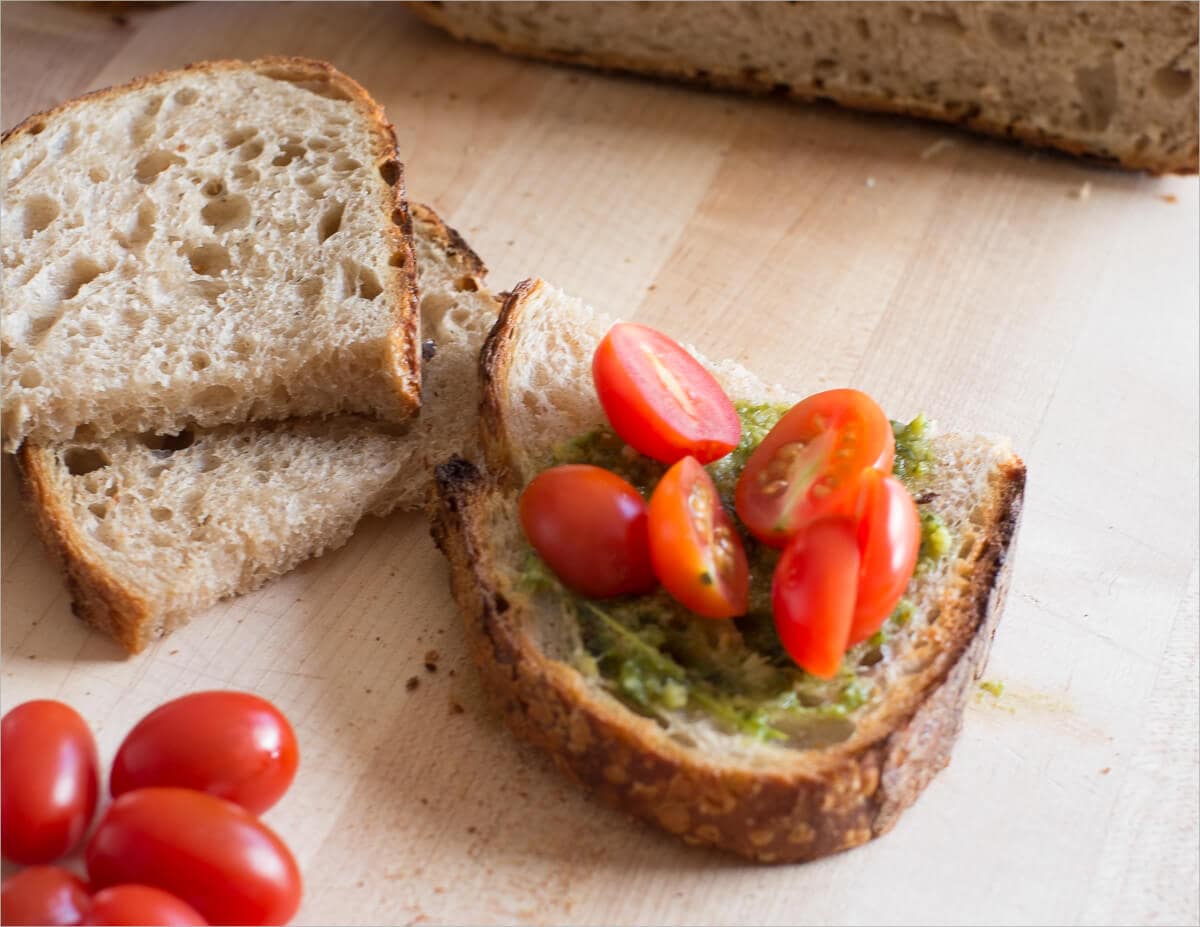
I sliced this loaf up after letting it cool for a few hours and spread on some fresh basil pesto with a few cherry tomatoes for a quick & dirty bruschetta of sorts. A seriously good afternoon snack.
In my next entry I up the hydration even more and get an even more open and tasty crumb!
Buon appetito!
If you use this recipe, tag @maurizio on Instagram so I can take a look!


134 Comments
Hello Leo,
Thanks so much for this recipe
I had great success trying this recipe for the second time, and the bread taste amazing. However, make some adjustment. I added a one hour hydration step at the beginning to ensure sufficient dough strength, performed slap and folds during the first hour of bulk fermentation and being out on whole wheat flour i replaced it with an equal mixture of spelt and rye. I will definitely be baking it on repeat.
is there a video no matter how much I try this mine always turns out flat
so help me understand how this is 80% hydration . . . .375 water to 500 flour, right?
It's actually 750g water to 1000g flour, but also the water in the levain needs to be calculated in. I'm going to update this post soon to make this all more clear!
but the flour and water in the levain is 50/50 so it still looks like a 75% hydration. My numbers 375/500 were for half the recipe. . .
I always add each amount explicitly, to calculate. His recipe is:
250g (25%) leaven
800g (80%) King Arthur bread flour
200g (20%) Great River Organics whole wheat flour
20g (2%) salt
750g and 50g water in reserve for the next step
So total water is 125 (from levain) + 750 + 50 = 925.
total flour is 125 (from levain) + 800 + 200 = 1125.
Hydration = 925/1125 = 82.2%
but there is also flour in the levain . . .?
Hello Leo,
I have your book,you did a good job with it, thank you!
I'm attempting this recipe, it's in the 1.5 -2 hrs. Rise in the bowl phase as I type😉
I haven't had good rise on any HH doughs recipes I've tried as of yet…yet! All of them still taste good though☺️
So far it isn't scareing me by the stickiness!
So I am very encouraged! I'll keep you posted.
I am having a hard time with my definitive thought concerning Baker's percentages, should the amount of flour and water in the leaven, be counted in the complete dough recipe or no?
I don't know why this just only half computes to me..
Example:
I made this recipe:
500g apf
350g water
150g starter
10g salt
It was so wet,I practically poured it into the brotform🤦🏼♀️ hard to believe it raised any at all, so I started researching more on baker's percentages because of that bake.
I haven't found a hard and fast rule to know, depends doesn't work for me because I don't know enough yet to be able to work around that! Haha
Thanks,
Brenda
Update:
Nope, the dough went into the brotform well enough, baking this morning right now and I can tell it's going to splay out and not go up🤦🏼♀️ugh
I have the second loaf to bake afterwards.
What if I put it in the freezer for 30-45 minutes, would that help it? Well, I guess we'll see.
B.
Hey Brenda, how did it turn out?
Thank you! Outstanding recipe, easy to follow, and tastes great!
Happy to help Lucy, thanks for the comments 🙂
I wish I saw this post 20 minutes ago before I gave up on my 80%experiment and covered it in olive oil to let it turn to foccacia. The dough looked gorgeous and was so fun in the stretch and folds stage, but when it got to shaping it was so sticky and wouldn’t keep its shape. It would just melt (perhaps it’s slightly overproofed as well…)!
Do you have any tips for shapping besides constant flouring?
I’m sad because the dough looked so promising!
I’m no expert but I’ve had the same experience with higher hydration. Here’s what I do now, an hour before you’re ready to bake put your proofing basket in the freezer. The outside gets just firm enough to hold shape. I’m sure it’s a cheat but it works great.
High hydration is definitely challenging to shape. With more water in the dough comes the need for more strength to be imparted during mixing and or bulk fermentation. Check out my guide here on mixing to get some more details:
https://www.theperfectloaf.com/guides/mixing-bread-dough/
Can you use a rye starter with this recipe? or even rye flour for that matter?
Organic rye is great in a starter because it has a lot of wild yeast, so it makes for a very robust starter. A tablespoon in with my AP flour is usually my cheat. However, rye has a very low gluten content, so it’s rarely used by itself to make bread (100% rye breads at the grocery store are usually VERY dense and compact). It wouldn’t be my first choice for a high hydration dough because it would make it even more difficult to shape
Should be just fine for the starter.
I started making this recipe about a year ago, and have been making it almost weekly since then. This is hands down the best bread I’ve ever had, and the majority of my friends who have tasted it agree. 🙂
So awesome to hear that, Erin!