
The following quote, a poignant and relatable statement from Lapo Elkann in a recent Monocle magazine interview. In a relatively jovial and concise article, he discusses what good food means to him and his family, and how it is the center of his daily ritual. In the same way, food is usually the center of my day and my interactions with my family and friends. I take care to plan and prepare food each week and generally plan my week’s worth of baking and cooking well before it arrives. My kitchen tends to revolve around what I receive from our farmers’ market co-op, which makes things interesting—you never know what you’re going to get. Similarly, baking high-hydration sourdough bread offers a place for experimentation, and this bread is the result of several rounds of tweaking and adjusting until it came out just right.
I think it’s important to add some pleasure to your life; without it, your creativity won’t be at its best. When the stomach calls, satisfy it. Don’t eat a lot but eat well.
Lapo Elkann
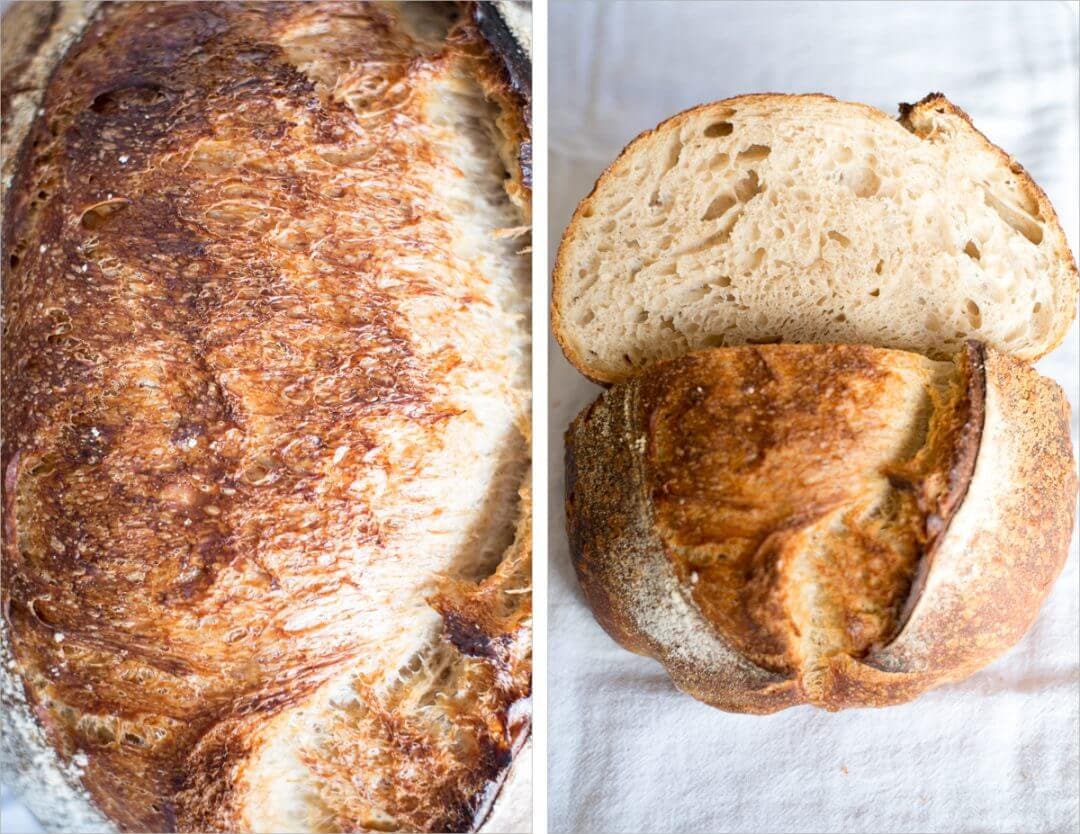
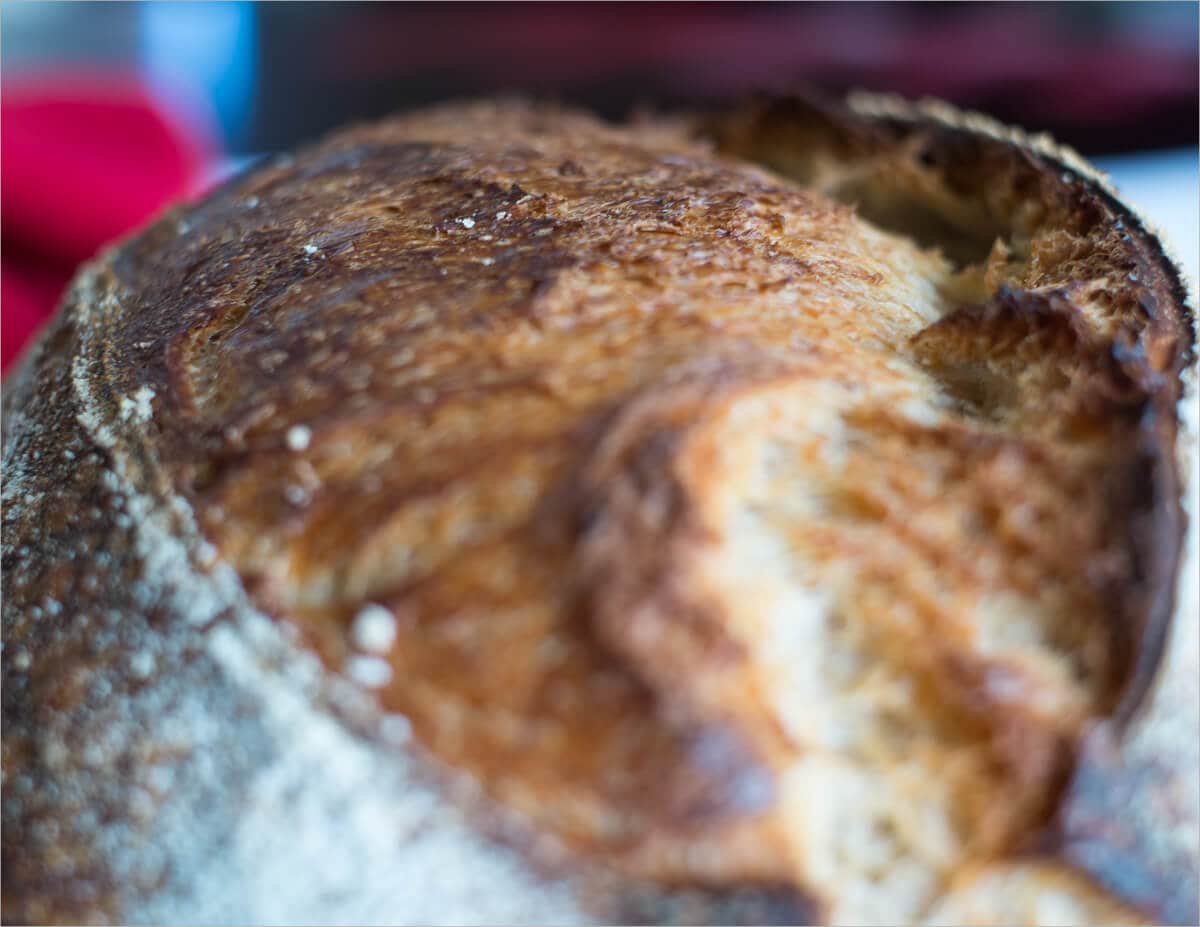
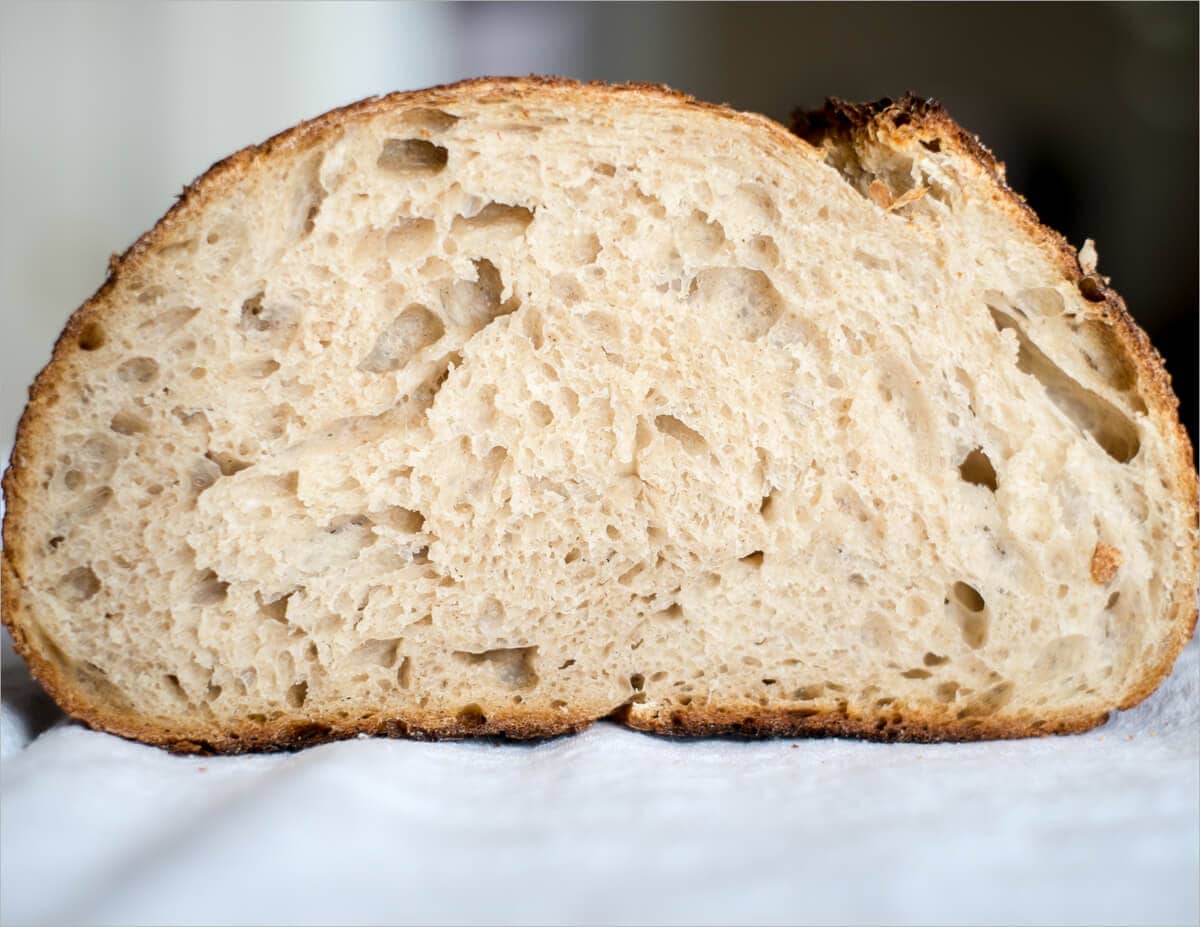
Each week my bread is a chance for me to improve on my tireless quest for the perfect loaf—a search that will likely never end, but it’s the journey that’s the critical part. The perfect loaf, that bread you pull from the oven and sit there for a minute to watch as it cools. The loaf, that when cut, shows a crumb so light and airy you can’t help but poke at it in disbelief. The dark, brittle crust, blisters and cracks on the outside, dynamic tears and rips on top, and an open, light crumb with an even interior from front to back.
Of course, they don’t all end up that way. That’s the hard truth of baking: every bake begins anew. Did bread flop last time? Well, take what you did, modify a single variable, and give it another try and compare what worked and what didn’t. This truth is both very frustrating and also very comforting.
Ok enough of the philosophical treatise on bread and artisan crafts, let’s get on to the actual baking!
The bread I set out to bake for this entry pushed my comfort zone with hydration, a high-hydration sourdough bread at 80%. I know that to get the open crumb I’m looking for, hydration has to increase, so I’ve decided to increase it without making any drastic changes. Shaping becomes incredibly difficult as you get up past 80%. It becomes very sticky and a little slacker. The next few entries, much like this one, will result in some less-than-perfect results (still tasty, however).
As we know, dough hydration is critically important, but to be clear, I’m not increasing the dough’s hydration just to push it high in an attempt to reach some number (because we all know that’s not The Way). It’s an experiment to see how the increased water affects the texture, fermentation, and eating quality of the final loaf. Does it make things better? If so, we’ll keep moving in that direction. If it doesn’t make things better? Back off and reevaluate.
Prepare the leaven – 10:15 p.m.
My typical 100% whole wheat leaven, prepared the night before:
- 30g ripe starter
- 120g whole wheat flour
- 120g water
After mixing the above in a glass container, cover and set in a slightly warm area in your kitchen. If it’s cold at night at your place like mine (around 65°F/18°C at night), you’ll need to experiment with an area that’s a bit warmer in your kitchen. For me, it’s on top of my refrigerator.
If you haven’t yet created your sourdough starter, don’t fret, it’s very simple. Head over to my post where I discuss creating a sourdough starter from scratch very easily in 7 steps.
Mix the flour and water, autolyse – 10:00 a.m.
Even with the warmer temperatures on top of my fridge, my leaven still needed more time to mature. I’ll usually start around 8:00 or 9:00 a.m. but the “nose” of my starter was not quite sour enough, and it could use a few more visible bubbles. At around 10:00 a.m. things looked much better and I started for the day.
I did a quick verification with the “float test,” scooping just a bit of my starter into a glass full of room temperature water – looks like it’s floating, we are ready to go. I don’t usually do the float test at this point anymore, but sometimes it’s a good sanity check to make sure things are progressing as expected.

Ingredients:
- 250g (25%) leaven
- 800g (80%) King Arthur bread flour
- 200g (20%) Great River Organics whole wheat flour
- 20g (2%) salt
- 750g and 50g water in reserve for the next step
I recently discovered that I’m a bit lucky here in New Mexico as we have a tremendous local flour mill that produces white flour from wheat grown up north around Taos. This Sangre de Cristo flour is available at some local co-ops, and I hope to have some to test with for the next entry. I thought I was out of luck and would have to eventually buy my small home mill to have complete control over that part of the process… To be honest, I’m still pining for a home mill and hope to have one in the future.
Method:
- Add the 250g of leaven to a large mixing bowl
- Pour in the 750g water and mix with your hands until the leaven is completely dissolved
- Add 800g of the bread flour and 200g whole wheat flour and mix with your hand until all the dry flour is incorporated
- Cover your bowl with a towel and let autolyse for 50 minutes
- After 50 minutes add 20g salt to the dough and slowly pour the remaining 50g water on top. Squeeze the dough with your hand to incorporate the salt
- Now reach your hand under the dough and pull one side up and over onto itself. Do this several times until you notice the consistency of the dough to turn sticky
- Transfer your dough to a large bowl for the bulk fermentation step
The final dough temperature after mixing in the salt was 78°F (25°C). Perfect.
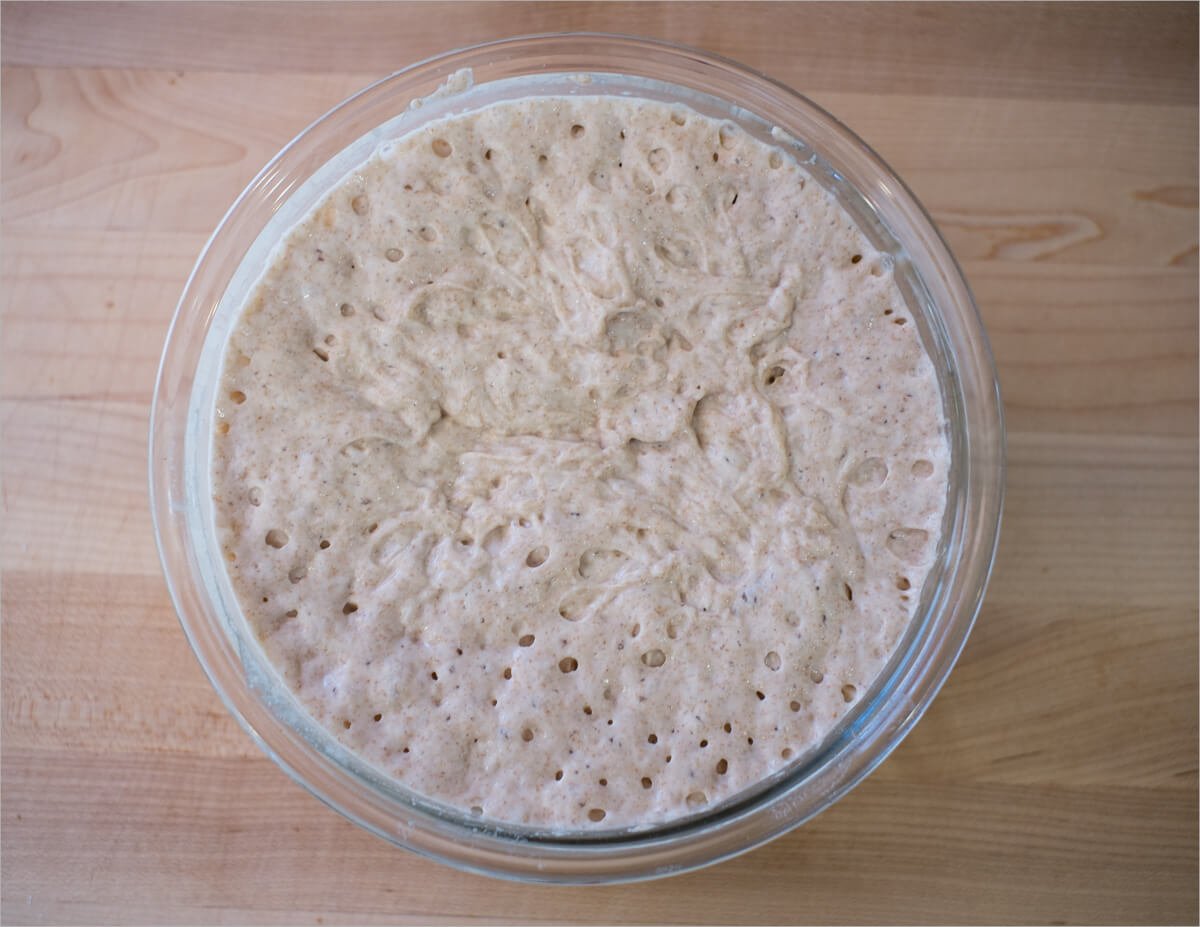
Bulk Fermentation – 11:00 a.m.
During bulk fermentation, you want to do about six turns spaced out 30 minutes apart. The first four turns should be fairly vigorous with the last two being more gentle as not to push out all the precious gasses built up.
- 11:30 a.m. – Turn 1
- 12:00 p.m. – Turn 2
- 12:30 p.m. – Turn 3
- 1:00 p.m. – Turn 4
- 1:30 p.m. – Turn 5
- 2:00 p.m. – Turn 6
- 2:00 p.m. – 3:30 p.m. – Rest on counter untouched
During the bulk fermentation step, taking place over several hours is usually a perfect place for me to take my dog out for a quick 30-minute walk and a post-walk espresso.

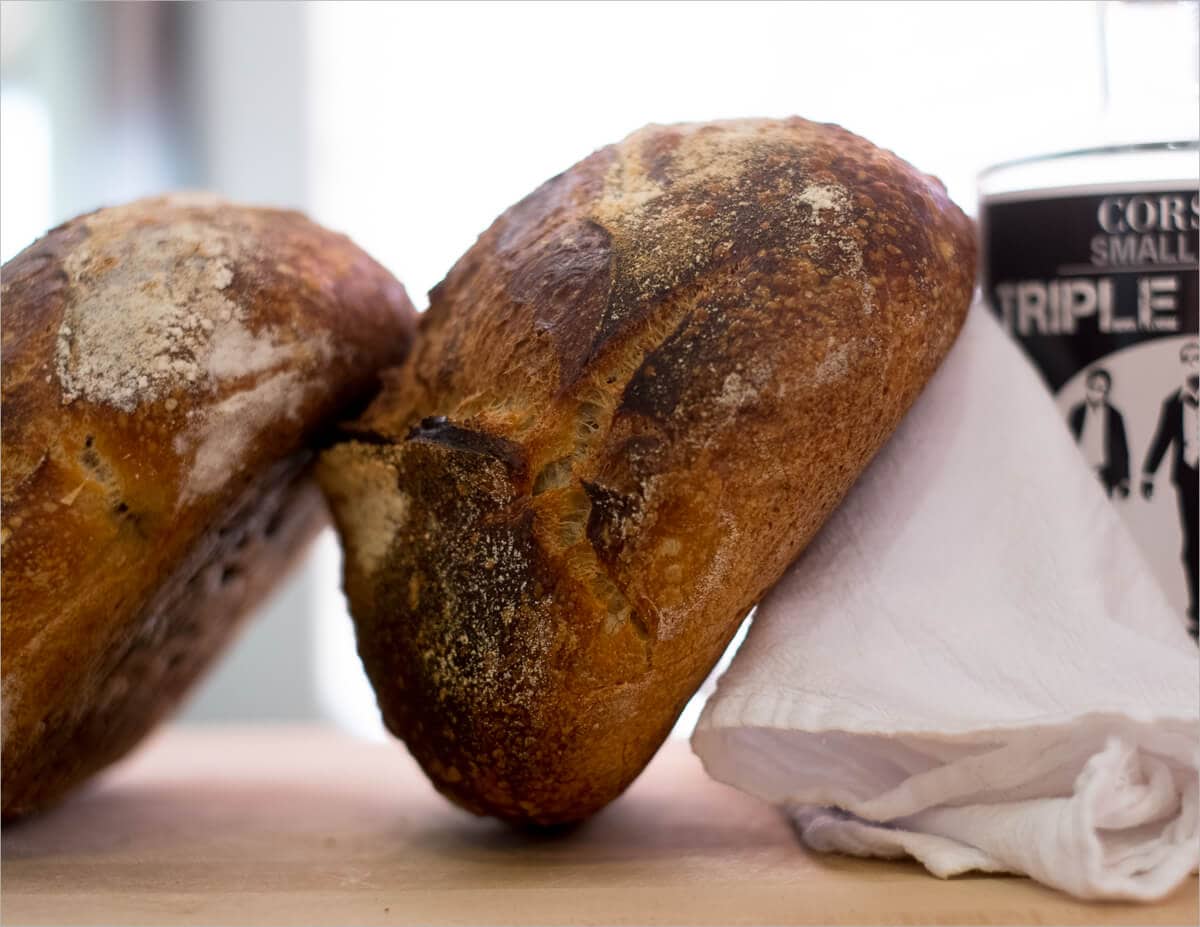
By 3:30 p.m. the dough had risen almost to the top of my bowl, was very bubbly throughout, and was ready to be shaped.
Pre-shape – 3:40 p.m.
Take the dough out of the bulk container onto your work surface and sprinkle some flour on top before dividing. Divide the mass into two halves and lightly spin each half with your dough knife in one hand and your other hand. This will very lightly create tension as the dough sticks to the work surface. Invert a bowl on top of each shaped mass to keep it from drying out and set a timer for 30 minutes.
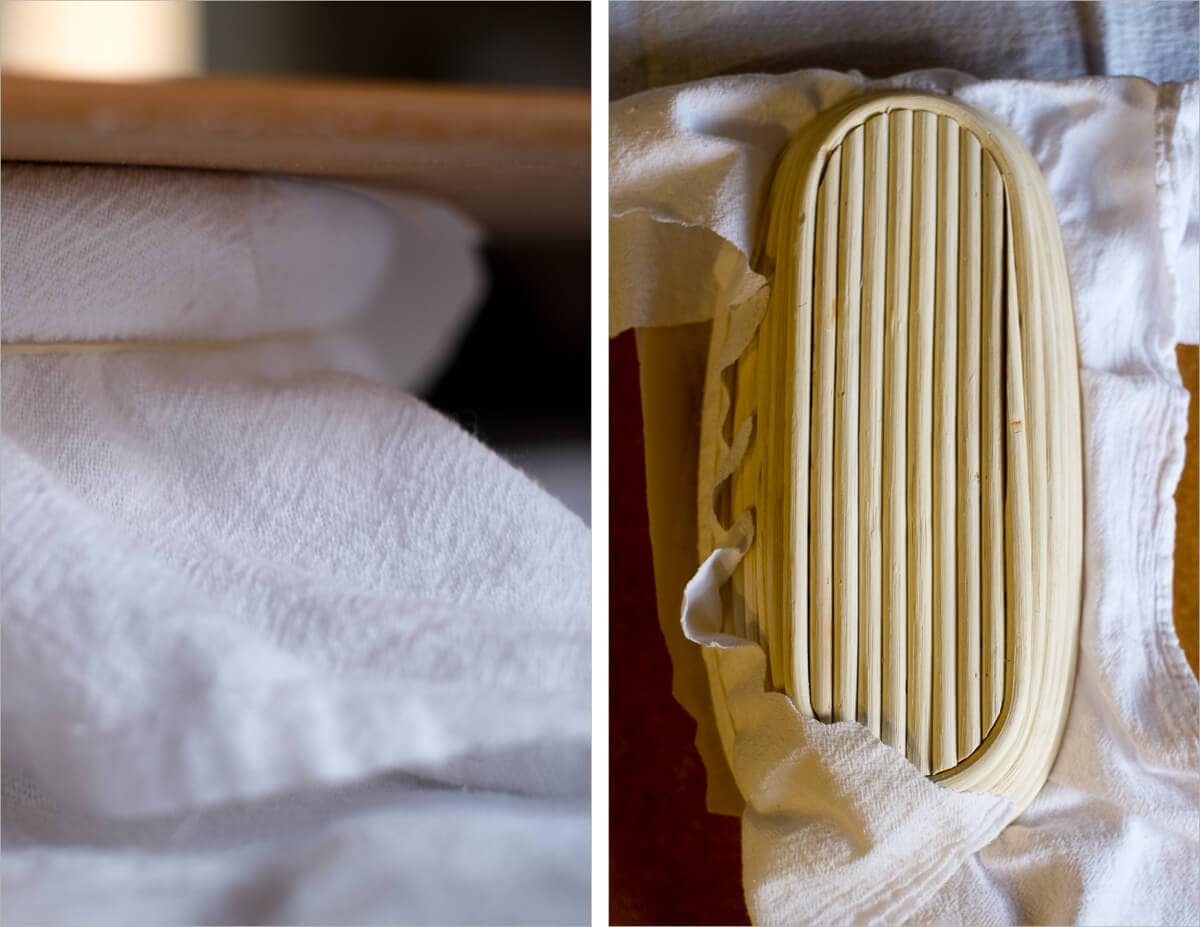
Lightly dust your two linen-lined bannetons with white rice flour. These bowls will hold our fermenting dough overnight in the fridge to proof (final rise).
Shape – 4:10 p.m.
Due to the 80% hydration of these loaves, I had to be very quick and gentle handling this dough. I floured my hands frequently, but I try not to flour the dough excessively. If you take too firm a hand, you’ll push out built-up gasses, but you still need to shape enough to form that taut outer skin that eventually creates the crust of your loaf.
First, I lightly flour the top of one of the rounds, slide my bench knife under and with my other hand flip the round over so the floured side is now resting on the work surface. I then fold the bottom 1/3 up to the middle, the right 1/3 out and on top over to the left side, the left 1/3 out and on top over to the right side. Then, I finish the “envelope” by taking the top 1/3 out and down over to the middle. At this point, I grab a little of the right side near the top, fold it over to the middle, grab a little of the left top and fold over to seal. I then repeat a little below that and continue onward down the mass. Visually it would look like little “X”‘s running down the top of the loaf. When you reach the bottom, pull up the top and roll it down to the bottom.
Have a look at my boule shaping guide for more pictures of the process, or you could shape this dough as a batard (an oblong or oval).
Proof – 4:30 p.m.
After shaping, gently place the dough into their baskets and the fridge for overnight proof.
Score + Bake – 8:30 a.m. (the next day)
Gather your tools:
Place your empty combo cooker in your oven (I like to place the shallow side to one side and deep side to the other), and preheat to 450°F (230°C).
After one hour, take one of your loaves out of the fridge and cut a piece of parchment paper to place on top of the basket containing the dough. Take your peel and then put it on top of those two and quickly invert it, so the dough is now resting on the parchment paper and the peel.
I had a request in my last post to show what this looks like, and here it is. I’ve found this to be the easiest, safest, and best way to transfer dough to your combo cooker without dropping it in and causing gasses to press out. On the left side you can see my linen-lined banneton on the bottom, a piece of parchment paper above that, and finally, the pizza peel on top. After you quickly invert, you’ll see the right side picture below. Then you lift the banneton off, and your dough is ready to be scored and slid into your pan from the oven.
Get your razor blade out and score the top of the loaf to allow the bread to expand while rising in the oven.
Place the dough into the combo cooker and bake, covered, for 20 minutes. After 20 minutes, take the lid off and bake for an additional 35 minutes, until done. This modified baking schedule is something I’ve adapted from Tartine No. 3, their newest book. I’ve noticed this helps to caramelize the crust and cook the dough more thoroughly.

Conclusion
Being one of my first takes at such a high hydration sourdough bread, I’m pleased with the results overall (see my next post on even higher hydration for some better results!). I need to focus on shaping more confidently for the next round to hopefully achieve an even more open crumb. The taste here was an unexpected revelation, the hydration level brings out more of the subtle flavor of the flour used and make the crumb nice and moist for days after baking.
Crust
The crust on this loaf was nice and thin, and colored so exceptionally well. I believe the slightly longer autolyse time of 50 minutes helped out to bring out more of the sugars in the flour leading to more caramelization. The increased baking time also helped to color the loaf a little darker without burning the outside. Those dynamic “tears” on the top of the loaf between the sides of the slash are precisely what I’m after.
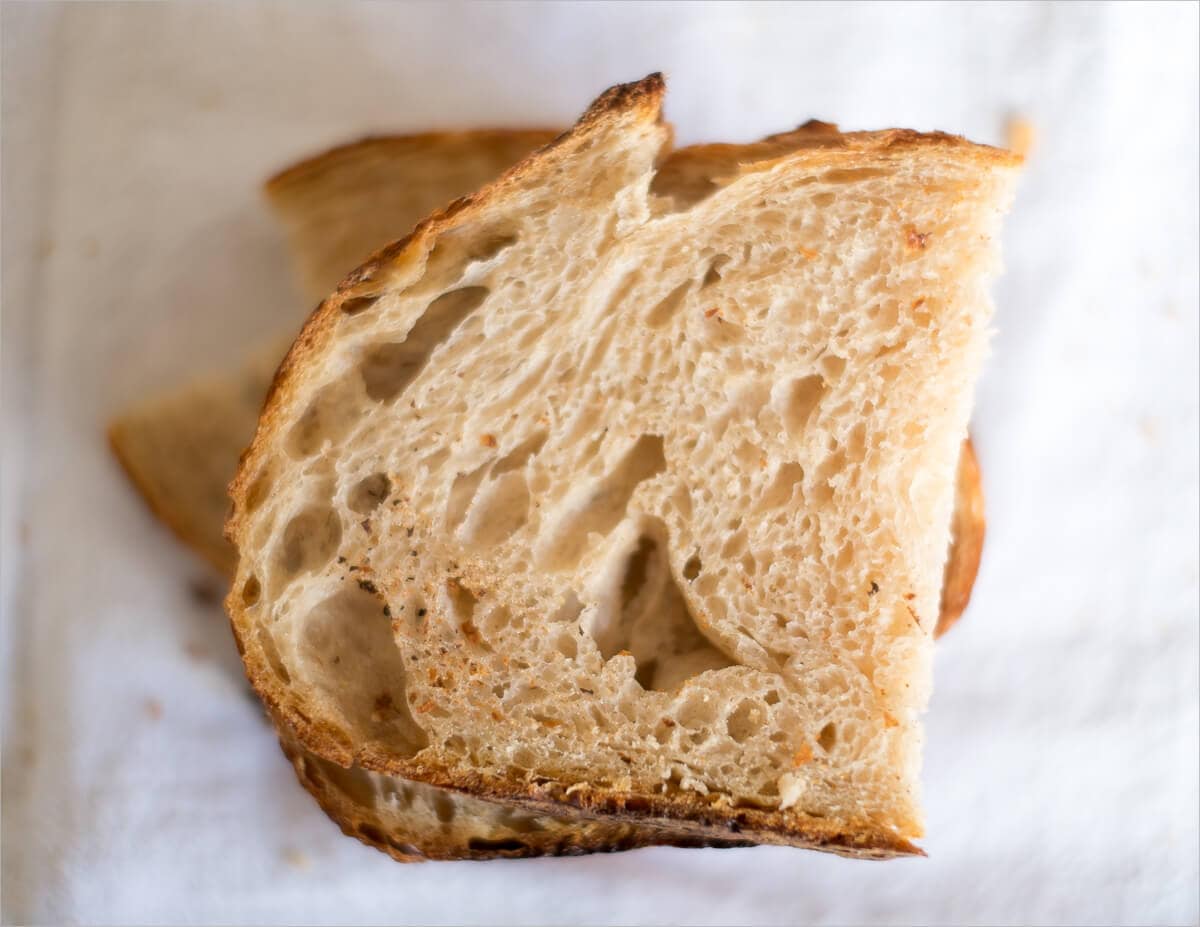
Crumb
The loaf overall was light and airy, but I wanted more openness and evenness to the crumb. While the texture was nice, next time I’m going to test out an even gentler and lighter set of turns for the end of my bulk fermentation.
Taste
Very, very good! The taste is always just great, but this one tasted better than usual. I’m attributing this great taste to the nicely caramelized and thin crust. Additionally, the higher hydration imparted a very moist and tender crumb that has me swearing off bread less than 80% hydration in the future.
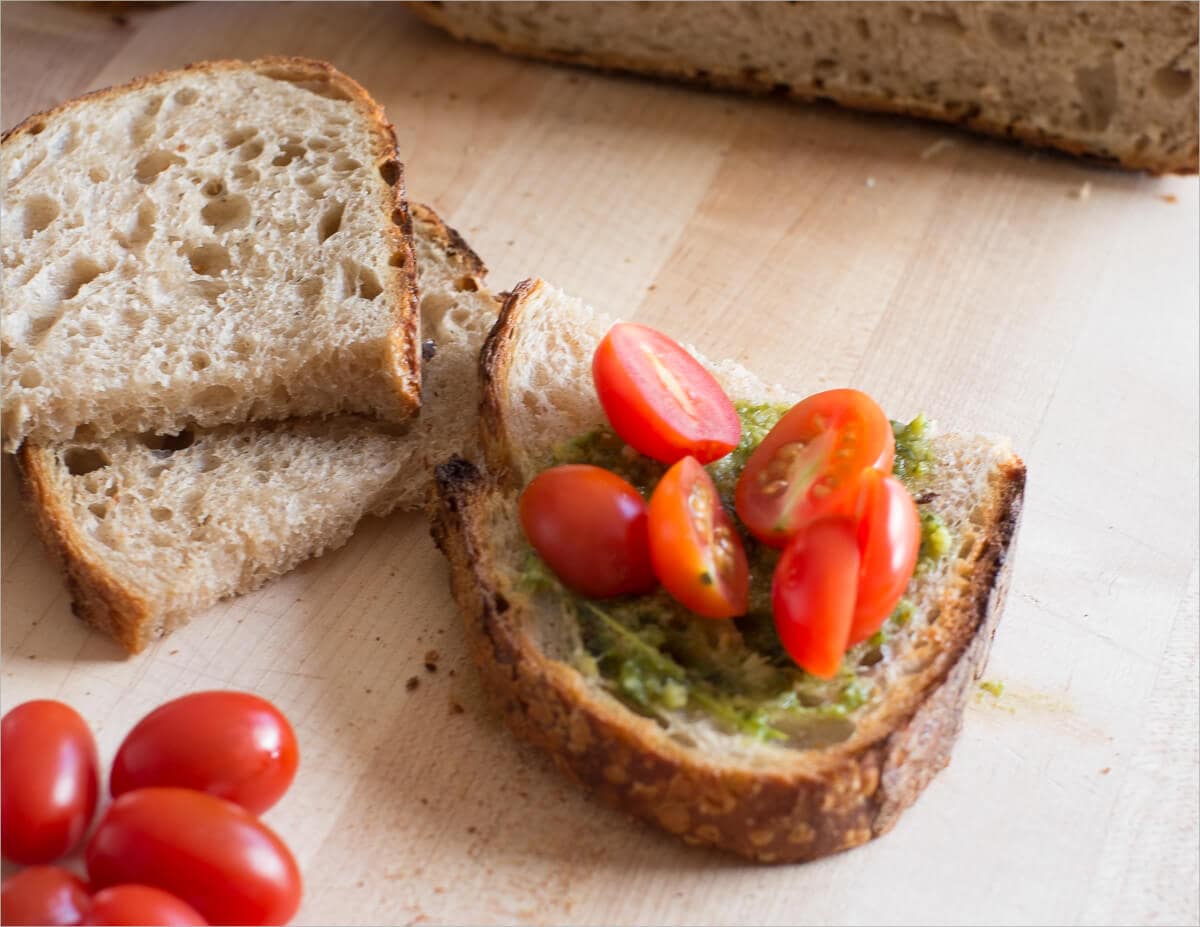
I sliced this loaf up after letting it cool for a few hours and spread on some fresh basil pesto with a few cherry tomatoes for a quick & dirty bruschetta of sorts. A seriously good afternoon snack.
In my next entry I up the hydration even more and get an even more open and tasty crumb!
Buon appetito!
If you use this recipe, tag @maurizio on Instagram so I can take a look!


134 Comments
How can you determine what hydration level your flour will withstand? Do you just experiment with different hydration levels until it’s good or is there some other way?
The only way is to play around with it. I make 8 loaves a week, so I’m at 2500g of flour. 1000g will give you 3 smaller loaves about 600g, or two 800g after baking, give it take. I would suggest something like 1500g of flour and do a 75% hydration, 80% and 85% and see what you prefer. What works well for me is a 81.8% hydration, but I have gone up to 91%.
I love your easy to follow high hydration recipe. My dough only needed 4 stretch and folds, 1 hr for in the fridge to slow down fermentation before baking, as my starter was super strong. I’d like to share a picture of how my loaves turned out.
Glad to hear that, Nancy! I don't have a way to upload photos yet 🙂
If I like a little more of a sour taste, would using a higher percentage of starter in the levain help with this?
No, you’d do a longer cold proof in the refrigerator, but no longer than 72 hours (3 days). I do a 48-70 hour cold proof. You must make sure though that you either wrap up the basket with a plastic bag (some use those plastic bags from grocery stores) or completely cover the bowl/basket with plastic wrap. Otherwise the dough will dry out, and lose its moisture.
Maurizio, I have been baking sourdough bread using your recipes. They have turned out great except for the higher hydration recipes. I would prefer to use white whole wheat vs regular whole wheat and wondered if I need to adjust the amount of water I’m using? I like the 50/50 recipe but again I would rather use white whole wheat. Thank you very much!
I would try reducing the water, it will probably help quite a bit!
Hi. Can you please explain autolyse? I thought autolyse meant just water and flour without levin?
Typically, yes, the autolyse does not have the levain added (and I don’t typically do this, either). This is an older recipe and I did so in testing!
Check out my thorough guide to the autolyse technique for more info (including when to add your preferment to the autolyse).
Hi Maurizio
Just wondering about oven temp
I want to try one loaf in Dutch oven and one in a loaf tin and open air oven.
Can you tell me about the difference in temperature of each cook? I usually put a little dish of water in the bottom of the oven for open air baking for steam but what about temp?
Emily
I usually like to bake those two separately since I do a lower temp, but for longer, with the tin (usually 425F or so).
Hi Maurizio! first of all thank you so much for all your wisdome in the form of all these great guides and recipes. I have been making some of your lower hydration loafs in great succes and learned so much.
I have been making this high hydration recipe for a couple of times and I cant seem to get a good loaf out of the oven.
I have tested my flour on its capabillity to hold this amount of hydration and that whent great, I folow the recipe including using my own sences. I have the idea now that the problem is with my starter, that its not strong enough for this kind of hydration, do you think thats possible? I have little rise during the bulk, I do have a lot of bubble activity and it never is nice and domed at the end of bulk. I also do great gluten activation by slap and folds during mixing and stretch and folds during bulk. I could really use some help here haha. Thank you so much!
You’re very welcome, Nick! Hmm. It sounds to me like the dough is likely not strong enough with all of the added water. I’d consider holding back more water, mixing for longer, then slowly adding the water in through the later stages of mixing. There’s no reason to push the water in the dough if your flour can’t handle it, either! It’s all very relative to the flour at hand 🙂
Thank you Maurizio!
I did do a test with my flower(a little 30 minute autolyse with just the flower and 80% hydration) to see if my flour could handle it. This seemed to be going very well and also my dough feels strong and windowpain test goes perfect at the end of bulk. It just looks like there’s not enough activity to make such high hydration bread rize, that’s why I thought maybe its a problem with my starter. Or is that really not likely in your opinion?
Thanks again, and thank
You for your quick reply Maurizio.
Nick
It’s possible you’re not getting enough fermentation in the dough, yes, but it sounds like a hydration issue to me. If you have a dough with a very high hydration, you’ll see less rise overall as the dough struggles to support the water. As long as your starter is rising and falling predictably with signs of strong fermentation, it’s probably working just fine!
Allright thank you Maurizio, that was great help. So if I would like to make higher hydration bread I should find a flour that can handle it? Or could more dough strengthening true slap and folds during mixing also fix the problem I’m having?
Increasing your dough development can help, yes. Generally, the more water you add, the more strengthening you’ll have to do. Eventually, though, you’ll reach a limit for the flour you’re using and that’s that!
Allright thank you, this has been great help.
I love this recipe so much! I saw a recipe on another blog for blueberry and lemon zest add ins. Do you think add ins would work in this high hydration or would it be better with say 70%?
So glad to hear that, Hannah! I’d say drop the hydro a bit… At least for the first test. Blueberries have a high water content!
What temp are you bulk fermenting at in this process? I have a proofer which will allow me to be a little more consistent on this aspect. 80F?
I’m usually around 76F for bulk, assuming the dough temp is what’s specified in the recipe!
hi maurizio
i just wanted to let you know i don’t even bother closing the Perfect Loaf tab on my browser anymore because i use this site so often. i’ve tried so many different sourdough recipes and yours are the only ones i trust now as they have had such a high rate of success for me. i do have one question, which is that since i live in a very small household, i don’t really need two big loaves at a time which is what the yield is for most of your recipes. do you anticipate a loss in oven spring or any other compromise in the loaf quality if i wait another 24 hours before baking the second loaf, which brings the retardation up to possibly 30+ (maybe even 40+) hours? thanks so much for everything you do, and for being SO GOOD at it!
Ha ha, well thank you I really appreciate that. I think that might have been the best compliment I’ve ever received—browser tabs are serious business! Leaving the dough an extra 24 hours should be fine, but yes, expect a slightly more sour flavor and a little less rise. The dough will (very slowly) continue to ferment even in a home fridge, which leads to more acid production and degradation of the gluten in the dough. It’ll still be totally delicious, though! I do it all the time, give it a try.
Another option: halve the recipe per my instructions on my baker’s percentages explained guide. That way, you only have to bake one loaf!
Hope that helps and thanks again. Happy baking 🙂
permanently open on both laptop and phone browsers, i might add.
to be honest i have been hesitant to scale down the recipes as i feel like they might affect the outcome (this feeling has no basis other than my lack of confidence in both my math and sourdough skills), but if you say that would work that’s good enough for me. will also try delaying the baking but that’s my second choice since sourdough gluten is my precious.
you have been so helpful! thank you.
Hah! That’s just great. Big compliment right there—thank you.
Happy to help. Let me know how it goes and if you have any more Q’s. Have fun!
How come you don’t autolyse. I made this bread and it was great but the second time I let it bulk ferment in the fridge and rushed the turns; it was still forgiving tho. Thanks, love the blog.
Hello, im wondering can i use a lodge enamel dutch oven for this recipe? Thanks!
Definitely!
Glad to hear that, Lisette!
I did the exact measurements as said, but my dough was runnier than pancake batter. What happened?
probably the difference in starter, but thats a guess. im just starting working on higer hydration doughs 🙂 they are so diffrent then kneaded doughs
sounds like the dough was over hydrated — try cutting back the water in this recipe by 10-15% to bring more strength to the dough!
It’s interesting that you take your loaves right out of the fridge, score them, and bake them. I’ve been under the impression that I’d end up with smaller loaves because they’d be too cold when going into my Dutch Oven (they’d have to spend more time warming up to more fully activate the yeast and get that oven rise versus warming to room temp on my counter, in other words). Thoughts, please? 🙂
I wondered the same thing. My thoughts were that the dough would be too firm from being cold and resist the oven spring.
It’s totally fine to bake straight from the fridge!
The oven spring is resulting from the water turning to steam and the entrained air from fermentation expanding, not from the yeast at this point. The yeast’s job was to create the air. Scoring from the fridge is far easier, and a cold retard helps boost flavor and helps achieve the highly sought after blisters.
Hello Maurizio! Thanks a lot for all the solid recipes and a taste of friendliness in your articles!
I have been doing sourdoughs for a while from your recipes, I live in Scotland which is not as warm as New Mexico.
In all the recipes I tried, my dough is still seem not stirdy enough when scoring, if that makes sense. I see a lot of videos where people easily score with a single move and the dough opens nicely and you see the ‘thick’ outer sking of the uncooked dough. That never happens with me, I push my score into dough to open is because it is still very much like a dough.
Still results are not bad, bread turns out great but I bet it could be better if it can open! Not sure what this problem is related to, do I need longer proof due to cold weather or is it my shaping?
Let me know if you have any idea! Thanks a lot!
You’re very welcome, Melody! Sorry for my delayed reply. It’s likely your issue is related to dough strength overall, but it could also be due to an overproofed dough.
First, I’d say look at dough strength. Make sure your dough has undergone enough kneading and/or sets of stretch and folds through bulk so preshape and shape results in a dough that’s smooth, strong, and holds its shape on the counter. If you find the dough is a little weak when you go to shape it, preshape it aggressively and shape it very tight. The goal is to have a dough that still has some strength to it when you go to bake, this will also lead to a dough that’s a bit easier to score.
Regarding overproofing, there are a few indicators your dough could be going over: sluggish rise in the oven, the score on top of the dough might not open with a nice “ear” and instead just kind of fuse together, the interior will have lots of small holes and perhaps one or two large ones near the top (but no dense areas of unfermented flour), and finally the loaf could be a little on the sour side. If you think this might be the case, try cutting back the proof time by 2-4 hours if you’re doing it in the fridge. If at room temp, try just 30 minutes to 1 hr.
Finally, one last note: if you’re proofing your dough at ambient room temp you’ll find it harder to score than if you pull the dough from the fridge and score before baking. Cold dough is much easier to score (which is one of the many reasons I like to retard my dough overnight in the fridge).
I hope this helps!
Maurizio! Avid reader and fan. As always, thanks for your guidance! Question for you… I seem to consistently have quite sticky/gummy crumb. The crust is lovely and cooked (the bottom is even burned) but the inside is consistently gummy. Have you experienced this before? Thoughts? Thanks!
Maddie: If the hydration is too high for your dough it can lead to an overly wet or gummy interior. If the dough feels “soupy” or very “slack” then try pulling back the water percentage by 5% and see if that helps.
Make sure to bake your loaves completely. The interior should register around 208°F or higher.
If your loaf is under proofed then this will typically lead to a gummy or “wet” textured interior. Make sure your starter and levain are very vigorous and strong when you use them. This is very important! From there, make sure to bulk ferment your dough fully (use the images you see in my posts to guide you on what the dough should look/feel like). You want the dough to be alive and aerated before you divide and shape. From there, a full and complete proof is also very important.
Hope that helps, let me know if these suggestions improve your bakes!
Hi! I realise this is an old question but it fits my query. I made this today and while I got good oven spring, it wasn’t as much as yours, and my crumb was quite wet. I followed your recipe to a T with a very vigorous mature starter. I got about 40% growth during bulk, it was gorgeous and highly/fluffy, but no rise whatsoever in the fridge (we keep it quite cold). When I try this again, would there be any harm to proofing at room temp for a while after shaping, or should I extend the bulk and then go straight to the fridge?
Thanks!
I have the same question 🙁
Hello. I have followed your recepie for 80% hydration. All is wonderful, but I don’t get a good crack on my final bread, the dough kind of flops as I slash it.
I have an old oven that only gets to 220c. I am not sure what I am doing wrong.
Hope ypu can help me
Thank you
Zora
Zora it sounds like your dough might have needed more strength and/or less water — this isn’t for sure but it’s my guess. I’d try reducing hydration by 5-10% and see how the dough feels. If it feels slack during bulk, give it more sets of stretch and folds to impart more strength, even if you reduced the water. Also, make sure it has enough strength by the end of shaping, it should hold itself on the work surface after you shape it. Shape tight if necessary!
Let me know how it goes 🙂
I have tried your higher hydration sourdough and high hydration sourdough yesterday and I am having trouble with my dough staying in shape. I followed your exact timing but the dough after bulk fermentation is sticky and doesn’t hold its shape. No matter how many times I tried, its flat and ended up pouring the dough into the banneton.
More information about my high hydration sourdough baked yesterday.
Dough info:
1. Feeding 100g whole wheat and 100g water to my starter twice a day
2. I am using stiff Levain – doesn’t float on the water
Observation:
1. the dough doesn’t pass window pane test after bulk fermentation – 6 sets of folds.
2. This I tried kneading it for the gluten but not sure if it’s because of the hydration of the dough, it manage to develop some for the window pane test – lifting around 2 inch height but still too watery to be shaped.
Environment:
1. Room temperature 26c -31c
What do you think I should try to make it better ? Reduce the hydration or what have I done wrong because I really wanted to try high hydration sourdough.
Kindly seeking for your advice. Many thanks in advance.
It sounds like your dough is most likely over hydrated. Try reducing the hydration by 10% and give it another go — the reduced water should bring a lot of strength to the dough and you’ll feel it immediately. Once you find a suitable hydration, you can try to push it back up, but as you do, take note of how the consistency of the dough changes: the dough will start to slacken out as you add more and more water, this means you’ll likely have to mix more upfront or add another set or two of stretch and folds during bulk fermentation.
Try to keep everything else as consistent as possible and let me know how the next attempt goes!
Hi Maurizio,
Love the blog. As a beginner baker (and fellow New Mexican) it is an endless source of inspiration. I recently made a loaf with a similar flour mix and ~80% hydration. I found I had an extremely difficult time scoring the loaf before baking; despite a steep angle, the dough would drag on the blade and prevent a clean slash. I also had some issues with dough strength (which I plan to fix with additional initial mixing) and I’m guessing the scoring issues are related to this–have you ever experienced issues scoring as you’ve increased hydration?
Max
Glad to hear you’re enjoying my website, Max! It’s also great to hear from a fellow New Mexican. To answer your question, yes, as the dough gets weaker (either from more water in the mix, less strengthening, or even over proofed dough) scoring becomes more and more challenging. My guess is if you knead the dough a little more upfront, or add in another set or two of stretch and folds during bulk, you’ll see scoring becomes easier.
It’s also important that your dough is shaped tightly enough. Developing sufficient tension on the outside of the loaf will help produce a cleaner score. Additionally, I do like to cold proof (retard) my dough overnight — this has many benefits I’m after but it also is much easier to score dough straight from the fridge when it’s cold and firm.
Hope that helps!
What are you doing with the leftover levain
I have a batch of this bread autolysing right now, but I hate to discard the remaining levain
Hey, Jeff! I need to go back and update this post to make less levain, only enough to cover the recipe. Here’s some ideas for using up that levain: sourdough waffles, banana bread, and pancakes.
I have been trying my hand at sourdough and have had my most successful bakes using your guidance. I already have my 2 sourdough starters made with organic rye (Arrowhead) and whole white wheat (Prairie Gold) flours. I have had the most success with the rye starter. My first starters were with KAF Organic All Purpose Flour (1 plain and one made with grape yeast) but I made the mistake of letting it go too sour after my first 2 bakes and had to toss them out and start over. So far so good. Links below to my semi-successful sourdough sandwich bread and boule. Working on my next loaf now.
https://www.instagram.com/p/BiNwlbHHYTPdctL4e-2it-nDK506glWe1WgsyM0/?taken-by=eviasgrand and https://www.instagram.com/p/BiLbQuonriG2jlSDR9ttK9Uh-R_ywpJnaM0d740/?taken-by=eviasgrand
Hi,
I just baked follow this recipe.
I followed everything the same except final proofing ( I proof inside fridge for 5 hrs instead put it overnight inside the fridge).
I found out the appearance was good, with oven spring, but not so many big crumb and taste quite sour.
I would like to seek opinion on why does it taste sour?
Thank you.
In addition, I stay in a country with a humid weather ,so when I build levain , and mix flour,water, and starter are done in Room Temperature (28-30C) and I did 3 stretch and fold (in your blog is written 6 turns).
I am not sure the sour taste because of the whole wheat I use which produce sour smell OR I ferment the levain too long at 30C.
Thank you for your help.
Tamar — thanks so much for the update and I’m super happy to hear that. Enjoy & happy baking!
Hi congrats
What was the brand and type of flour you used?
interesting……………. thanks!