
Generally, I’m not a big fan of overly cheesy, gooey, and drippy foods, but if there is an exception to my (admittedly) lightly-held rule, it is the calzone. As a devout pizza aficionado, it’s natural that I’d love a calzone because at its core, it’s essentially a pizza that’s been folded up around its toppings. But it does go farther than that: The crust crisps up in a way that a pizza does not. Plus, there is a seemingly infinite number of ingredients you can use to stuff the dough; from simple cheese blends to sausage to sauteed veggies—they’re all amazing.
In this sourdough calzone recipe, I use my wood-fired oven pizza dough recipe as the base with just a few changes, and adapt the cooking process for making it in a wood-fired or home oven. This recipe makes six calzones, but the dough can be kept in the refrigerator after balling up for 3 or 4 days, so you can pull one ball out to make a calzone (or even pizza) as desired. Additionally, see the FAQ at the end of this post for tips on how to parbake a calzone for reheating later.
I’ve heard it said that a calzone is the only acceptable way to single-handedly eat copious amounts of cheese in a single sitting. I’d have to agree; it’s the most delicious form of rationalization.
How to make a calzone in a wood-fired oven
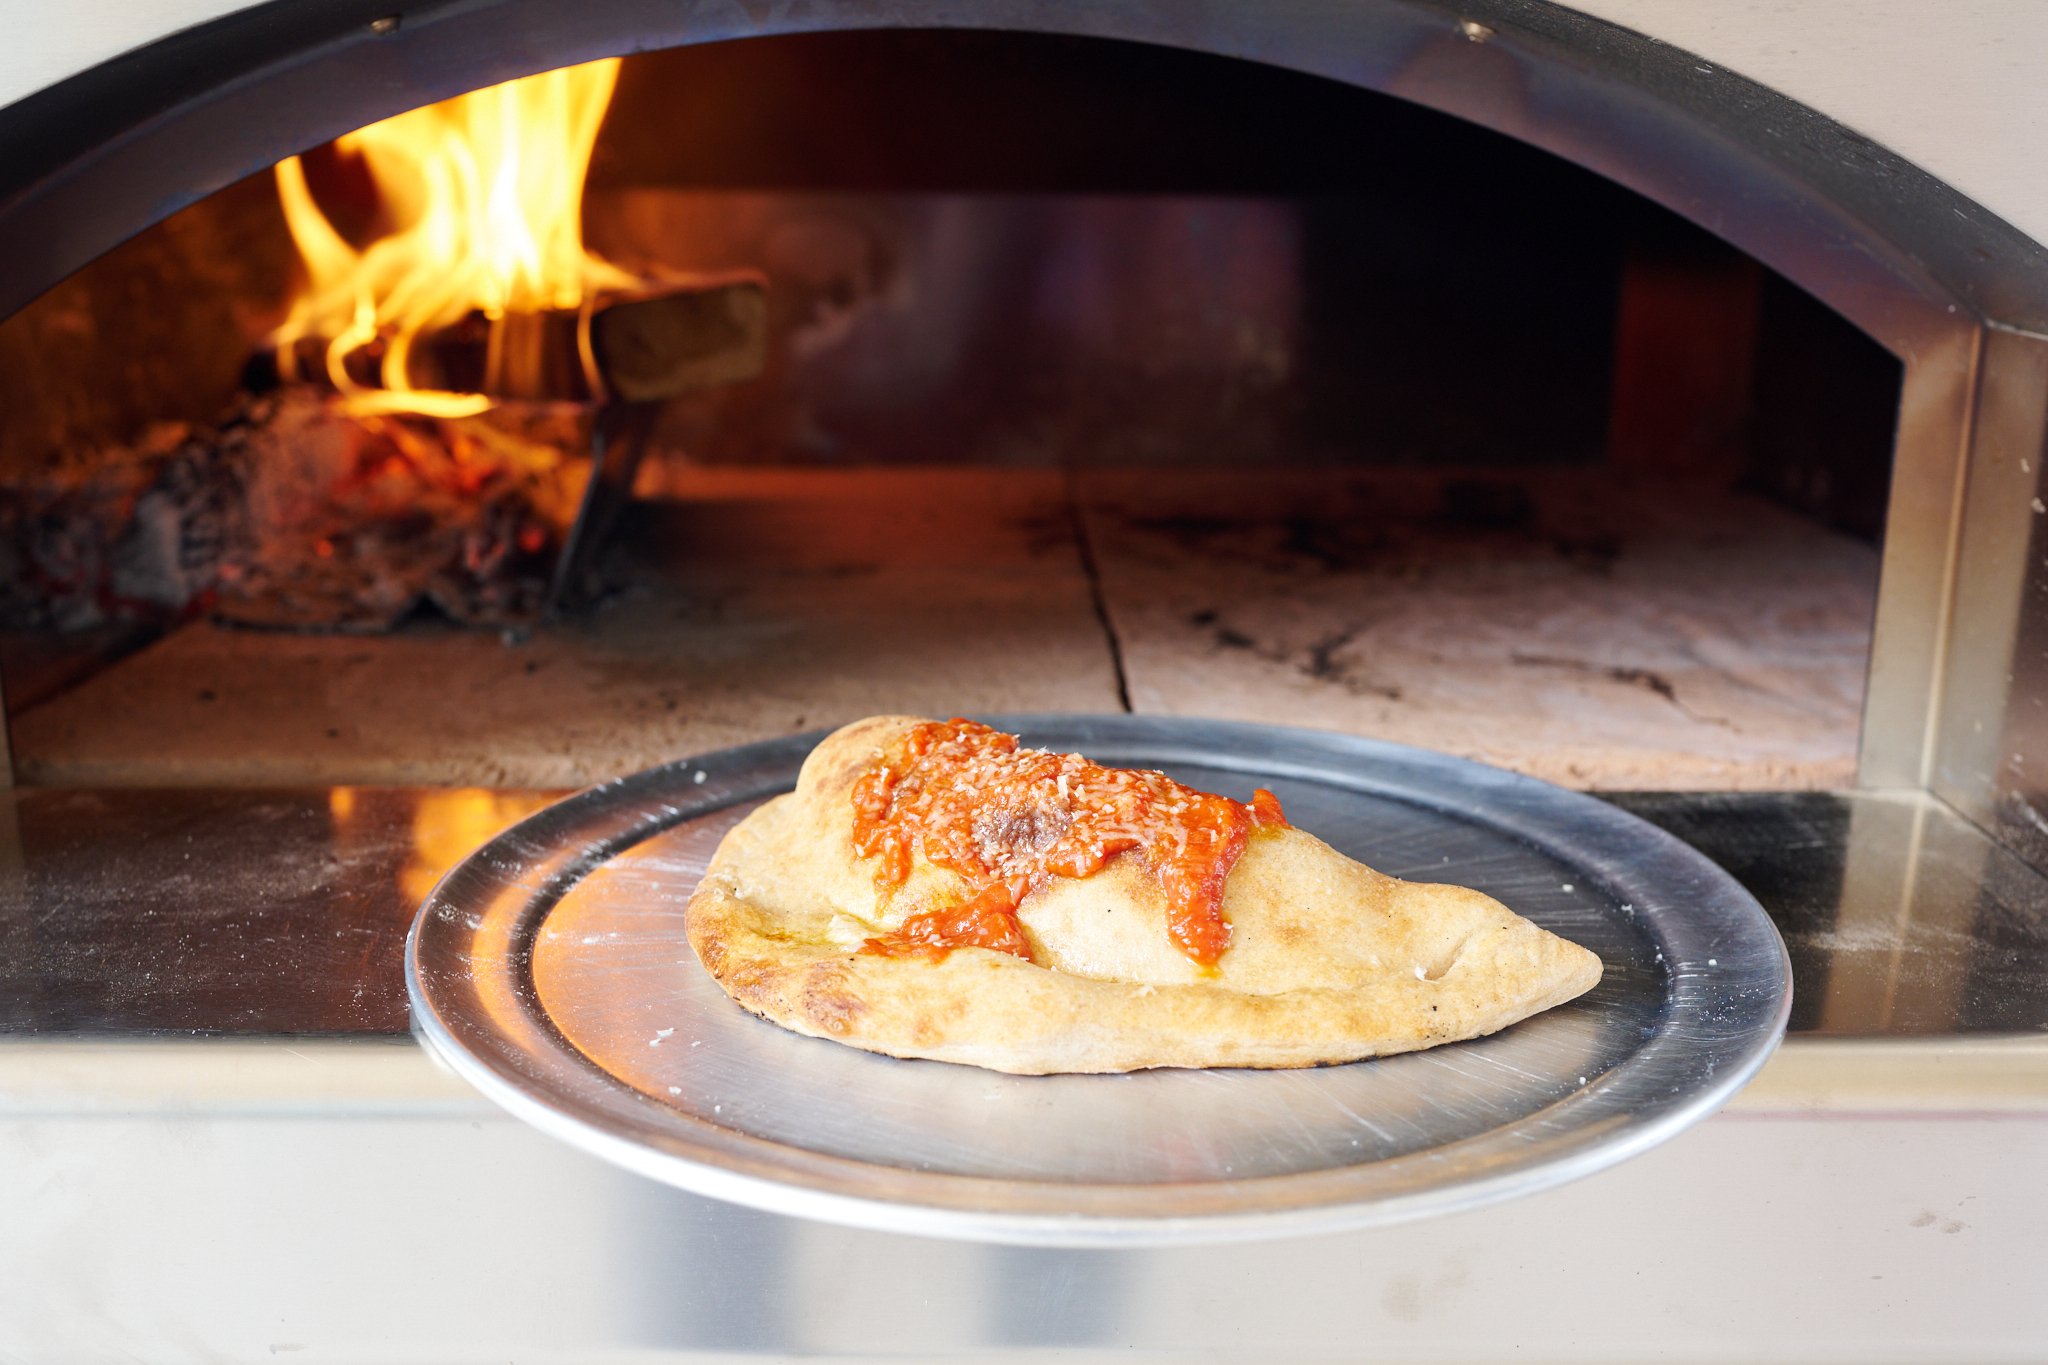
I used my Fontana Forni Marinara (sponsors of this recipe–thank you!) wood-fired oven to make these calzones, and I have to say, using a wood-fired oven turns the flavor knob for this calzone up to max. Like pizza cooked with live fire, the crust crisps up more than it would in an oven, resulting in a beautiful golden brown color and a hint of smokiness.
To make this calzone recipe in a wood-fired oven, fire your oven to about 575°F (300°C) ambient temperature. Let the fire die down to just a few flames or a pile of embers so that the floor (the cooking surface) is between 550°F and 575°F (285°C and 300°C). When the floor reaches the right temperature, bake the calzone for 10 to 15 minutes, rotating once or twice to ensure even coloring on the crust. In between baking calzone, toss on a small log to keep the embers hot and the oven at the right temperature.
See my wood-fired pizza dough post for more on how to heat a wood-fired oven →
How to make a calzone in a home oven
To make this calzone recipe in a home oven, put an oven rack in the middle position and preheat the oven to 475°F (245°C). Line a 13 x 18-inch baking sheet with parchment paper. Place your shaped calzone on the prepared baking sheet and bake for 10 minutes. Then, turn the oven down to 450°F (230°C), rotate the pan 180°, and bake until the exterior crust is a deep golden brown, about 10 to 15 minutes more.
Calzone fillings and toppings
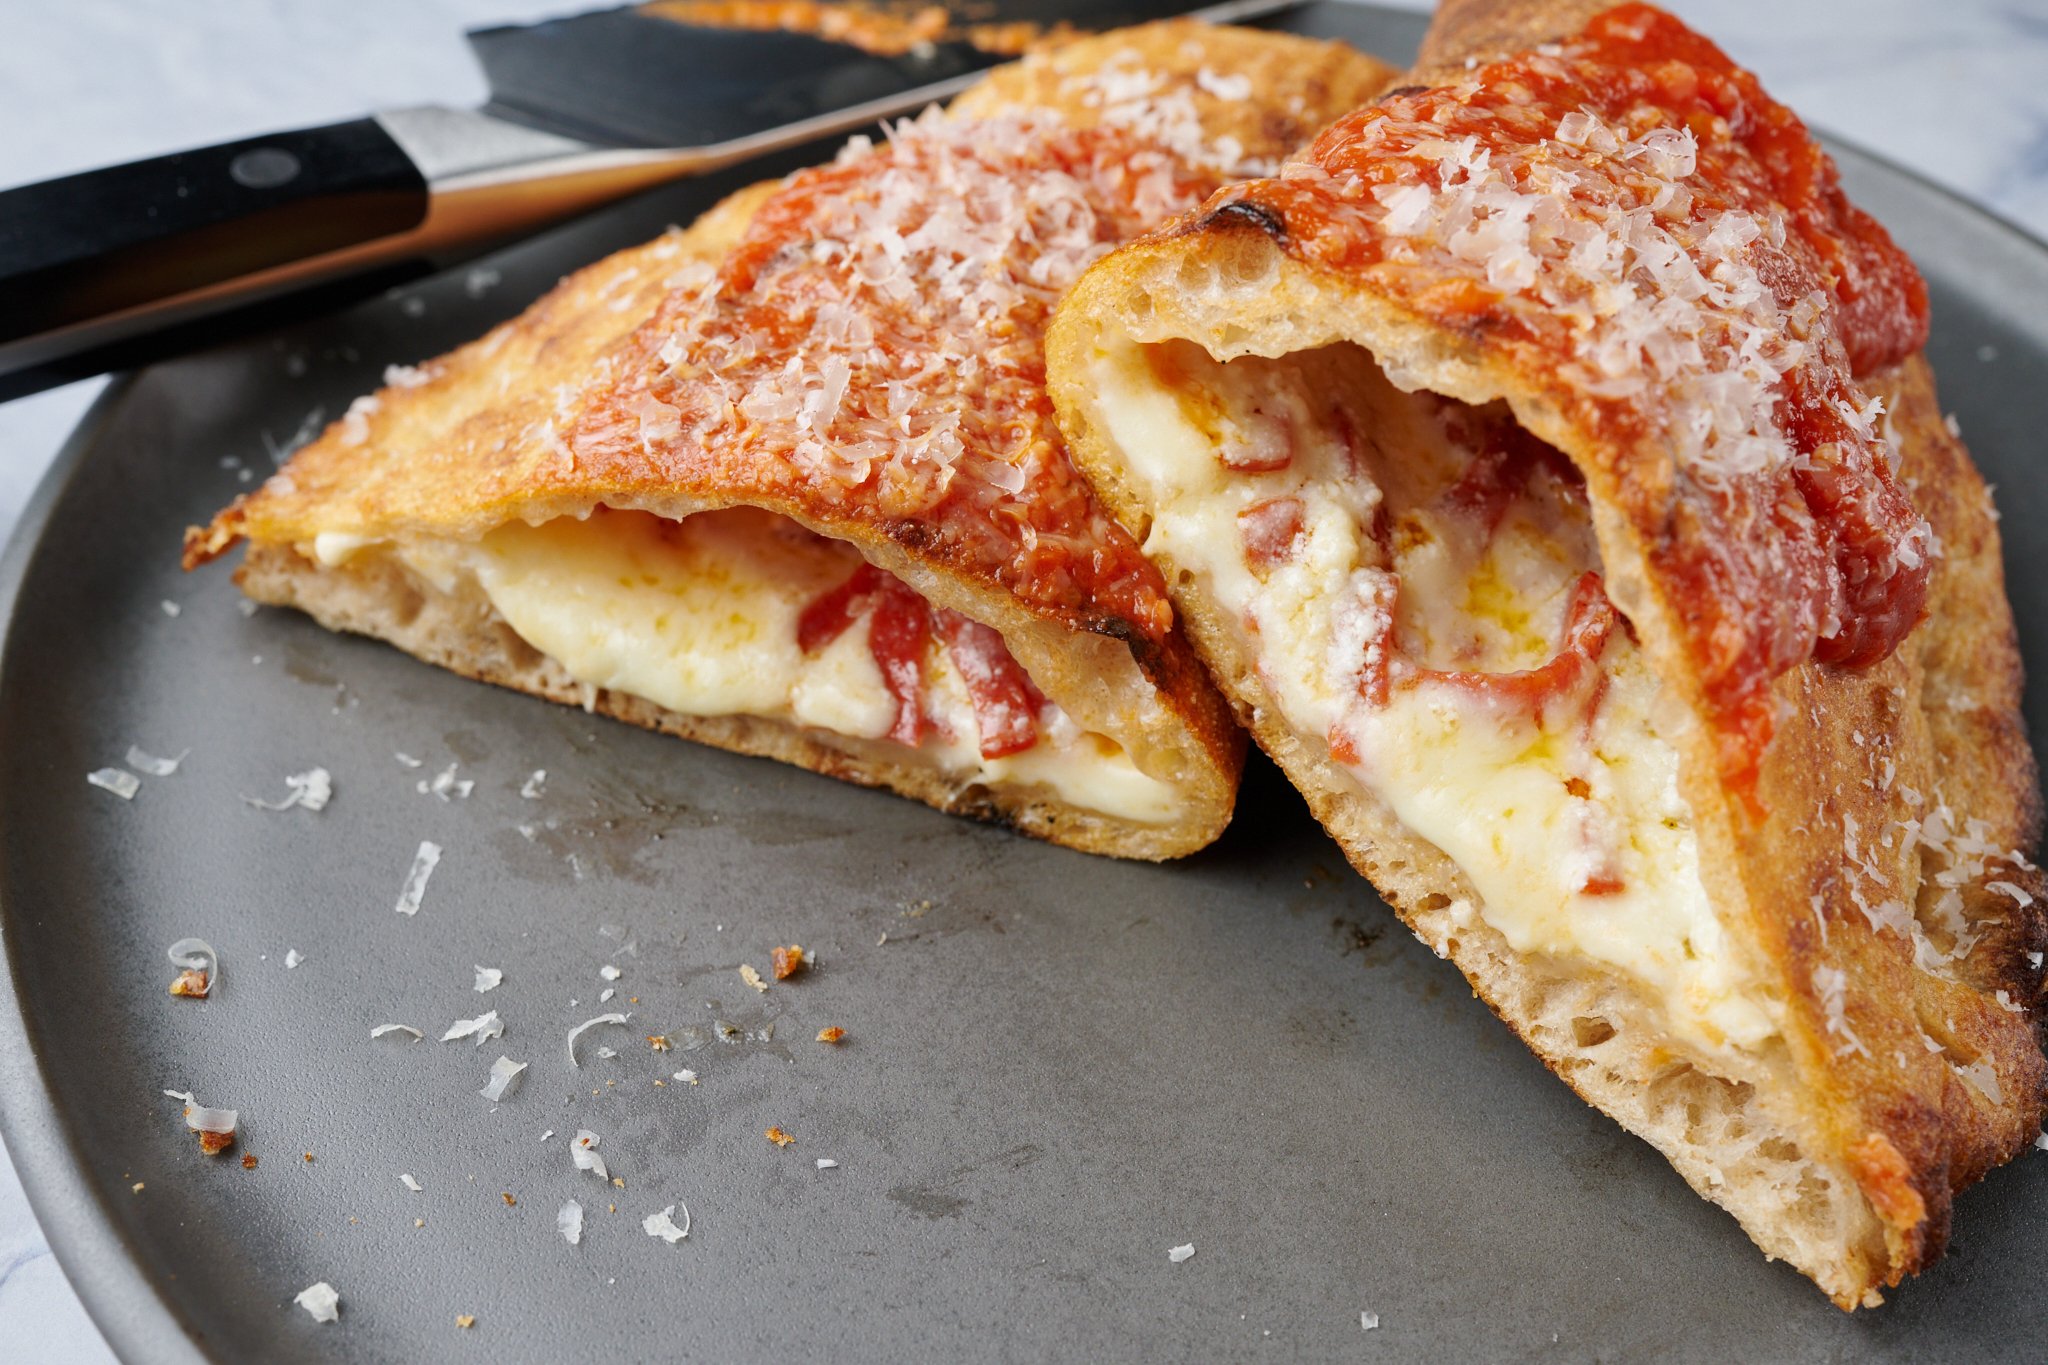
A calzone is so versatile; it can be filled with a myriad of cheeses, meats, and/or vegetables. My favorite is a simple cheese filling that’s a mixture of Parmigiano Reggiano, ricotta, and low moisture mozzarella cheese (this is included in the recipe below). To this cheese filling, feel free to add sliced pepperoni or another dried meat, precooked and crumbled sausage, and/or sauteed onions. My rule of thumb is if it sounds good on a pizza, it’ll be delicious in a calzone.
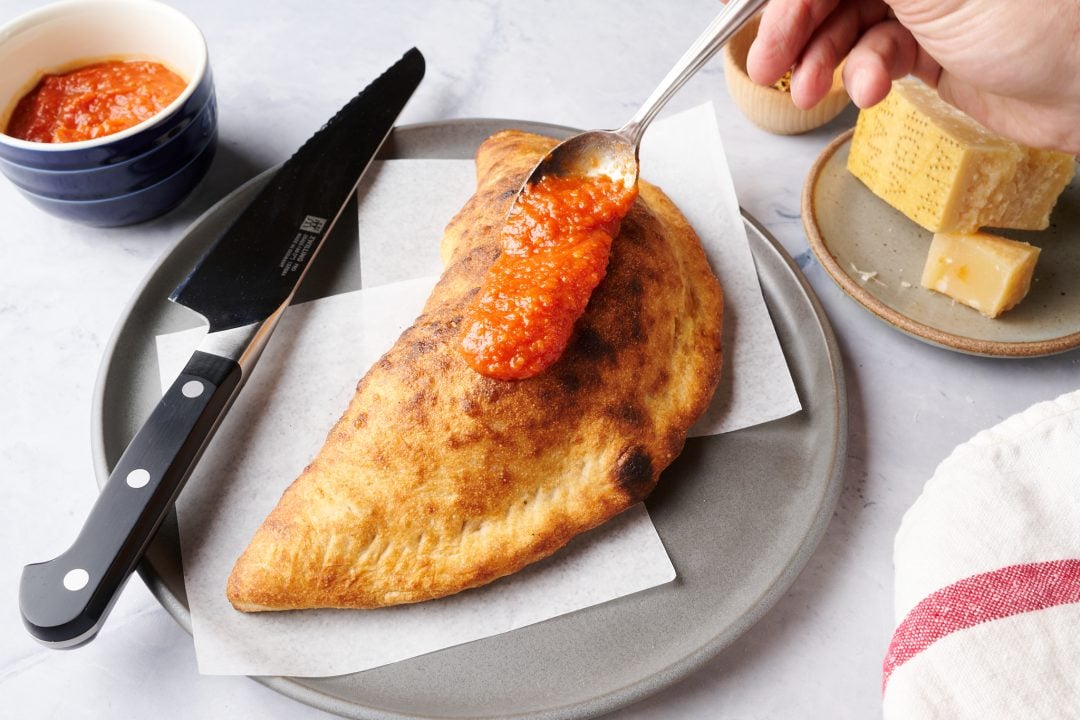
The traditional topping for a calzone is a cooked tomato sauce (salsa di pomodoro; see recipe below) with a final dusting of Parmigiano Reggiano cheese. Or, you could also skip topping the calzone and leave the sauce on the side for dipping.
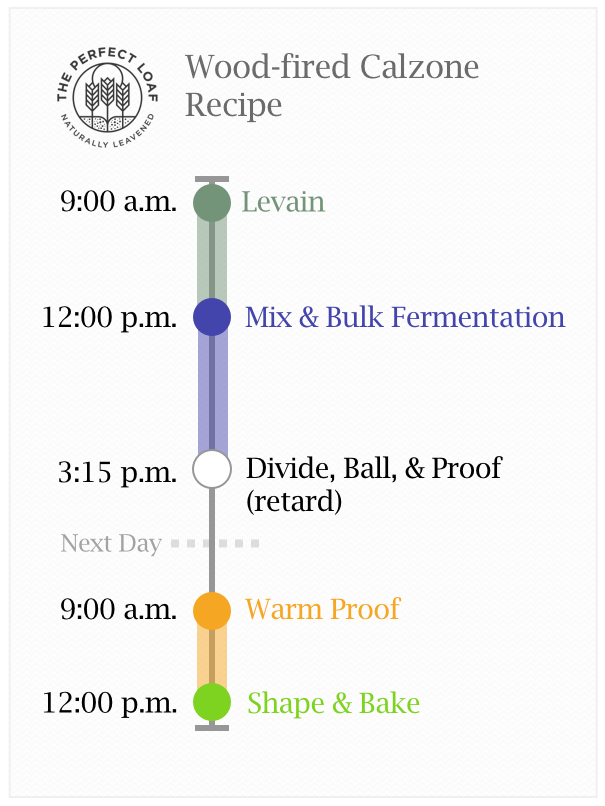
Baking schedule
This two-day wood-fired calzone recipe has flexible timing, but I like to divide the method as follows:
- Day one: mix the dough, let it bulk ferment, and divide and ball the dough; then place the dough into the fridge overnight to continue to ferment and build flavor.
- Day two: bake the dough.
Sourdough calzone formula
This formula is based loosely on my wood-fired sourdough pizza dough recipe. I’ve omitted the durum flour and increased the whole wheat percentage of this dough to 15% for increased flavor. I’ve also increased the hydration a bit due to the increased whole grain percentage.
Vitals
| Total dough weight | 1,200 grams |
| Pre-fermented flour | 5.0% |
| Hydration | 63.00% |
| Levain in the final dough | 15.79% |
| Yield | Six 200g calzone |
Total formula
Desired dough temperature: 78°F (25°C) (see my post on the importance of dough temperature).
| Weight | Ingredient | Baker’s percentage |
| 600g | White flour (about 12.5% protein; Caputo Pizzeria Soft Wheat Flour Type 00 or Central Milling Artisan Baker’s Craft) | 85.0% |
| 106g | Whole wheat flour (Central Milling Hi-Pro Whole Wheat) | 15.0% |
| 416g | Water 1 | 59.0% |
| 28g | Water 2 | 4.0% |
| 15g | Fine sea salt | 2.1% |
| 35g | Ripe sourdough starter, 100% hydration | 5.0% |
Additional ingredients:
Topping
2 tablespoons extra-virgin olive oil
¼ white onion, chopped
1 garlic clove, sliced
1 (28-oz) can whole peeled tomatoes (I like Bianco DiNapoli tomatoes)
Freshly ground black pepper
1/2 teaspoon salt
Grated Parmigiano Reggiano cheese (optional)
Filling (for one calzone)
1 tablespoon (14g) Parmigiano Reggiano cheese
2 tablespoons (27g) whole milk ricotta cheese
1 cup (90g) shredded low-moisture mozzarella cheese for the filling
Sourdough calzone method
1. Prepare the levain – 9:00 a.m.
Mix the following ingredients in a jar and leave them covered at a warm temperature, 74-76°F (23-24°C), to ripen for 3 hours.
| Weight | Ingredient | Baker’s percentage |
| 35g | White flour (about 12.5% protein) | 100.0% |
| 35g | Water | 100.0% |
| 35g | Ripe sourdough starter, 100% hydration | 100.0% |
2. Mix – 12:00 p.m.
Mix this dough to full development for the best results. I used my Famag spiral dough mixer, but you could also mix it by hand using the slap and fold technique.
| Weight | Ingredient |
| 564g | White flour (about 12.5% protein) |
| 106g | Whole wheat flour |
| 381g | Water 1 |
| 28g | Water 2 |
| 15g | Fine sea salt |
| 106g | Ripe levain (from Step 1) |
To the bowl of a stand mixer fitted with the dough hook attachment, add the flour, water 1, and ripe levain. Mix on low speed for 2 to 3 minutes until the ingredients come together and no dry bits remain. Increase the mixer speed to medium (I use #6 on the Famag) and mix for 3 to 4 minutes until the dough begins to smooth.
Let the dough rest in the bowl for 10 minutes, covered.
Add the salt and about half of water 2 to help it dissolve. Mix on low speed for 2 minutes until the salt is incorporated. Then, increase the mixer speed to medium and mix for 4 to 5 minutes until the dough clumps around the dough hook and is smooth and elastic.
Transfer the dough to a bulk fermentation container and cover.
3. Bulk fermentation – 12:15 p.m. to 3:15 p.m. (3 hours)
At a warm room temperature, 74-76°F (23-24°C), bulk fermentation should take about 3 hours. At the end of this time, the dough will have risen moderately and be smooth with a few scattered bubbles. The dough will not be very well fermented at this point as compared to other sourdough bread doughs.
Due to the level of mixing and the hydration of this dough, it does not require any stretches and folds during bulk fermentation.
4. Divide, ball, and proof – 3:15 p.m. (overnight)
Grease a pizza dough tray, half sheet pan, or six individual 4-cup glass containers with olive oil.
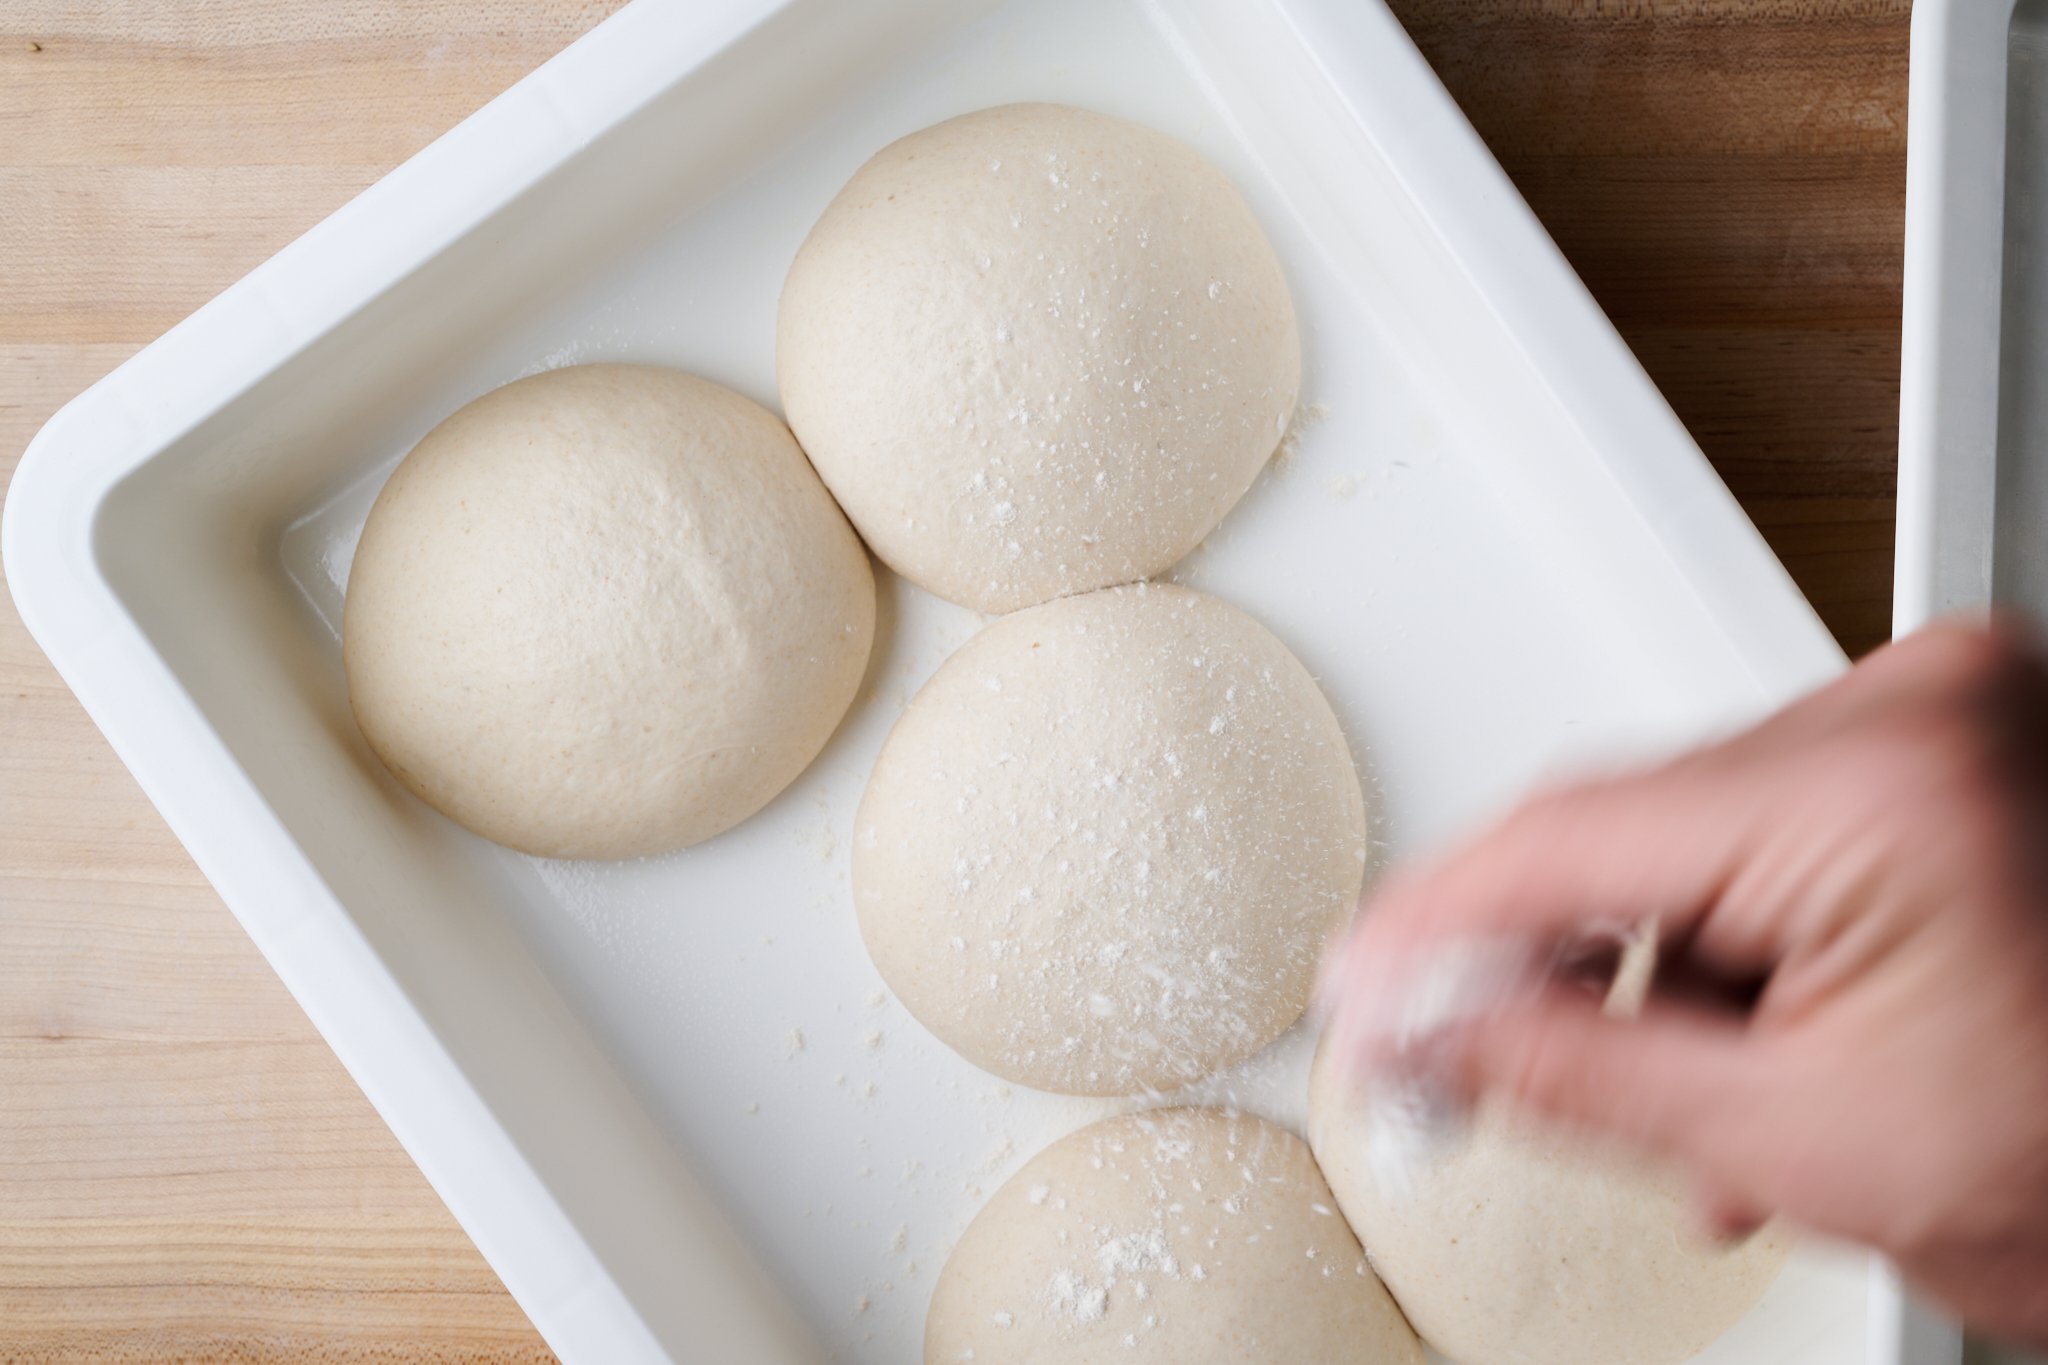
Gently scrape the dough out to a clean work surface. Using floured hands, divide the dough into six equal portions, each weighing about 200 grams. Preshape each piece into a very tight ball with no seam on the bottom. I like to pick up the dough and form a ball in my hand. After shaping, place each ball into the prepared dough tray with even spacing between, or into a single container.
Cover the dough with a lid or reusable wrap. Place into the refrigerator overnight or for up to 2 days.
5. Warm proof – 9:00 a.m. to 12:00 p.m.
Take the dough out of the refrigerator and let it finish proofing at room temperature for 3 hours before shaping and baking. At the end of proofing, the dough should be soft and puffy.
During this time, make the tomato sauce and filling.
Tomato sauce (salsa di pomodoro)
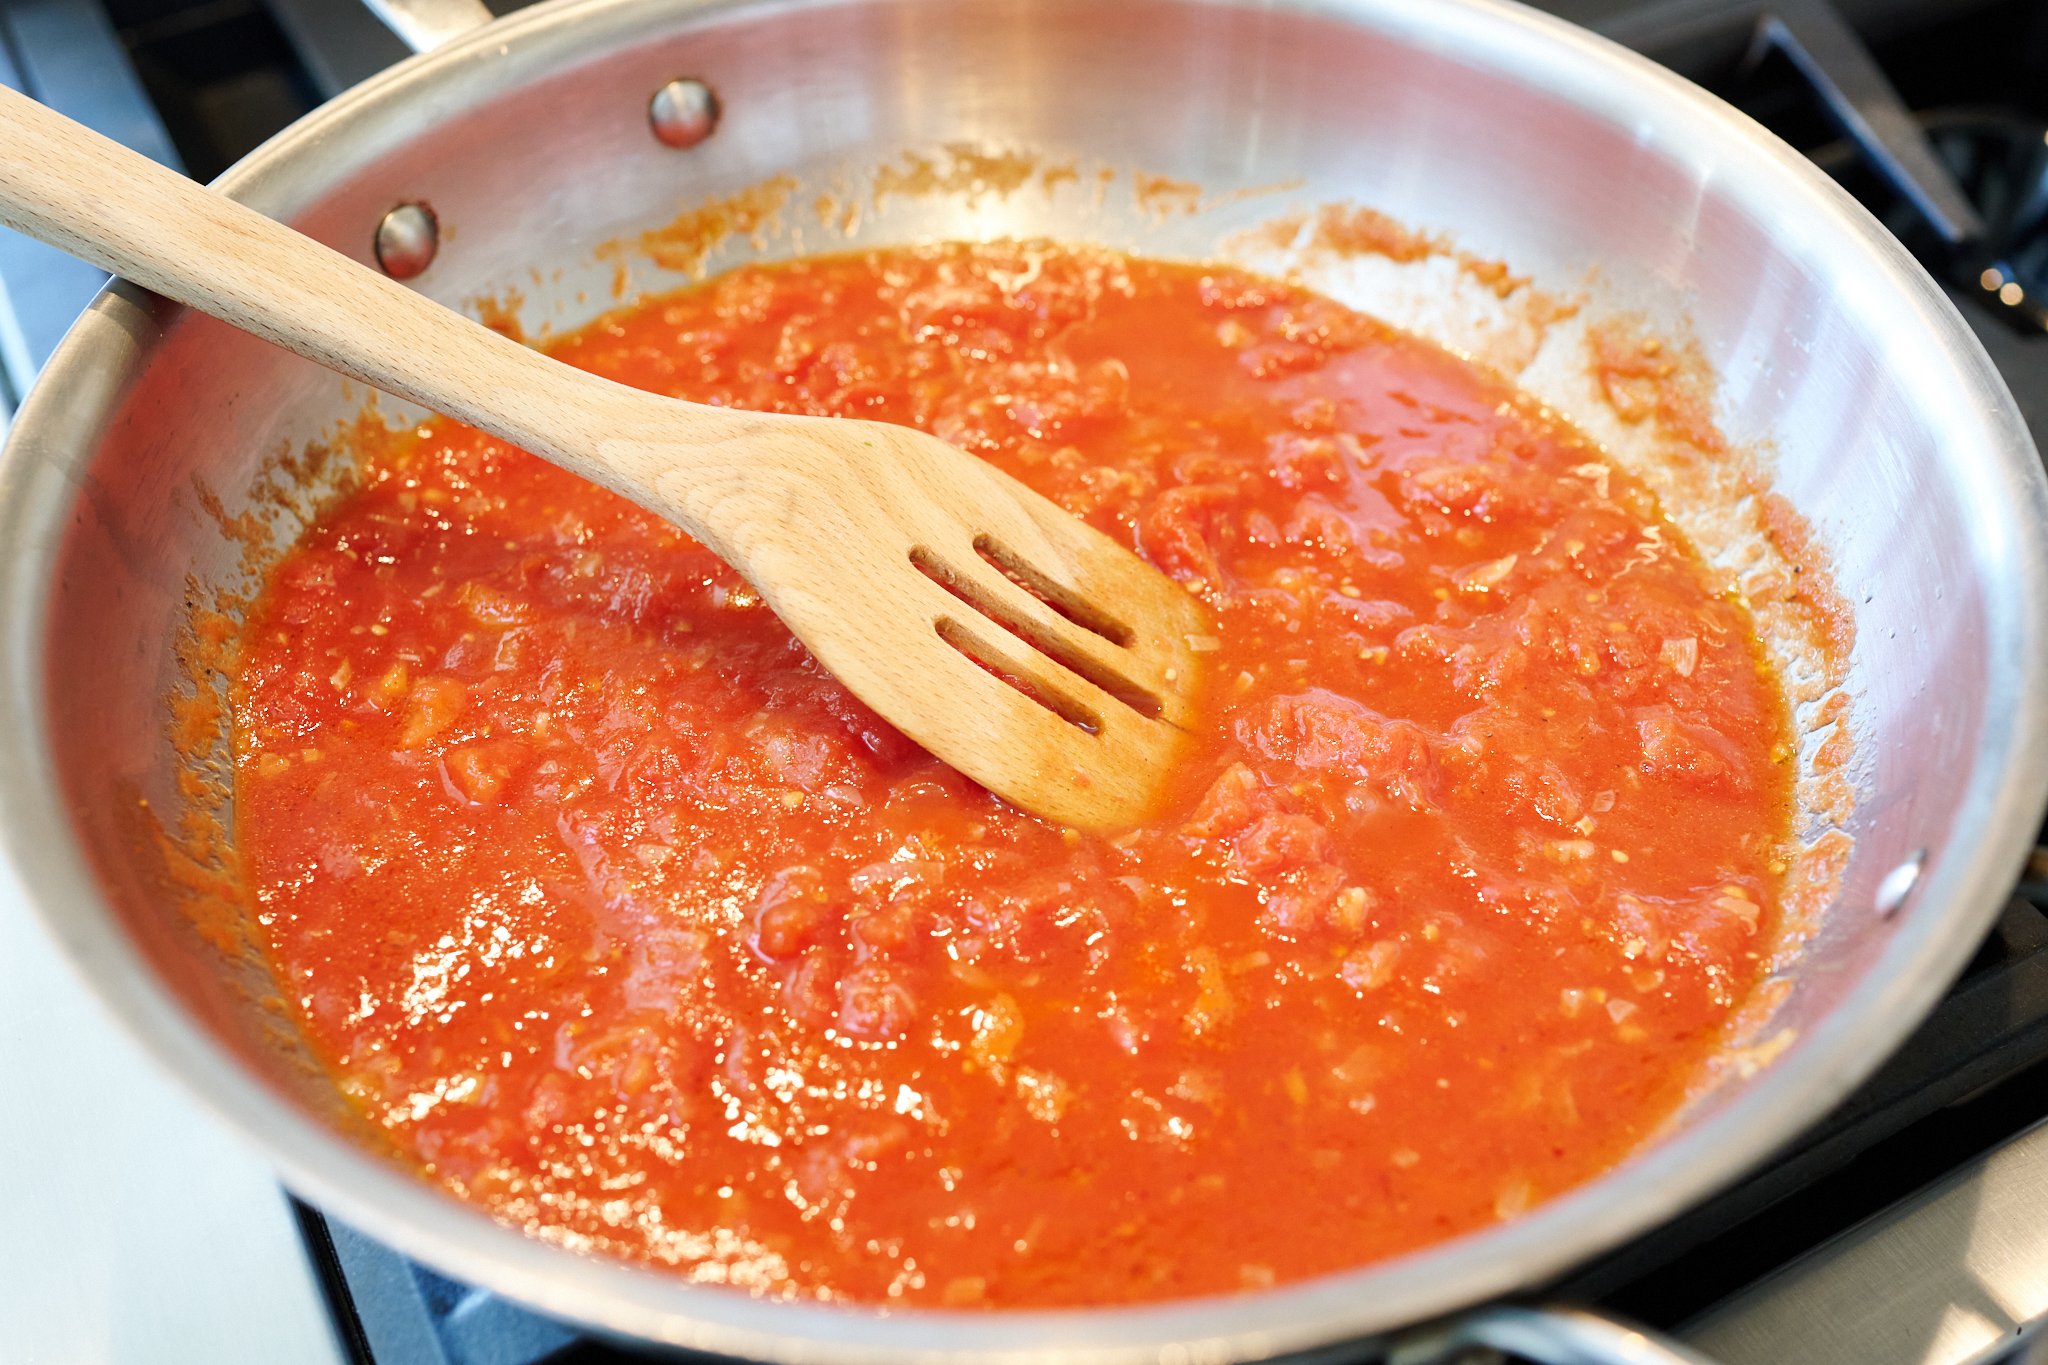
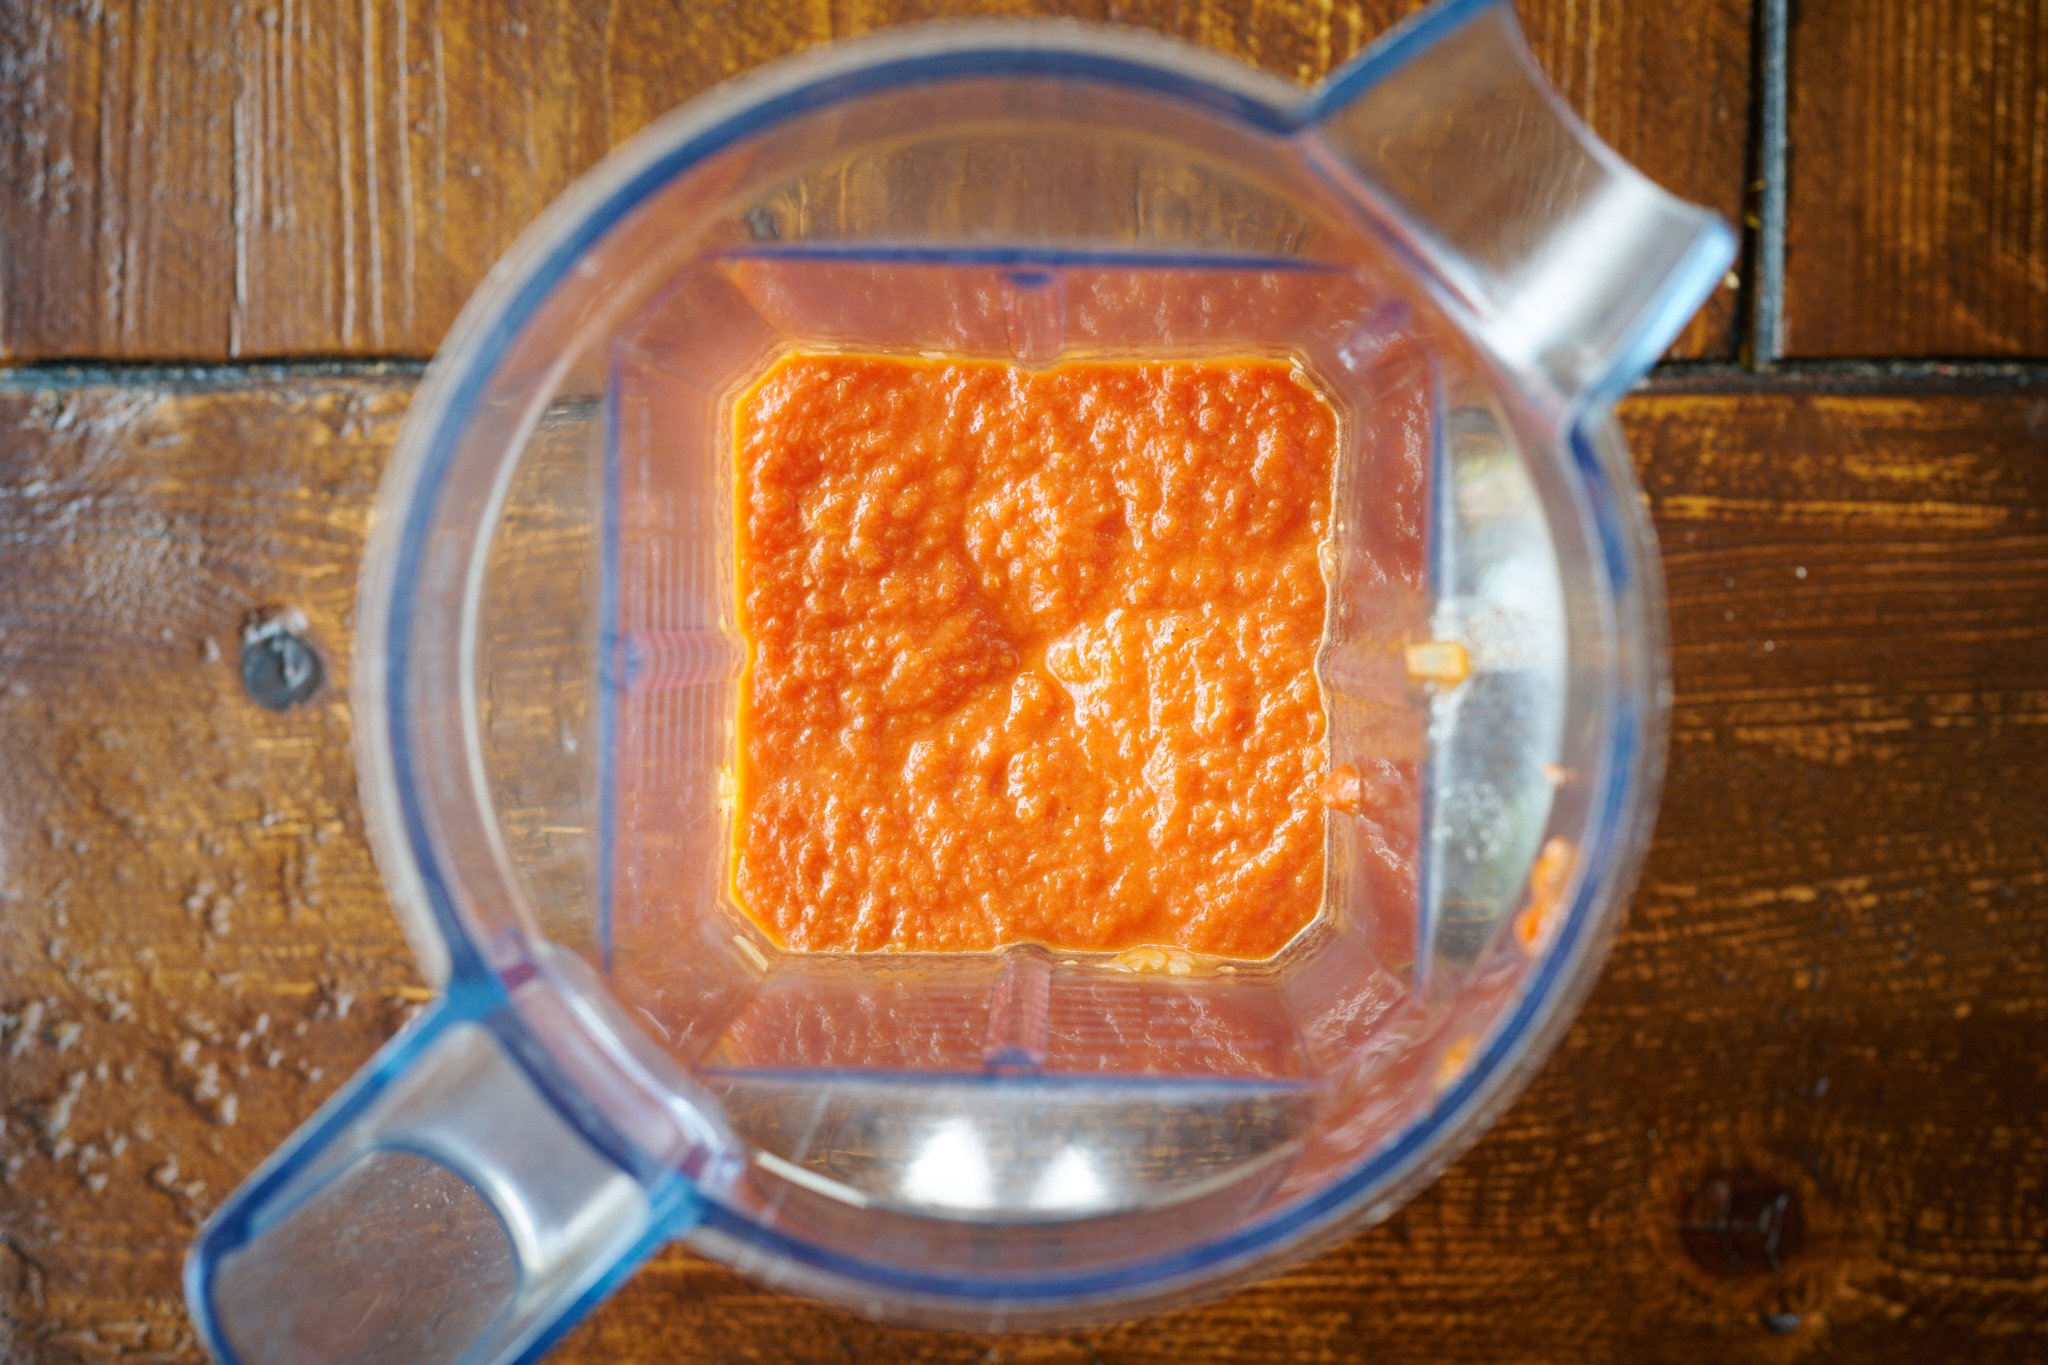
Heat 2 tablespoons of extra-virgin olive oil in a saute pan over medium. When the oil is warm, add the onion and garlic and cook, stirring, until golden brown, about 4 minutes. Add the whole peeled tomatoes and their juices. Cook, using a spatula to break up the tomatoes, and bring the sauce to a gentle simmer. Cook, stirring occasionally, until the sauce thickens, 30 to 45 minutes. Let the sauce cool slightly and transfer to a blender. Blend on low until smooth. Set aside to cool completely.
Cheese filling
In a small bowl, combine the 1 tablespoon Parmigiano Reggiano cheese, 2 tablespoons ricotta cheese, and 1 cup shredded low-moisture mozzarella. Keep in the refrigerator until ready to use.
6. Shape and bake – 12:00 p.m.
Preheat your high-heat wood-burning oven until the floor of the oven reaches around 575°F (300°C). For a home oven, heat to 450°F (230°C).
While the oven is heating and the dough is proofing, prepare your filling.
Be sure to seal the edge of the dough extremely well to prevent the fillings from leaking out during baking.
Flour a work surface and the tops of the dough balls. Using a spatula, scoop up one dough ball and flip it over onto the floured work surface. Sprinkle flour on top and use your hands, shaped like an inverted “V,” to press out the dough from top to bottom. Rotate the ball and press it out again. Then, flip the dough over and again, with your hands shaped like an inverted “V,” press the dough out. Next, pick up the dough with your hands, make fists, and drape the dough over your knuckles. Gently and slowly, pull your hands apart to stretch the dough. Rotate the dough over your hands and continue to stretch in this way a few more times until the dough has spread to about 8-inches in diameter. Lay the dough back on the work surface.

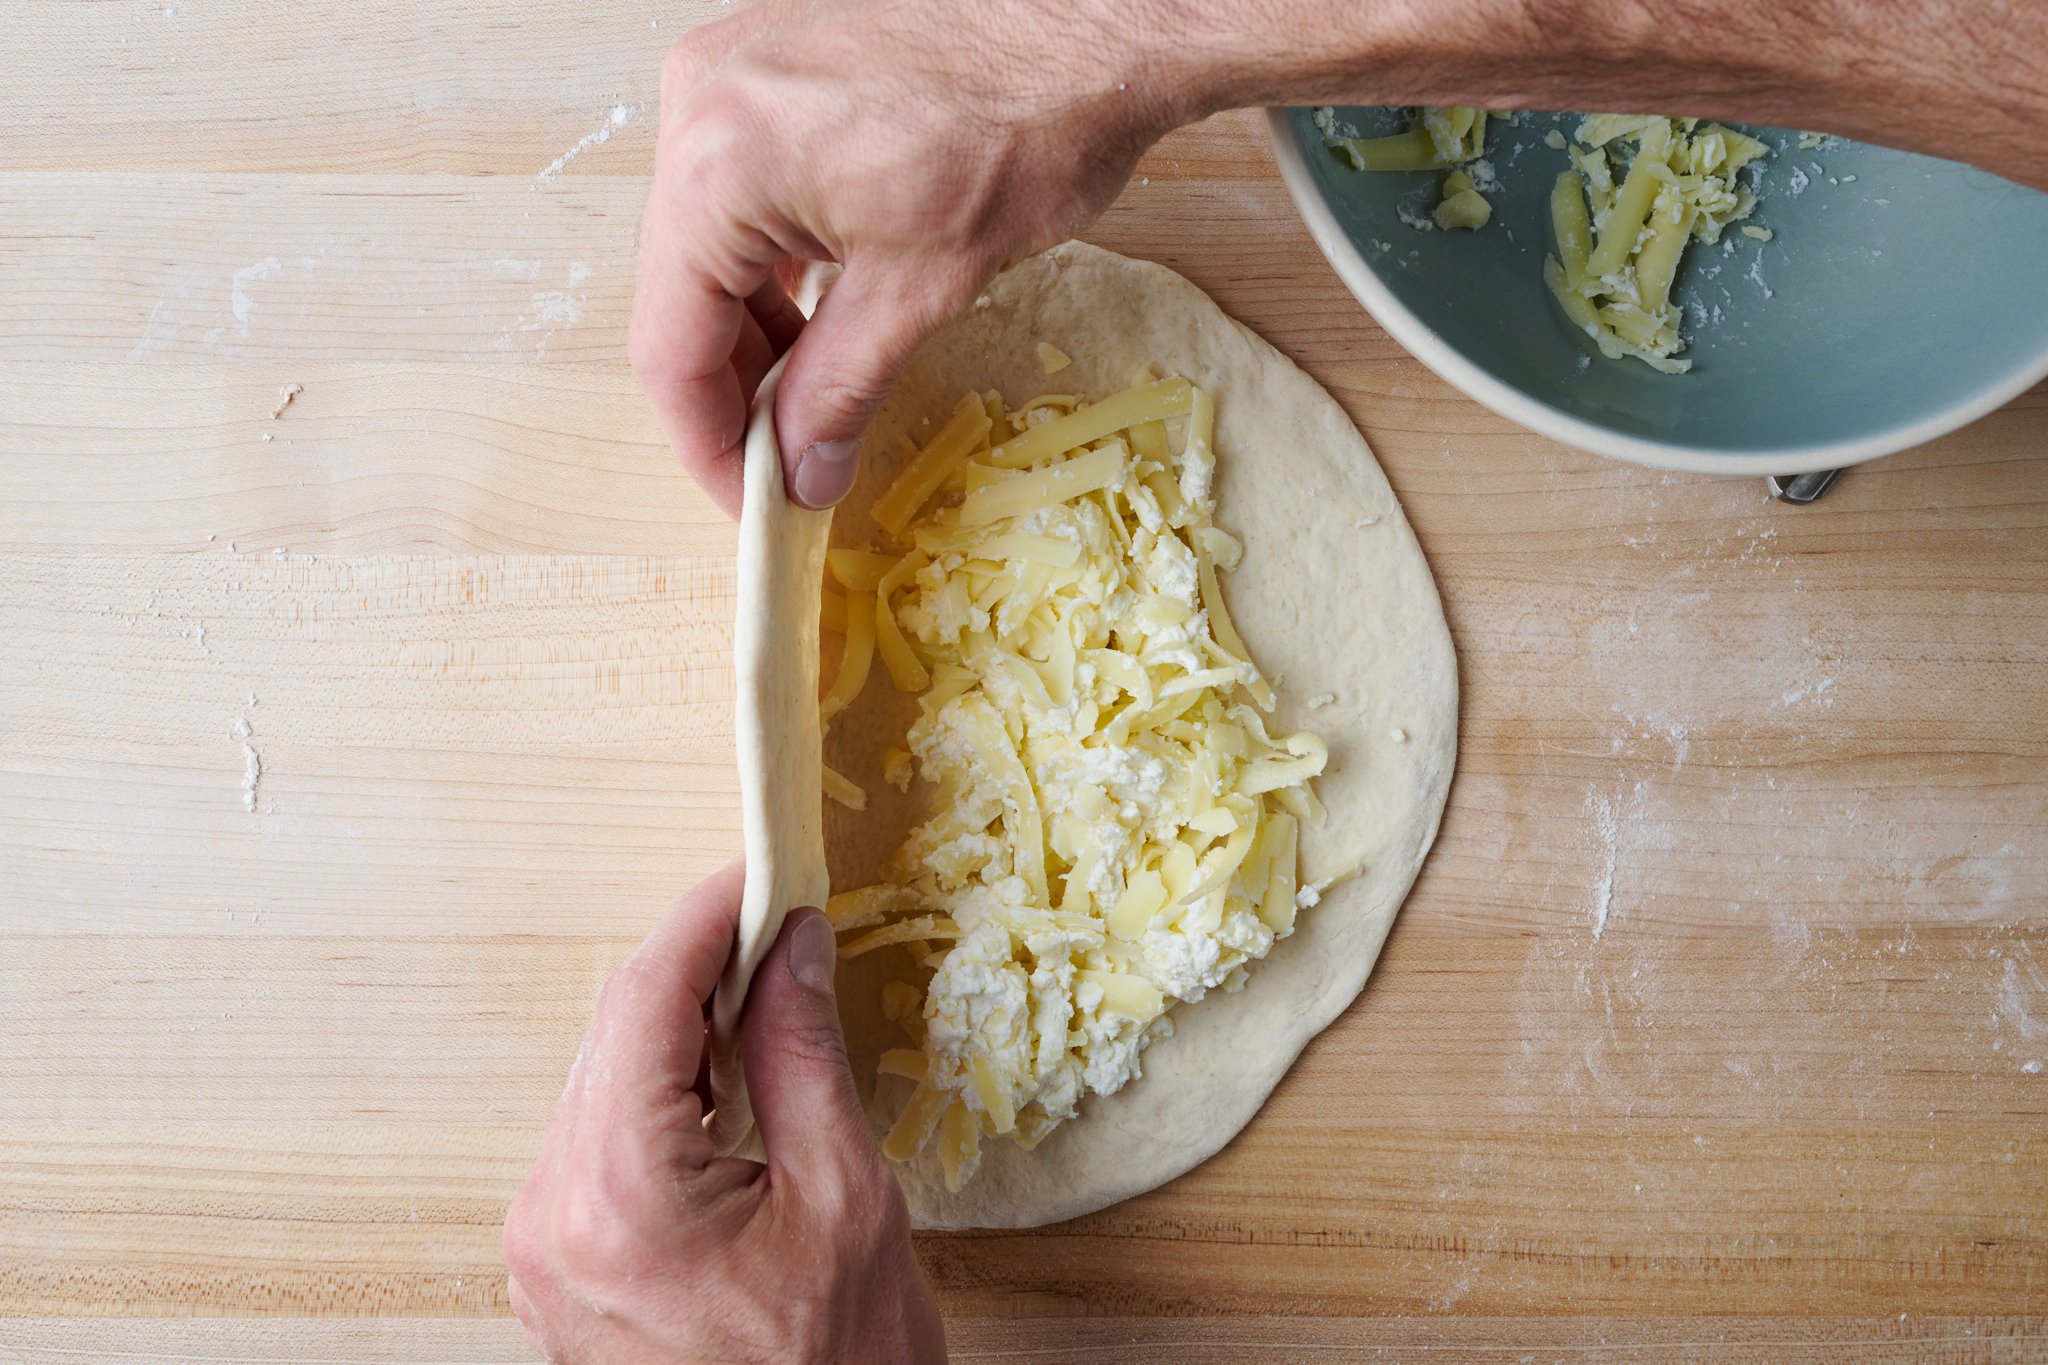
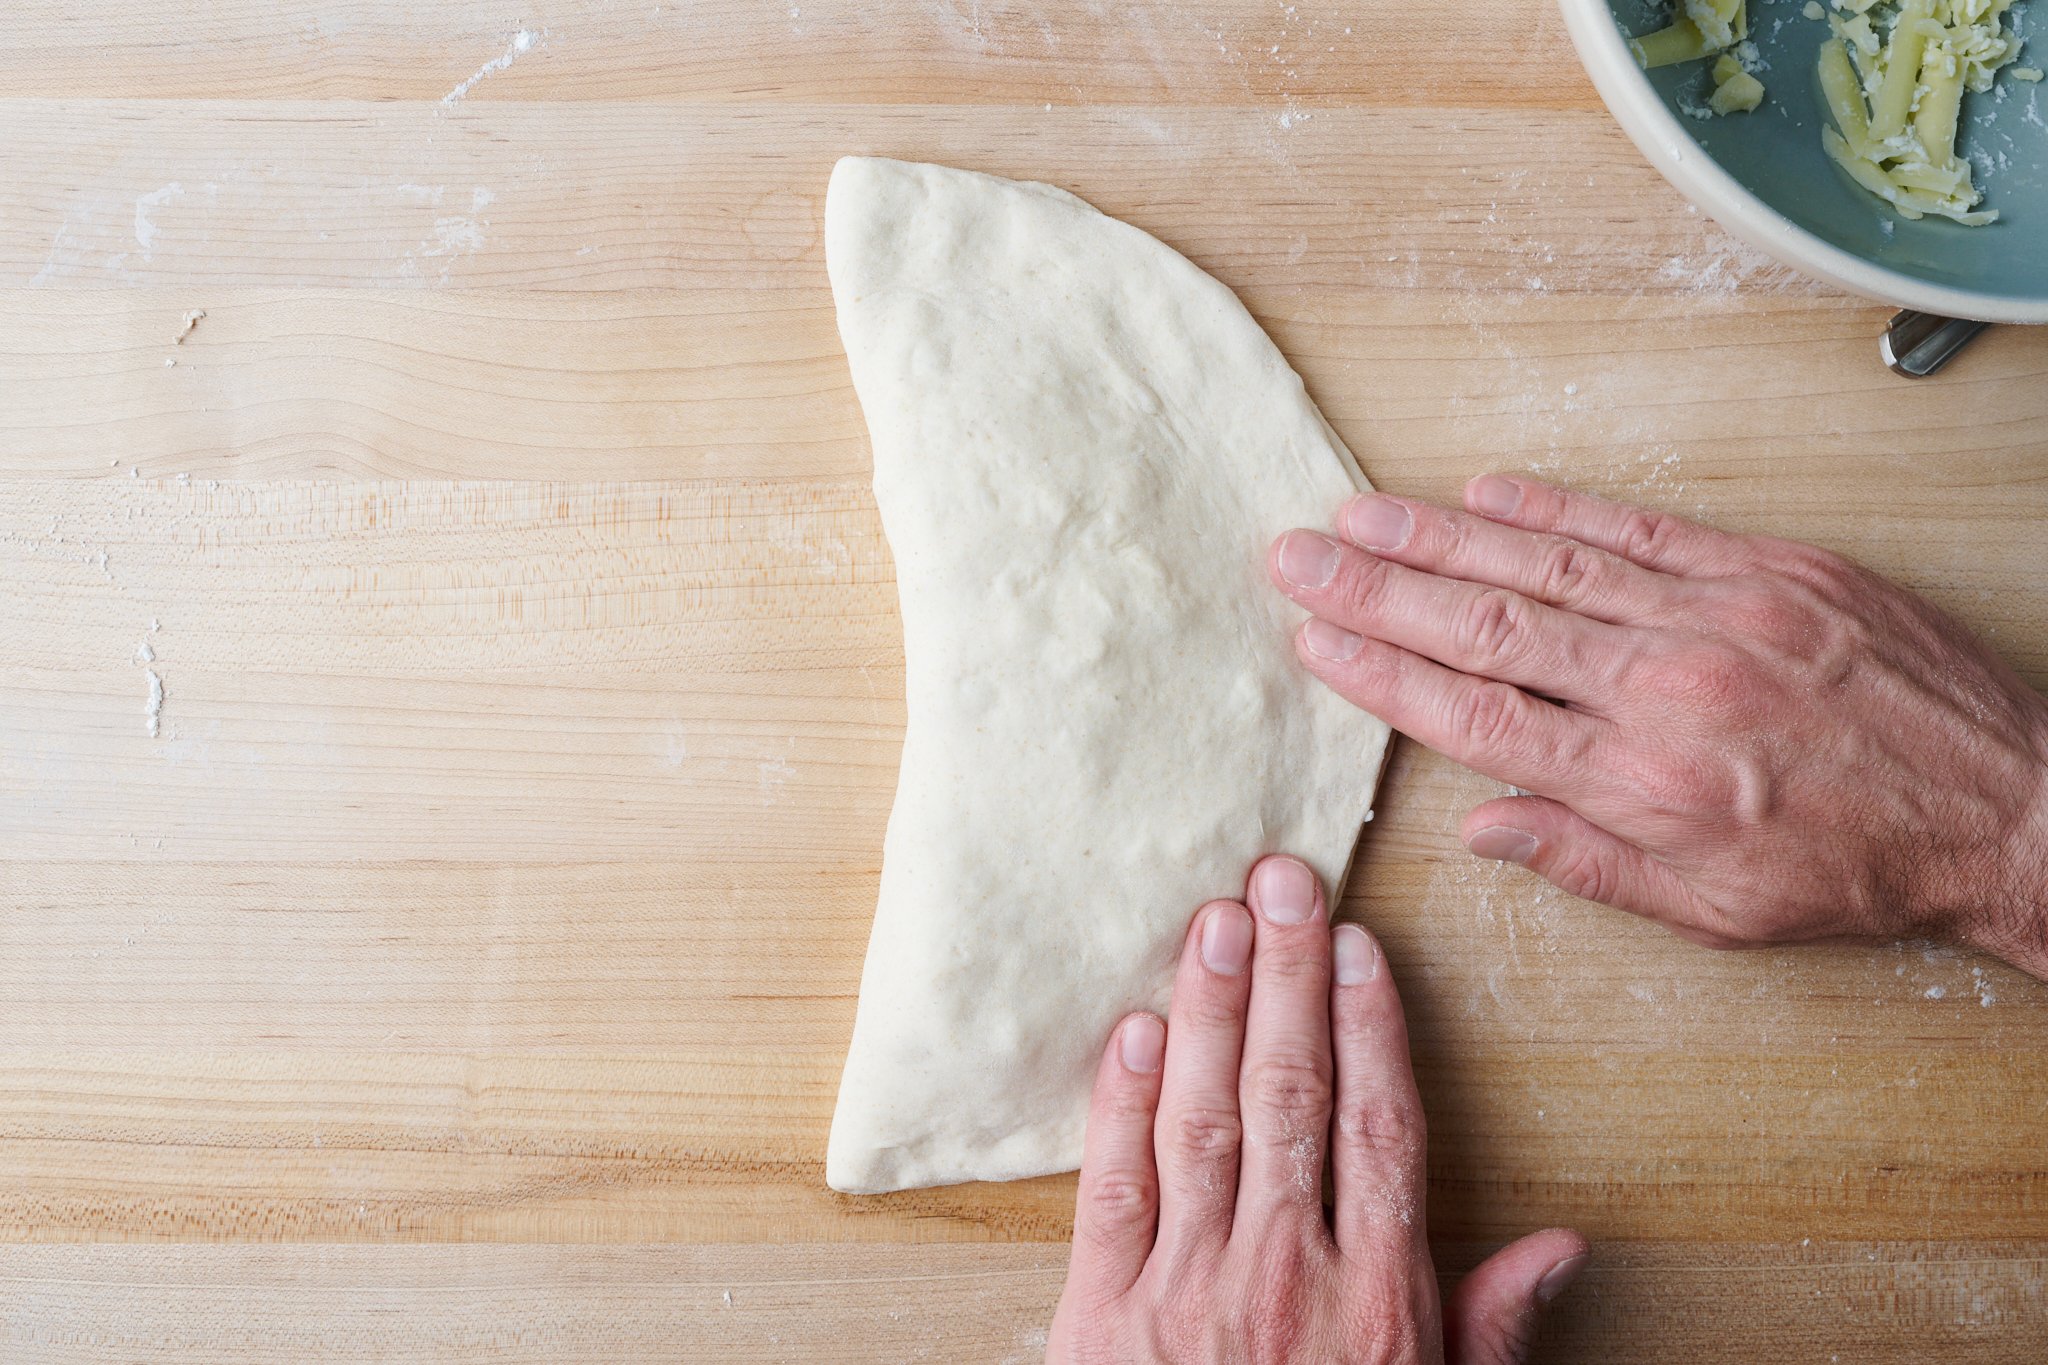
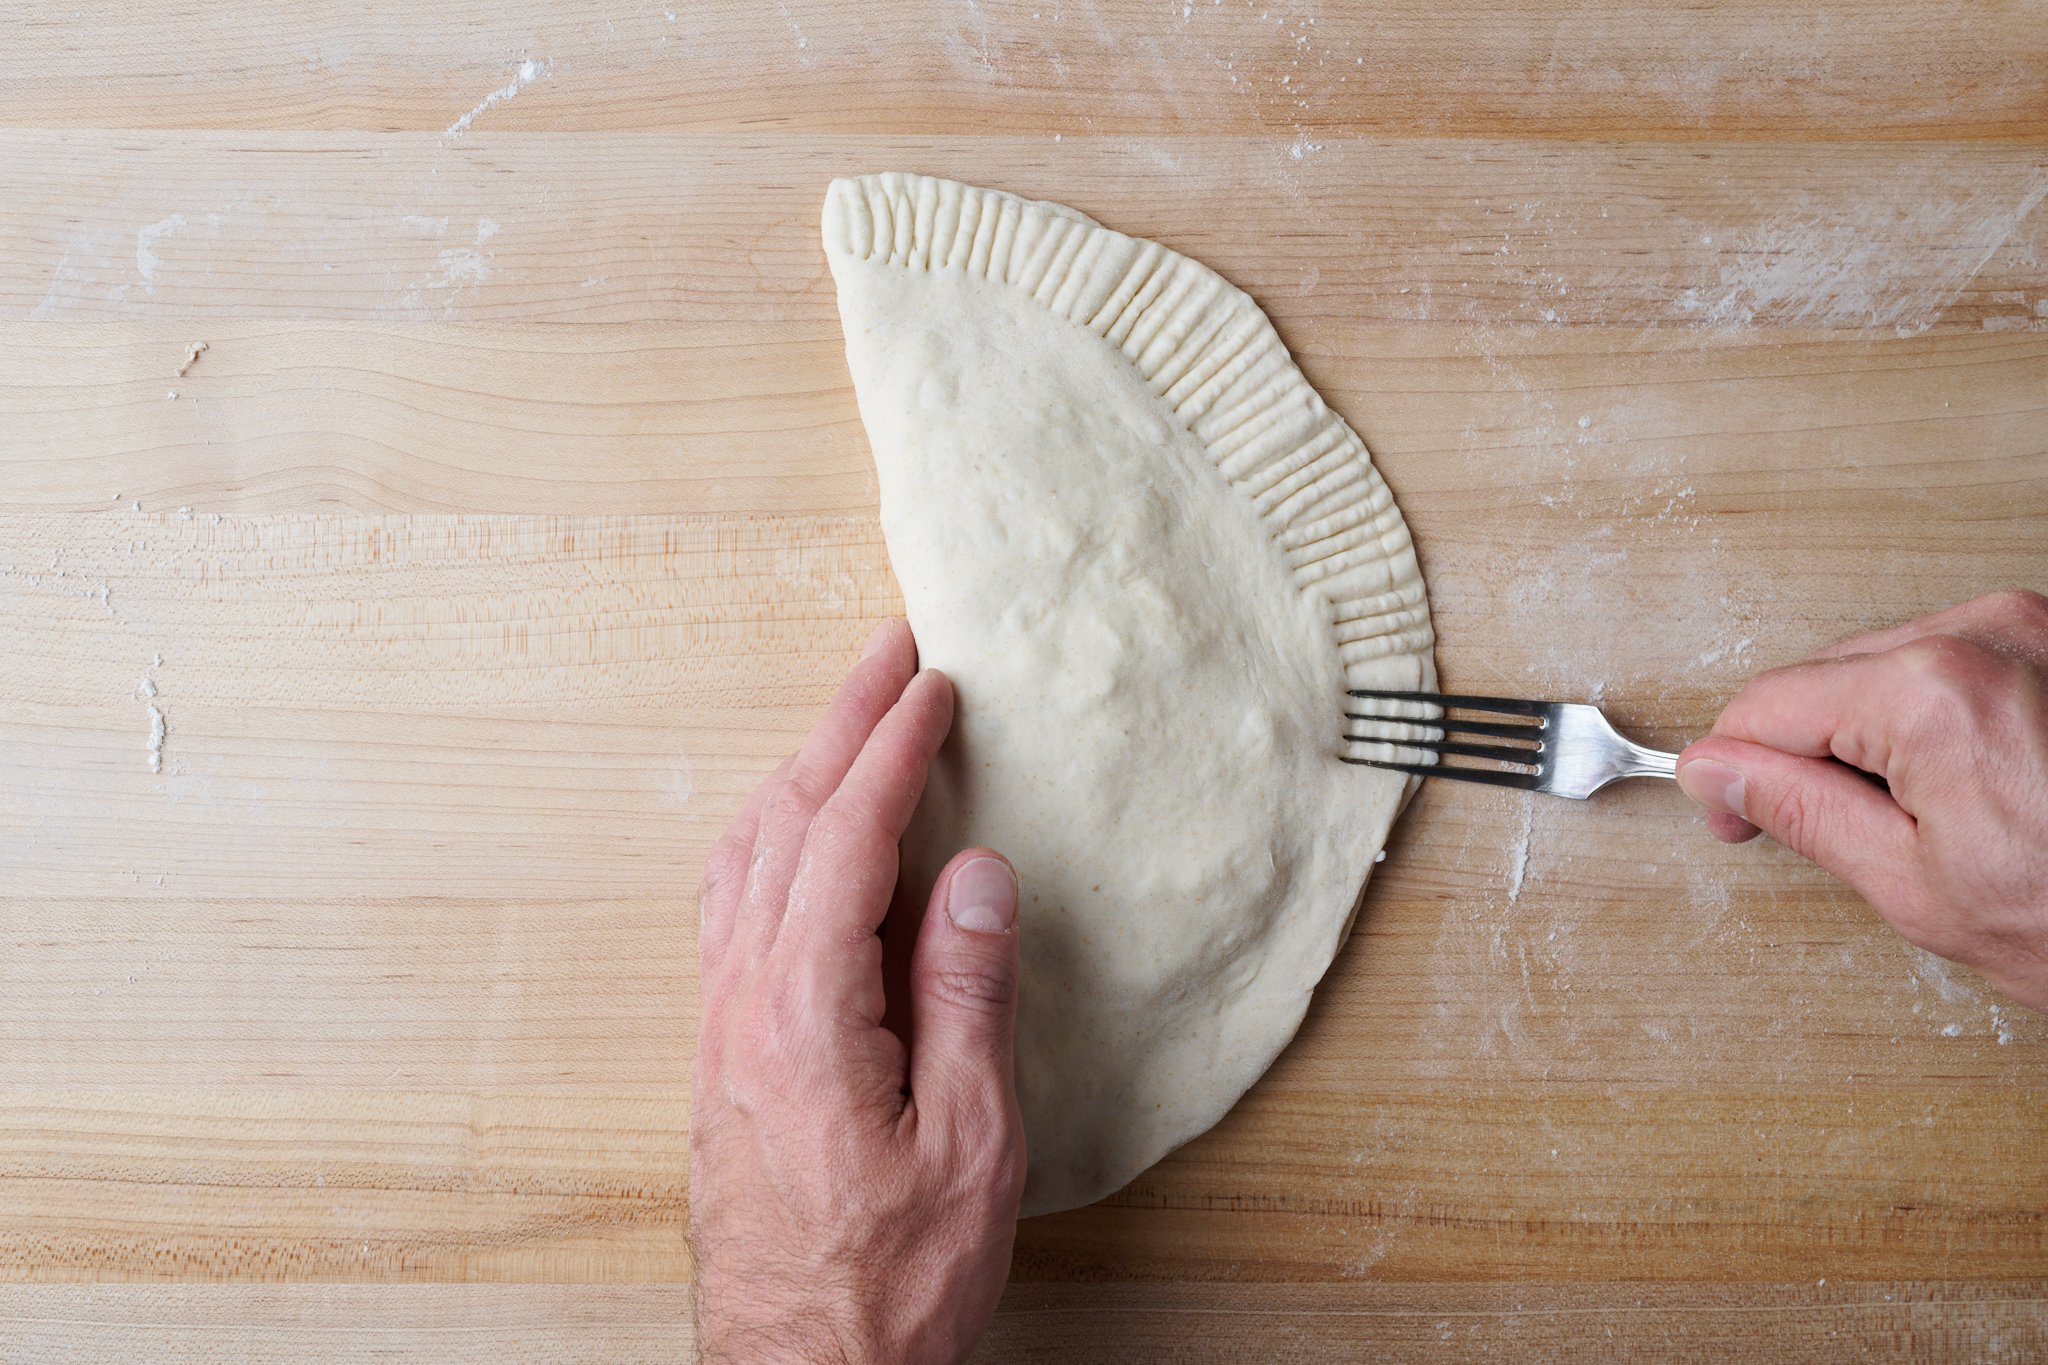
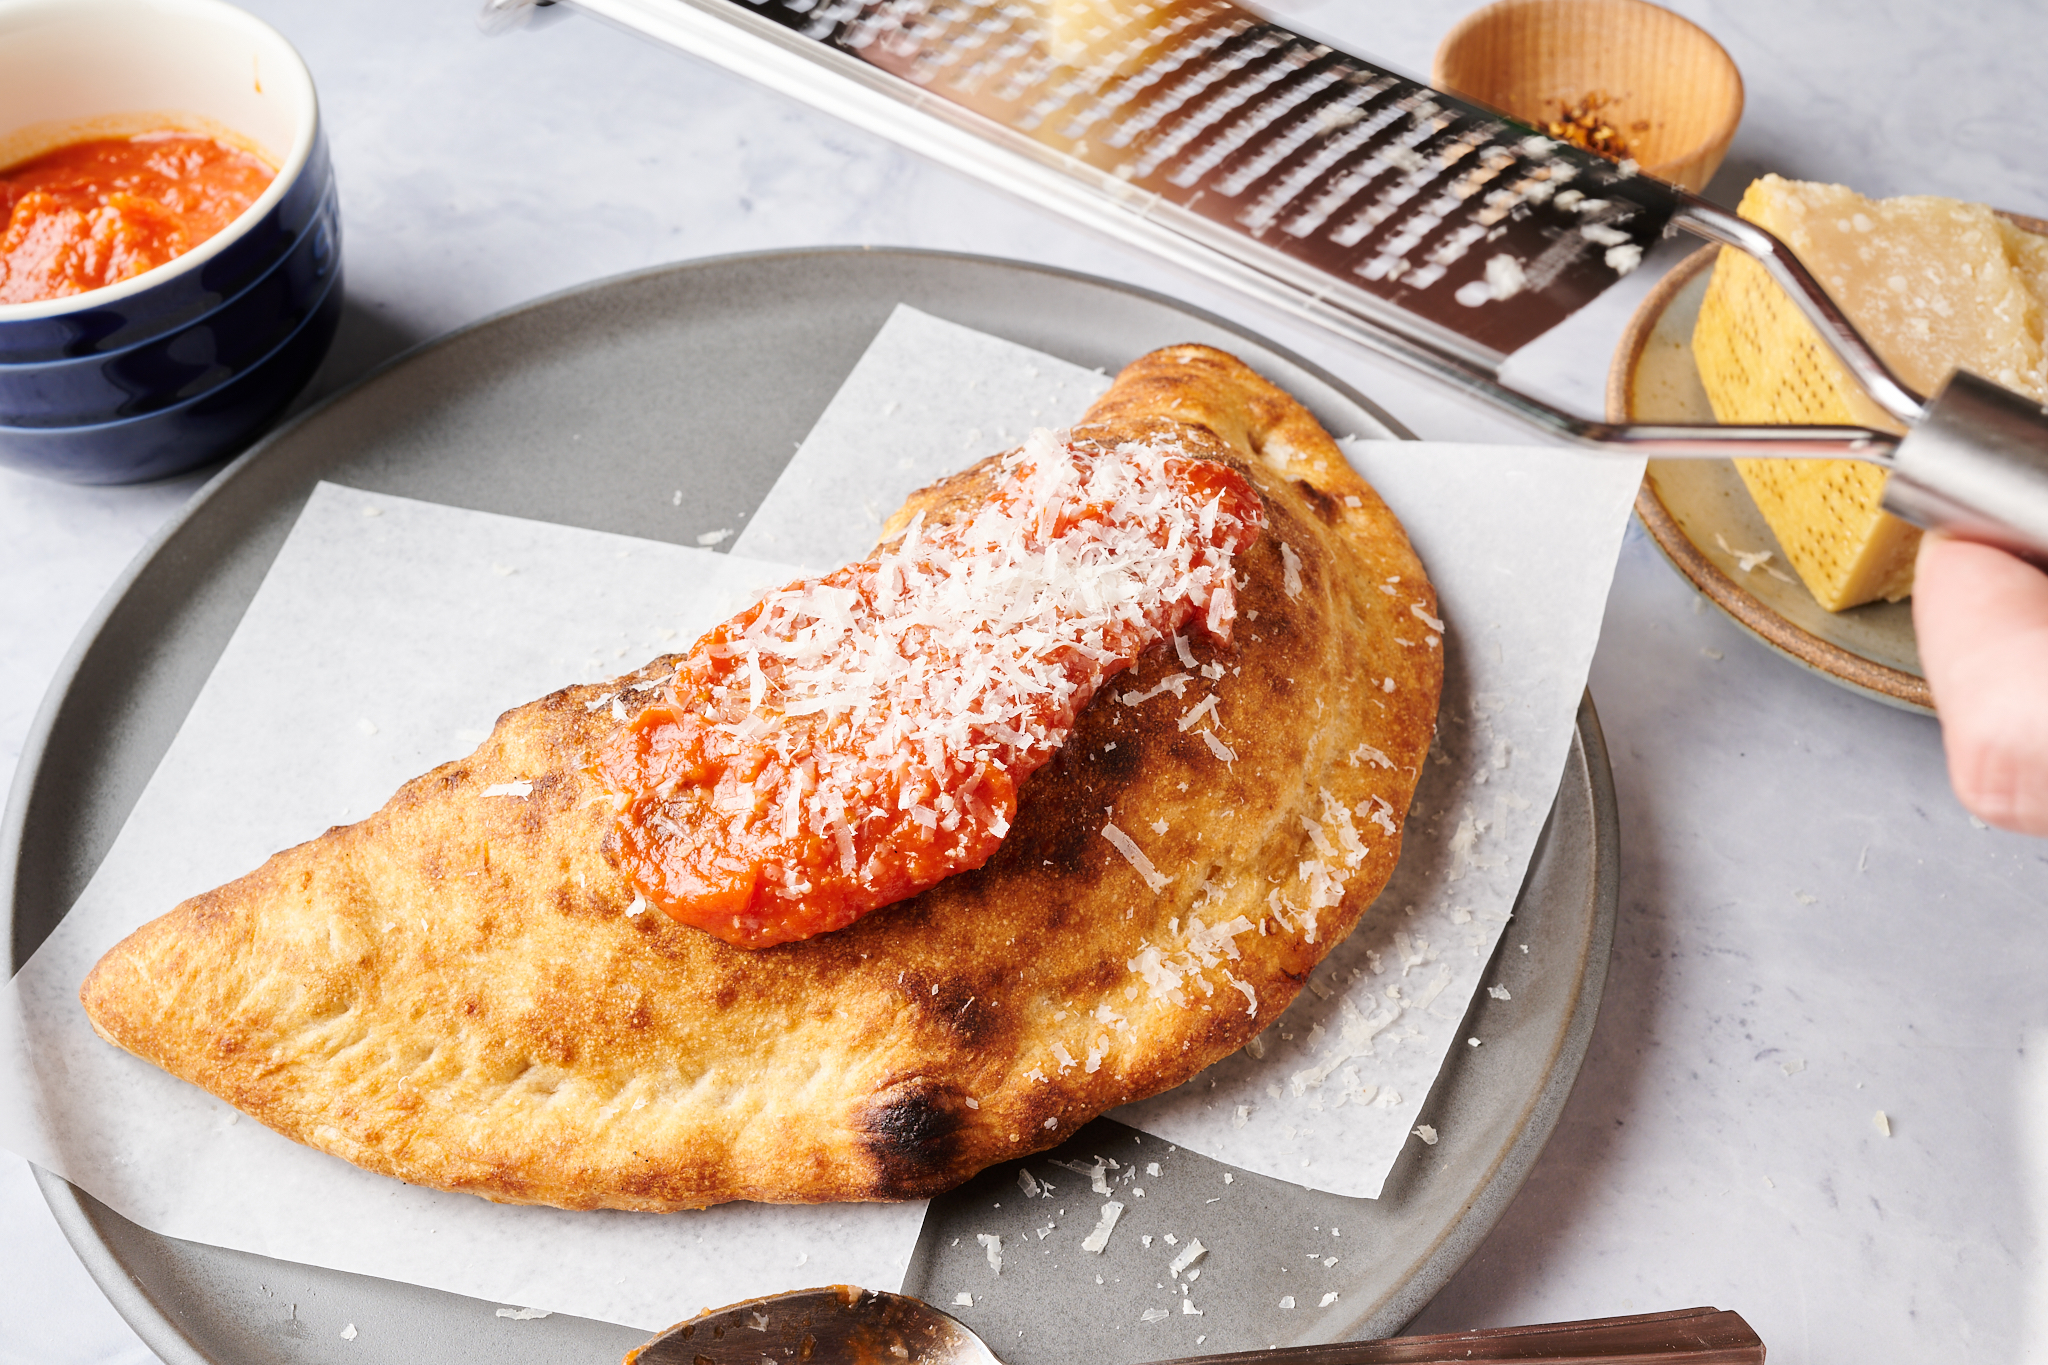
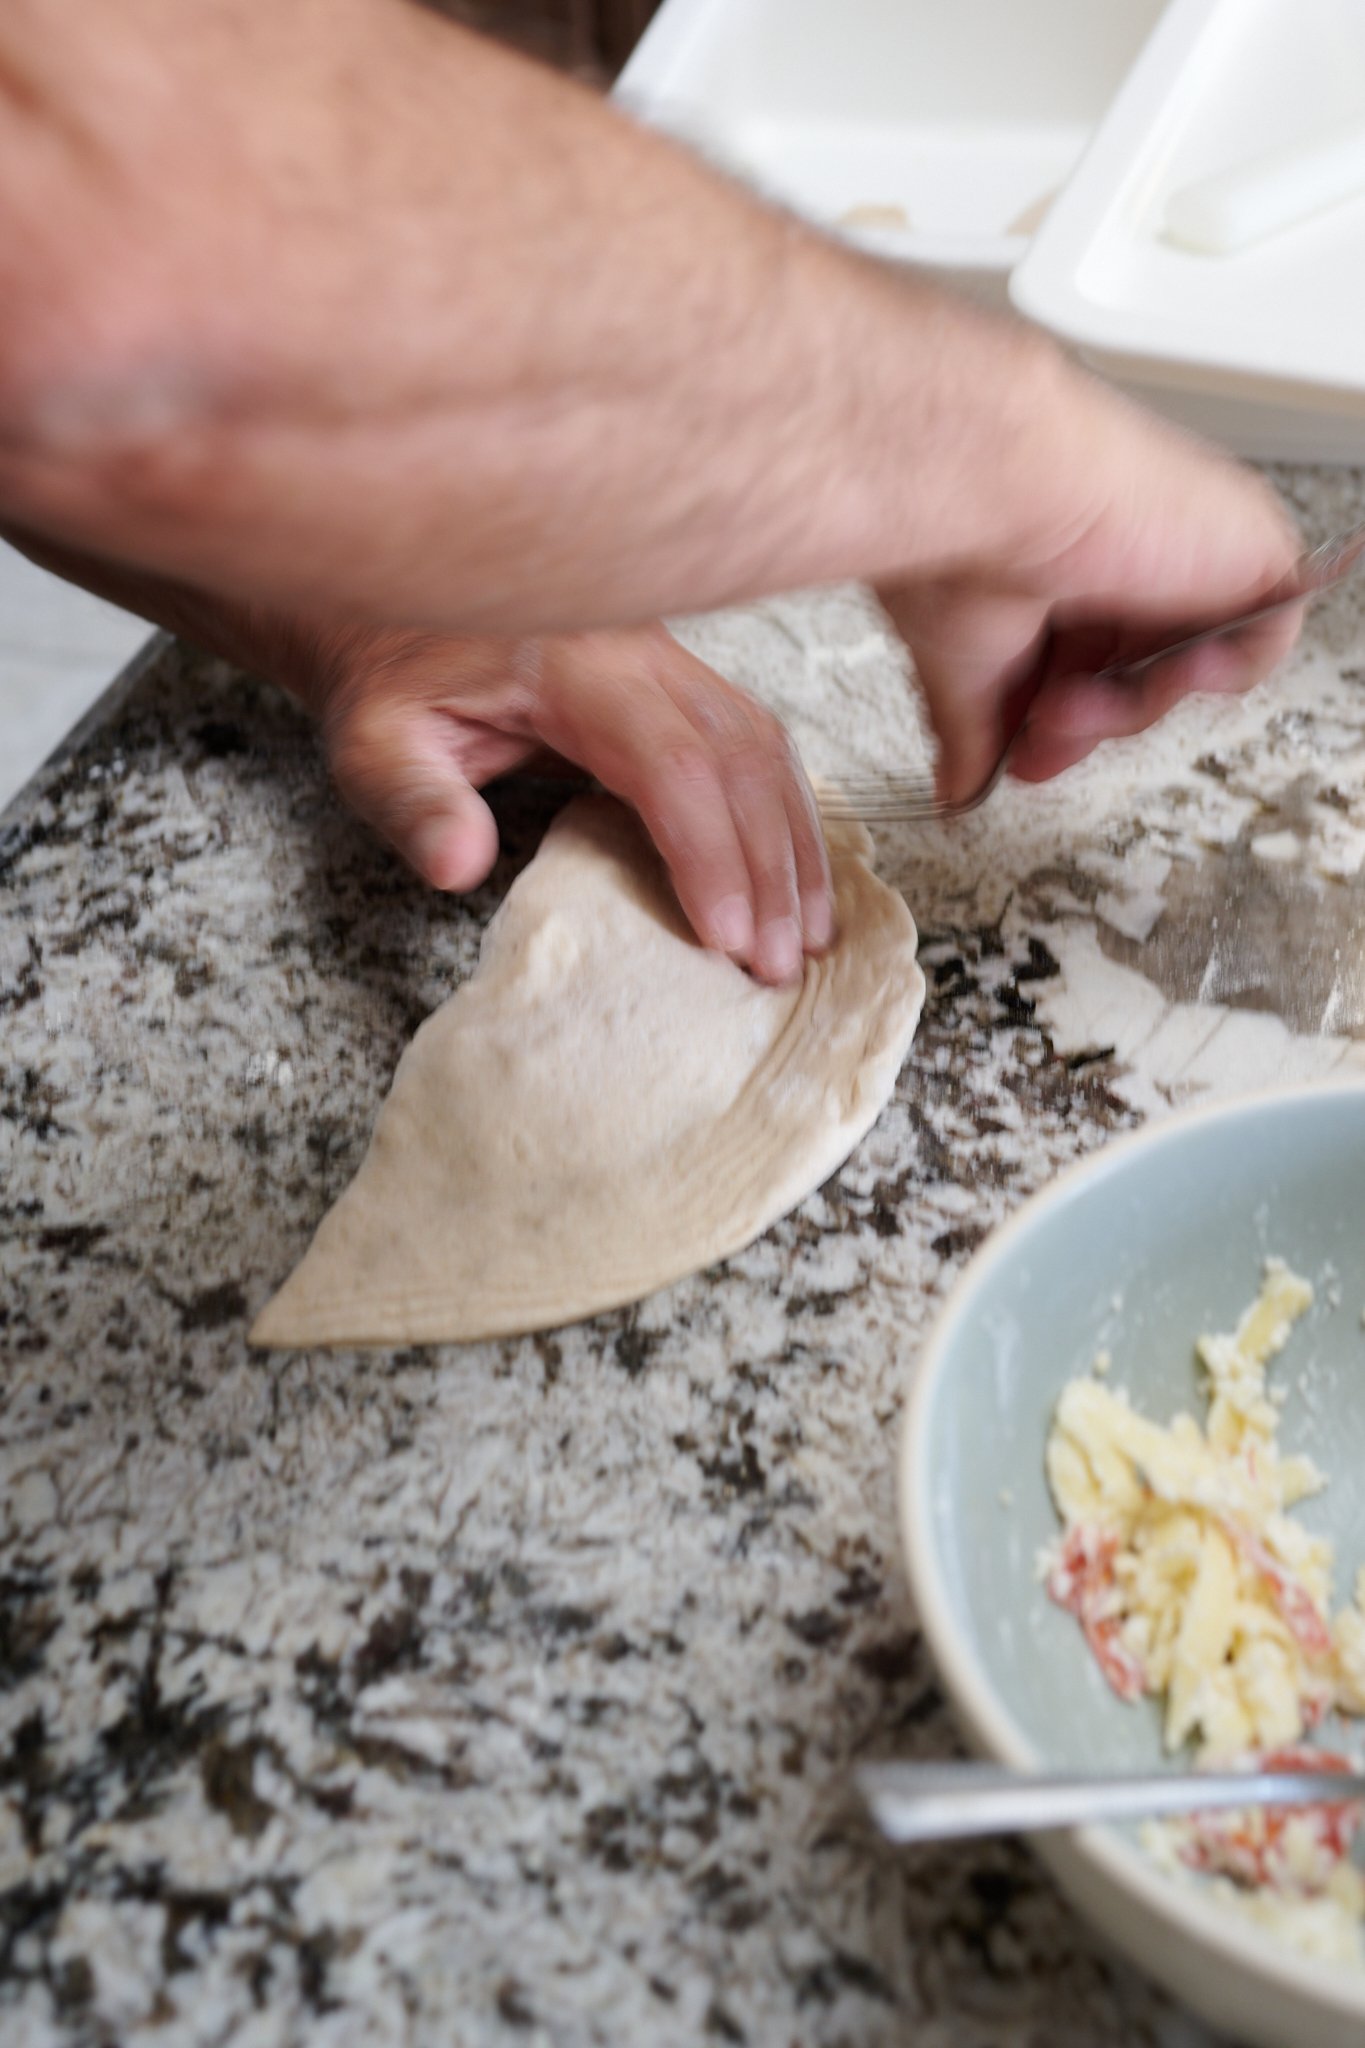
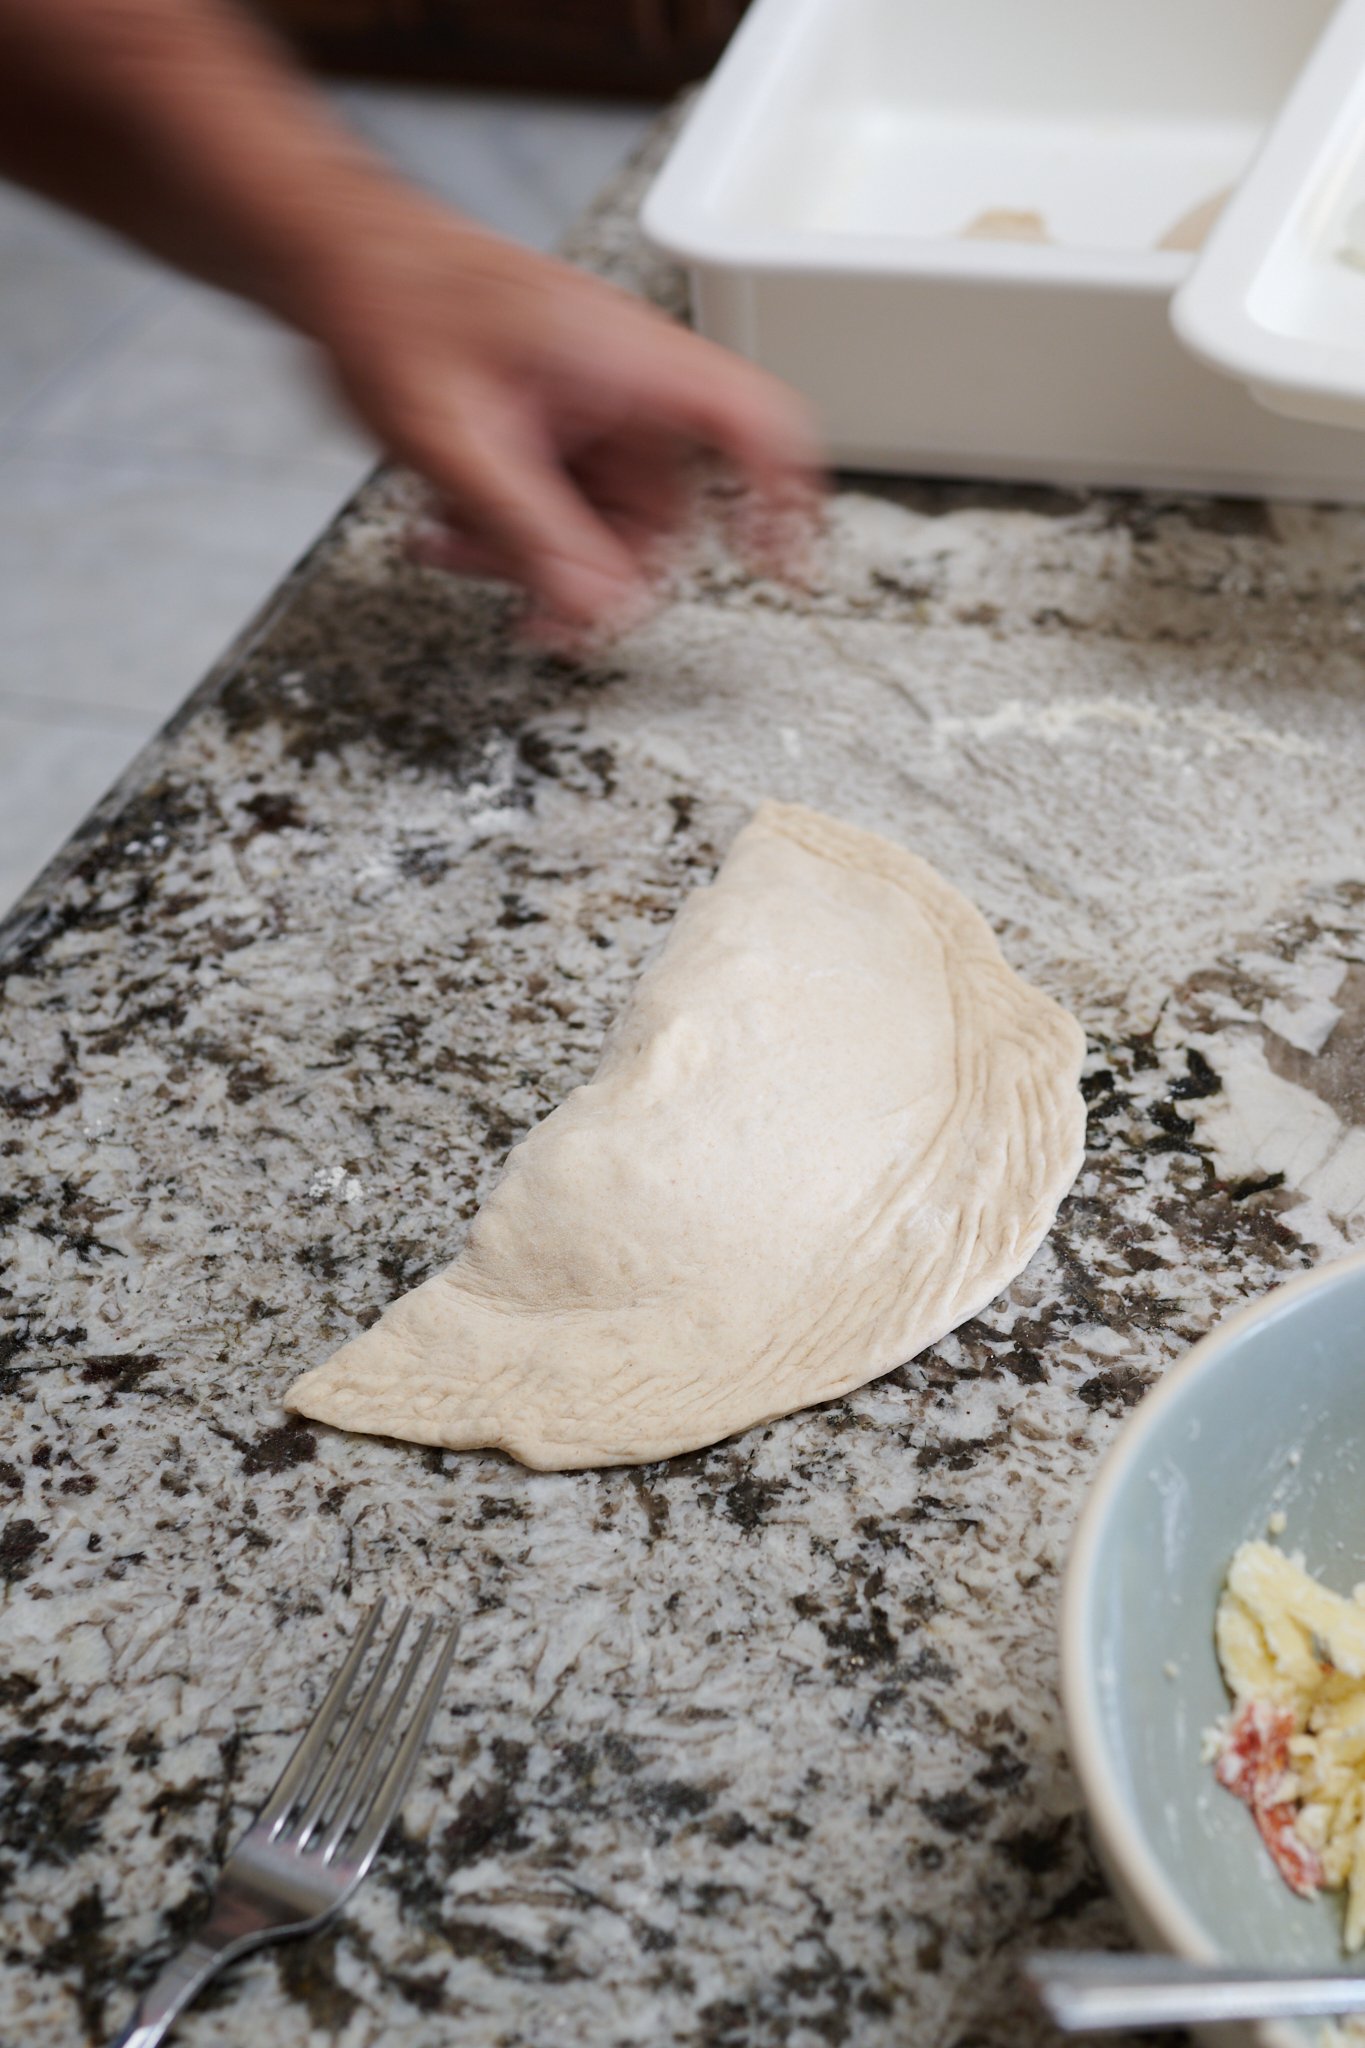
On one half of the dough circle, mound the filling, leaving a 1-inch border between the filling and the edge of the dough. Wet your fingers and dab around the circular edge of the dough (this will help it stick). Pick up the other side of the dough circle and fold it over the mound of filling so that the two wet edges of the circle meet exactly. I like to gently press the top of the dough to expel any extra air inside. Then, using a fork, seal the edge of the dough by pressing down forcefully with the tines all along the edge. Turn the fork 90° and go around the edge again to make a hash (“#”) mark to seal further.
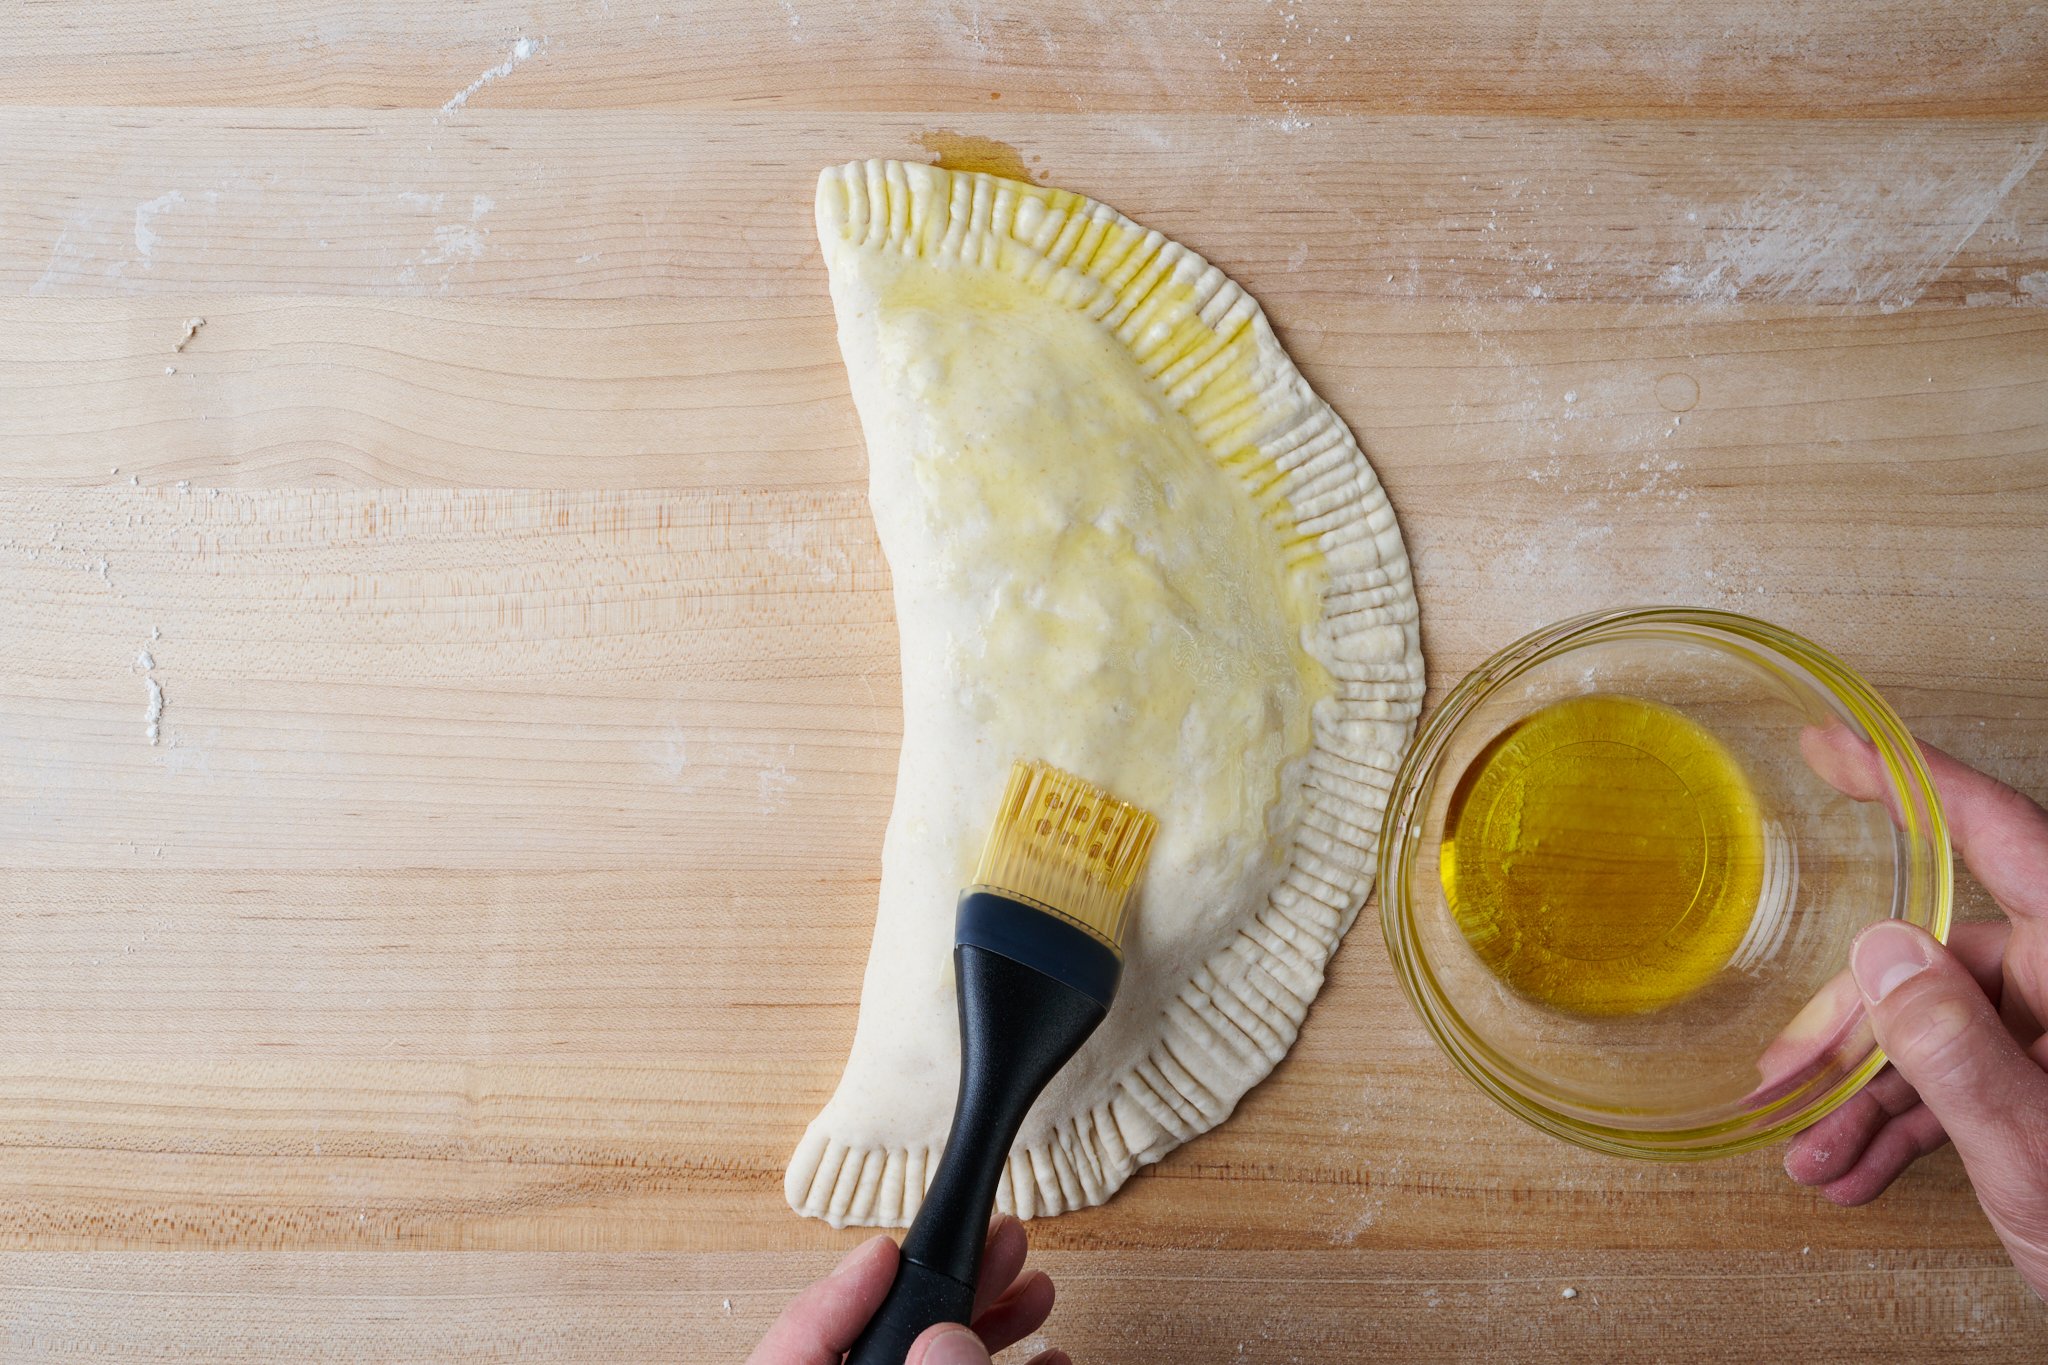
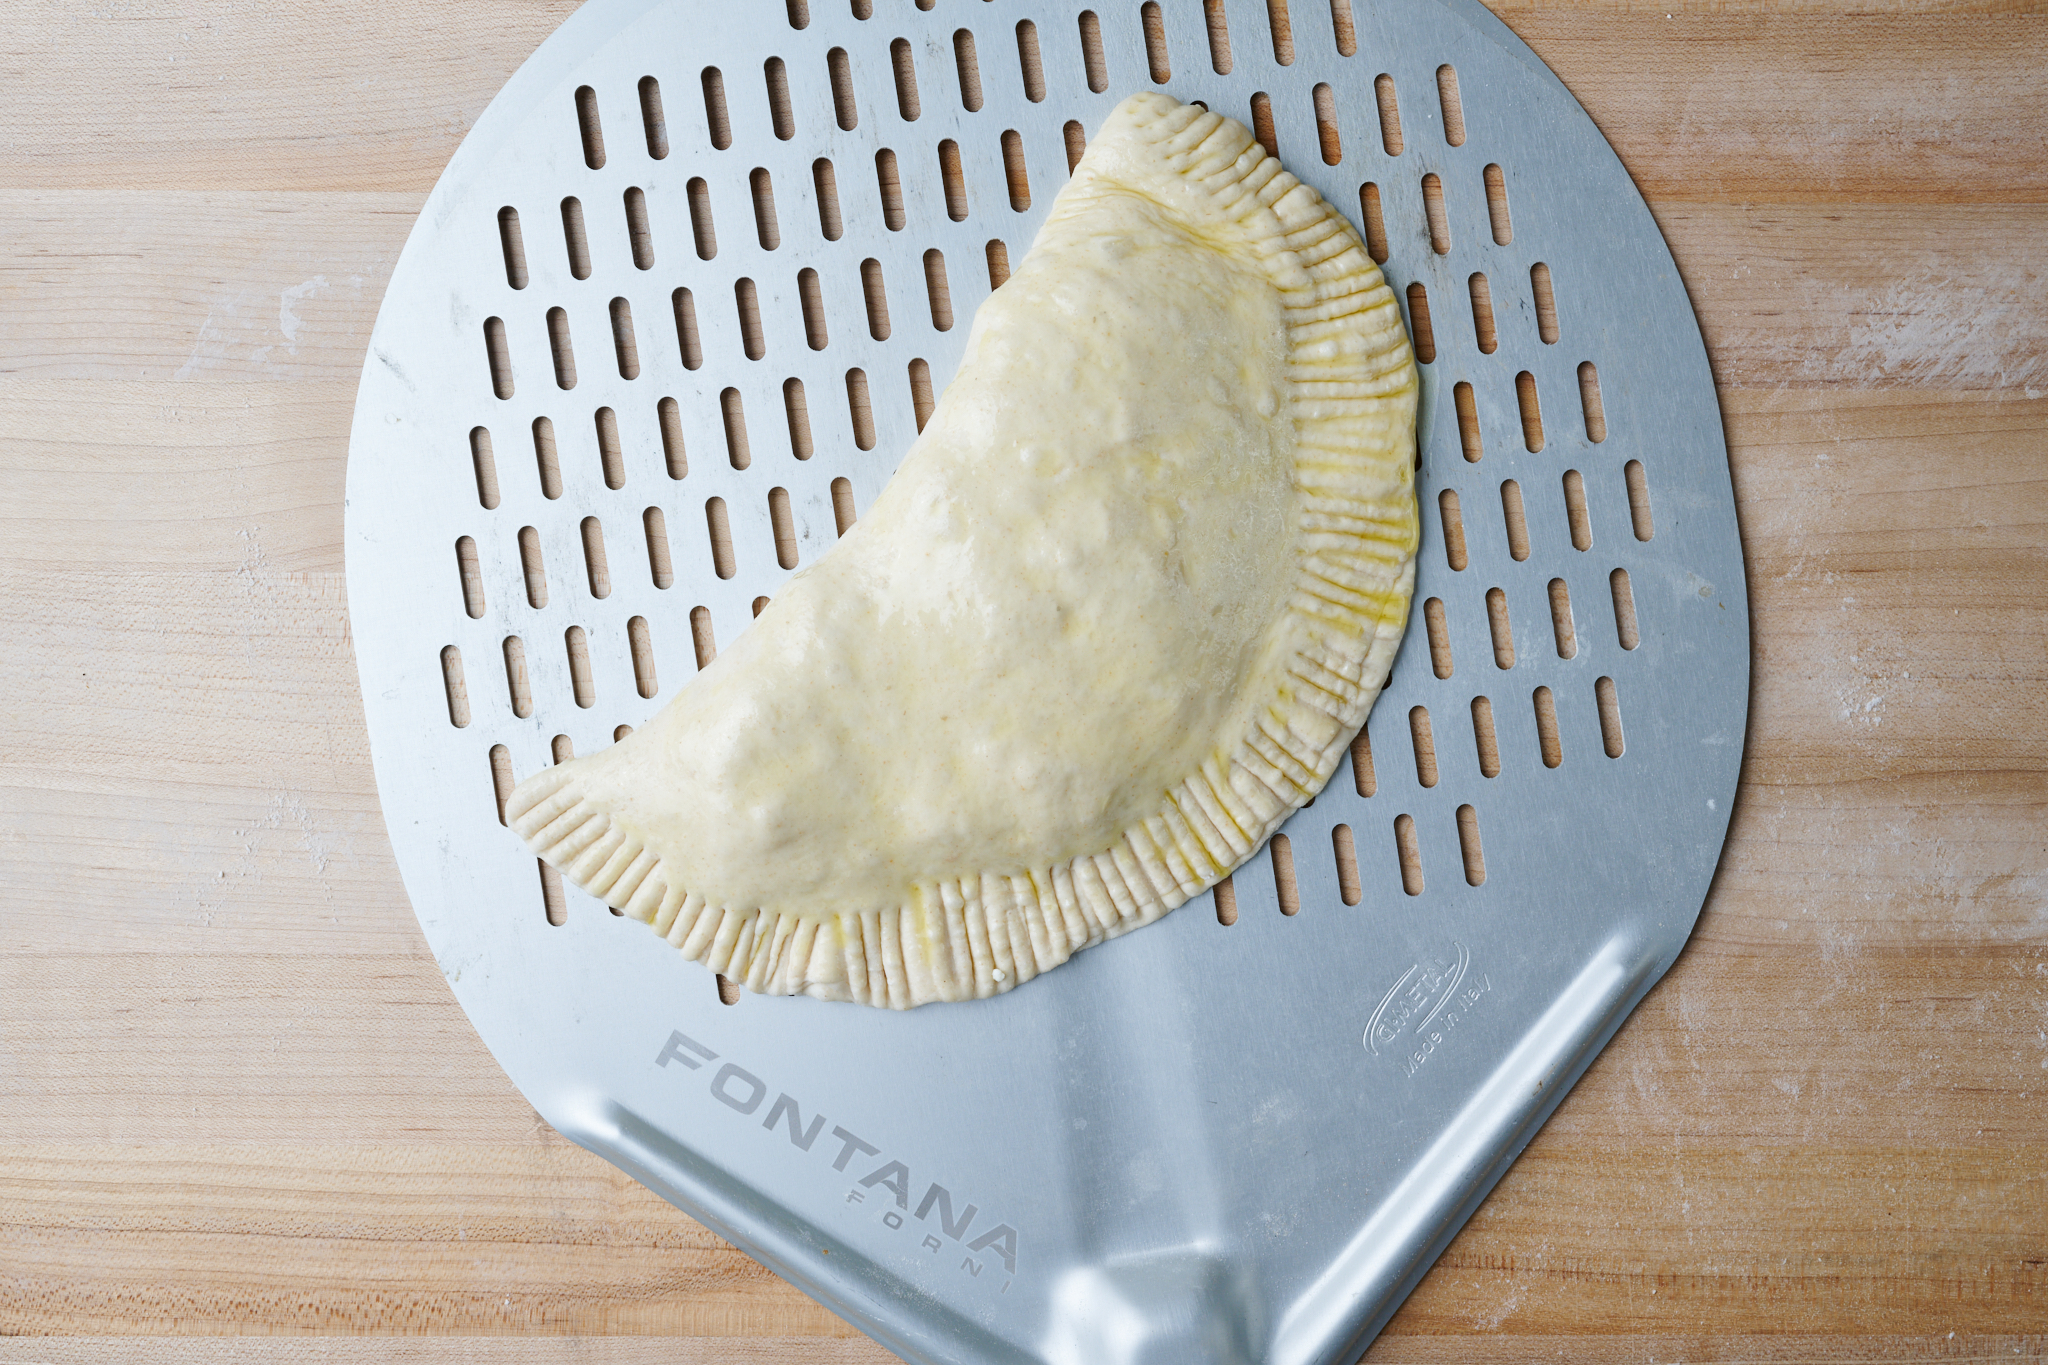
Brush a light layer of olive oil on the top of the dough. Slide the calzone onto a pizza peel (or cutting board), and then slide it into the oven.
Bake the calzone, rotating it periodically to ensure even cooking, until the crust is a deep golden brown, 10 to 15 minutes, depending on the intensity of the fire in your oven (in a home oven, total bake time will be longer, about 25 minutes). Transfer the calzone to a plate and let rest for 5 to 10 minutes. Then top it with the tomato sauce (or serve it on the side for dipping) and sprinkle with the grated Parmigiano Reggiano cheese. Repeat with the remaining dough balls.
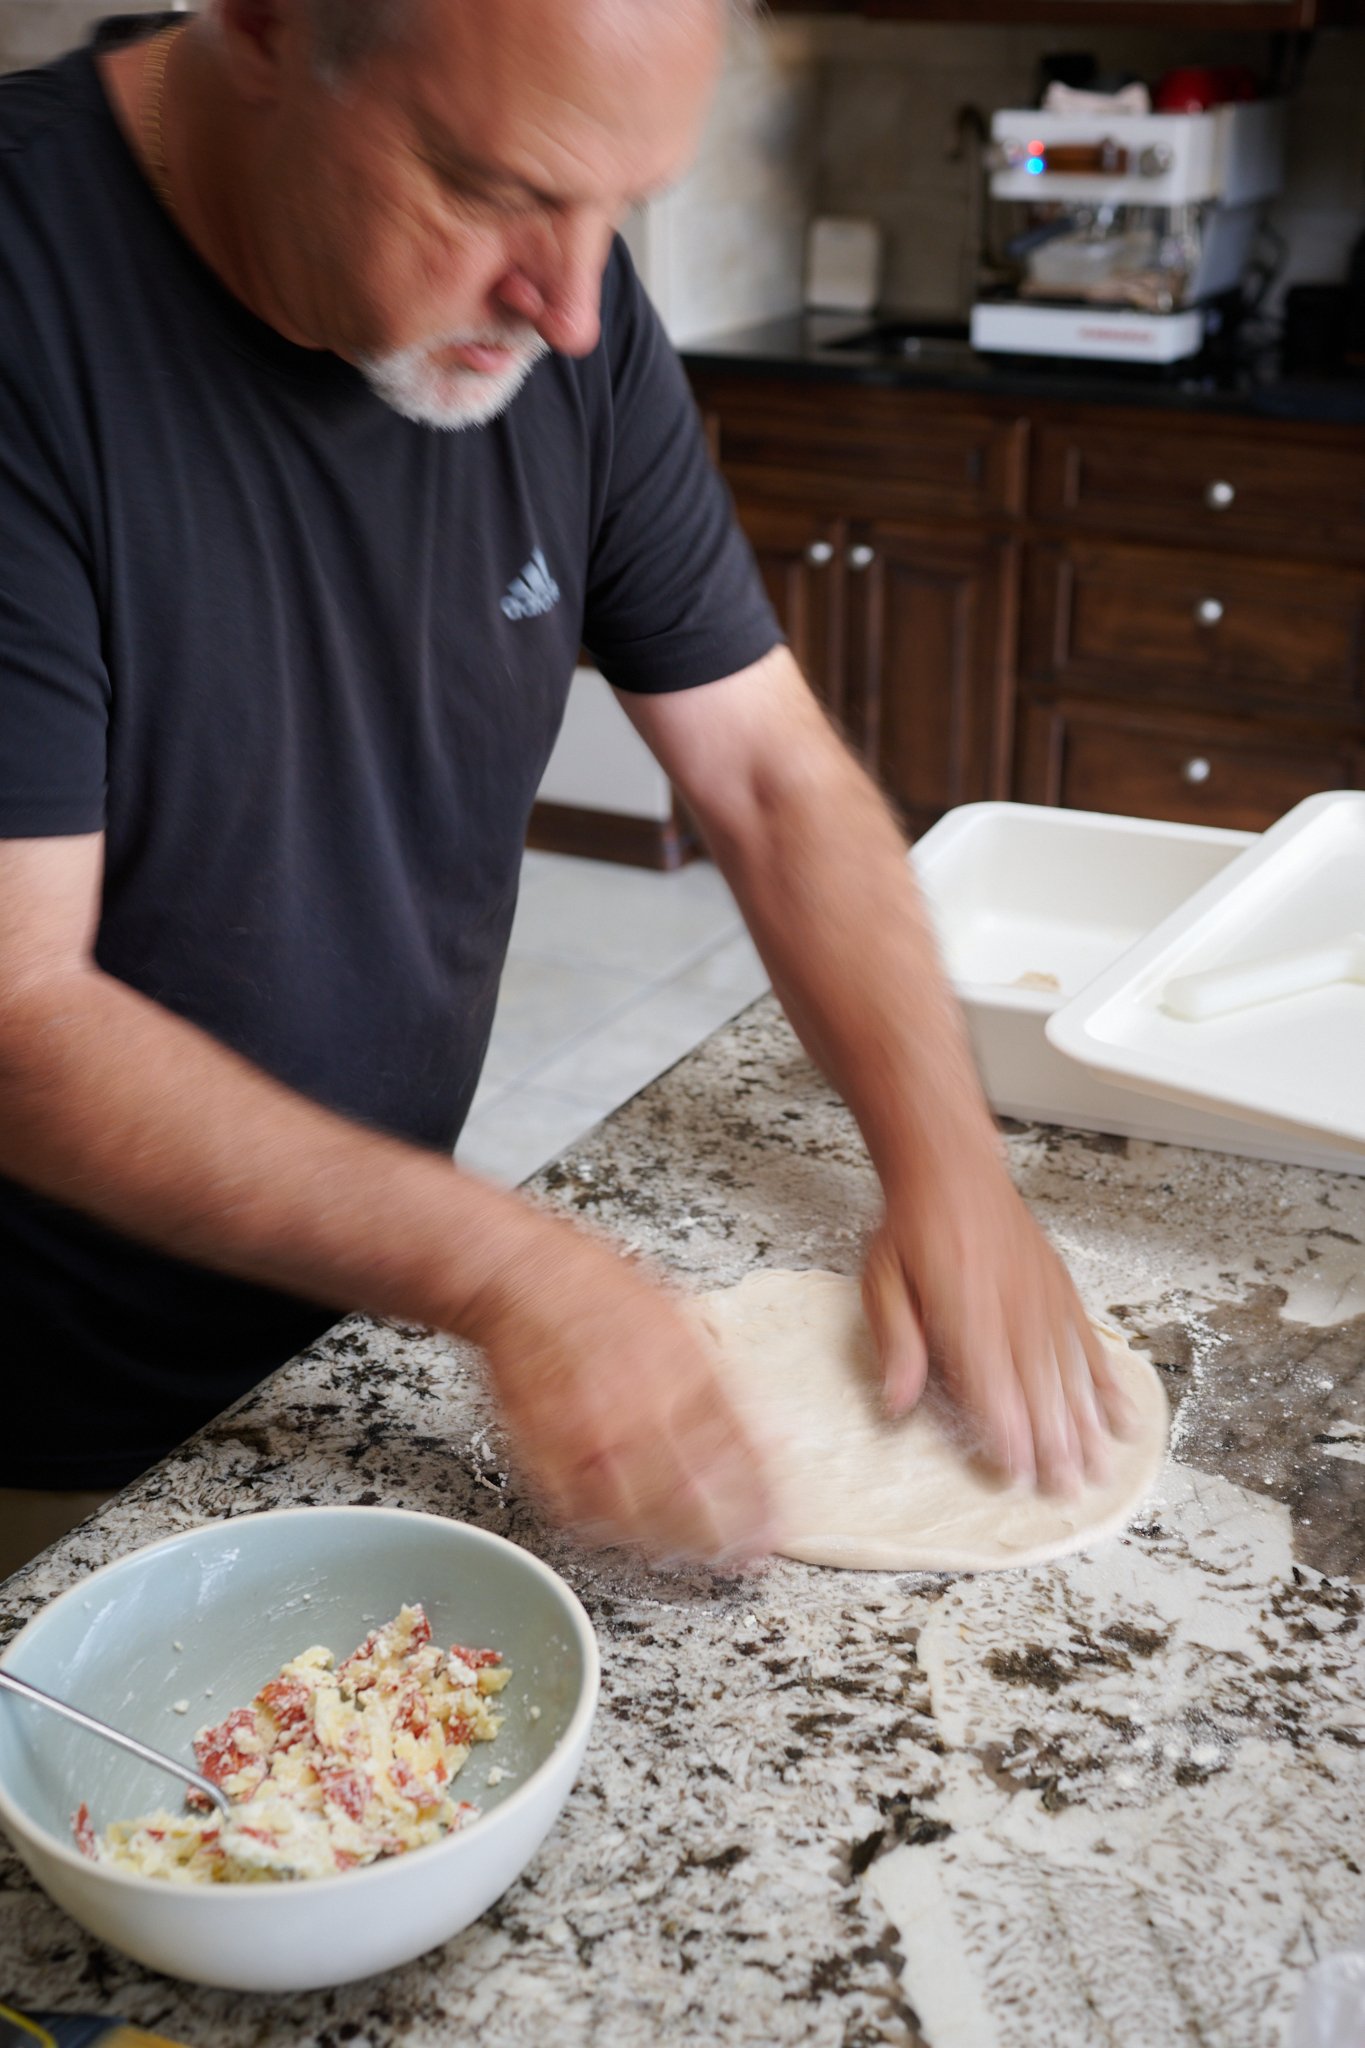
I also enlisted my dad’s help in filling a few calzones. He’s been making them for over 40 years and had some great tips for making these (which are all included in this post!). The filling we used in this bake was the cheese mixture in the recipe above, mixed with sliced pepperoni and a few grinds of fresh black pepper.
Print
Calzone Recipe
- Prep Time: 27 hours
- Cook Time: 1 hour
- Total Time: 28 hours
- Yield: 6 calzone
- Category: Sourdough
- Cuisine: Italian
Description
This cheesy, crispy, and delicious sourdough calzone is like pizza, but better.
Ingredients
Levain
- 35g white flour (about 12.5% protein)
- 35g water
- 35g ripe sourdough starter, 100% hydration
Main dough
- 564g white flour (about 12.5% protein)
- 106g whole wheat flour
- 381g water 1
- 28g water 2
- 15g fine sea salt
- 106g ripe levain
Topping
- 2 tablespoons extra-virgin olive oil
- ¼ white onion, chopped
- 1 garlic clove, sliced
- 1 (28-oz) can whole peeled tomatoes
- Freshly ground black pepper
- 1/2 teaspoon salt
- Grated Parmigiano Reggiano cheese (optional)
Filling (for one calzone)
- 1 tablespoon (14g) Parmigiano Reggiano cheese
- 2 tablespoons (27g) whole milk ricotta cheese
- 1 cup (90g) shredded low-moisture mozzarella cheese
Instructions
- Levain – 9:00 a.m.
Mix the levain ingredients in a jar and leave them covered at a warm temperature, 74-76°F (23-24°C), to ripen for 3 hours. - Mix – 12:00 p.m.
To the bowl of a stand mixer fitted with the dough hook attachment, add the flour, water 1, and ripe levain. Mix on low speed for 2 to 3 minutes until the ingredients come together and no dry bits remain. Increase the mixer speed to medium (I use #6 on the Famag) and mix for 3 to 4 minutes until the dough begins to smooth. Let the dough rest in the bowl for 10 minutes, covered. Add the salt and water 2 to help it dissolve. Mix on low speed for 2 minutes until the salt is incorporated. Then, increase the mixer speed to medium and mix for 4 to 5 minutes until the dough clumps around the dough hook and is smooth and elastic. Transfer the dough to a bulk fermentation container and cover. - Bulk fermentation – 12:15 p.m. to 3:15 p.m. (3 hours)
At a warm room temperature, 74-76°F (23-24°C), bulk fermentation should take about 3 hours. The dough does not require any sets of stretches and folds. - Divide, ball, and proof – 3:15 p.m. (overnight)
Grease a large dough tray, half sheet pan, or six individual 4-cup containers with olive oil. Scrape the dough out to the counter and divide it into 200g pieces. Shape tightly into balls and place in the proofing container(s). Cover and place into the refrigerator overnight (or up to 2 days later). - Warm proof – 9:00 a.m. to 12:00 p.m.Take the dough out of the refrigerator and let it finish proofing at room temperature for 3 hours before shaping and cooking. During this time, make the tomato sauce and filling.
Tomato sauce
Heat 2 tablespoons of extra-virgin olive oil in a saute pan over medium. When the oil is warm, add the onion and garlic and cook, stirring, until golden brown, about 4 minutes. Add the whole peeled tomatoes and their juices. Cook, using a spatula to break up the tomatoes, and bring the sauce to a gentle simmer. Cook, stirring occasionally, until the sauce thickens, 30 to 45 minutes. Let the sauce cool slightly and transfer to a blender. Blend on low until smooth. Set aside to cool completely.
Cheese filling
In a small bowl, combine the 1 tablespoon Parmigiano Reggiano cheese, 2 tablespoons ricotta cheese, and 1 cup shredded low-moisture mozzarella. Keep in the refrigerator until ready to use. - Shape and bake – 12:00 p.m.
Preheat your high-heat oven until the floor of the oven reaches around 575°F/300°C (If baking in a home oven bake at 475°F (245°C) for 10 minutes, rotate the pan, then bake at 450°F (230°C) for 10-15 minutes longer).
Flour a work surface and the tops of the dough balls. Scoop up one dough ball and flip it over onto the floured work surface. Sprinkle flour on top and use your hands, shaped like an inverted “V,” to press out the dough from top to bottom. Rotate the ball and press it out again. Then, flip the dough over and again, with your hands shaped like an inverted “V,” press the dough out. Next, pick up the dough with your hands, make fists, and drape the dough over your knuckles. Gently and slowly, pull your hands apart to stretch the dough. Rotate the dough over your hands and continue to stretch in this way a few more times until the dough has spread to about 8-inches in diameter. Lay the dough back on the work surface.
On one half of the dough circle, mound the filling, leaving a 1-inch border between the filling and the edge of the dough. Wet your fingers and dab around the circular edge of the dough (this will help it stick). Pick up the other side of the dough circle and fold it over the mound of filling so that the two wet edges of the circle meet exactly. I like to gently press the top of the dough to expel any extra air inside. Then, using a fork, seal the edge of the dough by pressing down forcefully with the tines all along the edge. Turn the fork 90° and go around the edge again to make a hash (“#”) mark to seal further.
Brush a light layer of olive oil on the top of the dough. Slide the calzone onto a pizza peel (or cutting board), and then slide it into the oven.
Bake the calzone, rotating it periodically to ensure even cooking, until the crust is a deep golden brown, 10 to 15 minutes, depending on the intensity of the fire in your oven. Transfer the calzone to a plate and let rest for 5 to 10 minutes. Then top it with the tomato sauce (or serve it on the side for dipping) and sprinkle with the grated Parmigiano Reggiano cheese. Repeat with the remaining dough balls.
Notes
Once the dough has been balled and placed into the refrigerator, it can be left up to 2 days.
FAQ
Can I freeze my calzone dough?
Yes, you can freeze this dough. After dividing the dough and shaping it into balls, place a single ball into a small container with an airtight lid (I like to use a 4-cup glass container to hold a single pizza dough ball), then place the covered container into the freezer. The dough will keep for up to 2 weeks.
Can I use parchment paper to help transfer my calzone?
Because of the high temperature in a wood-fired oven, using parchment paper is a hazard. Please do not use it. However, if baking in a home oven, you can bake the calzone on a parchment paper-lined baking sheet.
Can I freeze a calzone?
Calzone freeze incredibly well! I would bake the calzone halfway through (essentially parbaking it), and let it cool completely at room temperature. Then, wrap it with plastic wrap, place it in a freezer bag, and put it in the freezer. When you want to finish the calzone, take it out of the freezer the night before and let it thaw in the refrigerator. The next day, finish baking the calzone according to the instructions in this recipe.
What is the difference between a calzone and a stromboli?
A calzone is typically filled with a mixture of mozzarella cheese and ricotta, whereas a stromboli is only filled with mozzarella. Additionally, a calzone is a circular dough folded in half and sealed, whereas a stromboli is rolled up around its filling.
What is the difference between a calzone and a panzerotti?
The big difference between a calzone and panzerotti is that a calzone is baked, whereas a panzerotti is typically deep-fried. Additionally, panzerotti is usually much smaller than a calzone; it’s more the size of a sandwich rather than a medium-sized pizza folded in half.
What’s next?
If this sourdough calzone recipe has spurred a deep interest in all things cheesy, meaty, and delicious, check out my pizza al taglio (pizza in a sheet pan). Or, check out my ultimate guide to sourdough pizza for all the pizza shaping guides, tips, tricks, and tools to making the best pizza at home.
Thanks again to Fontana Forni for partnering with me on this calzone recipe, it’s something I’ve wanted to make for some time and the wood-fired oven takes it to the next level.
Buon appetito!