Growing up, I never really liked polenta. My grandmother would frequently cook the gritty yellow mash, and I’d eat it with this muted disdain, asking for something else after I finished eating. I remember her customarily cooking it in water and then serving a warm bowl fresh from the stove, but I’ve had it a variety of ways: boiled in water, simmered in chicken stock, cooled, and then pan-fried and, of course, cooled and topped merely with parmesan. Nowadays, I’ve somehow developed a deeper appreciation for the yellow stuff, and I find myself craving that deep, luxurious corn flavor that can readily be summed up as comforting. And this polenta and rosemary sourdough bread wraps that comforting flavor up in a neat, edible package.
Polenta is a typical Northern Italian dish that we’d have in some form or another just about every time we visited family. Maybe this is what slowly developed my admiration for the meal over the years. Or, perhaps, it was just my ever-developing palette as I was getting older (something I know all too well now with my young son—one week he loves chicken, the next week he’s moved on to something better), either way, you’re sure to find a bag of polenta in my pantry at all times.
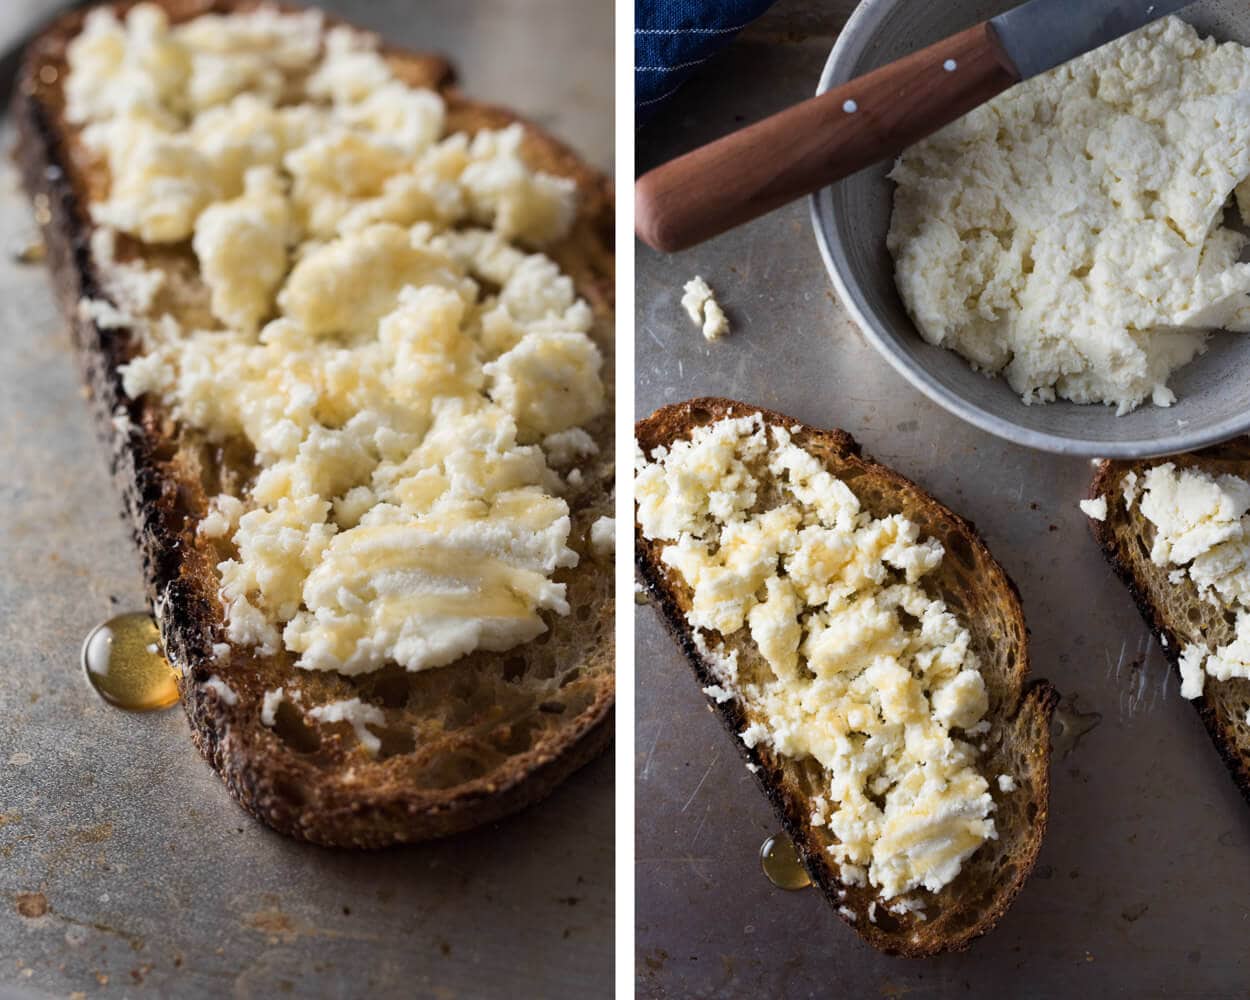
Along those same lines, and a food that I find equally comforting and make regularly, is fresh ricotta cheese. It’s an uncomplicated task whose result customarily finds itself spread warm on a toasted slice of sourdough with just a modest drizzle of honey — yeah, it’s as good as it sounds (see the end of this post for what I mean). One of the by-products of making ricotta is whey, and I’ve been thinking about what to do with the leftovers from the process.
Some readers suggested using it to supplant some of the water in my sourdough formula, which is a fantastic idea, but given my recent inclination for polenta, I thought: why not boil the polenta in the leftover whey and then bake with it? The result is a soft, creamy consistency that translates directly into the crumb of this bread, but the flavor is not so stifling that it becomes too milky or densely creamy; it complements the delicate corn flavor and reinforces its silken texture.
I played with varying levels of polenta with this bread, and I’ve settled on the amount listed in the formula. A few of my family members loved the light corn flavor, and a few thought it could use a touch more—personal preference plays a role. After trying this out, adjust the amount to your liking, up or down, to either bring up the corn flavor or make it even more subdued.
Flour and Cornmeal Selection
I treated this bake much like my experience with an oatmeal porridge loaf: I reduced starting hydration and also used a little stronger flour to help support the porridge-like polenta. Adding in a small percentage of Central Milling High Mountain flour, which has high protein levels, helped quite a bit. A good substitute would be any “Bread Flour” (13-14% protein) found at the market, including King Arthur Bread Flour (blue bag) found in the States. Even though the dough might feel overly stiff and dry at the start of this bake, try to refrain from adding any more water, as the polenta will release more than enough during bulk fermentation.
A coarse grind gives a more firm, toothy polenta whereas a finer grind gives a more loose and liquid result.
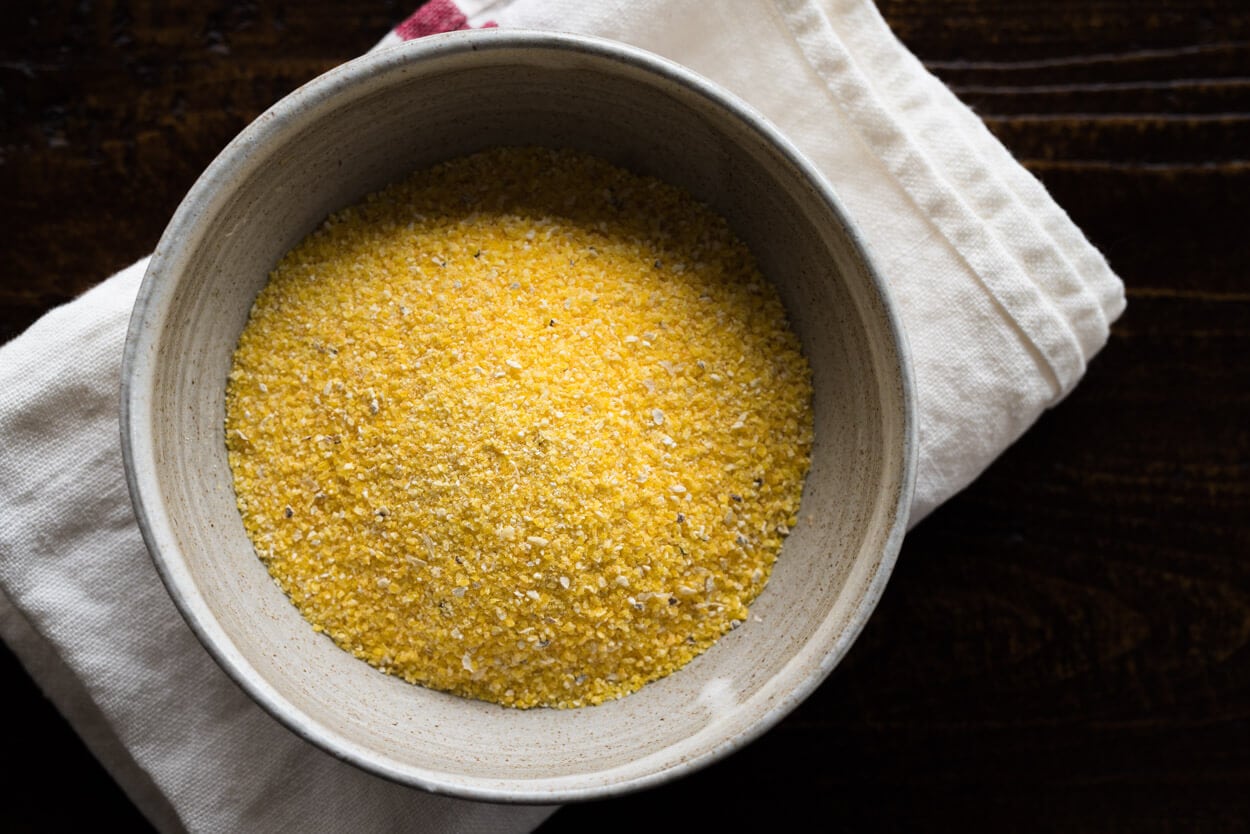
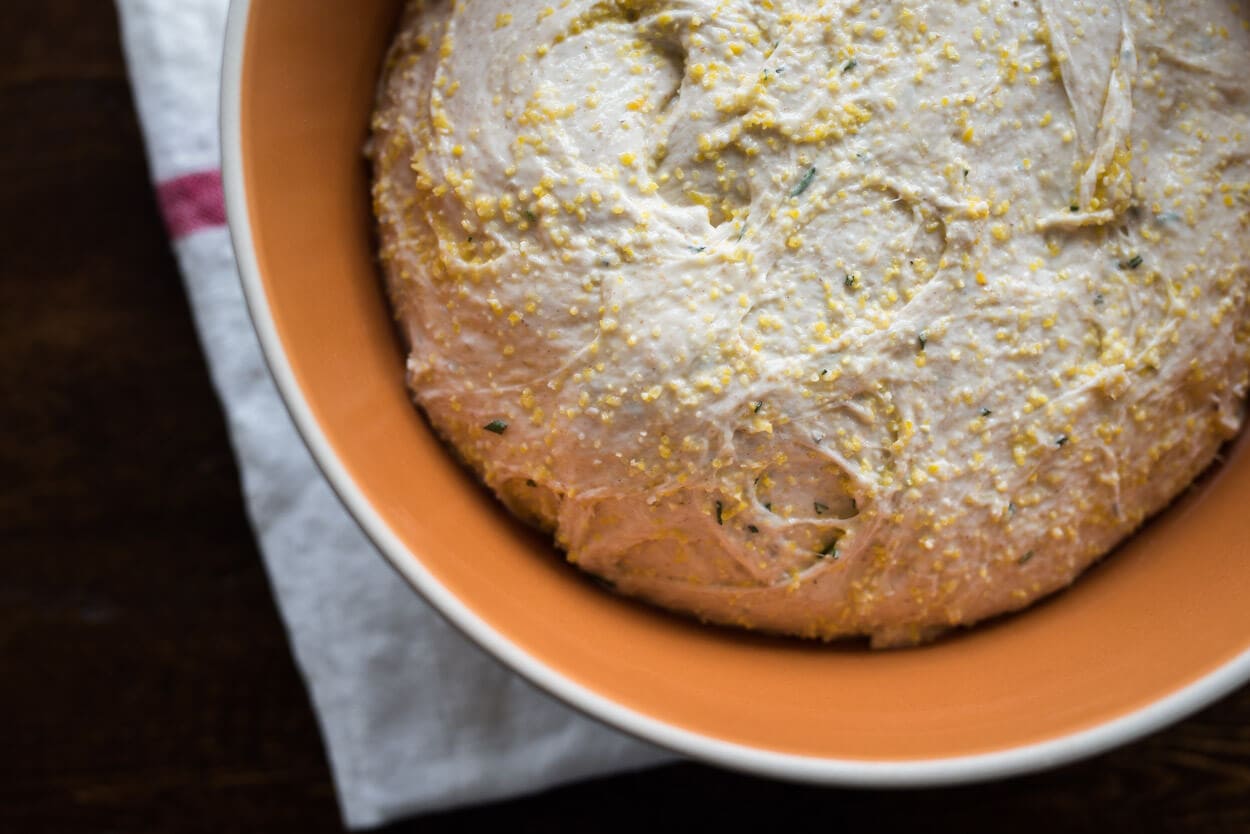
When shopping for polenta, you can find varying levels of coarseness, ranging from very fine to very coarse. Finer options are sometimes labeled corn grits or corn flour, while coarse varieties are typically labeled polenta. I went with Bob’s Red Mill Polenta/Corn Grits because the consistency of the grind was more coarse (even though they label them corn grits, which are typically finer) than other options I had at the market. I prefer the coarse grind; it reminds me more of what I recall having in Italy, and it mixes well in the dough. You could certainly choose a fine grind if that is your preference.
Oh, and do not use any instant polenta varieties; the flavor and texture are not correct.
One thing to be aware of when working with polenta is that different bags (and possible weather changes) display different water absorption levels. The ground corn behaves much like flour in this regard. Therefore, you’ll have to adjust your process for each bake according to how the dough feels at the mix. I discuss this below during Bulk Fermentation.
Liquid Whey
In one of my previous posts, I went into the process of making fresh ricotta at home. If you’d like to cook the polenta for this recipe in whey, first make a batch of this fresh ricotta and save the resulting whey once it cools. I do this the day (or up to a week) before and store the cooled whey in a glass jar in the fridge.
The small percentage of whey added to this rosemary and polenta sourdough adds not only flavor but nutrition. If you have extra, try baking with it in your standard sourdough recipe; just replace a percentage of the water in the formula.
Polenta and Rosemary Sourdough Formula
Vitals
Total dough weight: 1800g Pre-fermented flour: 4.75% Hydration: 75% (this does not include the whey) Yield: 2 x 900g loaves
If you want to halve this recipe just take all ingredients and divide by 2 — including the polenta, whey, and rosemary.
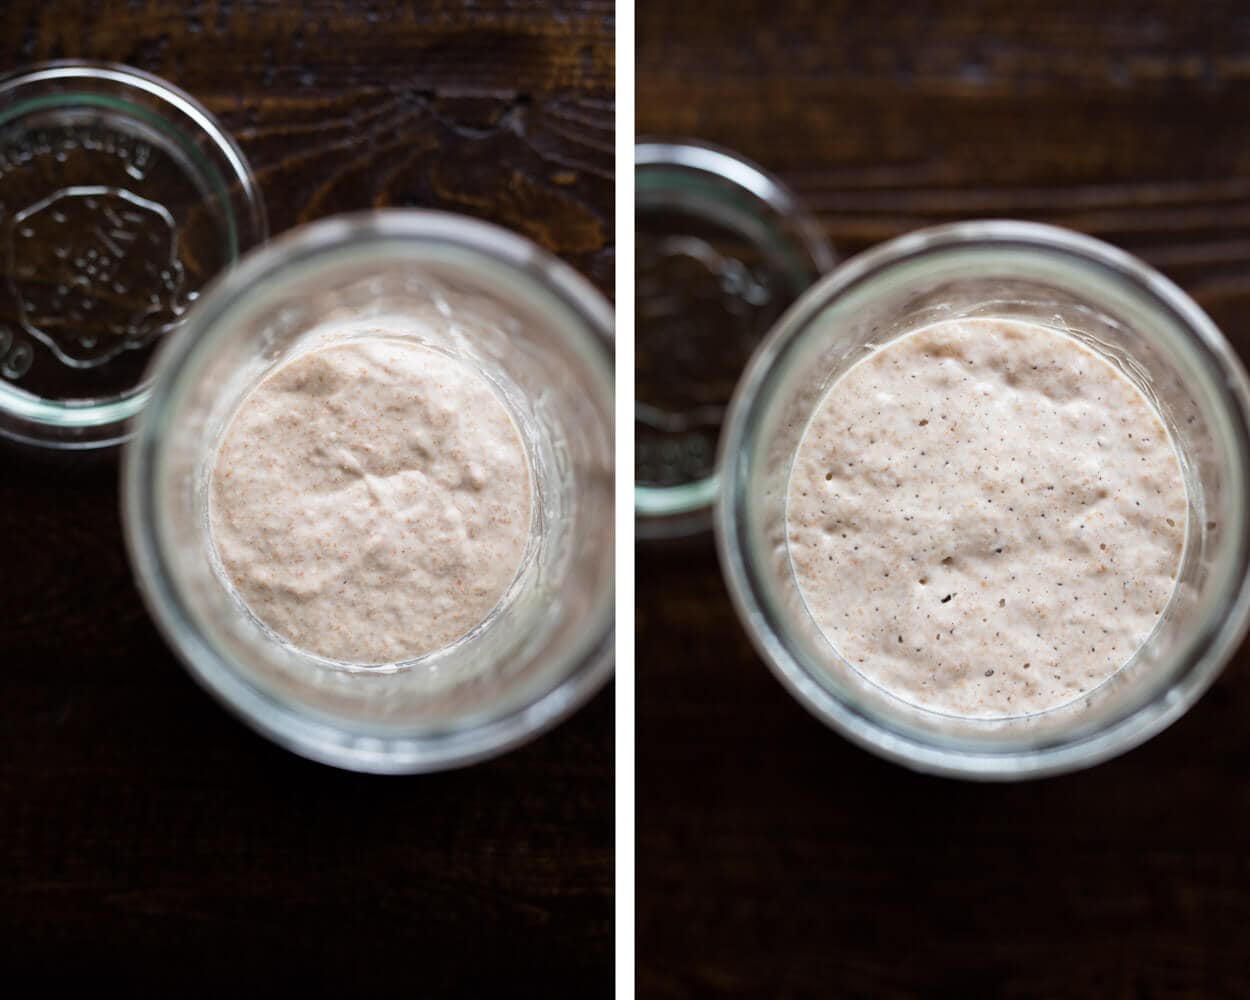
Build the liquid levain described above in the morning and store it somewhere around 74-76°F (22-24°C) ambient.
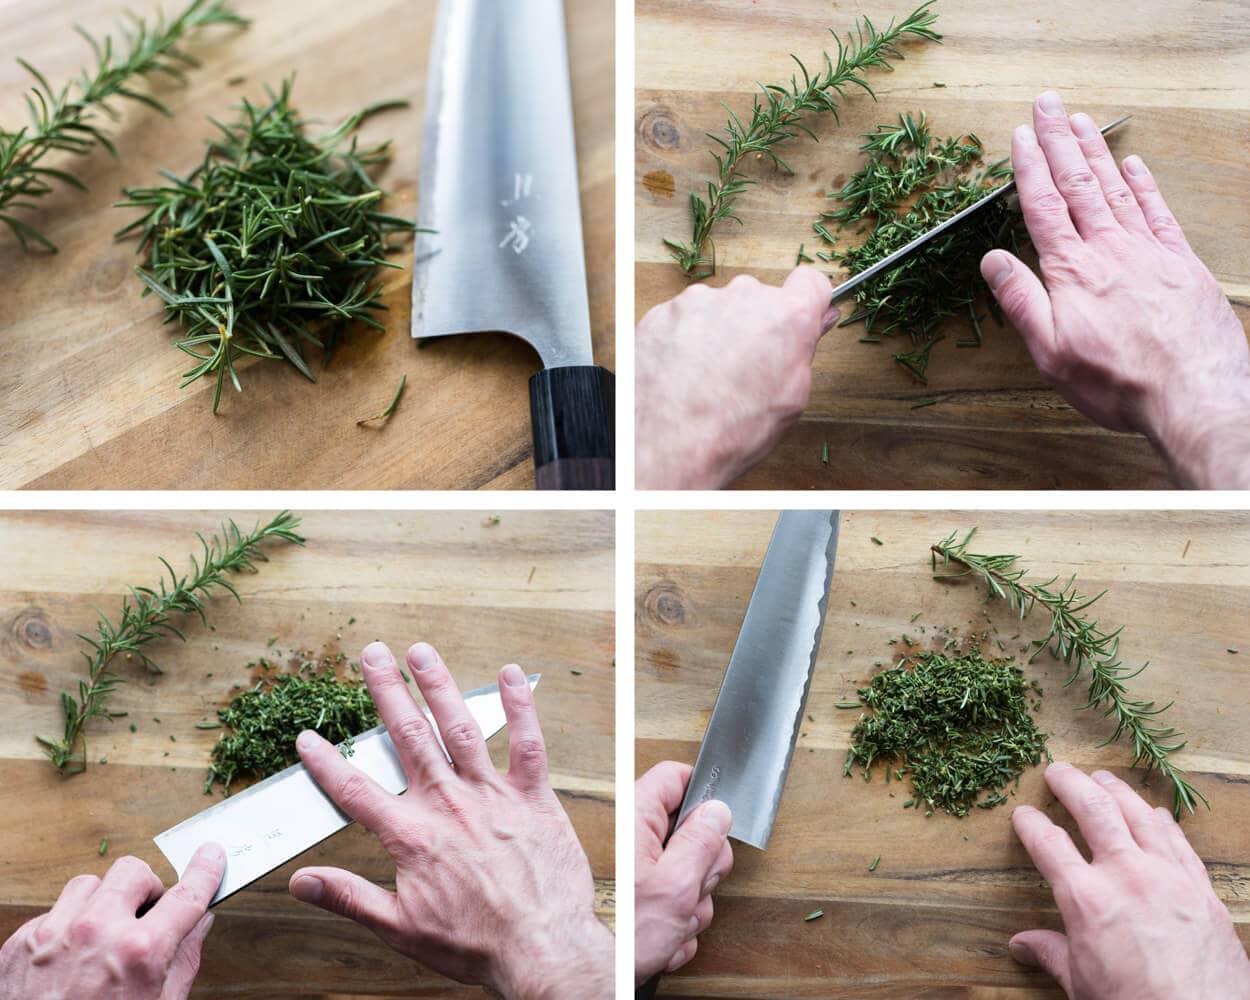
2. Make Polenta & Chop Rosemary – 3:00 p.m.
This chopping and cooking can be done at any time, but be sure to let it cool completely for at least 1-2 hours before mixing.
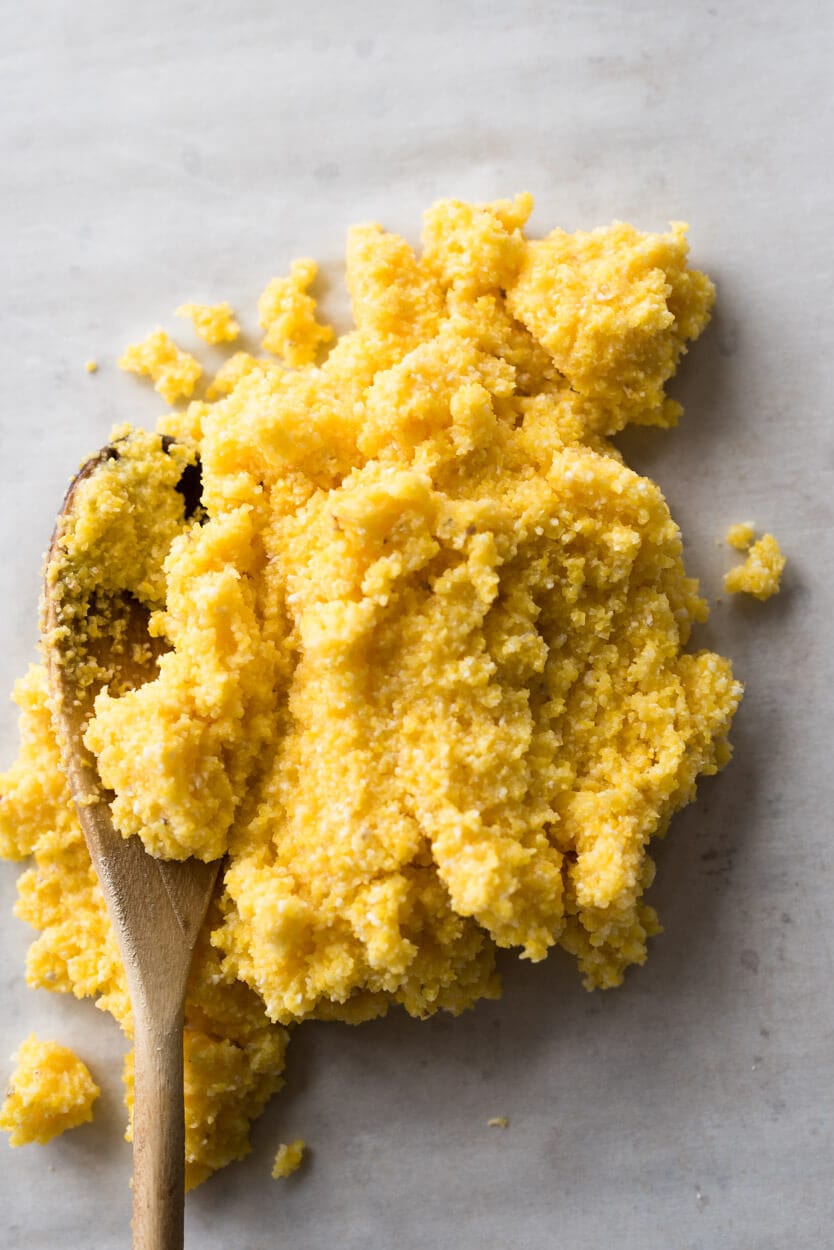
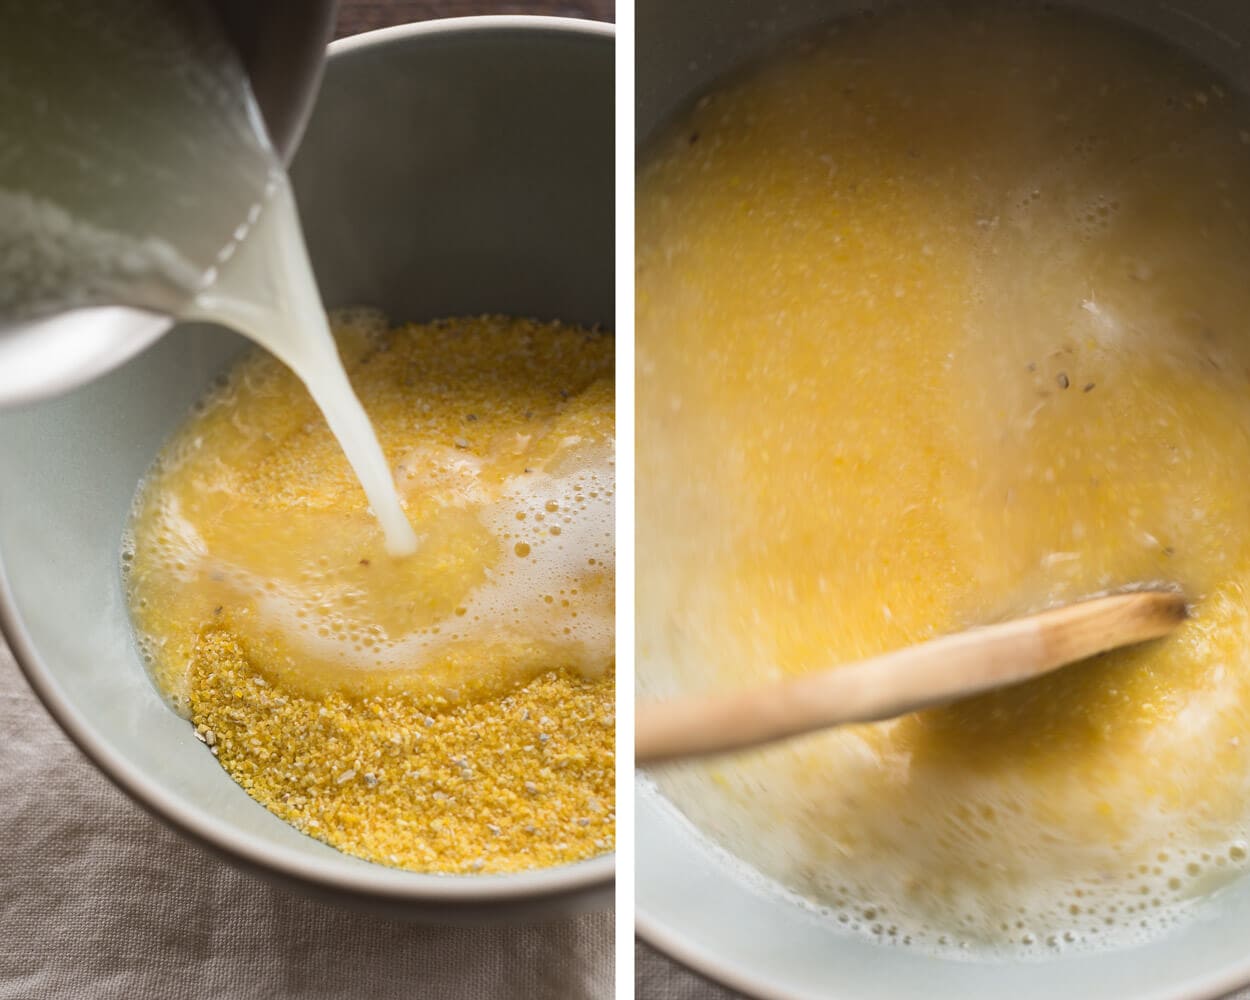
Gather the raw polenta and liquid whey and prepare a medium-sized baking sheet lined with parchment paper. Pour the whey into a heavy-bottomed saucepan and set it over medium heat. Bring to a boil. Stir occasionally to prevent scorching. Once boiling, pour the whey over the raw polenta in a bowl and stir until there are no lumps. Let it sit for 45 minutes (the longer you let this mixture soak, the more water the corn will absorb). After 45 minutes, dump the polenta mixture into a fine sieve and allow some of the liquid whey to drain. I didn’t press the polenta at this point; I just let any excess liquids drain freely for a minute or so.
You could also choose not to drain the whey, but this will depend on whether your flour can take on the added hydration. I tried this a few times, and the resulting bread is like a porridge loaf: super, super moist, lower rise, and very tender inside. This is something you can experiment with in the future.
Transfer the drained polenta to the prepared baking sheet and spread it out in a thin layer to cool until needed later.
3. Autolyse – 4:00 p.m.
Mix flour and water (reserve 50g water for the mix, later) in a bowl until all dry bits are hydrated. Cover bowl and store somewhere warm (around 75°F/24°C) until mix time.
4. Mix – 5:30 p.m.
Add the required levain and about half (25g) of the reserved water to the autolysed dough.
Porridge bread benefits from some strength created in the dough at mix time, especially since the polenta can hold on to quite a bit of hydration that later gets released during the bulk. For mixing, I chose to do slap and fold for about 4 minutes, just until the dough starts to show signs of a smooth surface and lightly holds its shape on the counter.
If you aren’t comfortable with the slap/fold method or don’t like it, you can stretch and fold in the bowl until your dough tightens up and becomes slightly hard to stretch out and fold over.
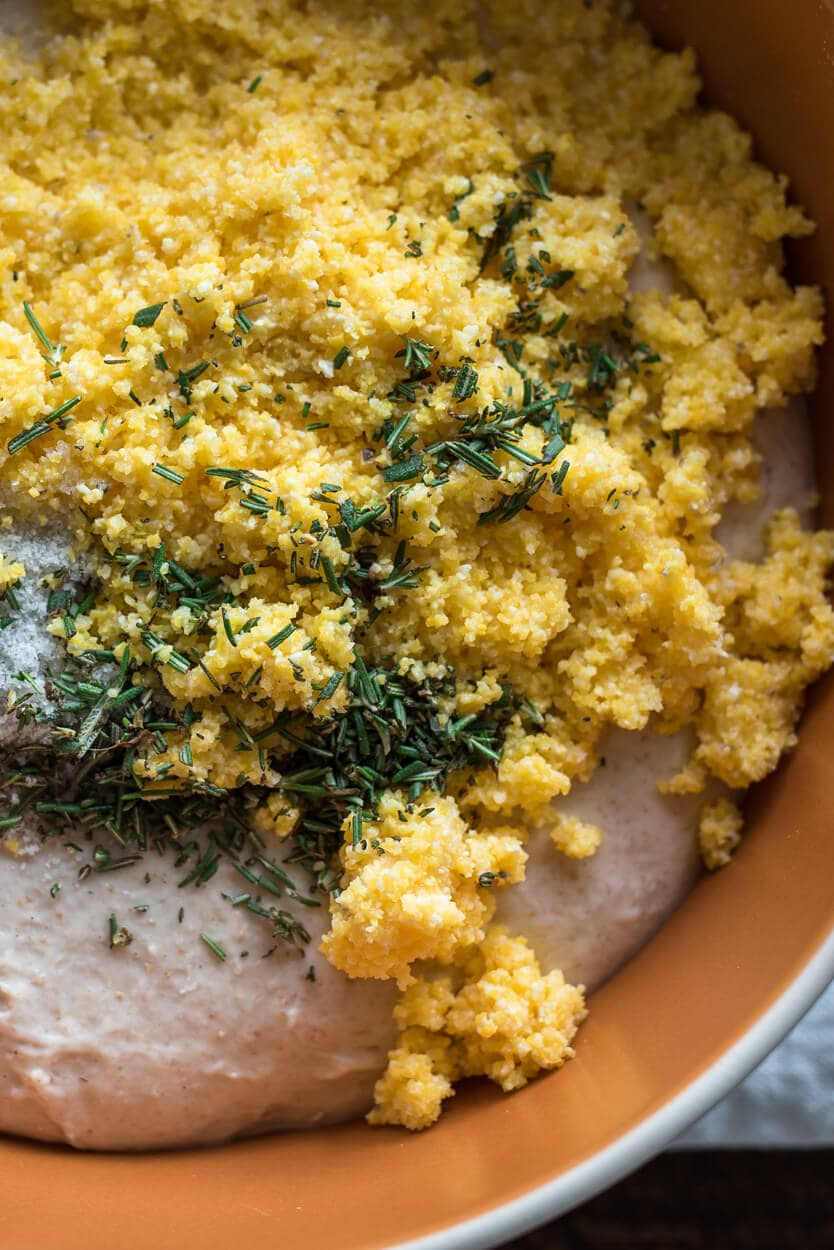
When finished, sprinkle the salt, rosemary, and polenta on top of the dough and use the remaining water to help moisten everything. Pinch through a few times and fold the dough over itself to help incorporate until all ingredients are well distributed.
In some books, authors like to mix in the add-ins (nuts, porridge, etc.) later in bulk fermentation, but I find it a little easier to fully incorporate them at this stage. Transfer the dough to a tub or thick-walled bowl for bulk fermentation.
5. Bulk Fermentation – 5:40 p.m. to 9:10 p.m.
At 78°F (25°C) ambient temperature, bulk fermentation should take about 3 hours and 30 minutes. Keep an eye on this dough because the corn, specifically its starches, speeds up fermentation significantly.
Keep a close eye on this dough during bulk, fermentation moves quick.
Perform four sets of stretches and folds during the bulk, spaced out by 30 minutes. Be gentle with your last set of stretches and folds. Lift just enough to fold the dough over itself, long before it feels like it would tear.
As I mentioned earlier, through my trials with this bread, I’ve noticed the polenta can absorb varying amounts of liquid (weather might also play a factor, as would each different bag of polenta). If your dough still feels very wet and soupy after your last set, add another set of stretch and folds. Be flexible here and be prepared to add/remove sets depending on how your dough feels.
6. Divide & Preshape – 9:10 p.m.
Divide the dough into two masses. Lightly shape each mass into a round and let rest for 20 minutes exposed to air. You don’t want each round to get so dry that it develops a skin on top, but I haven’t seen this happen. I find this exposure helps the next step, shaping, by slightly drying out the surface so it doesn’t stick to the work surface.
7. Shape – 9:30 p.m.
Lightly flour the tops of the dough rounds and the work surface. Flip each round and shape into either a batard or a boule. Try to get some good tension on the top of these loaves. After shaping, let rest on the bench for a few minutes and then place seam-side-up into a banneton or bowl that was dusted with white flour.
I prefer to use linen-lined bannetons for this extremely wet dough: they are easier to remove from the basket, and any liquid that escapes from the dough will go into the linen, which is far easier to clean.
8. Rest & Proof – 9:30 p.m.
Cover the bannetons with plastic and proof in a home refrigerator for 10 to 14 hours.
9. Bake – Next Morning: Preheat oven at 8:00 a.m., Bake at 9:00 a.m.
Bake for 20 minutes at 450°F (232°C) with steam. After 20 minutes, remove the lid if you’re using a Dutch oven or remove steaming pans and finish baking for about 25-30 minutes. Watch the dough in the last 10 minutes of this bake; it will color rather quickly. Remove from the oven and cool on wire racks.
Important: Let the finished loaves cool for a couple of hours before slicing to allow the interior to fully set. See my post on storing bread for information on how to store this bread to keep it fresh for longer.
Conclusion
Slice this loaf in half and take a big whiff. The smell is captivating. This smell, a mix of luscious, creamy corn and rosemary, permeates the entire kitchen when it’s still in the oven. Holding your hand away from the knife and the bread away from the cutting board until it cools is a real test of self-restraint.
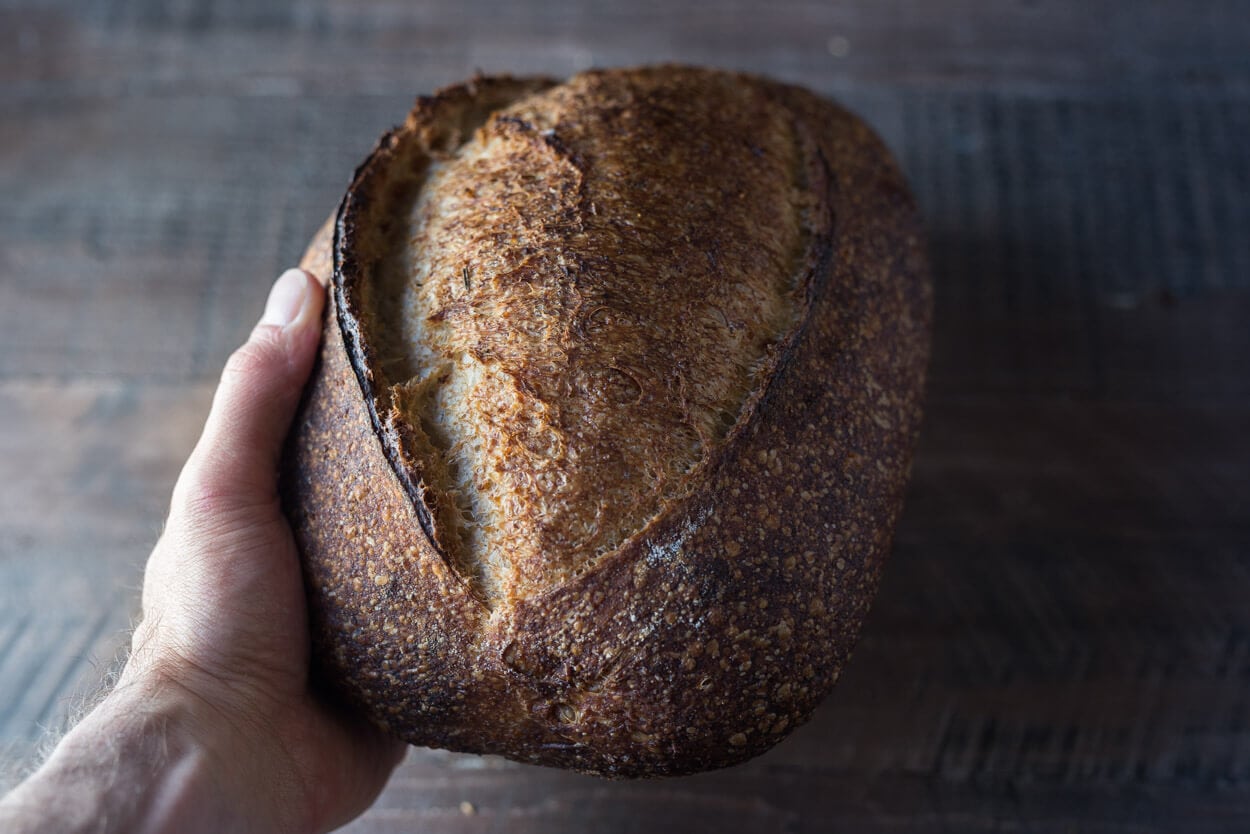
Crust
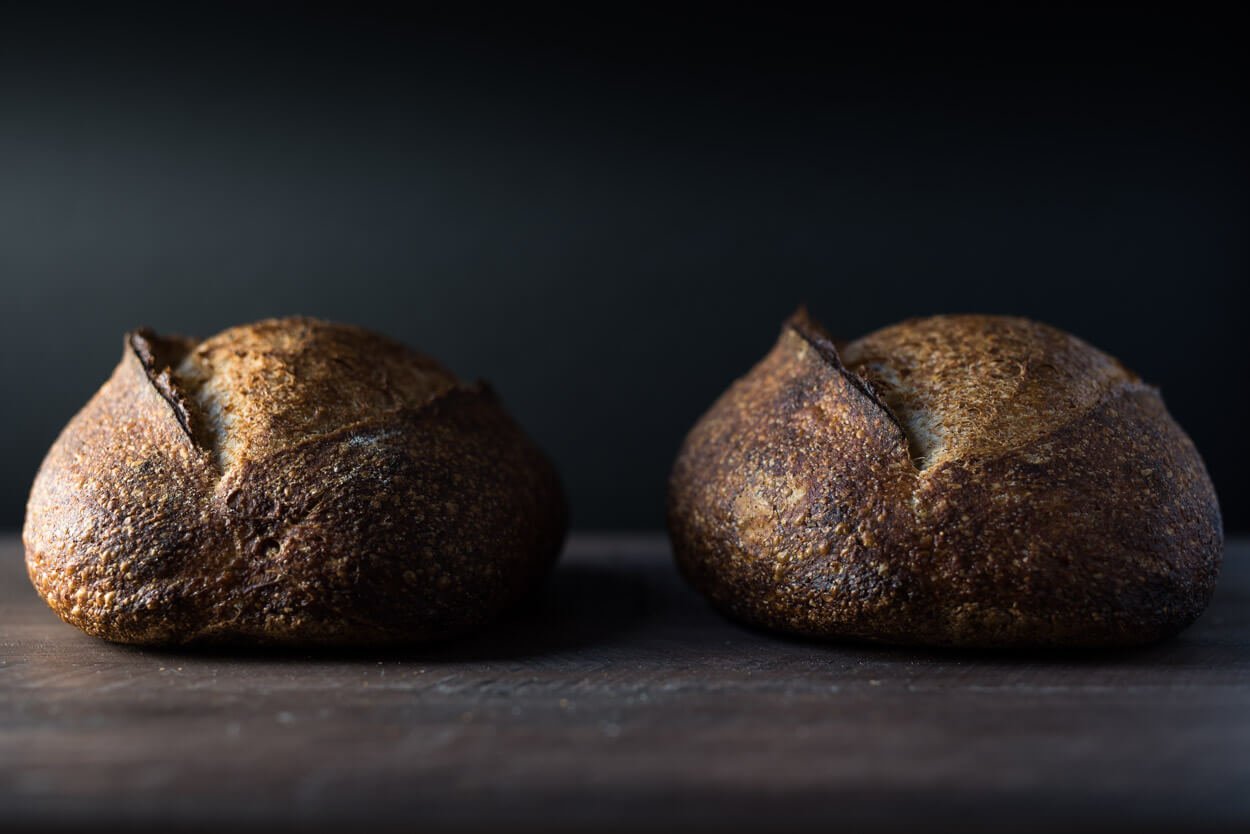
This gritty, thin, speckled crust is what keeps me mulling over this bread even after I’ve devoured a slice—and you know I love the crust. But really, can I get this crust on all my bread? It looks dark, hard, and thick, but that couldn’t be further from the truth. It’s splinter-thin with corn blemishes and deeply caramelized; it tastes like the entire loaf is wrapped in this thin, sweet cracker that only hints at the deeper flavors inside.
I found the bottom of these to get rather dark, so if you’re making these in a Dutch oven, be ready for this (I notice dough baked in a Dutch oven gets extra color on the bottom). You could sprinkle some raw wheat germ below the loaf before loading it into your Dutch oven. Similarly, you could do the same when baking directly on baking stones to help.
Crumb
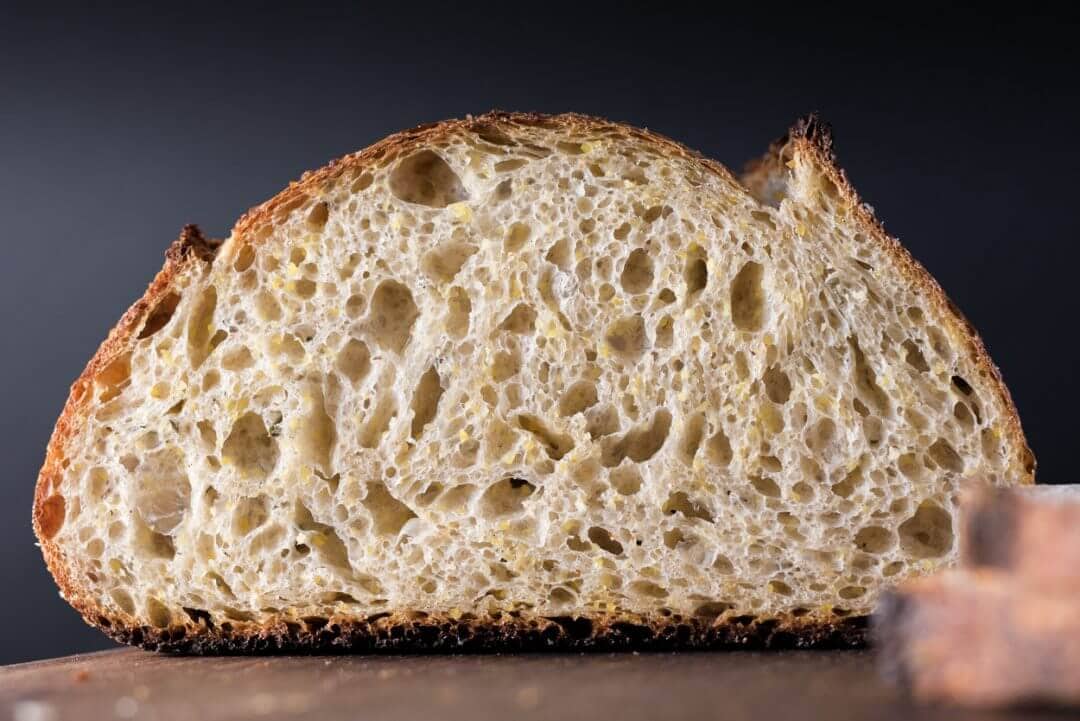
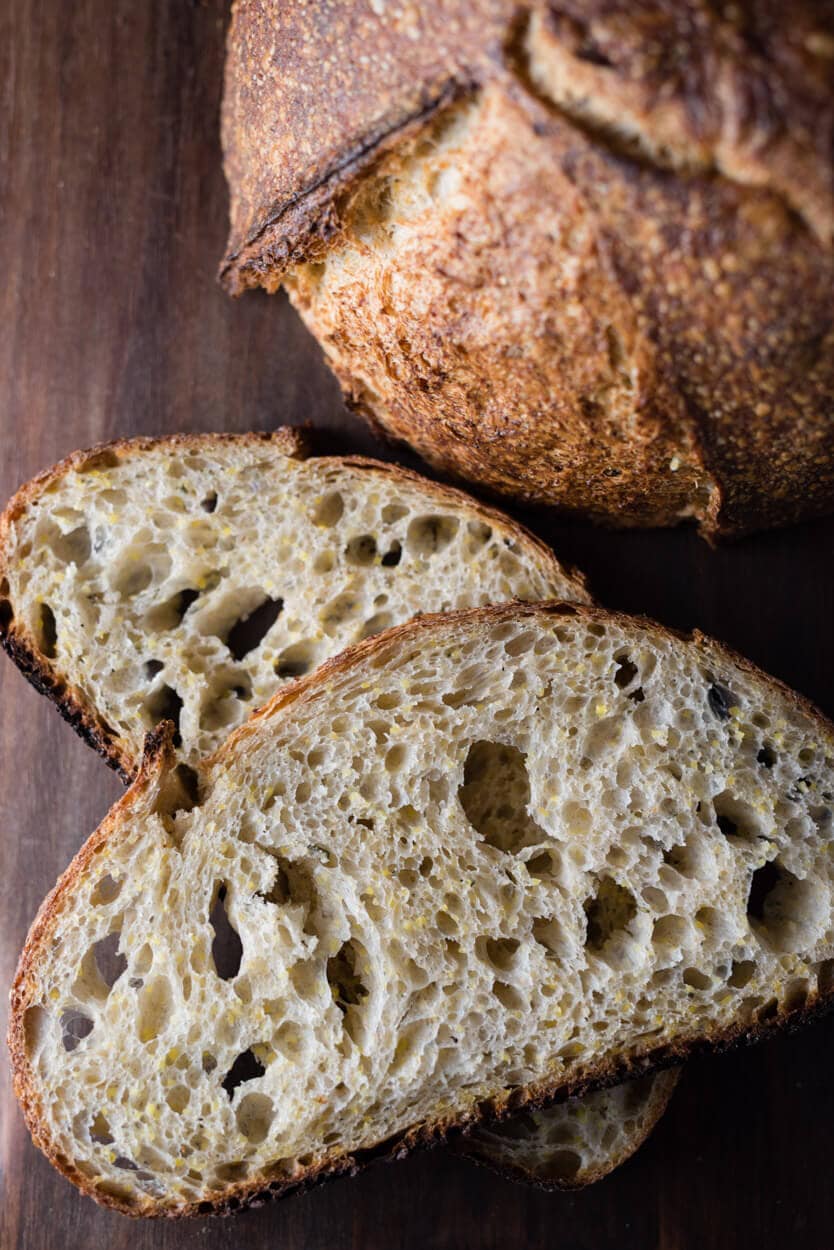
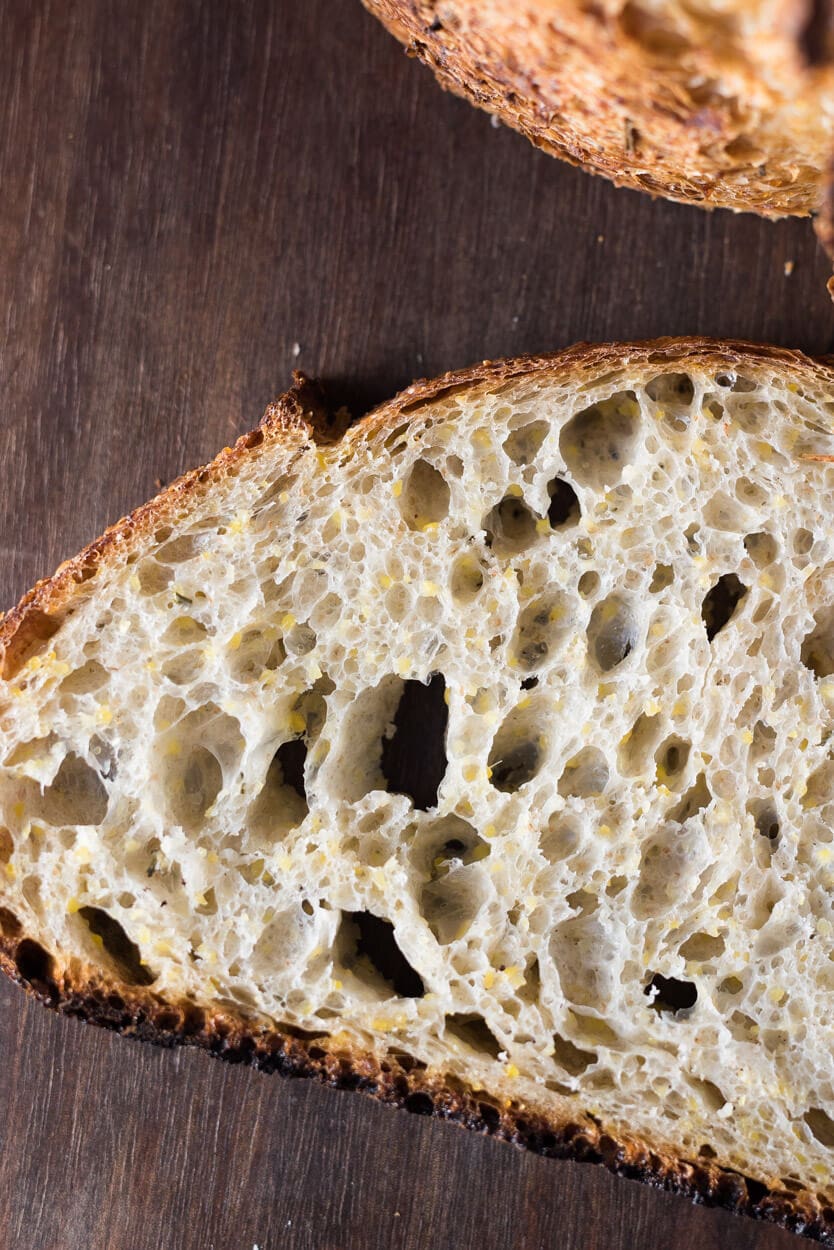
Baking what is necessarily a porridge bread, the crumb can usually be on the dense side (I mean, polenta is dense in itself), but one of my goals for this formula was to lighten it up, to open the crumb enough for an airy bread that wasn’t like eating a brick. I love the results, and I find the mix of flour to be just right for supporting the wet polenta.
The polenta is visible in each slice and provides a striking contrast to the dark crust. The crumb for this bread was somewhat shaggy and incredibly moist.
Taste
An un-toasted slice of this polenta rosemary sourdough is exceptionally creamy (thanks to the whey) and tender, to be expected from a porridge bread. When toasted, however, it’s elevated to new heights—the entire thing takes on a crunch & crackle that reminds me of that old-time favorite cereal: Cornflakes.
I like this bread with only the slightest hint of rosemary flavor; I find it can be overpowering, and just the right amount grounds the corn. However, increase the percentage of rosemary if you discover it is too subtle or you like more of a punch.
A wonderful by-product of making this bread is that you not only have a wicked loaf of bread but also fresh ricotta sitting around… although probably not for long. Buon appetito!
Maurizio Leo is the creator of the independent sourdough baking website The Perfect Loaf. His cookbook, The Perfect Loaf — The Craft and Science of Sourdough Breads, Sweets, and More, is a James Beard Award-winner and a New York Times bestseller. He lives in Albuquerque, NM, with his wife and two sons, where he's been baking sourdough for over a decade. He's been labeled "Bob Ross but for bread."
Do sourdough posts like this help you in your baking? Join The Baker’s Corner for only $60 a year, and get:
Come chat with me and other bakers and get baking help
Remove all ads on website
Get my bakers tools & discounts
Get the full recipe archive in editable spreadsheets