
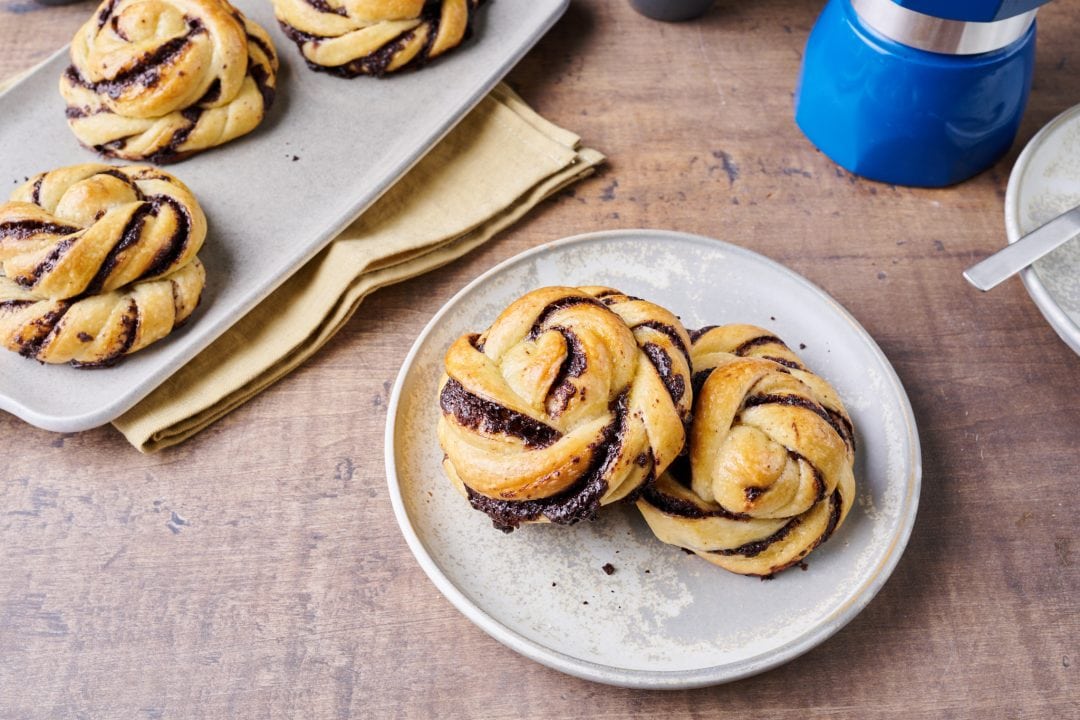
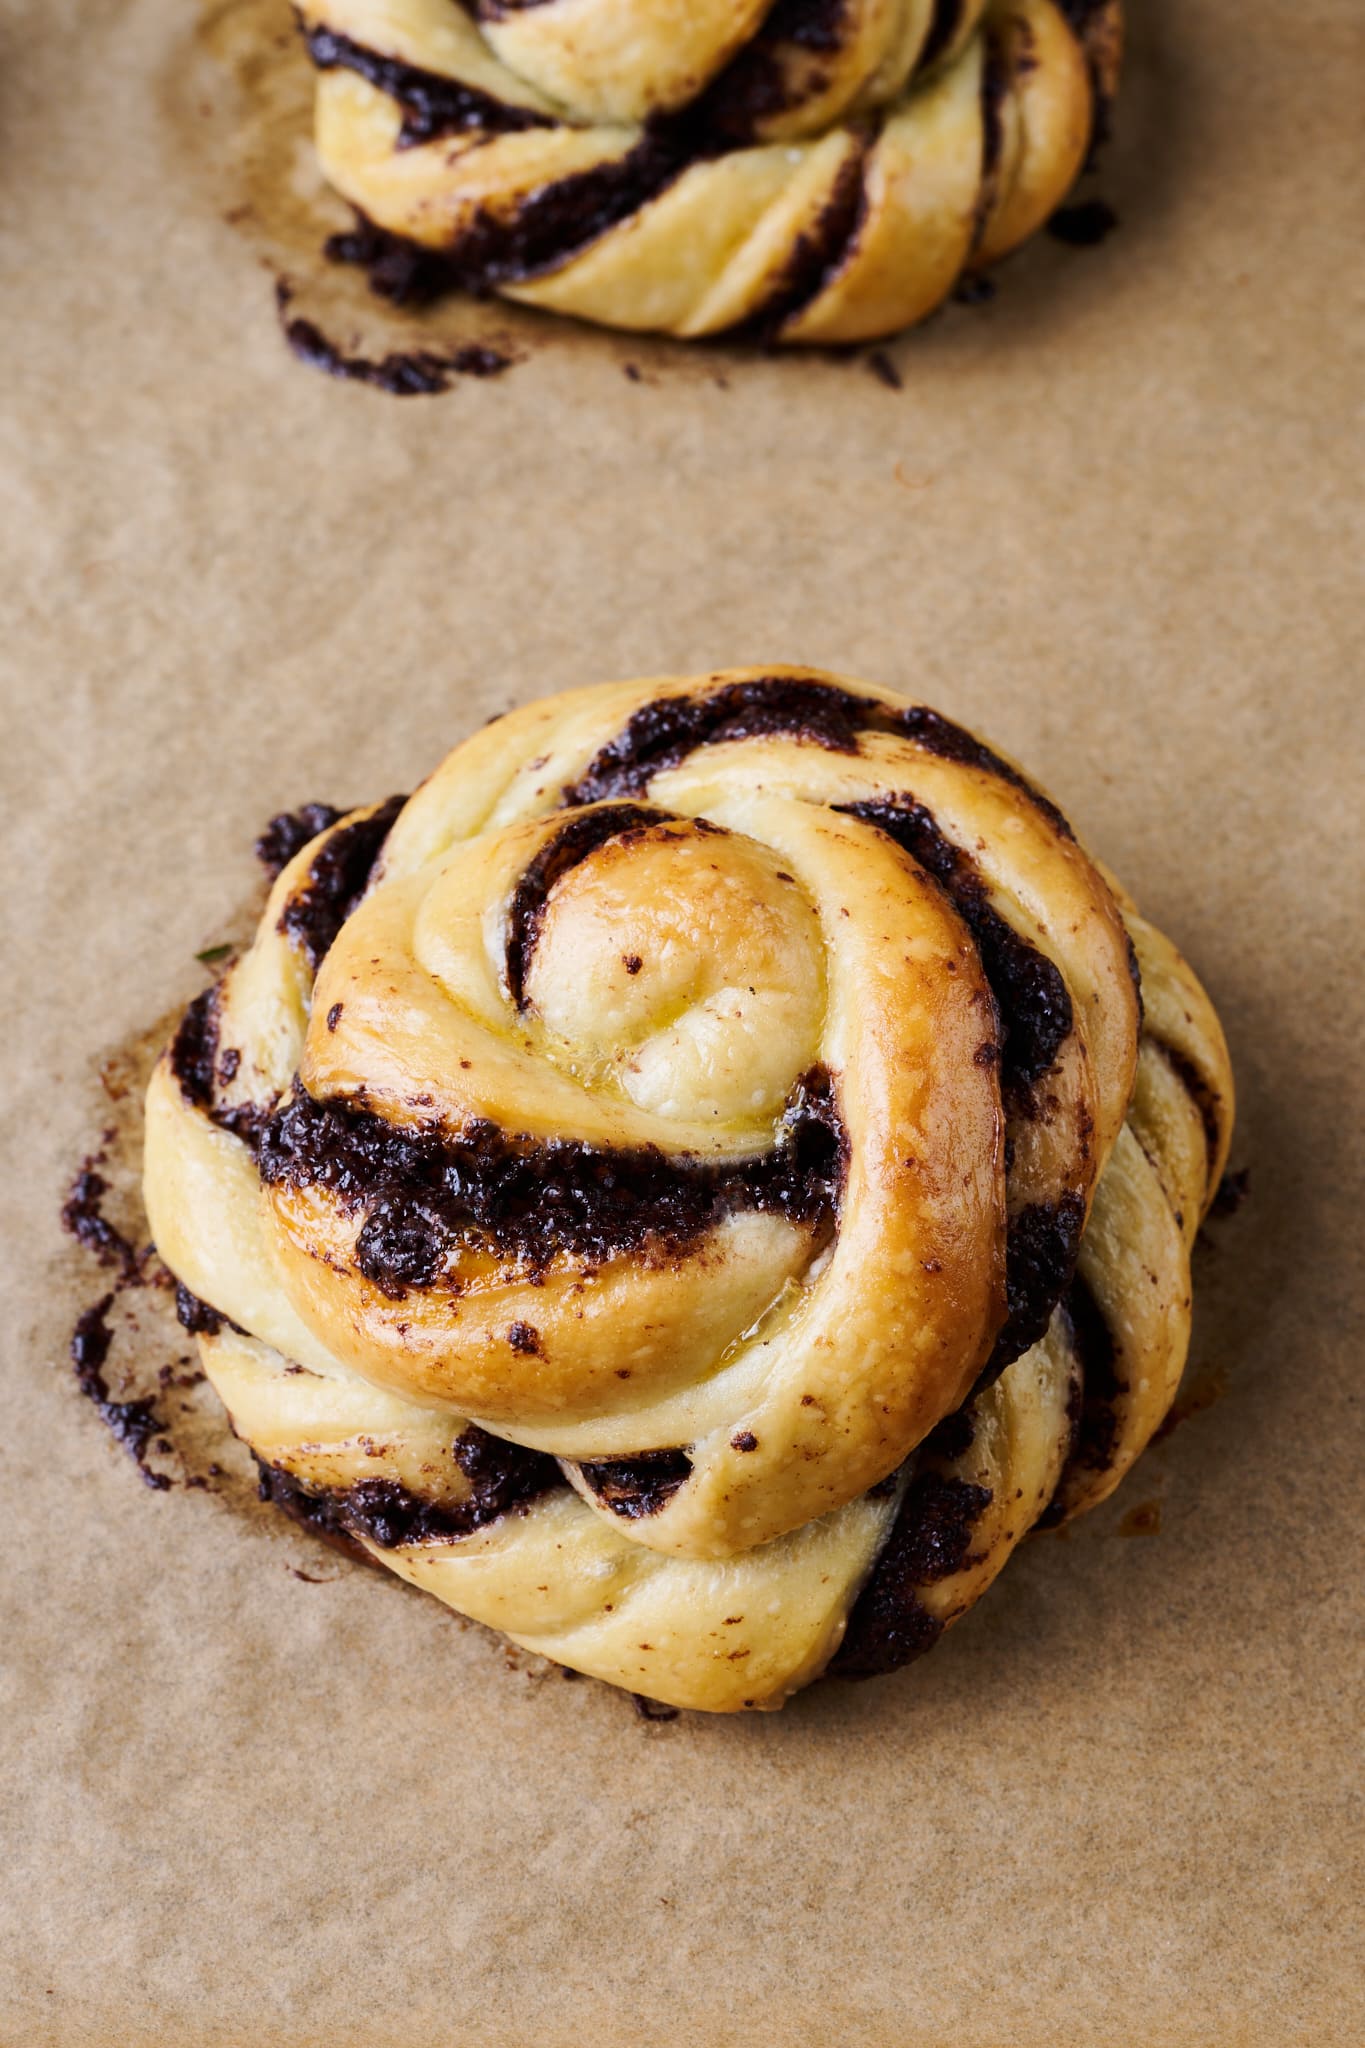
When I think of pastry that’s delicious and elegant—yet uncomplicated in execution—these sourdough chocolate knots will henceforth forever rise to the top. Their contortions paint chocolate through the knot in a candy cane-like design, providing a little extra flourish that elevates their deliciousness—we do eat with our eyes first, after all. But by taking a naturally leavened enriched dough and rolling it out thin, cutting it, and then twisting it, the result is more than just their charming looks: an intertwining of sweet, butter-enriched dough with chocolate that, when exposed to the heat of the oven, melts just enough to amplify its nutty and roasted coffee flavor further.
The dough and the filling are a marriage of two buttery things that sum to a result greater than their parts.
I’ve been working with chocolate often in the past few months, as my chocolate sourdough bread is evidence, and I’m absolutely okay with that. It’s a given working chocolate into pastry such as these chocolate knots, but one must have the right chocolate to take any pastry (or bread) from good to great.
Flour and ingredient selection
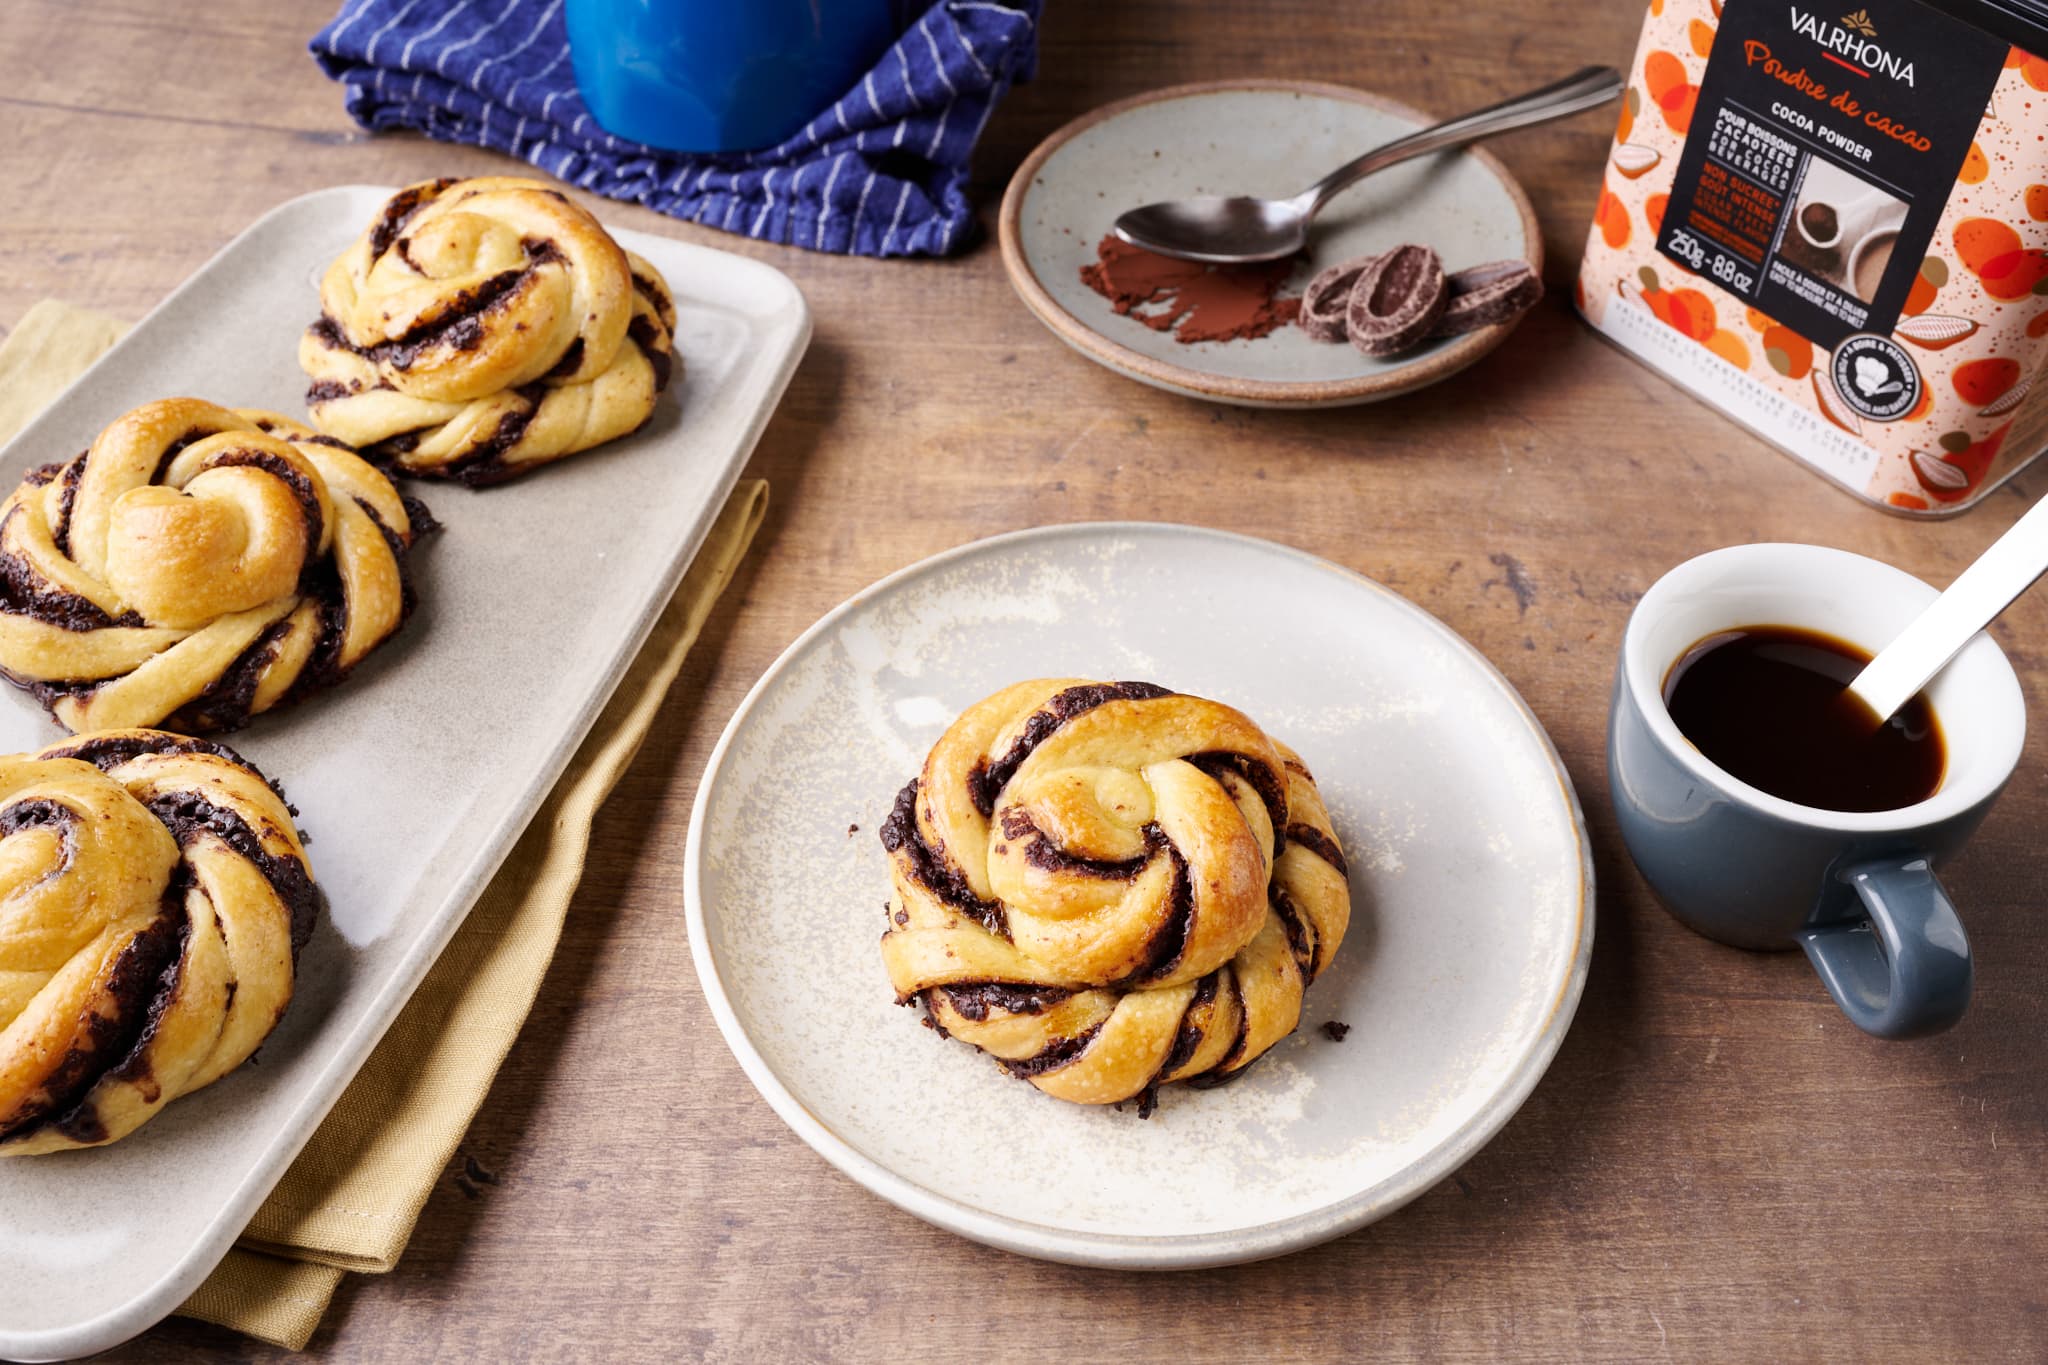
This recipe was sponsored by Valrhona, makers of my favorite chocolate for baking. For years, Valrhona has been a staple in my kitchen, used in everything from sourdough chocolate chip cookies to pastry (a chocolate bomboloni filling is one of my favorites).
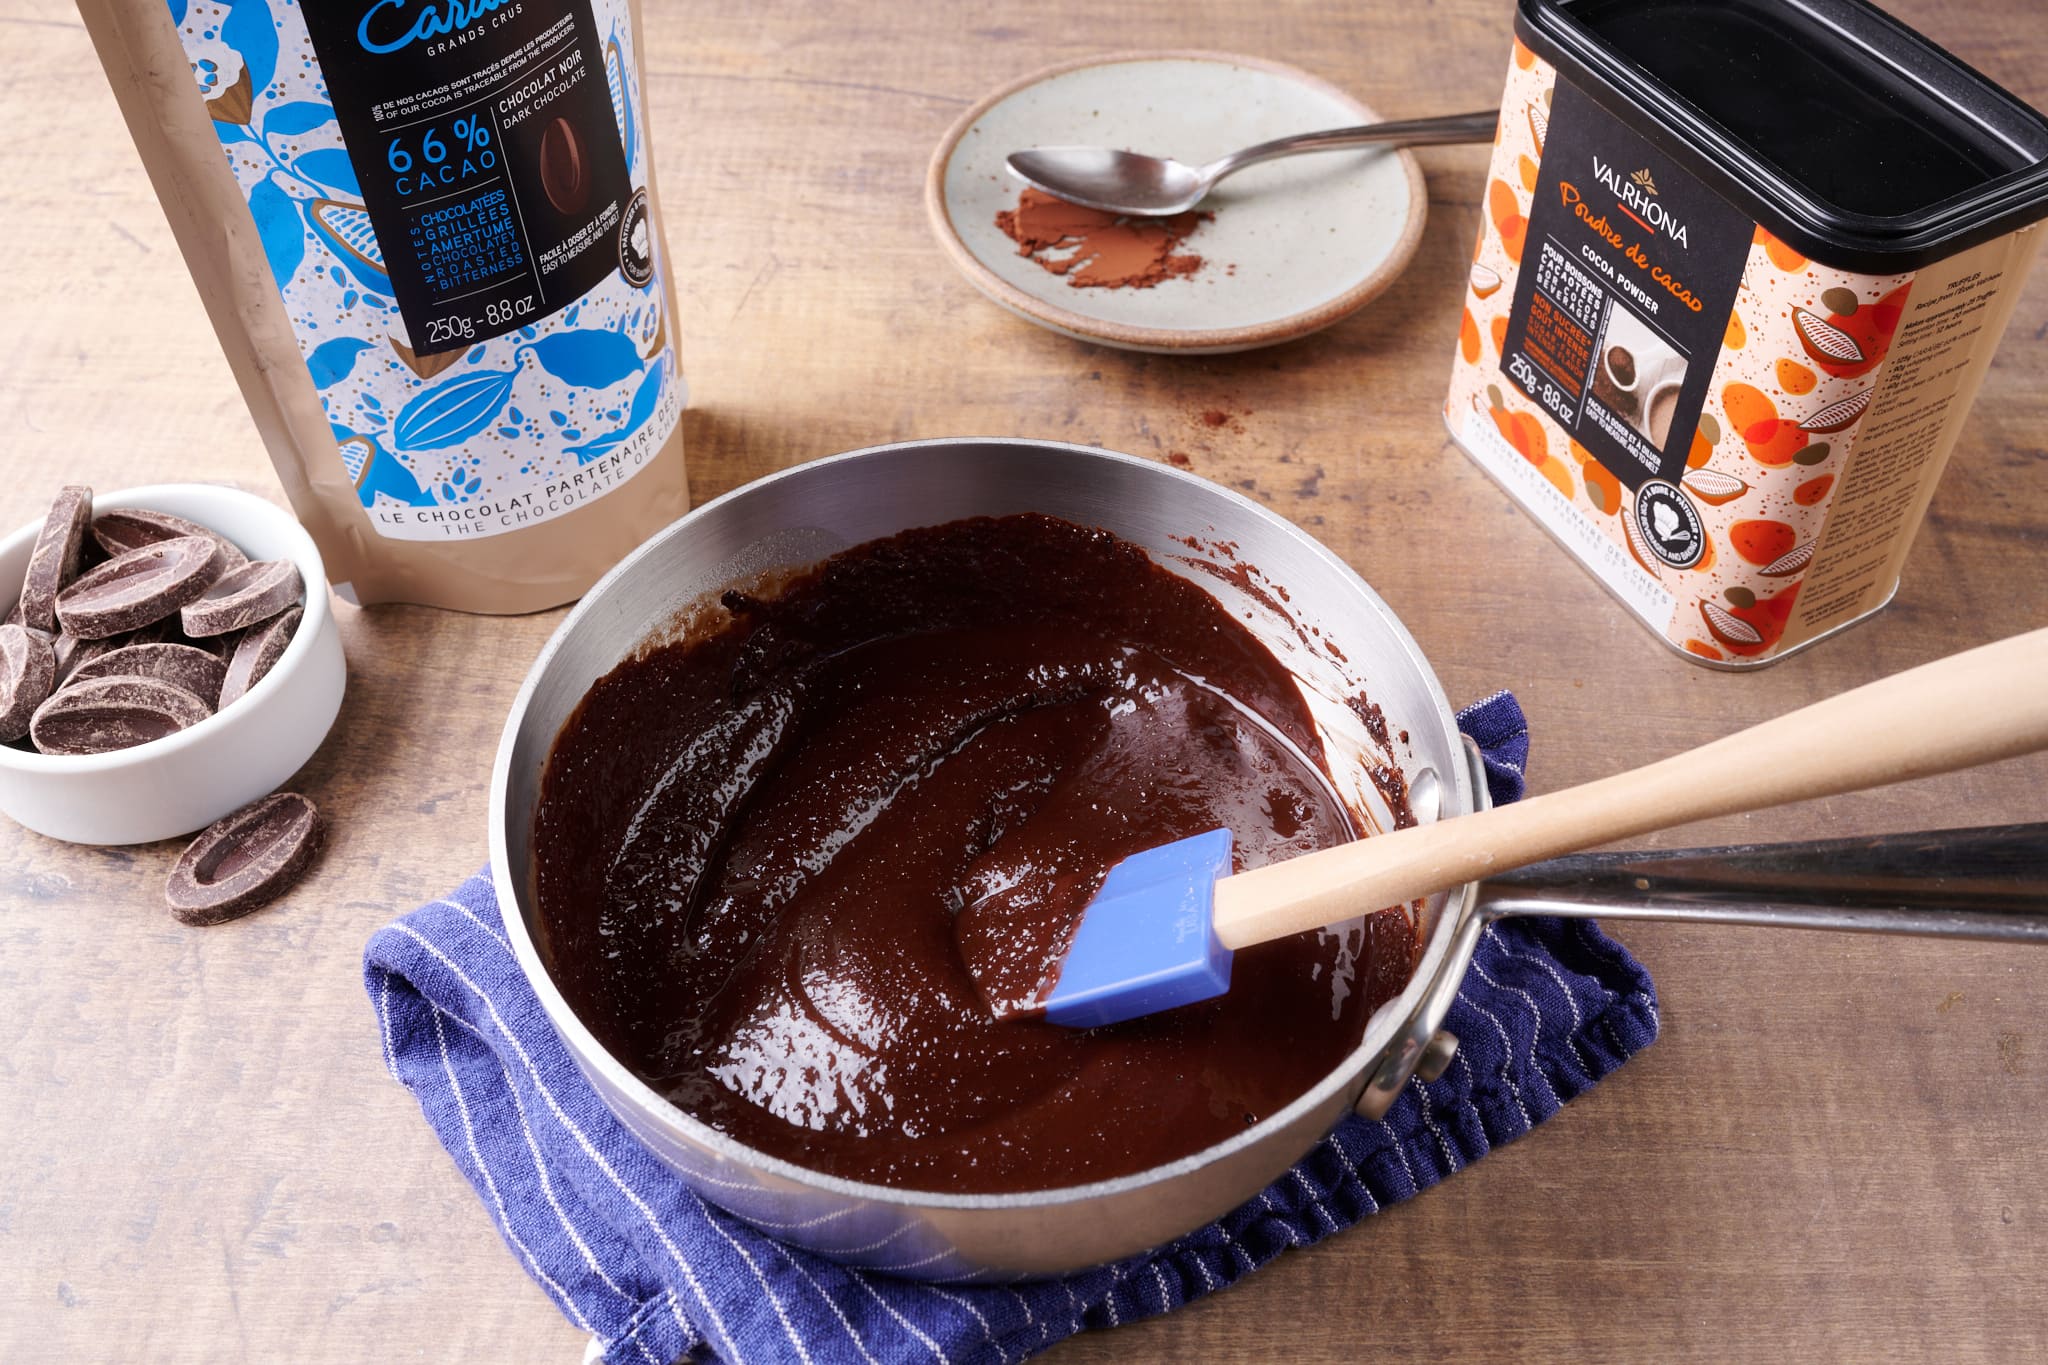
For these sourdough chocolate knots, I wanted to incorporate their rich cocoa powder and their Grand Cru Caraïbe baking chocolate. Caraïbe is 66% cacao and has a wonderful roasted coffee and nut flavor that complements the overall flavor profile in these naturally leavened sweets.
Baking schedule
These sourdough chocolate knots are made over two days, but there are options for adjusting the schedule.
Same day option: While the recipe calls for chilling the dough at the end of bulk fermentation in the refrigerator overnight, you could shorten this step to make the knots in a single day. However, I’d recommend at least chilling the dough for one hour or until the dough is firm and cool to the touch. Then, proceed with the recipe as directed. Chilling the dough makes rolling, filling, cutting, and twisting the dough possible.
Bake early on the second-day option: Chill the dough at the end of bulk fermentation for an hour instead of overnight, then proceed to shape the knots. Cover the sheet pans with knots and refrigerate them overnight. The next day, take them out and let them proof for several hours until puffy to the touch. This two-day process will mean you can have the sourdough chocolate knots ready for baking earlier on the second day.
Sourdough chocolate knots formula
Vitals
| Total dough weight | 800 grams |
| Pre-fermented flour | 12.0% |
| Hydration | 36.0% (water only) |
| Levain in the final dough | 40.9% |
| Yield | 12 chocolate knots |
Total formula
Desired dough temperature: 78°F (25°C) (see my post on the importance of dough temperature).
Main dough
| Weight | Ingredient | Baker’s percentage |
| 367g | High-protein white flour (about 12.7% protein; King Arthur Bread Flour) | 100.0% |
| 92g | Unsalted butter | 25.0% |
| 88g | Whole milk | 24.0% |
| 51g | Egg, beaten (about 1 large) | 14.0% |
| 18g | Superfine sugar (Caster sugar) | 5.0% |
| 132g | Water | 36.0% |
| 7g | Fine sea salt | 2.0% |
| 44g | Ripe sourdough starter, 100% hydration | 12.0% |
Filling
| Weight | Ingredient |
|---|---|
| 110g | Granulated sugar |
| 75g | Unsalted butter |
| 70g | Valrhona Carraibe 66% baking chocolate (or any dark baking chocolate cut into pieces for melting) |
| 25g | Valrhona Dutch Processed Cocoa Powder |
Topping (egg wash)
One whole egg, 1 tablespoon whole milk, and a pinch of salt.
Sourdough chocolate knots method
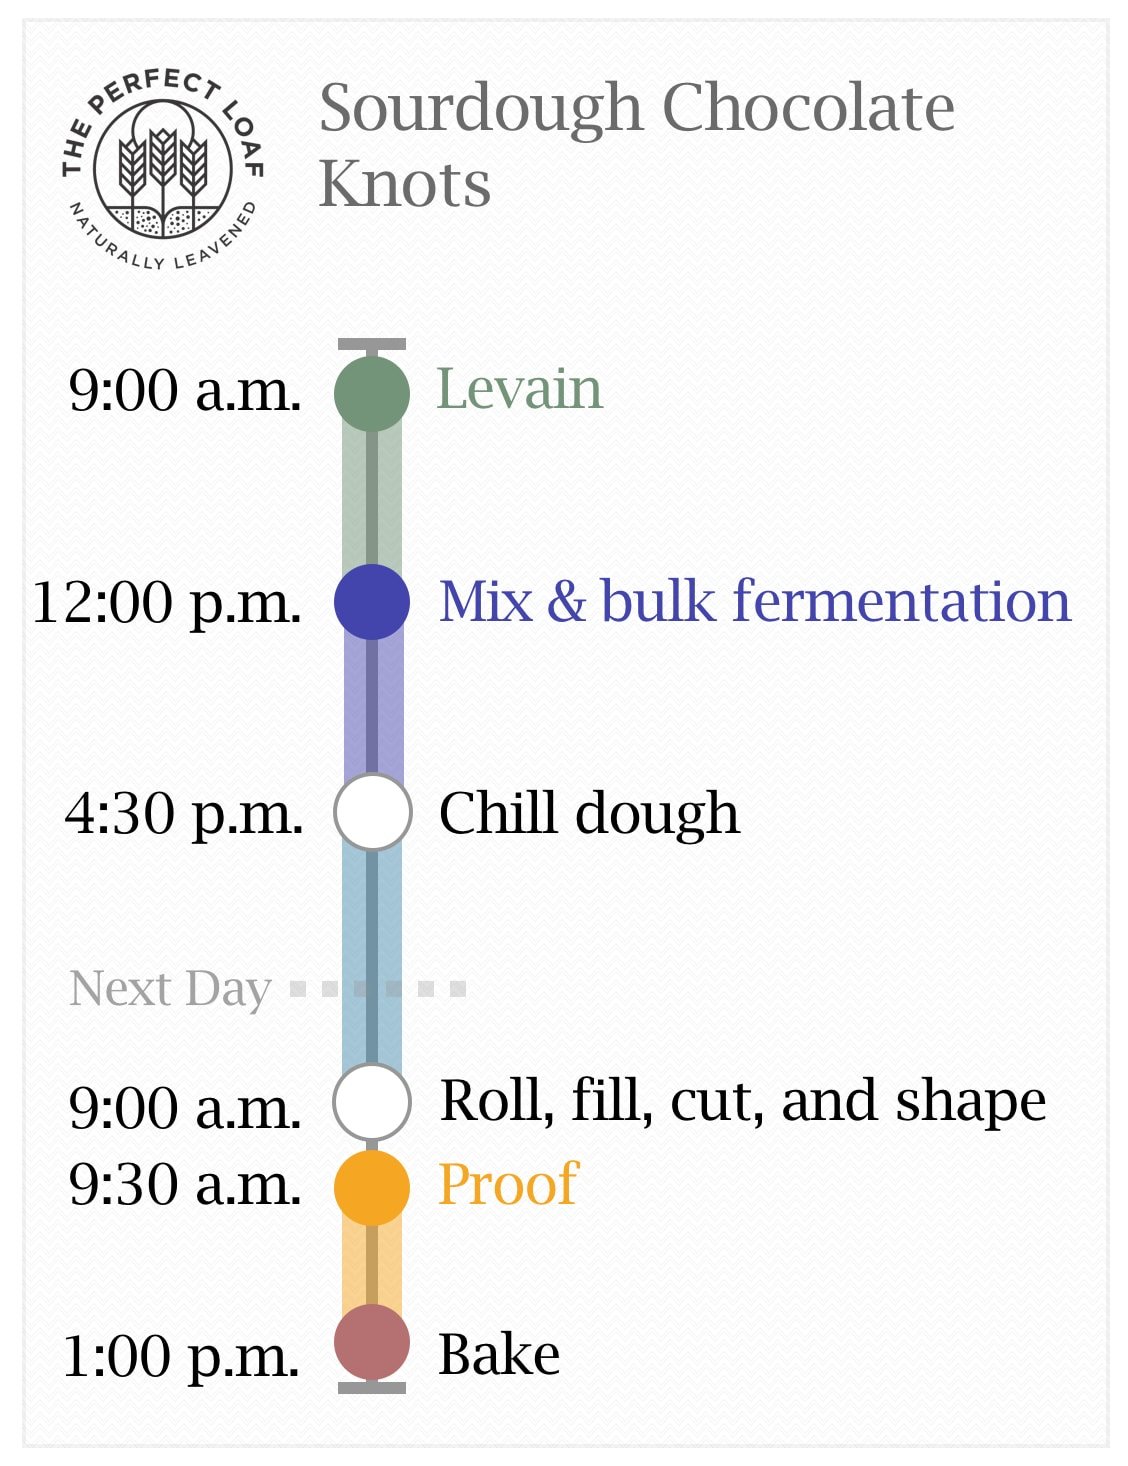
1. Prepare the levain – 9:00 a.m.
Mix the following ingredients in a jar and leave them covered at a warm temperature, 74-76°F (23-24°C), to ripen for 3 hours.
| Weight | Ingredient | Baker’s percentage |
| 44g | High-protein white flour | 100.0% |
| 44g | Water | 100.0% |
| 44g | Ripe sourdough starter, 100% hydration | 100.0% |
2. Mix – 12:00 p.m.
| Weight | Ingredient |
| 323g | High-protein white flour |
| 92g | Unsalted butter |
| 88g | Whole milk |
| 51g | Egg, beaten |
| 18g | Superfine sugar (Caster sugar) |
| 88g | Water |
| 7g | Fine sea salt |
| 132g | Ripe levain (from Step 1) |
Note: Warm the milk in the microwave or over the stove, as necessary, to help meet the final dough temperature of 78°F (25°C).
First, cut the butter into 1/2″ pats. Set them on a plate to warm to room temperature.
To the bowl of a stand mixer fitted with the dough hook attachment, add the flour, water, milk, egg, sugar, salt, and ripe levain. Mix on low speed (STIR on a KitchenAid) for 1 to 2 minutes until the ingredients come together and no dry bits remain. Next, mix on medium speed (2 to 3 on a KitchenAid) for 5 to 7 minutes until the dough smooths and begins to cling to the hook. If the dough is too dry, add a splash of milk as necessary to soften, but be conservative.
Let the dough rest in the bowl for 10 minutes.
Turn the mixer on low speed (STIR on a KitchenAid) and mix for 2 to 4 minutes until the dough gains more strength and begins to cling once again to the dough hook. Next, with the mixer running, add the room temperature butter, one pat at a time, waiting to add each pat until the previous one is fully absorbed. Adding all the butter will take 5 to 8 minutes. In the end, the dough will be very soft, and it won’t completely remove from the sides of the bowl. Transfer the dough to a bulk fermentation container and cover.
See my guide to mixing for more information on the best way to strengthen your dough.
3. Bulk fermentation – 12:30 p.m. to 4:30 p.m. (4 hours)
At a warm room temperature, 74-76°F (23-24°C), bulk fermentation should take about 4 hours. If your kitchen is cooler, place your bulk container in a small home dough proofer, or extend the bulk fermentation time to give the dough more time to ferment. The dough is ready when it is smooth, puffy, and well-risen.
This dough needs one set of gentle slaps and folds during bulk fermentation. After the first hour, gently scrape the dough out to the work surface. Using damp hands, pick up the dough at the sides, slap it gently down on the counter, stretch it back toward your body, and then fold it over. Rotate both your hands, pick up the dough at its sides, and repeat the same gentle slap and fold over. Repeat these slaps and folds a few times until the dough is smooth on the top and holds itself on the counter, after 4 to 5 times. Then, using a bench scraper, transfer the dough back to the bulk fermentation container. The dough should be neatly folded up in the bowl.
Let the dough rest, covered for the remainder of bulk fermentation.
4. Chill dough – 4:30 p.m. to 9:00 a.m., the next day
After 4 hours, the dough should be risen in the bulk fermentation container and be slightly puffy to the touch. If the dough is still dense and tight, give it another 30 minutes to rise further and check again.
Place the covered bulk fermentation container into the refrigerator for at least 1 hour or overnight (my preference) to firm the dough, making it easier to roll and cut.
5. Roll, fill, cut, and shape – 9:00 a.m.
Line two 13 x 18-inch sheet pans with parchment paper.
Take out the covered bulk fermentation container and let it warm for about 30 minutes until the dough feels cool to the touch but is pliable.
In the meantime, prepare the chocolate filling.
| Weight | Ingredient |
|---|---|
| 110g | Granulated sugar |
| 75g | Unsalted butter |
| 70g | Valrhona Carraibe 66% baking chocolate |
| 25g | Valrhona Dutch Processed Cocoa Powder |
In a medium saucepan, melt the butter. Remove from the heat and add the sugar and baking chocolate pieces; stir everything together while the chocolate melts until everything comes together and smooths. Add the cocoa powder and whisk the mixture into an emulsion using a handheld whisk. Set aside to cool until ready to use.
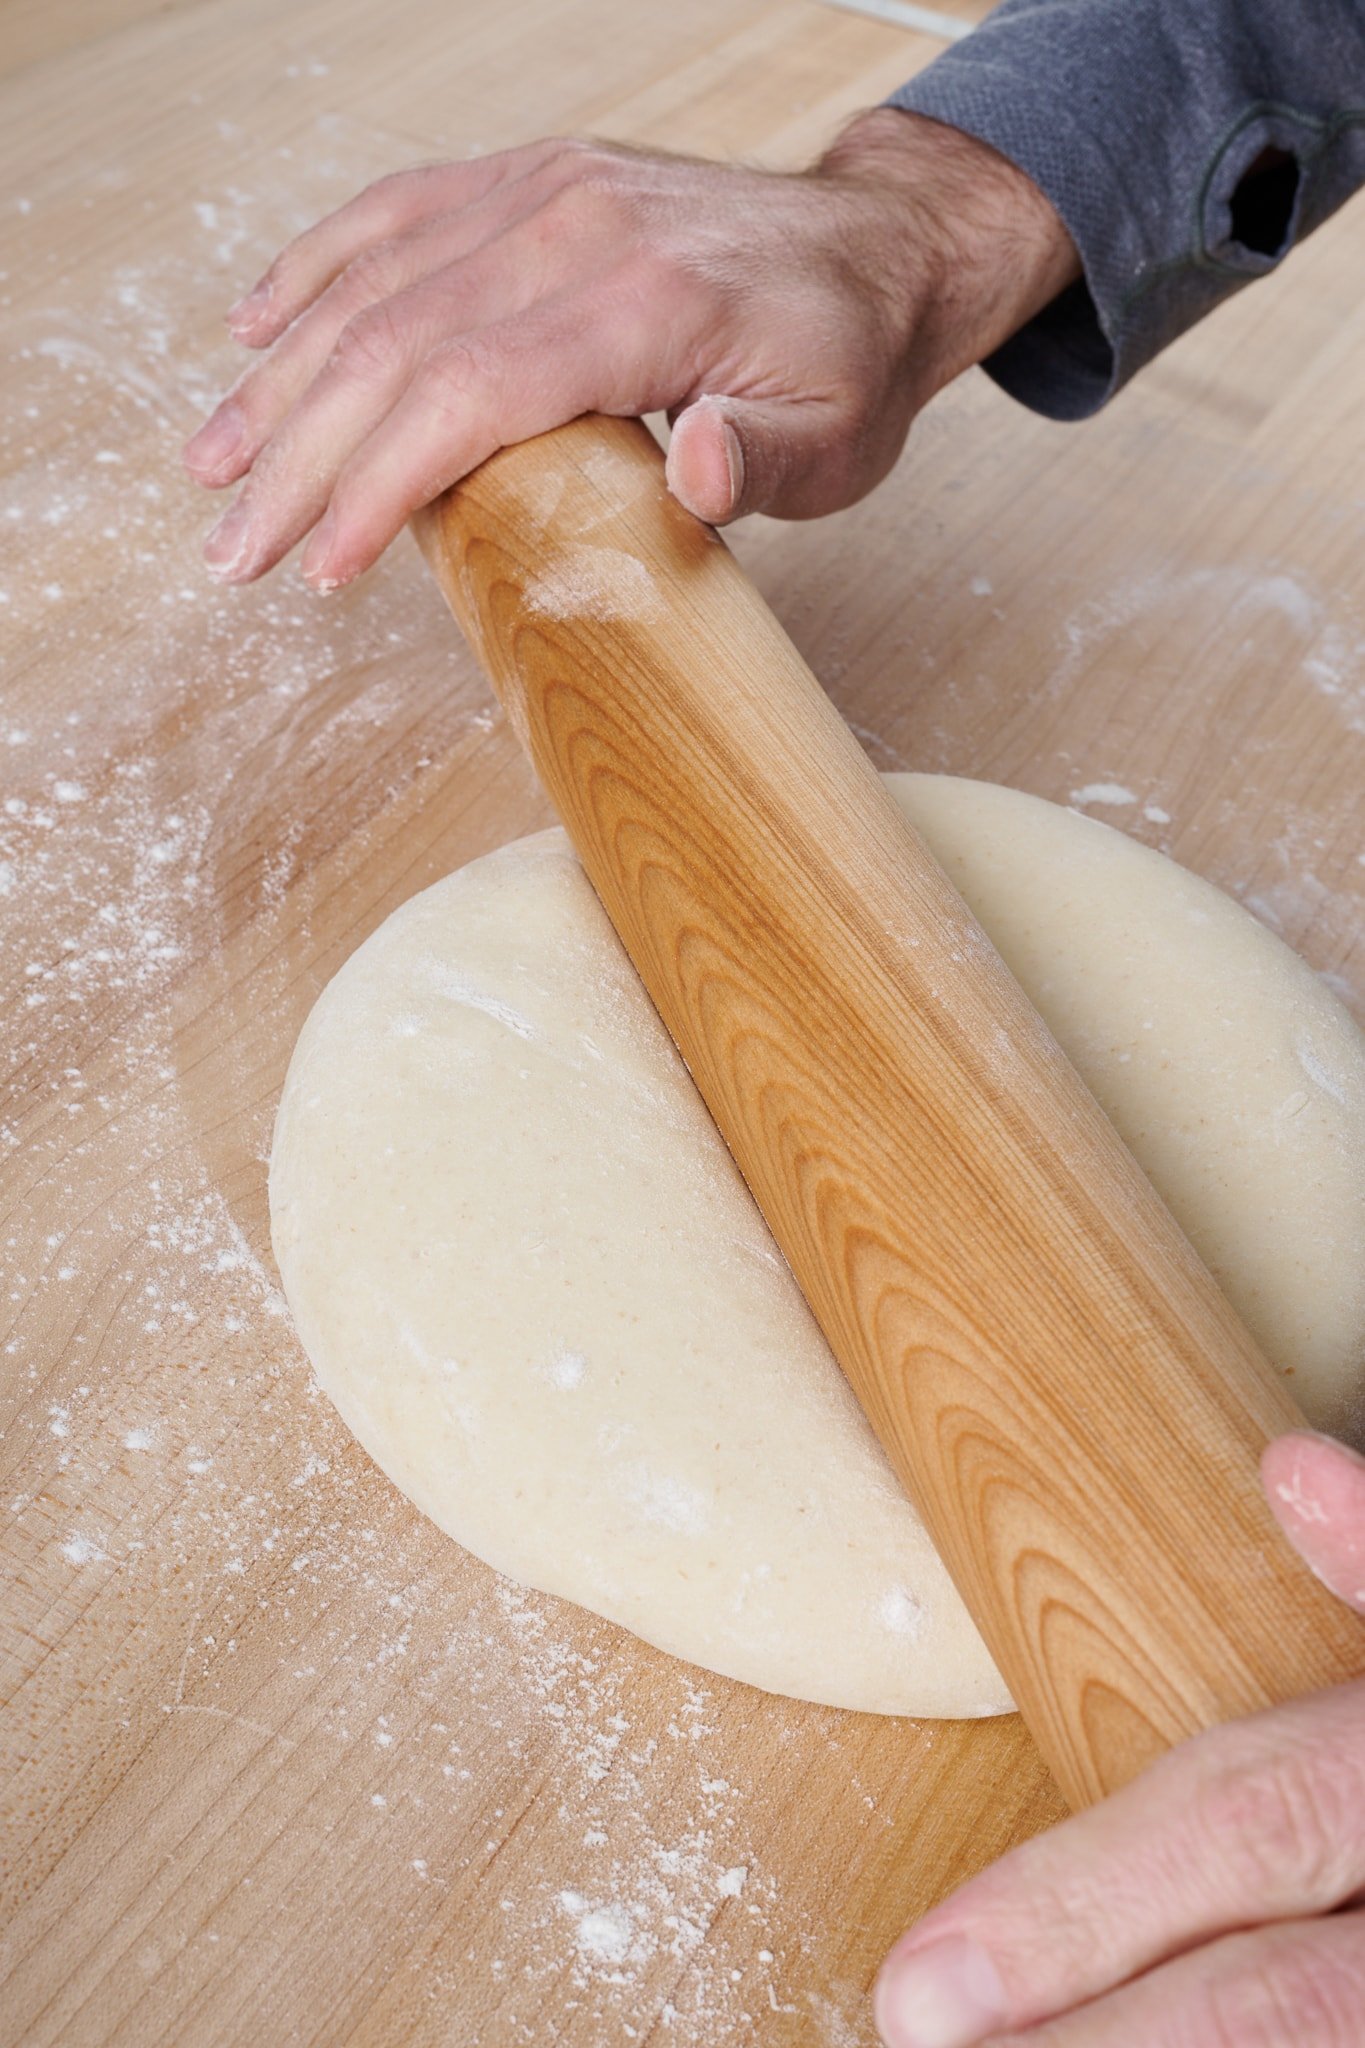
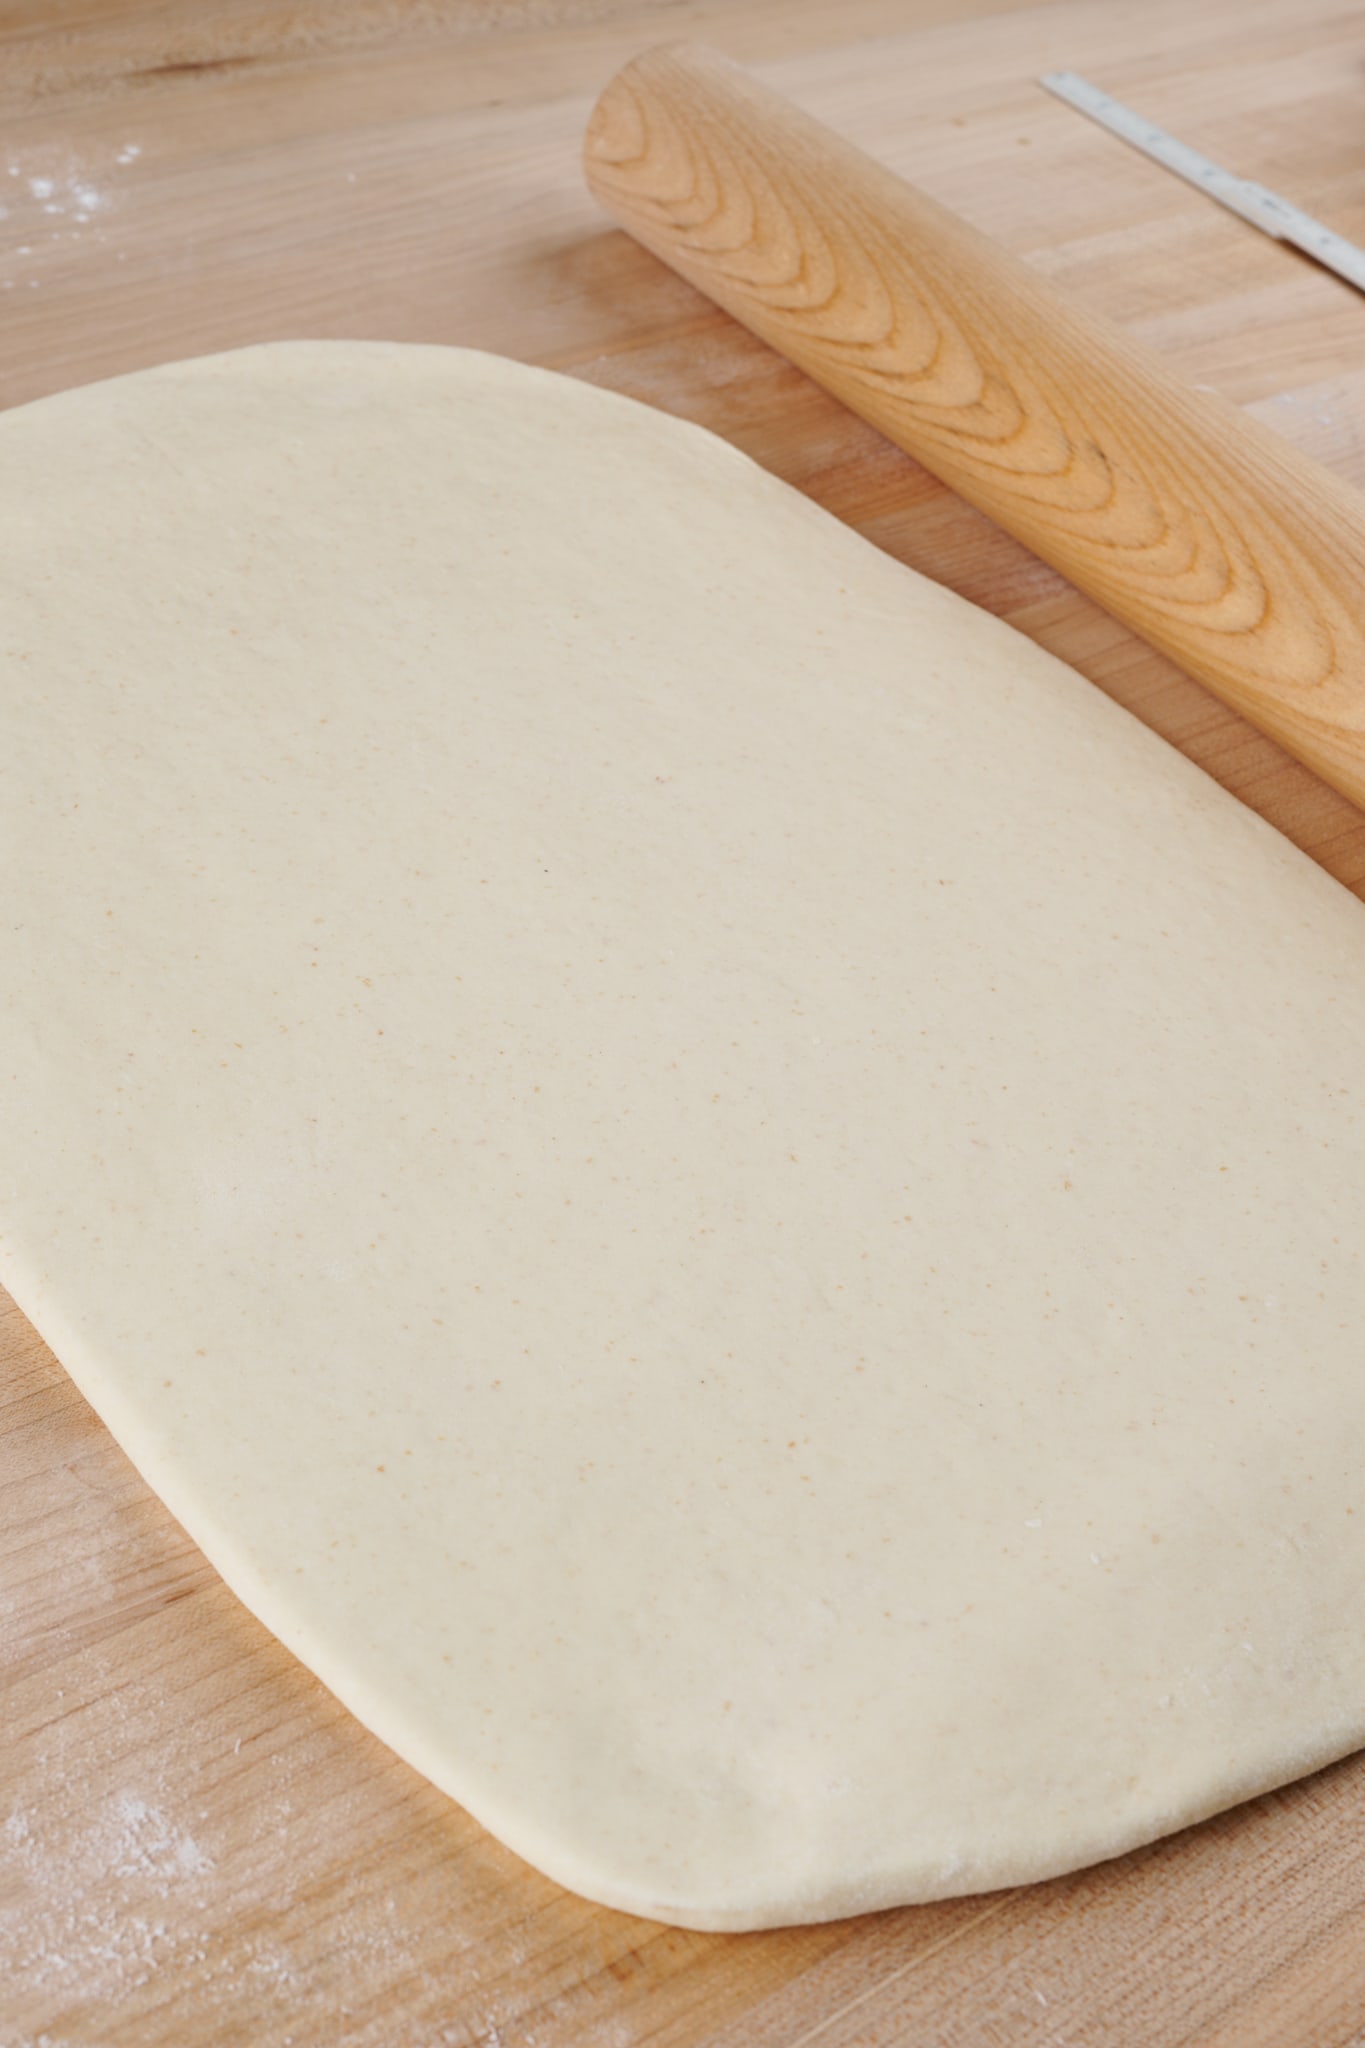
Uncover the dough and liberally flour the top and your work surface. Scrape out the dough to the floured surface, and using a rolling pin, roll out to a rectangle that’s about 12 x 17-inches with the short end nearest your body.
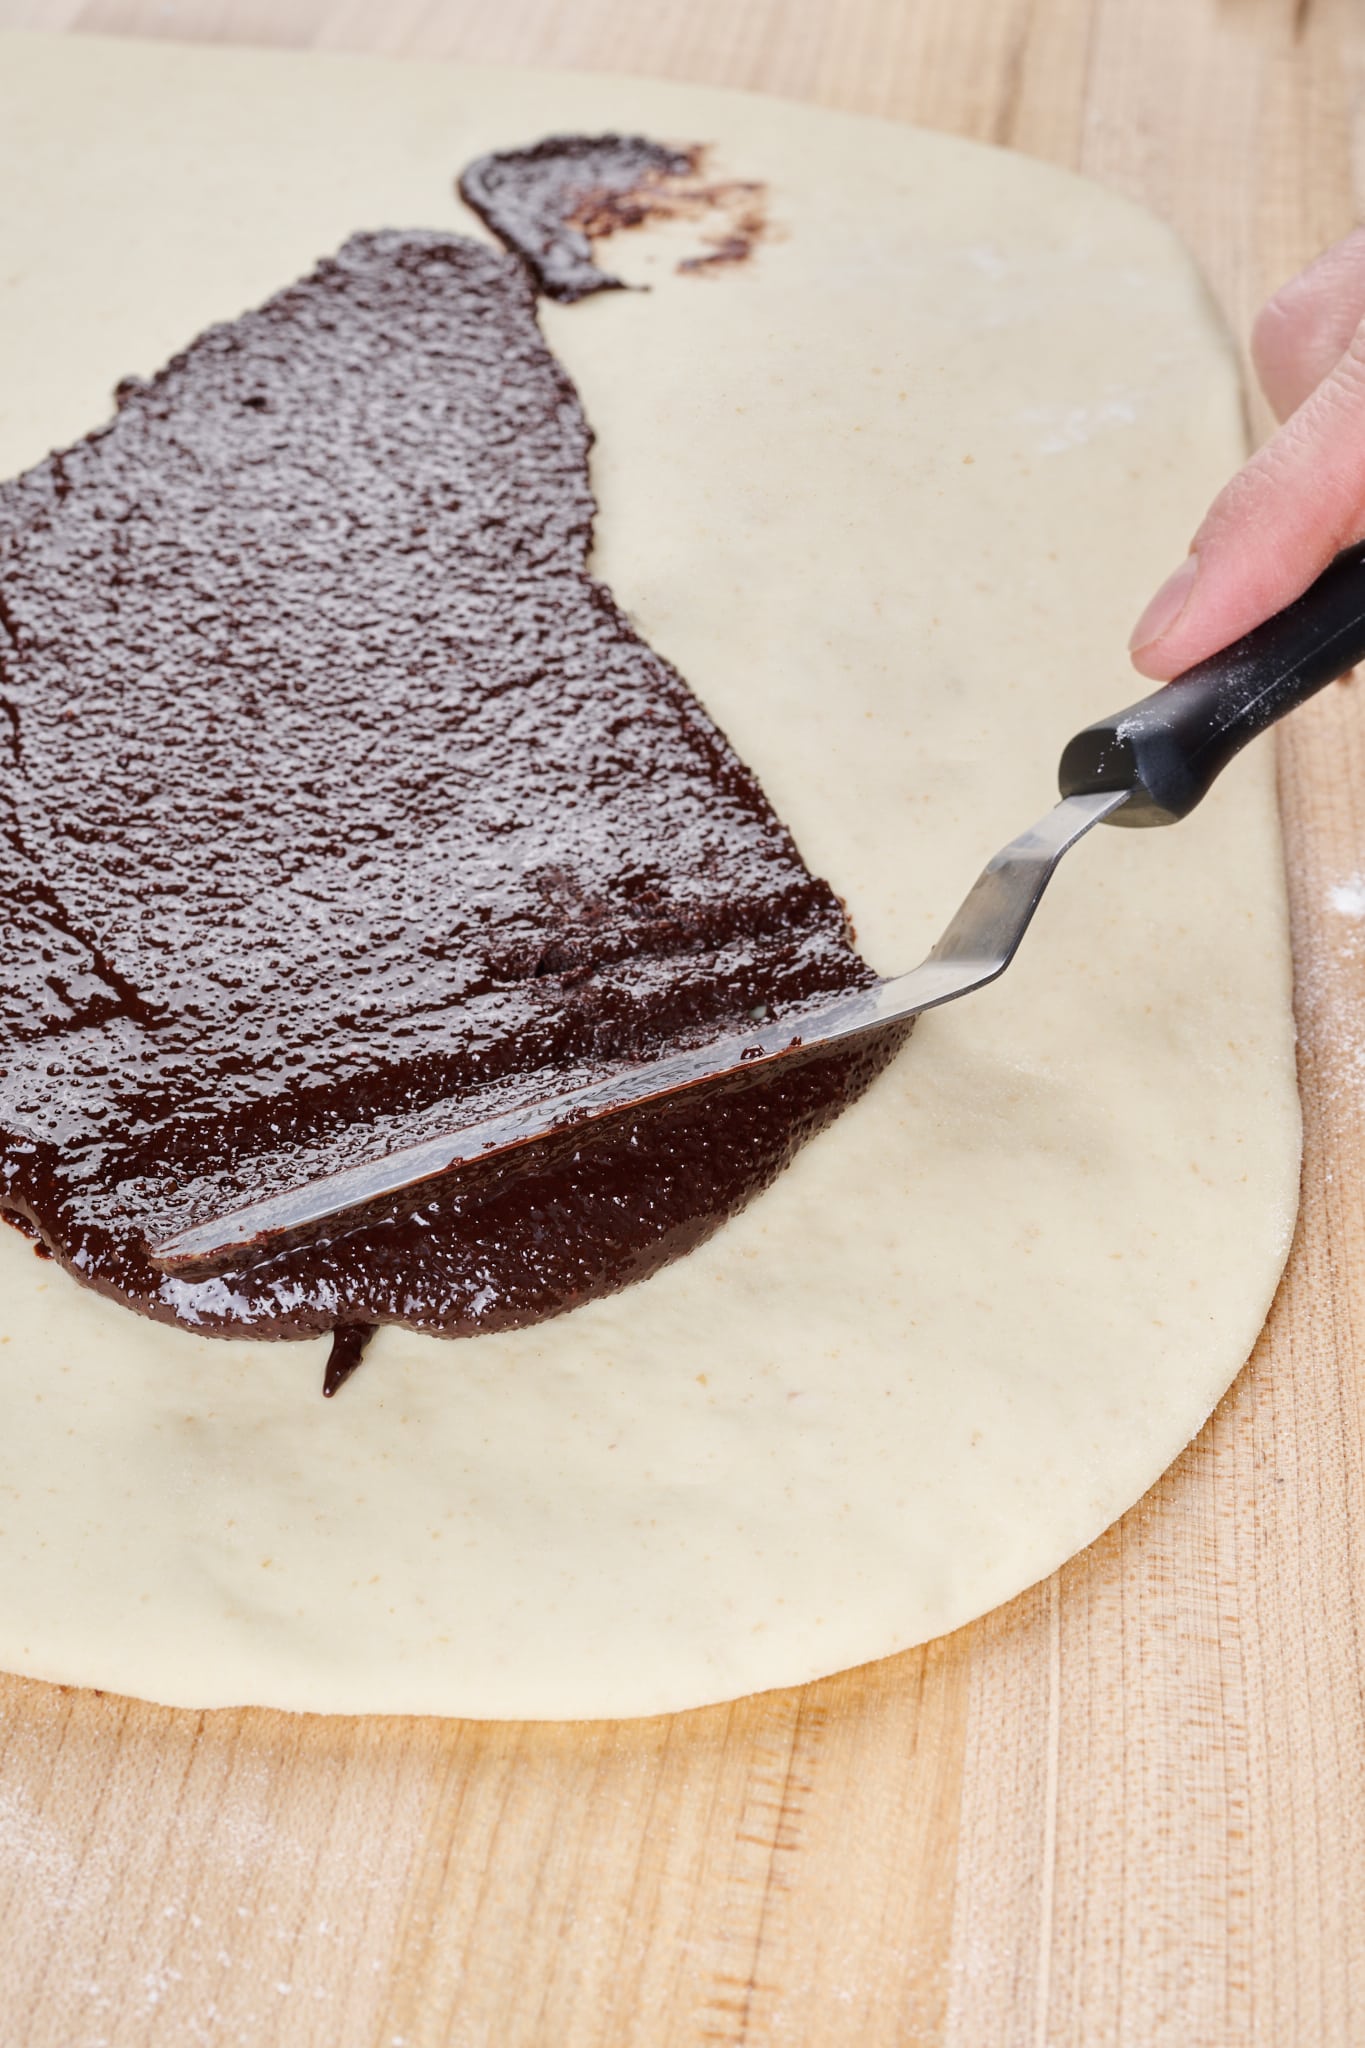
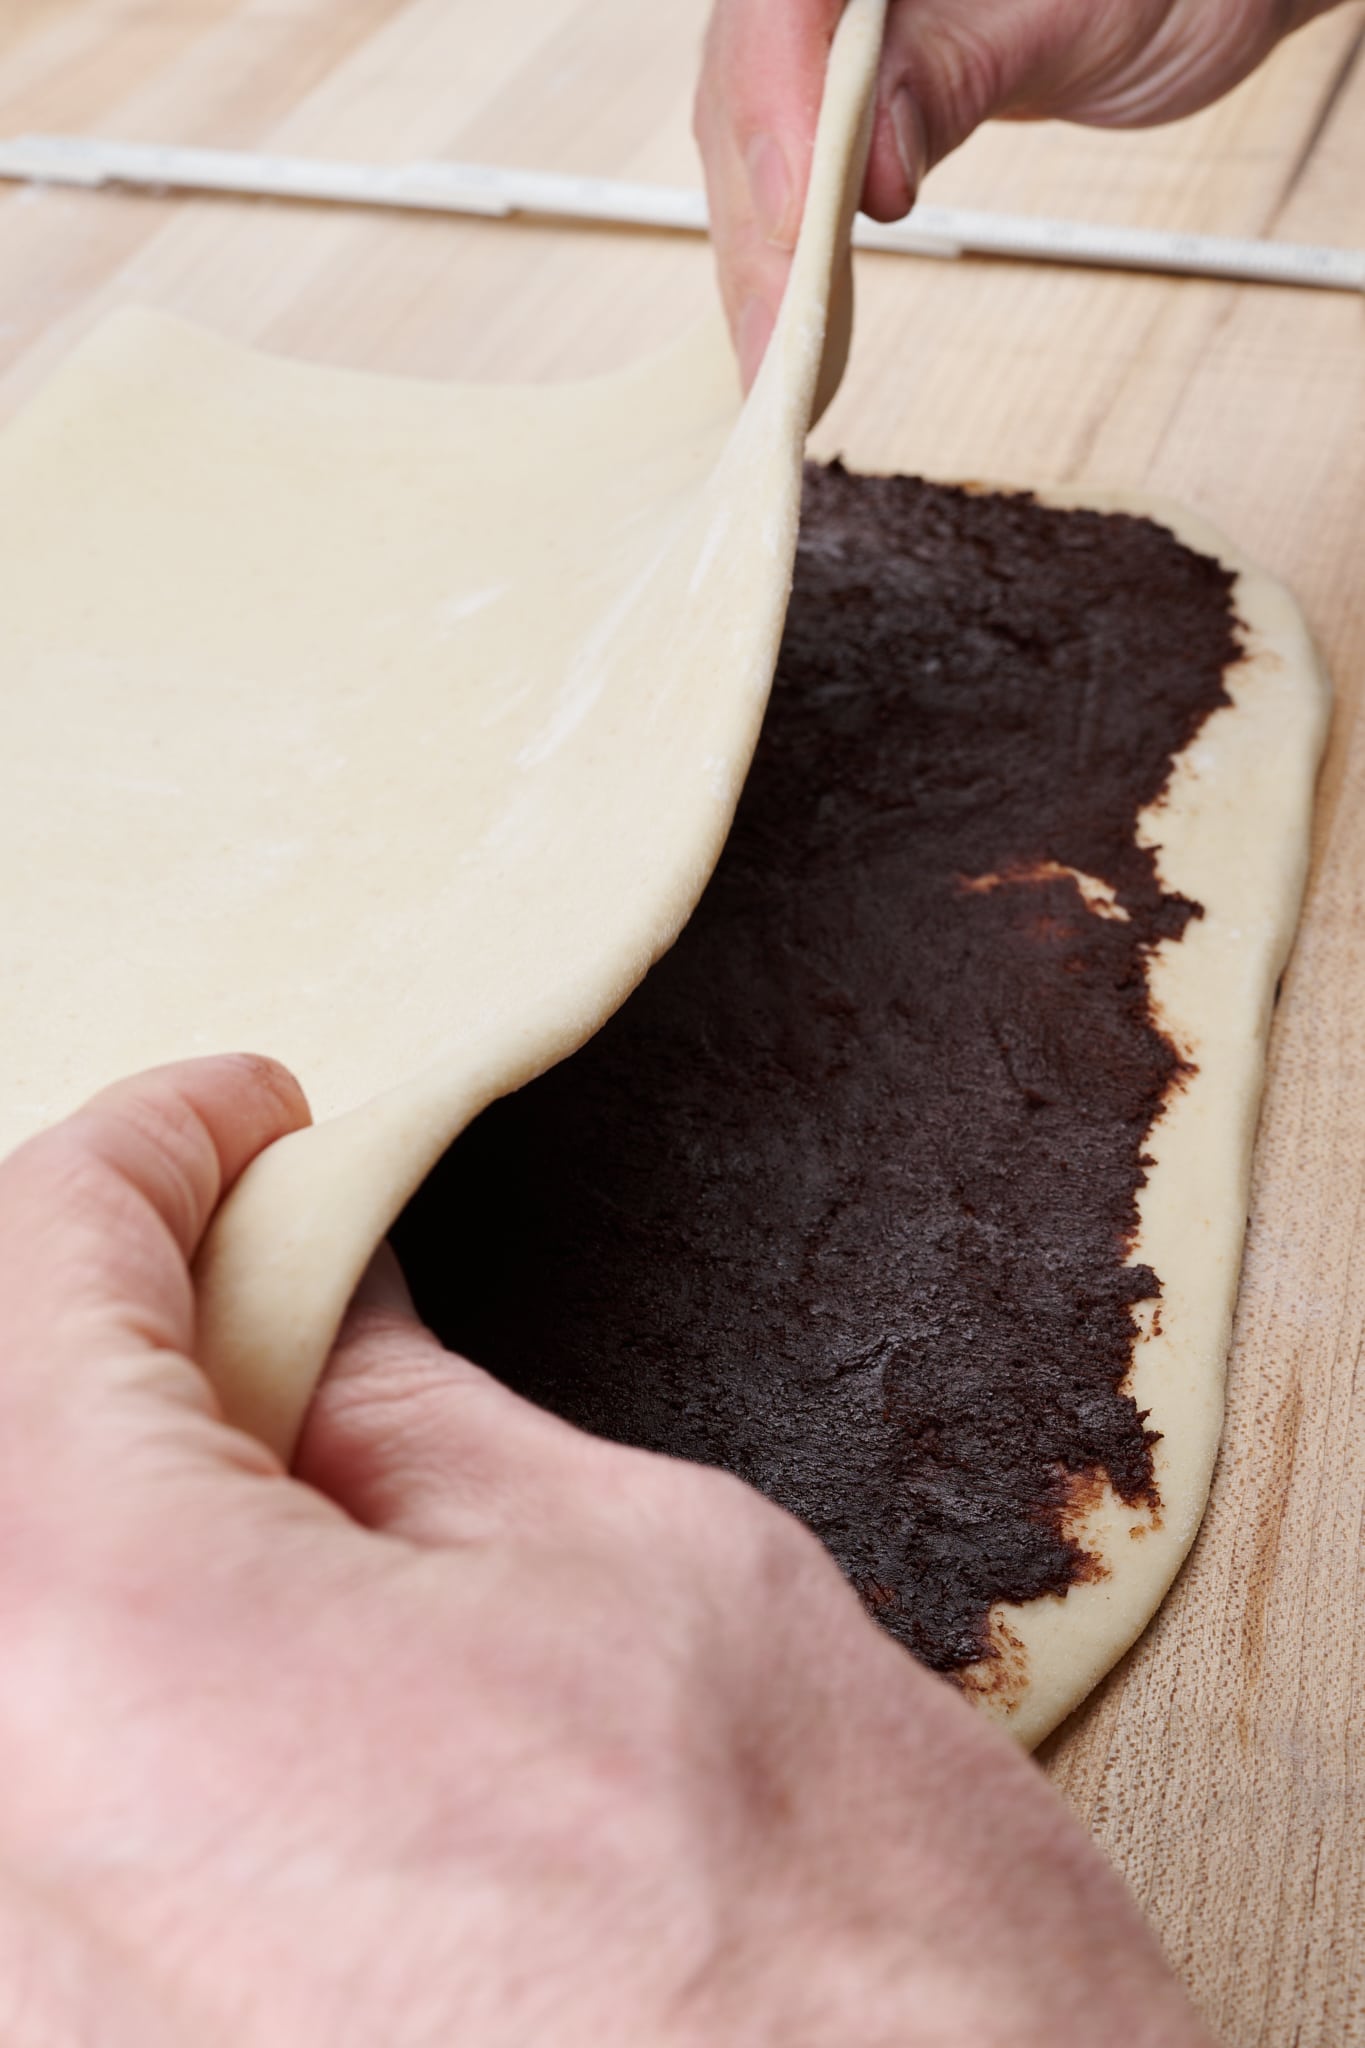
Using a small offset spatula, spread a thin layer of the chocolate filling evenly over half of the dough closest to your body (you may have some chocolate filling leftover). Fold the top half of the dough down over the chocolate. The width of the dough should be 12-inches; if it’s longer, use a knife to trim the ends; if it’s shorter, gently stretch the dough to 12-inches.
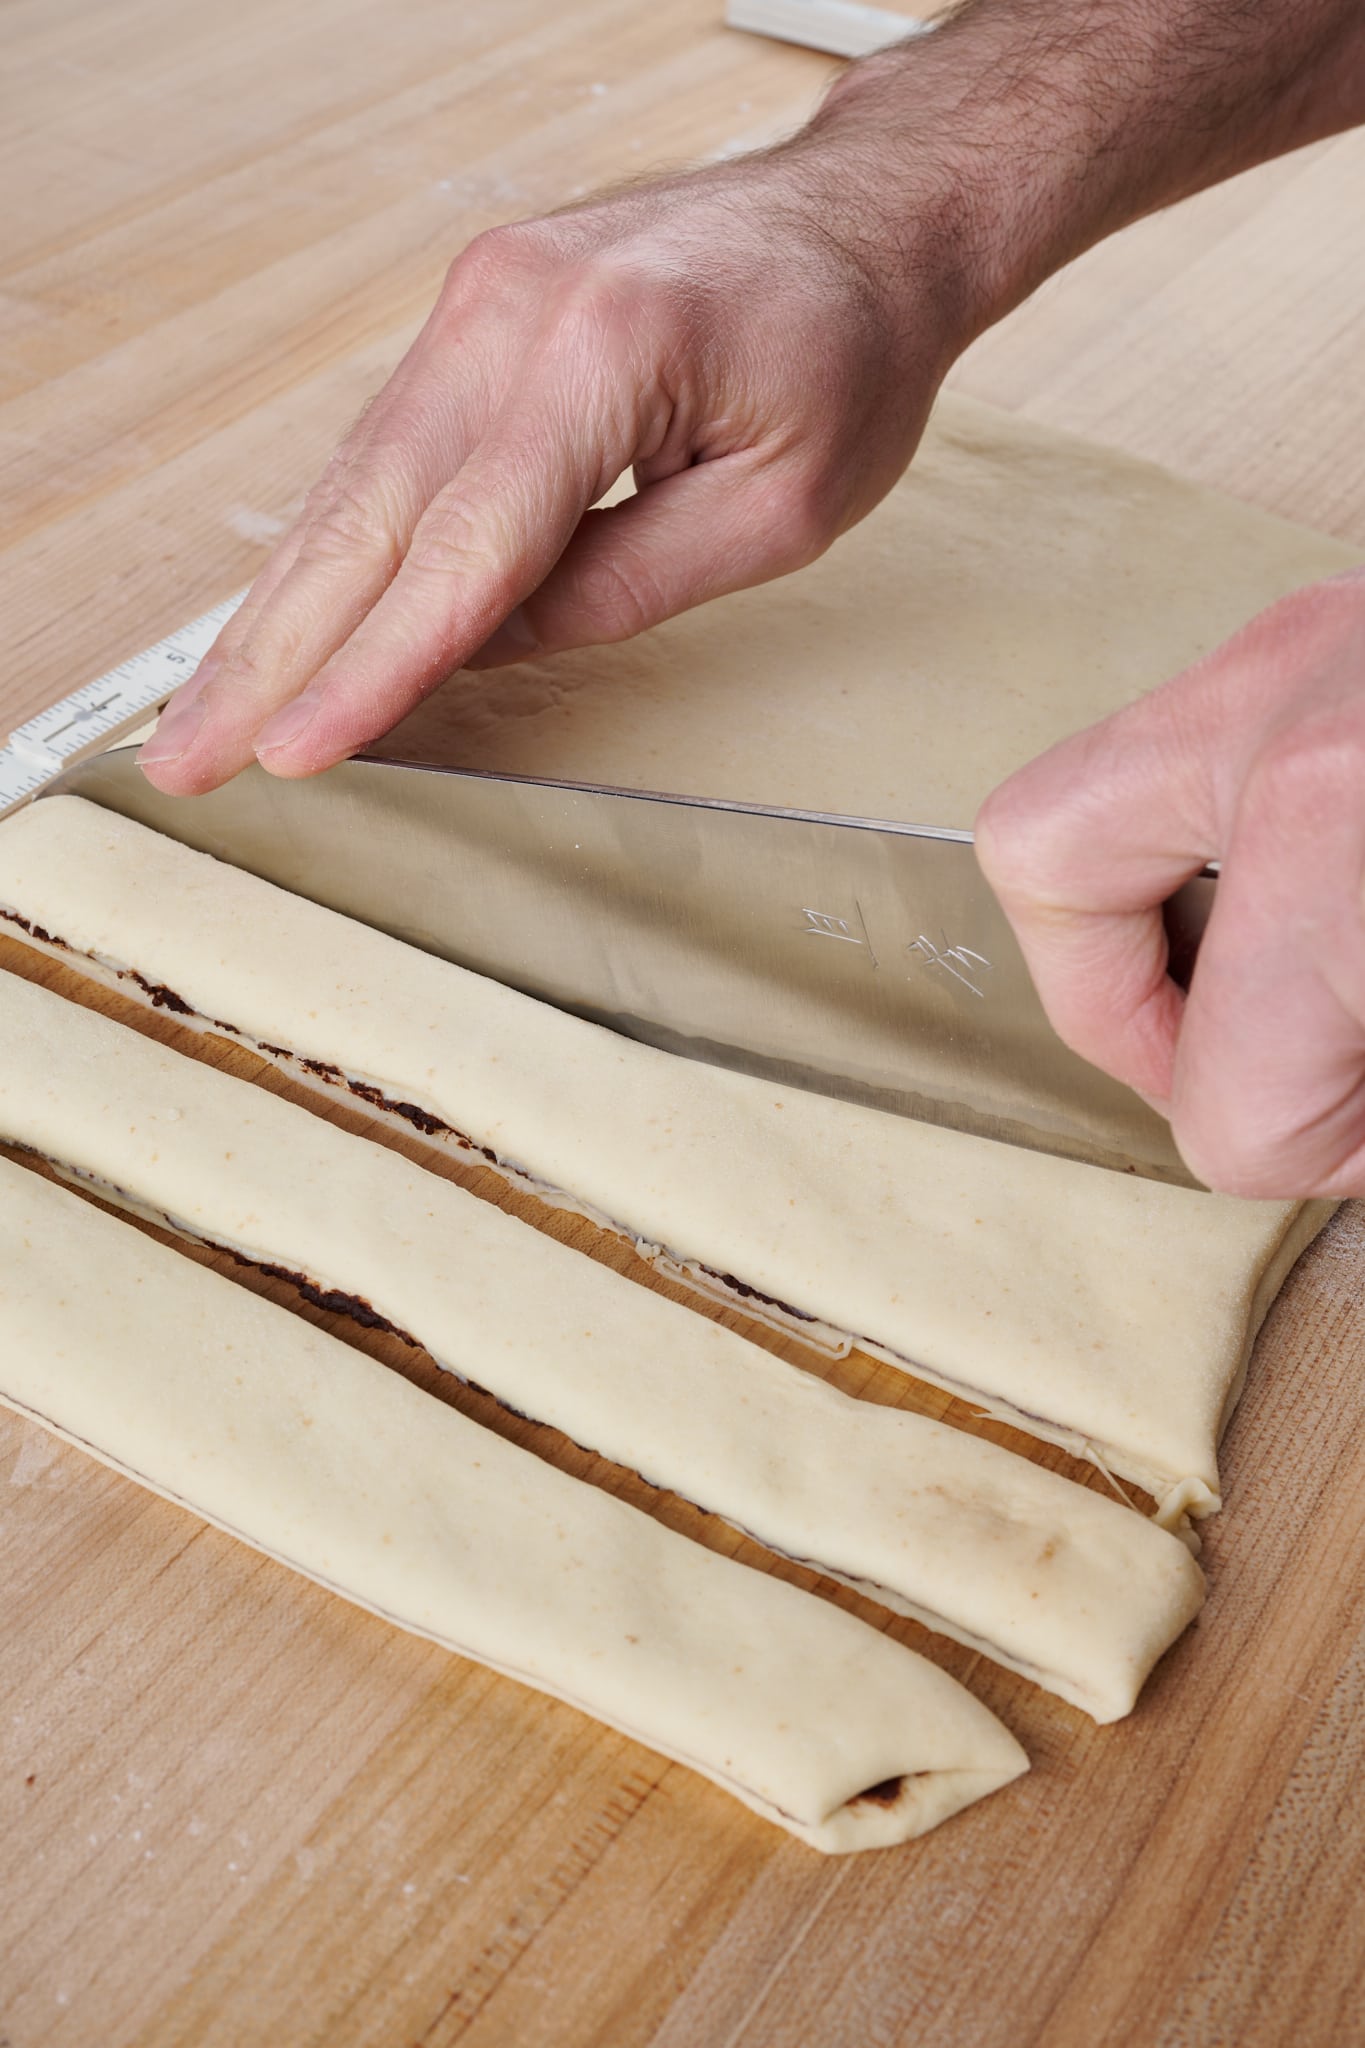
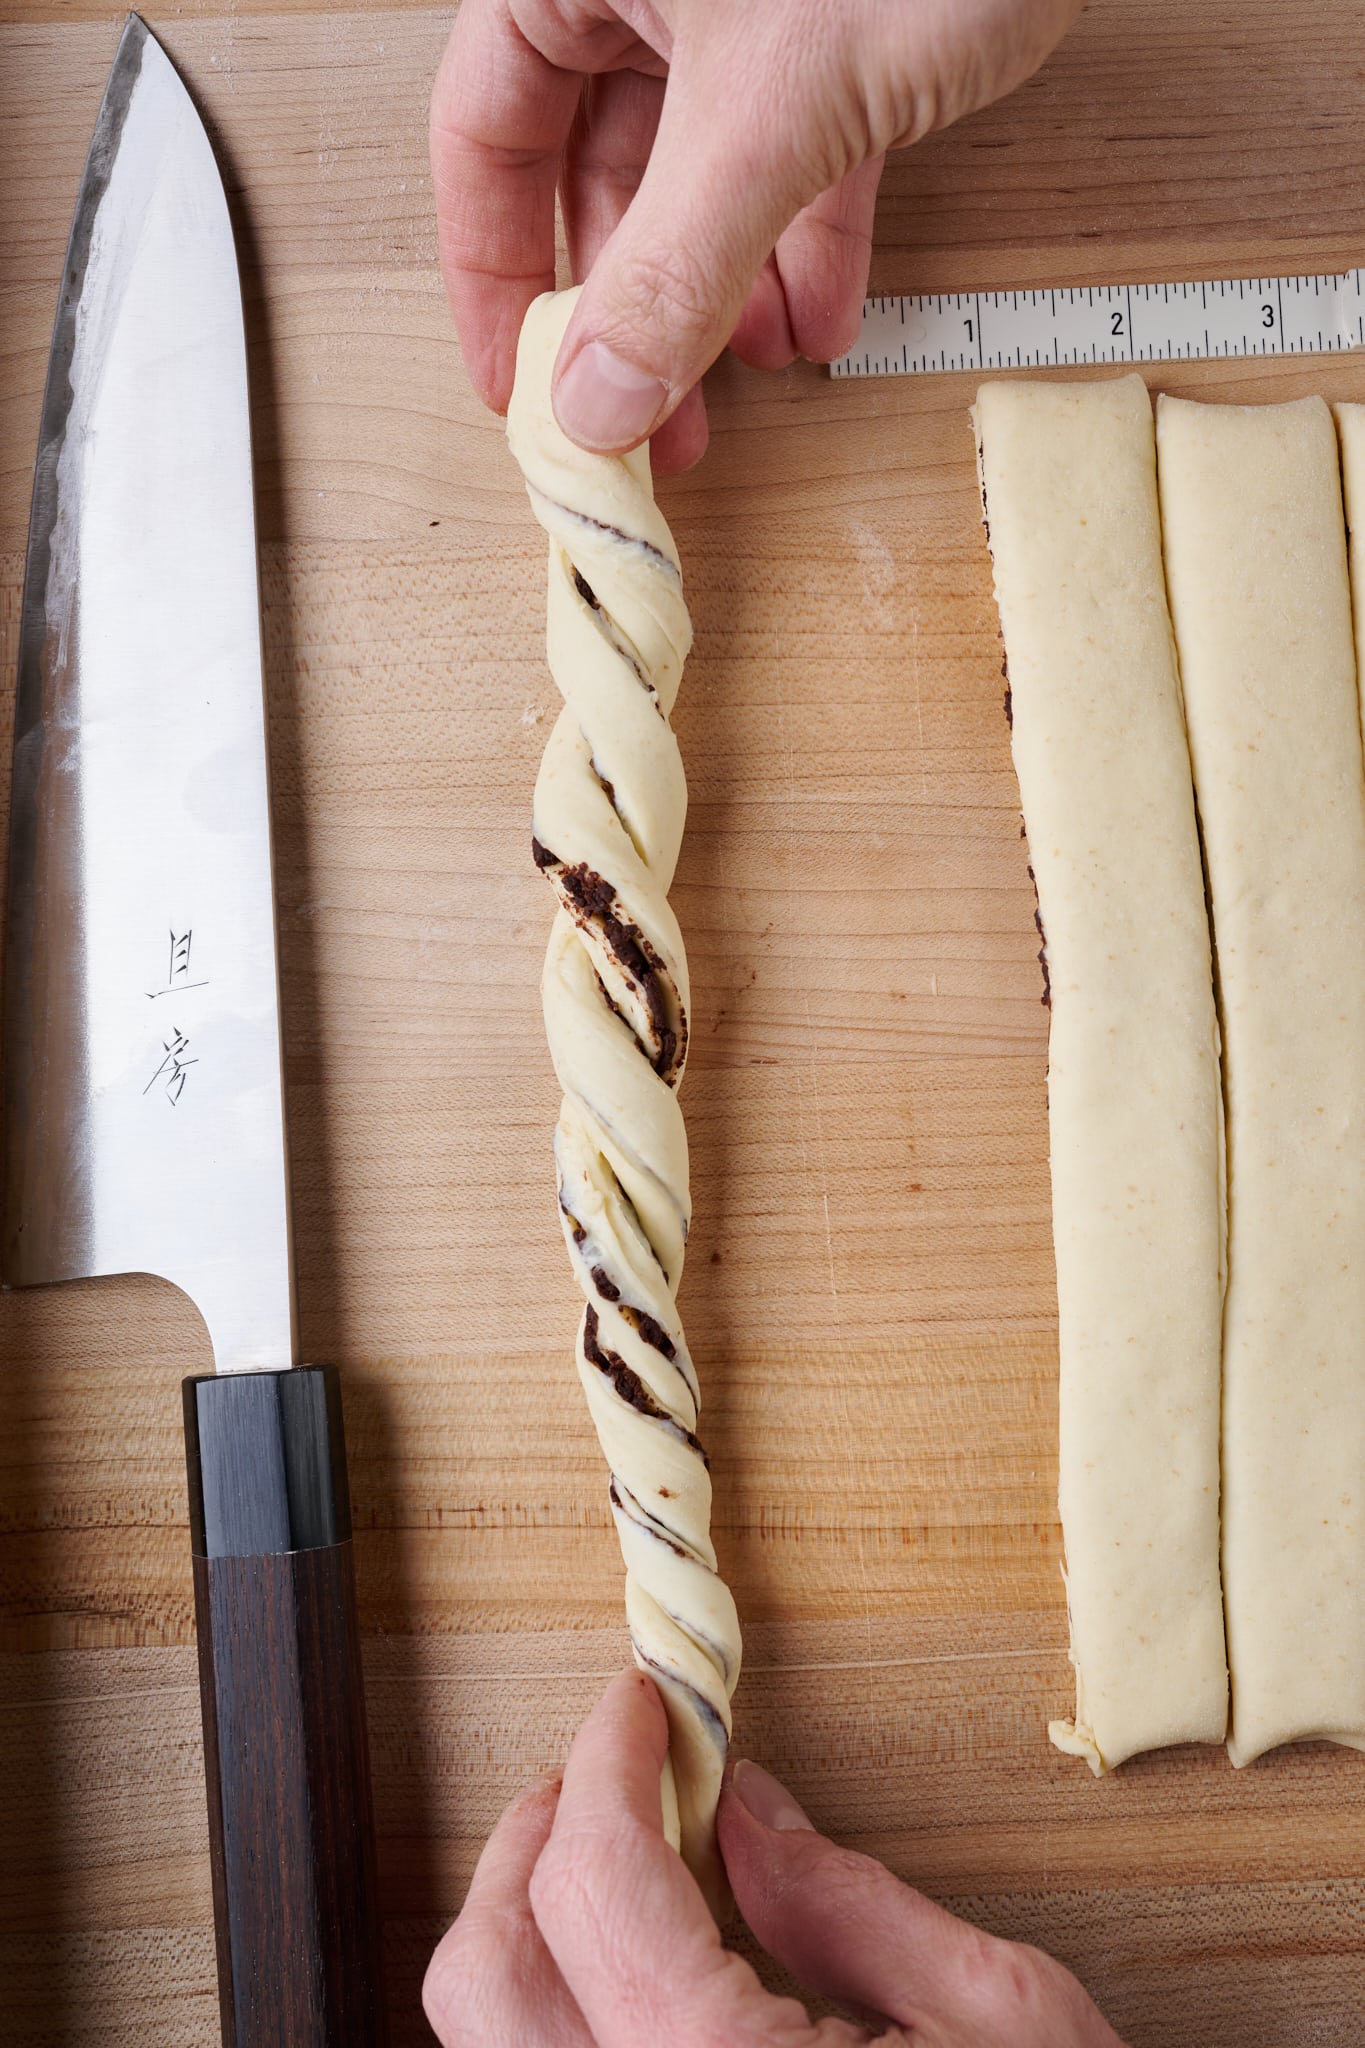
Using a knife, cut the dough into twelve 1-inch strips about 8-inches long (imagine the dough looks like very long piano keys).
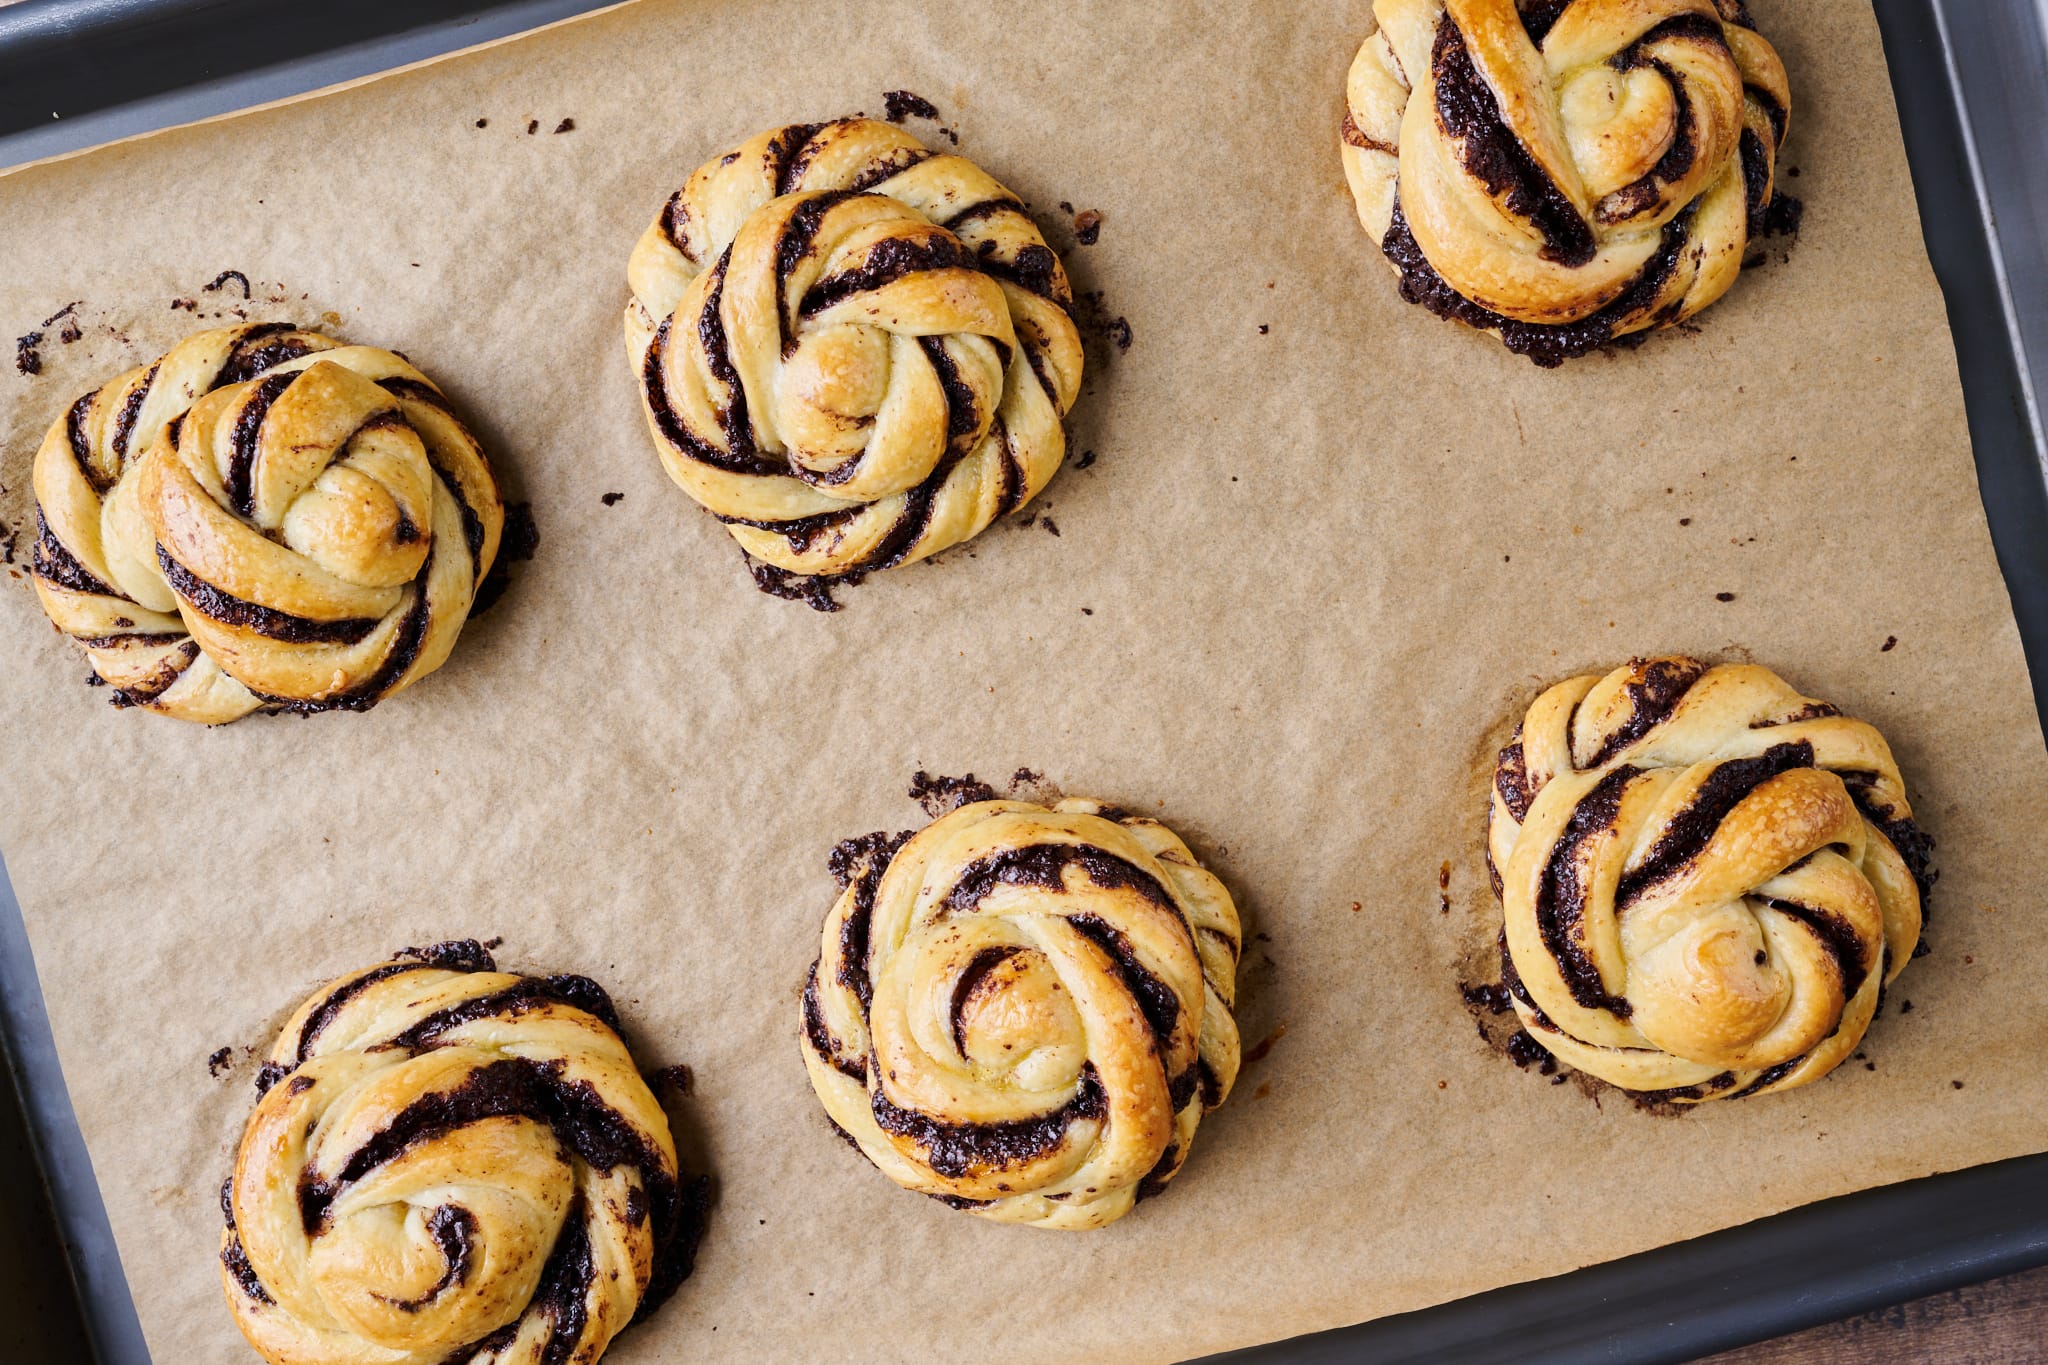
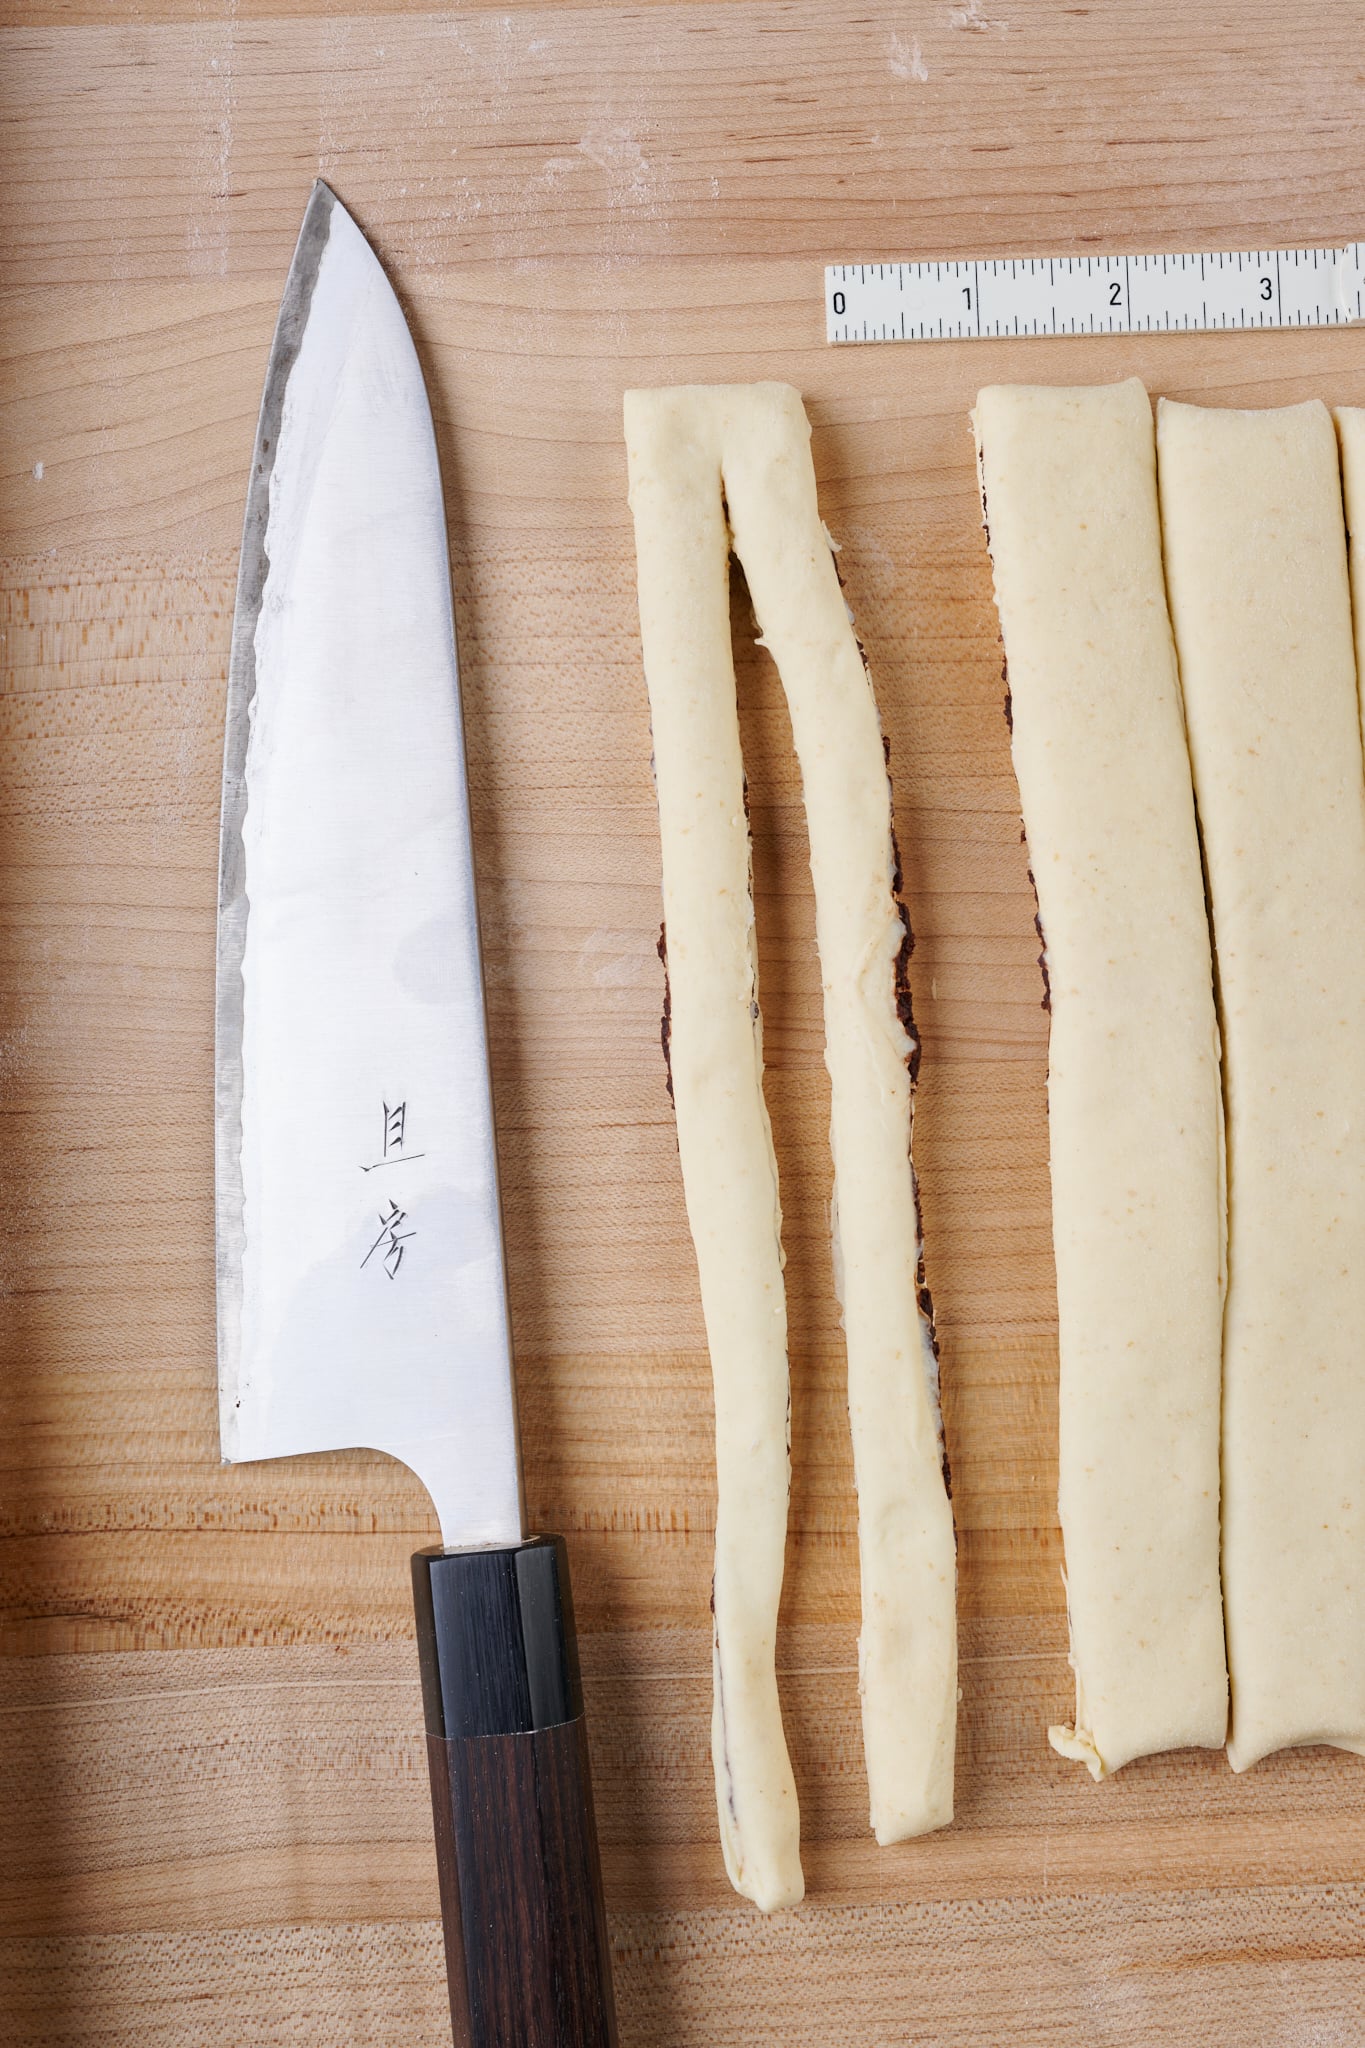
Using the knife, start about 1-inch from the end of each strip and cut each in half vertically to make two long strips that are still connected at the far end (the dough will now look like a pair of chopsticks that are at first connected at the far end). With your index finger and thumb, grab the far end that’s still connected with one hand and with the other hand the end of the two strips. Gently twist each end, so the whole thing begins to spiral (the cut will make the two strips twist independently, creating more twists). Once the entire thing is twisted, begin to roll the strip with your far hand around itself to make a snail-looking shape. Once you reach the end, tuck the end under the center, so it stays put.
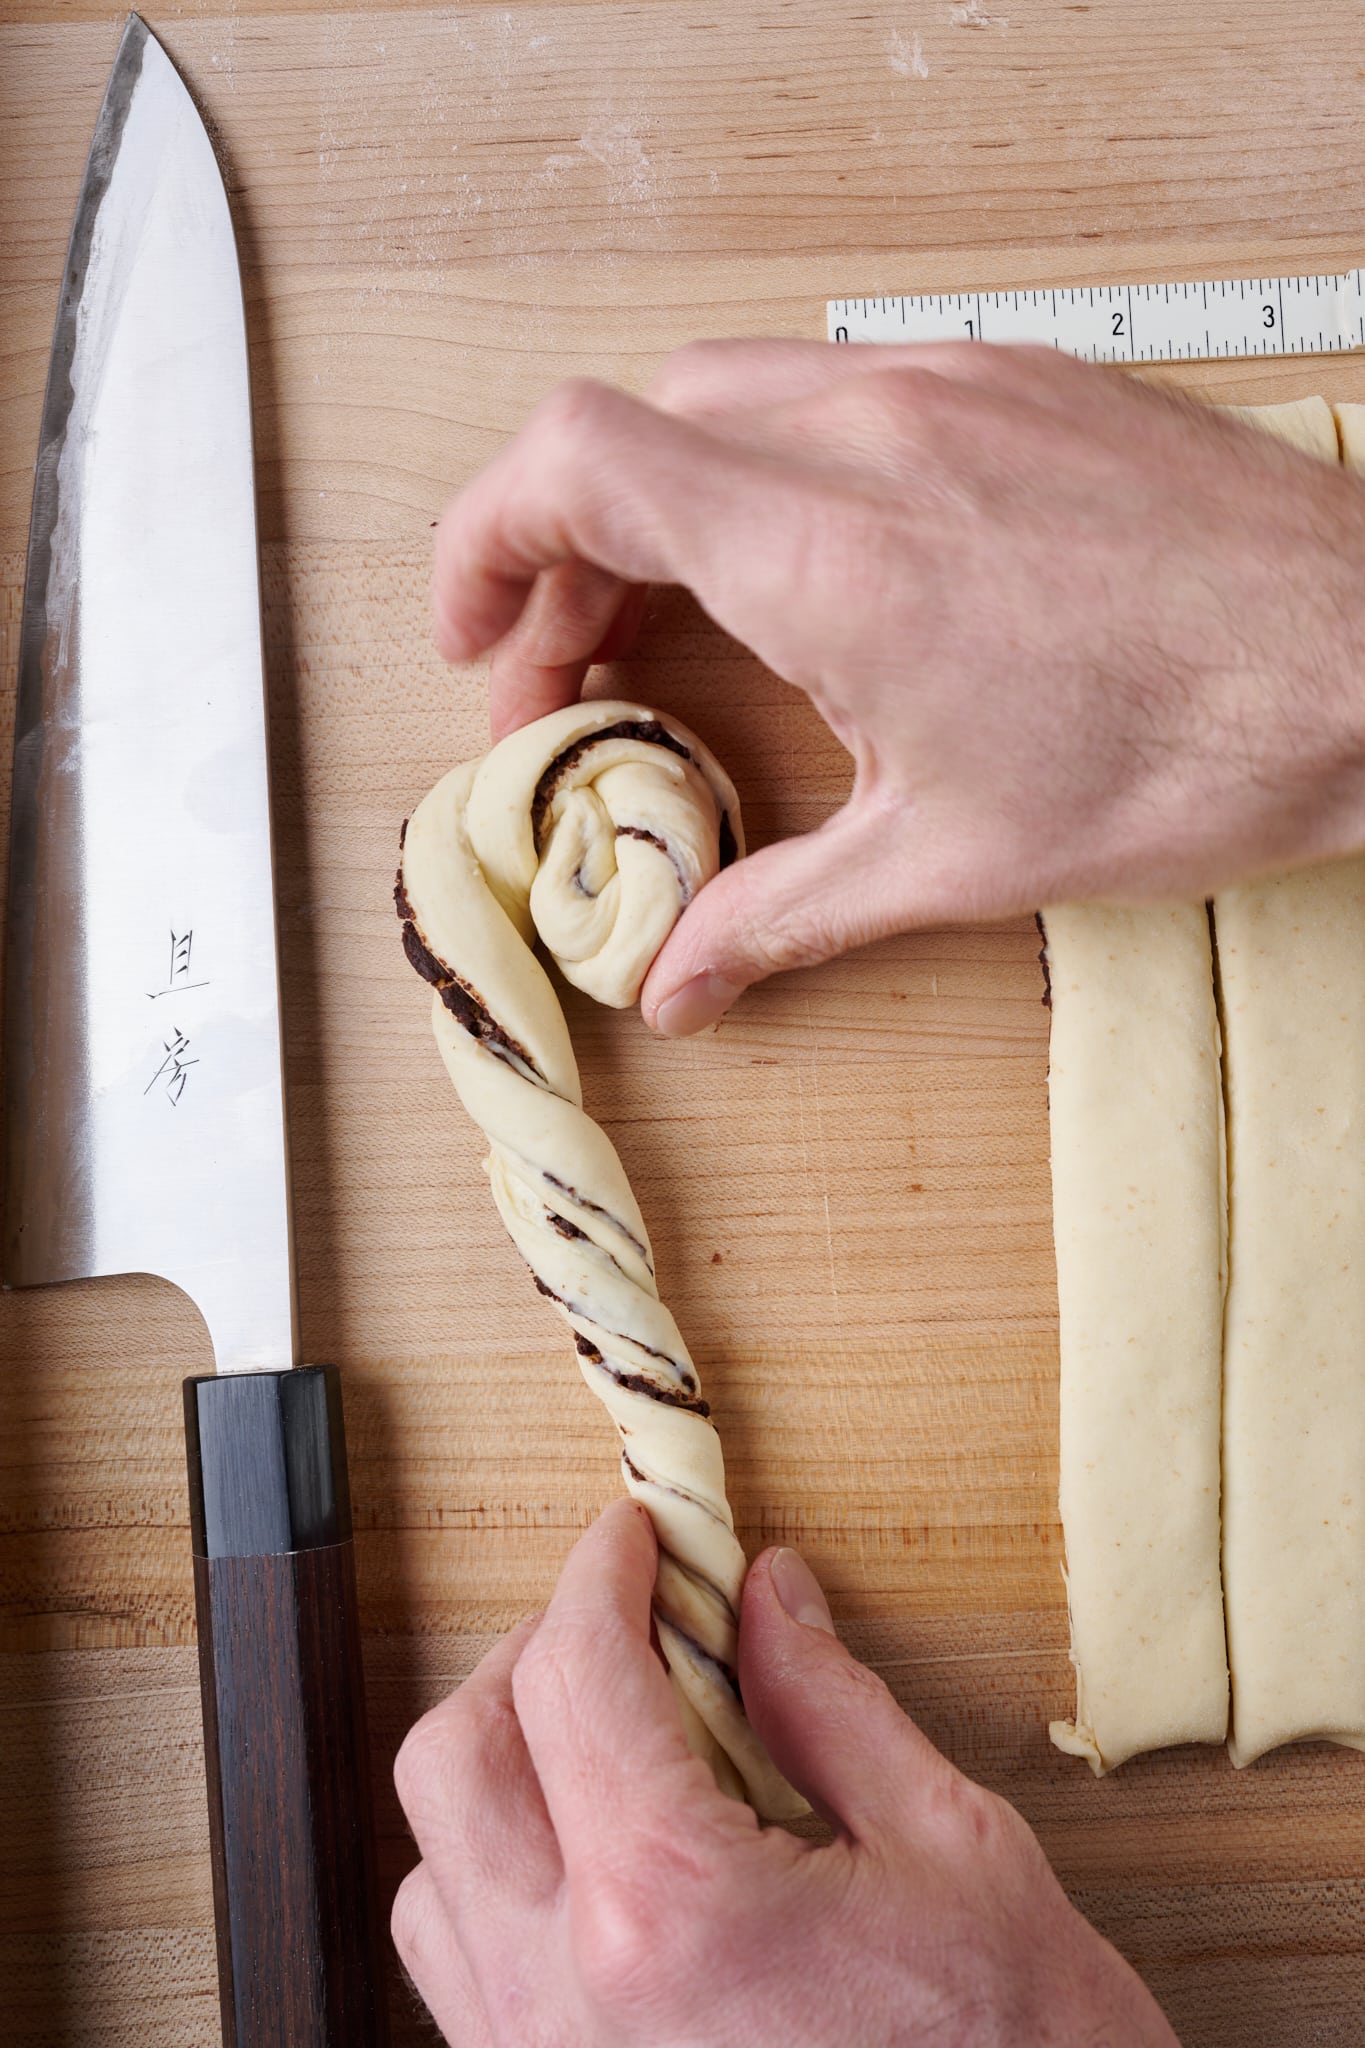
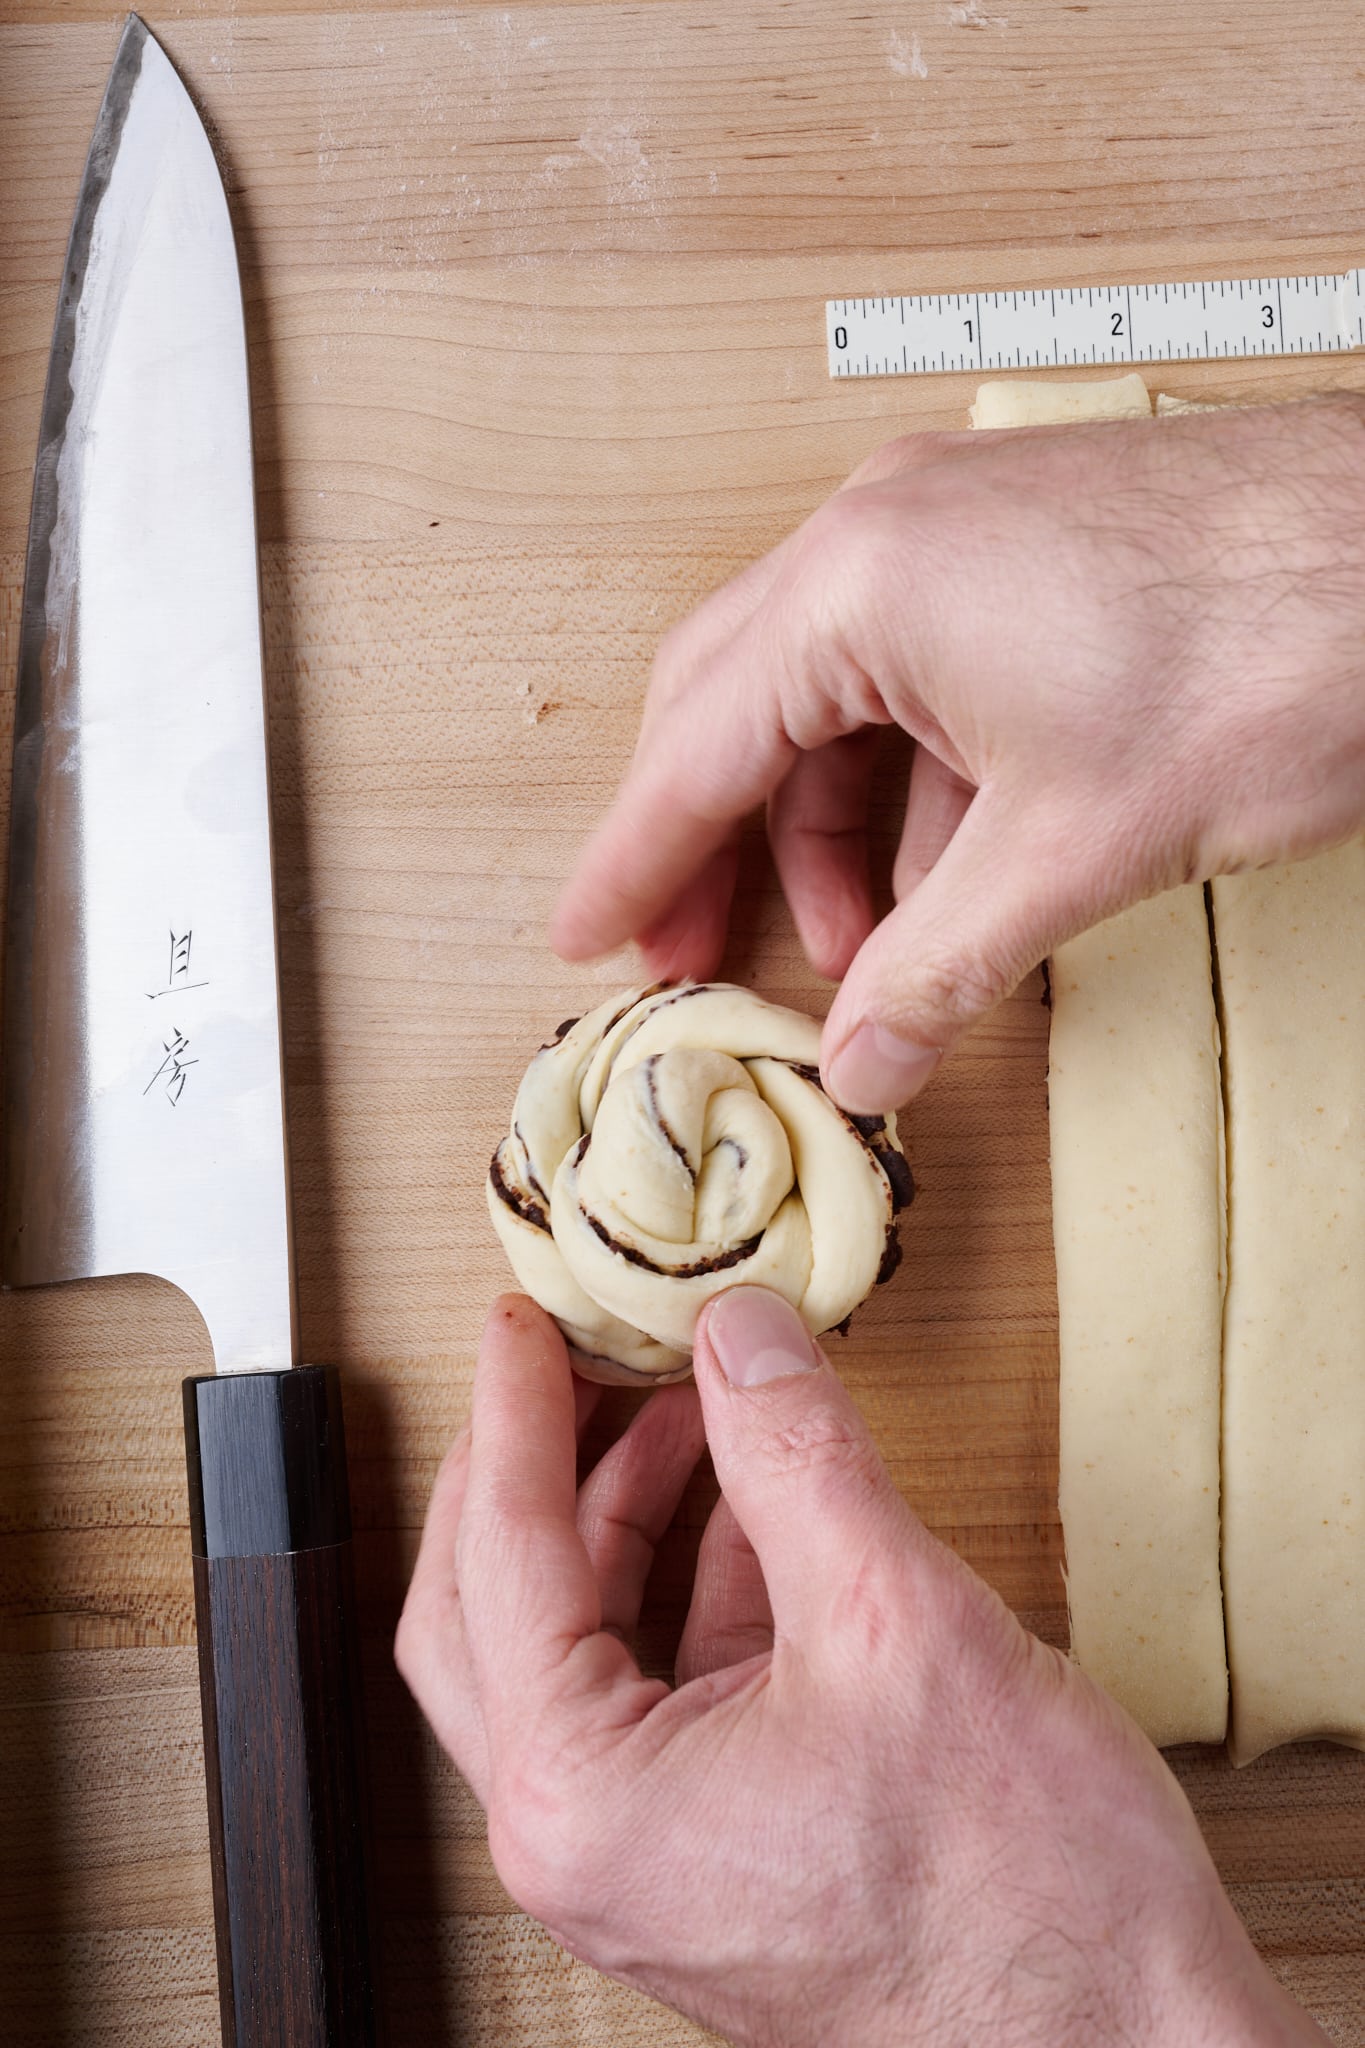
Transfer the knot to a baking sheet. Repeat for the remaining strips, placing six knots evenly spaced on each baking sheet. Cover the sheets with a large plastic bag or reusable sheet pan covers.
6. Proof – 9:30 a.m. to 1:00 p.m. (3 1/2 hours)
At warm room temperature, 74-76°F (23-24°C), this dough should take 3 ½ hours to fully proof. If your kitchen is cooler, expect it to take longer.
When fully proofed, the knots should be very soft to the touch (a poke will feel like poking a marshmallow).
7. Bake – 1:00 p.m.
Preheat the oven with one rack in the top third and one in the bottom third to 375°F (190°C) for 30 minutes.
In a small bowl, whisk together a whole egg, a small pinch of salt, and 1 tablespoon of whole milk. Uncover the dough and brush on a light layer of the egg wash, taking care not to drench the knots. See my guide to topping bread dough for more information on egg washes.
Slide the pans into the oven. Bake for 20 minutes, rotating the pans top to bottom and front to back halfway during this time. After 20 minutes, turn the oven down to 350°F (175°C) and continue to bake for another 10 to 12 minutes until the tops of the knots are a light golden brown. Take care not to overbake these; they should still be soft.
Remove from the oven and let cool for 10 minutes. These knots are best served warm but can be kept in a covered container for up to 3 days, reheated before serving.
Print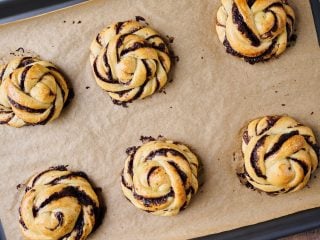
Sourdough Chocolate Knots
- Prep Time: 28 hours
- Cook Time: 32 minutes
- Total Time: 28 hours 32 minutes
- Yield: 12 chocolate knots
- Category: Pastry, Dessert
- Cuisine: American
Description
These naturally leavened sourdough chocolate knots are a delicious little treat perfect for breakfast, brunch, or even dessert after dinner. Inside, they’re filled with rich and delicious Valrhona chocolate.
Ingredients
Levain
- 44g high-protein white flour
- 44g water
- 44g ripe sourdough starter, 100% hydration
Main dough
- 324g high-protein white flour
- 92g unsalted butter
- 88g whole milk
- 51g egg, beaten
- 18g superfine sugar
- 88g water
- 7g fine sea salt
Filling
- 110g granulated sugar
- 75g unsalted butter
- 70g Valrhona Carraibe 66% Baking Chocolate
- 25g Valrhona Dutch Processed Cocoa Powder
Topping
One egg, 1 tablespoon whole milk, and a pinch of salt for the egg wash
Instructions
- Levain – 9:00 a.m.
Mix the levain ingredients in a jar and leave them covered at a warm temperature, 74-76°F (23-24°C), to ripen for 3 hours. - Mix – 12:00 p.m.
First, cut the butter into 1/2″ pats. Set them on a plate to warm to room temperature. To the bowl of a stand mixer fitted with the dough hook attachment, add the flour, water, milk, egg, sugar, salt, and ripe levain. Mix on low speed for 1 to 2 minutes. Next, mix on medium speed for 5 to 7 minutes until the dough smooths and begins to cling to the hook. Let the dough rest in the bowl for 10 minutes. Turn the mixer on low speed and mix for 2 to 4 minutes. Next, with the mixer running, add the room temperature butter, one pat at a time over the course of 5 to 8 minutes. Transfer the dough to a bulk fermentation container and cover. - Bulk fermentation – 12:30 p.m. to 4:30 p.m. (4 hours)
Give the dough one set of gentle slaps and folds during bulk fermentation. After the first hour, gently scrape the dough out to the work surface. Using damp hands, pick up the dough at the sides, slap it gently down on the counter, stretch it back toward your body, and then fold it over. Rotate both your hands, pick up the dough at its sides, and repeat the same gentle slap and fold over. Repeat these slaps and folds a few times until the dough is smooth on the top and holds itself on the counter, after 4 to 5 times. Transfer the dough back to the bulk fermentation container. Let the dough rest, covered for the remainder of bulk fermentation. - Chill dough – 4:30 p.m. to 9:00 a.m., next day
Place the covered bulk fermentation container into the fridge overnight. - Roll, fill, cut, and shape – 9:00 a.m.
Line two 13 x 18-inch sheet pans with parchment paper. Take out the bulk fermentation container and let it warm for 30 minutes. Prepare the filling: in a medium saucepan, melt the butter. Remove from the heat and add the sugar and baking chocolate pieces; stir everything together while the chocolate melts until everything comes together and smooths. Add the cocoa powder and whisk the mixture into an emulsion. Set aside to cool until ready to use. Uncover the dough and liberally flour the top and your work surface. Scrape out the dough to the floured surface, and using a rolling pin, roll out to a rectangle that’s about 12 x 17-inches with the short end nearest your body. Spread a thin layer of the chocolate filling evenly over half of the dough (you may have some chocolate filling leftover). Fold the top half of the dough down over the chocolate. The width of the dough should be 12-inches. Using a knife, cut the dough into twelve 1-inch strips about 8-inches long. Using the knife, start about 1-inch from the end of each strip and cut each in half vertically to make two long strips that are still connected at the far end. Gently twist the strips so the whole thing begins to spiral (the cut will make the two strips twist independently, creating more twists). Once the entire thing is twisted, begin to roll the strip with your far hand around itself to make a snail-looking shape. Once you reach the end, tuck the end under the center, so it stays put. Transfer each piece to a baking sheet, six pieces on each sheet. Cover. - Proof – 9:30 a.m. to 1:00 p.m. (3 1/2 hours)
At warm temperature, let the dough rise. - Bake – 1:00 p.m.
Preheat the oven with one rack in the top third and one in the bottom third to 375°F (190°C) for 30 minutes. In a small bowl, whisk together a whole egg, a small pinch of salt, and 1 tablespoon of whole milk. Uncover the dough and brush on a light layer of the egg wash. Slide the pans into the oven. Bake for 20 minutes, rotating the pans top to bottom and front to back halfway during this time. After 20 minutes, turn the oven down to 350°F (175°C) and continue to bake for another 10 to 12 minutes until the tops of the knots are a light golden brown. Remove and let cool for 10 minutes.
Chocolate sourdough knots FAQ
What else can I fill these knots with?
A sugar-cinnamon mixture would also be wonderful; see my sourdough babka for a recipe for this filling. Additionally, I could imagine these tasting delicious with Nutella, ground hazelnuts, or pecans added to the chocolate filling listed in the recipe.
Can I proof these overnight in shape?
Absolutely. After rolling, filling, and cutting the dough, shape the dough into knots as described in the recipe. Then, cover the baking sheets and place them into the refrigerator overnight. The next day, take the sheets out and let proof at warm room temperature until ready (I would imagine 3 to 4 hours would suffice). See the Baking Schedule section at the beginning for more information.
What’s next?
Fancy more chocolate? Check out my dark chocolate-cherry sourdough bread for an entire loaf—and I’d use Valrhona in that loaf, too.
Or go all in and make some sourdough starter and discard chocolate chip cookies (they’re easy to make but so delicious).
Buon appetito!

