

I’ve been using the autolyse technique since I started baking bread many years ago. And while I don’t use it in every single bake, in this post on how to autolyse I’ll show how it’s a handy tool that can help reduce mixing time, increase extensibility, and in some cases, can lead to increased flavor in your bread.
And while I think performing an autolyse can make things easier and improve your bread baking in some instances, I don’t think it’s necessary for every single bread. Like I said above, it’s a tool that you can use if your formula and process deem it useful, but just like a hammer, it might not be suitable for every job at hand.
At the start, this post is primarily geared toward sourdough baking. If you’re baking mostly commercially-yeasted or hybrid doughs, you might find your dough behaves differently when you autolyse.
What is the Autolyse Technique?
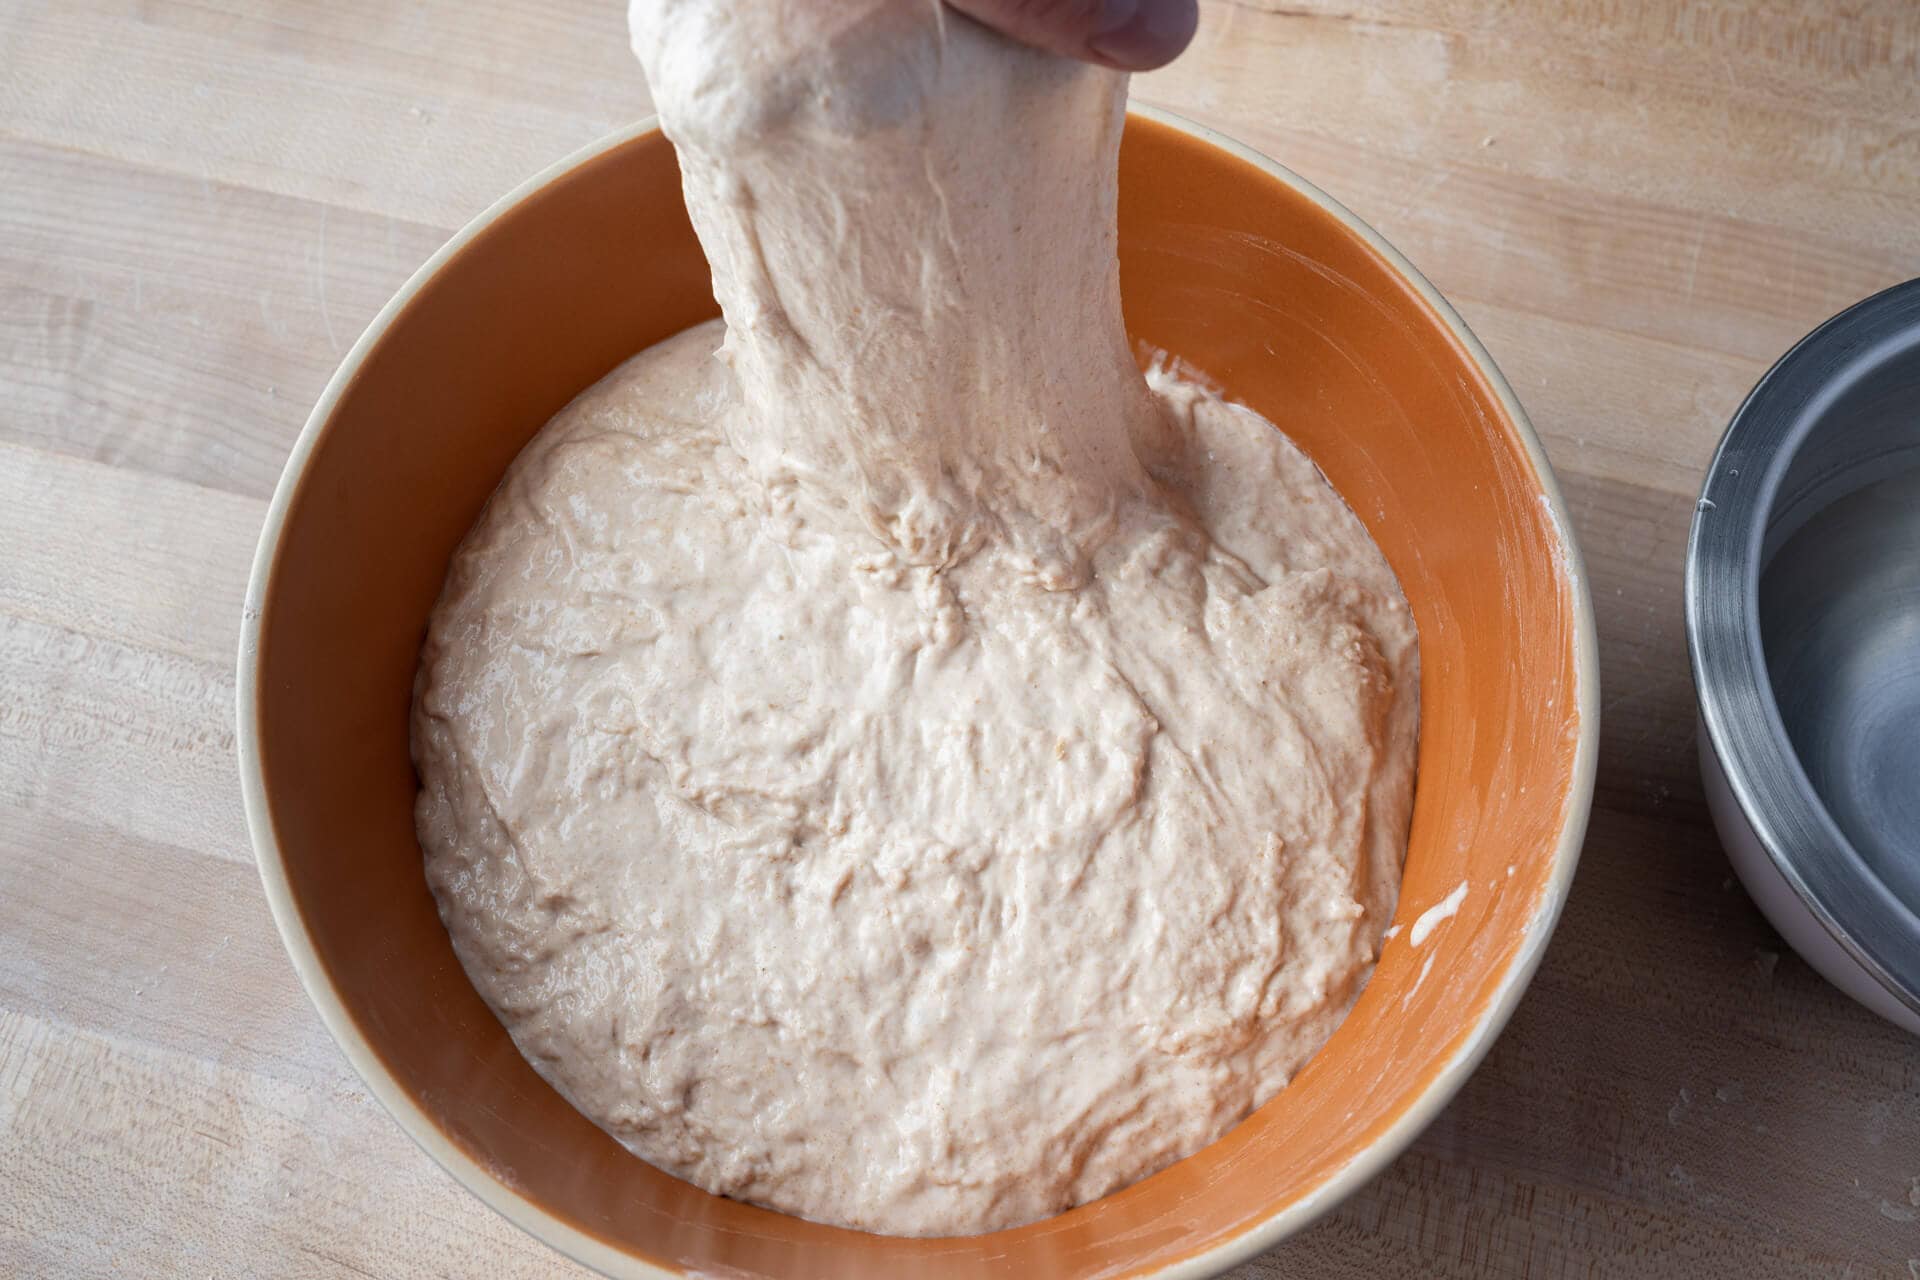
An autolyse (“aw-toe-lease”), sometimes written as autolyze, autolysis, or dough autolysis, combines the flour and some or all of the water in a recipe and then leaves the mixture to rest for some period. During this time, gluten bonds begin forming, and the dough takes on a smoother texture and strengthens overall.
Also, in the presence of water, enzymes in the flour begin to function. Somewhat paradoxically, since the dough feels stronger overall, protease enzymes start breaking down protein bonds, slackening the dough. This slackening leads to an increase in a dough’s extensibility1: the ability for the dough to stretch out without tearing. Extensibility is an essential quality for bread dough. Having the right extensibility—counter-balanced by elasticity or the tendency for the dough to resist stretching—means a dough can expand and be filled with the gaseous byproducts of fermentation.
What is the Difference Between Elasticity and Extensibility?
It’s often said that a well-strengthened sourdough bread dough is both elastic and extensible. These two forces can be seen to both work against each other but also complement each other.
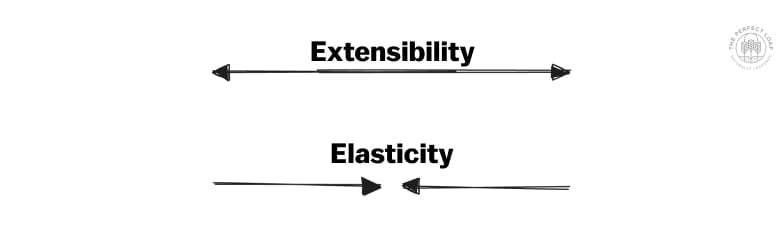
Elasticity is the dough’s ability to stretch and then return back to its original shape. Imagine pulling a rubber band and then releasing it; if the rubber band goes back to how it was before you stretched it, that’s similar to the elasticity in the dough. This property helps the dough to hold its shape and structure, especially when it rises and expands due to fermentation.
Extensibility is the capacity of the dough to stretch without breaking. Returning to the rubber band analogy, if you can pull the rubber band longer without snapping, that shows good extensibility. In bread dough, extensibility allows it to expand and accommodate the gases produced by yeast in a sourdough starter, leading to a nice rise in your bread without tearing.
How to Autolyse Bread Dough
To autolyse bread dough, combine the flour and water in a recipe and leave it to rest for some period of time. After this rest period, add the preferment (levain), salt, and any additional water, and continue mixing.
How long should I autolyse?
The autolyse period ultimately depends on the flour and recipe at hand. If you’re developing your recipe and feel an autolyse will help, I prefer to start conservatively at 15-30 minutes. There are no set periods one must adhere to.
For many of my recipes, I tend to stick to quarter-hour increments: 15, 30, 45, or 60 minutes. With high percentages of aged whole wheat flour, I might increase to 2 hours or more, depending on the dough’s consistency. If the dough were very stiff and elastic, I’d increase the autolyse period (while keeping everything else the same) and re-test.
For many of my mostly-white flour “country” loaves, I like to do a 1-hour autolyse. This lengthy period gives the dough significant extensibility. Then, I sufficiently develop the dough through mixing and stretch and folds during bulk fermentation. This combination results in a strong dough that traps gasses but is also extensible enough to expand optimally in the oven.
Is it ok to autolyse overnight (or for many hours)?
With some doughs it’s just fine. I’ve done this with recipes that have a large percentage of aged whole wheat and have seen great results. But I’ve found once you go too far with an autolyse, it’s hard to reverse the slackening of the dough. I approach a long autolyse like this with caution and thorough testing.
If you’re short on time and are trying to do the autolyse “ahead of time,” I’d instead skip the autolyse altogether.
Do I include my levain in an autolyse?
Typically, no.
Remember, an autolyse is simply the combination of the flour and water in a recipe—that’s it. However, in some cases, it might actually be necessary to include the levain, or preferment, in the autolyse.
Always remember, once a preferment (levain, biga, poolish, etc.) is added to a dough, fermentation begins.
If you have a liquid preferment and your dough is low hydration, you might have to include your levain in the autolyse mix. Why? Otherwise, there won’t be enough total water in the autolyse mix to incorporate and hydrate the flour effectively.
Think about how hard it would be to mix a 50% hydration dough! The liquid preferment, especially when a recipe has a high prefermented flour percentage, has a relatively large portion of the recipe’s water in the preferment itself. In this case, I’ll add the liquid preferment to the rest of the flour and water and do a short autolyse.
When and When Not to Autolyse
First, let’s look at a high-level comparison of when I might, and might not, autolyse:
You might autolyse when…
- The bread dough formula has a high percentage of high-protein flour
- The formula has a high percentage of whole wheat flour
- Additional extensibility is desired
- You’re hand mixing the dough
- You want to preserve maximum flavor in your dough at all costs
You might not autolyse when…
- The formula has a high percentage of freshly milled whole-grain flour
- The formula has a high percentage of flour known to be highly extensible (such as spelt)
- Would add increased complexity to the baking schedule
- The flour has a low falling number
I discuss this often in my cookbook. The essential fact about baking is that you have to look at the formula and process holistically. Nothing can be examined in isolation. So, while the above table of when and when not to autolyse generally holds, it’s certainly not written in stone.
When to Autolyse Bread Dough
I find it helpful to autolyse a dough comprising a large portion of high-protein bread flour. While there’s no clear protein percentage cut off, if you find your dough to be very strong, tight, and lacking extensibility when it’s mixed, an autolyse can help.
If the dough contains a high percentage of aged whole wheat flour, an autolyse can help soften the mixture. Additionally, an autolyse will reduce the mixing time required for the dough to reach maturity. Because whole wheat flour contains large bran and germ particles, the longer it’s mixed, the more opportunity these particles have to cut through any developed gluten matrix. In the end, this could achieve a more open interior.
If I’m mixing a dough completely by hand, I’ll often include at least a short (15-30 minutes) autolyse period. This helps reduce the time I have to physically mix and knead the dough.

Should I Autolyse a Pizza Dough?
I thought I’d include my thoughts on using the autolyse technique with pizza dough: I think it’s just fine! I’ve done this occasionally in experimentation, and it works as it would with any other dough. When I autolyse a pizza dough, which isn’t often, I usually keep it shorter (10-20 minutes).
When Not to Autolyse Dough
I prefer not to autolyse doughs made up of a large percentage of freshly milled flour. While it’s not a hard and fast rule to not autolyse when baking with freshly milled flour, that’s typically my approach. I’ve found that long autolyse periods can result in a dough that’s weaker and, assuming all else is equal, a dough that’s sticky and hard to work with. My theory is the autolyse provides too much time for unbridled enzymatic activity, specifically, an increase in proteolytic activity2 will cause the already delicate dough to lose elasticity (strength).
As discussed above, an autolyse gives enzymes, in this case, amylase, a chance to work efficiently (especially since there is no salt in the dough) and for longer. Because enzymes can be quite active in this environment, performing an autolyse with flour with a low falling number can lead to a troublesome bake. A low falling number indicates high amylase enzymatic activity in the flour itself. If you autolyse for too long, it can result in a sticky, weak dough that potentially degrades through extended fermentation.
Finally, when a formula has significant spelt flour, which is known to typically be very extensible, I’ll skip the autolyse.
Potential Benefits of an Autolyse
Reduced mixing time
A dough that undergoes autolysis will usually require less mixing and kneading time (either by hand or mechanical mixer). By letting the mixture of flour and water rest, gluten bonds will begin forming, and the dough will start to smooth out and soften. Because this happens without mechanical mixing, we can minimize the amount of dough oxidization.
Oxidization (oxidation) generally gets a bad rap. But with bread, some oxidization is good and necessary when mixing and developing a dough—to a point. Oxidization is necessary to develop the gluten matrix in a dough. And as we know, the development of gluten is essential to trap gasses and gain loaf volume. But go too far, and over oxidization from excessive mixing degrades carotenoid pigments, which bring desirable flavor and color to bread crumb and crust3.
Dough oxidization through mixing is good and necessary, up to a point.
But what are over-mixing and over-oxidization? In my experience, it’s tough to oxidize a dough to where color and flavor are stripped from the dough. However, this might happen if you’re mixing at high speed in a professional mechanical mixer for many minutes. If you’re hand mixing, I’d say it would be extremely difficult to reach this state, if not impossible.
So, if it’s tough to over oxidize if you’re not mixing excessively, why autolyse? Besides the list of benefits yet to come, a reduction in mixing time can be helpful in its own right. Mixing at high speed can affect the final dough temperature if not monitored closely. And if you’re mixing by hand, reducing the time you need spent physically mixing the dough can be a blessing. And while the slap and fold technique is very effective at developing a dough, adding even a short autolyse reduces the time needed for mixing.
Flavor and color preservation
This is related to the section on reduced mixing above. When faced with a situation where lengthy mixing is required, adding in a autolyse can help reduce over oxidizing the dough. This helps to preserve overall flavor and crust and crumb color.
Increased extensibility
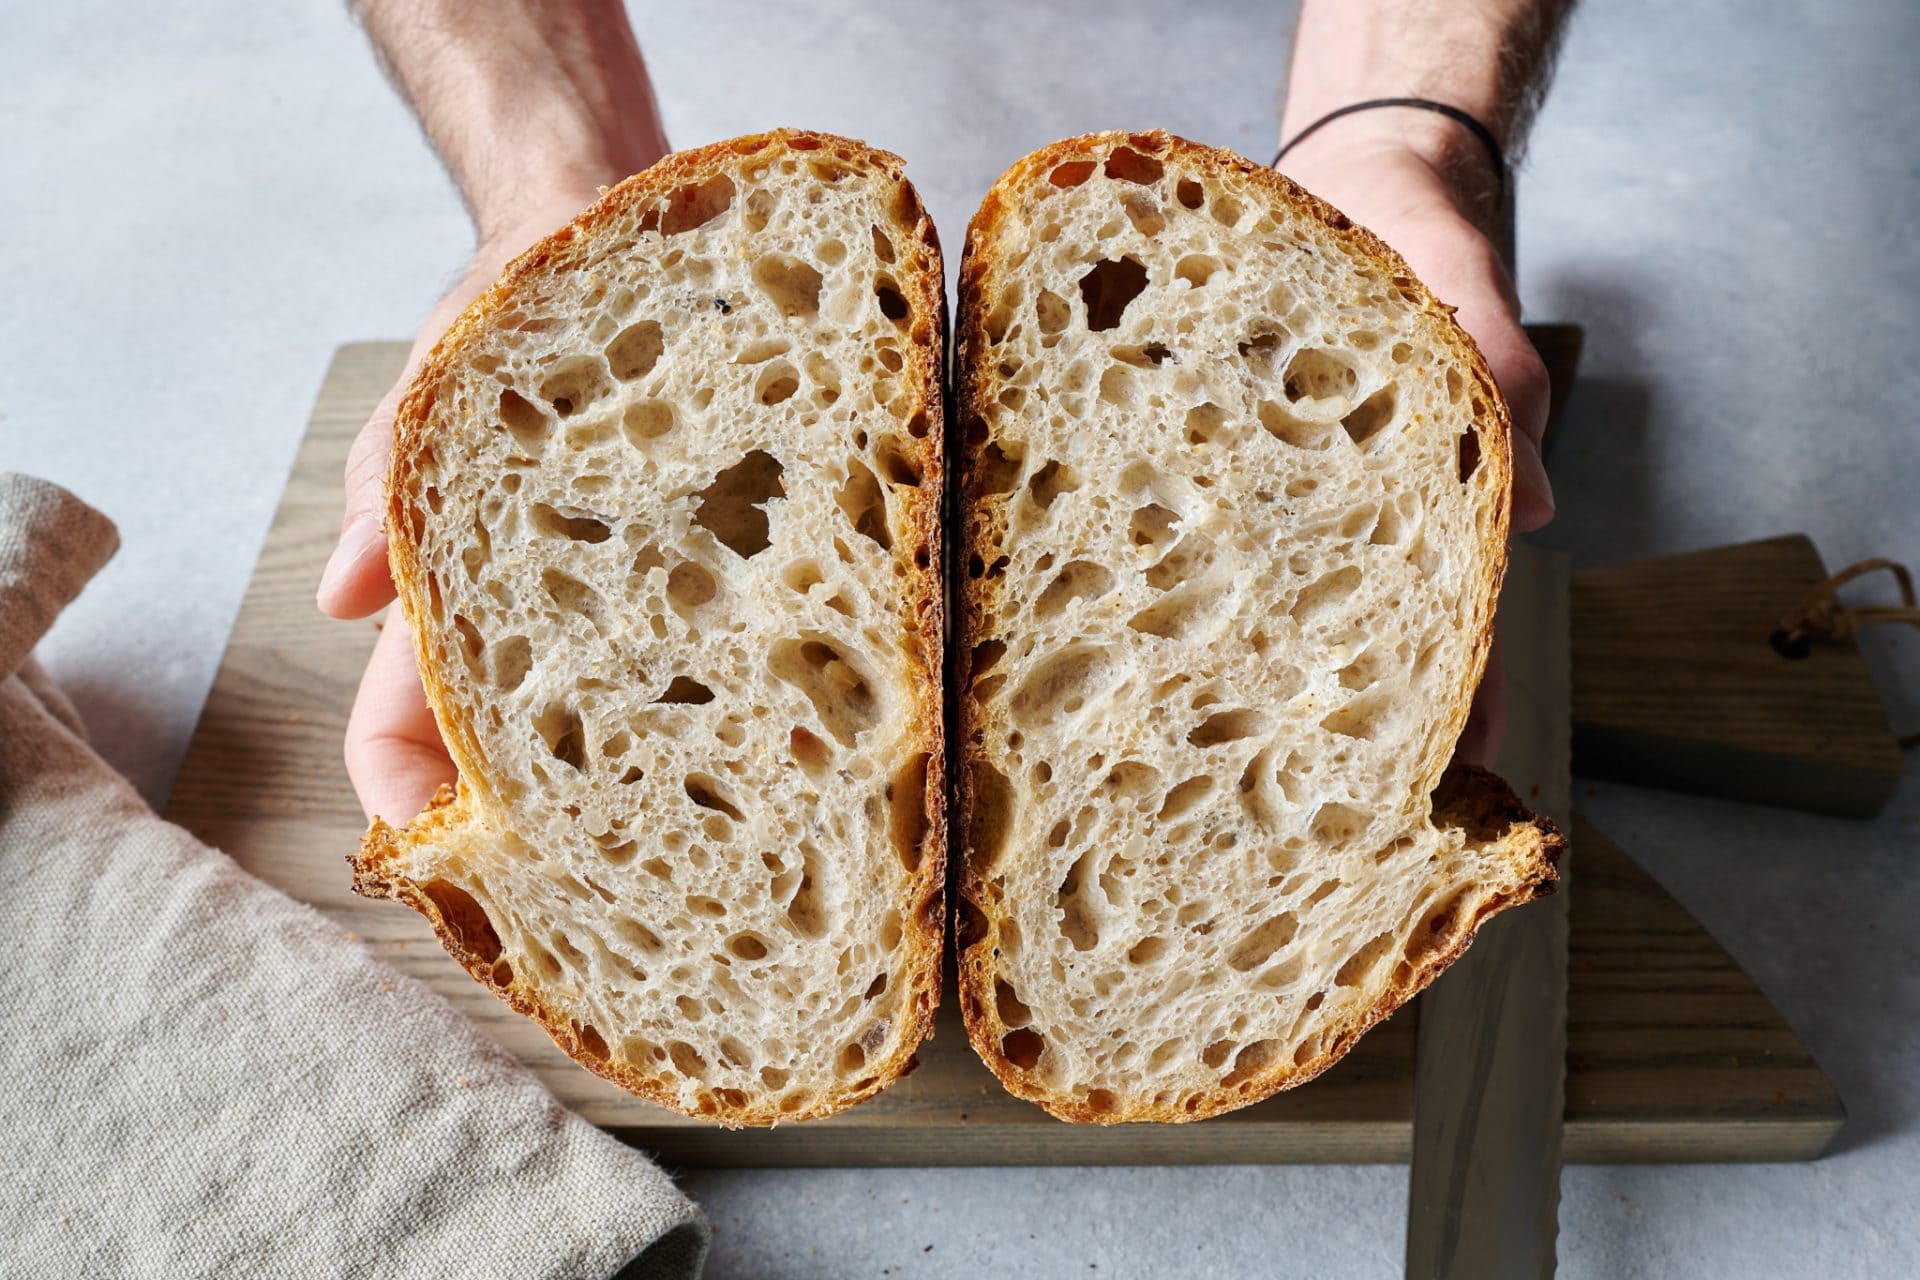
The balance between extensibility and elasticity is incredibly essential in bread baking. Extensibility allows the dough to stretch out farther and avoid tearing. This stretchy characteristic lets the dough fill with gasses created during fermentation for optimal volume. An open and light loaf of bread is vital for the best eating quality.
Potential Drawbacks of an Autolyse
Hard to incorporate ingredients
After you mix the flour and water and leave it to rest, the dough begins to smooth and strengthen. Thus, it can be hard to work additional water and salt into the dough, especially by hand. This mixing difficulty isn’t tremendous (I do it all the time!), but it might be a burden for some.
Added mixing complexity
Depending on your baking setup, it might be challenging to add a step to your baking process. This seemingly small step can add additional scheduling complexity. This complexity is especially evident if you’re baking in a commercial setting mixing multiple doughs each day.
Performing an autolyse requires you to mix your dough to let it rest. If you can’t let the dough sit in the mixer, you have to remove the dough and store it somewhere. Later, you put the dough back into the mixer to finish mixing (and then clean the mixer yet again).
Overall, performing an autolyse is just another step to the baking process that adds up over time.
Can cause excessive enzymatic activity
When a formula calls for significant freshly milled flour, an autolyse can degrade the structure of the dough. This might mean an overly sticky dough and a challenging bake. While I wouldn’t say an autolyse is completely out of the question here, it’s just something to be aware of when planning your bake.
In a similar vein, when the flour has a low falling number—which indicates high amylase enzyme activity—an autolyse can mean a sticky dough that’s gassy and hard to handle. This might happen regardless, but an autolyse can intensify the problem.
Autolyse Test Bake Comparison
I decided to do a quick test of two doughs: both are my Beginner’s Sourdough Recipe, one had the called for a one-hour autolyse, and in the other dough I skipped the autolyse altogether.
Admittedly, this is a very small sample size. But I think it is illustrative of the differences between using an autolyse and not when working with a dough formula like this. Keep in mind that the primary flour used in my Beginner’s Sourdough Recipe is high-protein bread flour, so an autolyse is very beneficial in this formula for all the reasons discussed above.
The two doughs were both mixed by hand only until everything was incorporated. They were not developed in a mechanical mixer and were not strengthened with the slap and fold or other kneading techniques. They were both given the same number of folds during bulk fermentation (3 sets).
Click on the photos below to see a larger version.
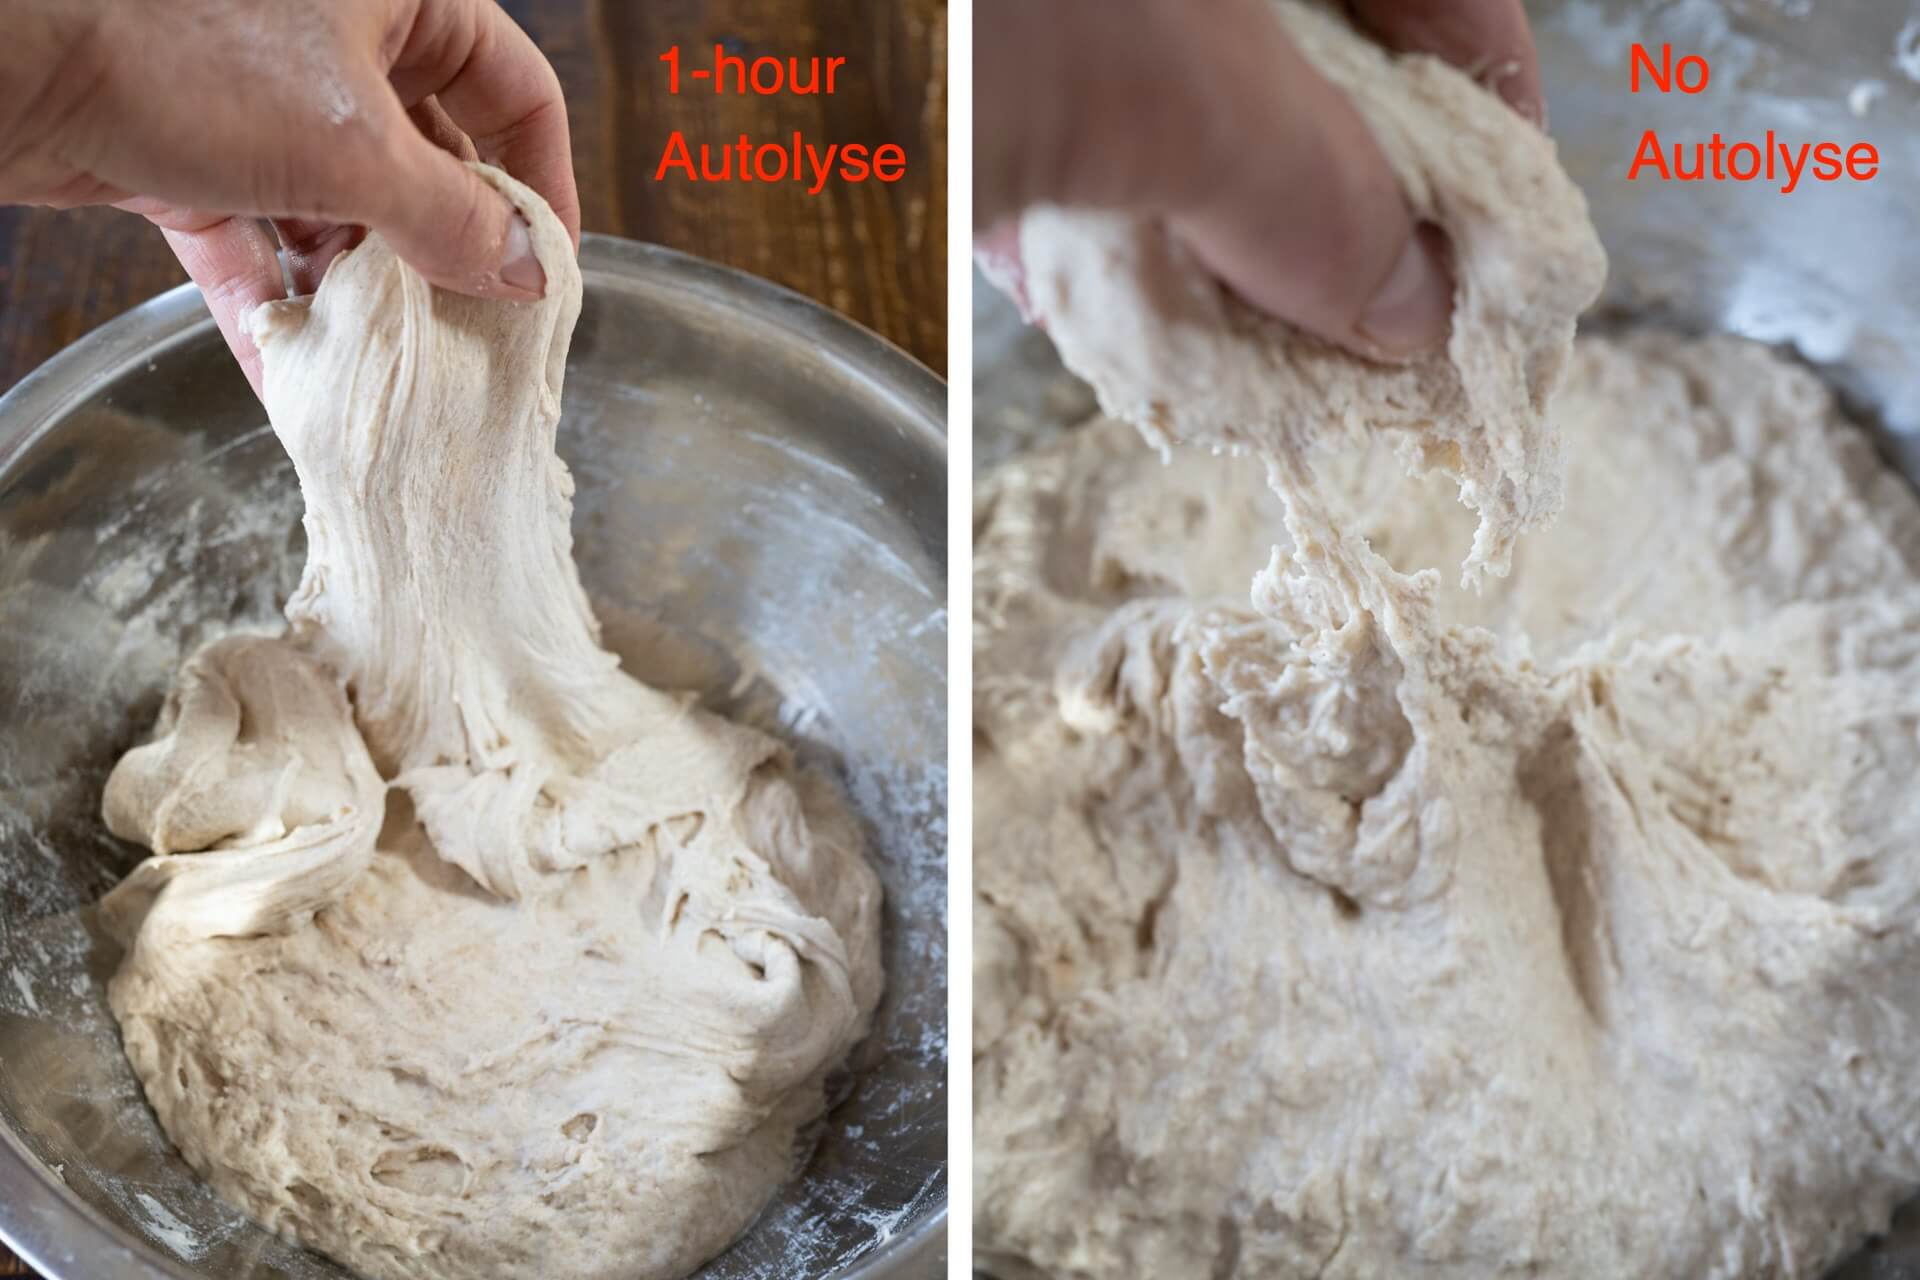
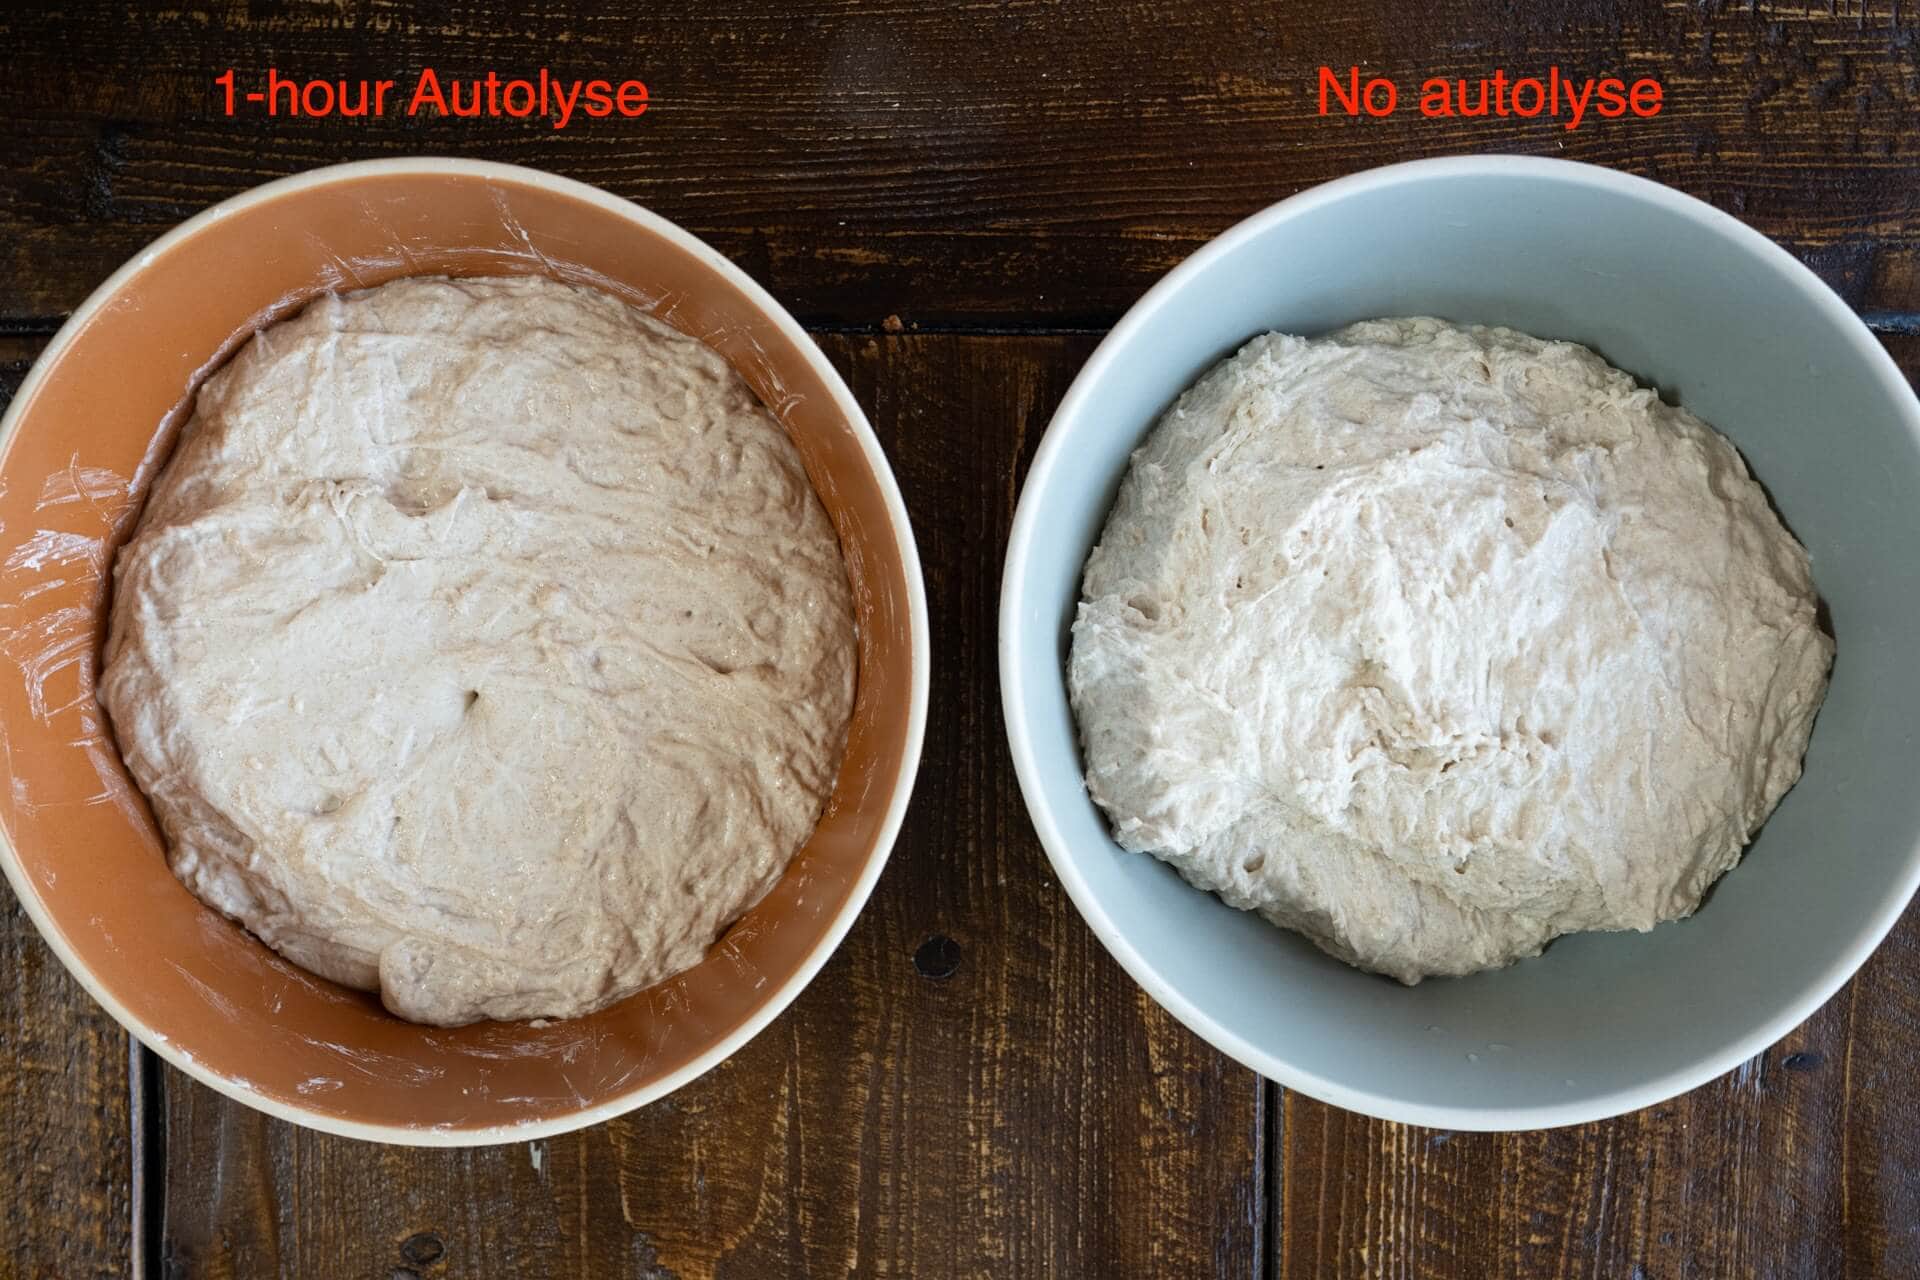
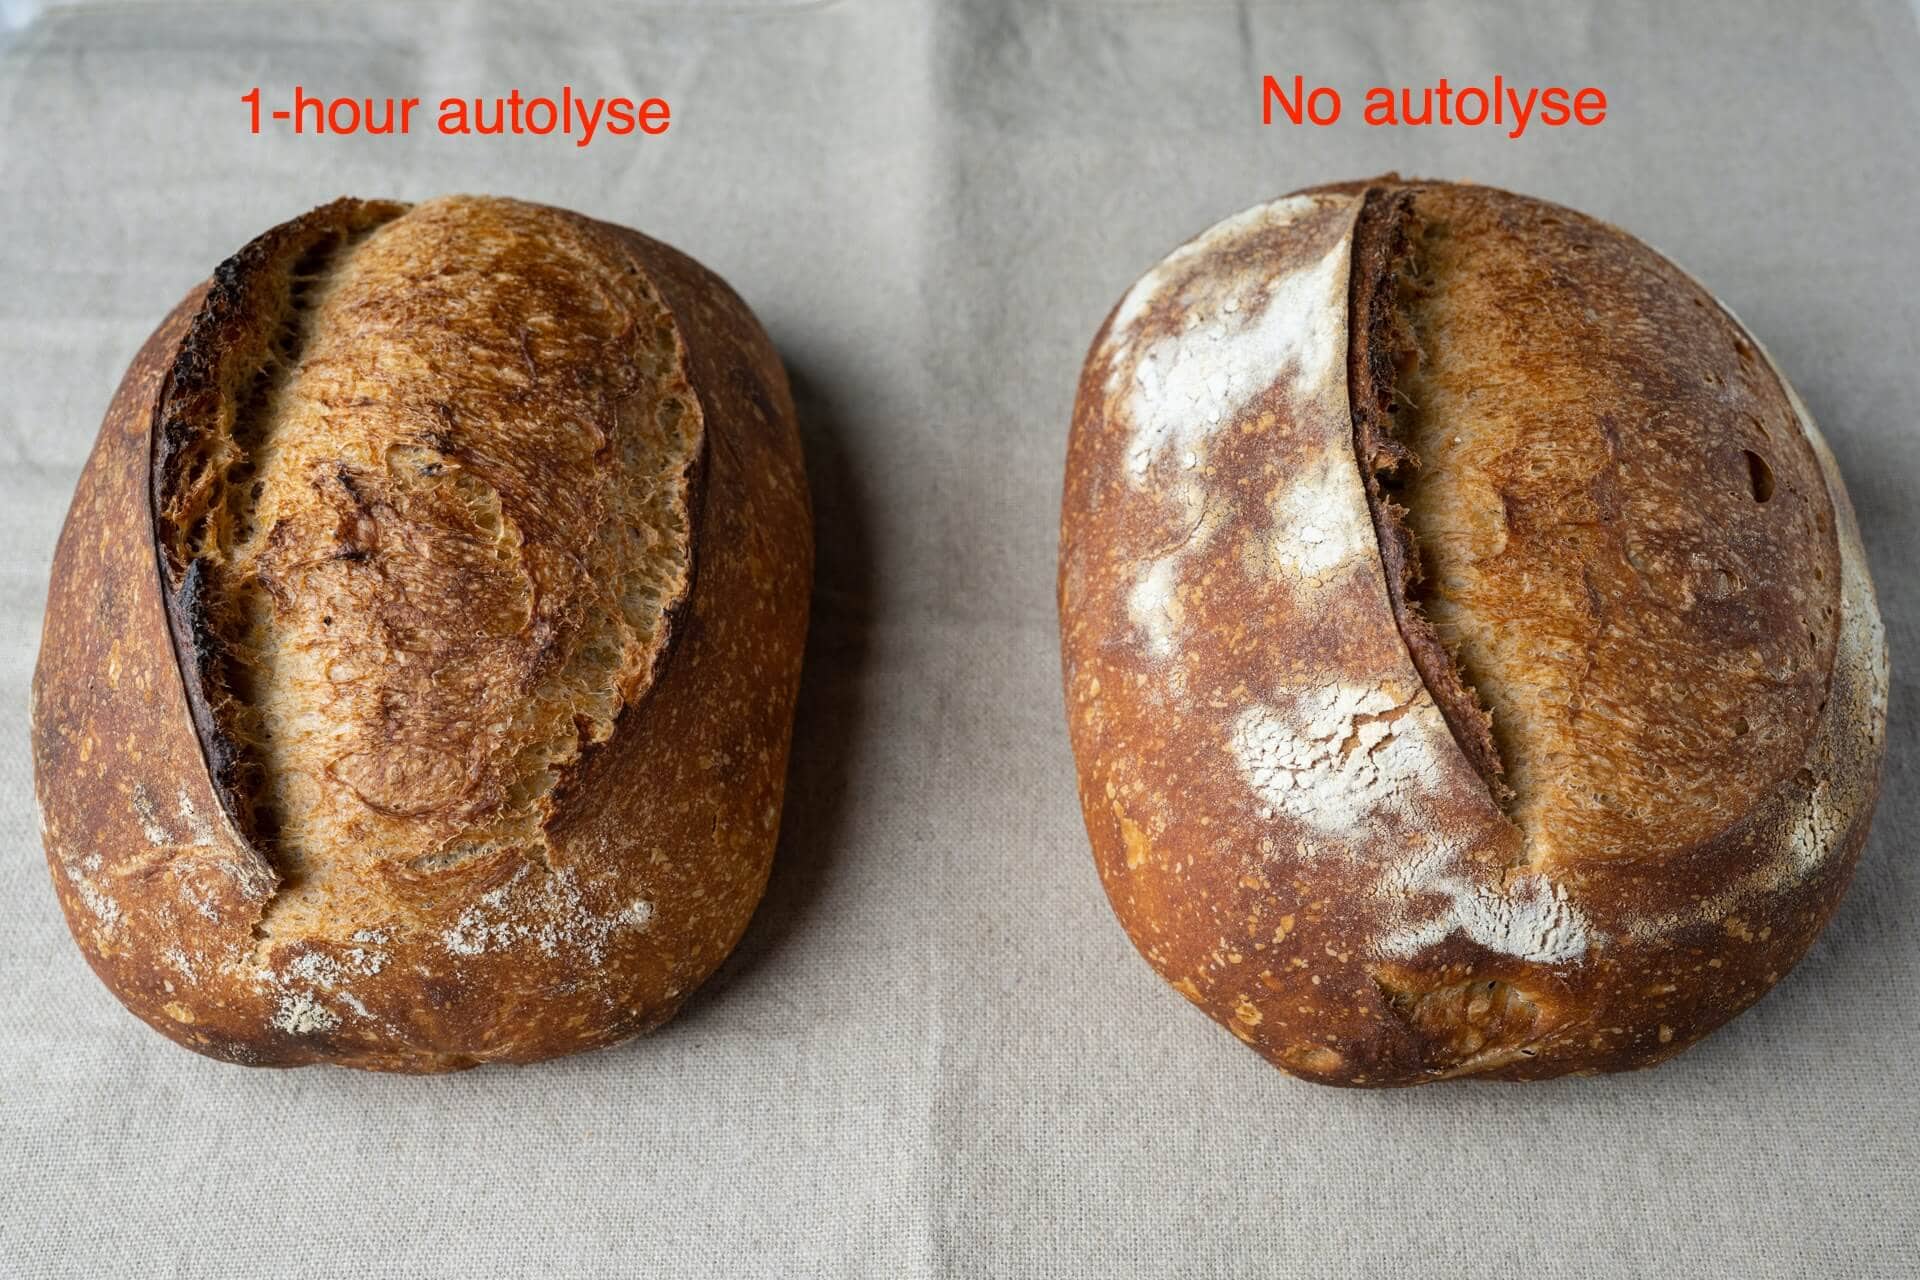
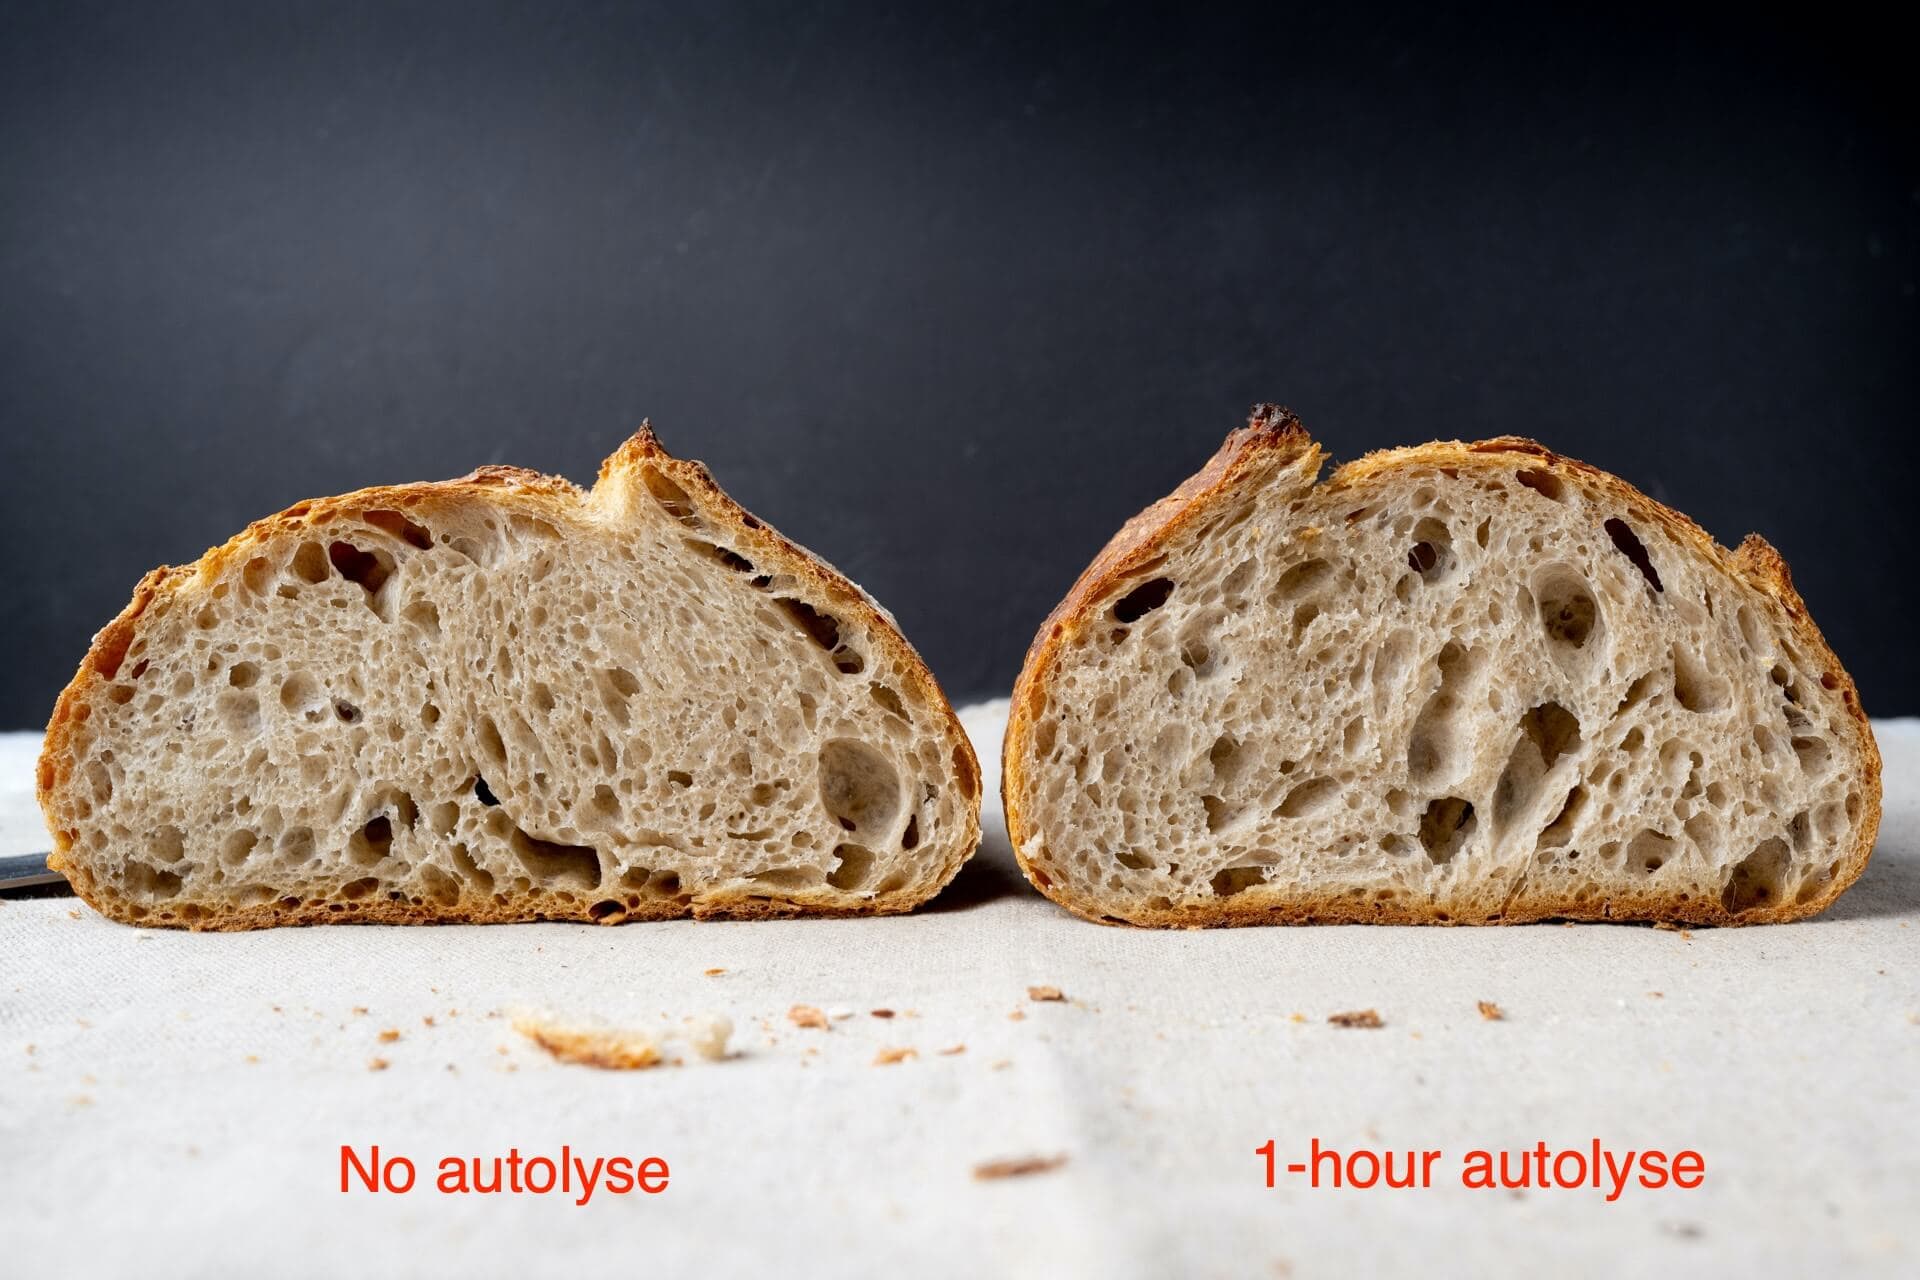
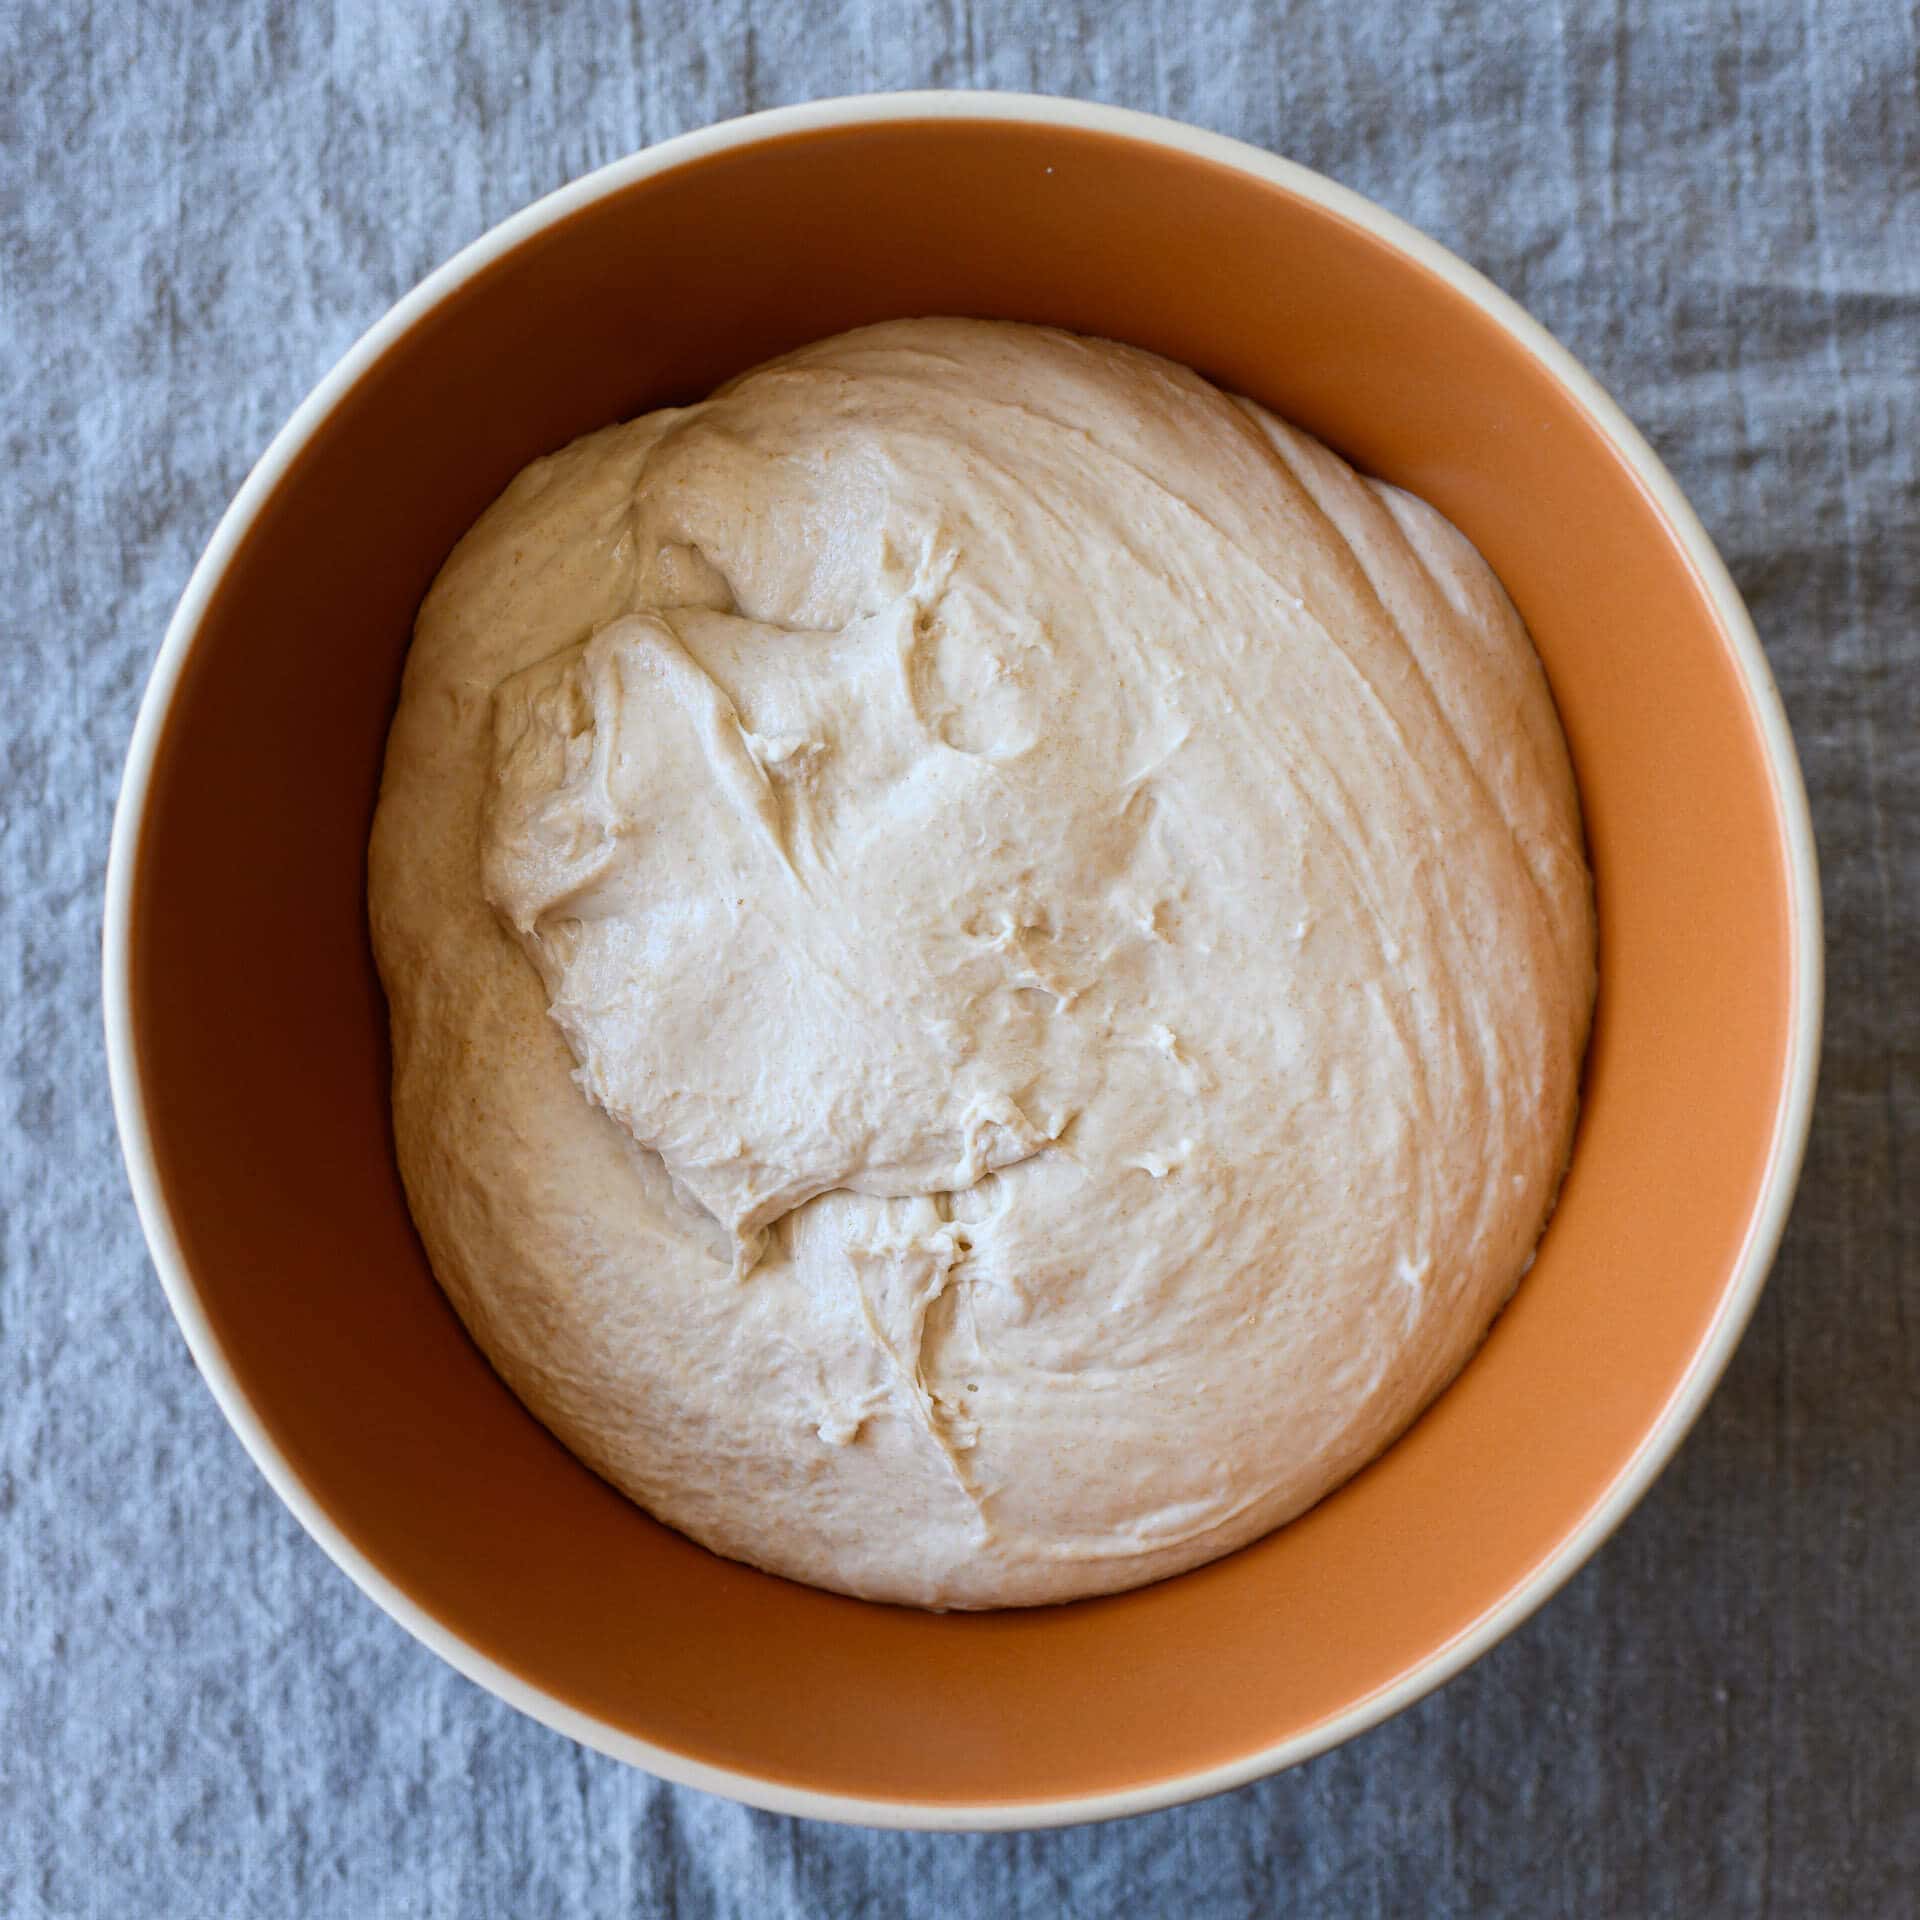
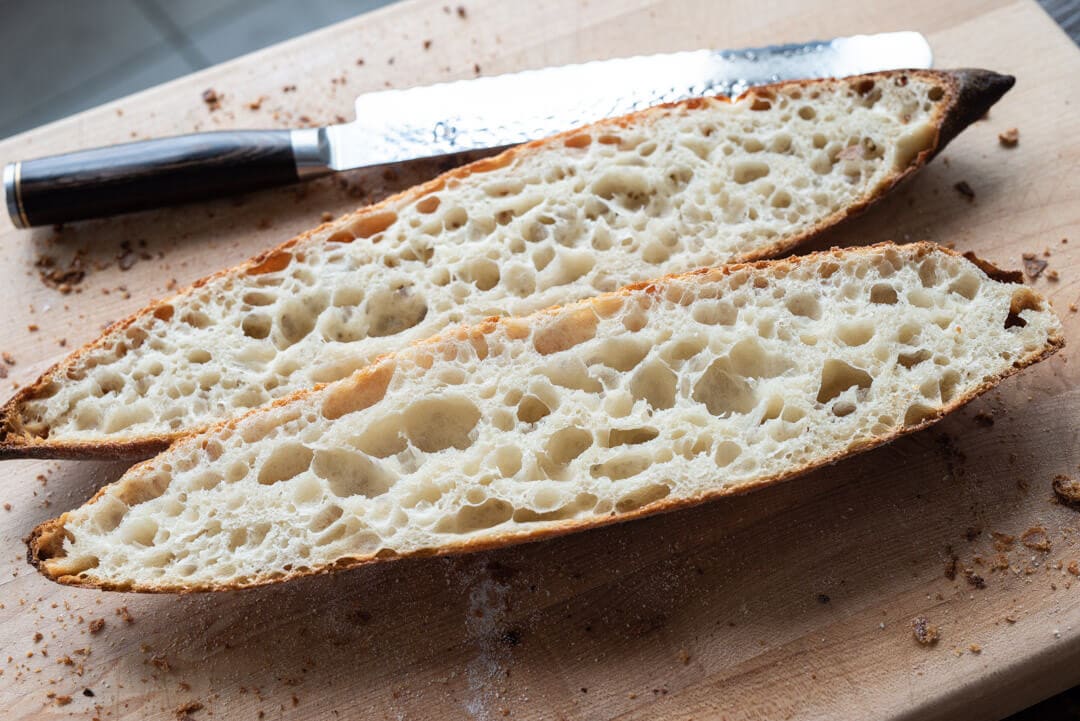
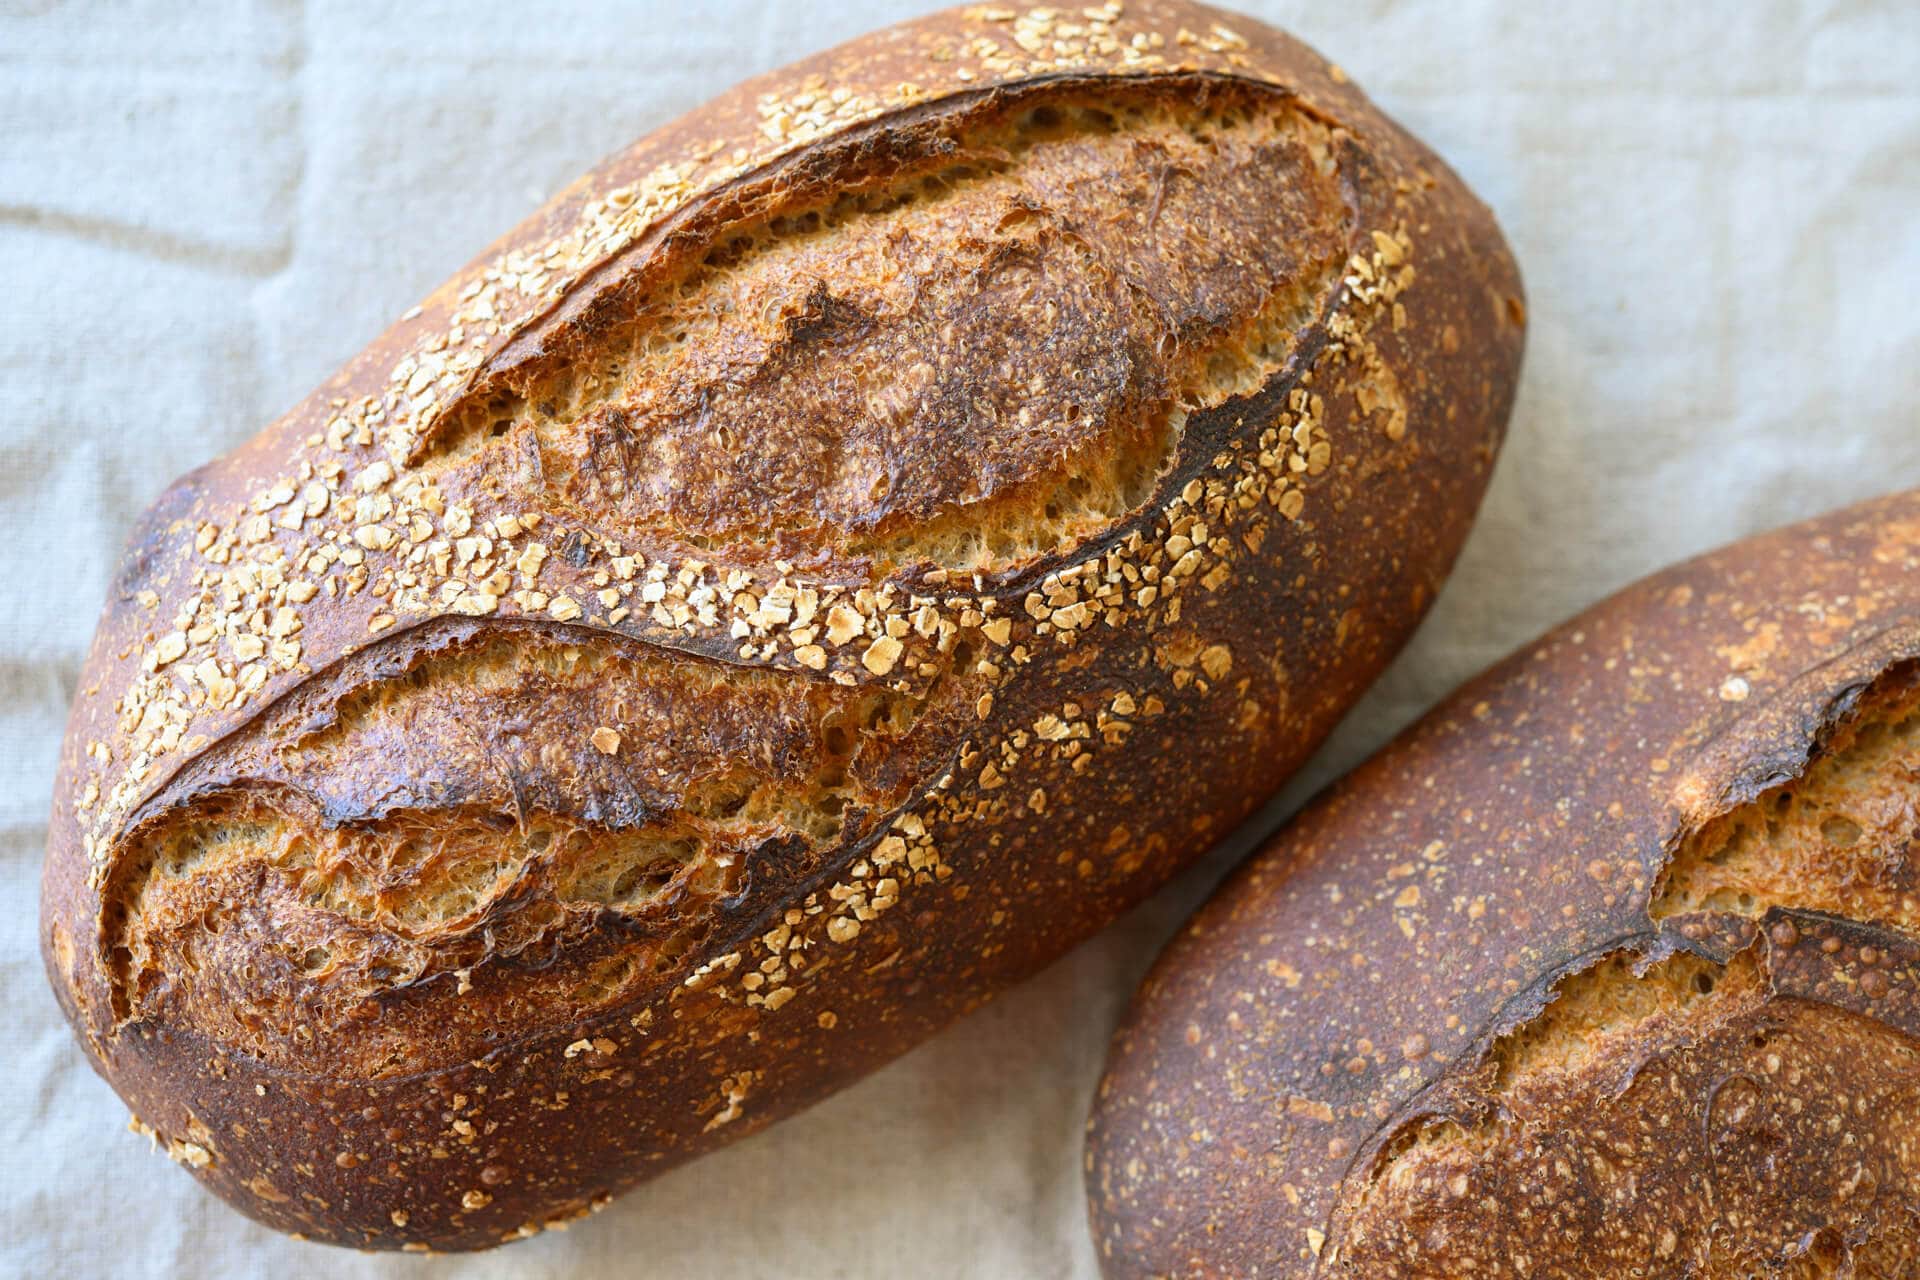
Starting at the left-most image, you can see the difference between the dough with the 1-hour autolyse and the one without. The dough with the autolyse was smoother, stronger, and very extensible, stretching out significantly before resisting and tearing. The dough without autolyse was shaggy and tore apart readily. This difference continued into bulk fermentation in the second photo, where the dough on the left (in the orange bowl) had the autolyse; it was smoother and more cohesive. In the last two pictures, you see the loaf with the autolyse had slightly more dramatic crust colors, and it had a little more volume with a more open interior.
When I was preshaping and shaping the doughs, it was immediately apparent the dough without autolyse was shaggier and weaker. This dough required more input to get it into proper form. If I were not doing a side-by-side test with this dough, I would have either mixed it longer or given the dough more stretch and folds to compensate for the lack of strength.
The dough that had the autolyse was smooth, elastic, and more comfortable to shape. Because it was easier to handle, it helped me be gentle with it during preshaping and shaping. More delicate handling during preshape and shaping helped me ensure a better final shape and a more open interior. Further, the increased extensibility in the dough allowed for an improved rise during proof and bake.
While this comparison is illustrative of the processes at work with an autolyse, it doesn’t outright mean an autolyse will get you better volume, crust color, and a more open interior. An autolyse can help you along the way to achieving these things, but it still requires you to tend to the necessary parts of any bake: strong fermentation, sufficient dough strength, and a full, complete proof.
A Brief History of the Autolyse Technique
I wanted to include a brief history of the autolyse technique to firmly plant where it came from and why it was “invented.” It’s vital with baking (and many things) always to see the context for why things are done so we can understand where and when they are appropriate.
In the case of the autolyse technique, Professor Raymond Calvel, author of The Taste of Bread (which is an excellent book for any baker’s bookshelf), outlined the autolyse technique to help combat the intensive mixing that was commonplace during his time (around 1970). These intensive mixing practices led to bakers producing bread with a bleached-out crumb color and bland flavor profile. Most of this was due to excessive mixing and the use of dough enhancers. His goal was to return optimal color, taste, and texture to the bread.
By implementing a short autolyse period before mixing, it was possible to reduce the overall mixing time. In doing so, excessive oxidization was eliminated. And as discussed above, having the appropriate oxidization when mixing means improved crumb color, flavor, and texture.
What’s Next?
I hope this guide covers all the basics of how, when, and when not to autolyse your sourdough bread dough. For more foundational techniques, be sure to read the beginner’s guide to sourdough bread.
If you’re looking to take your first step in using the autolyse technique, check out these recipes which use an autolyse:
Brown rice and sesame sourdough bread recipe

Simple Weekday Sourdough Bread
Spelt, Rye, and Whole Wheat Sourdough Bread
Or, head back to learn more about all 8 steps to making sourdough bread.
A big thanks goes out to Ian Pope for all the great discussions on this topic!