
Having just recently devoured every episode of the inspirational Michael Pollan series Cooked on Netflix1, I came away with a sudden urge to drop everything and get some fresh dough between my fingers and mix up this spelt sourdough bread. Throughout the entire series, he was on screen rallying behind slow food, especially so in the “Air” episode where Pollan points out that humanity lost something when we transitioned from quality, slow food to abundant, fast food—most significantly when it comes to bread. There’s truth to the old saying that all good things take time, right? I agree.
With this amped up baking gusto I’ve been baking more and more this past month, not only baking my staple weekly bread but also milling fresh spelt flour and testing a spelt sourdough formula. Chances are you’ve heard of spelt, an ancient species of wheat that has been used since long ago, and as Pollan alluded to, you feel a sort of connection with ancient bakers when baking bread this way, and especially for me with this ancient grain.
There are many ways to ferment food, and he goes into the science behind the magic of fermentation: how through a lengthy process flour and water are transformed from raw, inedible ingredients into something not only edible but delicious. This fermentation makes food more bioavailable for humans, and in many cases, it adds significant flavor. And oh is spelt delicious! It has a slightly nutty taste that also gives the crust a refreshing bite to it—a little thicker and a little crunchier. Spelt is known for its extreme extensibility (the ability to stretch out before resisting or tearing), and at high percentages, it can be a little tricky to incorporate into a dough formula — the dough feels perfectly strong at the beginning of bulk fermentation, but it becomes slacker by the end.
As I’ve heard some bakers say, baking takes a lot of time, but for the most part, it’s not your time.
Michael Pollan
To adapt, I quickly realized I needed to back off from my usual high hydration2 and also add in a little more strength to the dough through mixing. But still, be ready for some spreading on the counter at the end of pre-shape and cut it short if necessary. This bread harkens back to my oat porridge sourdough which displays many of the same characteristics.
For this bread, I built strength at the get-go through a few minutes of slap/fold and then utilized my traditional stretch and folds during the bulk. If you prefer only to do stretch and folds in the bulk container, load the front of bulk with a few more sets than usual. For example, perform four sets in the first hour of bulk at 15-minute intervals, and then continue with this recipe as outlined below.
Flour Selection
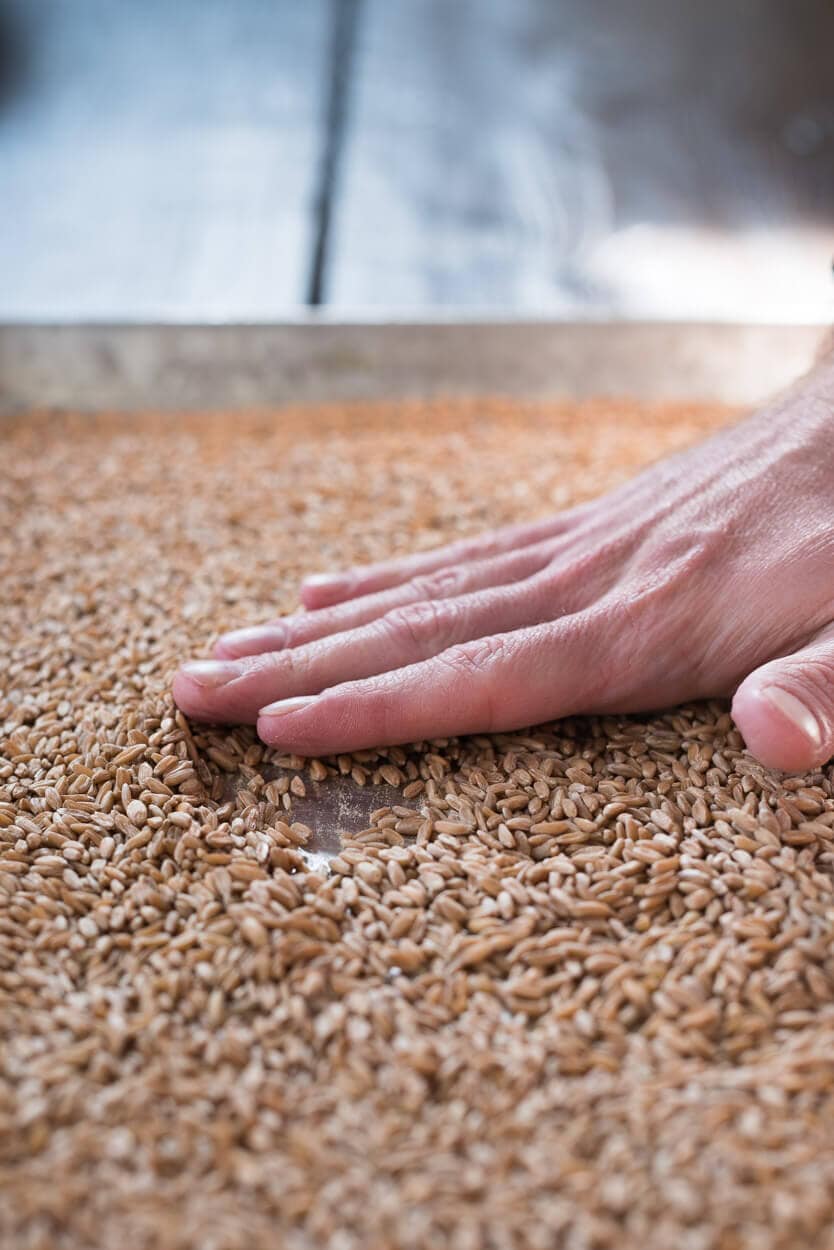
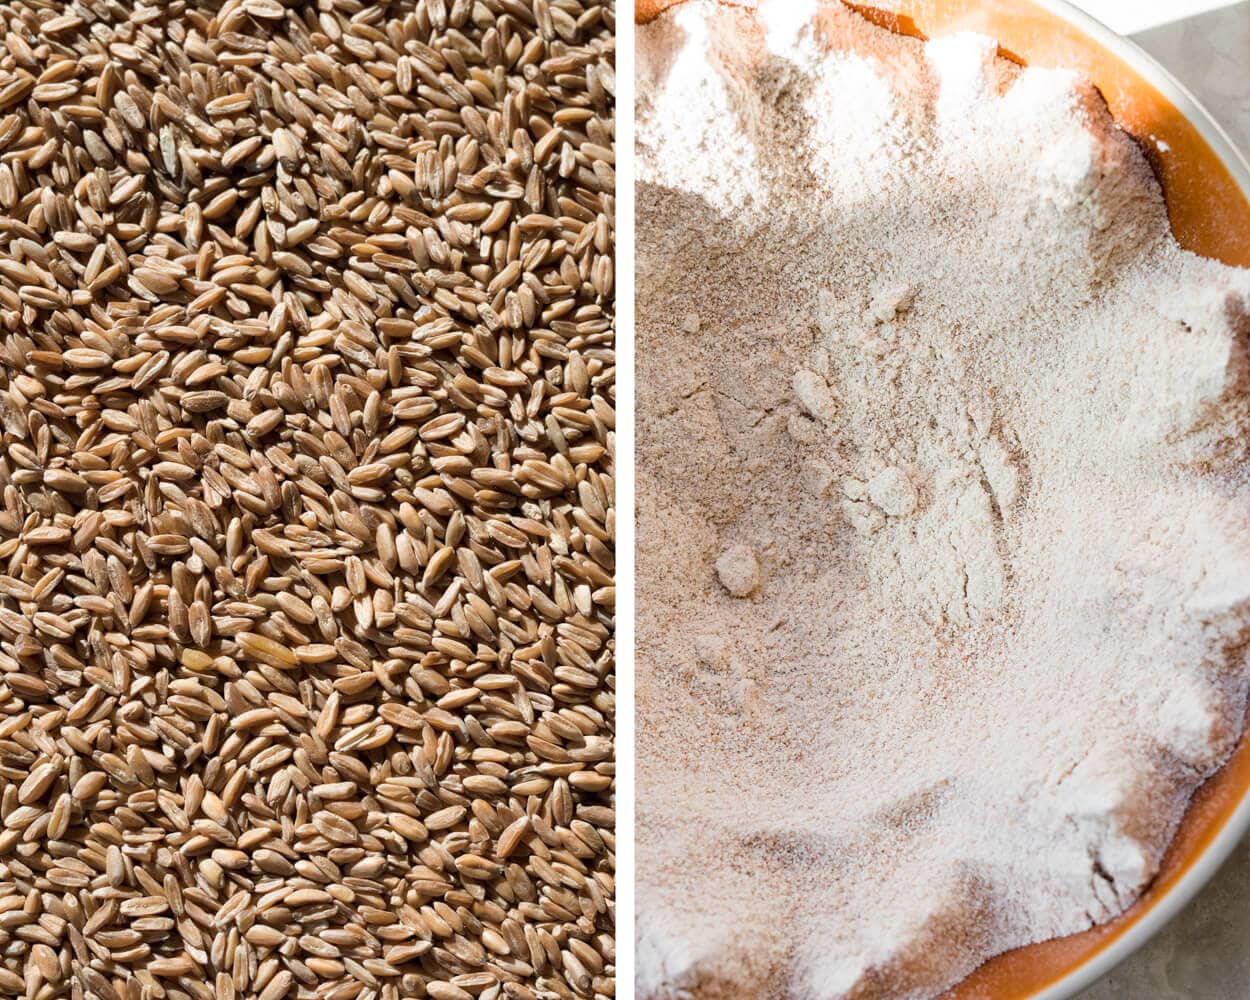
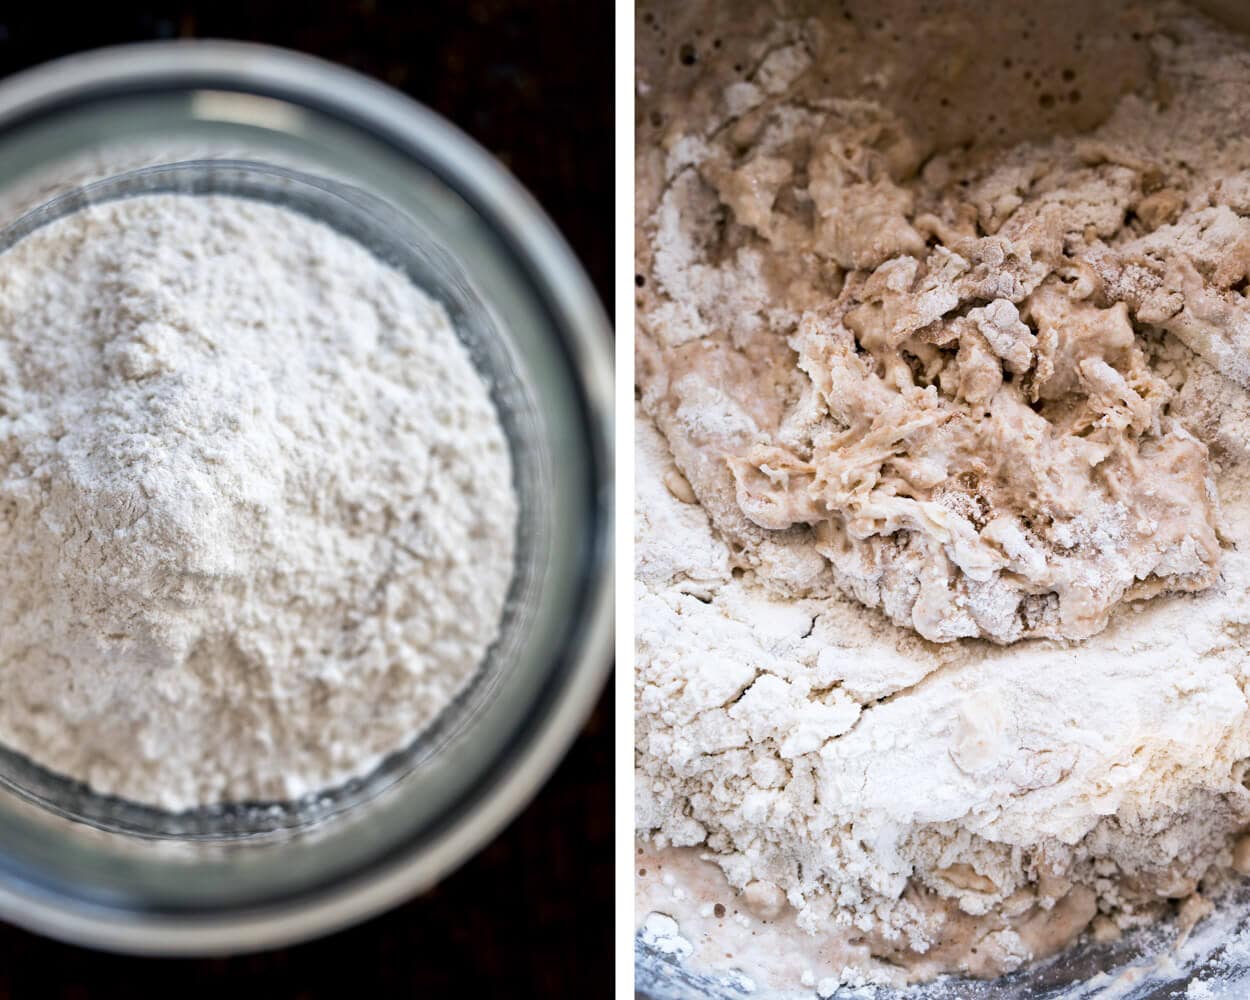
An important step when milling fresh flour is first to inspect your grain. I’ve experienced a varying level of cleanliness when it comes to the berries I’ve purchased, some having hardly a rock or pebble whereas others have a few more. You do not want this debris finding its way into your mill, let alone your bread. I first weigh out the amount of grain per my formula requirements, plus a few extra grams, and then dump the grain out onto a clean baking sheet. This process lets me quickly pick through the berries looking for anything out of place. Even with quite a bit of grain to inspect I can do this rather quickly. Once I have picked over the grain, it goes straight into my mill to be hand-milled: a slow process that produces an exceptionally fine flour. By keeping the flour temperature low, I’m able to retain more nutrients and essential oils present in the grain.
I don’t expect many to have a grain mill at their disposal if you don’t check with your local market to see if they have whole grain spelt flour for sale, chances are they will. If you can only find white spelt flour that will work just as well3, perhaps with a little less overall flavor. If you use aged spelt flour, please see my note about the levain percentage at the beginning of the formula below.
My formula also calls for “type 85” flour, which I source from Central Milling. If you don’t have type 85 on hand (I don’t expect many to have this) a good way to approximate this high-extraction flour is to mix half bread flour with half whole wheat, as described by Chad Robertson in Tartine No. 3. I like the level of extraction of this flour, it has just the right amount of bran/germ left to provide serious flavor but just enough removed to provide strength and loft still. I am relying on the strength of this flour to help support the extreme extensibility of the spelt at this hydration, and the added whole wheat flavors are just icing on the top.
Spelt Sourdough Formula
If any of the terms or steps below are new to you, have a look at my Beginner’s Sourdough post from a few weeks ago for more description and photos of each.
You will notice this formula has a low percentage of levain used in the Dough Formula (the pre-fermented flour is only 3.9%). If you are not using freshly milled spelt you might want to increase the levain from the 10% I used to around 15% or so. Just keep an eye on your dough during bulk and if it looks like it’s moving slow at 15%, lengthen bulk until the dough seems ready, and vice versa. Be flexible.
Vitals
Total dough weight: 1800g
Pre-fermented flour: 3.90%
Hydration: 85%
Yield: 2 x 900g loaves
If you want to halve this recipe, take all ingredients in the Dough Formula section and divide by 2, keep the Levain Build as-is (but still reduce the amount of levain in the Dough Formula by half).
Levain Build
| Weight | Ingredient | Baker’s Percentage |
|---|---|---|
| 25g | Mature liquid starter (100% hydration) | 50% |
| 25g | Central Milling Type 85 | 50% |
| 25g | Giusto’s Artisan Bread Flour | 50% |
| 50g | Water | 100% |
Dough Formula
Note that the baker’s percentages listed below are with respect to the final dough ingredients and do not take into account the levain. In other words, the levain ingredients are not represented in the percentages below.
Target final dough temperature (FDT) is 78°F (25°C).
| Weight | Ingredient | Baker’s Percentage |
|---|---|---|
| 362g | Giusto’s Artisan Bread Flour | 39.59% |
| 285g | Freshly milled spelt | 31.22% |
| 267g | Central Milling Type 85 | 29.19% |
| 771g | Water | 84.39% |
| 22g | Fine sea salt | 2.45% |
| 93g | Ripe, liquid levain | 10.15% |
Method
1. Levain – 10:00 a.m.
Build the liquid levain in the morning and store somewhere around 78°F (25°C) ambient for around 5-6 hours.
2. “Autolyse” (with levain) – 3:15 p.m.
I used the word “autolyse” in quotes because this isn’t a true autolyse (which is simply flour and water). Because I’m letting the dough rest for only 30 minutes, I decided to add the levain along with mixing the flour and water.
Mix flour, water (reserve 100g water for further mixing later), and the levain in a bowl until all dry bits are hydrated. Cover bowl and store somewhere warm for 30 minutes.
3. Mix – 3:45 p.m.
Sprinkle the salt on top of the rested dough and use the remaining water to help dissolve. Pinch through the dough with your hand and mix until all the water is incorporated. The dough will break apart a little and then come back together — it should only take a few minutes.
To build some more strength in this dough at the beginning I did slap/fold for about 5 minutes, just until it starts to show signs of a smooth surface. If you aren’t comfortable with the slap/fold method or don’t like it, you can do stretch and folds in the bowl until your dough tightens up and becomes smooth and slightly hard to stretch out and fold over—medium development.
Transfer the dough to a tub or thick-walled bowl and cover for bulk fermentation.
4. Bulk Fermentation – 3:50 p.m. to 8:20 p.m.
At 78°F (25°C) ambient temperature, bulk fermentation should go for about 4.5 hours. Watch the dough here and shorten or lengthen bulk fermentation based on how it’s developing. There are a few signs to look for that signal the end of bulk fermentation:
- the edges where the dough meets your container should be slightly domed (convex)
- your dough should have risen anywhere between 30% – 50%
- if you slightly jiggle your bulk container, the dough should also jiggle and look alive
- if you wet your hand and tug at the dough, it should provide some resistance and want to pull back
Perform four sets of stretch and folds during the bulk, spaced out by 30 minutes (your first stretch and fold will be 30 minutes after you finished mixing). Be vigorous with your first set of stretch and folds (really stretch that dough up and high, just until it starts to show resistance and before it begins to tear) and be more gentle with the remaining sets. After your last stretch and fold, let the dough rest in the bulk container for the remainder of the bulk time (for me it was 2.5 hours).
5. Divide & Preshape – 8:20 p.m.
Divide the dough into two masses. Lightly shape each mass into a round and let rest for 20 minutes uncovered.
6. Shape – 8:40 p.m.

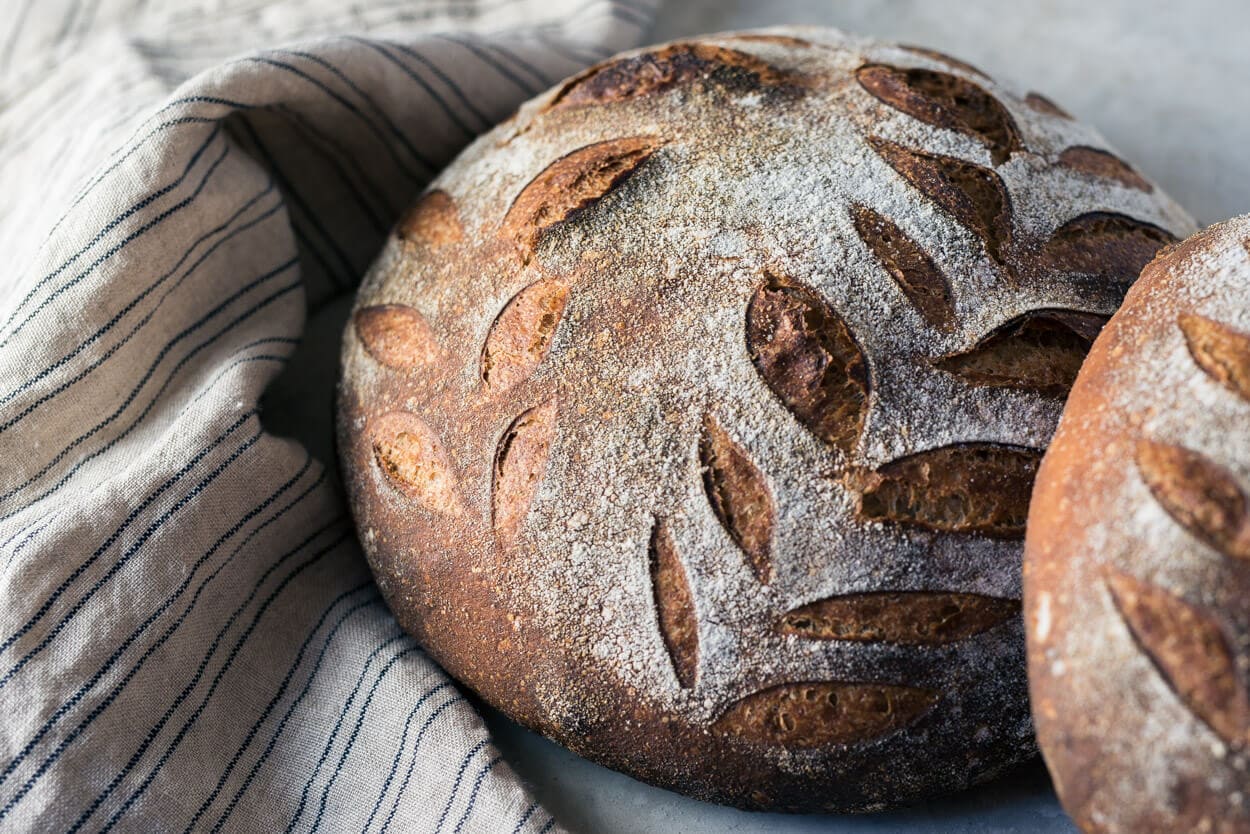
Lightly flour the top of your dough rounds and flour the work surface. Flip each round and shape into a boule. Try to get some good tension on the top of these loaves, but don’t over-handle the dough. After shaping, let rest on the bench for a few minutes and then place into a banneton seam-side-up. I prefer to use linen-lined bannetons for this moderately wet dough: it removes easier from the basket, and any liquid that escapes from the dough will go into the linen, which is far easier to clean. Only lightly dust the bannetons with white rice flour, just enough so the dough easily removes from them but no more.
7. Rest & Proof – 9:05 p.m.
Cover your banneton with plastic tied tight and let the dough rest on the counter for 25 minutes. Then, retard in the refrigerator at 38ºF for 14 hours.
8. Score & Bake – Next Morning: Preheat oven at 9:00 a.m., Bake at 10:30 a.m.
Preheat your oven to 450°F (230°C).

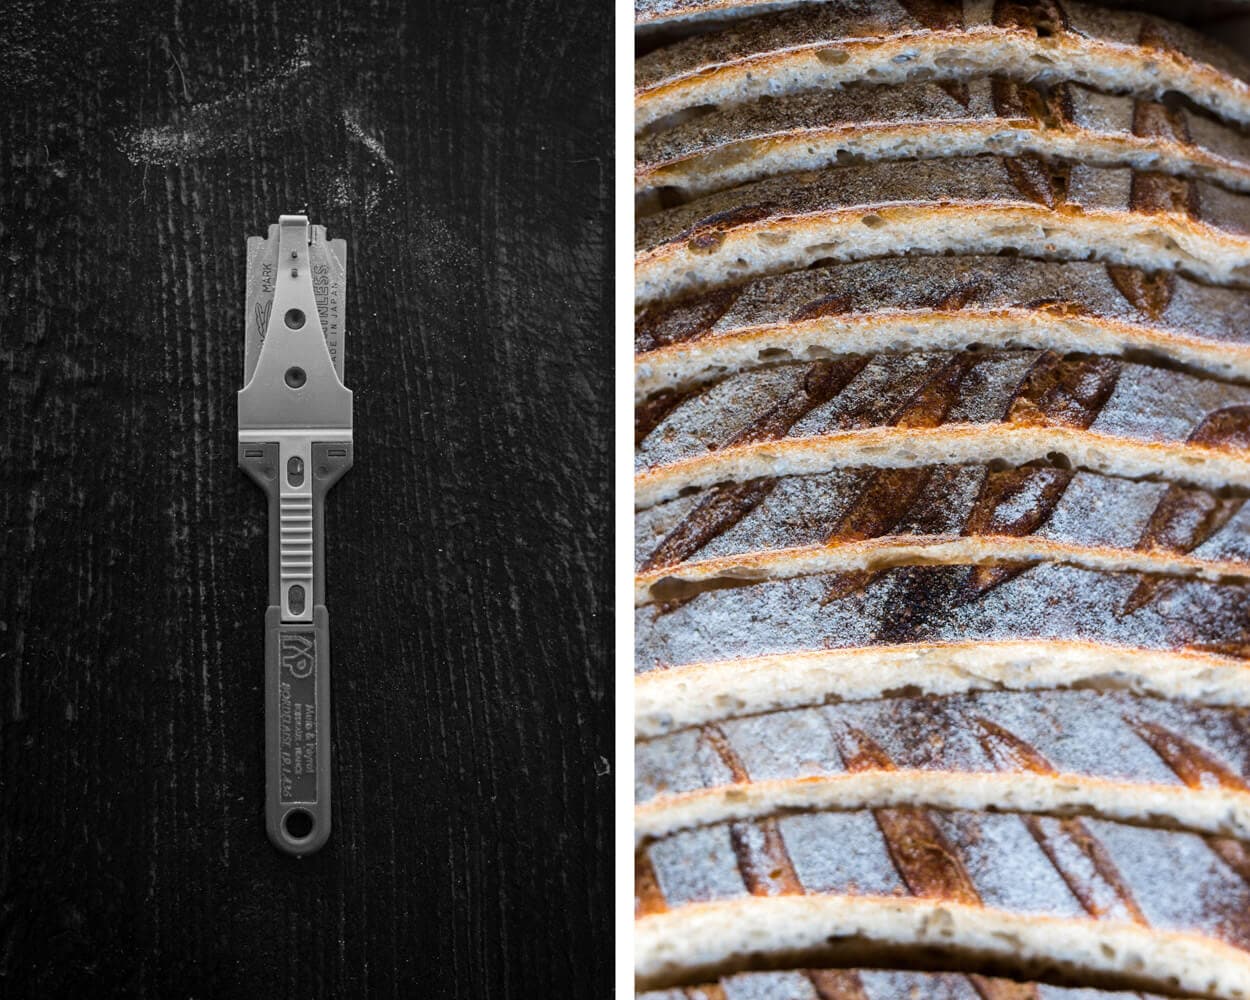
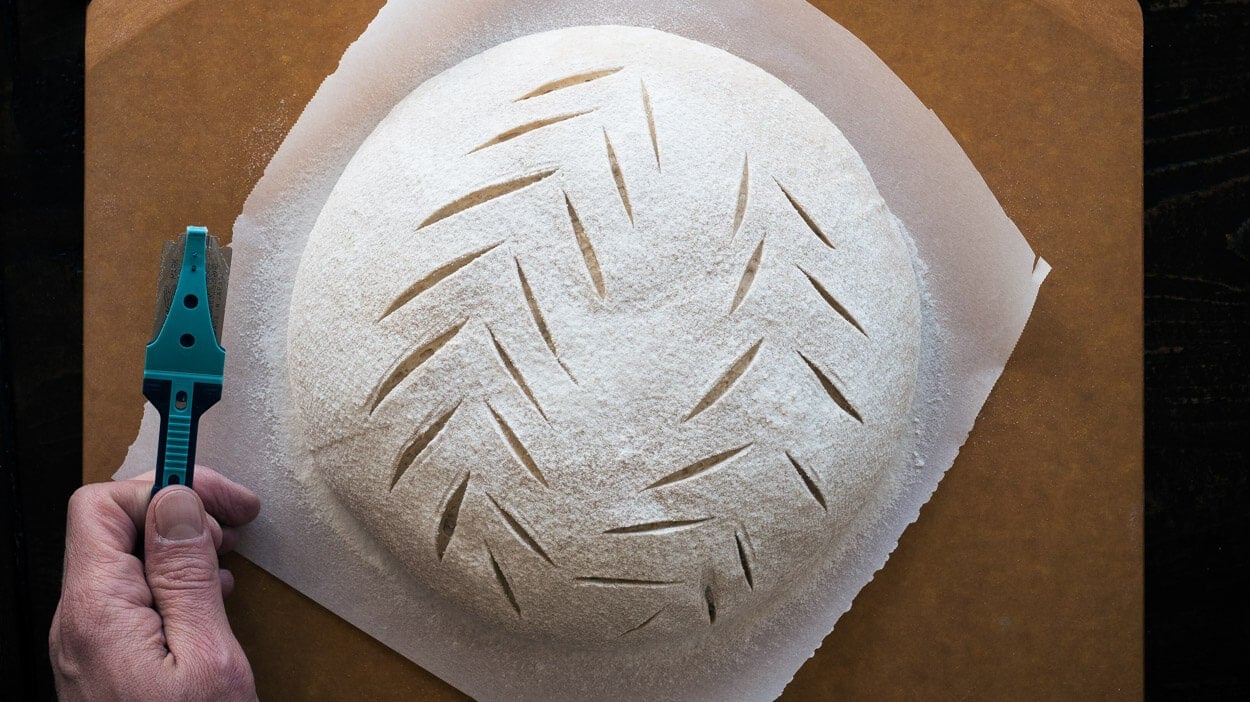
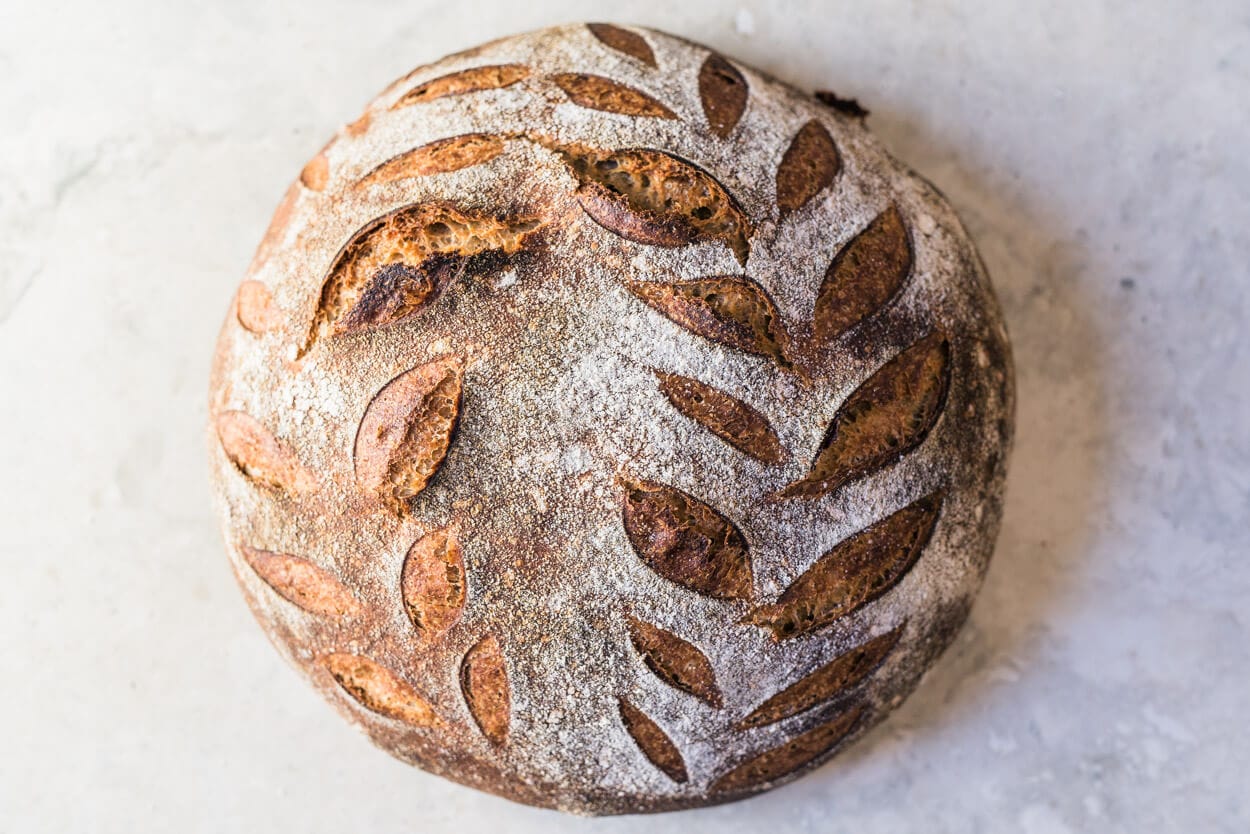
Take out your first boule and cut a piece of parchment paper to fit over your round banneton. Place the peel on top of the banneton and quickly invert the entire stack (banneton, parchment, and peel), gently pull off the basket and your dough should now be resting on the parchment that’s on top of the peel. Using a small sifter and some white rice flour lightly cover the entire boule with flour. Then use your bread lame to score the top. You can see the process below.
To ensure your design stays intact in the oven don’t mist your loaves with any additional water if this is your usual procedure. Drag the parchment paper directly into your preheated Dutch oven, if using, or slide right onto your hot baking stones.
I baked these loaves using a Dutch oven a few times but also straight on my baking stones with steam. Both methods produce an excellent loaf, but I do find that using my Dutch oven produces a slightly thicker crust.
Bake 20 minutes with steam. After 20 minutes vent your oven (or remove Dutch oven lid and place next to the bottom in the oven), and finish baking for about 30-35 minutes. Go for a nice dark color on the crust. Remove from the oven and cool on wire racks.
Conclusion
I’ve seen may bakers fall head over heels for spelt and after baking with it, I get it. The flavor is delicate but heady at the same time, at 30% I appreciate all that extra flavor and depth it brings to this bread. Lately, I find myself gravitating more and more toward bread with higher percentages of whole grain, mostly for the flavor but also for the added health benefits. Because I’ve used spelt in so many other things around my kitchen I think some incarnation of this bread will become a mainstay in my regular baking rotation—I just posted a variation of this bread, a multigrain sourdough with spelt that’s different but incredibly delicious!
Crust
As I mentioned, earlier this crust is a particular thing. It’s thicker, for sure, but not in an unpleasant cowhide sort of way. It’s thick but soft and crackles easily as you rapidly make your way through a slice. It’s hard to compare this crust to anything else. I’m drawing blanks as I sit here trying to find an analogy for the beautiful texture. If you’ve read other posts here at my site, you’ll know that I’m a total crust snob and this bread surpasses any expectation I had at the onset.
Crumb
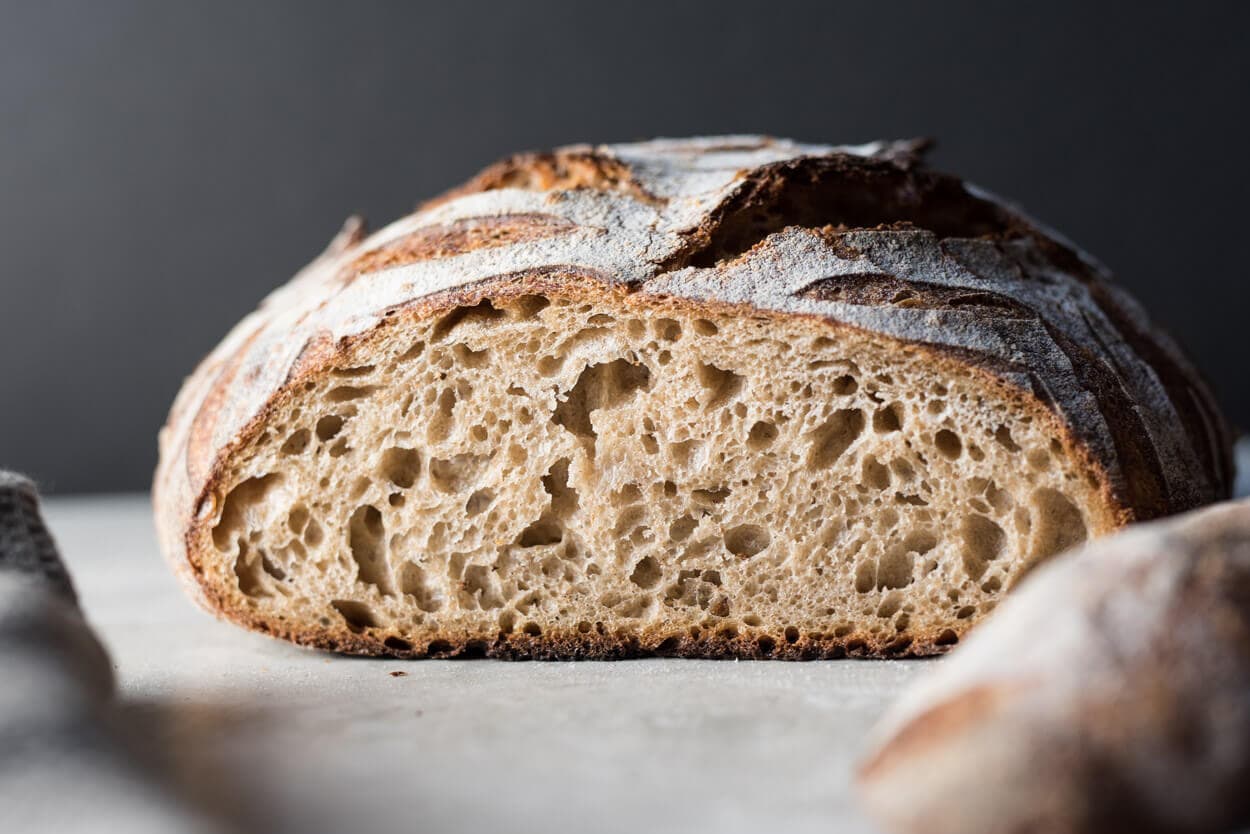
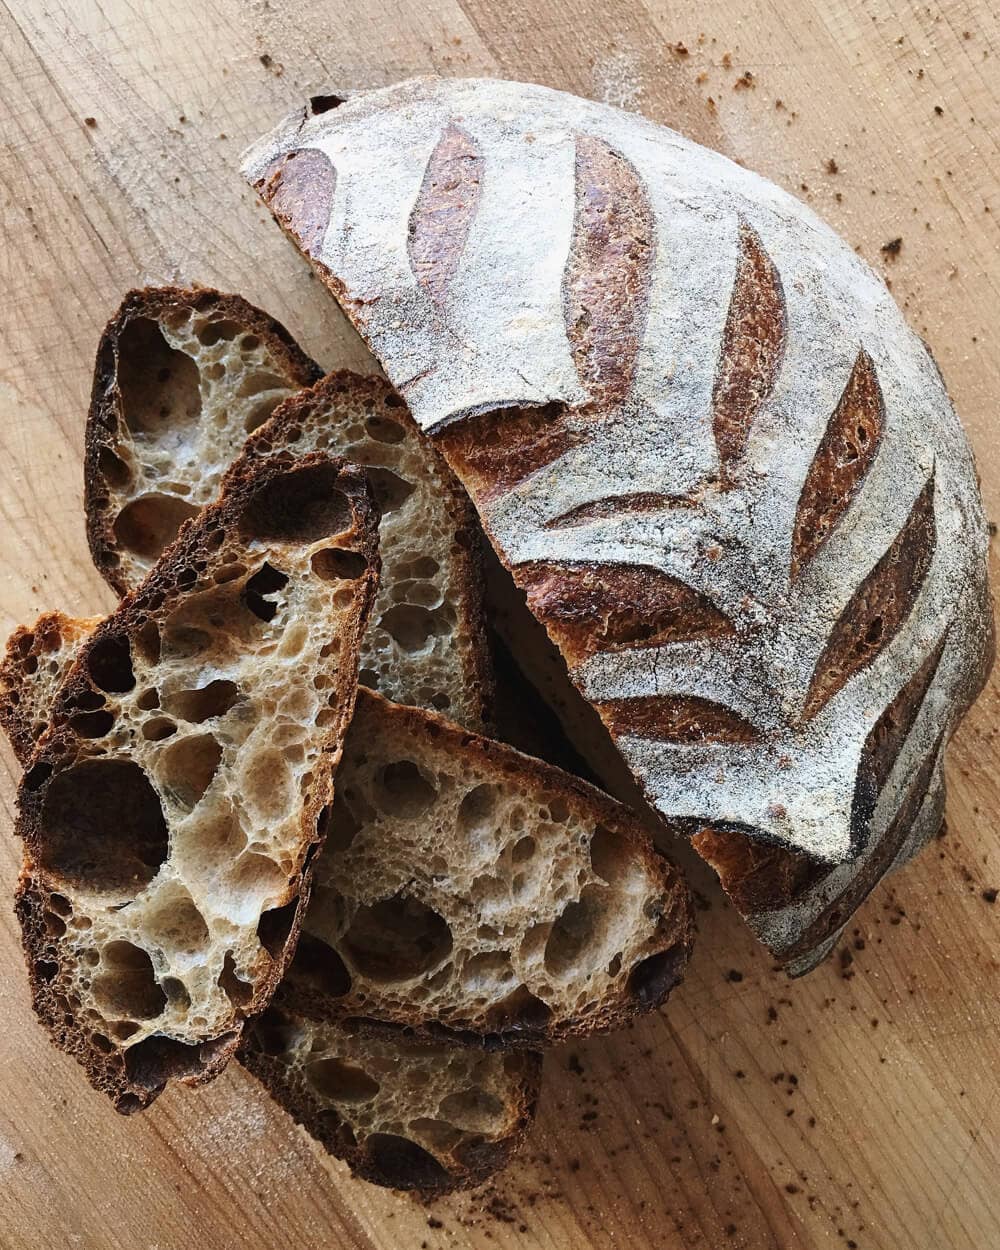
Because of the extreme elasticity of spelt, it’s known to contribute to an extremely open crumb. My formula still uses quite a bit of whole grains so don’t go into this bake expecting an insanely cavernous interior, especially with whole grain fresh milled flour. There are sections of these loaves that have a nice and open texture to them, but nothing jaw-dropping — and that’s fine. It’s light in hand, soft of texture and presents that perfect balance between a light bread that’s still perfect for hanging on to all the sandwich ingredients you could dream up.
Perhaps my favorite aspect of this crumb is that I don’t find even the slightest hint of gumminess, each flour works perfectly in balance to keep the crumb soft and chewy, but not overly so. And the taste…
Taste
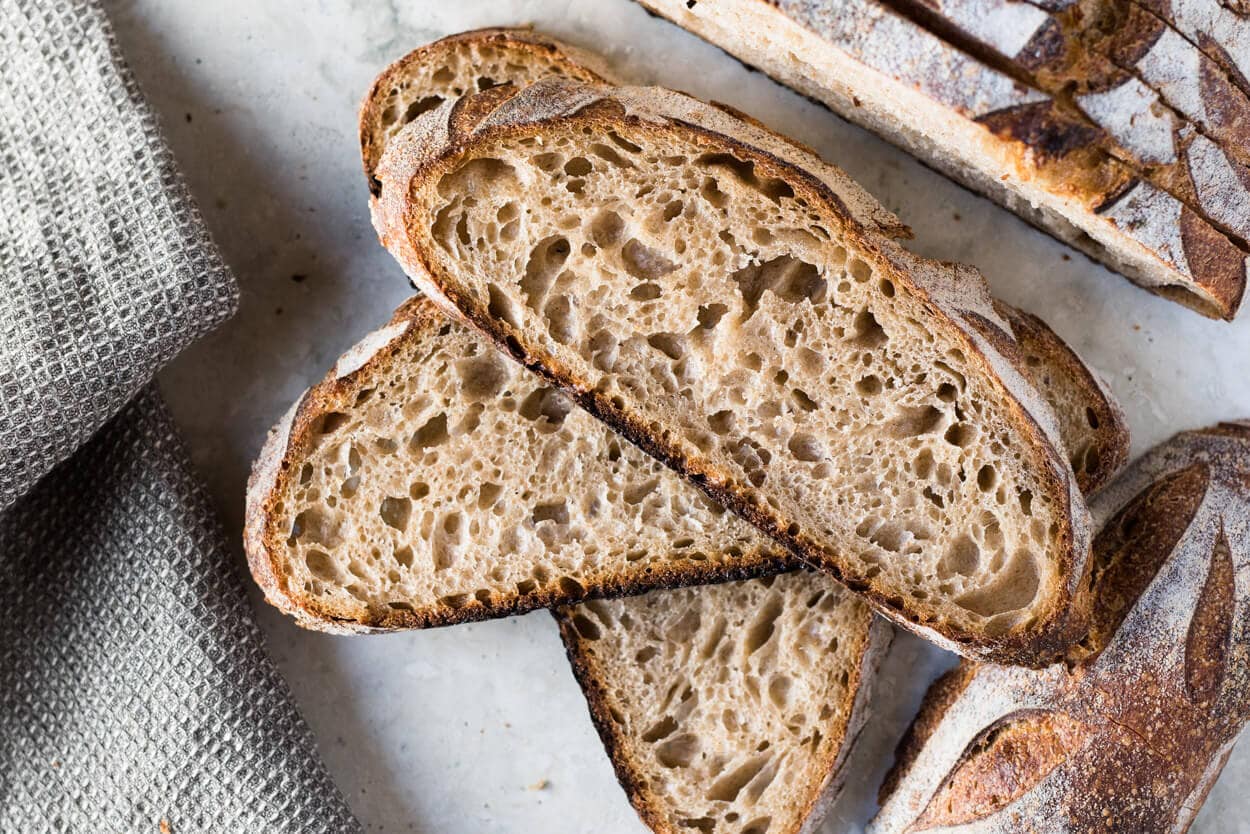
With the high percentage of freshly milled spelt flour and type 854 the taste of this bread is more on the whole-grain side of things with zero bitterness, which to me is just exquisite. Eating this bread a few hours post-bake is pure bliss — the crunch of the crust coupled with the soft interior and wheat overtones is sublime.
I could go on & on, but if I were selling loaves regularly, I’d use this bread cut up into little pieces as the taste test samples on my farmer’s market stand — one try and you’re going to buy it.
Spelt Notes
I decided to sum up a few notes I jotted down while developing this formula and process in the hopes that after you try this bread, you go on to use spelt in your creations.
- reduce hydration a bit to offset the extreme extensibility and reduced water absorption of this grain
- pair with a relatively strong flour (in this case my type 85)
- build strength upfront through mixing, with several sets of stretch and folds during bulk
- 30% spelt seems to be the “sweet spot” to me for that balance between flavor and aesthetics
mill a little extra spelt for use in other foods such as banana bread, sourdough tea cakes (more to come on this!), and muffins.
I was worried when I placed a blind order for 25 pounds of raw spelt berries: would I like the flavor? Would it bake according to my expectations? Would the extensibility be too hard to handle? After using this grain for a while now, I can confidently say I’m glad I bought a large quantity, and a little sad I didn’t get more. Not only is spelt incredible in sourdough bread I’m discovering a myriad of creative ways to use it in my kitchen… And with each loaf, I pull from my oven I somehow feel a little more connected to those that have used spelt for thousands of years before me.
Buon appetito!
If you use this recipe, tag @maurizio on Instagram so I can take a look!
I just picked up the book and can’t wait to get further into it, more information on fermentation and bread!↩
Spelt also seems to lack the ability to take on as much water as wheat↩
If you do use white spelt, I’d recommend reducing the overall hydration 5-10% to accommodate↩
Remember this flour has quite a bit more of the bran/germ present than a more “white” flour (which is usually referred to as type 60 or 65)↩
