This post might include affiliate links. See my policy.
This multigrain spelt sourdough is one of the many spelt recipe I’ve posted here, but possibly one of my most favorite. I am completely transfixed with the flavor of spelt, and I developed this formula not only because I wanted to use the wonderful grain again, but also for a short article I wrote that will appear in the Bread Baker’s Guild of America Bread Lines magazine early next year. The article has some background information on me, my process, and my motivation for baking sourdough—most of which if you’ve read my entries for a while you already know. I went into how I started baking, how both the scientific and artisanal processes captivate me every bake, and how baking not only reminds me of my childhood growing up in an Italian restaurant but also because good, healthy food requires time.
So why another spelt recipe? When thinking about the article, I went back and forth on what method to include, swaying between a few sourdough recipes I’ve been experimenting with and some of my old tried-and-true favorites. I knew I wanted to use one that had freshly milled flour, and without a doubt, my previous spelt sourdough recipe is among my most favorite; but I wanted to take it a bit further. I began to think about what things I’d change if I were looking to improve it. I decided to start with that formula as a base and rove from there to explore and find something that struck my palette as different or something that produced a substantial structural difference—or perhaps both.
When exploring different grains to include in a formula there are plenty of options, many you can sort of sneak in without their flavor showing up too much, or if they do they are so subtle, they are hardly noticeable. I’ve found that rye is one of those grains that, even at a small overall percentage, brings an unexpected depth of flavor to the overall taste profile—there’s a reason why all of a sudden you’ll see rye at every turn: rye cookies, rye cakes, rye brownies, rye bundt cakes and so on. However, due to the inherent nature of rye, as the percentage of it in the final mix increases the result will become more and more dense, compact, and less open. To help avoid a dense interior I paired the rye flour with a blend of wheat flour to help alleviate the issue (more later).
In addition to flour modifications, I changed my method for each stretch and fold set during bulk fermentation. During the typical bulk rise I’ve always started the sets with powerful North, South, East, and West folds that gradually get more gentle as bulk progresses, but for this bake I placed more emphasis on this, and even though the folds were vigorous for the first set, they were not overly rough in any way. There was no tearing, squeezing or slapping as I performed them quickly and efficiently. The last set of stretch and folds was incredibly gentle and was mostly performed to redistribute the dough for temperature equality reasons, perhaps with a small amount of additional strengthening imparted.
The main reason for the gentle hands at the end of bulk is to avoid pressing out any of the gasses trapped in your dough. Each interaction you have with the dough at that point will disturb these little pockets, whether it be smashing them or merely creating connections within them, reducing the overall size of the pocket. Because pre-shaping and shaping is usually enough to even out the size of these pockets, I found it best to be gentle with each stretch and fold set but even more so with the last. You can read about how bakers recommend gentleness at the end of bulk in many books but sometimes something doesn’t really stick until you realize and (re)experience it for yourself.
So to sum up, the basis for change and improvement with this formula over my last spelt sourdough (and also just my baking in general) were:
The flour blend for this formula was changed to promote a lighter and more open loaf without chewiness
The fresh flour was milled at a very fine coarseness (more on this in the next section)
Stretches during bulk fermentation were effective yet much more gentle
Final shaping was as gentle as possible
Let’s talk about flour.
Flour Selection
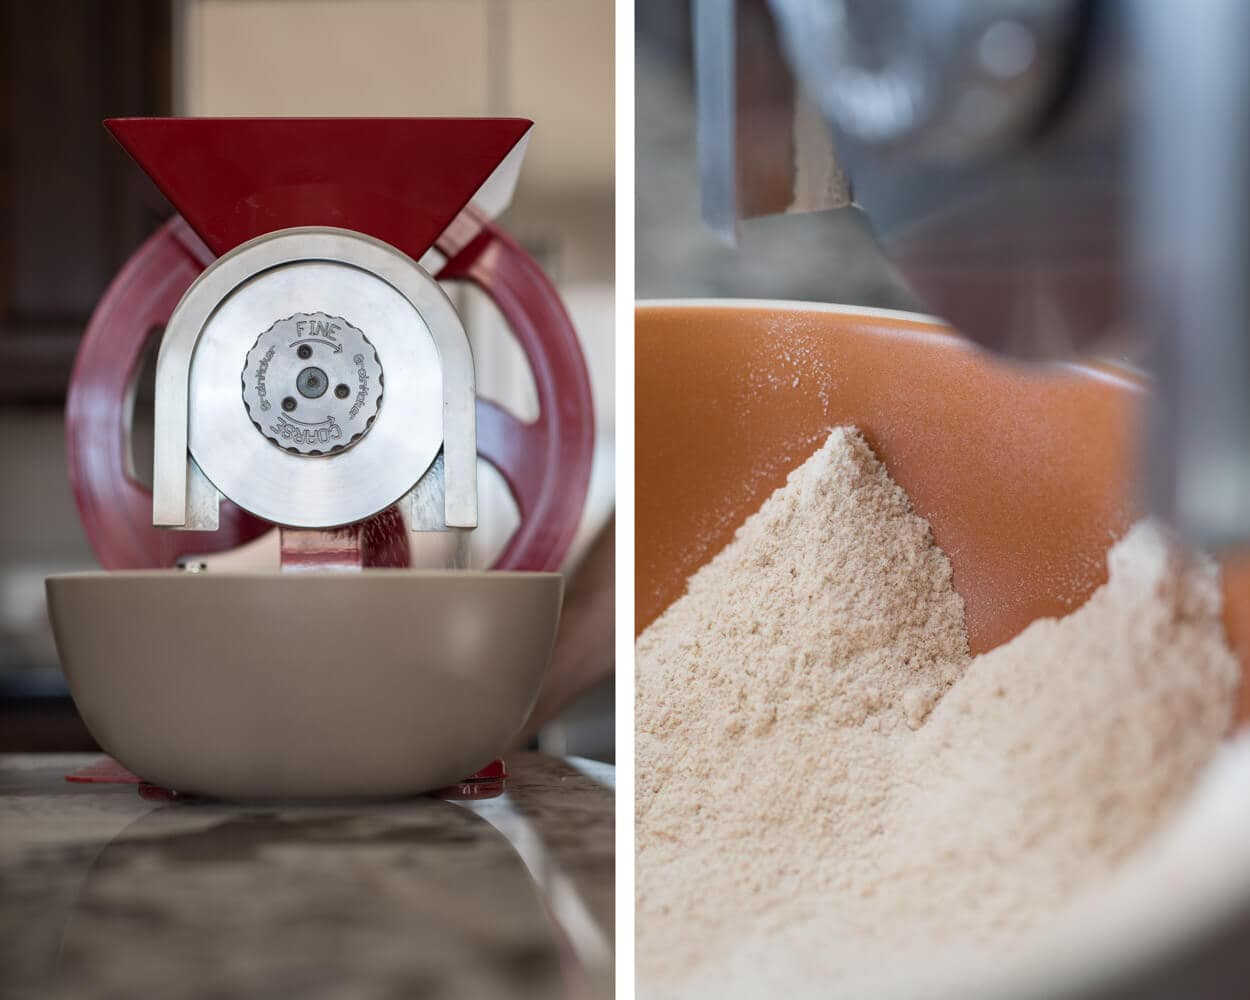
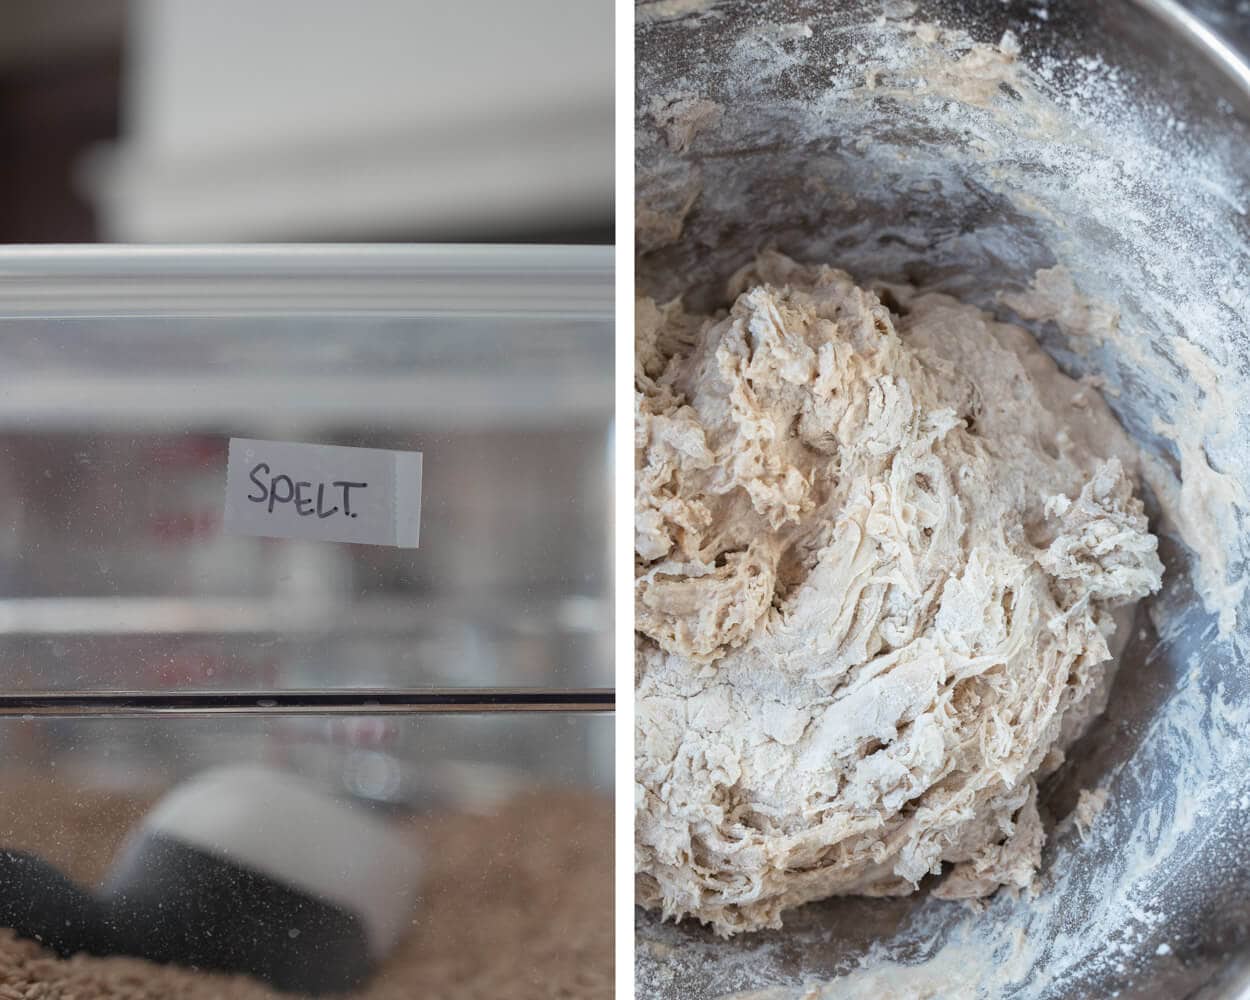
I milled the spelt fresh in the morning, first thing. I set my GrainMaker manual mill to the most refined setting it will go. From there, I got cranking as everyone else was still sleeping, dreaming of who knows what while I was watching the spelt float down into my mixing bowl. I’ve said it before but milling my grain is such a satisfying process—I value these solitary moments, time to think about and prepare for the day’s mixing, folding, and shaping.
Good music helps, too.
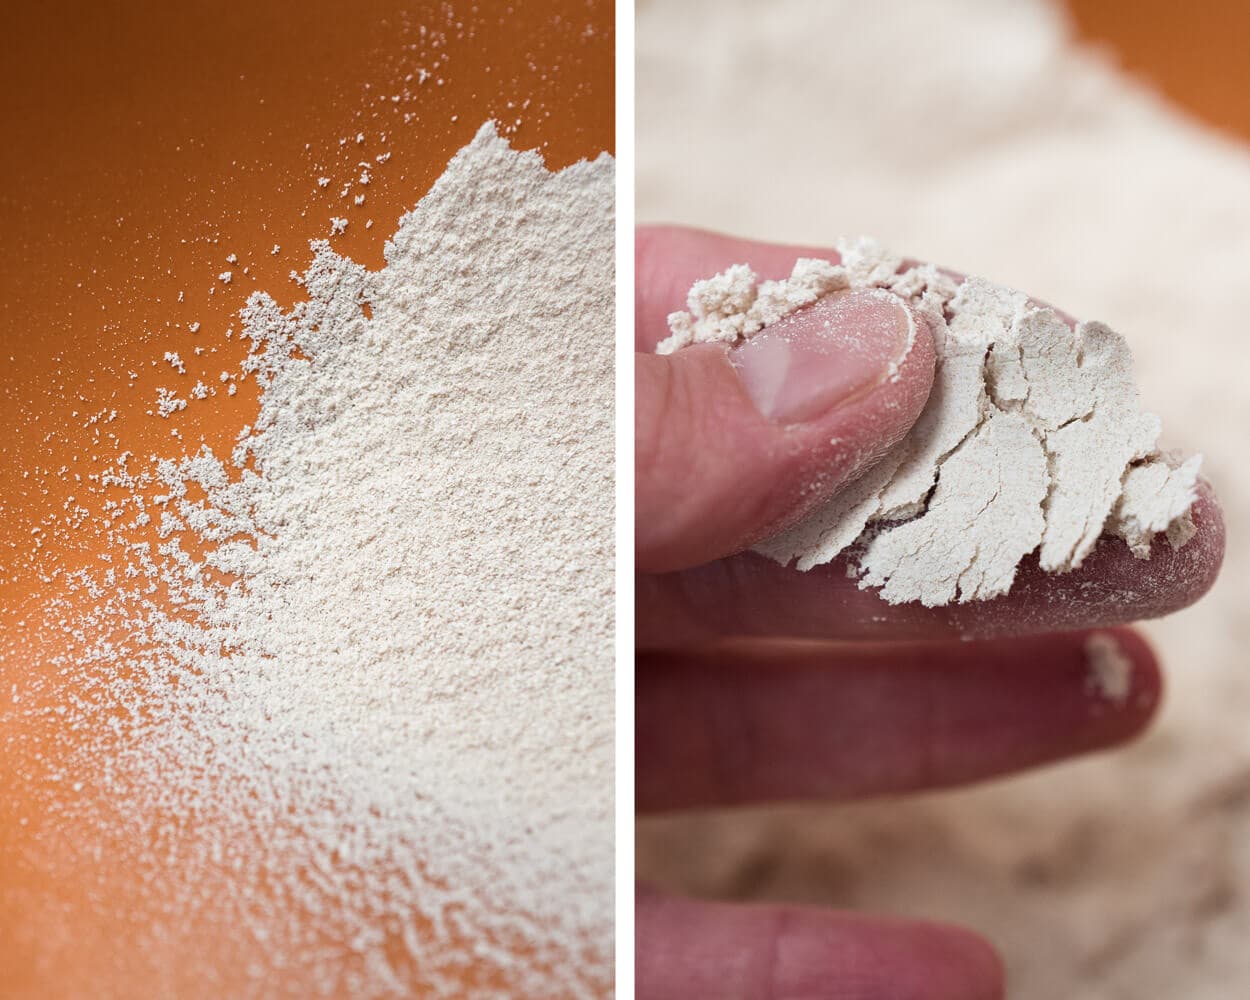
I’ve been experimenting and honing in on the right grind level with my manual mill, testing how the flour performs at varying coarseness1. It seems, at least with my recent findings, that milling the flour increasingly fine helps attain a more open crumb (assuming everything else is in place, of course), especially at this percentage of fresh milled whole grains.
With the burrs on my mill set very close, it takes me 20-30% longer to mill the required flour for this formula. As I placed the burrs closer and closer together, I have to follow suit and reduce the grain feed rate on my GrainMaker. Reducing the rate lessens the number of berries fed between the burrs at any one time—turning the crank gets more and more difficult. At this level, it is a bonafide gym substitute.
In the photos below you can see how fine I was able to mill, and keep in mind the flour used here is 100% whole grain spelt—I didn’t perform any sifting after milling.
I used a combination of flours to compliment the spelt in an attempt to maintain a light and airy loaf despite the relatively high percentage of fresh-milled whole-grain spelt. In my last spelt adventure, I didn’t use quite the mélange of flours I’m using here, but I’ve found this blend to be the sweet spot that avoids a chewy crumb (from too much high protein flour) but still has enough strength to rise high with an open interior.
A touch of Central Milling High Mountain and its high protein percentage can be substituted with any “bread flour” with a protein percentage of around 13% (King Arthur Bread Flour in the blue bag will work well here). As I’ve mentioned before, you can come somewhat close to Central Milling’s Type 85 by mixing 65% bread flour and 35% whole wheat flour.
Medium rye is not 100% whole-grain dark rye. It’s lighter in color and doesn’t have quite the hearty flavor of its darker sibling. That said, dark rye would do exceptionally well if medium rye is unavailable.
Multigrain Spelt Sourdough Formula
This bread, having a good portion of whole grains and freshly milled spelt, has a wonderfully sweet and nutty flavor. The spelt was milled extremely fine, and at a low temperature the morning it was used in the mix, which preserved as much of the flavor, oils, and nutrients as possible.
Hydration note: Depending on your spelt flour you will likely have to adjust the hydration. Typically I reduce the hydration of the dough when using spelt but because I milled the flour fresh, and this fresh flour can take on quite a bit of water. During mixing, I kept adding till it felt right and ended up at the hydration listed below. Please keep an eye on how the dough feels at the beginning stages of mixing and if the dough feels overly wet and soupy avoid adding in all of the reserved water. The dough should be “wet,” no doubt, but it should not feel like it’s falling apart easily or like soup.
Vitals
Total dough weight: 1900g Pre-fermented flour: 3.50% Hydration: 88% Yield: 2 x 950g loaves
Using diastatic malt is optional, and I use it in this formula because a good chunk of the flour is not malted. I love the way malt adds color to the crust, and as long as it’s not overused, it will not have any adverse effect on flavor and only helps to boost enzymatic activity.
Build the liquid levain (everything listed in the Levain Build section above) in the morning or afternoon and store somewhere around 78°F (25°C) ambient for 5 hours to ripen. It should be well fermented, expanded, and have a smell that’s slightly sour, perhaps with a hint of sweetness.
2. Autolyse – 4:00 p.m.
Mix flour and water (reserve 100g water for the mix, later) in a bowl until all dry bits are hydrated. Cover the bowl and store somewhere nice and warm for 1 hour. Somewhere near your levain is convenient.
3. Mix – 5:00 p.m.
Add the called for ripe levain and diastatic malt powder to the autolysed dough and using about half of the reserved 100g of water mix thoroughly by hand. The levain should be well mixed through the dough and the added water wholly absorbed.
I chose to slap and fold for about 5 minutes, just until the dough started to show signs of a smooth surface and it was catching some air. If you aren’t comfortable with slap/fold method or don’t like it, you can do stretch and folds in the bowl until your dough tightens up and becomes slightly hard to stretch out and fold over.
Let the dough rest for 20 minutes before adding salt.
When finished mixing and resting, sprinkle the salt on top of the dough and the remaining water to help dissolve. Pinch through the dough thoroughly and fold the dough over itself to help incorporate and absorb the remaining water. Keep pinching and folding until all the water is absorbed and the dough comes back together.
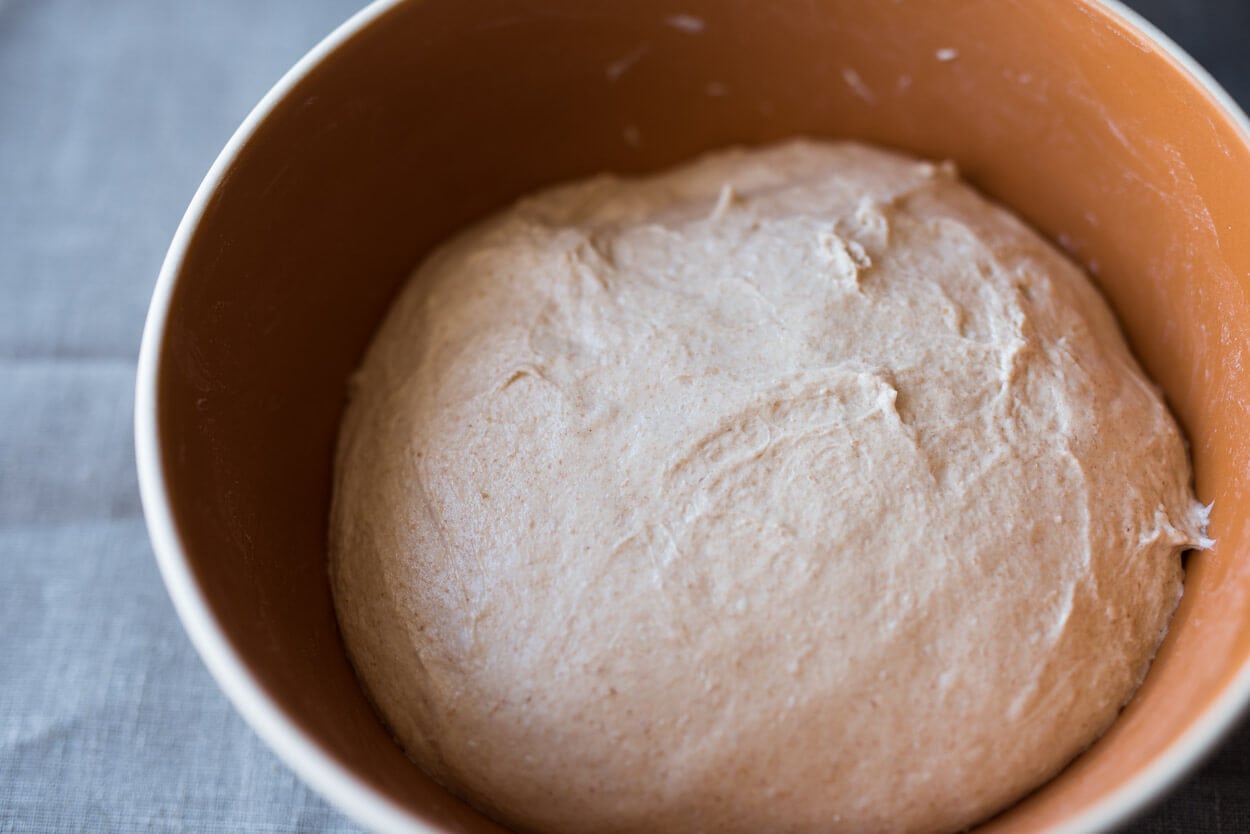
When finished transfer the dough to a tub or thick-walled bowl for the first rise: bulk fermentation.
4. Bulk Fermentation – 5:30 p.m. to 9:30 p.m.
At 78°F (25°C) ambient temperature, bulk fermentation should go for about 4 hours. Perform three sets of gentle stretch and folds during bulk, spaced out by 30 minutes. After the third set of stretch and folds let the dough rest for the remainder of bulk.
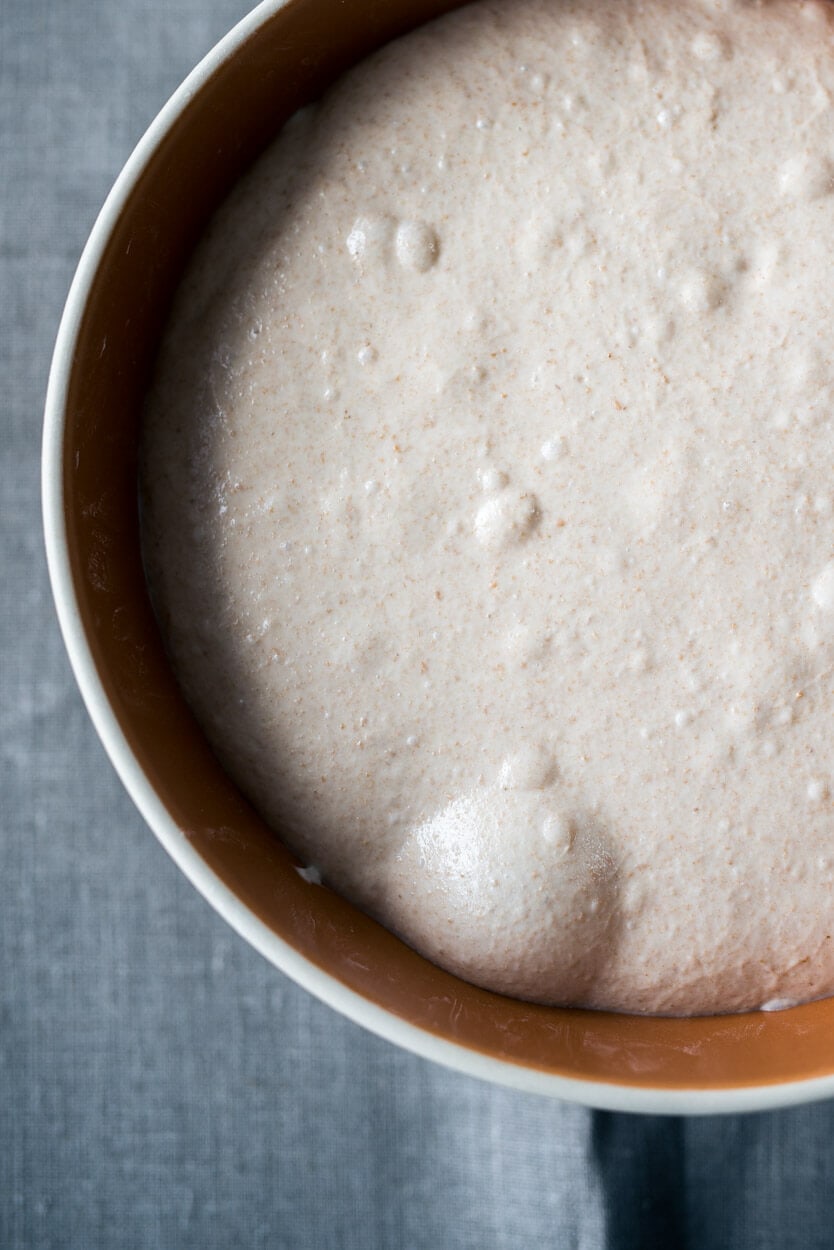
You can see my dough below, almost at the end of bulk fermentation—the photo shows it around 3.5 hours with half an hour left. Notice the bubbles on top, and the shadow at the edge of the bowl, indicating the dough is starting to dome at the sides (convex). These are signs I look for to ensure bulk fermentation has gone long enough.
After four hours get ready to divide the mass and pre-shape.
5. Divide & Pre-shape – 9:30 p.m.
Gently dump out the dough from your bulk container onto an un-floured work surface. Divide in half and pre-shape the dough into two round boules, let the rounds rest 20 minutes uncovered.
When pre-shaping this dough try to get each mass into a round with as little movements as possible, just enough to create tension in the dough, so it holds its shape but not overly tight which could cause inadvertent degassing of the dough.
6. Shape – 9:50 p.m.
Prepare two baskets that will hold your dough during its cold-proof in the refrigerator overnight. This dough works well shaped as a boule or batard, whatever your preference may be. I always tend to shape as a batard and this bake was no different.
To gently shape as a batard, first moderately flour the top of the dough and flour the work surface. Flip one resting round over, so the floured side is down on the work surface. Fold the top of the dough up and over to the middle and repeat for the bottom (you’ll now have a long slender rectangle in front of you). Pick up the rectangle and rotate it 90°, so it’s now lengthwise facing you. Grab the dough at the very top and fold over partway, press to seal with the central mass of the dough. Now grab this rolled over the top and gently continue to roll it down towards the bottom, tucking in the dough as you go (imagine rolling down a beach towel). At the end of this, you’ll have a tube that has mostly been rolled downward. Once shaped, transfer each to their floured shaping basket with the seam side facing up.
Cover your baskets with plastic and then place it in the refrigerator at 38°F (3°C) for about 10 hours. Even at such cold temperatures this dough can quickly overproof so keep an eye on it in the fridge in the morning.
8. Bake – Next Morning: Preheat oven at 6:45 a.m., Bake at 7:50 a.m.
Place your Baking Steel or baking stones in your oven and preheat for one hour at 450°F (230°C). Once preheated, take out both of the baskets from the fridge and remove the plastic wrap.
Bake for 20 minutes, then remove the steaming pans from inside the oven. Then, bake for an additional 30 minutes until the internal temp is between 206-210°F (96-98°C). Keep an eye on these loaves in the last 10 minutes of baking; they color very quickly. Remove from the oven and cool on a wire rack for at least 1-2 hours.
Conclusion
Spelt is flat out one of my favorite grains. Flavor, performance, incredible health benefits, and versatility—all part of its repertoire. When I find myself planning a spelt sourdough bake (which has been custom lately), I’ll usually mill some extra spelt flour to use in other pastry or breakfast items and let me say spelt pancakes, waffles, and tea cakes are to die for. My initial 25-pound order of organic spelt berries is dangerously low, but there’s no question I’ll be reordering soon.
I’ve baked this bread many, many times now. I’ve tested and tweaked times, percentages, and techniques and this formula has consistently produced my best loaves thus far—each has had a beautifully colored crust, high rise, and wonderfully open interior. This is darn close to being a perfect loaf for me2. There is so much flavor and there are so many health benefits locked away in this loaf of bread. It’s wicked.
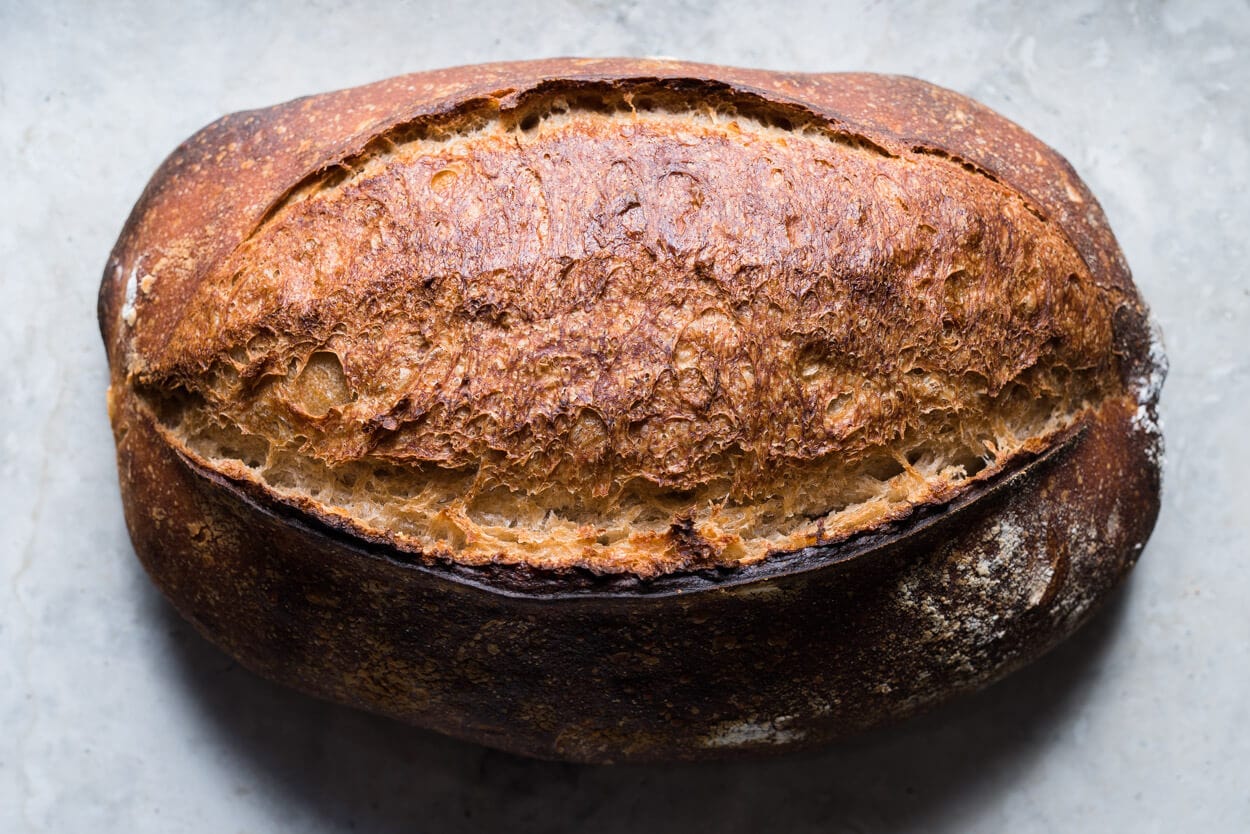
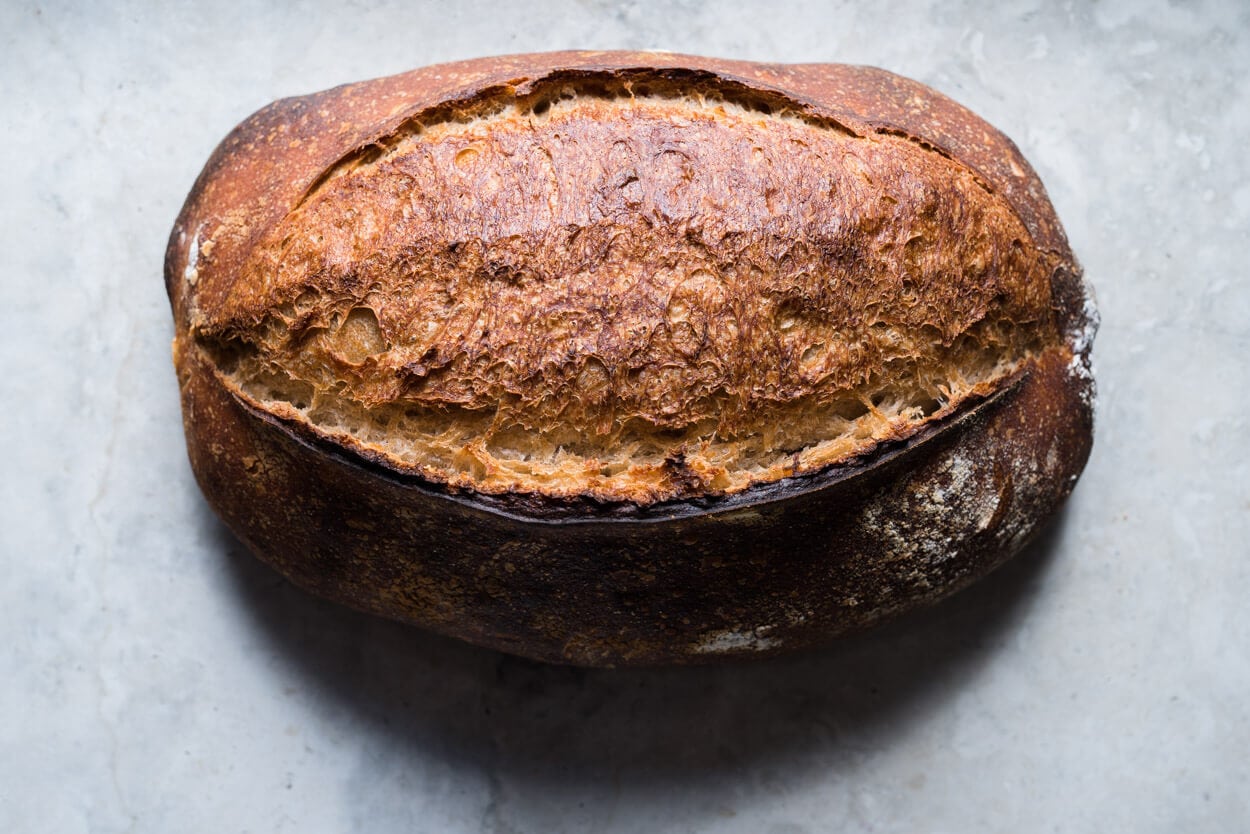
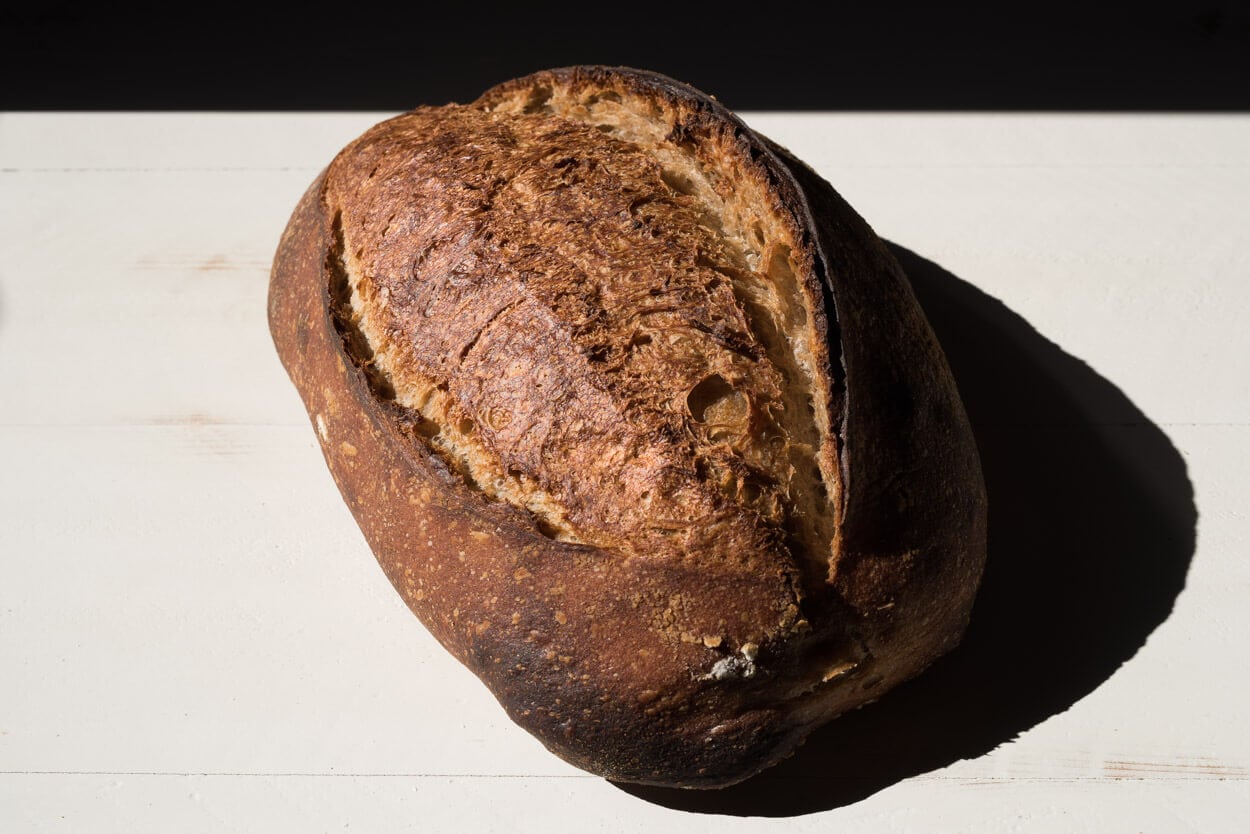
Crust
Dramatic. Sharp. Moody. Volcanic.
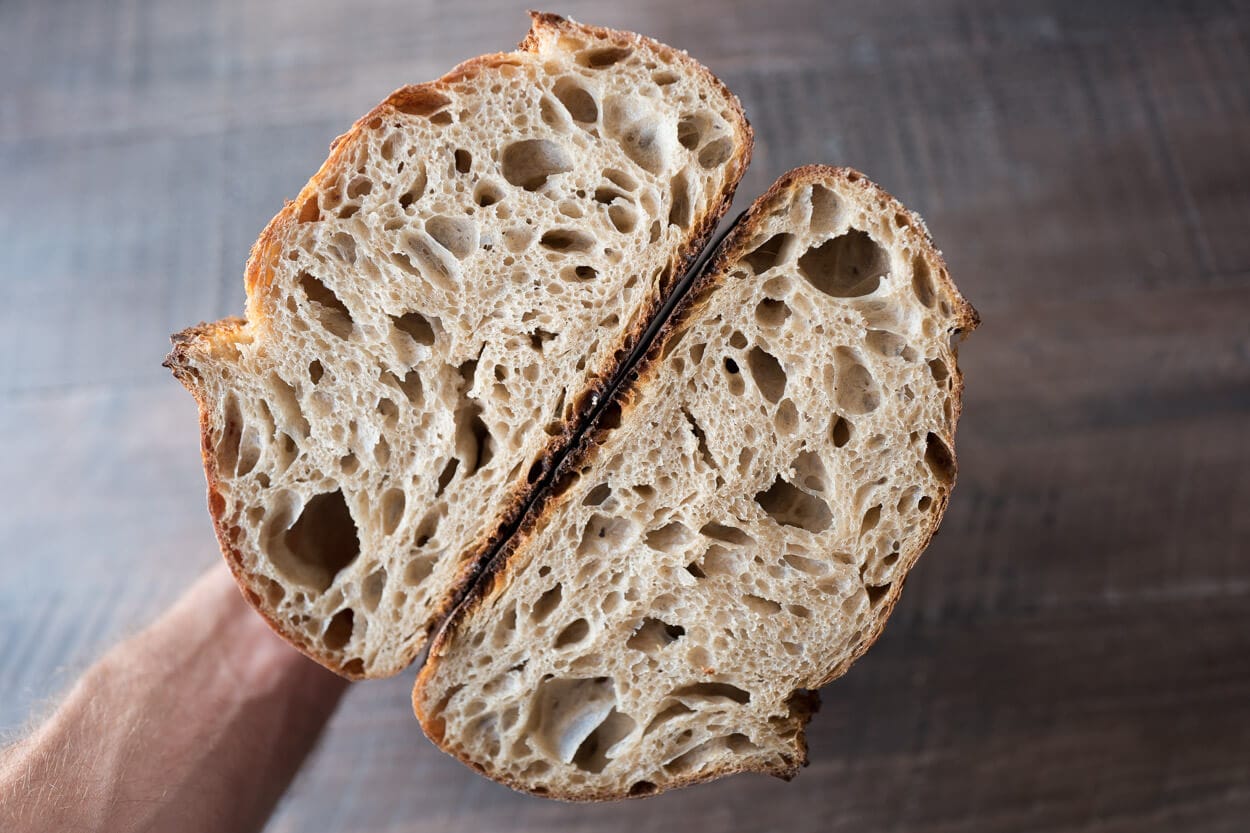
All adjectives I’d use to sum up this beauty. It’s hard to put words to this sensational crust, and the picture kind of tells it all, really, but the flavor and texture are left to the imagination. Because the crust is so, so important to me I strive to hit that mark, the high score on the wall I’m always reaching for—I think this one nailed it. Even though the crust looks intense, it was very thin (see the crumb shot below) and shattered when cut. Exactly how I like it.
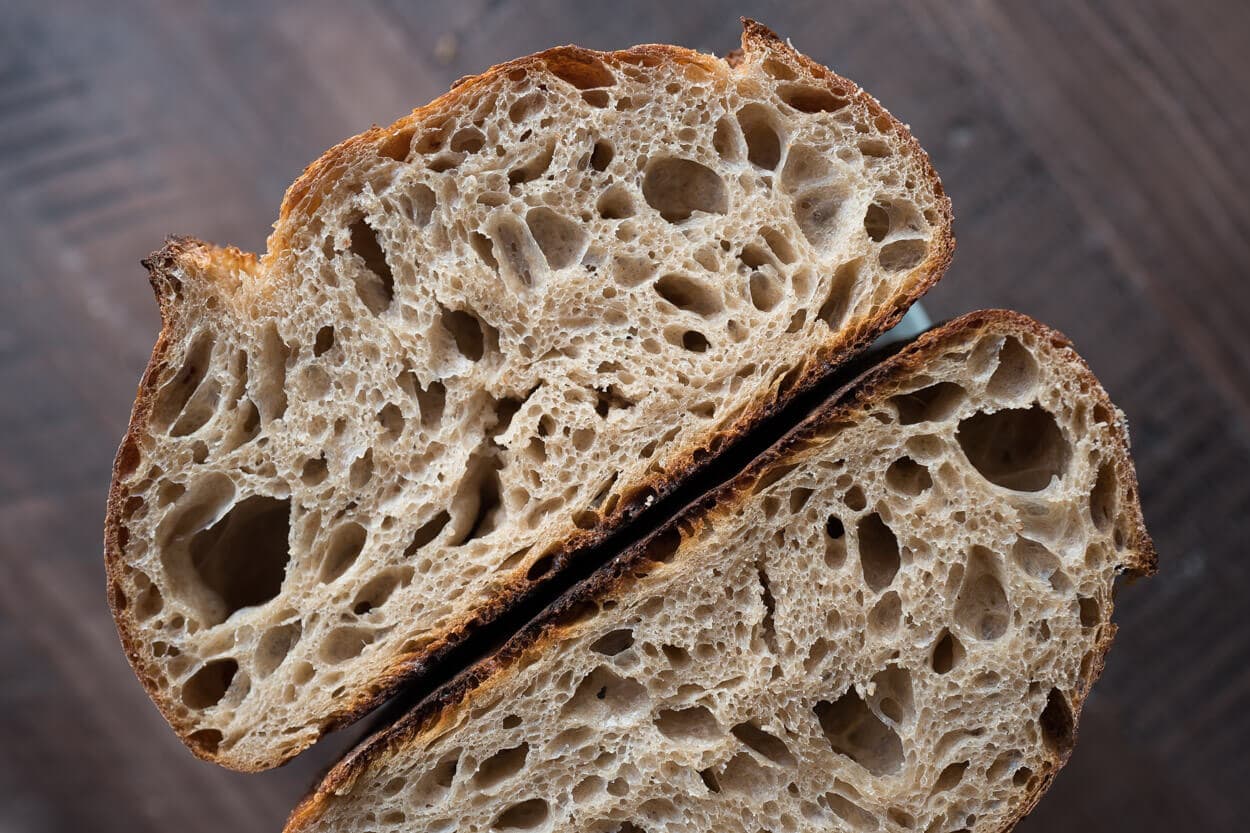
Crumb
This formula has a high percentage of whole grains, and yet the interior stayed quite moist and tender, creamy even. I pushed fermentation with this loaf, and that helped3, but also the higher hydration kept things on the moist side. Even with the high percentage of whole grains the interior was as open as I’d want it to be. Light, airy, and relatively uniform—just what I’m looking for. The gentle handling during bulk and final shaping also avoided excessively knocking out any of the gasses built up during the entire process.
Taste
The freshly milled spelt brought its classic slightly-nutty flavor profile to this bread, and when paired up with the rye flour it had quite a deep overall flavor profile. Between the whole grain spelt, the rye, and the type 85 flour this bread has the deep flavors of a whole grain loaf but the open and airy nature of a white loaf—a nice balance between the two.
I love the addition of rye flour in this recipe, even at such a small percentage. One thing you could play with is changing this grain out entirely: use Kamut, einkorn, white whole wheat or even buckwheat. It would also be interesting to try increasing from 5% to 10% (or potentially higher) to see if the flavor of the chosen grain compliments spelt even more so. As I said, it’s a very versatile grain.
In the end I love the changes I’ve made with this multigrain spelt sourdough formula and I feel I’ve achieved exactly what I was after in the first place: a fresh new flavor profile and a substantial structural improvement. The flour blend changes, extremely fine fresh spelt flour, gentle strengthening during bulk and light handling during final shape all contributed to the wonderful final result.
Maurizio Leo is a home baker, James Beard Award winning and New York Times Bestselling author, and the creator of the award-winning sourdough website, The Perfect Loaf. He has spent the past decade baking sourdough bread in Albuquerque, New Mexico.